warning light AUDI S8 2009 Service Manual
[x] Cancel search | Manufacturer: AUDI, Model Year: 2009, Model line: S8, Model: AUDI S8 2009Pages: 408, PDF Size: 91.63 MB
Page 105 of 408
__________________________________________________ S_ e_ a_t _s _ a_n_ d_ s_ t_ o _r_a ..;:g::... e __ _
& WARNING
• The ski sack is intended only for the transportation of ski s and
other light objects . To reduce the risk of serious per sonal in jury,
neve r tran sport heavy or pointed objects in the ski sa ck.
• When braking rapidly or during an accident , the load could be
d is pl ac ed and cau se inju ry to o ccupants .
• Sharp edges on the load mu st be covered for protection.
Always f asten the belt t ightly around th e sa ck and it s contents
=> pag e 102 , fig. 108.
[ i J Tips
Never stow the ski sack away when i t is sti ll wet or damp (for
examp le, snow me lting from skis) . Allow it to dry completely before
stowing it away. •
Roof rack
First things first
A roof rack can be fitted to carry addi tio nal luggage on
the roof.
- Always read and follow the i nstructions provided by the
roof rac k manufacture r w hen t he roof rack system must
be installed.
I f a roof rack or similar luggage carrying equipment is to be
insta lled, please note the following:
• To enhance the vehicle's streaml ined design, rain gu tters have
been molded into the roof. It is not possible to use norma l roof
racks . Only instal l a roof rack sp ecifically designed f or your mo del
A8. Contact the nearest Audi dea ler for information on approved
m odula r roof racks for your veh icle .
Controls and equip
ment
• T hese approved roof racks are the basis for a comp lete roof rack
sys tem . Add itio nal attachments for the basic roof rack are neces
sary to safe ly transport luggage, bicycles, surf boards, skis or smal l
boats. All necessary hardware fo r these systems is available at your
authorized Audi dea ler.
• We reco mmend t hat you keep the installation i nstructi ons for
your roof rack system together with your Owner's literature in the
vehicle .
When should the ro of r ac k be remo ved ?
• Before g oing th rough an a uto matic car wash (it is bes t to ask the
car wash operator for advice)
• When not i n use, to reduce fue l consumption, wind noise and to
guard against theft.
& WARNING
• Use of an unapproved roof r ack or in corre ct mounting of an
a pp roved roof r ack can c ause the roof rack or the ite ms attached
to it to fall off the roof onto the road .
• Obje cts falling from the roof of a veh icle c an c ause a cras h and
personal inj ury .
• Onl y mount the sy stem between the marking s shown in
=> page 104 , fig. 109.
• The roof ra ck sy stem must be installed e xa ctly a ccording to the
instruction s provided .
0 Note
• Your vehicle warranty does not c over any damages t o the vehicle
caused by using roof racks or mounting structures not approved by
Audi for your vehicle. The same applies to damage resulting from
incorrect roof rack installation.
• Always check t he r oof rack m ount ings and hardware before eac h
trip and during a trip to make sure everything is securely tightened . .,,
I • •
Page 108 of 408
• ..__S_ e _ a_t _s _ a_n _d_ s_ t_ o_ r _a_ g =-- e ______________________________________________ _
Adjusting the cupholder individually
Pr ess and hold the retainer arm @ in w ard an d adjust it
to fit t he c up size.
The retainer arm should f it snugly around the cup or can . T he
cu phol der is de signed to hol d no more than t wo c ups o r cans.
& WARNING
Spilled hot liquid can cause an accident and personal injury.
• Never carry any beverage containers with hot liquids , such as
hot coffee or hot tea , in the vehicle while it is moving. In case of an
accident , sudden braking or other vehicle movement , hot liquid
could spill , causing scalding burns. Spilled hot liquid can also
cause an accident and personal injury .
• Use only soft cups in the cupholder. Hard cups and gla sses can
cause injury in an accident.
0 Note
Only drink containers with lids should be carried in the cupholder.
Liq uid c ould sp ill out and dam age y our vehicle's elec tro nic e qu ip
ment or stain the upholstery , etc . •
Ashtray
Front ashtray
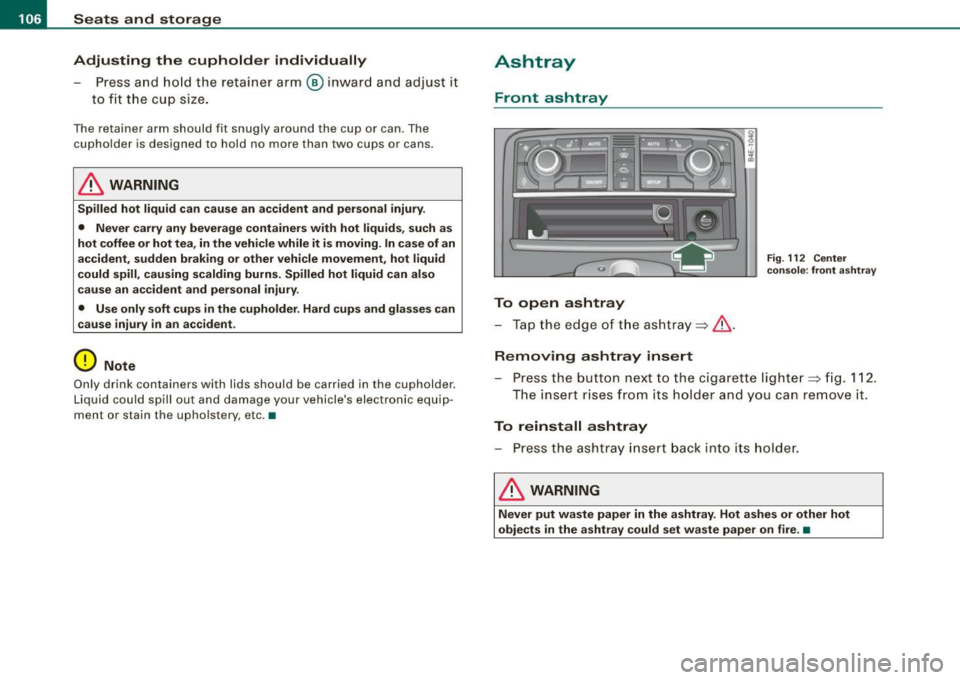
To open ashtray
- T ap the e dge o f th e a sh tr ay ~ & .
Removing ashtray insert
Fig . 112 Center
c o n sole : front a shtray
- Press the button nex t to the ciga rette lighter~ fig. 112 .
T he insert r ises f rom its hol der an d you ca n rem ove it.
To reinstall ashtray
- Pr ess th e as htra y in sert b ack into i ts hol de r.
& WARNING
Never put wa ste paper in the ashtray . Hot a shes or other hot
objects in the ashtray could set waste paper on fire . •
Page 109 of 408
________________________________________________ S_e_ a_ ts_ a_ n_d _ s_t _o _r_ a --' g"'" e _--J_
Rear ashtray
Fig . 113 Rear ashtray
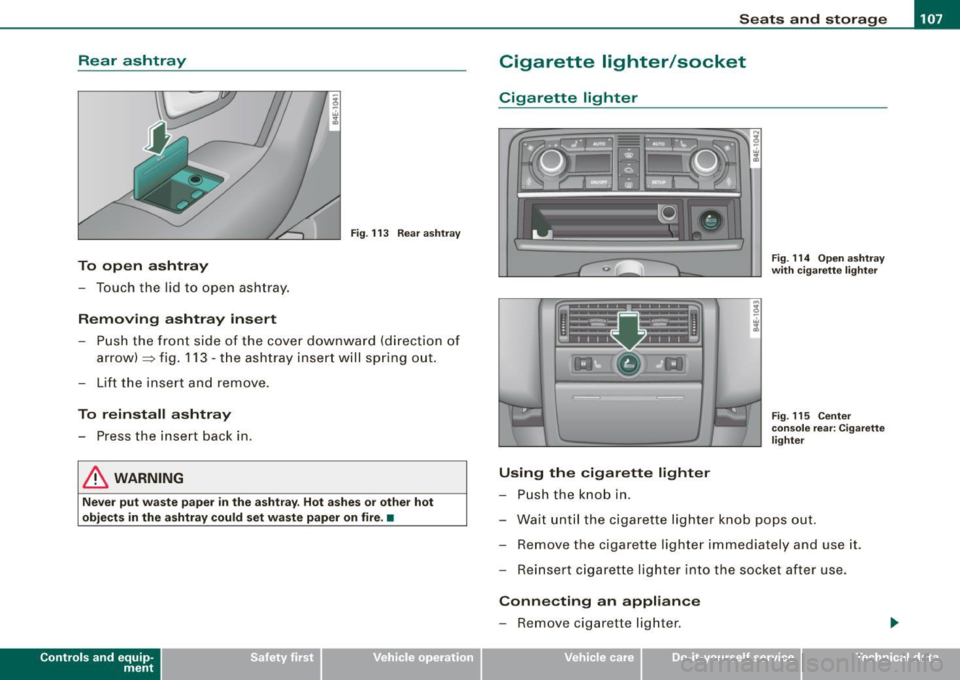
To open ashtray
- Touch the lid to open ashtray.
Removing ashtray insert
- Push the front side of the cover downward (direction of
arrow) ::::::, fig. 113 -the ashtray insert will spring out.
- Lift the insert and remove.
To reinstall ashtray
- Press the insert back in.
& WARNING
Never put waste paper in the ashtray. Hot ashes or other hot
objects in the ashtray could set waste paper on fire. •
Con tro ls and eq uip
ment
Cigarette lighter/socket
Cigarette lighter
Using the cigarette lighter
- Push the knob in.
Fig. 114 Open ashtray
with cigarette lighter
Fig . 115 Center
console rear: Cigarette
lighter
- Wait until the cigarette lighter knob pops out.
- Remove the cigarette lighter immediately and use it.
- Reinsert cigarette lighter into the socket after use.
Connecting an appliance
- Remove cigarette lighter.
Vehicle care I I irechnical data
Page 110 of 408
• ..__S_ e_a _ t_ s_ a_ n_ d_ s_t _o _r_ a-' g==- e ________________________________________________ _
-Plug in applian ce to be u se d.
The soc ket of t he ci gare tte l ighter may be used for 12 -vo lt appli
ances with maximum cons umption of u p to 100 watts, such as a
fl as h lig ht, small vacuum c leane r, etc .
Before you purchase any accessories , always read and fo llow th e
i nfo rm ati on in
=> p age 384 , "Add itio nal ac ce ssor ies a nd pa rts
replacement".
& WARNING
Improper use of the cigarette lighter can cause serious injury or
start a fire .
• Be careful when us ing the cigarette lighter . If you do not pay
attention to what you are doing when you are u sing the cigarette
lighter you can burn yourself .
• The cigarette lighter and socket remain functional even if the
ignition is switched off or the ignition key is removed . Never leave
children inside the vehicle without supervision.
0 Note
• To av oid damagi ng the so ck et, o nly u se p lug s th at fit pr oper ly.
• Only use the cigarette lighter socket as a power source for elec
tr ical acc esso ries f or s hor t durations. Use the s ock ets in the vehi cle
when a power source is needed for longer durations .
[ i J Tips
When the engine is off and accessories are sti ll plugged in and are
on, th e vehi cle battery ca n still be draine d.•
Long center console
Ap plies to veh icles : w it h lon g cen ter co nso le
Overview
F ig . 116 Long rear
center con sole
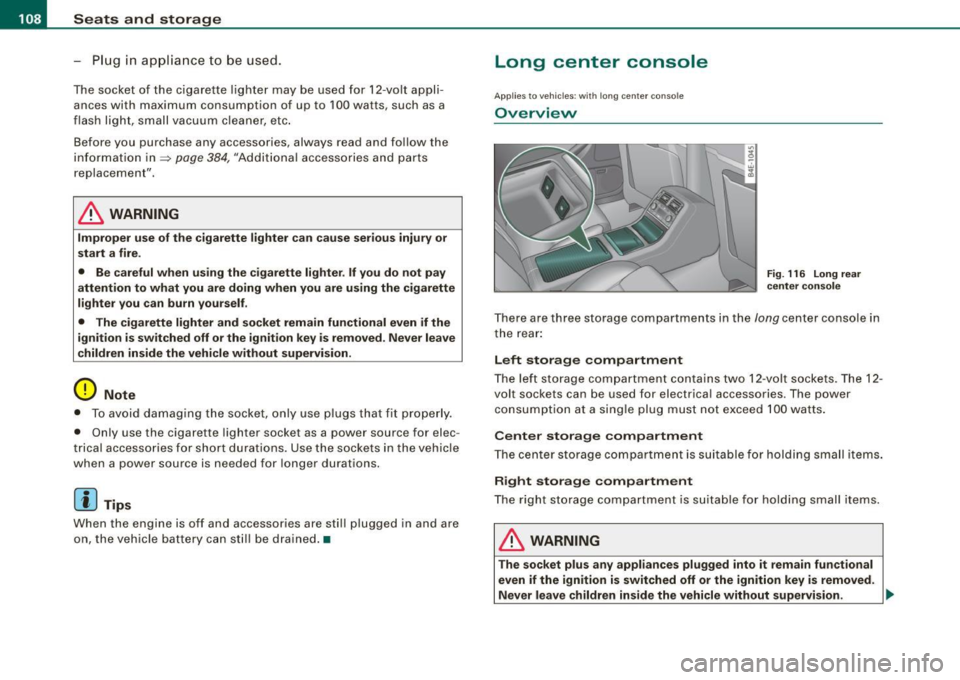
T here a re thre e storage co mpartments in th e lon g center co nsole in
t he rear :
Left storage compartment
The lef t st orage c om partm ent co ntain s two 12 -v o lt so cke ts . The 12 -
volt sockets can be used for elect rica l accessories . T he power
co nsump tion a t a sing le plug mu st no t exceed 100 wa tts.
Center storage compartment
The ce nter st orag e compa rtmen t i s s uita ble fo r hol ding small it em s.
Right storage compartment
The right st orage co mpart ment is s uit a bl e for hold ing sma ll items.
& WARNING
The socket plus any appliances plugged into it remain functional
even if the ignition is switched off or the ignition key is removed.
Never leave children inside the vehicle without supervision. ..
Page 111 of 408
![AUDI S8 2009 Service Manual ________________________________________________ S_ e_ a _ t_ s _a_ n_d _ s_t _o _ r_ a...: g==-- e __ llffllJI
0 Note
To avoid damaging the socket, only use plugs that fit properly.
[ i] AUDI S8 2009 Service Manual ________________________________________________ S_ e_ a _ t_ s _a_ n_d _ s_t _o _ r_ a...: g==-- e __ llffllJI
0 Note
To avoid damaging the socket, only use plugs that fit properly.
[ i]](/img/6/57618/w960_57618-110.png)
________________________________________________ S_ e_ a _ t_ s _a_ n_d _ s_t _o _ r_ a...: g==-- e __ llffllJI
0 Note
To avoid damaging the socket, only use plugs that fit properly.
[ i] Tips
When the engine is off and accessories are still plugged in and are
on, the vehicle battery can still be drained. •
Storage
General overview
There are numerous places to store items in your vehicle.
Glove compartment
Storage compartment
Pockets in the front seats*
Compartments in the door trim panels
Compartments in the rear doors* :::::,
page 109
=:> page 11 O
=:> page 110
=:> page 111
Left side storage compartment in the :::::, page 112
trunk
- -Right side storage compartment in the :::::, page 113
trunk
Emergency warning triangle
Umbrella holder
& WARNING
=:> page 350
• Always remove objects from the instrument panel. Any items
not stored could slide around inside the vehicle while driving or
Controls and equip
ment
& WARNING (continued)
when accelerating or when applying the brakes or when driving
around a corner.
• When you are driving make sure that anything you may have
placed in the center console or other storage locations cannot fall
out into the footwells. In case of sudden braking you would not be
able to brake or accelerate.
• Any articles of clothing that you have hung up must not inter
fere with the driver's view. The coat hooks are designed only for lightweight clothing . Never hang any clothing with hard, pointed
or heavy objects in the pockets on the coat hooks. During sudden
braking or in an accident -especially if the airbag is deployed -
these objects could injure any passengers inside the vehicle. •
Glove compartment
Your Owner's Literature and the media player are stored
in the lockable glove compartment.
t--------------. l
i
I • •
Fig. 117 Glove
compartment
Page 113 of 408
Seats and storage 1111
-----------------=-----'
Compartments in the door trim panels
Fig. 121 Storage
compartment in the
door panel
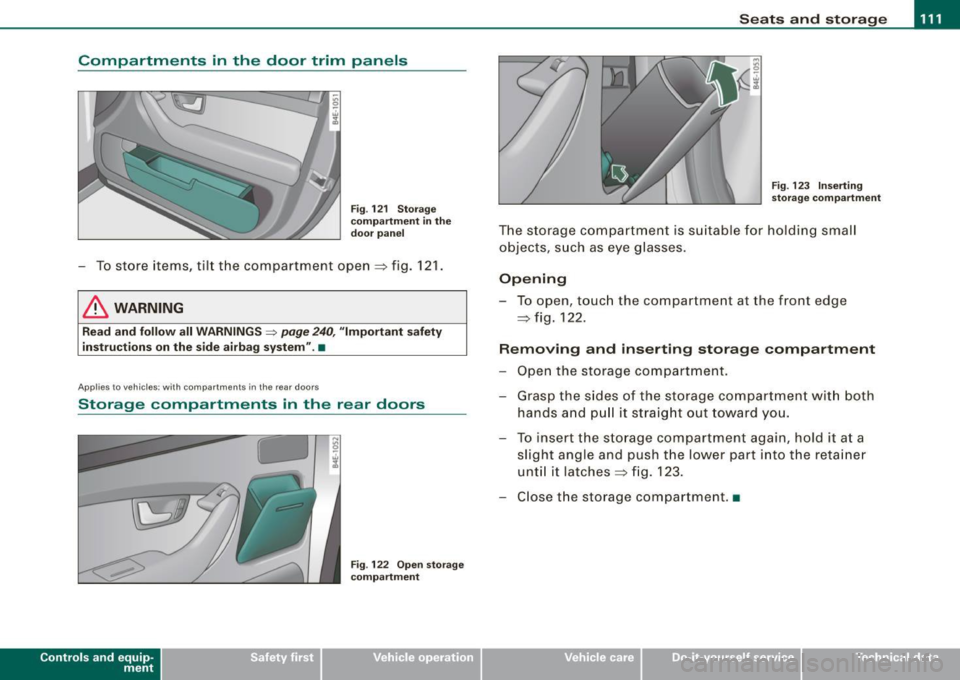
- To store items, tilt the compartment open=:> fig. 121.
& WARNING
Read and follow all WARNINGS ~ page 240, "Important safety
instructions on the side airbag system" .•
Ap plies to ve hicl es: with compartments in the rea r doo rs
Storage compartments in the rear doors
Con tro ls and eq uip
ment
Fig . 122 Open storage
compartment Fig.
123 Inserting
storage compartment
The storage compartment is suitable for holding small
objects, such as eye glasses.
Opening
-To open, touch the compartment at the front edge
=> fig. 122.
Removing and inserting storage compartment
- Open the storage compartment.
- Grasp the sides of the storage compartment with both
hands and pull it straight out toward you.
- To insert the storage compartment again, hold it at a
slight angle and push the lower part into the retainer
until it latches =:> fig. 123.
- Close the storage compartment .•
Vehicle care I I irechnical data
Page 114 of 408

-Seats and storage "-------=---------------
Coat hooks
Fig
. 124 Coat hook
above left rear seat
There are fold-out coat hooks over each rear door.
- To open, touch the top of the coat hook=> fig. 124.
& WARNING
• Hang clothes in such a way that they do not impair the driver's
v1s1on.
• The coat hooks must only be used for lightweight clothing . Do
not leave any heavy or sharp edged objects in the pockets which
may interfere with the side curtain airbag deployment and can
cause personal injury in a crash.
• Do not use coat hangers for hanging clothing on the coat hooks
as this can interfere with proper deployment of the side curtain
airbags in an accident.
• Do not hang heavy objects on the coat hooks, as they could
cause personal injury in a sudden stop .•
Left-side compartment
Fig . 125 Luggage
compartment , left side
Fig . 126 Luggage
compartment, left side
The DVD player for the navigation system is in the left-side
storage compartment.
To open the side storage compartment, turn the two pins
© to the vertical position.•
Page 133 of 408

On the road -
-------------------'
Stopping the engin e
-Turn the ignition key to position ©~ page 130, fig. 145.
& WARNING
• Never turn off the engine until the vehicle has come to a
complete stop.
• The brake booster and servotronic only work when the engine
is running. With the ignition turned off, you have to apply more
force when steering or braking. Since you cannot steer and stop
normally, this can lead to accidents and serious injuries .
• The radiator fan can continue to run for up to 10 minutes even
after you have turned off the engine and removed the ignition key.
The radiator fan can also turn on again if the engine coolant heats
up because of intense sunlight or heat build-up in the engine
compartment.
0 Note
Do not stop the engine immediately after hard or extended driving.
Keep the engine running for approximately two minutes to prevent
excessive heat build-up.•
Con tro ls and eq uip
ment
Starting and stopping the engine
using the Convenience key
A pp lies to veh ic les: w ith Convenie nce key
Starting th e engin e using th e [ START ] button
Using this button, you can switch on the ignition and start
the engine .
0
0
Fig. 146 Convenience
key: START button
The [ START] button has a two position feature. ~ fig. 146.
Switching on the ignition
- Press the [
START] button to the first position. Only the
ignition switches on .
Starting the engine
- Depress the foot brake.
- Move the selector lever into the P or N position
~ & .
- Press the I START] button to the second position. The
engine starts.
Vehicle care I I irechnical data
Page 135 of 408

On the road -
----------------
& WARN IN G ( continu ed )
required to steer or bra ke the vehicle . If you are not prepa red , th is
c ould re sult in a collision and serious per sonal in jur y.
• For your safet y, move the sele ctor lever t o the P po sition , then
turn off the engine . Otherwise the veh icle could inadvertently roll
away .
• After t urning off th e engine , the r adi ator f an c an come on and
run for up to 10 mi nute s -even if the i gnition i s switc hed off . Like
wise , the fan could come on if the temperature in the engin e
c omp artment r ais e s due to heat build up or if you le ave the vehi cle
s tandin g in direct sunlight .
0 Note
After driving at high engine load, heat can build up in the engine
compartment after you have turned off the engine. This can damage
t he engine . Let the veh icle stand and run in idle for about 2 minutes
before turning off the engine .•
Ap plies to ve hicles : w ith Conve nie nce key
Driver's messages in the instrument cluster
Messages appear in the instrument cluster to let the
driver know if something is missing or if some thing must
be done.
No ke y identified
This message appears when you press the [ START ] button, but
there is no remote control key insi de the vehicle or if the system
does not recogni ze the key . For example, if your key is
shielded by
an object or
encased, i.e . inside an a lum inum briefcase, the signal
from the key cannot be detected. Electronic devices such as cell
phones can also interfere with the radio signal.
Controls and equip
ment P
re ss br ake pedal to start engine
This message appears when you press the I S TART] button when
starting the engine but you have not depressed the brake pedal.
En gage N or P to start e ngine
This message appears when you start the engine but the selector
lever is not in the P or N position. The e ngine can be sta rted o nly if
the selector lever is in one of these two positions.
.!., Key not in vehicle
This message appears together with the ..Z. symbol when the
remote control key is removed from t he vehicle whi le the eng ine is
running . This is to remind you that you should not continue your trip
without you r key .
If the key is no longer inside the veh ic le when you turn off the
engine, you will not be able to switch on the ignition or restart the
engine. Also, you will not be ab le to lock the vehicle from the
outside.
S hift to P, othe rwis e vehi cle ca n roll a way. Door s do not lo ck i f lev er
is not in P.
This message appears for your safety together wit h an aud ib le
warning signa l when you press the [S TO P] button but the selector
lever is not in the P position and you open the driver 's door . Move
the selector lever into P, otherwise the vehic le could roll away. In
addition, you w ill not be able to lock the vehicle with either the lock
button located on the door handle or the remote control.
T o engage steering lo ck, press a nd hold STOP button
This message appears for your personal safety if you switch off the
eng ine and the ignition by pressing the
I S TOP ] button and then
open the driver's door . In this case, the steering will still not be
locked . The stee ring wheel wi ll lock :
• I f you press the
I STOP ] button for longer than 1 second.
• I f you lock the vehicle from the outside .•
I • •
Page 136 of 408
• ..__O_ n_ t_ h _e _ ro_ a_d __________________________________________________ _
Electromechanical parking brake
Operation
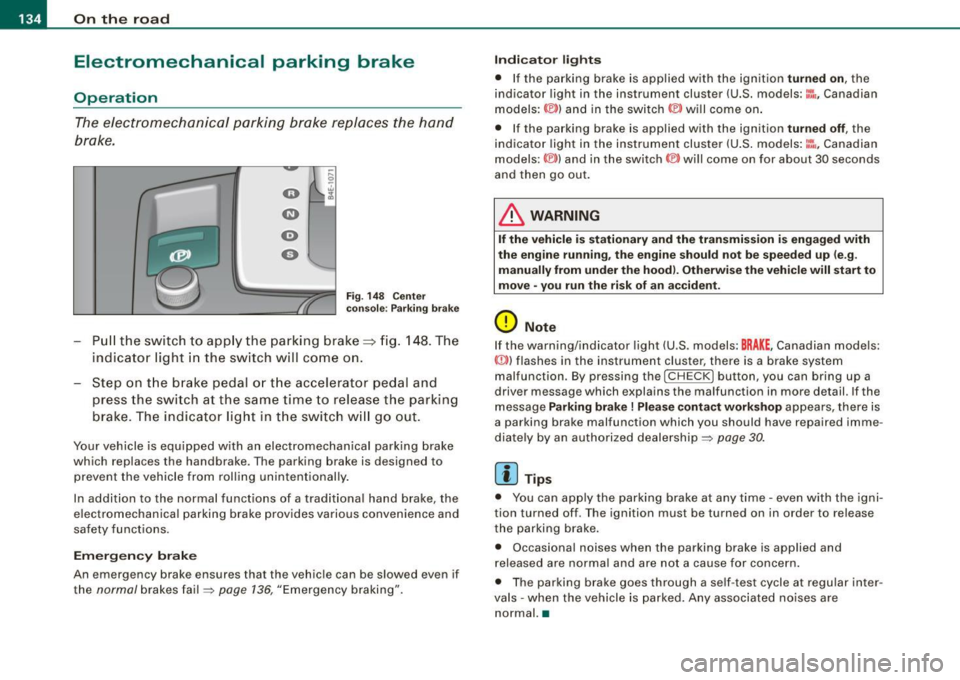
The electromechanical parking brake replaces the hand
brake.
F ig. 148 Cen ter
co nso le: P arki ng br ake
Pu ll the switch to app ly the parking brake==> fig. 148 . The
indicator light in the sw itch will com e on.
Step on t he brake ped al o r th e accelerat or pedal and
press the switch at the s am e time to rel eas e the parking
brake . The indicator light in t he switch w ill go out .
Your vehicle is equipped w ith an electromechanical parking brake
which replaces the handbrake . The parking brake is designed to
prevent the vehicle from rolling unintentionally .
In addition to the norma l functions of a trad itiona l hand brake, the
e lectromechanical parking brake provides various convenience and
safety functions.
Em erg en cy brake
An emergency brake ensures that the vehicle can be slowed even if
the
normal brakes fa il=> page 136, "Emergency braking".
Indi ca to r light s
• If the pa rking brake is app lied with the ignition turned on, the
indicator light in the instrument cluster (U.S. models:~-Canadian
models: ©) and in the switch © will come on .
• If the parking brake is applied with the ignition
turned off , the
indicator light in the instrument cluster (U .S . models :~~ , Canadian
models :(®) ) and in the switch(®) will come on for about 30 seconds
and then go out.
& WARNING
If the vehicle i s stationary and the transmis sio n i s e ngag ed with
the eng ine running , th e engine should n ot b e speeded up (e .g .
manu ally from under the ho od). Oth erw ise th e vehi cle will start t o
mo ve • you r un the ris k of an acc ident .
0 Note
If the warning/indicator light (U .S . models: BRAKE , Canadian models:
{(j))) flashes in the instrument cluster, there is a brake system
malfunction . By pressing the
I C HE CK] button , you can bring up a
driver message which explains the malfunction in more detail. If the
message
Parking brake ! Plea se conta ct w ork shop appears, there is
a parking brake malfunction which you should have repaired imme
diate ly by an authorized dealership=:>
page 30.
[ i ] Tips
• You can app ly the parking brake at any time -even with the igni
tion turned off . T he ignition mus t be turned on in order to release
the parking brake.
• Occasional noises when the parking brake is applied and
released are norma l and are not a cause for concern .
• The parking brake goes through a se lf -test cycle at regular inter
va ls - when the vehicle is parked. Any associated no ises are
normal. •