reset AUDI S8 2011 Owners Manual
[x] Cancel search | Manufacturer: AUDI, Model Year: 2011, Model line: S8, Model: AUDI S8 2011Pages: 302, PDF Size: 76.07 MB
Page 12 of 302
10 Instruments and warning/indicator lights
Instruments and warning/indicator Lights
Instruments
Instrument cluster and controls
The instrument cluster is your central source of information.
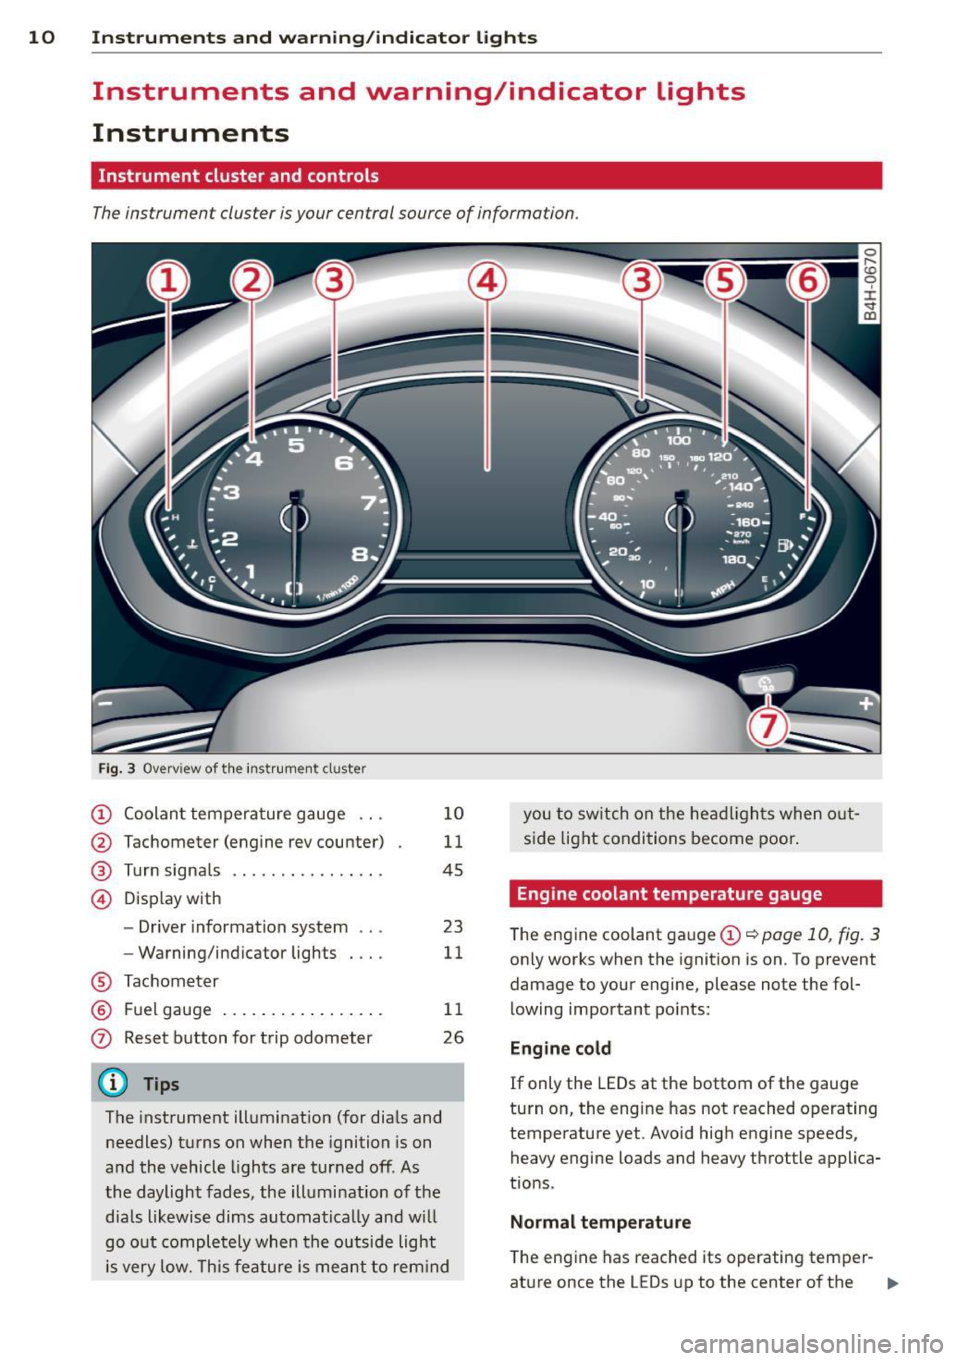
Fig. 3 Overv iew of th e ins tru me nt cluster
(!) Coolan t tempera ture gauge .. .
@ Tachometer (engine rev counter)
® Turn signa ls .. .... ... .. ... . .
© D isp lay with
- Driver information system ...
- Warning/ind icator lights
® Tac hom eter
® F uel gauge ... .. .... ... ... . .
0 Reset b utton for t rip odometer
(D Tips
1 0
11
45
23
11
1 1
26
The instrument illumination (for dia ls and
needles) t urns on when the ignition is on
a nd the vehicle lights are tur ned off . A s
the daylight fades, the illumination of the
dia ls likewise dims automa tica lly and w ill
go out co m ple tely when the o utside light
i s
very lo w. Th is feature is me ant t o rem ind you
to sw itch on the hea dlights when o ut
s id e lig ht condi tions be come poor .
Engine coolant temperature gauge
The engine coolant gauge (!) ¢ poge 10, fig. 3
only works when the ignition is on . To prevent
damage to your engine, please note the fol
lowing important po ints:
Engine cold
If only the LEDs at the bottom of the gauge
turn o n, the eng ine has not reached operating
temperature yet. Avoid hig h engine speeds,
heavy engine loads and heavy throttle applica
tions .
Normal temperature
The eng ine has reached its operating temper-
at ure once the LEDs up to the center of the .,.
Page 26 of 302
24 Instruments and warning /indicator lights
to ice on the ro ad ¢ & . If the vehicle is
stationary, o r if you are dr iving at a very
l ow speed, the tempe rat ure shown in the
display might be slightly higher t han the
actua l outside temperature. This is
ca used by the heat being rad iated from
t h e eng ine.
- You can se lect the un its used for temper
atu re, speed and other measurements in
the MMI.
- Fo r information on the audio/video and
nav iga tion* functions, refer to the sepa
r ate MMI owner's manual.
Operation
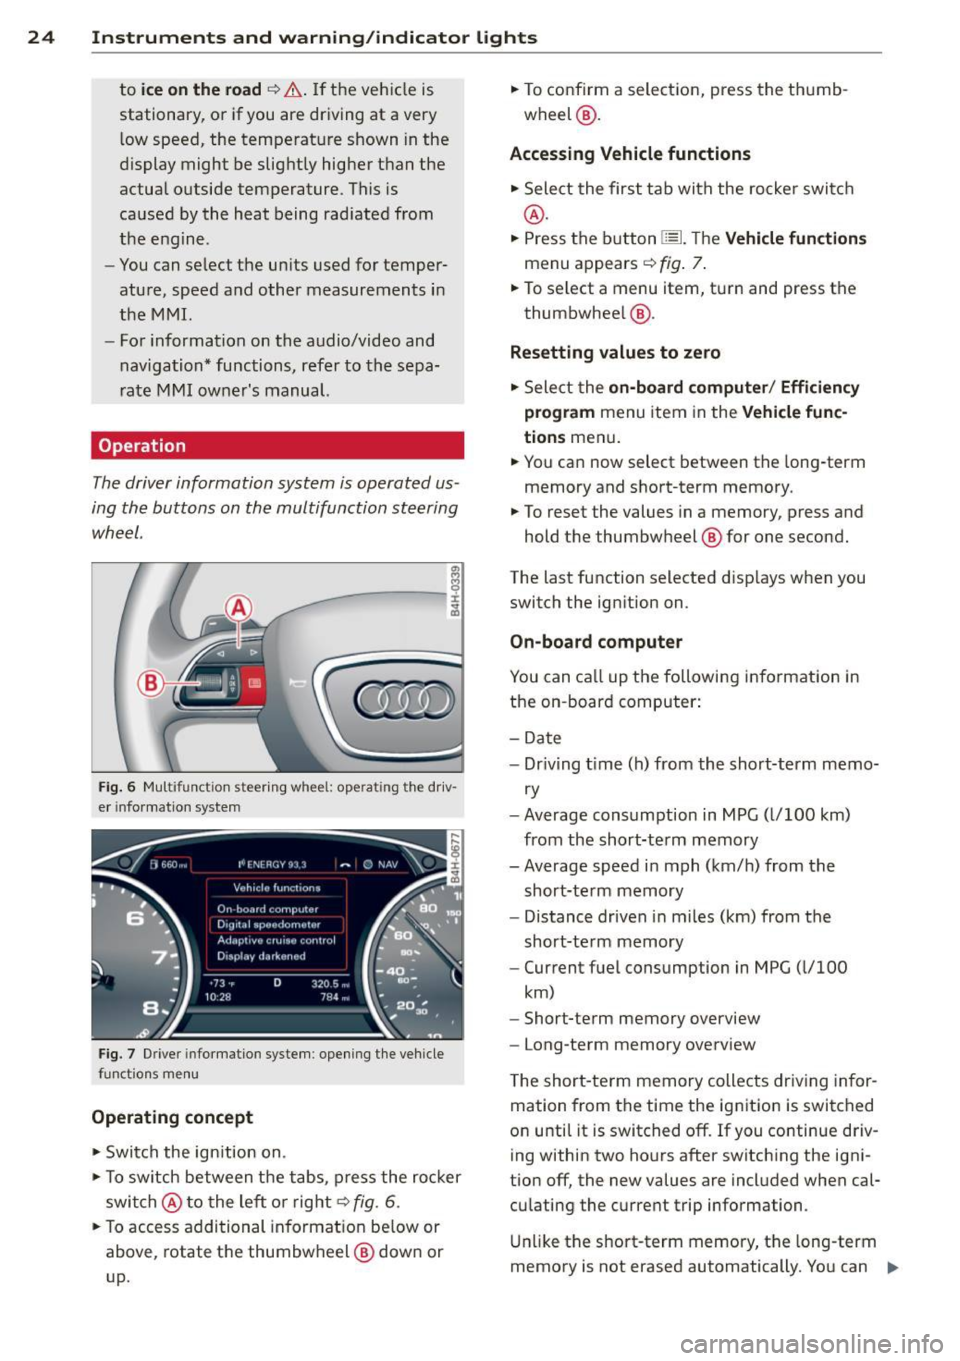
The driver information system is operated us
ing the buttons on the multifunction steering
wheel.
ffi
------,±.
~
Fig. 6 Multifunct ion steer ing wheel: ope rat ing the driv
e r info rmation system
Fi g. 7 Driver infor mat ion syste m: opening t he veh icle
functio ns me nu
Operating concept
.. Swi tch the ign itio n on.
.. To switch between the tabs, press the ro cker
swi tch @ to the left o r right¢
fig. 6.
.. To access additional in format io n be low or
above, rotate the thumbw heel @ dow n or
up. ..
To confirm a selec tion, press the thumb
wheel @.
Accessing Vehicle functions
.. Sele ct the first tab with the ro cke r swit ch
@.
.. Press the button 1::::L Th e Vehicle function s
menu appears¢ fig . 7.
.. To select a menu item, turn and press t he
thumbwhee l@ .
Resetting values to zero
.. Sele ct the on-board computer / Efficiency
program
menu item in the Vehicle func
tions
men u.
.. You can now select between the long-term
memory and short-term memory.
.. To reset the values in a memory, press and
hold the thumbw heel @ for one second.
The last function selected d isp lays when you
switch the ignition on .
On-board computer
You can ca ll up the followi ng i nformation in
the on -board computer:
- Date
- Dr iv ing t ime (h) from the short-term memo-
ry
- Average consumption in MPG ( l/100 km)
from the short-te rm memory
- Average speed i n mph (km/h) from the
short-te rm memory
- Distance driven in miles (km) from the
short-term memory
- Current fuel consumption in MPG ( l/100
km)
- Short-term memory overview
- Long-te rm memory ove rview
T he short-te rm memory collects dr iv ing in for
mation from the time the ignition is switched
on unti l it is switched off. If you continue driv
ing within two ho urs after switch ing the ign i
tion off, the new values are incl uded when cal
cu lating the cu rrent trip information .
Unli ke the short-term memory, the long-term
memo ry is not erased automatically. Yo u can .,..
Page 27 of 302
Instruments and warning/indicator lights 25
select the time period for evaluating trip in
formation yourself.
For some vehicle functions, you can access the
trip information from the temporary memory
in the line(D¢page23,
fig. 5.
Efficiency program*
The efficiency program can help you to use
less fuel.
It evaluates driving information in
reference to fuel consumption and shows oth
er equipment influencing consumption as well
as sh ift recommendat ions. ¢
page 25. Fuel
economy messages ¢
page 25 provide tips
for efficient driving . The efficiency program
uses distance and consumption data from trip
computer 1 .
To display the efficiency program, call up
Ve
hicle functions and select the menu option
Efficiency program. If the data are deleted in
the efficiency program , those values are also
reset in trip computer .
@ Tips
-All stored values will be lost if the vehi
cle battery is disconnected.
- Fuel consumptions (average and cur rent), range and speed are displayed in
metric units on Canadian models.
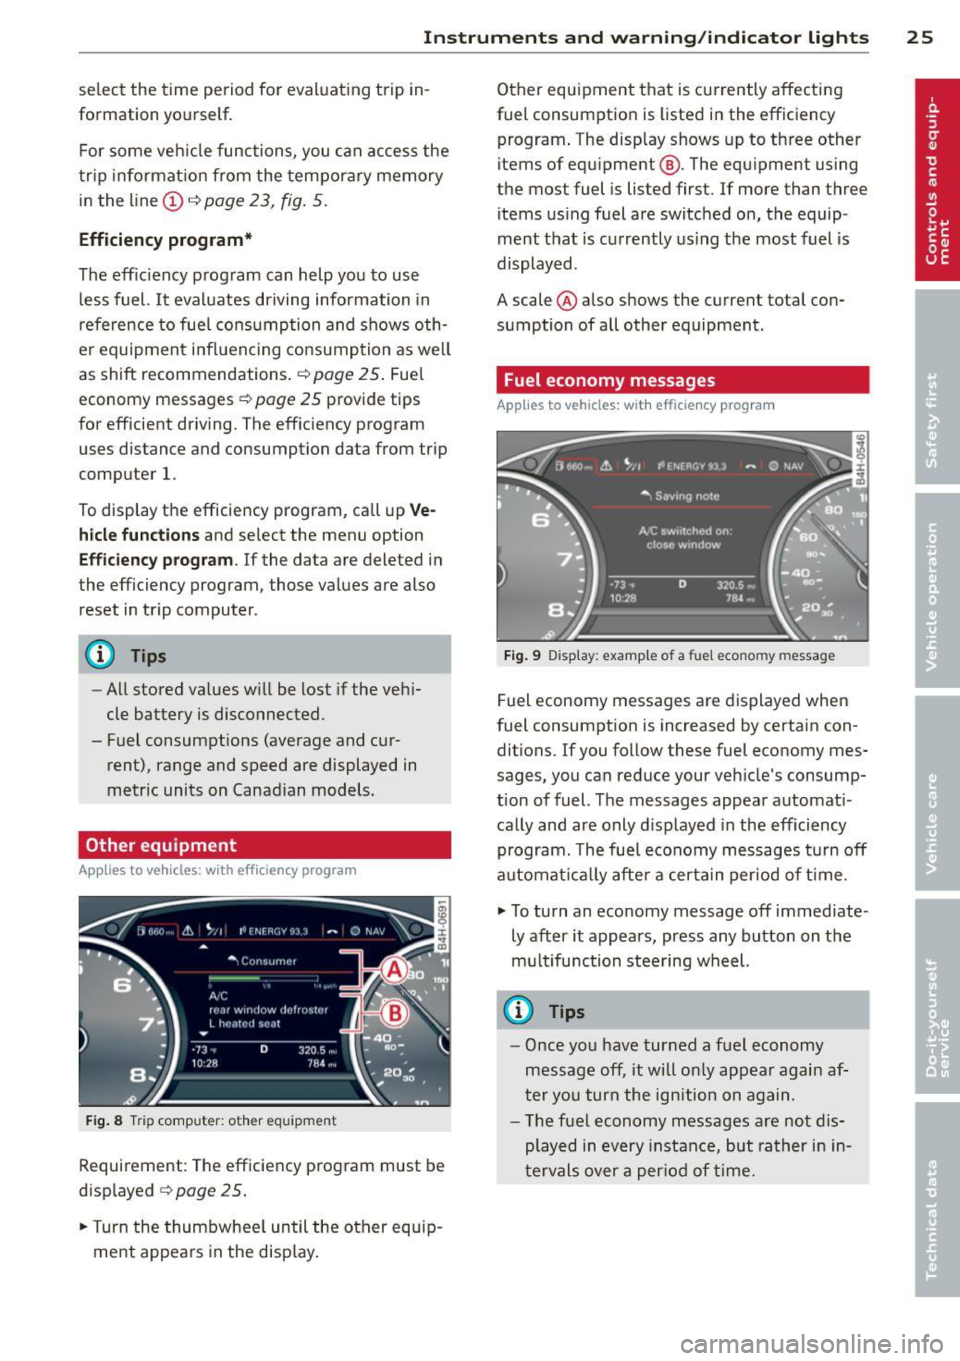
Other equipment
Applies to vehicles: with efficiency program
Fig. 8 Tri p comp uter: other equ ipment
Requirement : The efficiency program must be
displayed
¢ page 25 .
.,. Turn the thumbwheel until the other equip
ment appears in the display. Other equipment that is currently affecting
fuel consumption is listed in the efficiency program. The display shows up to three other
items of equipment @. The equipment using
the most fuel is listed first . If more than three
items using fuel are switched on, the equip
ment that is currently using the most fuel is
displayed .
A scale @also shows the current total con
sumption of all other equipment.
Fuel economy messages
App lies to vehicles: with efficiency program
Fig. 9 Display : example o f a fu el econo my m essa ge
Fuel economy messages are displayed when
fuel consumption is increased by certain con
ditions. If you follow these fuel economy mes
sages, you can reduce your vehicle's consump
tion of fuel. The messages appear automati
cally and are only displayed in the efficiency
program. The fuel economy messages turn off
automatically after a certain period of time .
.,. To turn an economy message off immediate
ly after it appears, press any button on the
multifunction steering wheel.
@ Tips
- Once you have turned a fuel economy
message off, it will only appear again af
ter you turn the ignition on again.
- The fuel economy messages are not dis
played in every instance, but rather in in
tervals
over a period of time.
Page 28 of 302
26 Instruments and warning/indicator lights
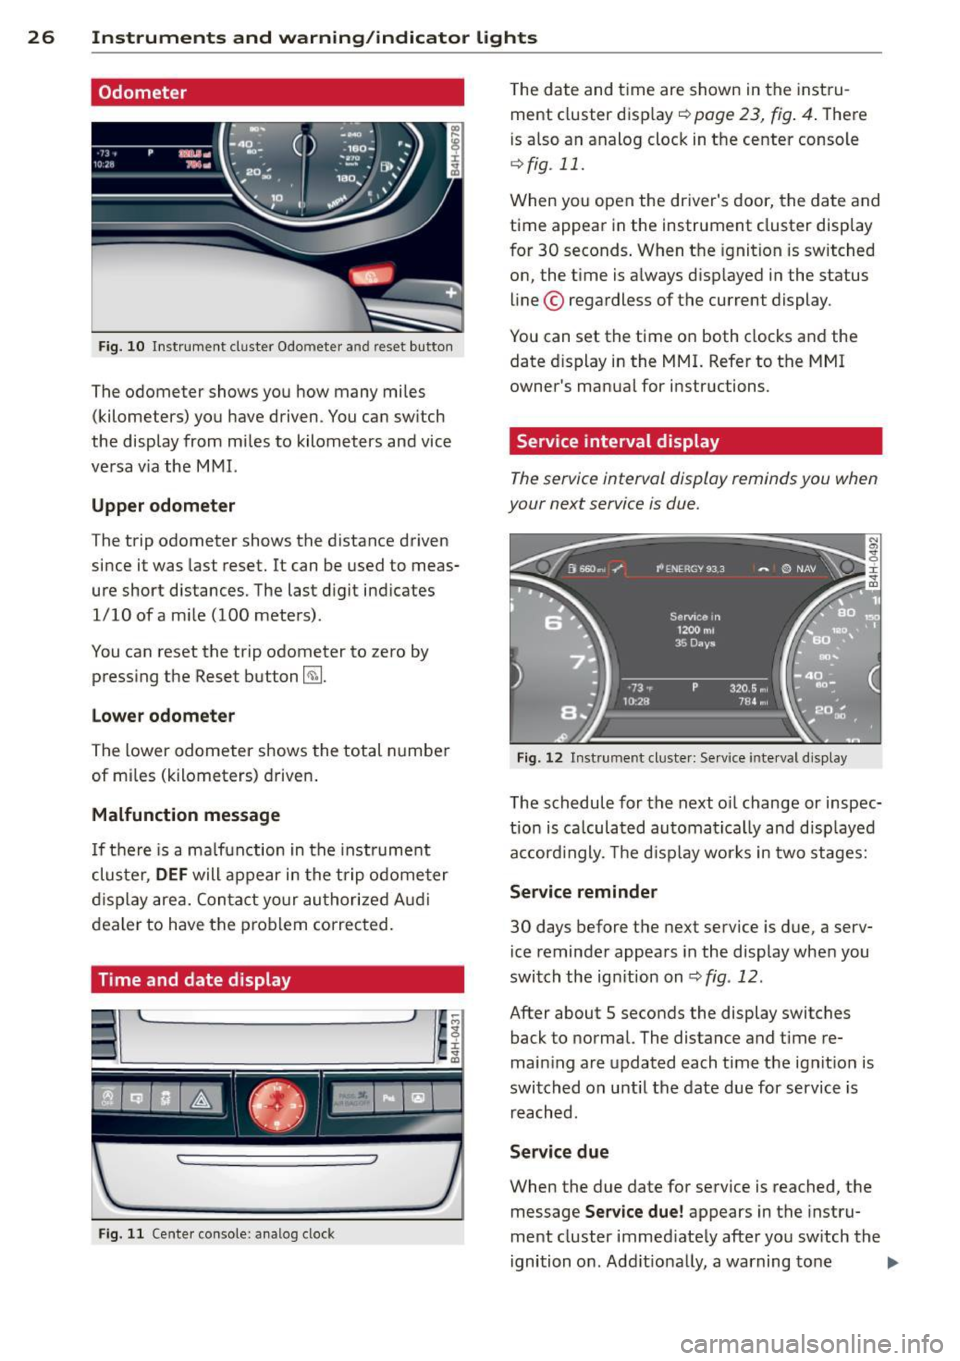
Odometer
Fig . 10 In str ument cl uster Odo mete r an d reset b utto n
The odometer shows yo u how many mi les
(kilometers) you have driven . Y o u can sw itch
the display from mi les to kilometers and vice
ve rsa v ia the M MI.
Upper odometer
The trip odometer shows the distance driven
since it was last reset. It can be used to meas
ure short distances. The last d igit ind icates
1/10 ofa m ile (100 mete rs) .
You can reset the trip odometer to zero by press ing the Reset button ~-
Lower odometer
The lower odometer shows the total n umber
of mi les (k ilometers) d rive n.
Malfunction message
If th ere is a ma lfunction in the instrume nt
clu ster,
DEF will appear in the t rip o dome te r
di sp lay are a. Con ta ct yo ur au tho riz e d Audi
dealer to have the prob lem correc ted.
Time and date display
F ig . 11 Cente r console: analog clock
T he date and time are shown in the inst ru
ment cluster display ~
page 23, fig . 4 . The re
is a lso an analog cloc k in t he center console
¢ fig . 11.
W hen yo u open the driver's door, the da te and
time appear in the instrument cluster disp lay
f or 30 seconds . When t he ignition is sw itched
on, the t ime is a lways d isp layed i n the status
line © regardless of the current display .
You can set the time o n both clocks and the
date d isplay in the MMI. Refer to the MMI
owner 's manua l for i nstructions.
Service interval display
The service interval display reminds you when
your next service is due.
Fi g. 12 Instrument cl uste r: Se rvice inte rva l d is pl ay
The schedule for the next o il change or inspec
t io n is ca lculat ed au toma tica lly an d disp layed
a cc ord ingly. The d isp lay wor ks in two stages:
Service reminder
30 days before the next serv ice is due, a serv
ice reminde r appea rs in the display whe n you
switch the ig nition on
¢ fig . 12.
After about 5 seconds the display switches
back to normal. The distance and time re
main ing a re updated each t ime the ignit ion is
swi tched on u ntil the date due for service is
r e ach ed.
Service due
When the due date for service is reached, t he
message
Service due! appears in the instru
ment cluster immed iate ly afte r yo u sw itch the
ignition on . Add it io na lly, a warning to ne .,.
Page 29 of 302
Instrument s and warning /indicator lights 2 7
sounds. After about S seconds the display
switches back to normal.
Calling up th e service schedules
If or when an oil change or inspe ct io n is due,
can be shown in the MM I disp lay by select ing
the servi ce inte rva l disp lay in the car menu .
Select the
I CA R I function button > Car s ys
tems
contro l button > Servicing & chec ks >
Service interval d isplays.
Resetting the service interval display
Your au thori zed A udi dealer w ill reset the cor
responding service sched ule after per forming
the approp riate service on yo ur vehicle. You
also have the possib ility to reset the o il
change sched ule after having performed an
oil change accord ing to Audi specifications.
Select the
I CAR I function button > Car sys
tems
control bu tton > Servicing & checks >
Service interval display s > Reset oil change
interval.
CJ) Note
If you disconnect the battery termina ls , no
calc ulations can be made for the service
interval display d uring this tim e and no
service remi nder w ill appea r. Remembe r
t h at observ ing the prope r serv ice intervals
is v ita lly impo rtant to ex tend ing the life o f
your veh icle , particu larly the engine, a nd
maintaining its va lue . Even if t he mileage
driven is low, the maximum period of one
year from one service to the next must not
be exceeded.
{!) Tips
- Do not reset the display between o il
changes, otherw ise the display will be i n
cor rect.
- The information in the Service Reminder
r ema ins stored even when the vehicle
battery is discon nected .
Open door /hood /rear lid warning
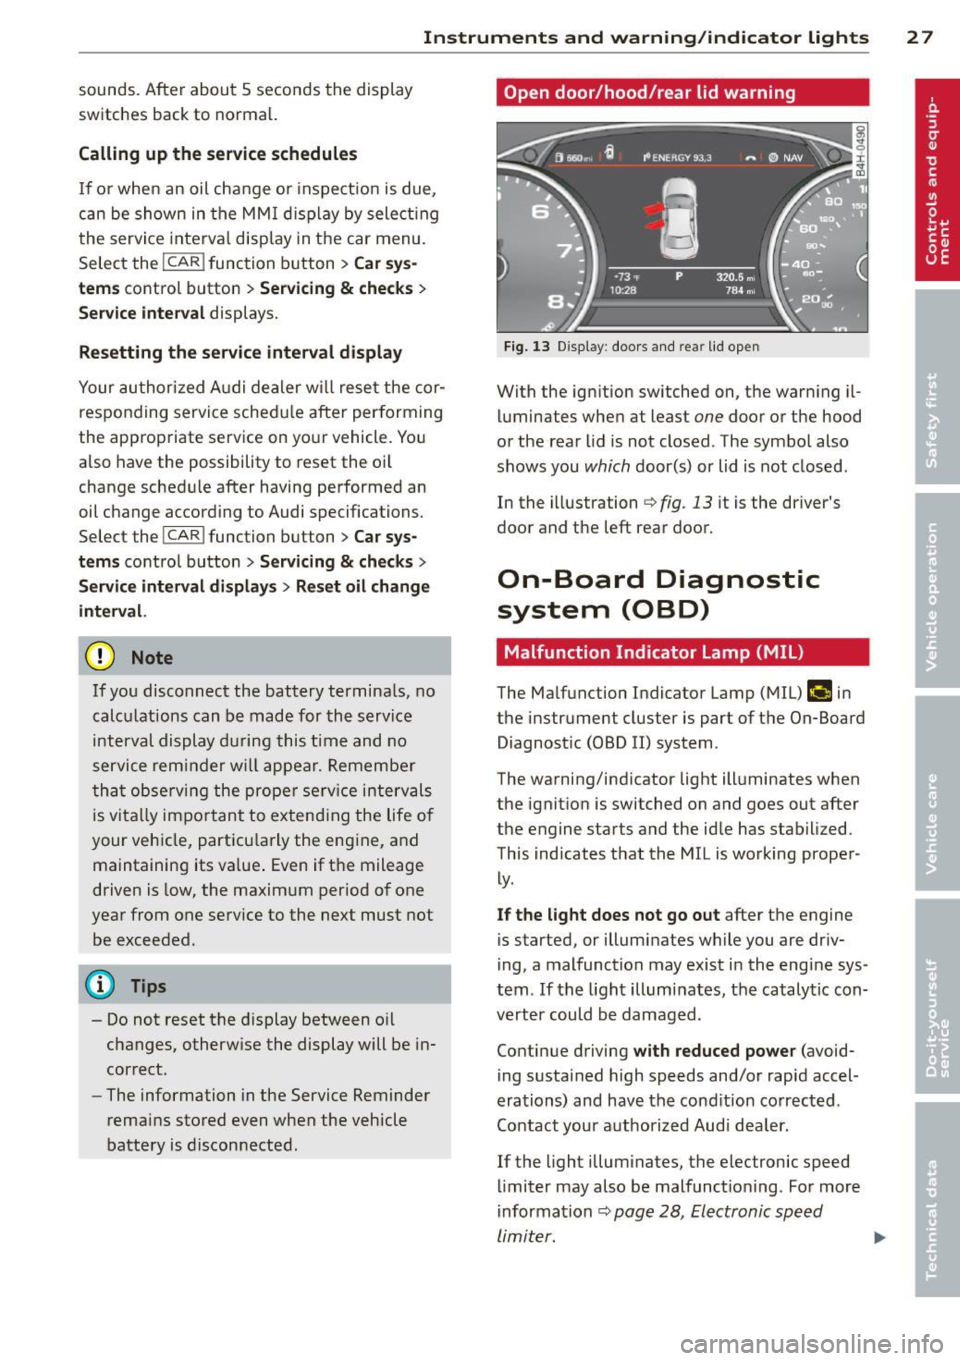
Fi g. 13 Display : doo rs a nd re ar lid open
With the ign ition switched on, the warn ing il
luminates when at least
one door or the hood
or the rear lid is not closed . The symbo l also
shows you
which door(s) or lid is not closed .
In the illustrati on
i:> fig . 13 it is the driver's
door and the left rear door.
On-Board Diagnostic
system (OBD)
Malfunction Indicator Lamp (MIL )
The Ma lfunction Indicator Lamp (MIL) fllllij in
the instrument cluster is part of t he On-Board
Diagnost ic (OBD II) system.
The warning/indicator light ill uminates when
the ignitio n is switched on and goes out after
the engine starts and the id le has stabilized.
This indicates that the MIL is working proper
ly .
If the light does not go out after the engine
is started, or illuminates while you are driv
i ng, a malfunction may exis t in the engi ne sys
tem . If the light illumi nates, the catalyt ic con
verter could be damaged .
Contin ue d riving
with reduced power (avoid
i ng s ustai ned h igh speeds and/or rapid accel
erations) and have the cond ition co rrected .
Contact your aut horized Aud i dea le r.
If the light illum inates, the electronic speed
li miter may also be malfunct io ni ng . For more
i nformation
~ pag e 28, Electronic speed
limiter. ...,
Page 87 of 302

fig. 84 is replaced with a white symbol. The
saved speed remains the same.
Presetting your speed
You con preset your desired speed while the
vehicle is not moving .
.,. Swit ch on the ignition .
.,. Pull lever into posit ion @ ~
page 84,
fig . 83 .
... Press the lever in the 0 or 0 direction to
increase or decrease your speed .
.,. Re lease the lever to save that speed.
This function makes it possible, for example,
to save the speed you want before driving on
the highway . Once on the highway, activate
the cruise control by pull ing the lever toward
@.
Switching the system off
Temp orar y de activation
.,. Press the brake pedal, or
... Press the lever into pos it ion @ (not clicked
into p lace)
c:;, page 84, fig . 83, or
.,. Drive for longe r than 5 minutes at more
than 5 mph (10 km/h) above the sto red
speed.
Switching off compl etely
.,. Press lever into position @(clicked into
place), or
.,. Switch the ign ition off.
The system reta ins the saved speed if you de
activate the cr uise control tempo rarily . To re
sume the saved speed, release the brake ped
a l and pull the lever to position@.
Sw itch ing the ign ition off erases the saved
speed .
A WARNING
You should only return to the saved speed
if it is not too fast for the current traffic
condi tions - risk of an ac ciden t!
On th e ro ad 85
Page 119 of 302
of the slits on the cover and pry the cover
off.
~ Pull the band @ in the direction of the ar
row until the release lever locks in place
¢fig . 122.
~ Fold the upper section of the release lever
down into the recess .
Resetting the parking lock
~ Press the button @ and the release lever at
the same time. You can now push the lever
back into its original position . Make sure the
lever locks in place
¢fig. 123 .
~ Install the cover .
The indicator light
[O] and the N position indi
cator in the instrument cluster turn on when
the park ing lock is released using the emer
gency re lease . The message
Risk of rolling! P
not possible. Please set the parking brake
al
so appears.
_& WARNING
If you release the parking lock using the
emergency release, secure your vehicle
with the parking brake or the brake pedal
if the parking brake is not working. The ve
hicle can roll away if it is not secured and
cause a crash.
-
Automatic Transmission 11 7
Page 259 of 302

remain continuously illuminated. This se
quence will continue upon subsequent vehicle
start-ups as long as the malfunction exists.
When the malfunction indicator is illuminat
ed, the system may not be able to detect or
signal low tire pressure as intended . TPMS
malfunct ions may occur for a variety of rea
sons, including the installation of replace ment or alternate tires or wheels on the vehi
cle that prevent the TPMS from functioning
properly . Always check the TPMS malfunct ion
tellta le after replacing one or more t ires or
wheels on your vehicle to ensure that the re
placement or alternate tires and wheels allow
the TPMS to continue to function properly.
Tire pressure indicator appears
Applies to vehicles: with tire pressure monitoring system
The tire pressure indicator in the instrument
cluster informs you if the tire pressure is too
low or if there is a system malfunction.
Fig. 189 Display : underinflatio n warning
Fig. 190 Display: System malfu nctio n
Using the ABS sensors, the tire pressure moni
toring system compares the tire tread circum
ference and vibration characteristics of the in
dividual tires . If the pressure decreases in one
or more tires, this is indicated in the instru-
Tires and wheels 257
ment cluster with a warning symbol [I) and a
message
r::!) fig. 189.
The tire pressure monitoring system must be
reset via MMI each t ime the pressures are ad
justed (e.g. when switching between partial
and full load pressure) or after changing or re
placing a tire on your vehicle
r::!) page 258. You
can find the recommended tire pressures for
your vehicle on the label on driver's side 8-pil
lar
r::!) page 242 .
Tire tread circumference and vibration charac
teristics can change and cause a tire pressure
warning if:
- the tire pressure in one or more tires is too
low,
- the tire has structural damage,
- the tir e pressure was changed, wheels rotat-
ed or replaced but the TPMS was not reset
r::!) page 258 .
Warning symbols
[I) Loss of pressure in at least one tire co& .
Check the tire or tires and replace or repa ir if
necessary. The indicator light
[I) in the instru
ment cluster also illuminates
r::!) page 11.
Check/correct the pressures of all four tires
and resetTPMS via MMI.
lli§ffl (Tire Pressure Monitoring System) Tire
pressure! System malfunction.
If llilffl appears after switching the ignition
on or while driving co
fig. 190 and the indica
tor light
[I) in the instrument cluster blinks
for approximately one minute and then stays
on, there is a system malfunction . See your
authorized Audi dea ler as soon as possible .
A WARNING
-If the tire pressure indicator appears in
the instrument cluster display , one or
more of your tires is significant ly under
inflated . Reduce your speed immediately
and avoid any hard steering or braking
maneuvers. Stop as soon as possible and
check the tires and their pressures . In
flate the tire pressure to the proper pres-
sure as indicated on the vehicle's tire .,.
Page 260 of 302

258 Tires and wheels
pressure label~ page 242 . Driving on a
significantly under-inflated tire causes
the tire to overheat and can lead to tire
failure. Under-inflation also is likely to
impair the vehicle's handling and stop
ping ability.
- The driver is responsible for maintaining
the correct tire pressures. You must
check the tire pressures regularly.
- Under certain cond itions (such as a spor
ty driving style, winter condit ions or un
paved roads), the pressure monitor indi
cator may be delayed.
- Ask your author ized Audi dealer if run
flat tires may be used on your veh icle.
Your vehicle registration becomes invalid
if you use these tires when not permit
ted. Damage to your vehicle or accidents
cou ld also result.
(D Tips
- The tire pressure monitoring system
stops working when there is an ESP/ABS
malfunction.
- Using snow chains may result in a system
malfunction.
- To ensure a proper TPMS function use
AUDI Original Tires which are marked
with "AO" or "RO" on the tire sidewall.
~p age 249.
- The tire pressure monitoring system on
your Audi was syntonized using tires with
the "AO" or "RO" identification. We rec
ommend using these tires.
Reset tire pressure monitoring system
App lies to vehicles: with tire pressure monitoring system
If the tire pressure is adjusted, wheels are ro
tated or changed, the TPMS must be reset via
MMI .
.. Switch on the ignition .
.. Se lect in the MMI: !CAR !function button>
Car systems contro l button > Servicing &
checks > Tire pressure monitoring > Store
tire pressures > Yes, store now.
(D Tips
Before resetting the TPMS, the current
pressures of all four tires must correspond
to the specif ied values. Adjust the tire
pressure and reset the pressure in the tire
pressure monitoring system according to
the load you are carrying~ page 242.
- Do not store the tire pressures if you are
dr iving with snow chains. Otherwise, a
system malfunction may occur.
Page 291 of 302
How do I properly install a child safety
seat in my vehicle? .............. .. . 172
Infant seats . . . . . . . . . . . . . . . . . . . . . . 17 4
Installing .. ............. .... .. ... 178
Installing a child restraint us in g the
LATCH system ..................... 184
LATCH system .... .. ... ... .. .. .. .. . 184
Lower anchorages ............... .. 182
Mounting and releasing the anchorage
hook .... .. ................. .. ... 184
Safety instructions ............ .. .. . 172
Clean ing and protection ......... .. .. . 206
A lcantara (synthet ic suede) .......... 215
Cooler ... .. ................. .. ... 216
Engine compartment ............... 216
Exhaust tail pipes ............ ... .. . 212
Fabrics and fabric coverings . ... .. .. . 212
Instrument panel ............ ... .. . 213
Interior . . . . . . . . . . . . . . . . . . . . . . . . . . 212
Leather . . . . . . . . . . . . . . . . . . . . . . . . . . 214
MMI display/controls ............... 212
Plastic and vinyl ................. .. 210
Plastic parts ..... .. ... ... .. .. .. .. . 213
Safety belts . . . . . . . . . . . . . . . . . . . . . . 216
tr im strips . ............. .. .. .. .. . 210
Trim strips . ............. .... .. ... 209
Climate controls . . . . . . . . . . . . . . . . . . . . . 7 4
Clock ....... .. ................ ..... 26
Closing Panoramic sunroof ........ .. .. .. .. .. 41
Sliding/tilting sunroof ............... 40
Sun shade (panoramic sunroof) ... .. .. 42
Cold tire inflation pressure ... .. .. .. .. . 242
Coming home ............. .... .. .. .. 45
Compact spare tire .................. 261
Compartments .... .. ... ... .. .. .. .. .. 70
Compass in the mirror ......... ... .. .. 52
Compliance .. .. ........... .. .. .. ... 286
Consumer Information . . . . . . . . . . 135, 283
Consumption (fuel) . . . . . . . . . . . . . . . . . . 24
Contacting NHTSA .................. 135
Convenience key .............. ... .... 33
Starting the engine ................. 79
Stopping the engine (START ENGINE
STOP button) . . . . . . . . . . . . . . . . . . . . . . 80
Switching the ignition on ............ 79
Unlocking and locking vehicle ........ . 33
Index 289
Convertib le child safety seats
Convertible locking retractor 17S
Activating . .. .. .. ................. 180
Deact ivating . .. .. .... ........... .. 181
Using to secure a child safety seat 1.78, 180
Coolant
refer to Engine coolant ............. 229
Cooler ....... .. .. .... ............. . 72
Cleaning .. .. .. .. .. ............... 216
Operation . . . . . . . . . . . . . . . . . . . . . . . . . 72
Cooling mode (automatic climate control) 75
Cornering light ........... .......... 106
Cruise control Changing speed .. .................. 84
Presetting your speed ............... 85
Switching off .. .. .. . .. ... .... ..... . 85
Switching on . . . . . . . . . . . . . . . . . . . . . . . 84
Warning/ind icator lights ............ . 22
(upholder .. .. .. .. ................. . 70
D
Data .............................. 282
Data recorder . .. .. .. .. ........... .. 190
Date display .. .. .. ... ... ...... ..... . 26
Daytime running lights .............. .. 43
Declaration of compliance Adaptive cruise control ............. 286
Audi s ide ass ist .. ............. .... 286
Cell phone package . . . . . . . . . . . . . . . . 286
Convenience key .. .. .............. . 286
Electronic immobilizer .............. 286
Homelink ® universal remote control .. 286
Remote control key ... ......... .. .. 286
Tire pressure monitoring system ..... 286
DEF What does this mean when it appears in
the trip odometer display? ........... 26
Defective light bulb warning ........... 21
Defrosting (windows) .. .. ... .... ..... . 76
Deluxe automatic climate control ..... .. 75
Determining correct load limit ........ 247
Digital compass . . . . . . . . . . . . . . . . . . . . . 52
Dimensions ....... .. . .............. 280
Dimming the rearview mirror .......... 51
Distance ....... .... ................ 24
Door/rear lid warning ... ............. . 23
•
•