sensor AUDI S8 2014 Owners Manual
[x] Cancel search | Manufacturer: AUDI, Model Year: 2014, Model line: S8, Model: AUDI S8 2014Pages: 314, PDF Size: 78.47 MB
Page 15 of 314
Instruments and warning/indicator lights 13
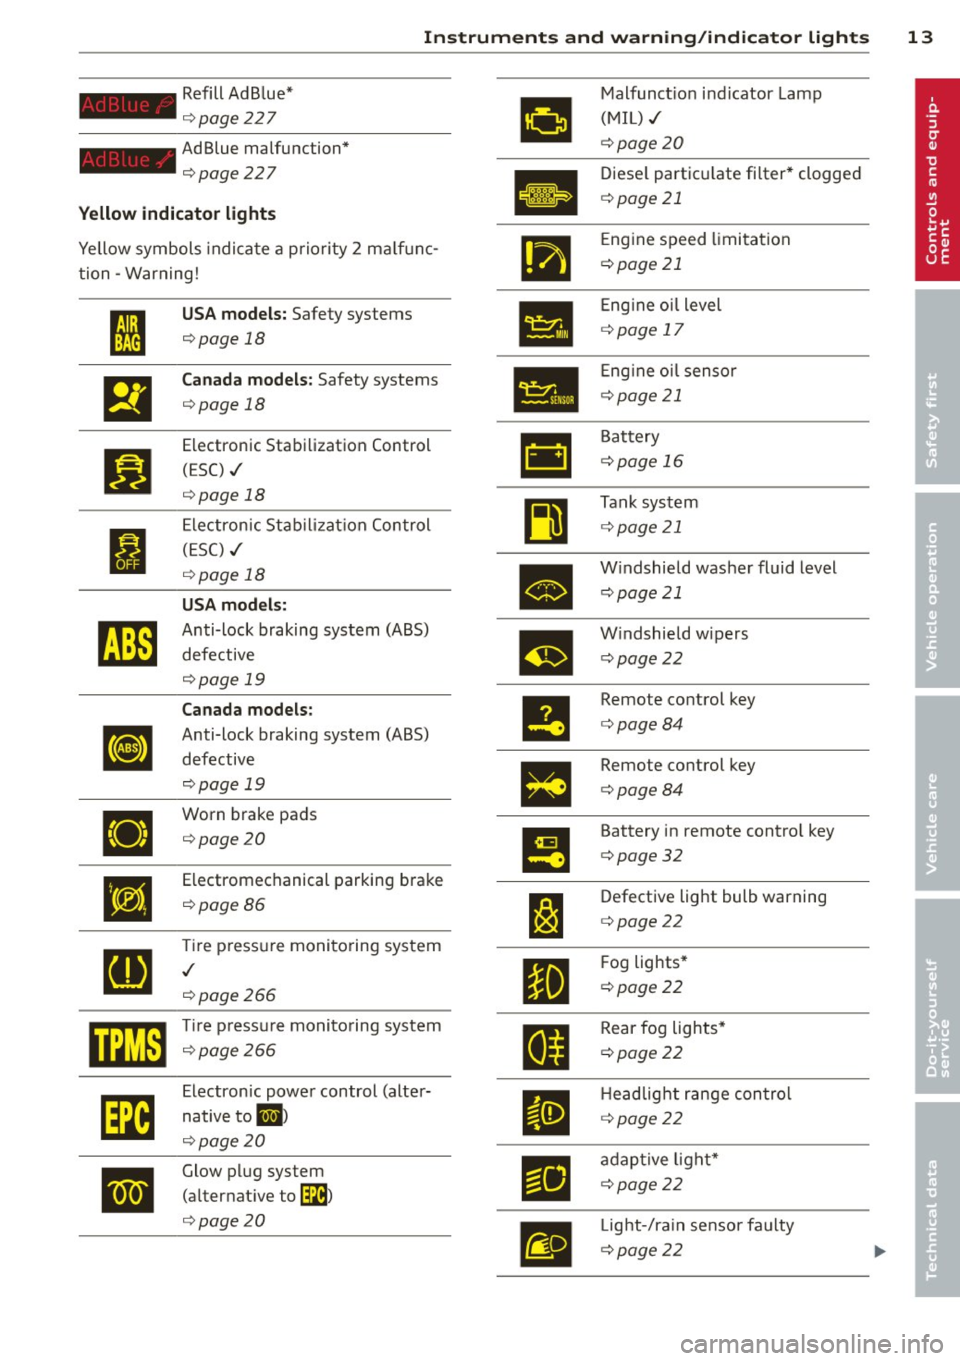
Refill Ad Blue*
1:11
Malfunction indicator Lamp
c::;, page 227 (MIL) ../
AdBlue malfunction*
¢page 20
c::;,page227
•
Diesel particu late filter* clogged
Yellow indicator lights
c::;, page 21 .
Yellow symbols indicate a priority 2 ma lfunc-
111
Engine speed limitation
c::;, page 21 tion -Warning!
Engine oil level
I
USA models: Safety systems
•
c::;, page 18 c::;,
page 17 •
El
Canada models: Safety systems
•
Eng ine oil sensor
c::;, page 18 c::;,
page 21
Electronic Stabilization Control
&1
Battery
II
(ESC) ../ c::;, page 16
c::;, page 18
Em
Tank system
I
Electronic Stabilization Control c::;, page 21
(ESC) ../
c::;,page 18
•
Windshield washer fluid level
USA models: c::;, page 21
~
Anti-lock braking system (ABS)
m
W indshield wipers
defective
c::;, page 2 2
¢page 19
Canada models:
!I
Remote control key
ti]
Anti-lock braking system (ABS) c::;,page84
defective
=
Remote control key
¢page 19
c::;, page 84
•
Worn brake pads
Battery in remote control key
c::;, page 20
!! c::;, page 32
•
Electromechanical parking brake
Defective light bulb warning
c::;,page 86
l:J c::;, page 2 2
[I]
Tir e p ressure monitoring system
Fog lights*
,/
II c::;, page 2 66 c::;, page 2 2
mm
Tir e p ressure monitoring system
II
Rear fog lights*
¢page 266 c::;, page 2 2
rm
Electronic power control (alter-
II
Headlight range control
native
to g c::;, page 2 2
c::;, page 20
•
Glow plug system
§l
adaptive light*
(alternat ive to
'3B >
c::;, page 2 2
c::;, page 20
m
Light-/rain sensor faulty
c::;, page 2 2
Page 23 of 314
Instruments and warning/indicator lights 21
switched on and will turn off after the engine
has started and has sett led at a constant idle
speed . This ind icates that the MIL is working
properly .
The warning light illuminates when there is a
malfunction in the engine e lectronic system .
Contact your author ized Audi dealer and have
the malfunction corrected .
An improperly closed fuel filler cap may also
cause the MIL light to illuminate
¢page 225.
For mo re in format ion ¢ page 29.
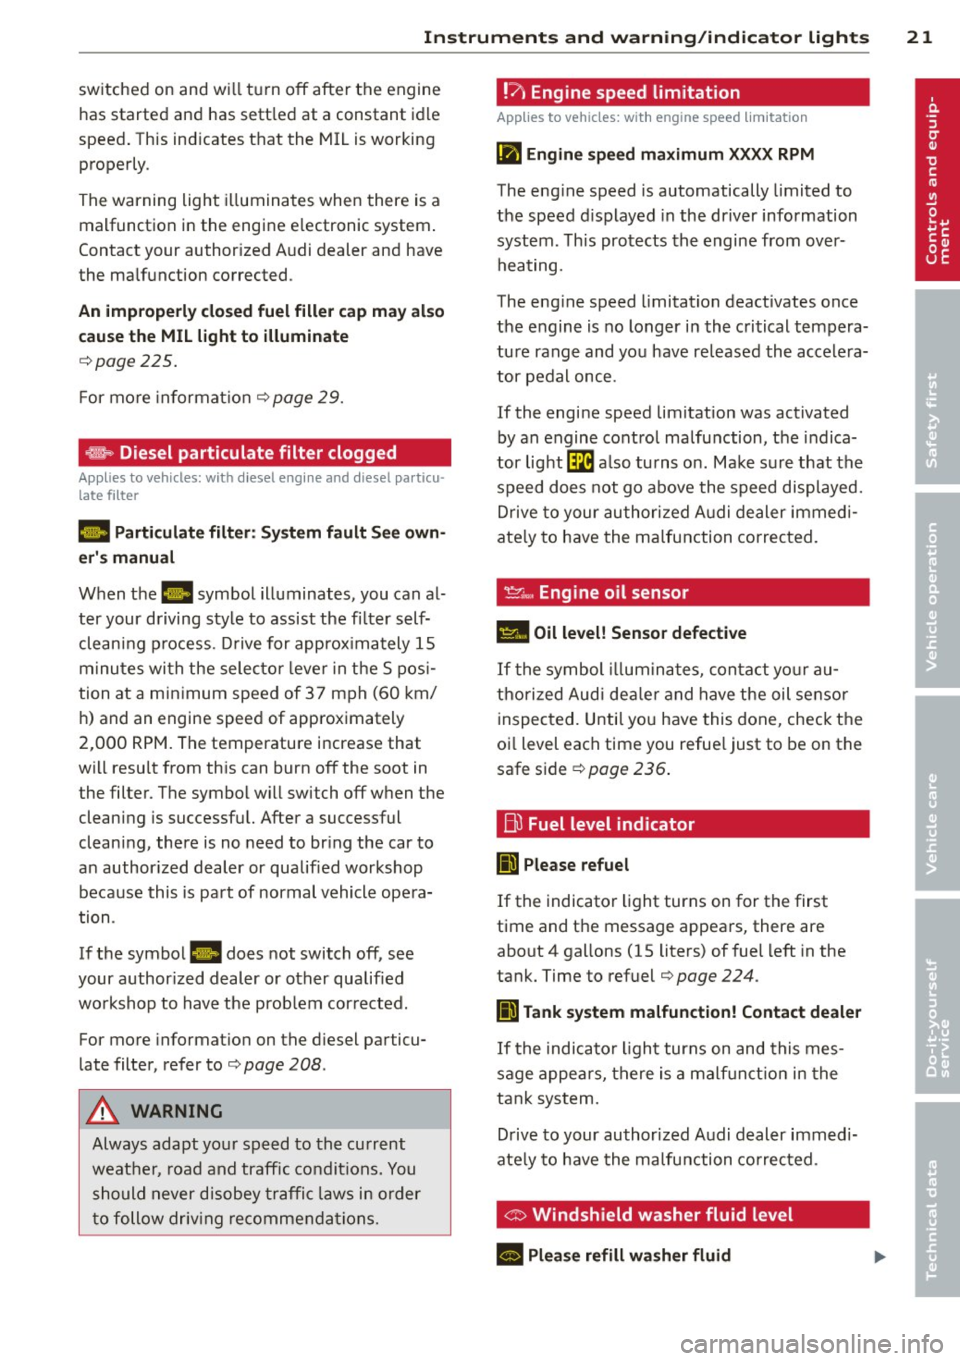
~. Diesel particulate filter clogged
Appl ies to vehicles: with d iesel e ngine and diese l pa rticu
late fi lte r
II Particulate filter : System fault See own
er's manual
When the Ill symbol illuminates, you can al
ter your driving style to assist the filter self
cleaning process. Drive for approximately 15
minutes with the selector lever in the 5 posi
tion at a minimum speed of 37 mph (60 km/
h) and an engine speed of approximately
2,000 RPM. The temperature increase that
will resu lt from this can burn off the soot in
the filter . The symbol will switch off when the
cleaning is successful. After a successful
cleaning , there is no need to bring the car to
an author ized dealer or qualified workshop
because this is part of normal vehicle ope ra
tion .
If the symbol
&I does not switch off, see
your author ized dealer or other qualified
workshop to have the prob lem corrected.
For more informat ion on the d iesel particu
late filter , refer to¢
page 208.
A WARNING
Always adapt your speed to the current
weather, road and traffic conditions. You
should never disobey traffic laws in order
to follow driving recommendations.
-
!'1 Engine speed limitation
App lies to veh icles: w it h e ngine speed lim itat io n
(II Engine speed maximum XXXX RPM
The engine speed is automatically limited to
the speed d isplayed in the driver information
system. This protects the engine from over·
heating.
The engine speed limitation deactivates once
the engine is no longer in the critical tempera
ture range and you have re leased the accelera
tor pedal once.
If the engine speed limitation was activated
by an engine control malfunction, the indica
tor light
lli also turns on. Make sure that the
speed does not go above the speed disp layed.
Drive to your authorized Audi dealer immedi
ate ly to have the malfunction corrected.
~v, Engine oil sensor
Ill Oil level! Sensor defective
If the symbol illum inates, contact your au
thorized Audi dea le r and have the oil sensor
inspected. Until you have this done, check the
oi l level each time you refue l just to be on the
safe side¢
page 236.
Bu Fuel level indicator
Ii') Please refuel
If the indicator light turns on for the first
time and the message appears, there are
about 4 gallons (15 liters) of fuel left in the
tank. Time to refuel
q page 224.
Ii] Tank system malfunction! Contact dealer
If th e indicator light turns on and this mes
sage appears, there is a malfunction in the
tank system.
D rive to your authorized Audi dealer immedi
ate ly to have the malfunction corrected.
Page 24 of 314
22 Instruments and warning/indicator lights
If the symbol illuminates, add windshield
washer fluid to the washer system/headlight
washer system* ¢
page 247.
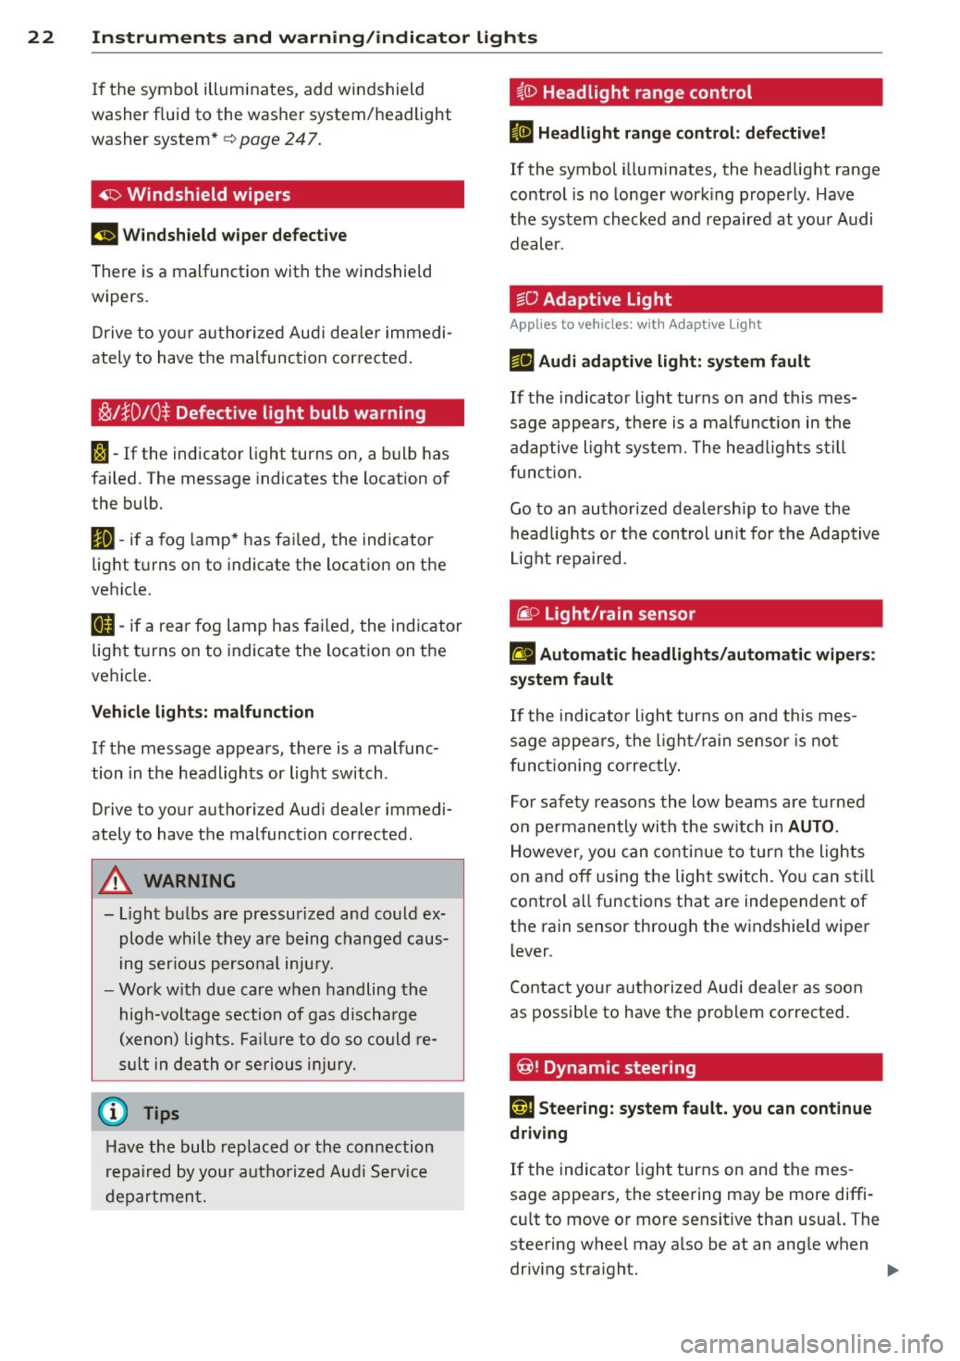
~ Windshield wipers
g,.5 Windshield wiper defective
There is a malfunction with the windshield
wipers.
Drive to your authorized Audi dealer immedi
ately to have the malfunction corrected.
i§i l}D 10 $ Defective light bulb warning
I-If the indicator light turns on, a bulb has
failed. The message indicates the location of
the bulb.
II-if a fog lamp* has failed, the indicator
light turns on to indicate the location on the
vehicle.
a-if a rear fog lamp has failed, the indicator
light turns on to indicate the location on the
vehicle.
Vehicle lights: malfunction
If the message appears, there is a malfunc
tion in the headlights or light switch .
Drive to your authorized Audi dealer immedi
ately to have the malfunction corrected.
A WARNING
, -
- Light bulbs are pressurized and could ex-
plode while they are being changed caus
ing serious personal injury.
- Work with due care when handling the
high-voltage section of gas discharge
(xenon) lights. Failure to do so could re
sult in death or serious injury.
Have the bulb replaced or the connection
repaired by your authorized Audi Service
department.
~(D Headlight range control
II Headlight range control: defective!
If the symbol illuminates, the headlight range
control is no longer working properly. Have
the system checked and repaired at your Audi
dealer.
§0 Adaptive Light
Applies to veh icles: w ith Adapt ive light
m;J Audi adaptive light: system fault
If the indicator light turns on and this mes
sage appears, there is a malfunction in the
adaptive light system. The headlights still
function.
Go to an authorized dealership to have the
headlights or the control unit for the Adaptive
Light repaired.
@.D Light /rain sen sor
l;I Automatic headlights/automatic wipers:
system fault
If the indicator light turns on and this mes
sage appears, the light/rain sensor is not
functioning correctly.
For safety reasons the low beams are turned
on permanently with the switch in
AUTO.
However, you can continue to turn the lights
on and off using the light switch. You can still
control all functions that are independent of
the rain sensor through the windshield wiper
lever .
Contact your authorized Audi dealer as soon
as possible to have the problem corrected.
@! Dynamic steering
l:rj Steering: system fault. you can continue
driving
If the indicator light turns on and the mes
sage appears, the steering may be more diffi
cult to move or more sensitive than usual. The
steering wheel may also be at an angle when driving straight. .,..
Page 36 of 314
34 Openin g and clo sing
A WARNING
- When you lock your ve hicle from outside,
nobody -especially children -should re
ma in ins ide th e veh icl e. Rememb er,
when you lock the ve hicle from the out
side the windows cannot be opened from
the inside .
- When you leave the vehicle, always take
the ignition key with you. This will pre
vent passengers (ch ildren, for example)
from accidentally being locked in the ve
hicle should they accidentally press the
power locking switch in the doors.
- Do not leave children inside the vehicle
unsupervised . In an emergency it would
be impossible to open the doors from
the outside w ithout the key.
- Applies to vehicles with power side door
closer*:
- When closing a door, make sure noth
ing can interfere w ith the doo r. T his
could cause ser ious personal in jury.
- You can stop the door from clos ing at
any time by pulling on the inside or
outside door handle.
@ Tips
- In the event of a crash with airbag de
ployment all locked doors will be auto
matically unlocked to g ive access to t he
vehicle occupants from the outside.
- If the power lock ing system should ma l
funct ion, you can lock the dr iver's door
u sing the mechanical key
~ page 3 7.
- If the power lock ing system should fail,
you can still open the fue l tank flap in an
emergency<=>
page 227 .
-You are we ll advised no t to keep valua
bles insi de an unattended vehicle, visib le
or not. Even a properly locked vehicle
cannot provide the sec urity of a safe.
- If the L ED in the upper edge of the d riv
er's door panel comes on fo r abo ut 30
seconds afte r the vehicle is locked, there
i s a ma lfunction in the power locking or
the anti-theft warning system. Have the malfunction corrected by an author ized Audi dealership or qualified repair facili
ty
.
Setting power locking
The driver can determine the functions for
power locking in the MMI.
.,. Select: I CAR I function button > Car sy ste m s
contro l bu tton > Vehicle setting s > (Central
locking ).
Lock wh en driving -
If you sele ct On, the vehi
cle locks automa tica lly when driv ing. A ll of
the doors and luggage compartment lid lock.
Central locking
Unlock door s -
You can dec ide if All doo rs or
o n ly the
Driver shou ld unloc k. The l uggage
compartment lid a lso un locks when
All is se
l ected. If you sele ct
Driv er in a ve hicle w it h a
convenience key* , on ly the door whose handle
you pull will un lock.
If you se lect Driver , all t he doors and luggage
compartment lid will un loc k if you press the@
button on the remote con trol master key
twice.
L ock exterior trunk handle -If you select On ,
the luggage compar tment lid handle is
locked. In this case the luggage compar tment
lid can be opened with the button
e:5 on the
master key or with the
e:5 b utton * in the driv
er's door. In ve hicles w ith a convenience key*,
you can st ill open the luggage compartment
lid using the handle if an authorized master
key is near the proxim ity sensor .
Fold mirrors* -If you select On, the exterior
rearview mirrors fold in automatically when
you press the
ffJ button o n the remote control
master key or touch the sensor * in the handle.
Tone when locking -When you select On, a
confirmat ion tone sounds when you lock the
vehicle .
Page 37 of 314
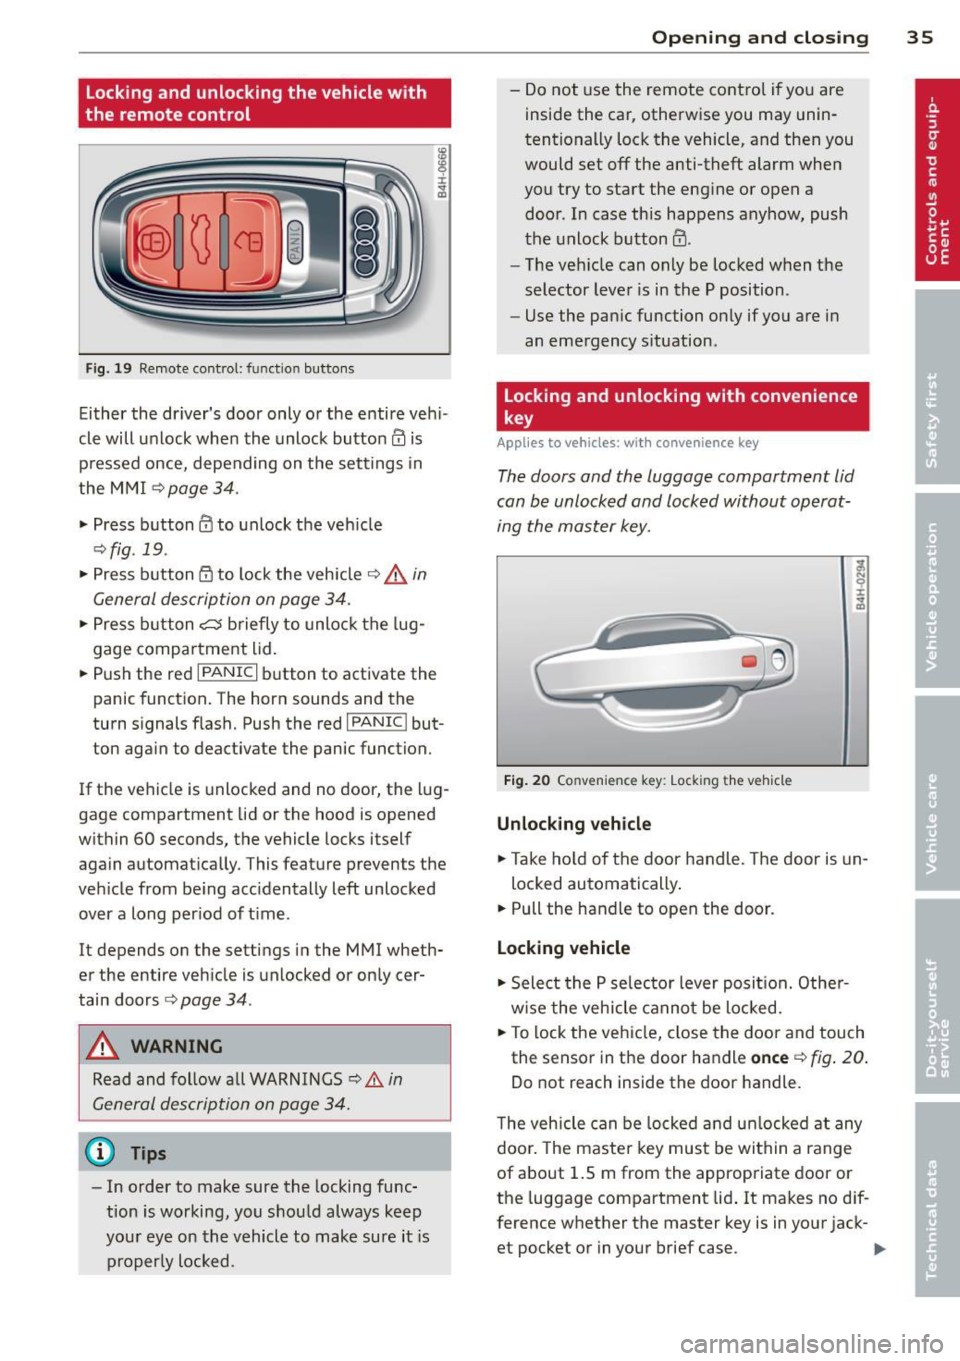
Locking and unlocking the vehicle with
the remote control
F ig. 19 Remote control: function buttons
Either the driver's door only or the entire veh i
cle will unlock when the unlock button
en is
p ressed once, depending on the settings in
the MMI
r::}page 34.
.. Press button @ to unlock the veh icle
¢ fig . 19 .
.. Press b utton @to lock the vehicle ¢.&. in
General description on page 34 .
.. Press b utton C::5 briefly to unlock the lug
gage compartment lid .
.. Push the red
I PANIC I button to activate the
panic function. The horn sounds and the
turn signals flash. Push the red
I PANIC ! but
ton again to deactivate the panic function.
If the vehicle is unlocked and no door, the lug
gage compartment lid or the hood is opened
within 60 seconds, the vehicle locks itself
again automatically. This feature prevents the
vehicle from be ing acc identally left unlocked
over a long period of t ime.
It depends on the settings in the MMI wheth
er the entire veh icle is unlocked or only cer
tain doors
c:> page 34 .
A WARNING
Read and follow all WARNINGS¢.&. in
General description on page 34.
@ Tips
- In order to make sure the locking func
tion is working, you s hou ld always keep
your eye on the vehicle to make sure it is
properly locked.
Op enin g an d clos ing 35
-Do not use the remote cont rol if you are
inside the car, otherwise you may unin
tentionally lock the vehicle, and then you
would set
off the anti-theft alarm when
you try to start the engine or open a door . In case this happens anyhow, push
the unlock button
en.
- The veh icle can only be locked when the
selector lever is in the P position .
- Use the panic function only if you are in
an eme rgency situation .
Locking and unlocking with convenience
key
Applies to vehicles: with convenience key
The doors and the luggage compartment lid
can be unlocked and locked without operat
ing the master key.
Fi g. 20 Co nve nience key: Lock ing the vehicle
Unlocking veh icle
.. Take ho ld of the door handle. The door is un-
locked automatically .
.. Pull the hand le to open the door.
Lo cking vehicle
.. Select the P selec tor lever posit ion. Other
w ise the vehicle cannot be locked .
.. To lock the vehicle, close the door and touch
the sensor in the door handle
on ce c:> fig . 20 .
Do not reach inside the door handle .
T he vehicle can be locked and un locked at any
doo r. The master key must be within a range
of about 1.5 m from the appropriate door or
the luggage compartment lid . It makes no dif
ference whether the master key is in your jack-
et pocket or in your brief case . ..,.
Page 38 of 314
36 Opening and clo sing
It is not possible to re-open the door for a
brief period direct ly after closing it. This al
l ows you to ensure that the doors are properly
locked.
I t depends on the se ttings in the MMI wheth
er the entire vehicle is unlocked or one of the
doors ¢
page 34.
A WARNING
Read and follow a ll WARNINGS c:> & in
General description on page 34.
(D Tips -
If you
r vehicle has been stand ing fo r an ex
tended period, please note the fo ll ow ing:
- The proximity sensors are deactivated af-
te r a few days to save powe r. Yo u then
have to pull on the door handle once to
unlock the ve hicle and a second time to
open the veh icle.
- To prevent the battery from draining and to preserve your vehicle's ability to start
fo r as long as possib le, the energy man
age men t sys tem grad ual ly sw itches off
u nn ece ssary conven ience f unct io ns.
It is
p ossi ble tha t you w ill not be able to un
l ock your ve hicl e using these conven
i en ce f unct io ns.
- Fo r De clarat ion of Com pliance to Uni ted
St ates FCC an d Indus try C anada regu la
tions
r::!; page 295.
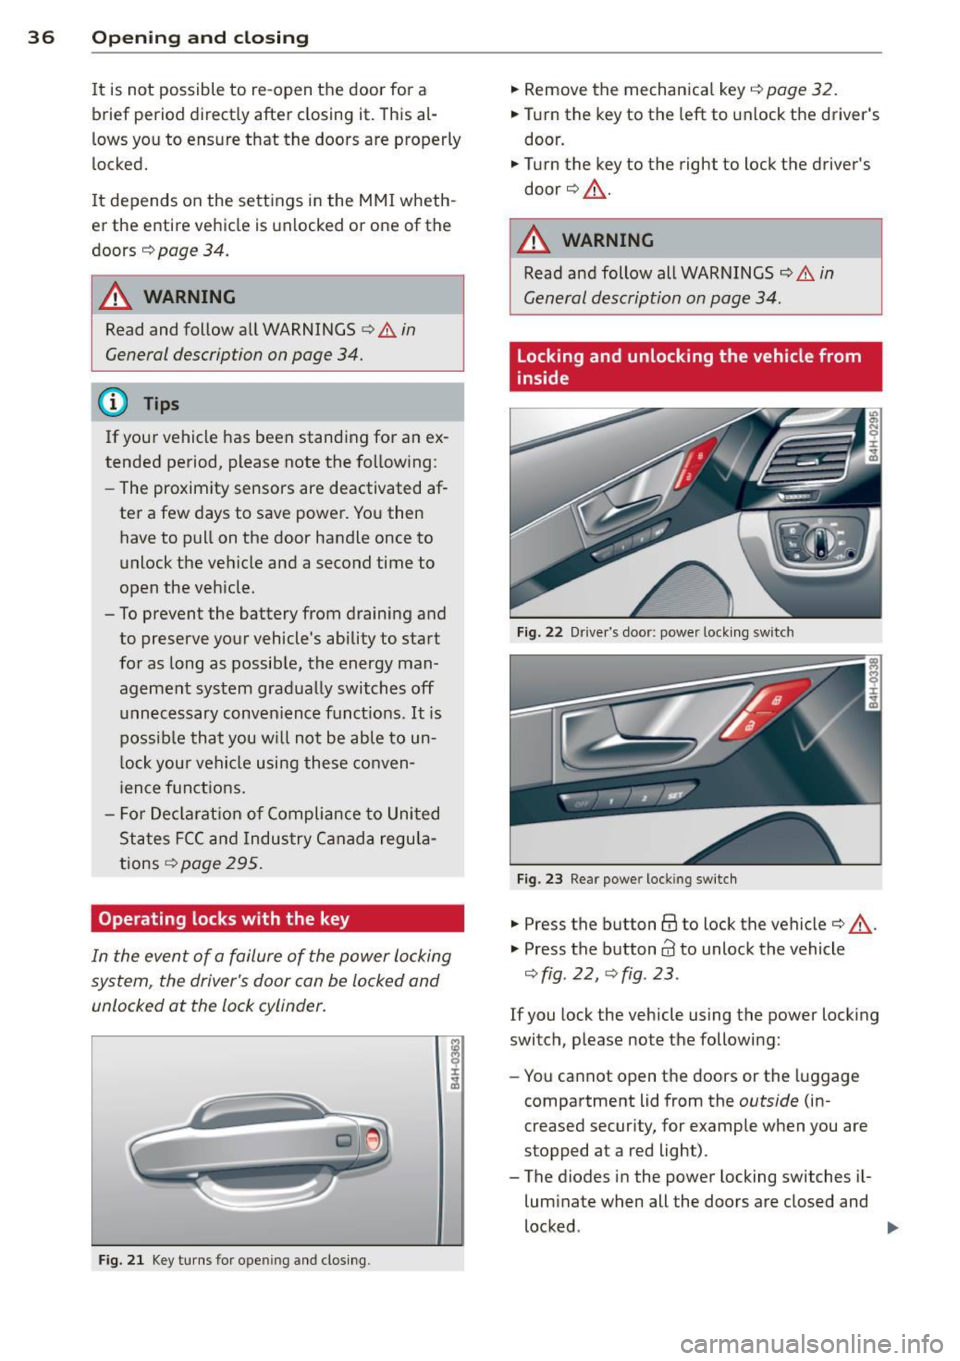
Operating locks with the key
In the event of a failure of the power locking
system, the driver's door con be locked and
unlocked at the lock cylinder.
F ig . 21 Key tu rns for ope ning and clos ing .
.,. Remove the mechan ica l key i=;, page 32.
.,. Tur n the key to the left to unlock the driver's
door .
.,. Turn the key to the right to lock the driver's
door ¢.&, .
A WARNING
Read and follow all WARNI NGS Q & in
General description on page 34 .
Locking and unlocking the vehicle from
inside
Fig. 22 Dr ive r's door: power lock ing sw it ch
Fig . 2 3 Rear power lock ing sw itc h
.,. Press the button@ to lock the vehicle¢.&,.
"' Press the button
63 to unlock the vehicle
q fig . 22, qfig . 23 .
If you lock the vehicle using the power locking
switch, p lease note the following:
- You cannot open t he doors or the luggage
compartment lid from the
outside (in
creased secur ity, for example when you are
stopped at a red light) .
- The diodes in the powe r locking switches il
luminate when all the doors are closed and
locked .
~
Page 42 of 314
40 Opening and closing
master key. When the luggage compart
ment lid is closed again, it locks auto
matically.
- If the vehicle battery charge drops be
low a certain level, you can still open or
close the luggage compartment lid man ually, however, you will need to apply
more force to close it.
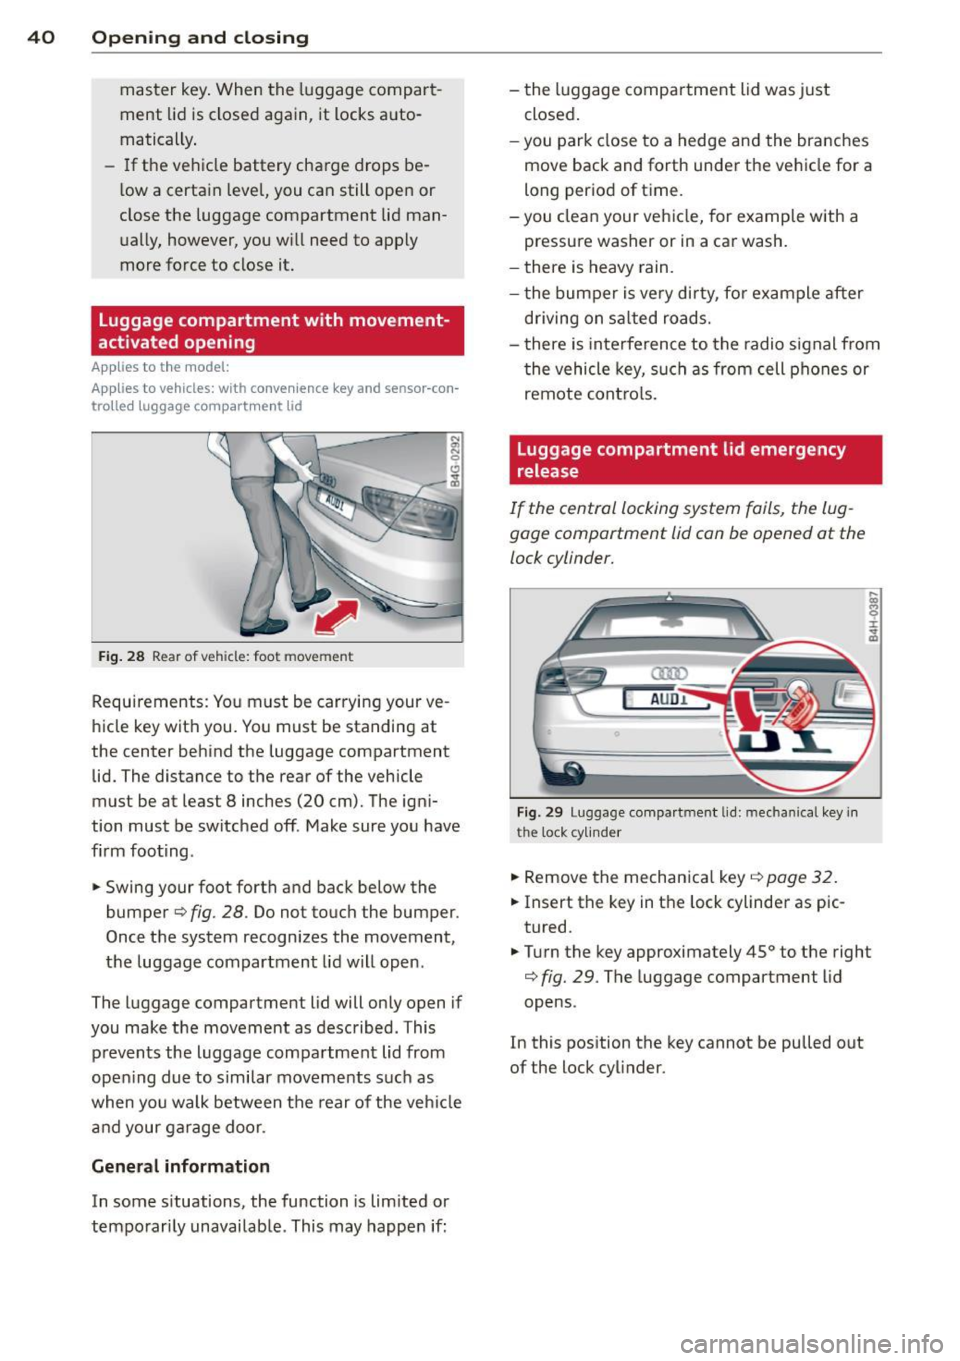
Luggage compartment with movement
activated opening
Ap plies to the model:
Appl ies to vehicles: with convenience key and sensor -con
tro lle d luggage compartment lid
Fig. 28 Rear of vehicle: foot move men t
Requirements: You must be carrying your ve
hicle key with you. You must be standing at
the center behind the luggage compartment lid. The distance to the rear of the vehicle
must be at lea st 8 inches (20 cm). The igni
tion must be switched off . Make sure you have
firm footing .
.. Swing your foot forth and back below the
bumper ¢
fig. 28 . Do not touch the bumper.
Once the system recognizes the movement,
the luggage compartment lid will open .
The luggage compartment lid will only open if
you make the movement as described . This
prevents the luggage compartment lid from
opening due to similar movements such as
when you walk between the rear of the vehicle
and your garage door.
General information
In some situations, the function is limited or
temporarily unavailable . This may happen if: -
the luggage compartment lid was just
closed.
-you park close to a hedge and the branches
move back and forth under the vehicle for a
long period of time.
-you clean your vehicle, for example with a
pressure washer or in a car wash.
- there is heavy rain.
- the bumper is very dirty, for example after
driving on salted roads.
- there is interference to the radio signal from
the vehicle key, such as from cell phones or
remote controls.
Luggage compartment lid emergency
, release
If the central locking system fails, the lug
gage compartment lid can be opened
at the
lock cylinder.
AUD .I.
Fig. 29 Luggage compartment lid: mechanical key in
the lock cylin der
.. Remove the mechanical key ¢page 32 .
.. Insert the key in the lock cylinder aspic
tured.
.. Turn the key approximately 45° to the right
¢
fig. 29. The luggage compartment lid
opens .
In this position the key cannot be pulled out
of the lock cylinder.
Page 49 of 314
Highway light function* (vehicles with LED
headlights) - this function adapts the lighting
for highway driving based on vehicle speed.
.&_ WARNING
-Automatic headlights are only intended
to assist the driver. They do not relieve
the driver of his responsibility to check
the headlights and to turn them on man ually according to the current light and
visibility conditions. For example, fog
cannot be detected by the light sensors.
So always switch on the headlights
~D
under these weather conditions and
when driving in the dark.
- Crashes can happen when you cannot see the road ahead and when you cannot be
seen by other motorists. Always turn on
the headlights so that you can see ahead and so that others can see your car from
the back.
- Please observe legal regulations when
using the lighting systems described.
(D Note
The rear fog lights should only be turned
on in accordance with traffic regulation, as
the lights are bright for following traffic.
(D Tips
- The light sensor* for automatic dynamic
headlight range control* is located in the
rear view mirror mount. You should
therefore not apply any stickers to the
windshield in this area in order to pre
vent malfunctions or failures.
- In the event of a light sensor malfunc
tion, the driver is notified in the instru
ment cluster display~
page 22.
- You will hear a warning tone if you open
the driver door when the exterior lights
are switched on.
- In cool or damp weather, the inside of
the headlights, turn signals and tail
lights can fog over due to the tempera
ture difference between the inside and
outside. They will clear shortly after Clear vision 4
7
switching them on. This does not affect
the service life of the lighting.
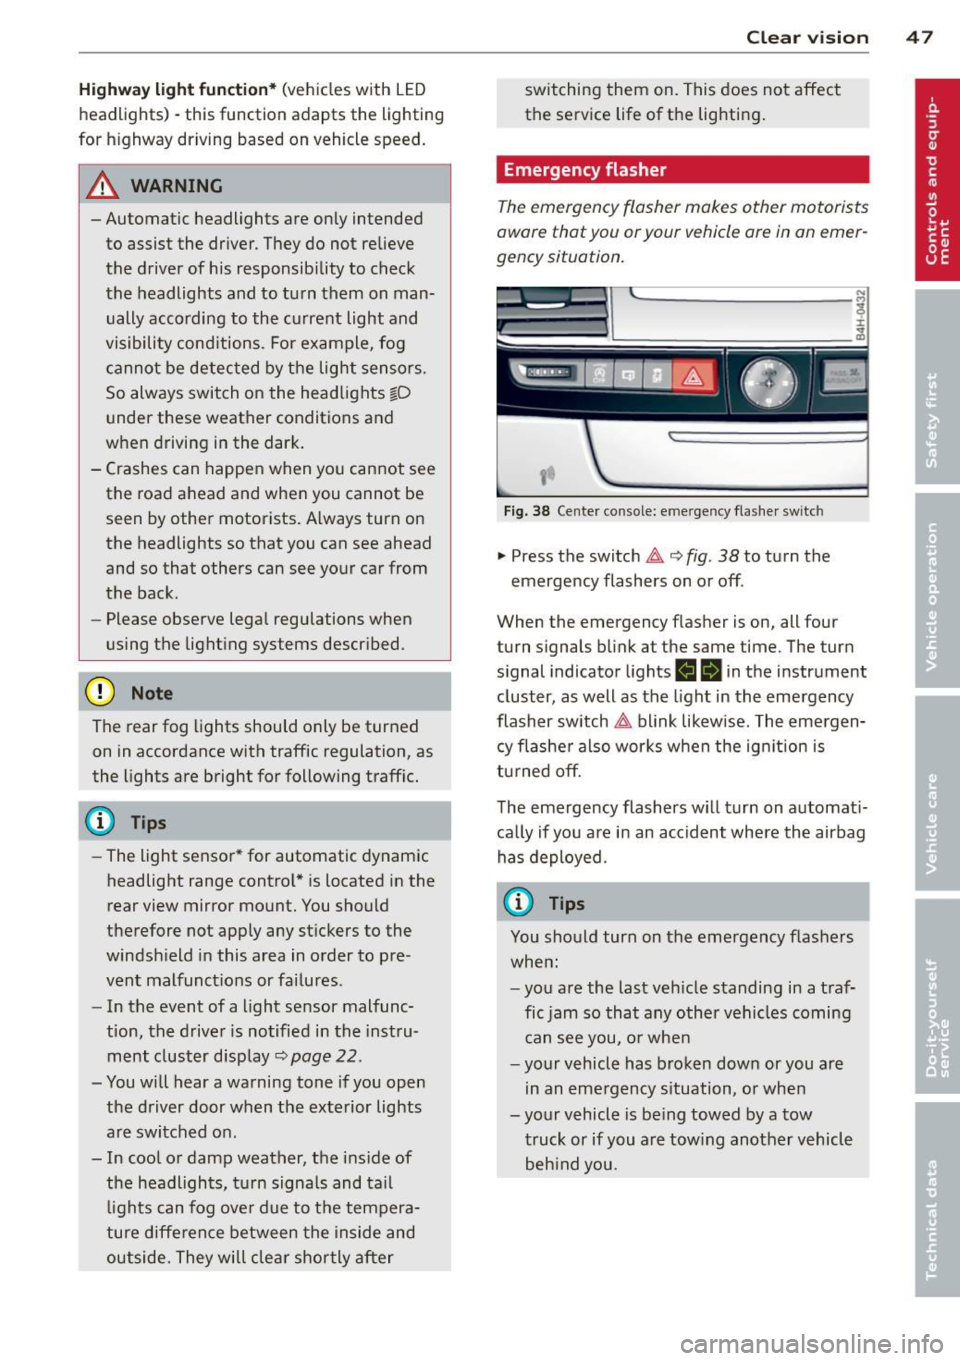
Emergency flasher
Th e emergency flasher makes other motorists
oware that you or your vehicle are in on emer
gency situation.
'1'.r-- ~·
~ ·--~. -~ -..... -._.. l'
1
Fig. 38 Center console: emergency flasher switc h
.,. Press the switch ~ 9 fig. 38 to turn the
emergency flashers on or off .
When the emergency flasher is on, all four
turn signals blink at the same time. The turn
signal indicator lights
H Iii in the instrument
cluster, as well as the light in the emergency
flasher switch~ blink likewise. The emergen
cy flasher also works when the ignition is
turned
off.
The emergency flashers will turn on automati
cally if you are in an accident where the airbag
has deployed.
@ Tips
You should turn on the emergency flashers
when:
-you are the last vehicle standing in a traf
fic jam so that any other vehicles coming
can see you, or when
- your vehicle has broken down or you are
in an emergency situation, or when
-your vehicle is being towed by a tow truck or if you are towing another vehicle behind you.
Page 50 of 314
48 Clear vision
Adjusting the exterior lighting
The settings are adjusted in the MMI.
• Se lect : I CAR ! function button > Car systems
control button > Vehicle settings > Exterior
lighting .
Automatic headlights
You can adjust the following settings in the
Automatic headlights menu:
Headlights activation time -You can adjust if
the head lights switch on
Early, Med. or Late
according to the sensitivity of the light sensor .
Audi adaptive light * -You ca n sw itch adaptive
l ight
On and Off.
Automatic high beams*
You can switch the high beam ass ist on and
off .
Daytime running lights
USA models :
You can switch the dayt ime run
ning lights
on and off .
Canada models:
The function cannot be
turned off .
It is activated a utomat ica lly each
time the ign ition is switched on. This menu
item is shown "greyed out".
Coming home, Leaving home
The coming home function illuminates the
area outside the vehicle when yo u switch the
ignition off and open the driver's door. To turn
the function on, select
Lights when leaving
car > On .
The leaving home function illuminates the
area outside the vehicle when you un lock the
ve hicle. To turn the funct ion on, select
Lights
when unlocking car > On .
The coming home and leaving home functions
only operate when it is dark and the light
switch is in the
AUTO position.
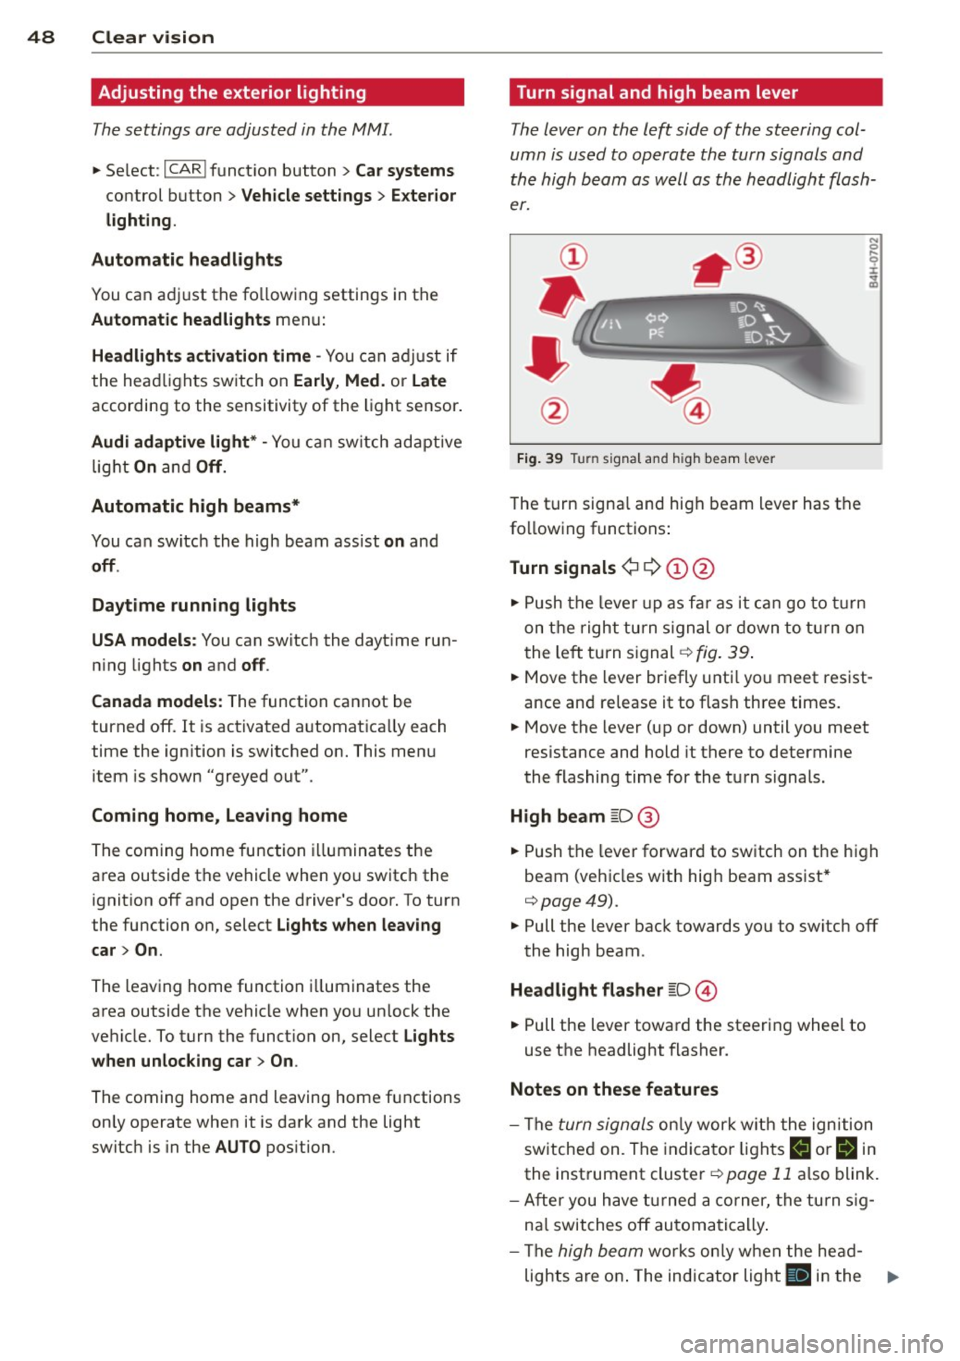
Turn signal and high beam lever
The lever on the left side of the steering col
umn is used to operate the turn signals and
the high beam as well as the headlight flash
er.
Fig. 39 Tu rn signal and high beam lever
The turn signa l and high beam lever has the
following functions:
Turn signals ¢ 9 (D@
• Push the lever up as far as it can go to turn
on the right turn signal or down to turn on
t he left turn signal¢
fig. 39.
N 0 ... 'i' :r
~
• Move the lever briefly unti l you meet res ist·
ance and re lease it to flash three times.
• Move the lever (up or down) until you meet
resistance and hold it there to determine
the flashing time for the turn signals.
High beam [D @
• Push the lever forward to switch on the high
beam (vehicles with high beam assist*
¢ page49).
• Pull the lever back towards you to switch off
the high beam .
Headlight flasher [D ©
• Pull the lever toward the steering wheel to
use the headlight flasher.
Notes on these features
- The turn signals only work w ith the ignition
switched on. The indicator lights
II or Bin
the instrument cluster¢ page 11 also blink.
- After you have turned a corner, the turn sig-
na l switches off automatically.
- The
high beam works only when the head-
lights are on . The indicator light
II in the ..,.
Page 51 of 314
instrument cluste r ill uminates when the
high beams are on.
- T he
headlight flasher works only as long as
you hold the lever -even if there are no
li ghts turned o n. The indicator light
El in
the instr ument cluster illuminates when you
use the head light flasher.
A WARNING
Do not use the hig h beam or headlight
flasher if you know that these could blind
oncoming traffic.
High beam assist
Applies to vehicles: with high beam ass ist
The high beam assist automatically switches
the high beams on or off, depending on the
surroundings and traffic conditions .
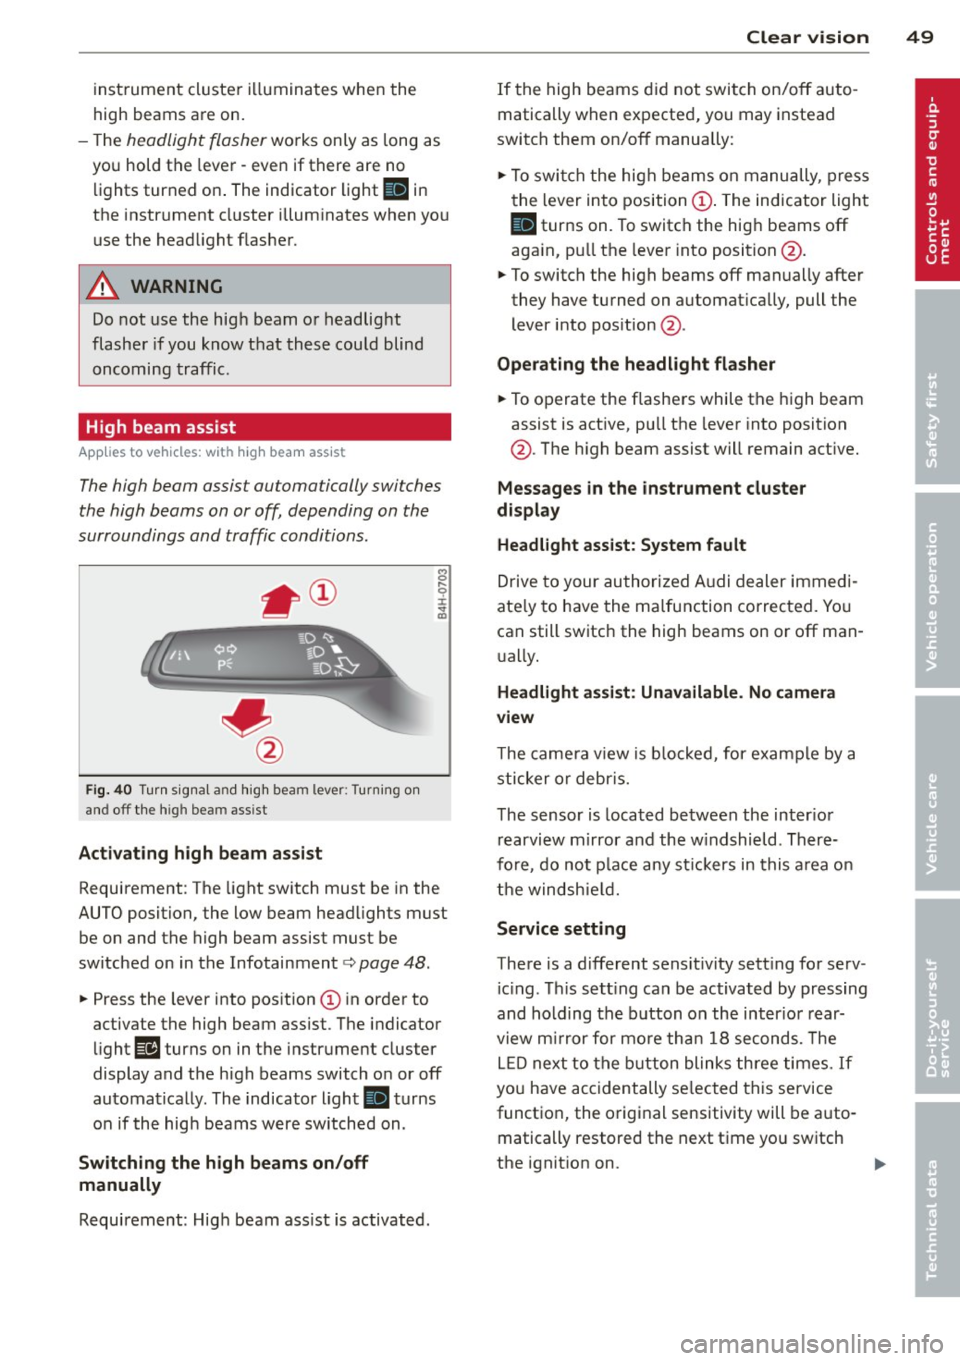
Fig. 40 Turn sig na l and high beam lever: Turning on
and off the high beam ass ist
Activating h igh beam a ssi st
8 .... 0 :i: ;g
Requirement: The light sw itch must be in the
AUTO position, the low beam head lights must
be on and the high beam assist must be
switched on in the Infotainment¢
page 48.
~ Press the lever into position @ in order to
activate the high beam assist. T he indicator
light
Ill turns on in the instrument cluster
display and the high beams switch o n or off
automatically . The indicato r light
II turns
on if the high beams w ere switched on .
Switching the high beams on /off
manually
Requirement: Hig h beam ass ist is activated.
Clear vis ion 49
If the high beams d id not swi tch on/off auto
matically when expected, you may instead
switch them on/off manua lly:
~ To swi tch the high beams on manually, press
the lever into position@. The indicator light
II turns on. To switch the hig h beams off
aga in, p ull the leve r into position @.
~ To switch the high beams off manually after
they have turned on a utomat ica lly, pull the
lever i nto pos ition @.
Oper ating the headlight fla sher
~ To operate the flashe rs while the high beam
assist is act ive, pu ll the lever into position
@ . T he high beam assist will remain act ive.
Messag es in the instrument cluster
di spl ay
Headlight assist: System fault
Drive to your authorized A udi dealer immed i
ate ly to have the ma lfunction corrected. Yo u
can still switch the high beams on or off man
u ally.
Headlight a ssi st: Unavailable . No camera
view
T he came ra v iew is b locked, for example by a
sticker o r debr is.
The sensor is loca ted be tween the inter io r
r earvi ew mirror and the w indshield . There
fo re, do no t place any st ic kers in this a rea on
th e windsh ie ld .
Service setting
There is a d ifferent sens it ivity sett ing for serv
ic ing . Th is sett ing can be activated by pr essing
and hold ing the b utton on the int erio r r ear
view m irror for mo re tha n 1 8 seconds. The
L E D next to the button blinks th ree times.
If
yo u have accidentally se lec ted this service
funct io n, the origi nal sensitivity will be a uto
matically restored the next t ime yo u sw itch
the ignit ion on.