warning light AUDI S8 2016 Owners Manual
[x] Cancel search | Manufacturer: AUDI, Model Year: 2016, Model line: S8, Model: AUDI S8 2016Pages: 302, PDF Size: 75.68 MB
Page 196 of 302
Smart Techn olo gy
- Under certain climatic and operating condi
tions such as passing through water, driving
in heavy rain or after washing the vehicle,
the effectiveness of the brakes can be re
duced . In w inter, ice can accumulate on the
brake pads, linings, discs and drums . Care
fully apply brakes fo r a tes t. Brakes w ill dry
and ice coatings wi ll be cleaned off after a
few careful brake applications .
- Driving for an extended pe riod of time on
salt-covered roads witho ut using your
brakes can also affect bra king efficiency.
Clean off accumulated salt coating from
brake discs and pads with a few carefu l
brake applications.
- If you damage the front spoiler, or if you in
stall a different spoiler, be sure the air flow
to the front brakes is not obstructed. Other
wise the brake system could overheat reduc
ing the effectiveness of the entire brake sys
tem.
- Failure of one brake circuit will impair the
braking capability result ing in an increased
stopp ing distance. Avoid driving the vehicle
and have it towed to the nea rest Aud i dealer
or qualified workshop.
- Never let the vehicle roll to a stop with the
engine shut off.
- If the brake booster is not working, the
brake pedal must be pressed considerably
harder to make up for the lac k of booster
assistance.
Electromechanical power
assist, dynamic steering
The electromechanical power assist helps the
driver when steering.
Power steering adapts electronically based on
the vehicle speed.
Ind icator light s and messages
• Stee ring defective! St op th e ve hicle
If th is ind icator light turns on and stays on and
this message appears, the power steer ing may
have fa iled.
194
Do not continue driving. See your authorized
Audi dealer or other qualified repair facility for
ass istance .
,Ion Steering : System faul t You can c ontinue
dri ving
If the indicato r light turns on and the message
appears, the steeri ng may be more diff icult to
move o r more sensitive than usu a l. T he steer ing
whee l may also be at an angle when driving
straight.
D rive slowly to your a uth orized Aud i dea ler or
qualified wo rkshop to have the malfunct ion cor
rected.
1;r,ij D ynamic steering : Init ializing
If this driver message appears and the indicator
light is flashing on the instrument panel, dynam
i c steer ing* is being re initialized . After starting
the engine, t he steering wheel w ill move slightly.
Re- initializa tion might be necessary if the steer
i ng whee l was moved hard to the left and right
while the vehicle was not moving . The display
goes out as soon as initialization is comp lete .
D rive slowly to your a uth orized Aud i dea ler or
qualified wo rkshop to have the mal func tion cor
rected.
.&_ WARNING
Have the dynamic steering * system malfunc
tion repaired as soon as possible by an au
thorized Audi dealer or qualif ied workshop -
risk of acc ident!
(D Tips
If the . or ,Ion indicator light only stays on
for a short time, you may continue driving.
- The dynamic steering* stabi lity systems are
not ava ilable in the event of a system mal
function.
- For additiona l information on dynamic
steering *, refer to~
page 106 .
Page 204 of 302
Trail er mode
Trailer mode
Driving with a trailer
General information
Your Audi was designed primarily for passenger
transportation.
If you plan to tow a trailer, please remember that
the additional load will affect durability, econo
my and performance.
Trailer towing not only places more stress on the
vehicle, it also calls for more concentration from the driver.
For this reason, always follow the operating and
driving instructions provided and use common
sense.
(D Note
If you are going to tow a trailer, you must ac
tivate the trai ler operation mode
¢ page 202, Operating instructions.
Technical requirements
Tr ailer hitch
Use a weight-carrying hitch conforming to the
gross trailer weight. The hitch must be suitable
for your veh icle and trailer and must be mounted
securely on the vehicle's chassis at a
technically
sound
location . Use only a trailer hitch with a re
movable ball mount . Always check w ith the t rail
er h itch man ufact urer to make sure that you are
using the co rrect hitc h.
Do not u se a bumper hitch .
The hitch must be installed in such a way that it
does not interfere with the impact-absorbing
bumper system . No mod ificat ions should be
made to the vehicle exhaust and brake systems .
F rom t ime to t ime, check that a ll hitch mo unt ing
bolts rema in securely fastened.
When you are not tow ing a traile r, remove the
tra iler hitch ball mount. This prevents the hitch
from caus ing damage should your vehicle be
struck from behind
¢ ,&. .
202
Trailer b rakes
If your trailer is equipped with a braking system,
check to be sure that it co nforms to all regu la
tions.
The tra iler hydrau lic brake system must not be
directly connected to the vehicle's hydrau lic
brake system .
Safety chains
Always use safety chains between your vehicle
and the tra iler.
Trailer light s
Trailer lights must meet all regulations. Be sure
to check with your Aud i dealer for correct wir ing,
switches and relays .
Mirror s
If you are unable to see the traffic behind you us
ing the regular outside mirrors, then you
must in
stall extended mirrors . It is important that you
always have clear vision to the rear.
A WARNING
Afte r remov ing the tra iler hitch, do not sto re
i t in you r vehicle. In case of s udden braking,
the hitch could fly fo rwa rd and injure you or
your passengers.
Operating instructions
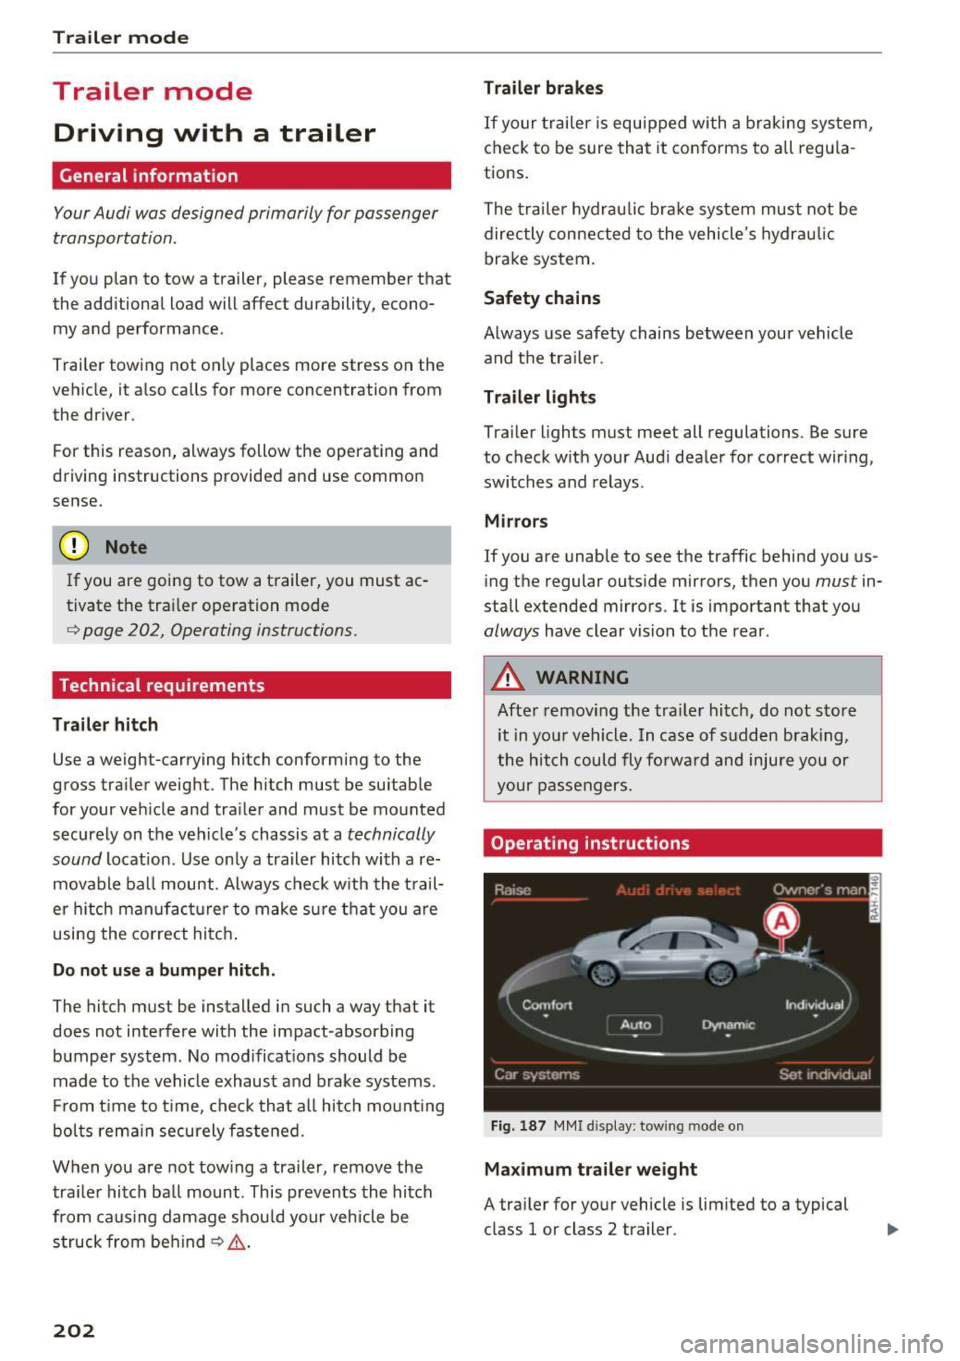
Fig. 1 87 MMI d ispl ay: tow ing mode o n
Maximum traile r weight
A tra iler for your vehicle is lim ited to a typical
class 1 or class 2 trailer.
Page 206 of 302
Trailer mod e
conditions are unfavorable - particularly when
going downhill.
Red uce veh icle speed
imm ediatel y if the tra ile r
shows the s lightest sign of swaying.
Do not try
to stop the sway in g b y accele rating .
Observe speed lim its . In some areas, speeds for
ve hicl es towing tra ilers are lower than for reg ula r
veh icles.
A lways apply brakes early . When dr iving down
h ill , sh ift into a lower gear to use the engine
b raking effect to slow the veh icle. Use of the
brakes a lone can cause them to overheat and fail.
Air suspension*
When driving with a tra iler, activate the trailer
mode of the air suspension . Switch the air sus
pens ion tra iler mode on when you a re towing a
tra ile r. This will limit the regulat ion by the air
suspens ion while driving . Select in the MM I:
ICARI function button > (Car )* sys tem s control
button >
Vehicle setting s > Air su sp .: to wi ng >
On .
Coolant temperature
The coolan t temperature gauge¢ page 10 must
be observed carefully. The coo lant temperature
can increase if you drive on long inclines in a low
gear at high engine speeds. Reduce your speed
immed iate ly if the LEDs in the top part of the dis
p lay turn on.
For more information about indicator lights, re
fer to.
¢page 15.
A WARNING
Anyone not properly restrained in a moving
vehicle is at a much greater risk in an acci
dent. Never let anyone ride in your car who is
not properly wearing the restraints provided
by Audi.
Trailer mode notes
Important to know
Your vehicle hand les different ly when towing a
trai ler because of the additiona l weight and dif
ferent weight distr ibut ion. Safety, performance
204
-
and economy will g reatly depend on how carefu l
l y you load your trai ler and operate your rig .
Befo re yo u actually tow yo ur t railer, pract ice
turning, stopping and backing up in an area away
from traffic. Keep practicing unti l you have be
come complete ly familiar with the way your vehi
cle-tra iler combination behaves and responds .
Backing up is diff icult and requ ires practice.
Backing up with a trailer genera lly req uires steer
ing action opposite to that when backing up your
vehicle witho ut a trailer .
Maintain a greater distance between yo ur vehicle
and the one in front of you. You will need more
room to stop . To compensate for the trailer, you
will need a larger than normal turning radius .
When passing, remember tha t you canno t accel
erate as fast as you normally wou ld because of
the added load . Make sure you have enough room
to pass. After passing, allow p lenty of room for
your trailer before changing lanes again.
Avoid jerky starts, sharp turns or rapid lane changes.
(D Tips
- Do not tow a trailer du ring the break-i n pe ri
od of your vehicle.
- If you tow a tr aile r, your A udi may requi re
more frequent ma intenance due to the ex
tra load ¢
page 281.
Parking on a slope
Do not park on a slope with a trailer . If it cannot
be avoided, do so only after doing the following:
When parking:
.,. App ly the foot brake.
.,. Have someone p lace chocks unde r both the ve
hicle and the trailer wheels .
.,. With chocks in place, slowly release the brakes
until the wheel chocks abso rb the load .
.,. Turn the whee ls towards the curb.
.,. App ly the parking brake .
.,. Select the P selector lever posit ion.
Page 208 of 302
Care and cleaning
Care and cleaning
General information
Regular, proper care helps to maintain your vehi
cle's value.
It can also be a requirement when
submitting warranty claims for corrosion damage
and paint defects on the body.
The required cleaning and care products can be
obtained from your authorized Audi dealer or a
qualified workshop. Read and follow the instruc
tions for use on the packaging.
A WARNING
-Using cleaning and care products incorrectly
can be dangerous to your health .
- Always store cleaning and care products out
of reach of children to reduce the risk of poi
soning.
@ For the sake of the environment
- Preferably use environmentally-friendly
products when buying cleaning agents.
- Do not dispose of leftover cleaning and care
products with household trash.
Car washes
The longer deposits remain on the vehicle, the
more the surface can be damaged. High temper
atures such as those caused by sunlight increase
the damaging effects .
Before washing, wet heavy deposits with plenty
of water.
Stubborn deposits such as bird droppings or tree
sap are best removed with plenty of water and a
microfiber cloth.
Also, wash the underside of your vehicle once
road salt stops being used for the season.
Pressure washers
When washing your vehicles with a pressure
washer, always follow the operating instructions
provided with the pressure washer. This is espe
cially important in regard to the pressure and
spraying distance . Do not aim the spray directly
at seals on side windows, doors, the hood, the
206
rear lid or the sunroof* or at tires, rubber hoses,
insulating material, sensors* or camera lenses*.
Keep a distance of at least 16 inches (40 cm) .
Do not remove snow and ice with a pressure
washer.
Never use rotary nozzles or high pressure noz
zles.
The water temperature must not be above 140 °F
(60 °C).
Automatic car washes
Spray off the vehicle before washing.
Make sure that the windows and roof* are closed
and the windshield wipers are
off . Follow instruc
tions from the car wash operator, especially if
there are accessories attached to your vehicle.
If possible, use car washes that do not have
brushes.
Only use car washes where the vehicle remains
stationary and the washing equipment moves
around the vehicle when washing and drying. Car
washes that move the vehicle through the car
wash using a chain are not recommended.
Washing by hand
Clean the vehicle starting from the top and work
ing down using a soft sponge or cleaning brush.
Use solvent-free cleaning products.
Washing vehicles with matte finish paint by
hand
To avoid damaging the paint when washing, first
remove dust and large particles from your vehi
cle. Insects, grease spots and fingerprints are
best removed with a special cleaner for matte
finish paint.
Apply the product using a microfiber cloth. To
avoid damaging the paint surface, do not use too
much pressure.
Rinse the vehicle thoroughly with water. Then
clean using a neutral shampoo and a soft micro
fiber cloth .
Rinse the vehicle thoroughly again and let it air
dry. Remove any water residue using a sham my. ..,..
Page 209 of 302
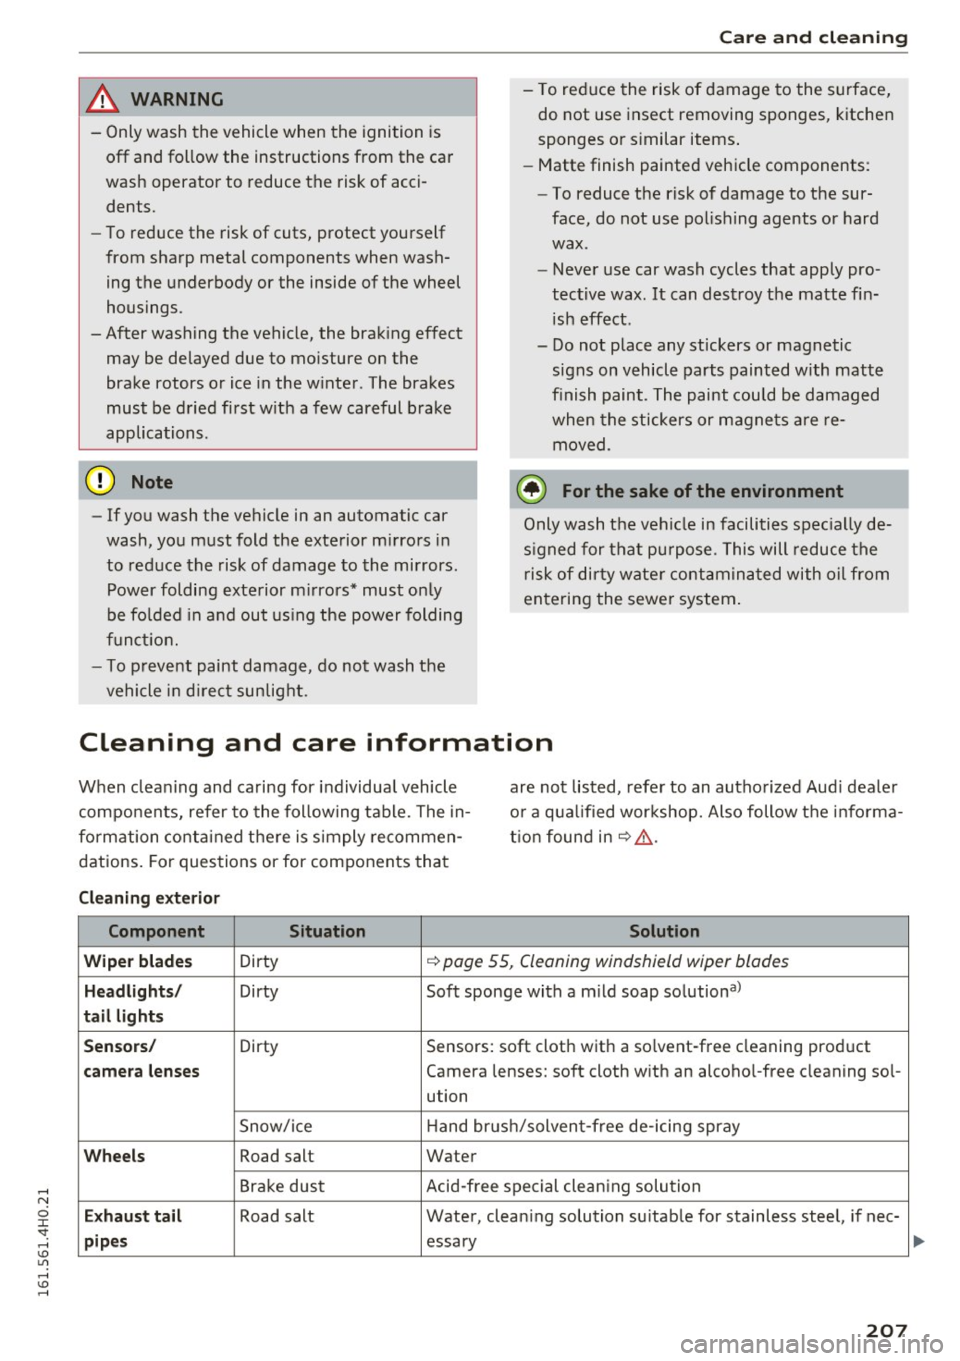
& WARNING
-Only wash the vehicle when the ignition is
off and follow the instructions from the car
wash operator to reduce the risk of acci
dents.
- To reduce the risk of cuts, protect yourself
from sharp metal components when wash
ing the underbody or the inside of the wheel
housings.
-After washing the vehicle, the braking effect
may be delayed due to moisture on the
brake rotors or ice in the winter . The brakes
must be dried first with a few careful brake
applications.
{[) Note
-If you wash the vehicle in an automatic car
wash, you must fold the exterior mirrors in
to reduce the risk of damage to the mirrors.
Power folding exterior mirrors* must only
be folded in and out using the power folding
function.
- To prevent paint damage, do not wash the
vehicle in direct sunlight.
-
Care and cleaning
-To reduce the risk of damage to the surface,
do not use insect removing sponges, kitchen
sponges or similar items.
- Matte finish painted vehicle components:
- To reduce the risk of damage to the sur-
face, do not use polishing agents or hard
wax.
- Never use car wash cycles that apply pro
tective wax. It can destroy the matte fin
ish effect.
- Do not place any stickers or magnetic
signs on vehicle parts painted with matte
finish paint. The paint could be damaged
when the stickers or magnets are re
moved .
@ For the sake of the environment
Only wash the vehicle in facilities specially de
signed for that purpose. This will reduce the
risk of dirty water contaminated with oil from
entering the sewer system.
Cleaning and care information
When cleaning and caring for individual vehicle
components, refer to the following table. The in
formation contained there is simply recommen
dations. For questions or for components that are not
listed, refer to an authorized Audi dealer
or a qualified workshop. Also follow the informa
tion found in
~ ,&. .
Cleaning exterior
Component Situation Solution
Wiper blades
Dirty ~ page 55, Cleaning windshield wiper blades
Headlights/ Dirty Soft sponge with a mild soap solution a>
tail lights
Sensors/
Dirty Sensors: soft cloth with a solvent-free cleaning product
camera lenses Camera lenses: soft cloth with an alcohol-free cleaning sol-
ution
Snow/ice Hand
brush/solvent-free de-icing spray
Wheels Road salt Water
Brake dust Acid-free special cleaning solution
Exhaust tail Road salt
Water, cleaning solution suitable for stainless steel, if nee-
pipes essary
207
Page 211 of 302
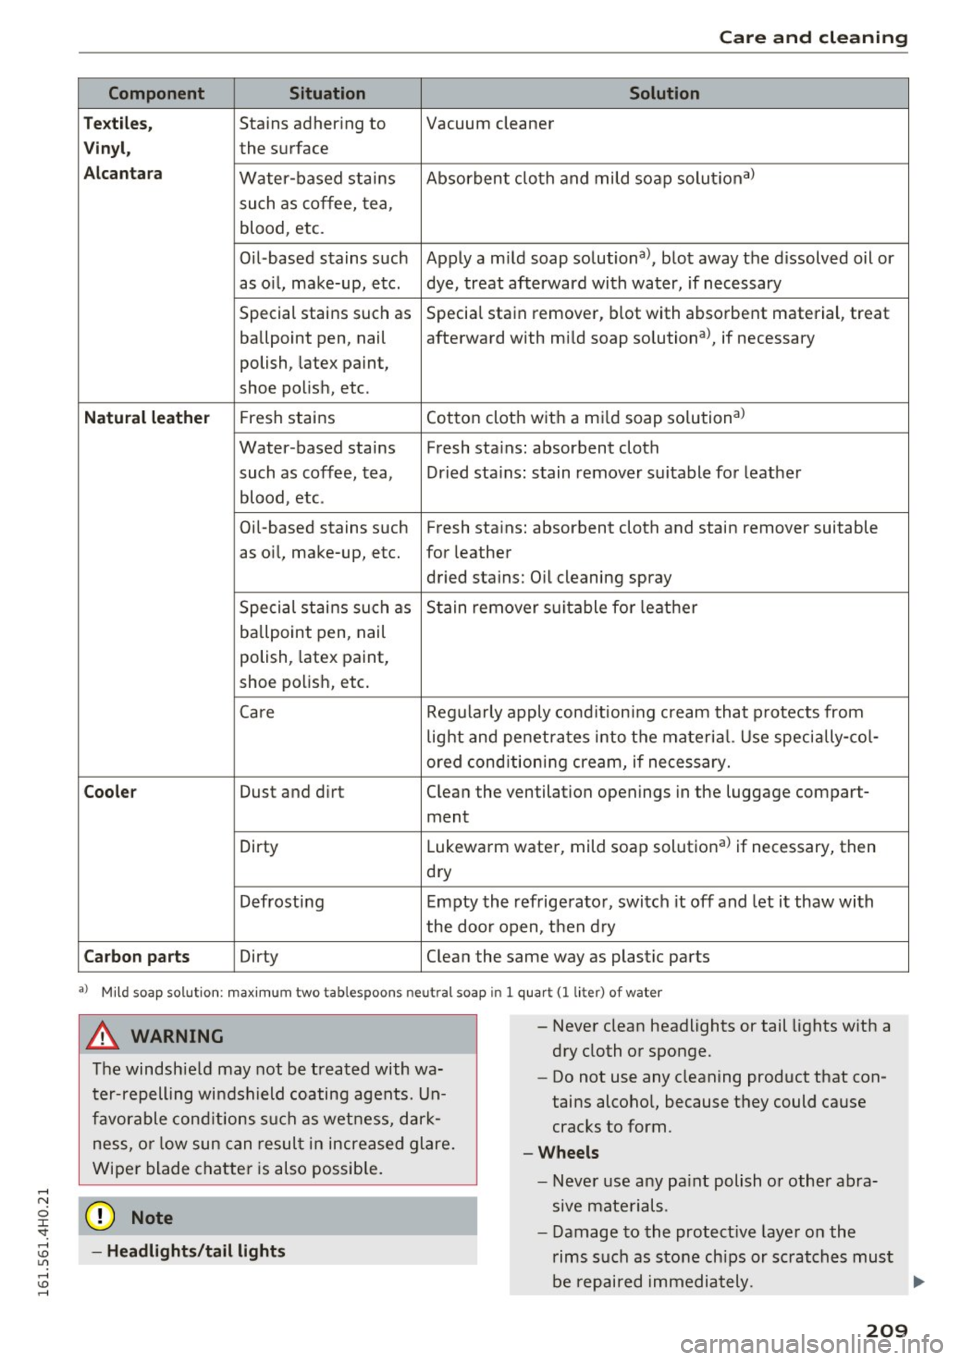
Care and cleaning
Component S ituation Solution
Tex tiles,
Stains adhering to Vacuum cleaner
Vin yl, the surface
A lcan tara Water-based stains Absorbent cloth and mild soap
solutional
such as coffee, tea,
blood, etc.
Oil-based stains such Apply a m ild soap solutional, blot away the d issolved oil or
as o il, make-up, etc. dye, treat afterward with water, if necessary
Special stains such as Special stain remover, blot with
absorbent material, treat
ballpoint pen, nail afterward with mild soap solutional, if necessary
polish, latex paint,
shoe polish, etc .
Natural le athe r Fresh stains Cotton cloth
with a mild soap solutiona l
Water -based stains Fresh stains : absorbent cloth
such as coffee, tea, Dried stains : stain remover suitable for leather
blood, etc.
Oi l-based stains such Fresh stains: absorbent cloth and stain remover suitable
as oi l, make-up, etc. for leather
dried stains: Oil cleaning spray
Special stains such as S tain remover suitable fo r leather
ballpoint pen, nail
polish, latex paint,
shoe po lish , etc.
Ca re Regularly apply cond ition ing cream that p rotects from
light and penetrates into the materia l. Use specially-co l-
ored cond itioning cream, if necessary.
Cooler Dust and dirt Clea n the ventilation openings in the luggage com part-
ment
Dirty Lukewarm water, mild soap solutional if necessary, then
dry
Defrosting Empty the refrigerator, switch it off and let it thaw with
the doo r open, t hen dry
Car bon p art s Dirty Clean the same way as plastic parts
a) M ild soap solut io n: max imu m two tablespoons neutral soap in 1 q uart (I liter) of water
A WARNING
The windshie ld may not be treated with wa
ter-repelling windshield coating agents. Un
favorable cond itions such as wetness, dar k
ness, o r low sun can resul t in increased glare.
Wiper blade chatter is also possib le.
- Headlights /tail light s
-
-Never clean headlights or tail lights with a
dry cloth or sponge.
- Do not use any cleaning product that con
tains alcoho l, because they could cause
cracks to form.
-Whe els
- Never use any pa int polish or other abra-
sive mate rials.
- Damage to the protect ive layer on the
rims such as stone chips or scratches must
be repaired immediately. .,..
209
Page 222 of 302
Checking and Filling
Checking and Filling
Hood
Releasing the engine hood
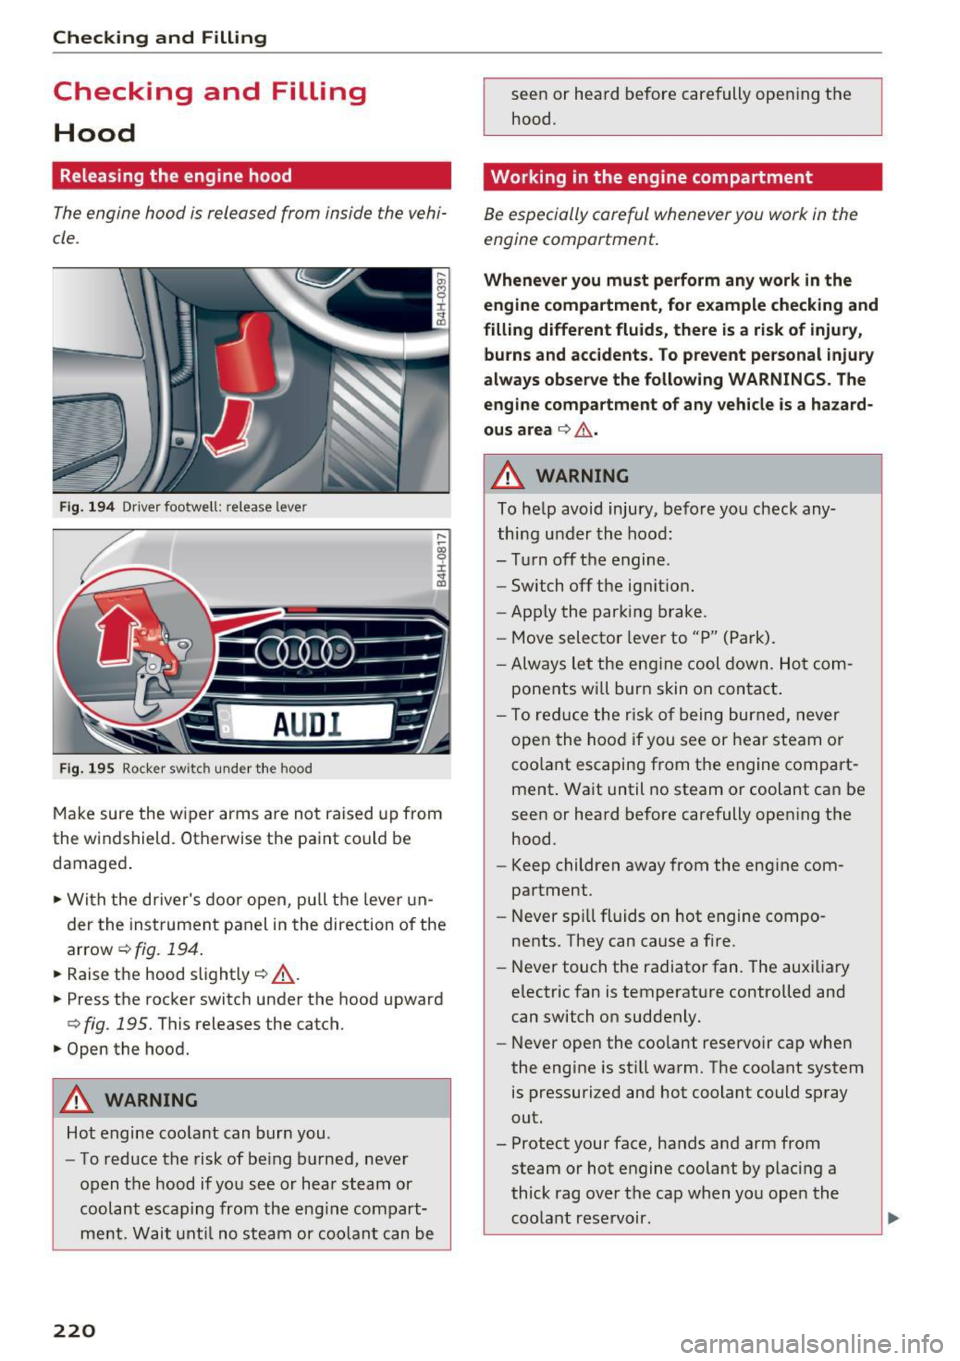
The engine hood is released from inside the vehi
cle .
Fig. 194 Driver footwell : release leve r
Fig. 195 Ro cker switc h under the hood
Make sure the wiper arms are not raised up from
the windshield . Otherwise the paint could be
damaged .
.. With the driver's door open, pu ll the lever un
der the instrument panel in the direction of the
arrow ¢
fig. 194.
.. Raise the hood slightly Q _A .
.. Press the rocker switch under the hood upward
Q fig. 195. This releases the catch.
.. Open the hood.
A WARNING
Hot engine coo lant can burn you .
- To reduce the risk of be ing burned, never
open the hood if you see or hear steam or
coolant escaping from the eng ine compart
ment. Wait unt il no steam or coolant can be
220
seen or heard before carefully open ing the
hood.
Working in the engine compartment
Be especially careful whenever you work in the
engine comportment.
Whenev er yo u mu st perform an y work in the
engin e compartment , for exampl e chec king and
filli ng d iffe rent fl uids , the re is a ri sk of injur y,
bu rn s and accid ent s. T o preven t perso na l injur y
alway s obse rve the foll owing WARNING S. The
en gine compartment o f an y v ehicl e is a haz ard
ou s a rea
Q _6 .
A WARNING
To help avoid injury, before you check any
thing under the hood:
- Turn off the engine .
- Switch off the ignit ion.
- Apply the parking brake.
- Move selector lever to "P" (Park).
-Always let the eng ine cool down. Hot com-
ponents will burn skin on contact .
-
-To redu ce the risk of being burned, never
open the hood if you see or hear steam or
coo lant escaping from the engine compart
ment . Wait until no steam or coolant can be
seen or heard before carefully opening the
hood.
- Keep children away from the engine com
partment .
- Never sp ill fluids on hot engine compo
nents. They can cause a fire.
- Never touch the radiator fan. The auxiliary
electric fan is temperature controlled and
can switch on suddenly.
- Never open the coolant reservoir cap when
the engine is sti ll warm. The coolant system
is pressurized and hot coolant could spray
out.
- Protect your face, hands and arm from
steam or hot engine coolant by placing a
thick rag over the cap when you open the
coolant reservoir .
Page 225 of 302
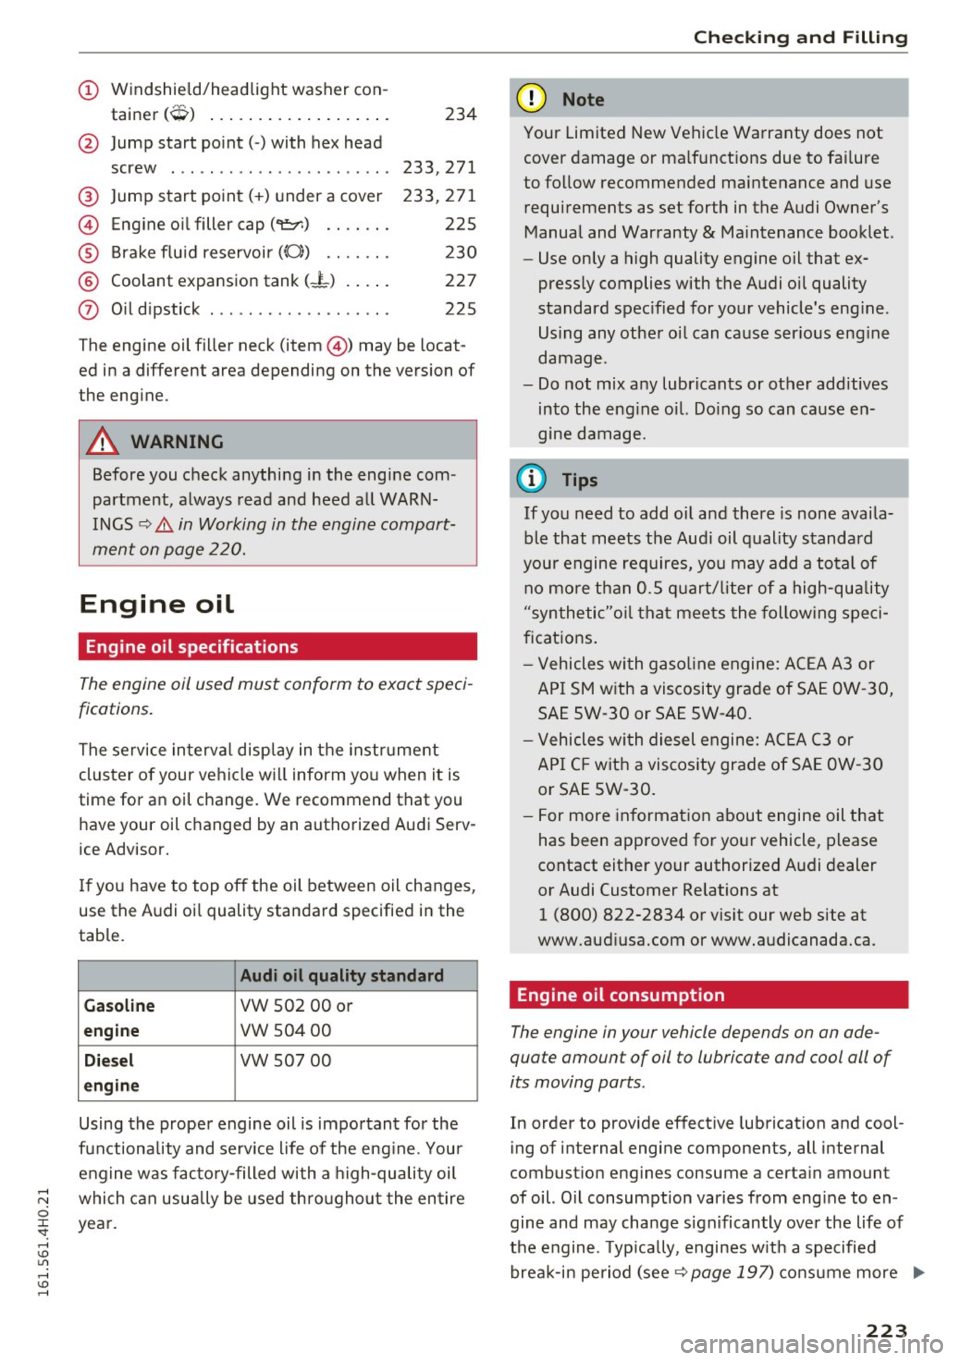
(!) Windshield/headlight washer con-
tainer
(O) ................. . .
@ Jump start point(-) with hex head
screw . ..................... .
@ Jump start point(+) under a cover
© Engine oil filler cap ("t!:r.) ...... .
® Brake fluid reservoir((();) ...... .
® Coolant expansion tank (-L) .... .
0 Oil dipstick .................. . 234
233,271
233,271 225
230
227
225
The engine oil filler neck (item@) may be locat
ed in a different area depending on the version of
the engine.
A WARNING
Before you check anything in the engine com
partment, always read and heed all WARN
INGS ¢
&. in Working in the engine compart
ment on page 220.
Engine oil
Engine oil specifications
The engine oil used must conform to exact speci
fications.
The service interval display in the instrument
cluster of your vehicle will inform you when it is
time for an oil change. We recommend that you hav e your oil changed by an authorized Audi Serv
ice Advisor.
I f you have to top off the oil between oil changes,
use the Audi oi l quality standard specified in the
table.
Audi oil quality standard
Gasoline
VW 502 00 or
engine vw 50400
Diesel vw 507 00
engine
Using the proper engine oil is impo rtant for the
functiona lity and service life of the eng ine. Your
engine was factory-filled with a high-quality oil
;:;:: which can usually be used throughout the entire
0
~ year.
,....,
(D Note
Your Limited New Vehicle Warranty does not
cover damage or malfunctions due to failure
to follow recommended maintenance and use
requirements as set forth in the Audi Owner's
Manual and Warranty
& Maintenance booklet .
- Use only a high quality engine oil that ex-
pressly complies with the Audi oil quality
standard spec ified for your vehicle's eng ine.
Us ing any other oil can cause ser ious eng ine
damage.
- Do not mix any lubricants or other additives
into the eng ine oi l. Do ing so can cause en
gine damage.
(D Tips
If you need to add oil and there is none availa
ble that meets the Aud i oil quality standard
your engine requires, you may add a total of no more than 0.5 quart/liter of a high-quality
"synthetic"oi l that meets the following speci
fications.
- Vehicles with gasoline engine: ACEA A3 or
API SM with a viscosity grade of SAE OW-30,
SAE SW -30 or SAE 5W-40.
- Vehicles with diesel engine: ACEA C3 or
API C F with a viscosity grade of SAE OW-30
or SAE SW-30.
- For more information about engine oil that
has been approved for your vehicle, please
contact either your authorized Audi dealer
or Audi Customer Relations at
1 (800) 822-2834 or visit our web site at
www.audiusa.com or www.audicanada.ca.
Engine oil consumption
The engine in your vehicle depends on an ade
quate amount of oil to lubricate and cool all of
its moving parts.
In order to provide effective lubrication and cool
ing of internal engine components, all internal
combust ion engines consume a certain amount
of oil. O il consumption varies from eng ine to en
gine and may change significantly over the life of
the engine. Typ ically, engines w ith a specified
break-in period (see ¢
page 197) consume more ""
223
Page 226 of 302
Check ing and F illing
oil du ring the break -in period than they consume
after oil consumption has stabilized .
Unde r no rmal condi tions, the rate of o il con
sumpt ion depends on the quality and viscosity of
the oi l, the RPM (revolutions per minute) at
which the engine is operat ed, the ambient tem
perature and road cond itions . Further factors are
the amount of oil dilut ion from water condensa
tion or fuel residue and the oxidation level of the
oil. As any eng ine is subject to wear as m ileage
bu ilds up, the oil consumption may increase over
time until rep lacement of worn components may
become necessa ry .
W ith all these variables com ing into play, no
standard rate of oil consumpt ion ca n be estab
lished or specified . There is no a lternative to reg
ular and frequent checking of the oil leve l, see
Note .
If the ye llow eng ine oil level war ning symbol in
the instrument cluster
II lights up, you should
check t he oil leve l as soon as possib le
¢
page 224 o r ¢ page 225. Top off the o il at
your ea rliest convenience ¢
page 225.
A WARNING
Before you check anything in the engine com
partment, a lways read and heed a ll WARN
INGS ¢.&
in Working in the engine compart
ment on page 220.
(D Note
Driving with an insufficient oil level is likely to
cause severe damage to the engine .
@ Tips
-The oil pres sure warning display. i s not
an indicator of the o il level. Do not rely on
i t. Instead , check the oil level in your en
gine at regular intervals, preferably ea ch
time you refuel , and always befo re going
on a long trip.
- If you have the impression your engine con
sumes excessive amounts of oil, we recom
mend that you co nsul t yo ur Audi dealer to
have the cause of your concern p roperly di
agnosed . Keep in mind that the acc urat e
224
meas urement of oi l consumption re quires
great care and may take some t ime. Yo ur
Audi dea ler has instructions about how to
meas ure o il consumption acc urately.
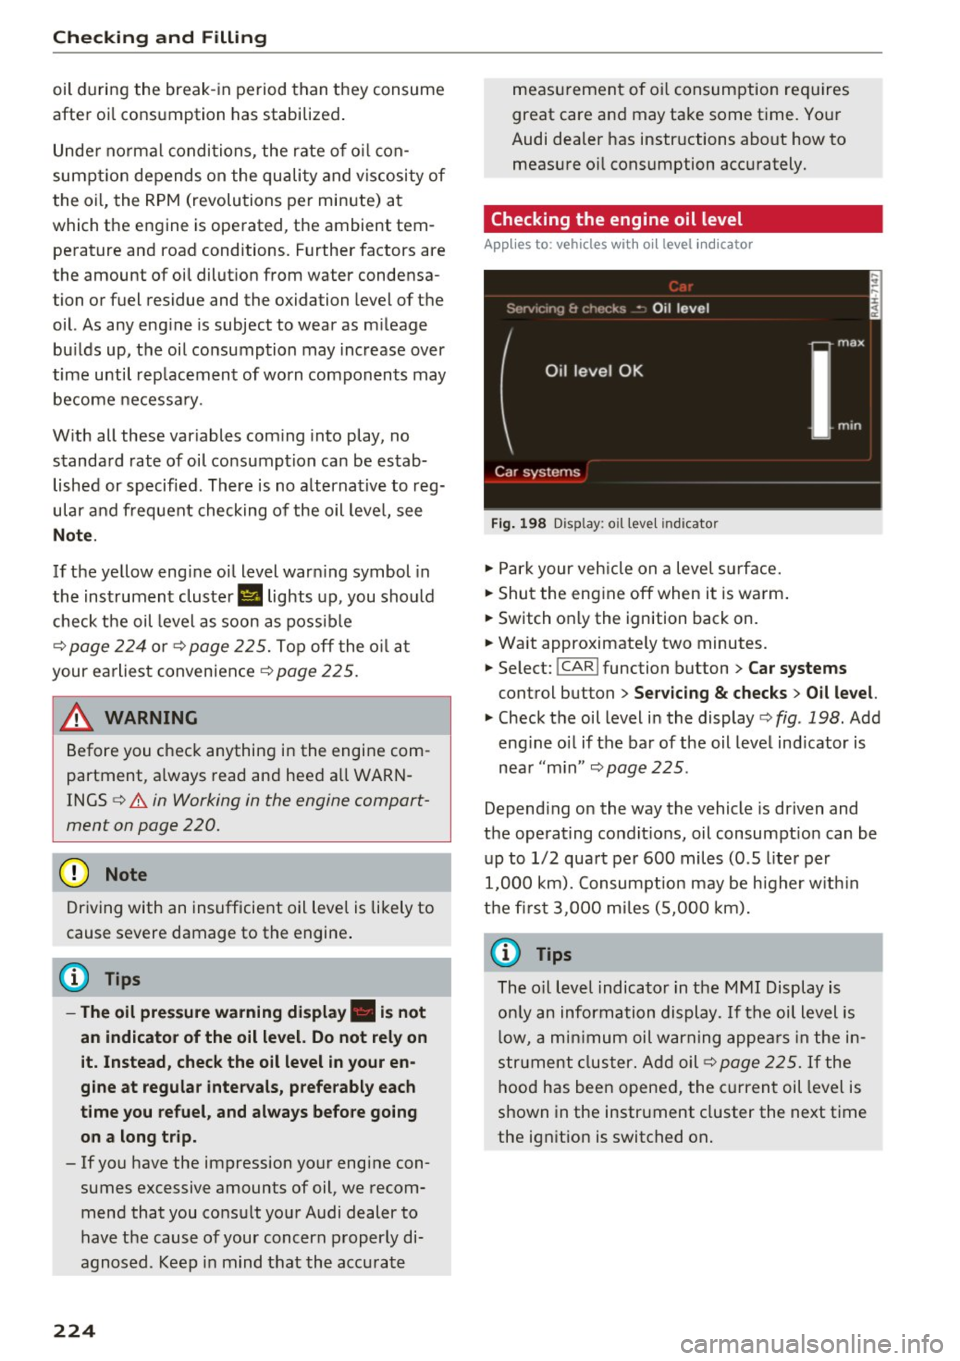
Checking the engine oil level
App lies to: vehicles wi th oil level indicato r
Fig. 198 Disp lay : o il leve l ind icato r
.,. Par k your veh icle on a leve l su rface.
.,. Shut the eng ine off when it is warm .
.,. Switch o nly the ignition back on.
.,. Wait approximate ly two minutes.
.,. Select:
!CAR ! function button > Car systems
control button > Servicing & checks > Oil le vel.
.,. Check the oil level in the display c> fig . 198 . Add
eng ine oi l if the ba r of the oil leve l ind icator is
nea r "m in"
¢ page 225 .
Depend ing on the way the vehicle is driven and
the operating cond it ions, oil consumpt io n can be
u p to 1/2 qua rt pe r 600 miles (0 .S liter per
1,000 km). Consumpt ion may be h igher w it hi n
the first 3, 000 mi les (5,00 0 km).
(D Tips
The o il level indicato r in the MMI Display is
o nl y an information display. If t he oi l level is
l ow, a m inimum oil w arn ing appea rs in the in
str ument clus ter. Ad d oil ¢
page 225. If the
hood has been opened, the curren t oil level is
shown in the instrument cluster the next t ime
the ignition is switched on .
Page 230 of 302
Checking and Filling
the engine is warm, the level may be slightly above the "max" marking.
The location of the coolant expansion tank can be
seen in the engine compartment illustration
¢ page 222.
To obtain an accurate reading, the engine must
be switched off.
The expansion tank in your vehicle is equipped
with an electric coolant level sensor.
When the coolant level is too low, the warning
light in the Auto-Check System¢
page 15 will il
luminate until you add coolant and the level has
been restored to normal. Even though there is an
electric coolant level sensor, we still recommend
you check the coolant level from time to time .
Coolant loss
Coolant loss may indicate a leak in the cooling
system . In the event of coolant loss, the cooling
system should be inspected immediately by your
authorized Audi dealer.
It is not enough merely
to add coolant.
In a
sealed system, losses can occur only if the
boiling point of the coolant is exceeded as a re
sult of overheating.
_& WARNING
The cooling system is under pressure and can
get very hot. Reduce the risk of scalding from
hot coolant by following these steps.
- Turn off the engine and allow it to cool
down.
- Protect your face, hands and arms from es
caping fluid and steam by covering the cap
with a large, thick rag.
- Turn the cap slowly and very carefully in a
counter-clockwise direction while applying
light, downward pressure on the top of the
cap.
- To avoid being burned, do not spill anti
freeze or coolant on the exhaust system or
hot engine parts. Under certain conditions,
the ethylene glycol in engine coolant can
catch fire.
228
(D Note
Do not add any type of radiator leak sealant
to your vehicle's engine coolant. Adding radia
tor repair fluid may adversely affect the func
tion and performance of your cooling system
and could result in damage not covered by
your New Vehicle Limited Warranty .
Adding coolant
Be very careful when adding engine coolant.
Before you check anything in the engine compart
ment,
always read and heed all WARNINGS
¢.& in Working in the engine compartment on
page 220 .
.. Requirement: There must be a residual amount
of coolant in the expansion tank ¢(D .
.. Turn off the engine .
.. Let the engine cool down .
.. Place a thick rag over the coolant expansion
tank ¢
page 22 7, fig. 201 and carefully twist
the cap counter-clockwise ¢&, .
.,. Add coolant mixed in the correct ratio
r::!> page 22 7, Coolant up to the MAX marking.
.. Make sure that the fluid level remains stable.
Add more coolant if necessary .
.. Twist the cap on again
tightly.
Replacement engine coolant must conform to ex
act specifications ¢
page 22 7, Coolant.
We recommend using only coolant additive G12+
+, G13 or in an emergency G12+ . Do
not use a
different additive. In an emergency use plain wa
ter until you can get the correct additive and can
restore the correct ratio. This should be done as
soon as possible.
If you have lost a considerable amount of cool
ant, then you should add cold antifreeze and cold
water only when the engine is cold.
Always use
new engine coolant when refilling.
Do not fill coolant above the "MAX" mark . Excess
coolant will be forced out through the pressure
relief valve in the cap when the engine becomes
hot.
~