display AUDI TT 2013 Owner´s Manual
[x] Cancel search | Manufacturer: AUDI, Model Year: 2013, Model line: TT, Model: AUDI TT 2013Pages: 262, PDF Size: 65.91 MB
Page 48 of 262
46 Clear vision
The brightness of the lights is controlled au
tomatically by a dimmer when they are
switched on and
off.
Instrument panel illumination
The illumination of the instruments , displays
and the center console can be adjusted.
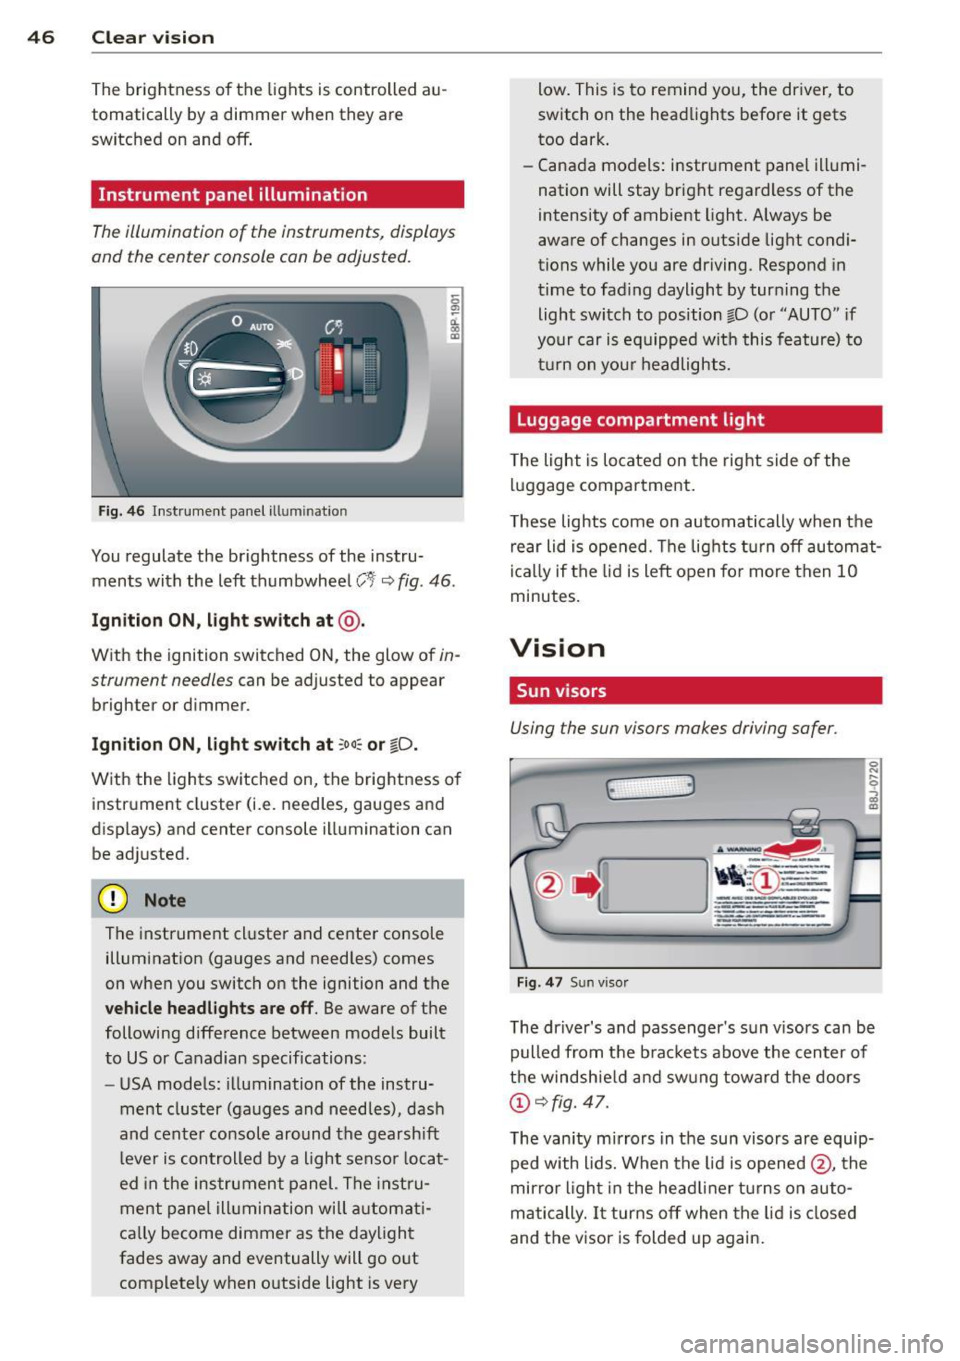
Fig. 46 Instrument panel ill um inat io n
0 ~ d. 00 m
You regulate the brightness of the instru
ments with the left thumbwheel
C t<=:> fig . 46 .
Ignition ON, light switch at@ .
With the ignition switched ON, the glow of in
strument needles
can be adjusted to appear
brighter or dimmer.
Ignition ON, light switch at ~oo:c or io.
With the lights switched on, the brightness of
instrument cluster (i.e. needles, gauges and
displays) and center console illumination can
be adjusted.
(D Note
The instrument cluster and center console
illumination (gauges and needles) comes
on when you switch on the ignition and the
vehicle headlights are off. Be aware of the
following difference between models built
to US or Canadian specifications :
- USA models: illumination of the instru
ment cluster (gauges and needles), dash
and center console around the gearshift
lever is controlled by a light sensor locat
ed in the instrument panel. The instru
ment panel illumination will automati
cally become dimmer as the daylight
fades away and eventually will go out
completely when outside light is very low.
This is to remind you, the driver, to
switch on the headlights before it gets
too dark.
- Canada models: instrument panel illumi
nation will stay brig ht regardless of the
intensity of ambient light. Always be
aware of changes in outside light condi
tions while you are driving. Respond in
time to fading daylight by turning the
light switch to position fD (or "AUTO" if
your car is equipped with this feature) to
turn on your headlights.
Luggage compartment light
The light is located on the right side of the
luggage compartment.
These lights come on automatically when the
rear lid is opened. The lights turn
off automat
ically if the lid is left open for more then 10
minutes.
Vision
, Sun visors
Using the sun visors makes driving safer .
(· 3
Fig. 47 Sun visor
The driver's and passenger's sun visors can be
pulled from the brackets above the center of
the windshield and swung toward the doors
(!)<=:>fig. 47.
The vanity mirrors in the sun visors are equip
ped with lids. When the lid is opened
@, the
mirror light in the headliner turns on auto
matically. It turns
off when the lid is closed
and the visor is folded up again.
Page 52 of 262
50 Clear vis ion
- Make sure the washe r fl ui d reservoi r in
the engine compartment is topped
off
before going on a long t rip . L oo k up
c:> page 194 for checking and fi lling the
washer container.
- The w ipers only operate w ith the hood
completely closed.
Headlight washer system
App lies to vehicles : with hea dli ght washer syste m
The headlight washer system cleans the
headlights.
., Operate the windshield wiper/washer sys
tem
c:> page 48, fig. 50 ® with the head
li ghts turned on by holding the lever for lon
ger than one second.
The washe r jets extend forward o ut of the
front bumper driven by water pressure to
spray the front headlights with water.
You shou ld inspect the headlights regularly
(for example when refue ling) and clean
off
any solid dirt or insects from the lenses .
To ensure the system wo rks properly in winter,
keep the washer jets free o f snow and remove
any ice using a de- ic ing spray.
Service position
It is only possible to change wiper blades if
you move the wiper arms to the service posi
tion .
In o rder to use the windsh ie ld w ipers, the
front lid must be comp letely closed .
Moving wiper blades to the service
position
., When there is a ris k of frost, ma ke s ure that
the wiper b lades are not frozen to the wind
shield .
.. Switch the ignition on .
., Move the wiper lever to position
0
c:> page 48, fig. 50 .
., Press the I Re set I button until the D isplay
typ e
menu appears in the Driver Informa
t ion System display . .,
Using the rocker switch and the
I R ese t! but
ton, se lect the
Set > Wipe rs > Front > Serv
ice position on
funct ion . T he w indshield
w iper arms move to the service posit ion.
Mo ving wip er blades to pa rk position
., Ma ke certain that the w iper arms are ly ing
against the windshield .
., Switch the ignitio n on and move the wiper
lever from pos ition O
to 4 c:> page 48,
fig. 50. The w iper arms will move back to
the park position.
@ Note
Never drive your veh icle when the wind
sh ield wiper arms are in the service posi
tion and pulled away from the winds hield .
When you drive faster than
4 mph (6 km/
h), the wiper a rms automatically return to
the pa rk position and cou ld cause paint
damage to the front lid!
@ Tips
- Yo u can also tur n on the se rvice posit ion,
for example, if you want to p rotect the
w indshield from icing by us ing a cover.
- The service posit ion moves to
off auto
matically whe n you ope rate the w ind
shield wiper lever, o r speed exceeds
4 mph (6 km/h) .
Page 54 of 262
52 Clear vis ion
- To help prevent damage to the wiper sys
tem, a lways loosen blades which are fro
zen to the windsh ield before operat ing
wipers.
- To he lp prevent damage to w iper blades,
do not use gasoline, kerosene, pa int
thinner, or other solvents on or near the
wiper blades.
- To he lp prevent damage to the wiper
arms or other components, do not at
tempt to move the wipers by hand .
(D Tips
-Commercial hot waxes applied by auto
matic car washes affect the cleanability
of the glass surface .
- The front wiper blades are different
l engths; the blade on the driver's s ide is
l onger .
Digital compass
Activating or deactivating the compass
Applies to vehicles: with digital compass
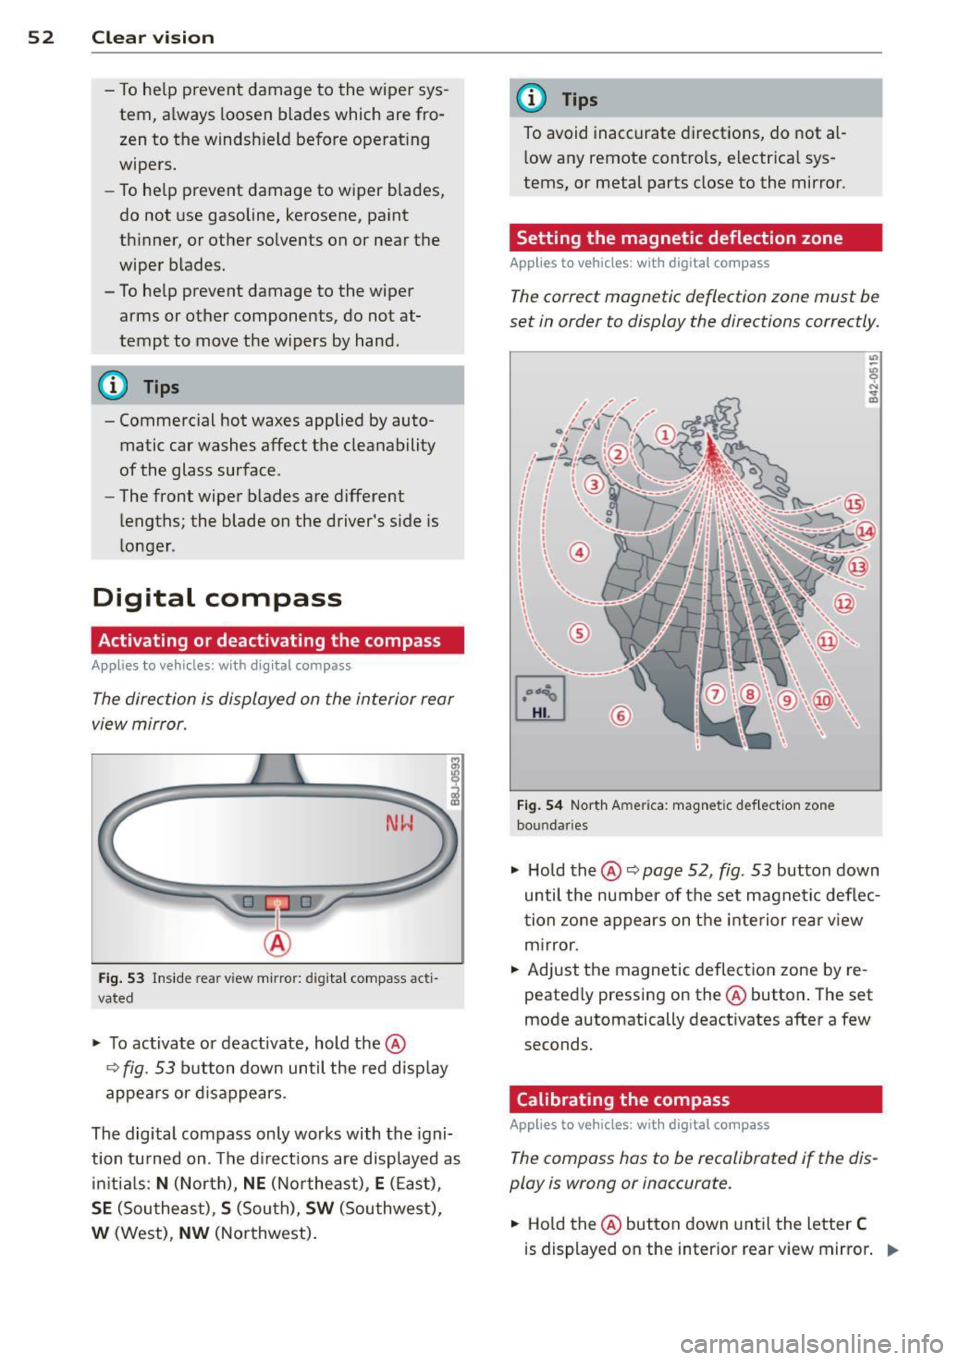
The direction is displayed on the interior rear
view mirror.
Fig . 53 In side rea r vi ew m irro r: digi tal compass ac ti
v at ed
.. To activate o r deactivate, hold the@
c::> fig. 53 b utton down until the red disp lay
appe ars or d is a ppears.
The digital compass only works with the igni
tion tu rned on . T he d irect io ns are displayed as
ini tia ls :
N (North), NE (No rthe ast) , E (E as t),
SE (Southe ast), S (Sou th), SW (Southwest),
W (West) , NW (Northwest).
(D Tips
To avoid inaccurate directions, do not al
l ow any remote contro ls, electr ica l sys
tems, or metal parts close to the mirror .
Setting the magnetic deflection zone
Applies to vehicles: with digita l compass
The correct magn etic deflection zon e must be
set in order to display the dire ctions correctly.
©
Fi g. 54 North A meric a: magne tic def le ction zo ne
bo un daries
" Ho ld th e@ c::> page 52, fig . 53 button down
until the number of the set magnetic deflec
t ion zo ne appe ars on the inte rior re ar v iew
m irror.
.. Adjust the magnetic de flect ion zone by re
peated ly pressing on the @button . The set
mode automatically deact ivates after a few
seconds.
Calibrating the compass
Applies to vehicles: with digita l compass
The compass has to b e recalibrated if the dis
play is wrong or inaccurate.
.. Hold the @button down unti l th e letter C
is displayed on the inter ior rear view mirror . ..,.
Page 76 of 262
74 On the road
Only afte r the vehic le has come to com
p lete stop, should you f irm ly set the park
ing brake and either move the gearshift
lever into 1st. gear (manual transm iss ion)
or move the selector lever into "P" (Auto
mat ic transm ission).
Parking
Parking
.,. Stop the veh icle using the brake pedal.
.,. Set the parking brake firmly .
.,. Switc h off the eng ine.
.,. Move t he selecto r lever in to the P position
(autom atic tr an smi ssio n) or move the gear
shift lever into 1st . gear
(manual t ransmi s
sion ).
.,. Remove the ign ition key from the ignit ion
lock.
In addition on incline s and grad es
.,. Turn the steering whee l so that your vehicle
wi ll ro ll against the curb in case it should
start to move.
A WARNING
This is how you can reduce the risk of in
jury when leaving your veh icle.
- Never park the vehicle where it can come in contact with dry grass, sp illed fuel or
any other flammable mater ials .
- Never allow anyone - especially small
children -to remain in the vehicle when
it is locked. Locked doors make it more
difficult for rescuers to access the pas
senger compartment in the event of an
emergency. Danger to life!
- Never leave children unsupervised in the
vehicle. Children could re lease the park
ing brake o r move the gea rshift lever out
of gear. The vehicle could start to roll
away and cause an accident .
- No matter what the season is, the tem
perature in a parked vehicle can reach
dangerous levels .
Starting on hills
Applies to vehicles: wi th hill hold assist
Hill ho ld assist makes it easier to start on
hills.
T he system is activated when the bra ke peda l
is depressed
for a few sec ond s.
After releasing the brake pedal, the brake
power is held for a
brief moment to p reven t
the vehi cle from rolling back when s tarti ng. At
th is time, you can easi ly beg in to move your
vehicle .
A WARNING
- If you did not begin moving immediate ly
after releasing the brake pedal, under
certain circumstances, the vehicle would
begin to roll backward. Depress the
brake peda l immediately or engage the
hand brake.
- Should the engine stall, depress the
brake peda l immediately or engage the
hand brake .
- In order to prevent the vehicle from roll ing back unintentionally when starting in
stop-and-go traffic, keep the brake pedal
depressed for a few seconds before driv
i n g off.
@ Tips
You can find o ut if yo ur vehicle is equ ipped
with "Hill hold ass ist" at an authorized
Audi dealersh ip.
Speed warning system
Overview
The speed warning system helps you to keep
your driving speed below a set speed limit.
The speed warning system warns the driver if
he exceeds a previous ly stored maximum
speed. A warning tone will so und as soon as
the vehicle speed exceeds the set speed by
about 3 mph (3 km/h). At the same time, a
warning symbol appears in the display. .,,.
Page 77 of 262
The speed warning system has two warning
thresholds
that function independently of
each other and that have somewhat different
purposes:
Speed warning 1
You can use speed warn ing 1 to set the maxi
mum speed while you are driving. This setting
will remain in effect until you turn
off the igni
tion, assuming that you have not changed or
reset the setting.
The speed warning symbo l
(mj (USA models)/
(SJ (Canada models) in the warning 1 display
appears when you exceed the maximum
speed.
It goes out when the speed falls below
the stored max imum speed.
The speed warning symbo l wi ll also go out if
the speed exceeds the stored maximum speed
by more than about 2S mph (40 km/h) for at
least 10 seconds. The stored maximum speed
is deleted.
Setting speed warning l <=:> page
75.
Speed warning 2
Stor ing warn ing 2 is recommended if you al
ways want to be reminded of a certa in speed,
for example when you are traveling in a coun
try that has a general maximum speed limit,
or if you do not want to exceed a spec ified
speed for winter tires.
The speed warning 2 symbol,
(zj
(•j (Canada models) appears in the dis
p lay when you exceed the stored speed lim it.
Unlike warning 1, it will not go out until the
vehicle speed drops below the stored speed limit .
Sett ing speed warning 2 <=:>page 76.
@ Tips
Even though your vehicle is equipped with
a speed wa rning system, you should sti ll
watch the speedometer to make sure you
are not driving faster than the speed lim it.
On the road 75
Speed warning 1: setting a speed limit
Warning threshold 1 is set by the button.
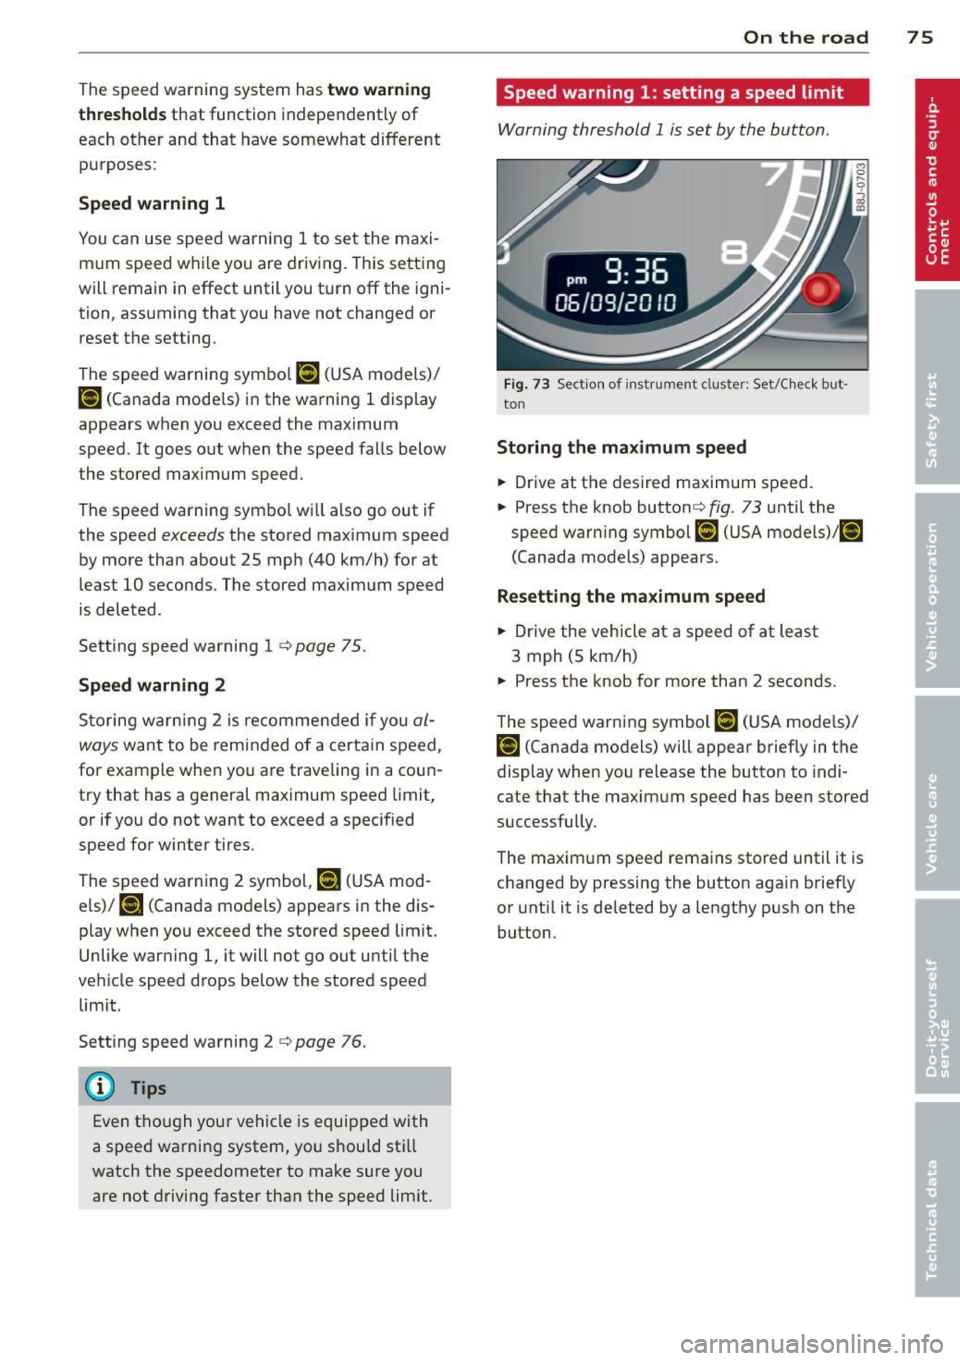
Fig. 73 Sect ion of instrument clus ter: Set/C heck but ·
ton
Storing the maximum speed
.,. Drive at the des ired maximum speed .
.,. Press the knob buttonr=:>fig .
73 unti l the
speed warning symbol
[iJ (USA models)/ ~
(Canada models) appears.
Resetting the maximum speed
.,. Drive the vehicle at a speed of at least
3 mph (5 km/h)
.,. Press the knob for more than 2 seconds.
The speed warning symbol
(G:l (USA models)/
i•j rcanada models) will appear briefly in the
display when you release the button to indi
cate that the maximum speed has been stored
successfully .
The maximum speed remains stored until it is
changed by pressing the button aga in brief ly
or until it is deleted by a lengthy push on the
button.
Page 78 of 262

76 On the road
Speed warning 2: setting a speed limit
Switches in the wiper arm are used to operate
warning threshold
2 .
'----I ®
Fig. 74 Wiper lever: Tr ip computer con trols
To store maximum speed
> Turn off the ignit ion.
> Briefly press the button in the instrument
cl uster ¢
page 75, fig. 73. The odometer
and the digital clock are now illuminated .
> Press the button for at least 2 seconds. The
currently stored maximum speed appears in
the display
or the crossed out symbol for
warning threshold 2, if no max imum speed
was set previously.
> Press the function selector sw itch in the
wipe r lever @¢
fig. 74 up or down to
change the set value. Values run up or dow n
i n steps of 6.2 mph (10 km/h).
To delete maximum speed
> Turn off the ignit ion .
> Briefly press the button in the instrument
cluster ¢
page 75, fig . 73. T he odometer
and the digital clock are now illumi nated.
> Press the button for at least 2 seconds . Th e
cu rrently stored maxim um speed appears in
the display.
> Press the reset button in the wiper lever ®
¢fig . 74 until the crossed out speed warn
ing symbol for warning threshold 2 appears
i n the display.
A few seconds after the adjustment is com
pleted, the illumination for the odometer and
the dig ital clock will go out.
(D Tips
This warning threshold can a lso be con
trolled thro ugh the tr ip computer
¢ page 25, Navigating the menu.
Cruise control
Switching the system on
The cruise control system makes it possible to
drive at a constant speed starting at 20 mph (30 km/h) .
®-
Fig. 75 Contro l leve r with set b utton
Fig. 76 D isplay : Se lecte d speed
> Pull the lever to position (D ¢ fig. 75 to
switch the system on.
> Dr ive at the speed you w is h to set.
> Press button @ to set that speed.
.., ....
i
The display ¢ fig. 76 will show the set speed .
The display may vary depending on the type of
display in your vehicle. The indicator light
M;ll)~14 (US model)/ . (Canadian model) will
also light up in the instrument cluster .
A WARNING
- Always pay attention to traffic even when
the cruise control is switched on. You are
always responsib le for your speed and
Page 82 of 262
80 Transmi ssion
Transmission
Manual transmission
Gearshift lever
Applies to vehicles: with manual transmission
The clutch pedal must be depressed all the
way before you can start the engine.
The manual transmission in your Audi is
equipped with an
interlock-feature.
• Depress the clutch pedal a ll the way.
• Start the engine with the gearshift lever in
Neutral and the clutch pedal depressed.
(D Note
Always depress the clutch peda l fully when
changing gears. Do not ho ld the vehicle on
a hill with the clutch pedal partially de
pressed. This may cause premature clutch
wear or damage.
@ Tips
- Resting your hand on the gearsh ift lever
knob while driving will cause premature
wear in the transm ission.
- The back-up lights go on when you sh ift
i nto Reverse w ith the ignition on.
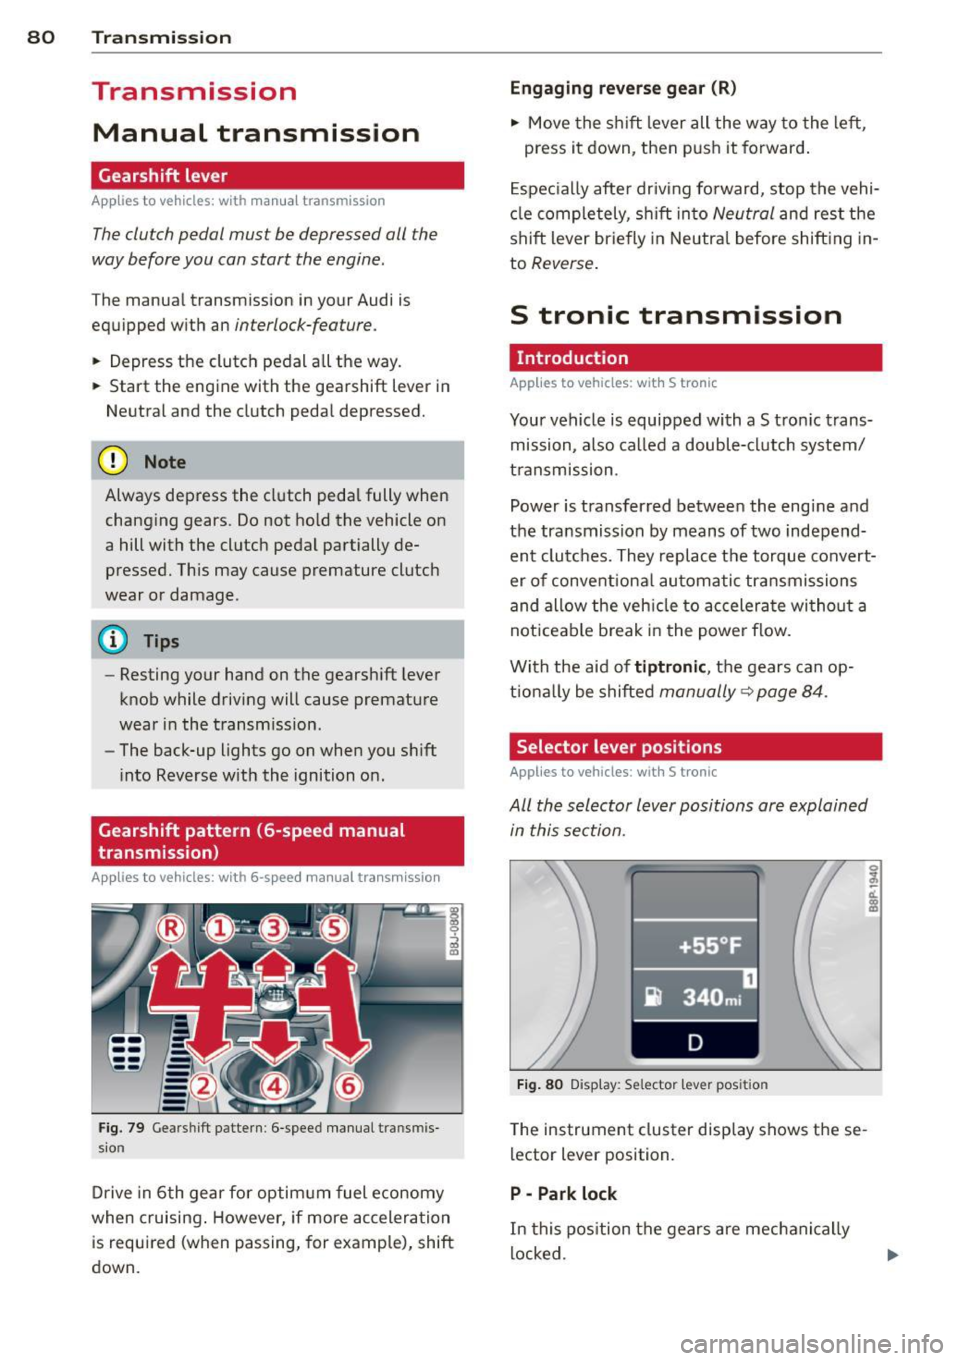
Gearshift pattern (6-speed manual
transmission)
Applies to vehicles: with 6-speed manual transmission
Fig. 79 Gearshift pattern: 6 -speed manual transm is
sion
D rive in 6th gear for optim um fuel economy
when cruising . However, if more accelera tion
is required (when passing, for example), shift
down.
Eng aging rev erse gear (R )
• Move the shift lever all the way to the left,
press it down, then push it forward.
E spec ia lly after driv ing forward, stop the vehi
cl e completely, shift into
Neutral and rest the
shift lever briefly in Neutral before shift ing in
to
Reverse .
S tronic transmission
· Introduction
Applies to vehicles: with S tronic
Your vehicle is equipped with a S tron ic trans
mission, also called a double-clutch system/
t ransmission .
Power is transferred between the engine and
the transmission by means of two independ ent clutches. They replace the torque convert
er of conventiona l au tomatic transmissions
and allow the veh icle to accelerate wi thout a
noticeab le b reak i n the power flow.
With the aid of
tiptr onic , the gears can op
t ional ly be shifted
manually~ page 84.
Selector lever positions
Applies to vehicles: with S tronic
All the selector lever positions are explained
in this section.
~-. -·~•-~ _ .. _....,-l
•+55 °F '
i} 340 mi
D
Fig . 80 Display: Selector lever pos it ion
T he instrument cluster display shows these
lector lever position.
P -Park lock
In this pos ition the gears are mechanically
locked.
Page 86 of 262
84 Transmission
tiptronic operation
Applies to vehicles: with S tron ic
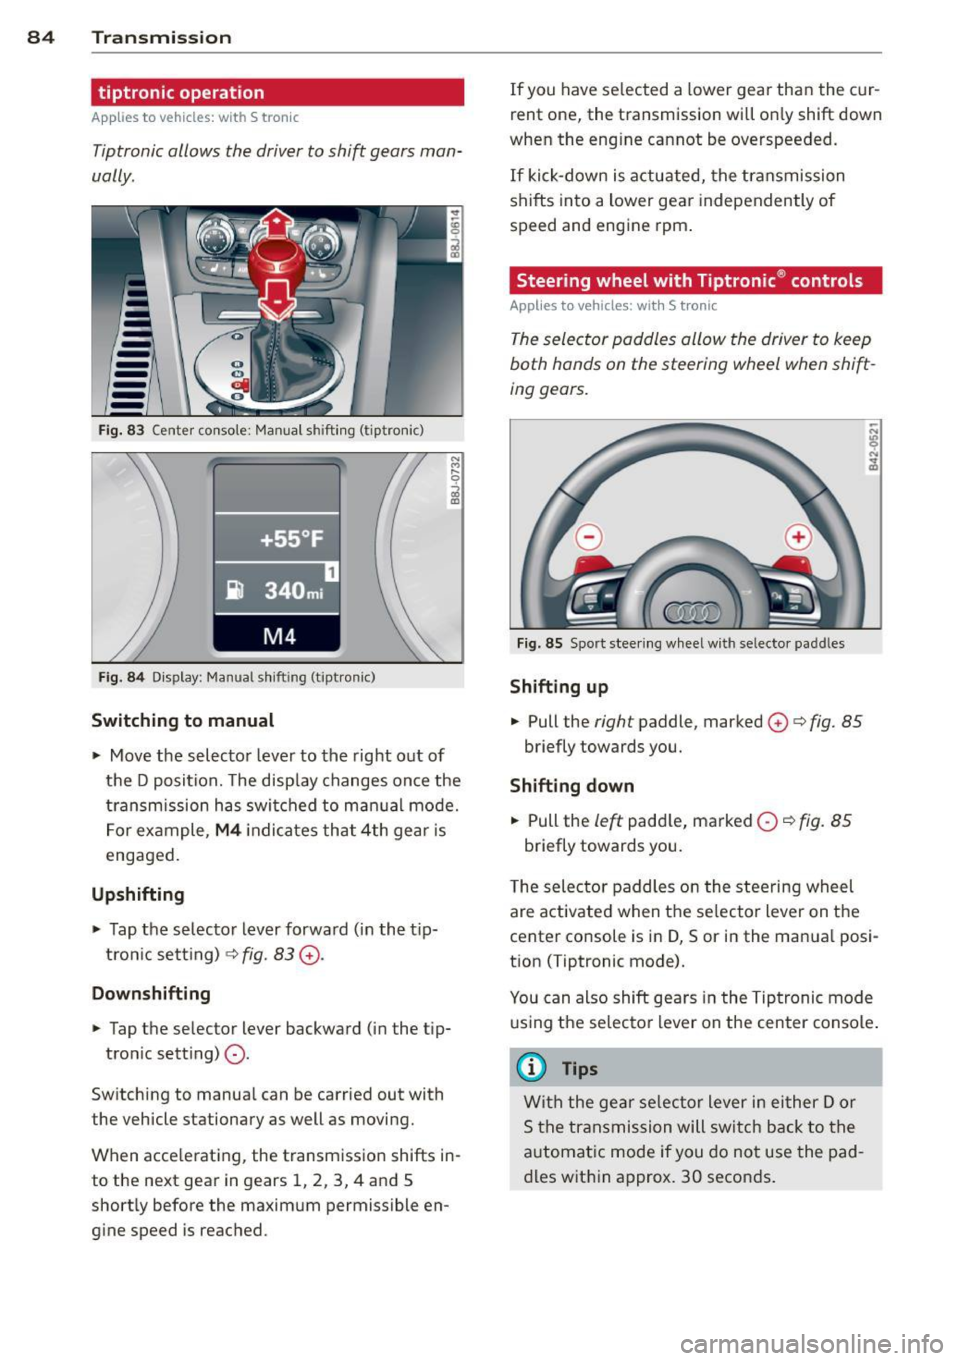
Tiptronic allows the driver to shift gears man
ually.
--
-
Fig. 83 Center conso le : Manual shift in g (tiptronic)
Fig . 84 Display : Manual sh ift ing (tipt ron ic)
Switching to manual
.,. Move the selector lever to the right out of
the D position. The disp lay changes once the
transmission has switched to manual mode.
For example,
M4 indicates that 4th gear is
engaged.
Upshifting
.,. Tap the selecto r lever forward (in the tip
tron ic setting)
¢ fig. 83 G).
Downshifting
.,. Tap the selector lever backward (in the t ip-
tron ic sett ing)
0-
Switching to manual can be carried out with
the vehicle stationary as well as moving.
When accelerat ing, the transmission shifts in
to the next gear in gears 1, 2, 3, 4 and 5
shortly before the maximum permissible en
gine speed is reached. If
you have selected a lower gear than the cur
rent one, the transmission will only shift down
when the eng ine cannot be overspeeded.
If kick-down is act uated, the transmission
shifts into a lower gear independently of
speed and engine rpm.
Steering wheel with Tiptronic ® controls
Applies to vehicles: with S tronic
The selector paddles allow the driver to keep
both hands on the steering wheel when shift
ing gears.
Fig . 85 Sport steering wheel with selecto r padd les
Shifting up
.,. Pull the right paddle, marked 0 ¢ fig. 85
briefly towards you .
Shifting down
.,. Pull the left padd le, marked 0 ~ fig. 85
briefly towards you.
T he selector paddles on the steering wheel
are activated when the se lecto r lever on the
center co nsole is in D, Sor in the manua l posi
tion (Tiptronic mode).
You can also shift gears in the Tiptronic mode
using the selector lever on the center console .
@ Tips
With the gear selector lever in either Dor
S the transmission will switch back to the
automatic mode if you do not use the pad
dles within approx. 30 seconds.
Page 113 of 262
as defined in the electronic control unit
¢ page 119, PASSENGER AIR BAG OFF light .
Always remember, a chi ld safety seat or infant
carrier installed on the front seat may be
struck and knocked out of position by the rap
id ly inflating passenger's airbag in a frontal
coll is ion . T he airbag cou ld greatly reduce the
effectiveness of the child restraint and even
seriously injure the child during inflat ion.
F or this reason, and because the back seat is
the safest p lace for children -when properly
rest ra ined accord ing to their age and si ze - we
s trongly recommend that children always sit
in the back seat¢
page 130, Child Safety.
A WARNING
A child in a rearward-facing child safety
seat insta lled on the front passenger seat
w ill be seriously injured and can be k illed if
t he front a irbag inf lates - even with an Ad
vanced Airbag System .
- The inflating a irbag w ill hit the child
sa fety seat or infant carrier w it h great
f orce and w ill smash the ch ild safety seat
and child against the backrest , door or
roof .
- Always install rear -facing child sa fety
seats on the rear seat.
- If you mus t install a rearward facing
child safety seat on the front passenger
seat because of exceptional circ umstan
ces and the
PASSENGER AIR BAG O FF
light does not come on and stay on, im
med iately install the rear-facing child
safety seat in a rear seating posit ion and
have the a irbag system inspected by you r
Audi dealer.
- Forward-fac ing ch ild safety seats instal
led on the front passenger's seat may in
terfere with the deployment of the air
bag and cause serious person al injury to
the ch ild .
WARNING
If, in exceptional c ir c umstances, you mus t
install a forwa rd -facing child restra int on
the front passenger's seat:
A irbag system 11 1
-Always ma ke sure the forward-facing
seat has been designed and certified by
its manufacturer for use on a front seat
with a passenger front and s ide a irbag.
- Never put the forward-facing child re
straint up against or very near the instru ment panel.
- Always move the passenger seat into its
rearmost position in t he seat's fore and
aft adj ustment range, as fa r away from
the airbag as possible before installing
the forward-fa cing ch ild restra int. The
backrest mu st be ad ju sted to an upright
posi tion.
- Ma ke sure that the
PASSENGER AIR BAG
OFF
li ght comes on and stays on all the
time wheneve r the ignit ion is swi tched
on.
A WARNING
To reduce the risk of serious injury, make
sure that the
PASSENGER AIR BAG OFF
light wi ll be displayed whenever a child re
straint is installed on the front passenger
seat and the ignition is sw itched on .
- If the
PASSENGER AIR BAG OFF light
does not stay on, perform the checks de
scribed ¢
page 119 , Monitoring the Ad
vanced Airbag System .
-Take t he chi ld restraint off the front pas
senger seat and install it properly at one
of the rear seat positions if the
PASSEN
GER AIR BAG OFF
li g ht does not stay on .
- Have the airbag system inspected by
your Aud i dea le r i mmediately .
- Always carefully follow instr uctions from
child restraint manufacture rs when in
stalling c hild restra ints .
A WARNING
If, in e xcept io na l circumstances, you must
ins tall a forward o r rearwa rd-facing child
restra int on the front passenger's se at:
- Imp roper install ation of ch ild restrai nts
can reduce their effec tiveness o r even
preven t them from providing any protec
tion. •
•
Page 123 of 262
-a safety be lt extender has not been left in
the safety belt latch for the front passenger
seat .
I n addition to the
P ASS ENGER AIR B AG OFF
light in the center of the instrument panel,
the message
PA SSENGE R AIR BAG OFF or
PASSENGER AI R BAG ON will briefly appear
in the instrument cluster display. Th is is to in
form the driver of the current front passenger
airbag status .
Important safety instructions on
monitoring the Advanced Airbag System
A WARNING
An airbag system that is not functioning
properly cannot provide supplemental pro
tection in a frontal crash.
- If the airbag indicator light comes on, it
means that there may be someth ing
wrong with the Advanced Airbag System .
It is possible that the airbag will inflate
when it is not supposed to, or w ill not in
flate when it should.
- Have the airbag system inspected imme
diately by your Aud i dealer.
A WARNING
If the front airbag inflates, a ch ild without
a child restra int, in a rearward-facing child
safety seat or in a forward-facing chi ld re
straint that has not been properly insta lled
wi ll be seriously injured and can be ki lled .
- Even though your veh icle is equipped
with an Advanced Airbag System, make certain that a ll children, especially 12
years and younger, a lways ride on the
back seat properly restrained for their
age and size.
- Always install forward or rear-facing
child safety seats on the rear seat -even
with an Advanced Airbag System.
- If you must install a rearward-facing
child safety seat on the front passenger
seat because of exceptional circumstan ces and the
PAS SENG ER AIR BAG OFF
light does not appear and stay on, imme-
A irbag system 12 1
diately install the rear- facing child safety
seat in a rear seat ing pos ition and have
the airbag system inspected by your Audi
deale r.
- A t ight tether or other strap on a rear
ward-facing child restraint attached to
the front passenger seat can put too much p ressu re on the weight-sensing
mat in the seat and reg ister more weight
than is a ctually on the seat. The heavier
weight regis tered can make the system
wo rk as tho ugh an adult we re on the seat
and deploy the Advanced Airbag when it
m ust be suppressed causing serious or
even fata l injury to the ch ild.
- If, in exceptiona l circumstances, you
m ust install a forward-fac ing ch ild re
straint on the front passenger seat, al
ways move the seat into its rearmost po
sition in the seat's fore and aft adjust
ment range, as fa r away from the a irbag
as poss ible. The backrest must be ad just
ed to an upright pos ition. Make sure that
the
PASSENGER AIR BAG OFF light
comes on and stays on all the time when
ever the ignition is switched on .
A WARNING
-
-If the PASSENGER AIR BAG OFF light
does not go out when an ad ult is sitting
on the front passenger seat after taking
the steps described above, make sure the adu lt is properly seated and restra ined at
one of the rear seat ing pos itions.
- Have the airbag system inspected by
your Aud i dea ler before transporting
anyone on the front passenger seat.
(l) Tips
If the weight-sensing mat in the front pas
senger seat detects an empty seat, the
front airbag on the passe nger side will be
turned off, and
PASSENGER AIR BAG OFF
will stay on.
•
•