tow AUDI TT 2021 Owner´s Manual
[x] Cancel search | Manufacturer: AUDI, Model Year: 2021, Model line: TT, Model: AUDI TT 2021Pages: 280, PDF Size: 99.18 MB
Page 64 of 280
Sitting correctly and safely
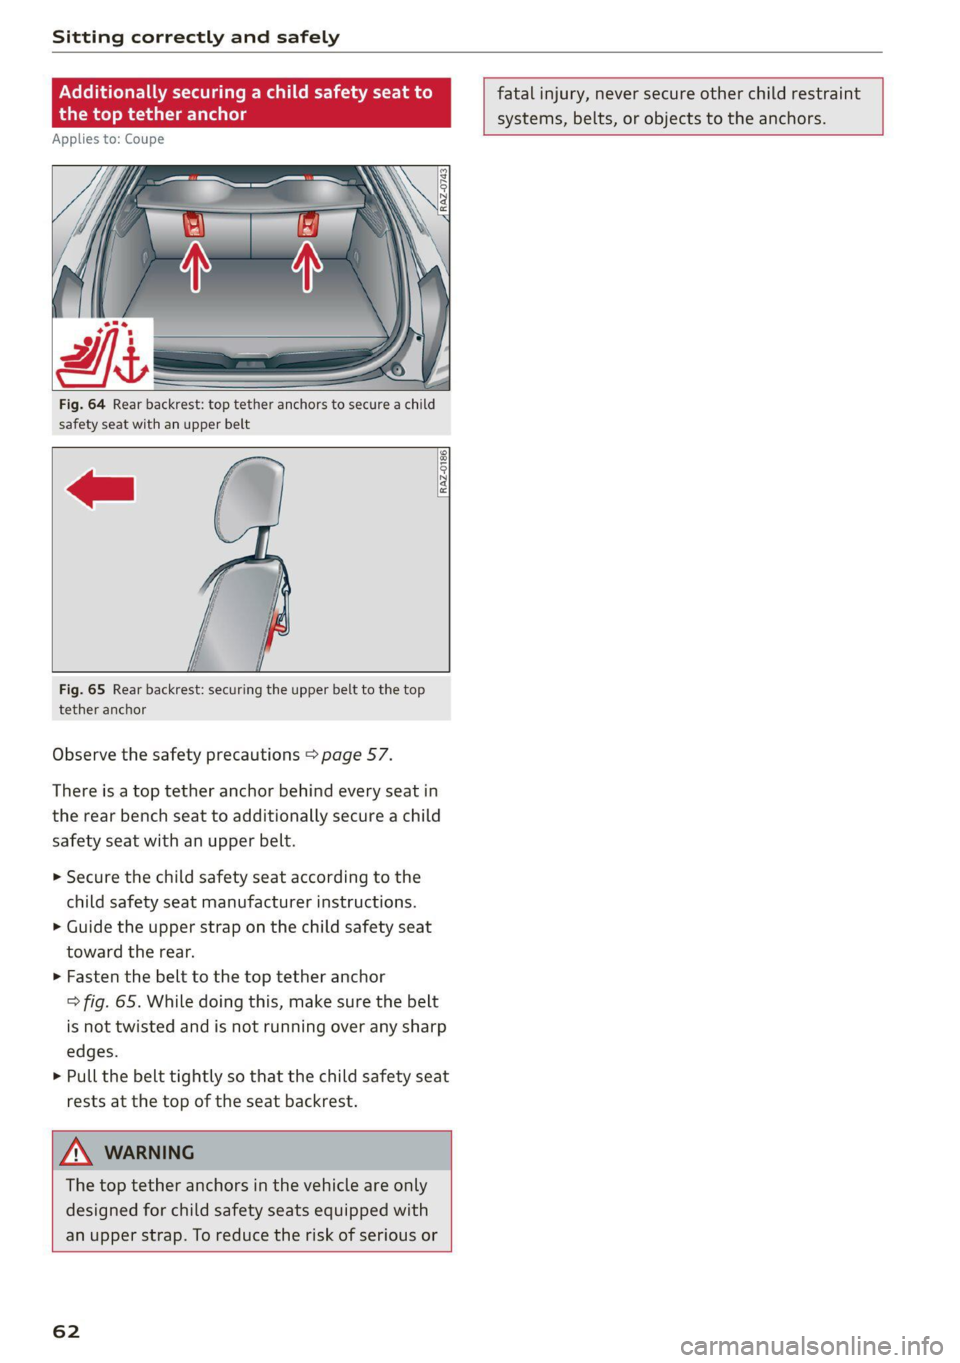
Fig. 64 Rear backrest: top tether anchors to secure a child
safety seat with an upper belt
fatal injury, never secure other child restraint
systems, belts, or objects to the anchors.
RAZ-0186,
Fig. 65 Rear backrest: securing the upper belt to the top
tether anchor
Observe the safety precautions > page 57.
There is a top tether anchor behind every seat in
the rear bench seat to additionally secure a child
safety seat with an upper belt.
> Secure the child safety seat according to the
child safety seat manufacturer instructions.
> Guide the upper strap on the child safety seat
toward the rear.
> Fasten the belt to the top tether anchor
> fig. 65. While doing this, make sure the belt
is not twisted and is not running over any sharp
edges.
> Pull the belt tightly so that the child safety seat
rests at the top of the seat backrest.
‘The top tether anchors in the vehicle are only
designed for child safety seats equipped with
an upper strap. To reduce the risk of serious or
62
Page 66 of 280
Storage and convenience
— Never drive with containers that contain hot
liquid such as coffee or tea. The hot liquid
could spill and cause burns during a colli-
sion, sudden braking or other vehicle move-
ment. Spilled hot liquid can also increase
the risk of accidents and injuries.
— Only use soft containers in the cup holders.
Hard cups and glasses can increase the risk
of injury during a collision.
— Never use the cup holder or the adapter as
an ashtray because this is a fire hazard.
@) Note
Beverage containers in the cup holders should
always
have a lid. Otherwise, the liquid inside
could spill and cause damage to vehicle
equipment.
Storage areas and
compartments
Depending on vehicle equipment, there are a va-
riety of storage areas, compartments, and retain-
ers, such as the glove compartment, for safely
storing and securing objects.
ZA\ WARNING
—To reduce the risk of injury, make sure all
storage compartments are always closed
while driving.
— Loose objects can be thrown around the ve-
hicle interior during sudden driving or brak-
ing maneuvers, which increases the risk of
an accident. Store objects securely while
driving.
— Only use the storage compartments in the
door trim panels to store small objects that
will not stick out of the compartment and
impair the function of the side airbags.
— Make sure your view toward the rear is not
blocked, for example by hanging clothing or
objects in the vehicle.
— Applies to: Coupe: No heavy or hard objects
may be placed on the storage compartment
behind the rear seat backrest. There is a risk
of
injuring the vehicle passengers when
braking suddenly.
64
— Applies to: Coupe: Only lightweight clothing
should be hung from the garment hooks in
the vehicle. Do not use clothes hangers to
hang clothing. The pockets of the clothing
must not contain any heavy, breakable, or
sharp-edged objects. This could impair the
effectiveness of the side curtain airbags.
() Note
Applies to: Coupe
Make sure that the heating grid strips for the
rear window defogger are not damaged by
abrasive objects.
Luggage compartment
General information
All pieces of luggage or objects must be securely
fastened in the luggage compartment. Note the
following to maintain good vehicle handling:
> Distribute the load evenly in the luggage com-
partment.
> Stow heavy luggage as far forward in the lug-
gage compartment as possible.
» Use non-elastic cords attached to the tie-downs
to secure objects.
ZX WARNING
— Loose objects can be thrown around the ve-
hicle interior during sudden driving or brak-
ing maneuvers, which increases the risk of
an accident. Always stow objects securely in
the luggage compartment and secure them
at the tie-downs. Use straps suitable for
heavy objects.
— If pieces of luggage or objects are secured to
the tie-downs with unsuitable or damaged
straps, this can increase the risk of injury
during braking maneuvers or accidents.
— When transporting heavy objects, the vehi-
cle characteristics will change due to the
shift in the center of gravity, which increases
the risk of an accident. You may need to
adapt your driving style and speed to the
current conditions.
Page 68 of 280
Storage and convenience
Observe the safety precautions > page 64.
> To remove the luggage compartment cover, re-
lease it by turning the twist lock into the verti-
cal position > fig. 68.
> Grip the side of the luggage compartment cov-
er and pull the cover in the direction of the ar-
row > fig. 69.
> To install the luggage compartment cover, posi-
tion it with the retainers on the pins and slide
the cover upward.
> Turn the twist lock with gentle pressure to the
vertical position.
Folding the backrests
Applies to: vehicles with folding backrests
Ky
S 2
z oO
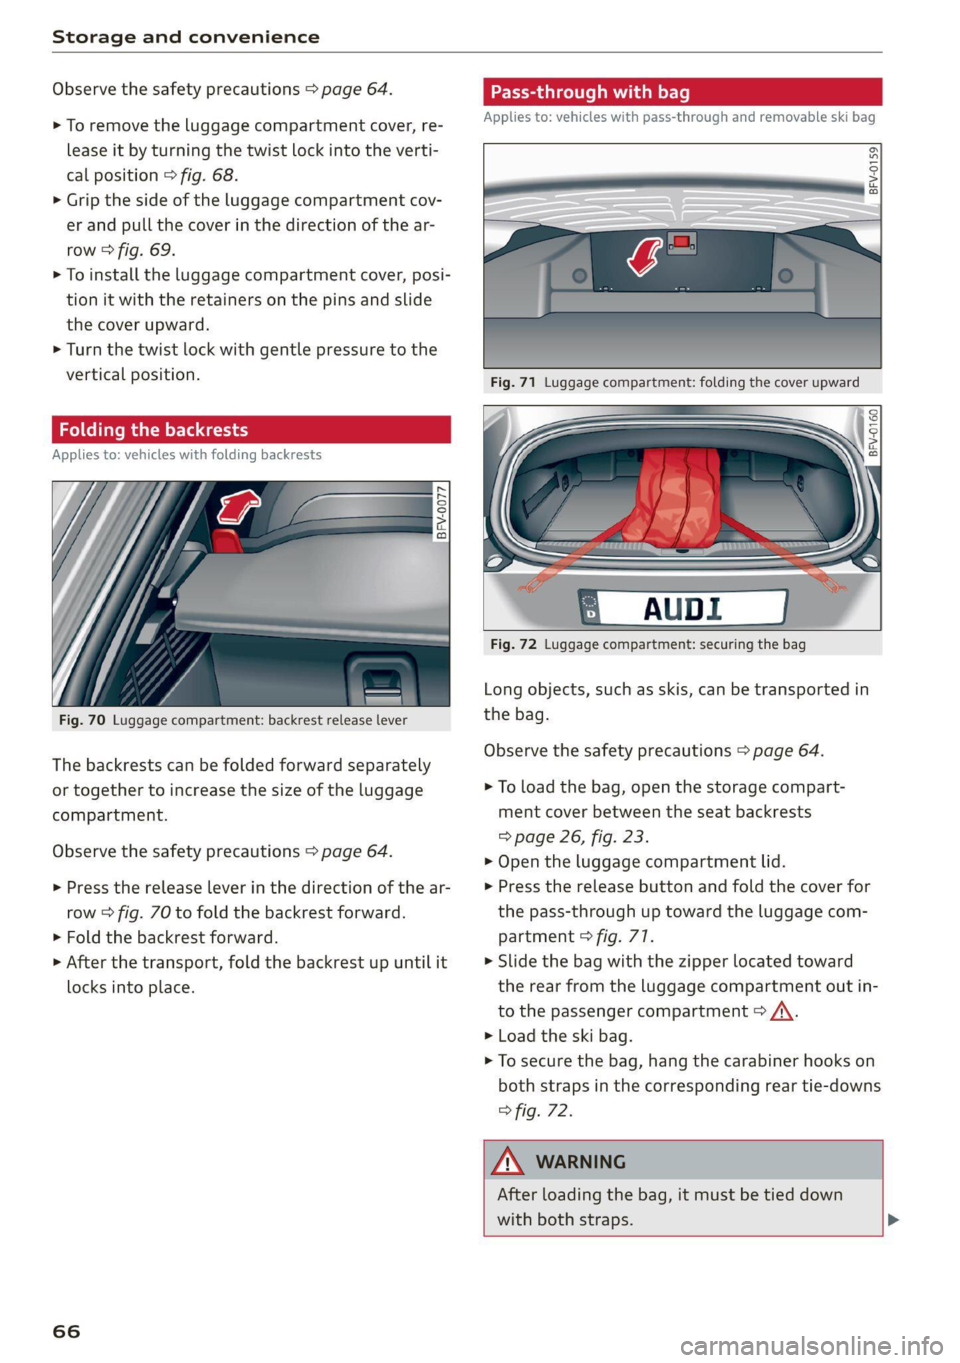
Fig. 70 Luggage compartment: backrest release lever
The backrests can be folded forward separately
or together to increase the size of the luggage
compartment.
Observe the safety precautions > page 64.
> Press the release lever in the direction of the ar-
row > fig. 70 to fold the backrest forward.
> Fold the backrest forward.
> After the transport, fold the backrest up until it
locks into place.
66
Pass-through with bag
Applies to: vehicles with pass-through and removable ski bag
BFV-0159
BFV-0160
Fig. 72 Luggage compartment: securing the bag
Long objects, such as skis, can be transported in
the bag.
Observe the safety precautions > page 64.
> To load the bag, open the storage compart-
ment cover between the seat backrests
=> page 26, fig. 23.
> Open the luggage compartment lid.
>» Press the release button and fold the cover for
the pass-through up toward the luggage com-
partment > fig. 77.
> Slide the bag with the zipper located toward
the rear from the luggage compartment out in-
to the passenger compartment oA.
> Load the ski bag.
>» To secure the bag, hang the carabiner hooks on
both straps in the corresponding rear tie-downs
> fig. 72.
ZX WARNING
After loading the bag, it must be tied down
with both straps. >
Page 72 of 280
Warm and cold
Deluxe automatic climate control
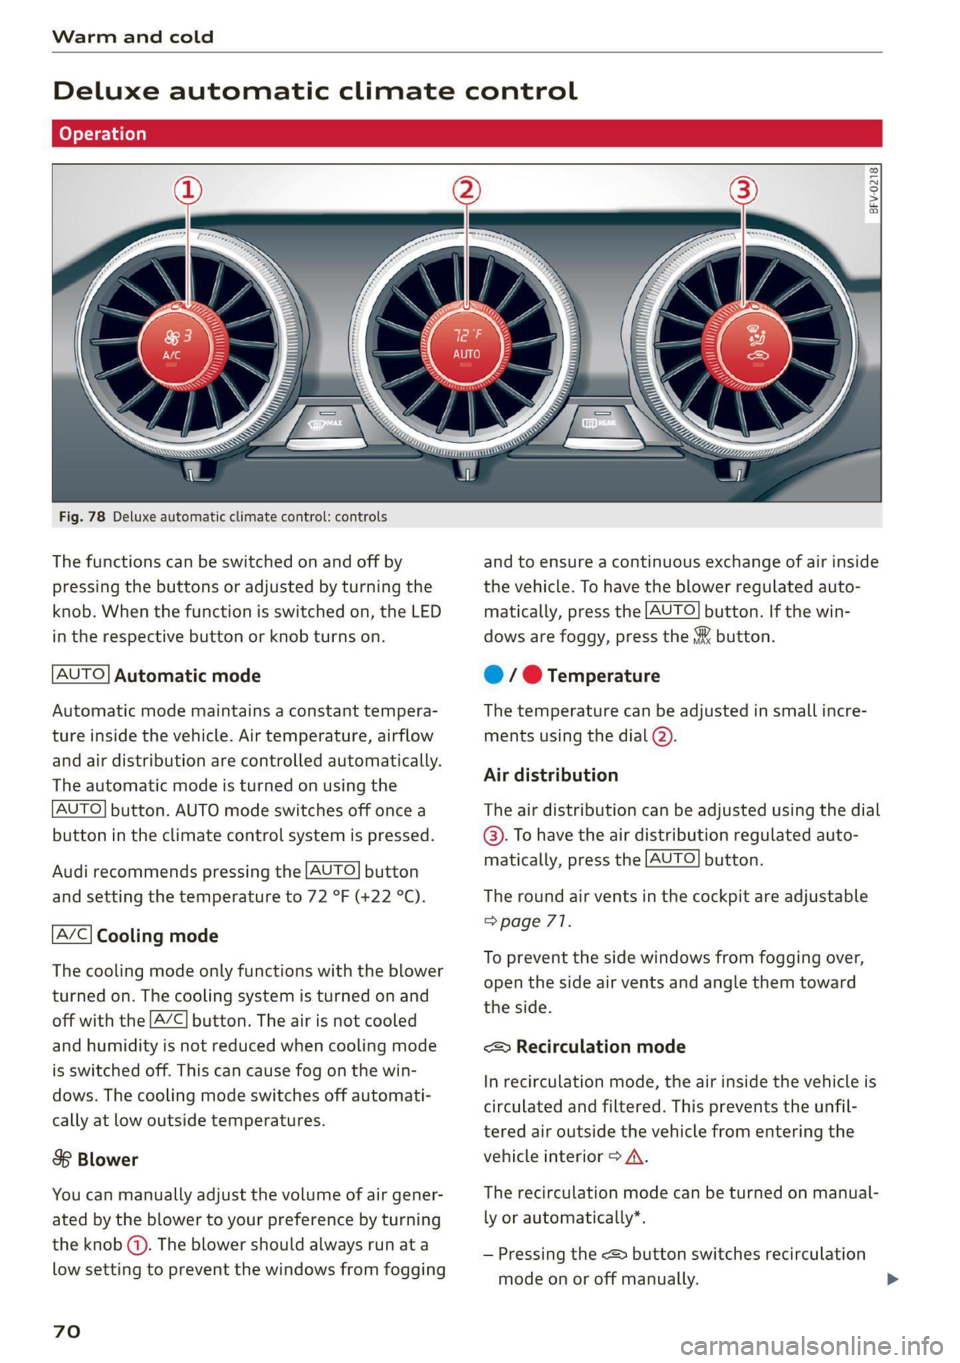
Fig. 78 Deluxe automatic climate control: controls
The functions can be switched on and off by
pressing the buttons or adjusted by turning the
knob. When the function is switched on, the LED
in the respective button or knob turns on.
AUTO] Automatic mode
Automatic mode maintains a constant tempera-
ture inside the vehicle. Air temperature, airflow
and air distribution are controlled automatically.
The automatic mode is turned on using the
AUTO] button. AUTO mode switches off once a
button in the climate control system is pressed.
Audi recommends pressing the [AUTO] button
and setting the temperature to 72 °F (+22 °C).
A/C} Cooling mode
The cooling mode only functions with the blower
turned on. The cooling system is turned on and
off with the [A/C] button. The air is not cooled
and humidity is not reduced when cooling mode
is switched off. This can cause fog on the win-
dows. The cooling mode switches off automati-
cally at low outside temperatures.
S$ Blower
You can manually adjust the volume of air gener-
ated by the blower to your preference by turning
the knob (4). The blower should always run at a
low setting to prevent the windows from fogging
70
BFV-0218
and to ensure a continuous exchange of air inside
the vehicle. To have the blower regulated auto-
matically, press the [AUTO] button. If the win-
dows are foggy, press the & button.
@ / @ Temperature
The temperature can be adjusted in small incre-
ments using the dial (2).
Air distribution
The air distribution can be adjusted using the dial
@. To have the air distribution regulated auto-
matically, press the [AUTO] button.
The round air vents in the cockpit are adjustable
=> page 71.
To prevent the side windows from fogging over,
open the side air vents and angle them toward
the side.
< Recirculation mode
In recirculation mode, the air inside the vehicle is
circulated and filtered. This prevents the unfil-
tered air outside the vehicle from entering the
vehicle interior > A\.
The recirculation mode can be turned on manual-
ly or automatically*.
— Pressing the <> button switches recirculation
mode on or off manually.
Page 76 of 280
Driving
Driving
General information
Breaking in
A new vehicle must be broken in within the first
1,000 miles (1,500 km) so that all moving parts
work smoothly together, which helps to increase
the service life of the engine and other drive com-
ponents.
Do not drive higher than two-thirds of the maxi-
mum permitted engine RPM during the first 600
miles (1,000 km) and do not use full accelera-
tion. The engine can be increased RPM gradually
during the next 300 miles (S00 km).
Trailer mode
® Note
Your Audi is not designed for towing a trailer.
Damage caused by towing a trailer is not cov-
ered by the warranty.
Reducing the risk of vehicle damage
@) Note
When driving on poor roads, over curbs, and
on steep ramps, make sure that components
that hang below the vehicle, such as the spoil-
er and exhaust system, are not struck because
they could be damaged. This especially ap-
plies
to vehicles with low ground clearance
and vehicles that are heavily loaded.
Driving through water
If you must drive through water, follow these in-
structions:
— Check the stability of the ground, the current,
and the water depth. If the ground is unstable,
there is a strong current, or there are waves,
the water must only reach up to the lower edge
of the body at the most.
— Deactivate the Start/Stop system*.
— Drive carefully and no faster than at walking
speeds to prevent the front of the vehicle from
creating waves, because they could splash
above the lower edge of the body. Oncoming
vehicles could also create waves.
— Do not stop the vehicle while in the water.
— Drive in reverse.
— Do not turn the engine off.
ZA WARNING
After driving through water, press the brake
pedal carefully to dry the brakes so that the
full braking effect will be restored.
@) Note
Vehicle components such as the motor, drive
system, suspension, or electrical system can
be severely damaged by driving through wa-
ter
Gi) Tips
If possible, avoid driving through salt water
because it increases the risk of corrosion. Use
fresh water to clean any vehicle components
that come into contact with salt water.
Efficient and environmentally-friendly
driving
The amount of fuel consumption, the environ-
mental impact, and the wear to the engine,
brakes, and tires depends mostly on your driving
style. Note the following information for efficient
and environmentally-conscious driving:
— Turn off electrical equipment that is not need-
ed, for example seat heating*.
— Anticipate upcoming traffic situations while
driving to avoid unnecessary acceleration and
braking.
— Avoid driving at high speeds.
— Avoid adding extra weight to the vehicle if pos-
sible, for example by not leaving roof racks or
bike racks installed when they are not needed.
— Make sure the tire pressure is correct.
— Have maintenance performed regularly on the
vehicle.
— Do not let the engine run while the vehicle
parked.
Page 87 of 280

8S1012721BE
Driving
— If the engine must run while you are working
in the engine compartment with the hood
open, make sure a gear is not engaged. The
selector lever must be firmly in the P posi-
tion and locked in place and the parking
brake must be set > page 200. Otherwise,
the vehicle could begin moving when in-
creasing the engine speed, even with the
parking brake set.
() Note
— If you have to stop on an incline, always
press the brake pedal to hold the vehicle in
place to reduce the risk of the vehicle rolling
backward. Do not try to hold the vehicle in
place by pressing and holding the accelera-
tor pedal. The transmission can overheat,
which increases the risk of damage.
— Allowing the vehicle to roll when the engine
is stopped and the selector lever is in the N
position will damage the automatic trans-
mission because it is not lubricated under
those circumstances.
— The transmission can overheat and be dam-
aged under certain driving and traffic condi-
tions such as frequent starts, creeping fora
long time, or stop-and-go traffic. When the
i or os] indicator light turns on, stop the
vehicle at the next opportunity and let the
transmission cool > page 87.
— Allowing the vehicle to roll when the engine
is stopped will damage the S tronic trans-
mission because it is not lubricated
= page 250, Towing.
@® Tips
For safety reasons, the parking brake is re-
leased automatically only when the driver's
safety belt is fastened.
Hill descent control
The hill descent control system assists the driver
when driving down hills.
Hill descent control is activated when the selec-
tor lever is in the "D" or "S" position and you
press the brake pedal. The transmission auto-
matically selects a gear that is suitable for the
hill. Hill descent control tries to maintain the
speed that was selected at the time of braking,
within physical and technical limitations. If may
still be necessary to adjust the speed with the
brakes. Because hill descent control cannot shift
down farther than 3rd gear, it may be necessary
to shift into tiptronic mode in very steep areas. In
this case, shift manually into 1st or 2nd gear in
tiptronic mode to use the engine's braking force
to relieve the brakes.
Hill descent control switches off once the hill lev-
els
out or if you press the accelerator pedal.
On vehicles with a cruise control system*
= page 89, hill descent control is also activated
when the speed is set.
ZA\ WARNING
Hill descent control may not be able to main-
tain a constant speed under all conditions. Al-
ways be ready to apply the brakes.
Shifting manually (tiptronic mode)
The tiptronic mode allows the driver to shift the
gears manually.
| 8Fv-0114]
Fig. 90 Center console: shifting manually with the selector
lever
Fig. 91 Steering wheel: shift paddles*
8s
Page 88 of 280
Driving
You can shift the gears manually when in “D”
mode. The transmission must be in tiptronic
mode.
Shifting with the selector lever
You can shift into manual shifting mode while the
vehicle is stationary or while driving.
> To switch to manual shifting mode, tilt the se-
lector lever toward the front passenger's side
> fig. 90. “M” will be displayed in the instru-
ment cluster.
> Upshifting: push the selector lever forward G).
> Downshifting: push the selector lever toward
the rear ©).
> To switch back to automatic mode, tilt the se-
lector lever toward the driver's side.
Shifting with the shift paddles
Applies to: vehicles with shift paddles
> Upshifting: press the @) shift paddle © fig. 97.
> Downshifting: press the ©) shift paddle.
» Applies to: RS models: To select the lowest/
highest possible gear, press and hold the shift
paddle @)/@).
If the shift paddles are tapped while in the D/S
selector lever position, automatic mode switches
off briefly. To switch from manually shifting back
to automatic shifting immediately, tap the shift
paddle @) © fig. 97 for 1 second.
To keep shifting manually, tilt the selector lever
toward the front passenger's side.
@ Tips
— The transmission only allows manual shift-
ing when the engine speed is within the per-
mitted range.
— The transmission automatically shifts up or
down before critical engine speed is
reached.
— Applies to: RS models: When accelerating,
the transmission will not automatically shift
to the next gear shortly before the maxi-
mum permitted engine RPM is reached.
Shift to the next highest gear at the right
time.
86
Kick-down enables maximum acceleration.
When you press the accelerator pedal down be-
yond the resistance point, the automatic trans-
mission downshifts into a lower gear and the en-
gine utilizes its full power, if the vehicle speed
and engine RPM permit. It shifts up into the next
higher gear once the maximum permitted engine
RPM is reached.
ZA\ WARNING
Please note that the wheels could spin on
slick or slippery roads when kick-down is ac-
tive.
Launch Control
Applies to: vehicles with Launch Control
Launch Control provides the best possible accel-
eration when starting from a stop.
Requirements
— The engine must be at operating temperature.
— The steering wheel must not be turned.
— Start/Stop system* must be deactivated
=> page 79.
— ESC must be limited > page 105.
— Driving program “S” > page 82 or the Dynamic
Audi drive select* mode must be selected
=> page 96.
Using Launch Control
— Press the brake pedal with your left foot and
hold it all the way down for at least one second.
— With the brake pedal pressed, press the accel-
erator pedal all the way down with your right
foot at the same time.
— Once the engine reaches a constant speed, re-
move your foot from the brake pedal.
Once the vehicle has started moving, reactivate
the ESC so that it is fully functional.
ZA WARNING
Only use Launch Control when road and traffic
conditions allow it and other road users will
not be endangered or impacted by your >
Page 92 of 280
Assist systems
Switching the system on
Applies to: vehicles with cruise control system
BFV-0220
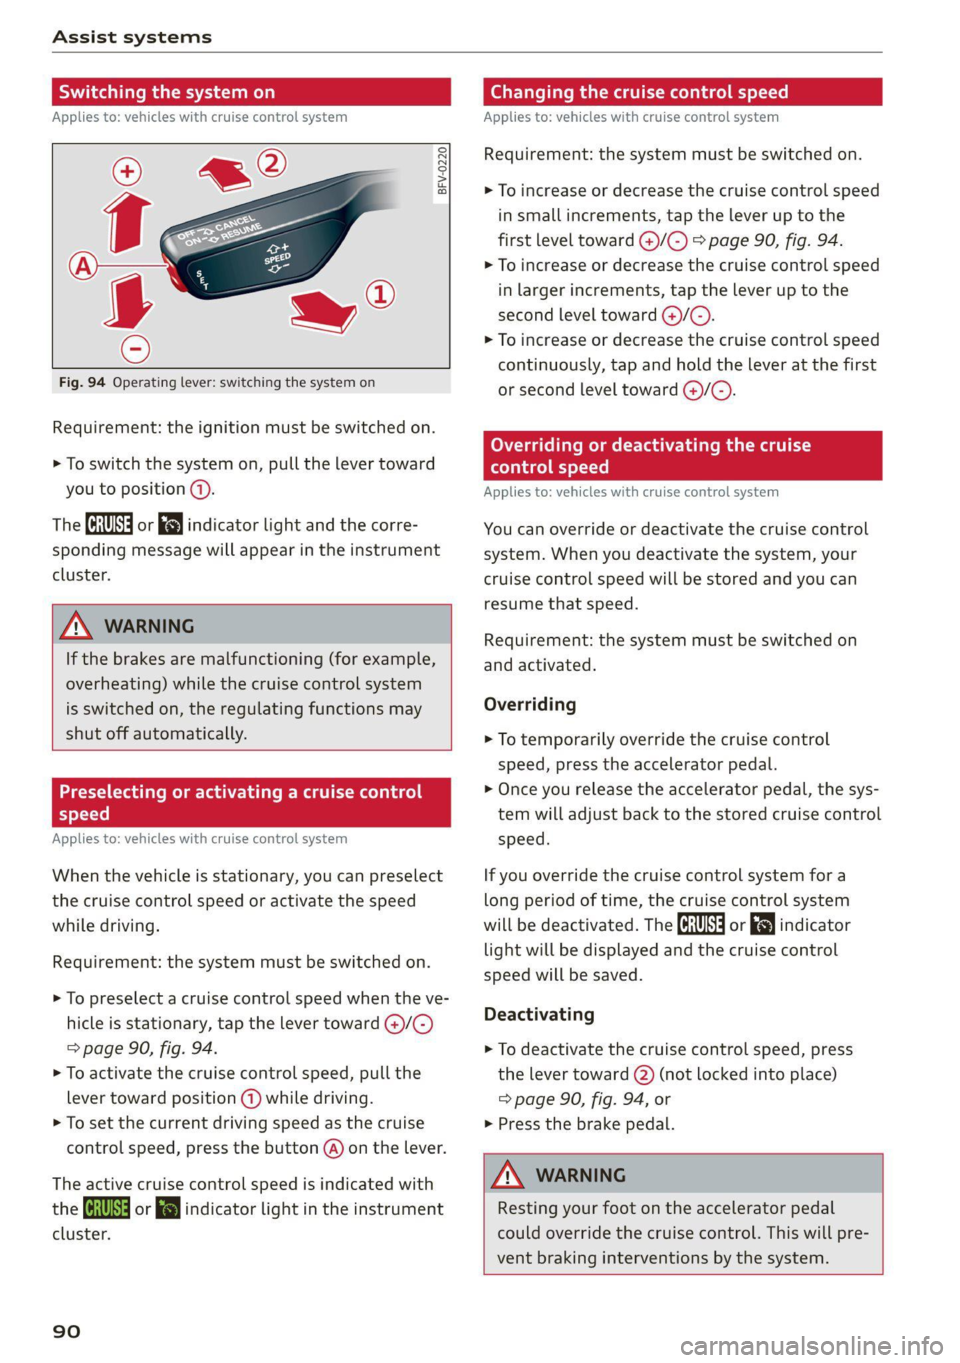
Fig. 94 Operating lever: switching the system on
Requirement: the ignition must be switched on.
> To switch the system on, pull the lever toward
you to position (4).
The (a or (8) indicator light and the corre-
sponding message will appear in the instrument
cluster.
ZA\ WARNING
If the brakes are malfunctioning (for example,
overheating) while the cruise control system
is switched on, the regulating functions may
shut off automatically.
Preselecting or activating a cruise co
speed
Applies to: vehicles with cruise control system
When the vehicle is stationary, you can preselect
the cruise control speed or activate the speed
while driving.
Requirement: the system must be switched on.
> To preselect a cruise control speed when the ve-
hicle is stationary, tap the lever toward @)/G)
=> page 90, fig. 94.
> To activate the cruise control speed, pull the
lever toward position (@) while driving.
> To set the current driving speed as the cruise
control speed, press the button @) on the lever.
The active cruise control speed is indicated with
the Gs or =) indicator light in the instrument
cluster.
90
Changing the cruise control speed
Applies to: vehicles with cruise control system
Requirement: the system must be switched on.
> To increase or decrease the cruise control speed
in small increments, tap the lever up to the
first level toward @/C) > page 90, fig. 94.
> To increase or decrease the cruise control speed
in larger increments, tap the lever up to the
second level toward @)/C).
> To increase or decrease the cruise control speed
continuously, tap and hold the lever at the first
or second level toward (+)/G).
Overriding or deactivating the cruise
control speed
Applies to: vehicles with cruise control system
You can override or deactivate the cruise control
system. When you deactivate the system, your
cruise control speed will be stored and you can
resume that speed.
Requirement: the system must be switched on
and activated.
Overriding
> To temporarily override the cruise control
speed, press the accelerator pedal.
> Once you release the accelerator pedal, the sys-
tem will adjust back to the stored cruise control
speed.
If you override the cruise control system for a
long period of time, the cruise control system
will be deactivated. The [M4 or RSM indicator
light will be displayed and the cruise control
speed will be saved.
Deactivating
> To deactivate the cruise control speed, press
the lever toward (2) (not locked into place)
=> page 90, fig. 94, or
» Press the brake pedal.
ZA WARNING
Resting your foot on the accelerator pedal
could override the cruise control. This will pre-
vent braking interventions by the system.
Page 93 of 280
8S1012721BE
Assist systems
Seem ea
Applies to: vehicles with cruise control system
When you switch the system off, the cruise con-
trol speed will be erased.
Requirement: the system must be switched on.
> To switch the system off, press the lever toward
@ (locked into place) > page 90, fig. 94, or
> Switch the ignition off.
Applies to: vehicles with cruise control system
ICRUISE| / 3) Speed control system: currently un-
available. See owner's manual
If the indicator light turns on and this message
appears, the cruise control system has been de-
activated. There is a temporary malfunction, for
example the brakes are overheating. Switch the
cruise control system on again later.
Lap timer
Introduction
Applies to: vehicles with lap timer
You can measure and analyze lap times with the
lap timer in the display. The time is measured in
minutes, seconds and 1/10 seconds. With lap
times longer than 60 minutes, the hour is also
shown and the display of 1/10 seconds is re-
moved.
The time measurement on an individual lap ends
after 99 hours 59 minutes and 59 seconds. A new
lap starts automatically after that.
You can control the lap timer using the controls
on the multifunction steering wheel > page 72.
ZA WARNING
Your focus should always be on driving your
vehicle safely. As the driver, you have com-
plete responsibility for safety in traffic. To re-
duce the risk of an accident, only use the lap
timer functions in such a way that you always
maintain complete control over your vehicle in
all traffic situations.
@) Tips
You can retrieve information from the trip
computer while the lap timer stopwatch is
running.
Caer mi ra Opening the lap
Applies to: vehicles with lap timer
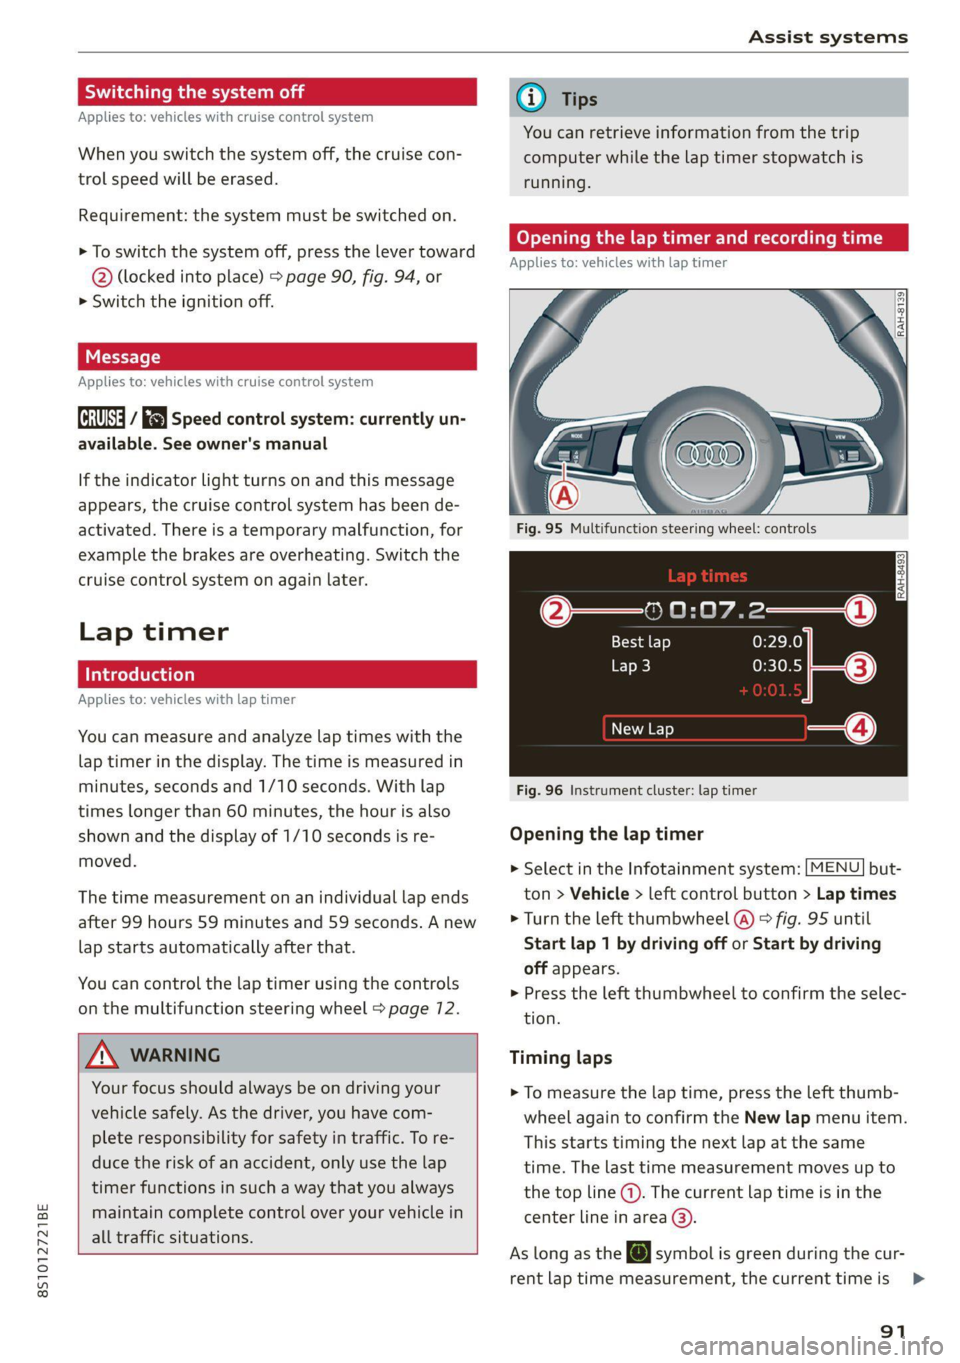
Fig. 95 Multifunction steering wheel: controls
[RAH-£493]
@—» 0:07.2——_@
Best lap 0:29.0
0:30.5 ETO)
New Lap
Fig. 96 Instrument cluster: lap timer
Opening the lap timer
> Select in the Infotainment system: [MENU] but-
ton > Vehicle > left control button > Lap times
> Turn the left thumbwheel @) © fig. 95 until
Start lap 1 by driving off or Start by driving
off appears.
> Press the left thumbwheel to confirm the selec-
tion.
Timing laps
> To measure the lap time, press the left thumb-
wheel again to confirm the New lap menu item.
This starts timing the next lap at the same
time. The last time measurement moves up to
the top line @). The current lap time is in the
center line in area @).
As long as the [@J symbol is green during the cur-
rent lap time measurement, the current timeis >
91
Page 95 of 280

8S1012721BE
Assist systems
— If timing is paused, you can continue it later
even if you switch the ignition off.
— Saved lap times cannot be individually de-
leted from the total results.
— The saved lap timer values will remain after
switching the ignition off.
Audi side assist
Applies to: vehicles with Audi side assist
BFV-0079
Fig. 98 Diagram: coverage area of the sensors
BFV-0080
Fig. 99 Exterior mirror: display
Side assist helps you monitor your blind spot and
traffic behind your vehicle. Within the limits of
the system, it warns you about vehicles that are
coming closer or that are traveling with you with-
in sensor range @) > fig. 98: if a lane change is
classified as critical, the display @ in the exterior
mirror © fig. 99 turns on.
The display in the left exterior mirror provides as-
sistance when making a lane change to the left,
while the display in the right exterior mirror pro-
vides assistance when making a lane change to
the right.
Information stage
As long as you do not activate the turn signal,
side assist informs you about vehicles that are
detected and classified as critical. The display in
the mirror turns on, but is dim.
The display remains dim in the information stage
so that your view toward the front is not distur-
bed.
Warning stage
If you activate the turn signal, side assist warns
you about vehicles that are detected and classi-
fied as critical. The display in the respective mir-
ror blinks brightly. If this happens, check traffic
by glancing in the exterior mirrors and over your
shoulder > A\ in General information on
page 94.
You can adjust the brightness on of the dis-
play on the rearview mirror > page 95.
93