ignition AUDI TT 2021 Owner´s Manual
[x] Cancel search | Manufacturer: AUDI, Model Year: 2021, Model line: TT, Model: AUDI TT 2021Pages: 280, PDF Size: 99.18 MB
Page 49 of 280
8S1012721BE
Sitting correctly and safely
AN WARNING
The power front seats can also be adjusted
when the ignition is switched off. For this rea-
son, children should never be left unattended
in the vehicle because they could be injured.
It ttetarad (elem eleiacoya
Applies to: vehicles with multifunction button
You can adjust the side bolsters using the multi-
function button.
> If you turn the multifunction button @)
=> page 46, fig. 57 to the left or right, the side
bolsters on the seat backrests will increase or
decrease the lateral support.
@ Tips
The air in the side bolsters* is released as
soon as the driver's door opens. This makes is
possible to enter and exit the vehicle more
comfortably. As soon as you start driving the
vehicle, the side bolsters fill.
TSA
Applies to: vehicles with easy entry function
Easy seat entry makes it easier to get into the
back seats.
BFV-0119
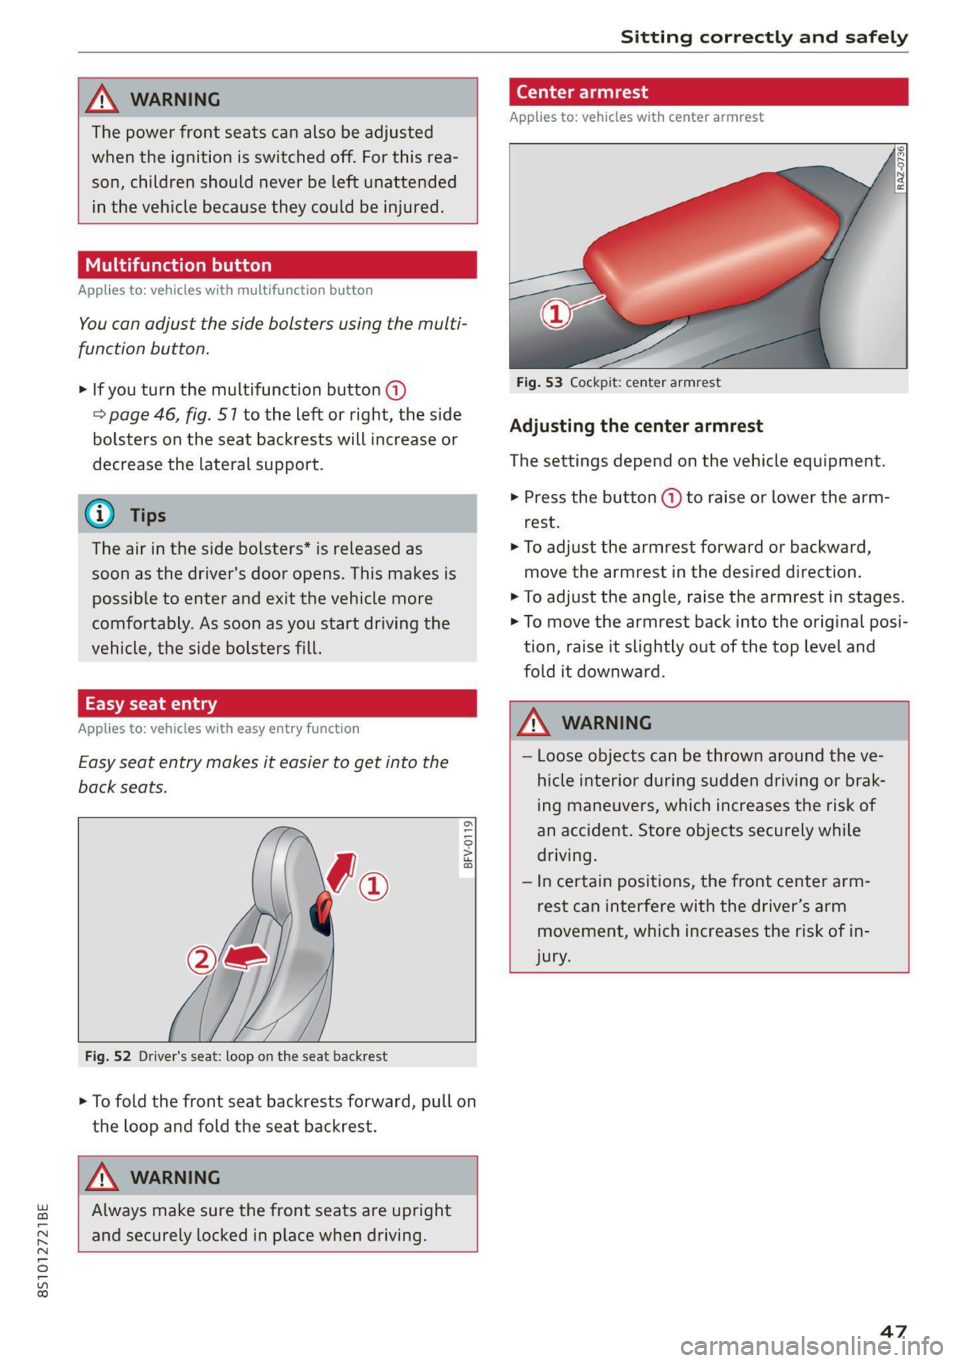
Fig. 52 Driver's seat: loop on the seat backrest
> To fold the front seat backrests forward, pull on
the loop and fold the seat backrest.
A\ WARNING
Always make sure the front seats are upright
and securely locked in place when driving.
Cea
Applies to: vehicles with center armrest
Fig. 53 Cockpit: center armrest
Adjusting the center armrest
The settings depend on the vehicle equipment.
> Press the button (A) to raise or lower the arm-
rest.
> To adjust the armrest forward or backward,
move the armrest in the desired direction.
> To adjust the angle, raise the armrest in stages.
> To move the armrest back into the original posi-
tion, raise it slightly out of the top level and
fold it downward.
Z\, WARNING
— Loose objects can be thrown around the ve-
hicle interior during sudden driving or brak-
ing maneuvers, which increases the risk of
an accident. Store objects securely while
driving.
— In certain positions, the front center arm-
rest can interfere with the driver’s arm
movement, which increases the risk of in-
jury.
47
Page 55 of 280

8S1012721BE
Sitting correctly and safely
had asthma or other health issues that af-
fect breathing. Exit the vehicle or open the
windows or doors to get access to fresh air.
@ Tips
If you are transporting children in the vehicle,
read the information and follow the safety
precautions > page 57.
Safety systems monitoring
The ka indicator light in the instrument cluster
monitors the safety systems such as the airbags
(including the control modules, sensor, and wir-
ing) and the belt tensioners. It turns on when you
switch the ignition on and turns off after several
seconds.
If the indicator light does not turn on when the
ignition is switched on, does not turn off after
several seconds, or turns on or flashes while driv-
ing, there may be a malfunction in one of the
safety systems. Drive to an authorized Audi deal-
er or authorized Audi Service Facility immediately
to have the malfunction corrected.
ZA\ WARNING
Have the malfunction in the safety systems in-
spected immediately. Otherwise, there is a
risk that the systems may not activate during
an accident, which increases the risk of seri-
ous or fatal injury.
53
Page 57 of 280

8S1012721BE
Sitting correctly and safely
The locations of the airbags are labeled with
“AIRBAG”. The following airbags are installed in
your vehicle:
Driver's airbag
Front passenger's airbag
Side airbags
Applies
to: Coupe: Head curtain airbag with
ejection mitigation
©
©0080
Knee airbags
Airbags offer the best possible protection in your
vehicle during an accident when they are used to-
gether with safety belts that are fastened cor-
rectly, and when passengers are sitting in the
correct seating position. Airbags are a supple-
mentary restraint system and do not replace
safety belts.
Applies to: Coupe: Airbags may deploy during
head-on, side-impact, or rollover collisions.
Applies to: Roadster: Airbags may deploy during
head-on or side-impact collisions.
The deployment area for the airbag system can-
not be defined for every situation, since the cir-
cumstances surrounding accidents can vary wide-
ly. Factors that play an important role include the
condition of the object that the vehicle hits (hard
or soft), the angle of impact, vehicle speed, etc.
The deciding factor for the deployment of the air-
bag system is the deceleration that occurs during
an accident. Sensors in the vehicle are designed
to detect the severity of an accident in conjunc-
tion with the control module, and to provide a
targeted and timely deployment of the restraint
system. If the vehicle deceleration that is meas-
ured during an accident is below the specified
reference values in the control module, then the
airbags will not deploy, even though the vehicle
may be severely damaged from the accident. In
these cases, the vehicle occupants will be pro-
tected by the safety belts if they are fastened and
worn correctly.
The deployment of the front passenger's airbag
will depend on the occupancy of the seat
=> page 55.
Each deployed airbag is filled with gas. When this
occurs, the airbag covers open and the airbags
unfold with great force into the deployment zone
within milliseconds. Inflated airbags reduce the
movement of passengers wearing safety belts in
the direction of the impact and thus help to re-
duce the risk of injury. They can help to protect
the head, upper body, and lap, for example. How-
ever, there is the possibility that airbag deploy-
ment can cause injuries.
The airbag system only works when the ignition
is turned on.
If you or other vehicle passengers have physical
limitations that prevent sitting in a correct posi-
tion, modifications to the vehicle may be neces-
sary. For more information, contact an author-
ized Audi dealer or authorized Audi Service Facili-
ty, or call Audi customer support at
1-800-822-2834.
) Tips
Applies to: Coupe
The side curtain airbags in your vehicle have
ejection mitigation functions. This reduces
the risk of being ejected from the vehicle inte-
rior during an accident, especially in the event
of a vehicle rollover.
Advanced airbag system
Fig. 62 Headliner: indicator light to display the status of
the front passenger's airbag
The Advanced Airbag System in your vehicle has
been certified to comply with the requirements
of the United States Federal Motor Vehicle Safety
Standard (FMVSS) 208, as well as Canada Motor
Vehicle Safety Standard (CMVSS) 208 as applica-
ble at the time your vehicle was manufactured.
According to these requirements, the front Ad-
vanced Airbag System on the passenger’s side
55
>
Page 58 of 280
Sitting correctly and safely
has been certified for “suppression” for infants
approximately 12 months old and younger, and
for “low risk deployment” for children aged 3 to
6 years old (as defined in the standard).
The advanced airbag system will activate or deac-
tivate the front passenger's airbag based on the
occupancy of the seat. If a front airbag deploys
during an accident, the deployment force will
adapt to the passenger.
Components
The advanced airbag system consists of the fol-
lowing components:
— Front airbags in the steering wheel and in the
instrument panel on the front passenger's side:
these can protect the front passengers during
an accident
— Passenger occupant detection sensor in the
front
passenger's seat: this detects if the front
passenger's seat is occupied (for example, by a
person or asmall child in a child safety seat)
— Seat position sensors on the front seats: these
determine the distance between the seat and
the steering wheel or instrument panel
— Sensors in the front seat belt latch: these de-
tect if the safety belts are fastened
— PASSENGER AIR BAG OFF 8%; ON ® indica-
tor light in the headliner:this indicates if the
front passenger's airbag is activated or deacti-
vated
- indicator light in the instrument cluster:
this monitors the function of the Advanced Air-
bag System components to ensure they are
functioning correctly
How the components function together
The passenger occupant detection sensor in the
front passenger's seat detects if the front pas-
senger's seat is occupied. The passenger occu-
pant detection sensor measures the electrical ca-
pacity on the front passenger’s seat. The pas-
senger's airbag is activated or deactivated de-
pending on the electrical capacity that is meas-
ured.
The passenger's airbag is activated if:
56
— The electrical capacity is higher than the
threshold stored in the control module
— The electrical capacity is the same as or greater
than the electrical capacity of a typical adult
The passenger's airbag is deactivated if:
— The electrical capacity is lower than the thresh-
old stored in the control module
— The electrical capacity is the same as or less
than the electrical capacity of a typical one-
year-old child in a child safety seat that has
been used for certification in accordance with
FMVSS 208
If the front passenger's airbag is activated, the
PASSENGER AIR BAG ON @ indicator light
will turn on. If the front passenger's airbag is de-
activated, the PASSENGER AIR BAG OFF #;
indicator light will turn on.
The deployment force of the front airbags adapts
based on whether or not the safety belt is used
and the distance between the seat and the steer-
ing wheel/instrument panel. For example, if a
person is too close to the front airbag, the front
airbag will deploy with less force to help reduce
the risk of injury.
Meaning of PASSENGER AIR BAG OFF #4, ON
® indicator light
When the ignition is switched on, the system de-
tects whether the front passenger's seat is occu-
pied. PASSENGER AIR BAG OFF #;, ON @
will turn on for several seconds during this proc-
ess. Then it will indicate whether the front pas-
senger's airbag is activated or deactivated.
— PASSENGER AIR BAG OFF 8%; the front
passenger's airbag is deactivated and will not
deploy in the event of an accident.
— PASSENGER AIR BAG ON @: the front pas-
senger's airbag is activated and could deploy in
the event of an accident.
If a change to the occupancy status of the front
passenger's seat is detected
PASSENGER AIR BAG OFF #, ON @ will
flash for several seconds and will then display the
status of the front passenger's airbag.
Page 65 of 280

8S1012721BE
Storage and convenience
Storage and convenience
Power sources
When the ignition is switched on, you may be
able to use multiple power sources for external
devices, depending on the vehicle equipment.
12 volt sockets
You can connect electrical accessories to the 12
volt sockets. The power usage from the sockets
must not exceed a total of 120 watts. Do not
connect multiple devices to the sockets in the ve-
hicle at the same time.
The 12 volt sockets are labeled with the 12V
symbol. They are located in the front center con-
sole and on the side trim panel in the luggage
compartment”.
USB ports
Applies to: vehicles with USB port
You can charge mobile devices using the USB
ports. The USB ports are labeled with the + or
[4 symbol or CHARGE ONLY.
ZA WARNING
—To reduce the risk of fatal injury, store all
connected devices securely when driving so
that they do not move around inside the ve-
hicle when braking or in the event of an acci-
dent.
— Incorrect usage can lead to serious injuries
or burns. To reduce the risk of injuries, never
leave children unattended in the vehicle
with the vehicle key.
@) Note
— Read the operating manuals for the con-
nected devices.
—To reduce the risk of damage to the vehicle
electrical system, never attempt to charge
the vehicle battery by connecting accesso-
ries that provide power to the power sour-
ces.
— Do not connect any device whose network
class (voltage) does not match the network
class designed for the socket.
— Disconnect the connectors from the power
sources carefully to reduce the risk of dam-
aging them.
G) Tips
Do not connect any other devices to the sock-
ets when using the compressor* provided by
the factory > page 242. The power consump-
tion in the sockets may be temporarily ex-
ceeded when using the compressor*.
Cup holders
Applies to: vehicles with cup holders
rr) RK S g >
gc oa
Fig. 67 Center armrest folded up: cup holder
Your vehicle has an open cup holder in the center
console > fig. 66 and there may be an additional
cup holder under the center armrest > fig. 67,
depending on vehicle equipment.
Cup holder under the center armrest*
> Fold the center armrest* upward > page 47.
> To use the cup holder, fold the plastic bracket
to the rear.
A WARNING
— Spilled hot liquid can increase the risk of ac-
cidents and injuries. >
63
Page 73 of 280
![AUDI TT 2021 Owner´s Manual 8S1012721BE
Warm and cold
— Automatic recirculation mode*: automatic re-
circulation needs to be activated in the Info-
tainment system. Select in the Infotainment
system: [MENU] button > Ve AUDI TT 2021 Owner´s Manual 8S1012721BE
Warm and cold
— Automatic recirculation mode*: automatic re-
circulation needs to be activated in the Info-
tainment system. Select in the Infotainment
system: [MENU] button > Ve](/img/6/40287/w960_40287-72.png)
8S1012721BE
Warm and cold
— Automatic recirculation mode*: automatic re-
circulation needs to be activated in the Info-
tainment system. Select in the Infotainment
system: [MENU] button > Vehicle > left control
button > Vehicle settings > Air conditioning >
Auto recirculation. When switched on, auto-
matic recirculation controls the recirculation
mode automatically. You must press the $Y but-
ton if fog forms on the windows.
Pressing the <> button, [AUTO], or the 8 button
switches recirculation mode off.
® Defroster
The windshield and side windows are defrosted
or cleared of condensation as quickly as possible.
The maximum amount of air flows mainly from
the vents below the windshield. Recirculation
mode switches off. The temperature should be
set at +72 °F (22 °C) or higher. The temperature
is controlled automatically. Depending on the
outside temperature, the A/C cooling mode may
automatically switch on.
The [AUTO] button switches the defroster off.
& Rear window defogger
If the rear window defogger is activated when the
ignition is switched on, the battery management
determines based on the battery charge if it is
possible to turn on. Otherwise, the rear window
defogger functions with the engine running and
switches off automatically after 10 - 20 minutes,
depending on the outside temperature.
To prevent the rear window defogger from
switching off automatically, press and hold the
® button for more than two seconds. This re-
mains stored up to approximately 15 minutes af-
ter turning off the ignition.
Adjusting the vents
x 8 8
x z a
Fig. 79 Cockpit: adjusting the air vents
To adjust the direction of air flow, turn the
ridged outer adjustment wheel (1).
To adjust the amount of air flow, move the lever
@ on the air vent. To stop the air flow, move the
lever all the way to the left.
Seat heating
Fig. 80 Air vents: seat heating
Pressing the w button switches the seat heating
on at the highest setting (level 3). The LEDs indi-
cate the temperature level. To reduce the tem-
perature, press the button again. To switch the
seat heating off, press the button repeatedly un-
til the LED turns off.
Z\ WARNING
You should not use the recirculation mode for
an extended period since no fresh air is drawn
in. With the air-conditioning switched off, the
windows can fog up, which increases the risk
of an accident.
ZA WARNING
Individuals with reduced sensitivity to pain or
temperature could develop burns when using
the seat heating function. To reduce the risk
of injury, these individuals should not use seat
heating. >
71
Page 74 of 280
Warm and cold
@) Note
To reduce the risk of damage to the seat heat-
ing elements, do not kneel on the seats or
place heavy pressure on one area of the seat.
@) Tips
— The setting for the seat heating on the driv-
er's side is assigned to the key that is in use.
— If the front passenger's seat heating is
turned on, it will not turn on again automat-
ically if more than 10 minutes have passed
between switching the ignition off and
switching it on again.
Neck heating
Applies to: vehicles with neck heating
BFV-0177
BFV-0178
Fig. 82 Cockpit: neck heating
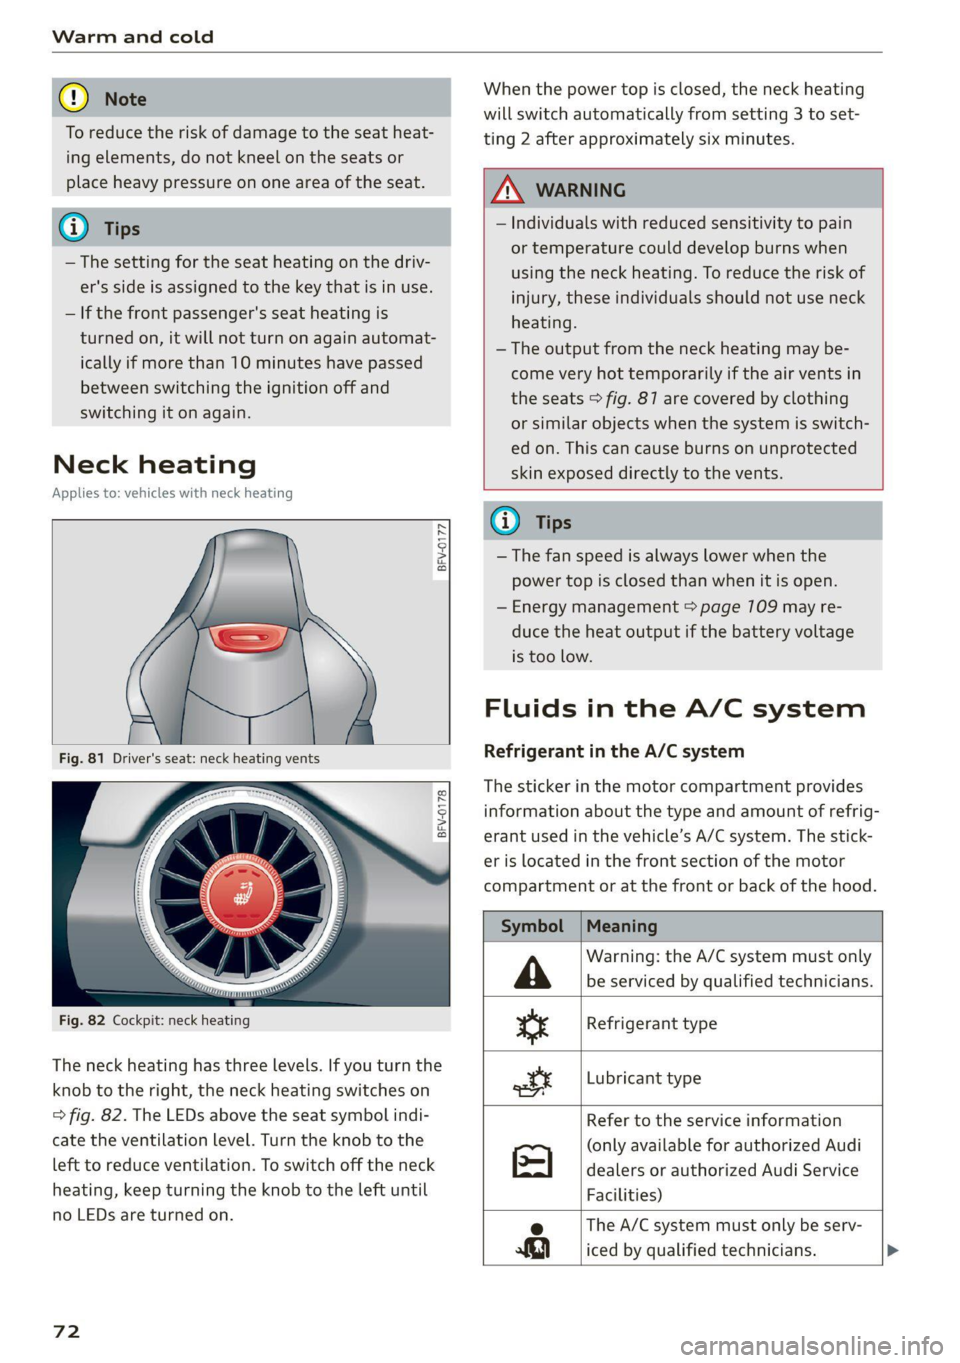
The neck heating has three levels. If you turn the
knob to the right, the neck heating switches on
=> fig. 82. The LEDs above the seat symbol indi-
cate the ventilation level. Turn the knob to the
left to reduce ventilation. To switch off the neck
heating, keep turning the knob to the left until
no LEDs are turned on.
72
When the power top is closed, the neck heating
will switch automatically from setting 3 to set-
ting 2 after approximately six minutes.
ZA WARNING
— Individuals with reduced sensitivity to pain
or temperature could develop burns when
using the neck heating. To reduce the risk of
injury, these individuals should not use neck
heating.
— The output from the neck heating may be-
come very hot temporarily if the air vents in
the seats > fig. 87 are covered by clothing
or similar objects when the system is switch-
ed on. This can cause burns on unprotected
skin exposed directly to the vents.
@ Tips
— The fan speed is always lower when the
power top is closed than when it is open.
— Energy management > page 109 may re-
duce the heat output if the battery voltage
is too low.
Fluids in the A/C system
Refrigerant in the A/C system
The sticker in the motor compartment provides
information about the type and amount of refrig-
erant used in the vehicle’s A/C system. The stick-
er is located in the front section of the motor
compartment or at the front or back of the hood.
Symbol
A
ss
ott
Meaning
Warning: the A/C system must only
be serviced by qualified technicians.
Refrigerant type
Lubricant type
Refer to the service information
(only available for authorized Audi
dealers or authorized Audi Service
Facilities)
e The A/C system must only be serv-
Ri} iced by qualified technicians. >
Page 77 of 280
8S1012721BE
Driving
— Do not drive with winter tires during the summ-
er.
— Utilize the engine braking effect.
— Avoid driving short distances when possible.
G) Tips
The amount of noise produced by the vehicle
can increase significantly when driving with a
sporty style. Show respect to others around
you and the environment with the way you op-
erate your vehicle, especially at night.
Starting and stopping
the engine
Starting the engine
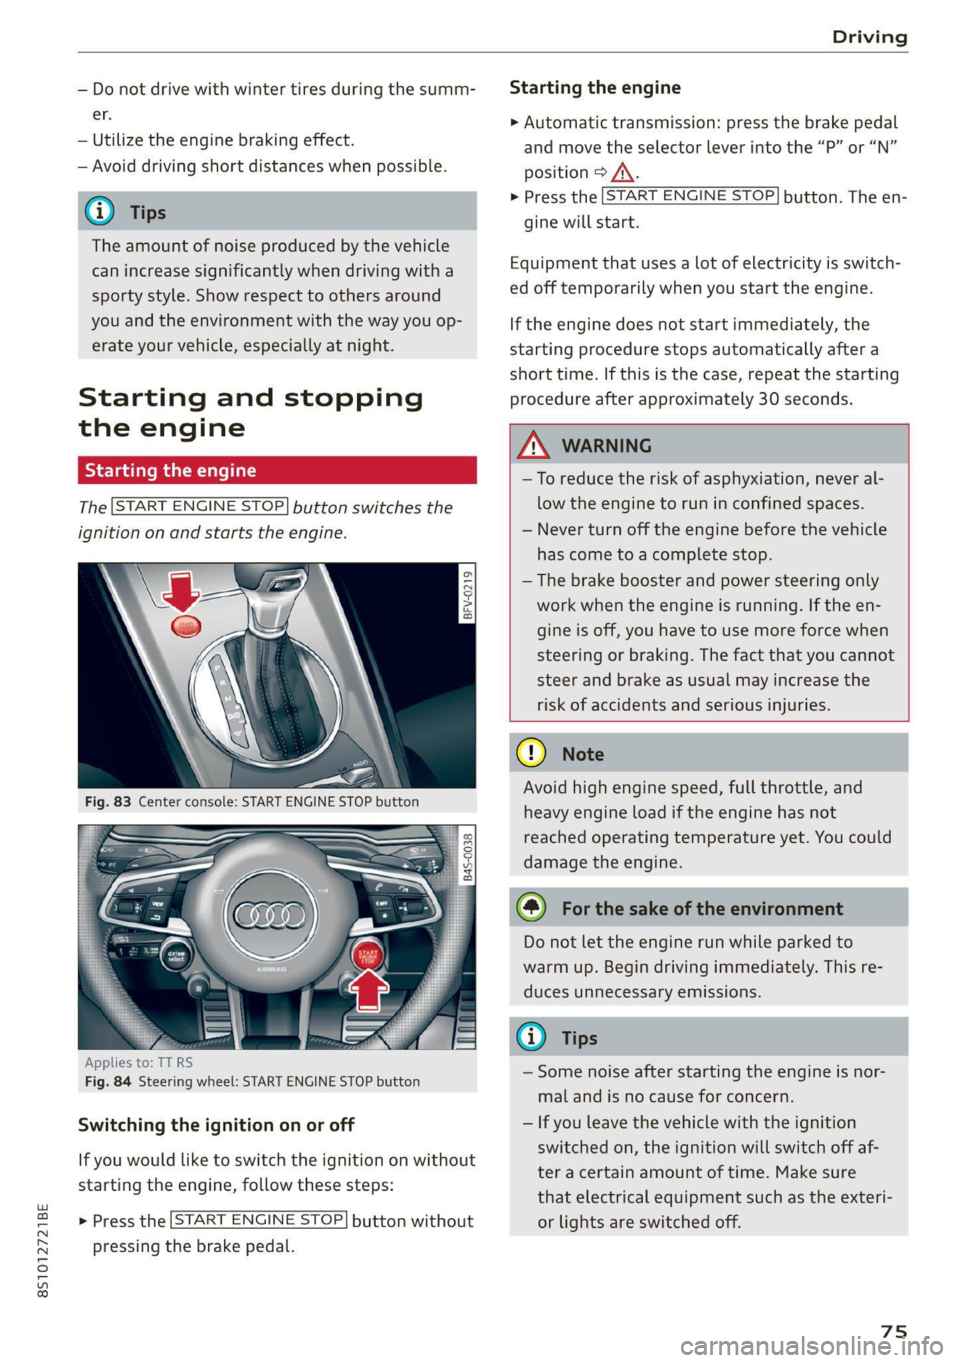
The [START ENGINE STOP] button switches the
ignition on and starts the engine.
[eFv-0219
|
8 Ss
& od = a
Applies to: TT RS
Fig. 84 Steering wheel: START ENGINE STOP button
Switching the ignition on or off
If you would like to switch the ignition on without
starting the engine, follow these steps:
> Press the [START ENGINE STOP} button without
pressing the brake pedal.
Starting the engine
> Automatic transmission: press the brake pedal
and move the selector lever into the “P” or “N”
position > /\.
> Press the [START ENGINE STOP} button. The en-
gine will start.
Equipment that uses a lot of electricity is switch-
ed off temporarily when you start the engine.
If the engine does not start immediately, the
starting procedure stops automatically after a
short time. If this is the case, repeat the starting
procedure after approximately 30 seconds.
ZA\ WARNING
—To reduce the risk of asphyxiation, never al-
low the engine to run in confined spaces.
— Never turn off the engine before the vehicle
has come to a complete stop.
— The brake booster and power steering only
work when the engine is running. If the en-
gine is off, you have to use more force when
steering or braking. The fact that you cannot
steer and brake as usual may increase the
risk of accidents and serious injuries.
() Note
Avoid high engine speed, full throttle, and
heavy engine load if the engine has not
reached operating temperature yet. You could
damage the engine.
@) For the sake of the environment
Do not let the engine run while parked to
warm up. Begin driving immediately. This re-
duces unnecessary emissions.
(i) Tips
— Some noise after starting the engine is nor-
mal and is no cause for concern.
— If you leave the vehicle with the ignition
switched on, the ignition will switch off af-
ter a certain amount of time. Make sure
that electrical equipment such as the exteri-
or lights are switched off.
75
Page 78 of 280
![AUDI TT 2021 Owner´s Manual Driving
Stopping the engine
> Bring the vehicle to a full stop.
> Press the [START ENGINE STOP] button.
Emergency off function*
If it is absolutely necessary, the engine can also
be AUDI TT 2021 Owner´s Manual Driving
Stopping the engine
> Bring the vehicle to a full stop.
> Press the [START ENGINE STOP] button.
Emergency off function*
If it is absolutely necessary, the engine can also
be](/img/6/40287/w960_40287-77.png)
Driving
Stopping the engine
> Bring the vehicle to a full stop.
> Press the [START ENGINE STOP] button.
Emergency off function*
If it is absolutely necessary, the engine can also
be turned off while driving at speeds starting at
4 mph (7 km/h). To stop the engine, press the
START ENGINE STOP] button twice in a row or
press and hold it one time.
Z\ WARNING
— Never turn off the engine before the vehicle
has come to a complete stop. Switching it
off before the vehicle has stopped may im-
pair the function of the brake booster and
power steering. You may need to use more
force when braking or steering. Because you
cannot brake and steer as you usually would,
this could lead to accidents and serious inju-
ries.
— If you leave the vehicle, switch the ignition
off and take the vehicle key with you. If you
do not do this, the engine could be started
and electrical equipment such as the power
windows could be activated. This can lead to
serious injuries.
— For safety reasons, always park the vehicle
with the selector lever in the P position.
Otherwise, there is the risk that the vehicle
could roll unintentionally.
@) Note
If the engine has been under heavy load for an
extended period of time, heat builds up in the
engine compartment after the engine is
switched off and there is a risk of damaging
the engine. For this reason, let the engine run
at idle for approximately two minutes before
shutting it off.
@) Tips
For up to 10 minutes after stopping the en-
gine, the radiator fan may turn on again auto-
matically or it may continue to run, even if the
ignition is switched off.
76
IY ett Tel -1
Pressing the start/stop button again will switch
off the engine
This message appears when you press the
START ENGINE STOP] button while driving.
Engine start system: malfunction! Please con-
tact Service
The engine automatic start system has a mal-
function. Drive immediately to an authorized
Audi dealer or authorized Audi Service Facility to
have the malfunction repaired. To start the en-
gine, press and hold the [START ENGINE STOP
button.
Remote control key: hold back of key
against the designated area. See owner's man-
ual
This message appears if there is no convenience
key inside the vehicle or if the system does not
recognize the key. The convenience key may not
be recognized, for example, if it is covered by an
object that disrupts the signal (such as a brief-
case), or if the key battery is weak. Electronic de-
vices such as cell phones can also interfere with
the signal.
To still be able to start or stop the engine, see
= page 77, Starting the engine when there is a
malfunction.
B Remote control key: key not detected. Is the
key still in the vehicle?
The B indicator light turns on and this message
appears if the convenience key was removed from
the vehicle when the engine was running. If the
convenience key is no longer in the vehicle, you
cannot switch the ignition on or start the engine
once you stop it. You also cannot lock the vehicle
from the outside.
Please press the brake pedal
This message appears if you do not press the
brake pedal when starting the engine.
Please select N or P
Page 79 of 280
8S1012721BE
Driving
This message appears when starting or stopping
the engine if the selector lever is not in the "N" or
"P" position. The engine will not start/stop.
Starting the engine when there is a
Teles (ela)
It may not be possible to start the engine under
certain circumstances, for example, if the bat-
tery in the vehicle key is drained, if interference
is affecting the key or if there is a system mal-
function.
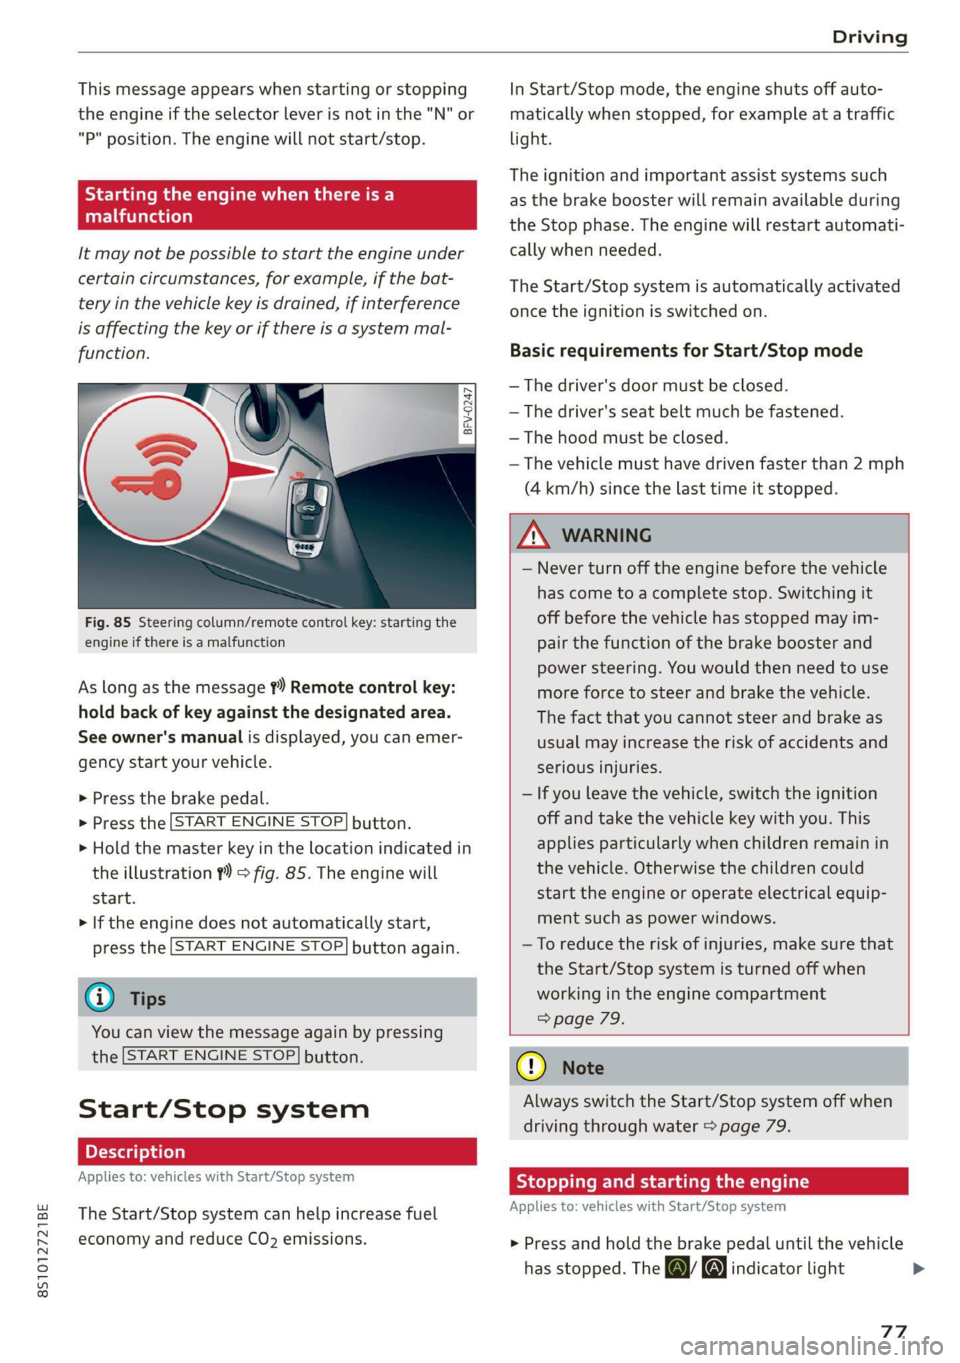
Fig. 85 Steering column/remote control key: starting the
engine if there is a malfunction
As long as the message ?) Remote control key:
hold back of key against the designated area.
See owner's manual is displayed, you can emer-
gency
start your vehicle.
» Press the brake pedal.
> Press the [START ENGINE STOP] button.
> Hold the master key in the location indicated in
the illustration ?) = fig. 85. The engine will
start.
> If the engine does not automatically start,
press the [START ENGINE STOP] button again.
@ Tips
You can view the message again by pressing
the [START ENGINE STOP] button.
Start/Stop system
Applies to: vehicles with Start/Stop system
The Start/Stop system can help increase fuel
economy and reduce CO2 emissions.
In Start/Stop mode, the engine shuts off auto-
matically when stopped, for example at a traffic
light.
The ignition and important assist systems such
as the brake booster will remain available during
the Stop phase. The engine will restart automati-
cally when needed.
The Start/Stop system is automatically activated
once the ignition is switched on.
Basic requirements for Start/Stop mode
— The driver's door must be closed.
— The driver's seat belt much be fastened.
— The hood must be closed.
— The vehicle must have driven faster than 2 mph
(4 km/h) since the last time it stopped.
Z\ WARNING
— Never turn off the engine before the vehicle
has come to a complete stop. Switching it
off before the vehicle has stopped may im-
pair the function of the brake booster and
power steering. You would then need to use
more force to steer and brake the vehicle.
The fact that you cannot steer and brake as
usual may increase the risk of accidents and
serious injuries.
— If you leave the vehicle, switch the ignition
off and take the vehicle key with you. This
applies particularly when children remain in
the vehicle. Otherwise the children could
start the engine or operate electrical equip-
ment such as power windows.
—To reduce the risk of injuries, make sure that
the Start/Stop system is turned off when
working in the engine compartment
> page 79.
@) Note
Always switch the Start/Stop system off when
driving through water > page 79.
Stopping and starting the engine
Applies to: vehicles with Start/Stop system
> Press and hold the brake pedal until the vehicle
has stopped. The a& indicator light
77