display AUDI TT 2021 Owner´s Manual
[x] Cancel search | Manufacturer: AUDI, Model Year: 2021, Model line: TT, Model: AUDI TT 2021Pages: 280, PDF Size: 99.18 MB
Page 101 of 280
8S1012721BE
Parking aid
Make sure the sensors are not covered by stick-
ers, deposits or any other obstructions as it may
impair the sensor function. For information on
cleaning, see > page 236.
The range at which the sensors begin to measure
is approximately:
Side 3 feet
(0.90 m)
Rear
Center 5.2 feet
(1.60 m)
The closer you get to the obstacle, the shorter
the interval between the audible signals. A con-
tinuous tone sounds when the obstacle is less
than approximately 1 foot (0.30 meters) away.
Do not continue backing up > A in Introduction
on page 98, > © in Introduction on page 98!
If the distance to an obstacle remains constant,
the volume of the distance warning gradually
drops after about four seconds (this does not ap-
ply in the continuous tone range).
Activating
The rear parking assist activates automatically
when the reverse gear is engaged. A brief tone
will sound.
Parking system plus
Description
Applies to: vehicles with parking aid plus
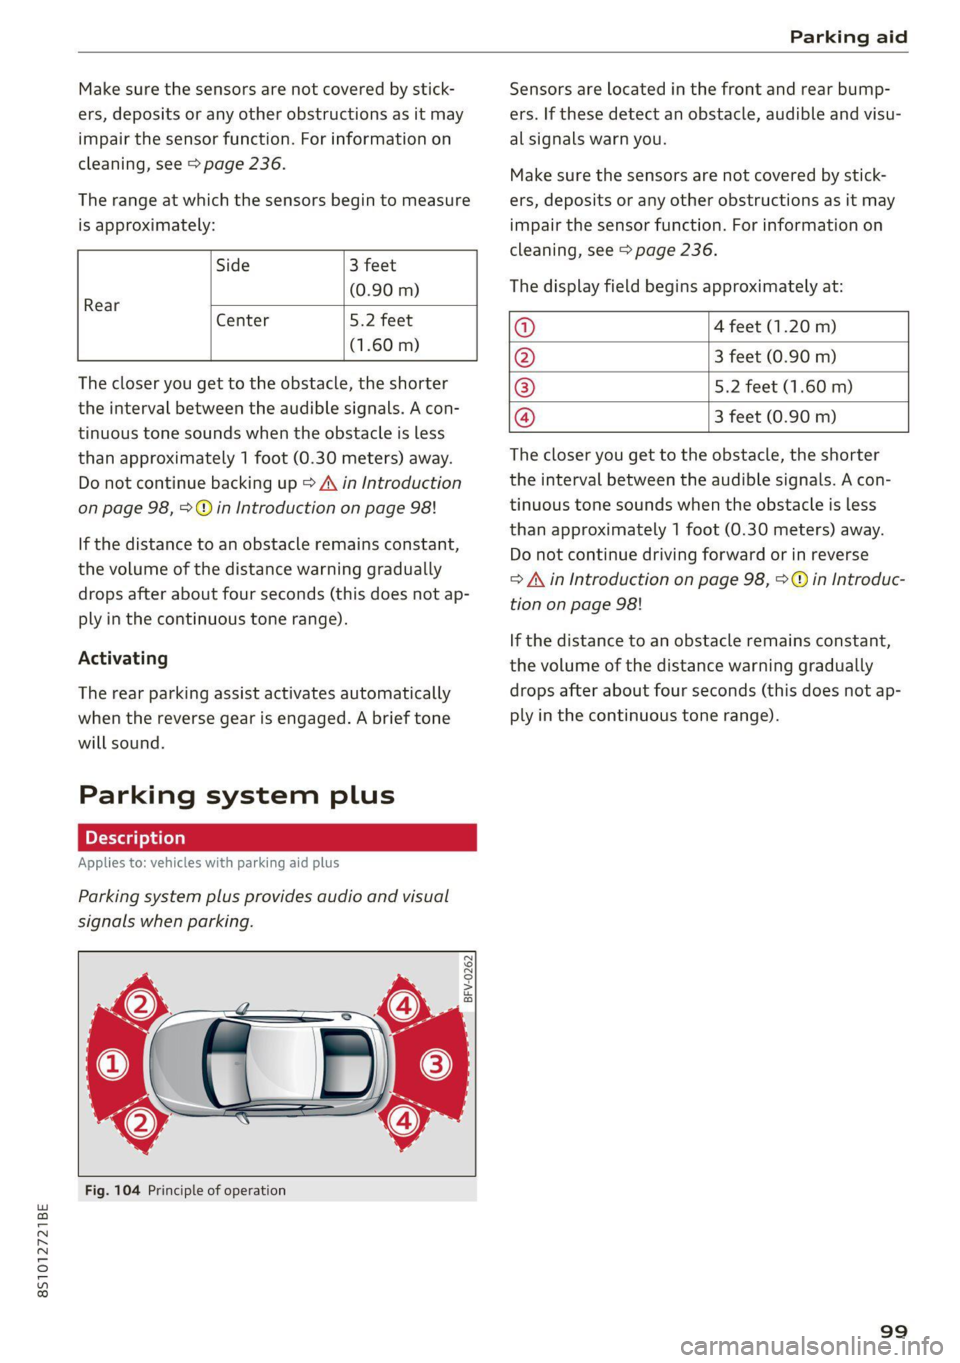
Parking system plus provides audio and visual
signals when parking.
BFV-0262
Fig. 104 Principle of operation
Sensors are located in the front and rear bump-
ers. If these detect an obstacle, audible and visu-
al signals warn you.
Make sure the sensors are not covered by stick-
ers, deposits or any other obstructions as it may
impair the sensor function. For information on
cleaning, see > page 236.
The display field begins approximately at:
@ 4 feet (1.20 m)
@ 3 feet (0.90 m)
® 5.2 feet (1.60 m)
@ 3 feet (0.90 m)
The closer you get to the obstacle, the shorter
the interval between the audible signals. A con-
tinuous tone sounds when the obstacle is less
than approximately 1 foot (0.30 meters) away.
Do not continue driving forward or in reverse
=> A in Introduction on page 98, >@ in Introduc-
tion on page 98!
If the distance to an obstacle remains constant,
the volume of the distance warning gradually
drops after about four seconds (this does not ap-
ply in the continuous tone range).
99
Page 102 of 280
Parking aid
Siedler lie Rela
Applies to: vehicles with parking aid plus
BFV-0209
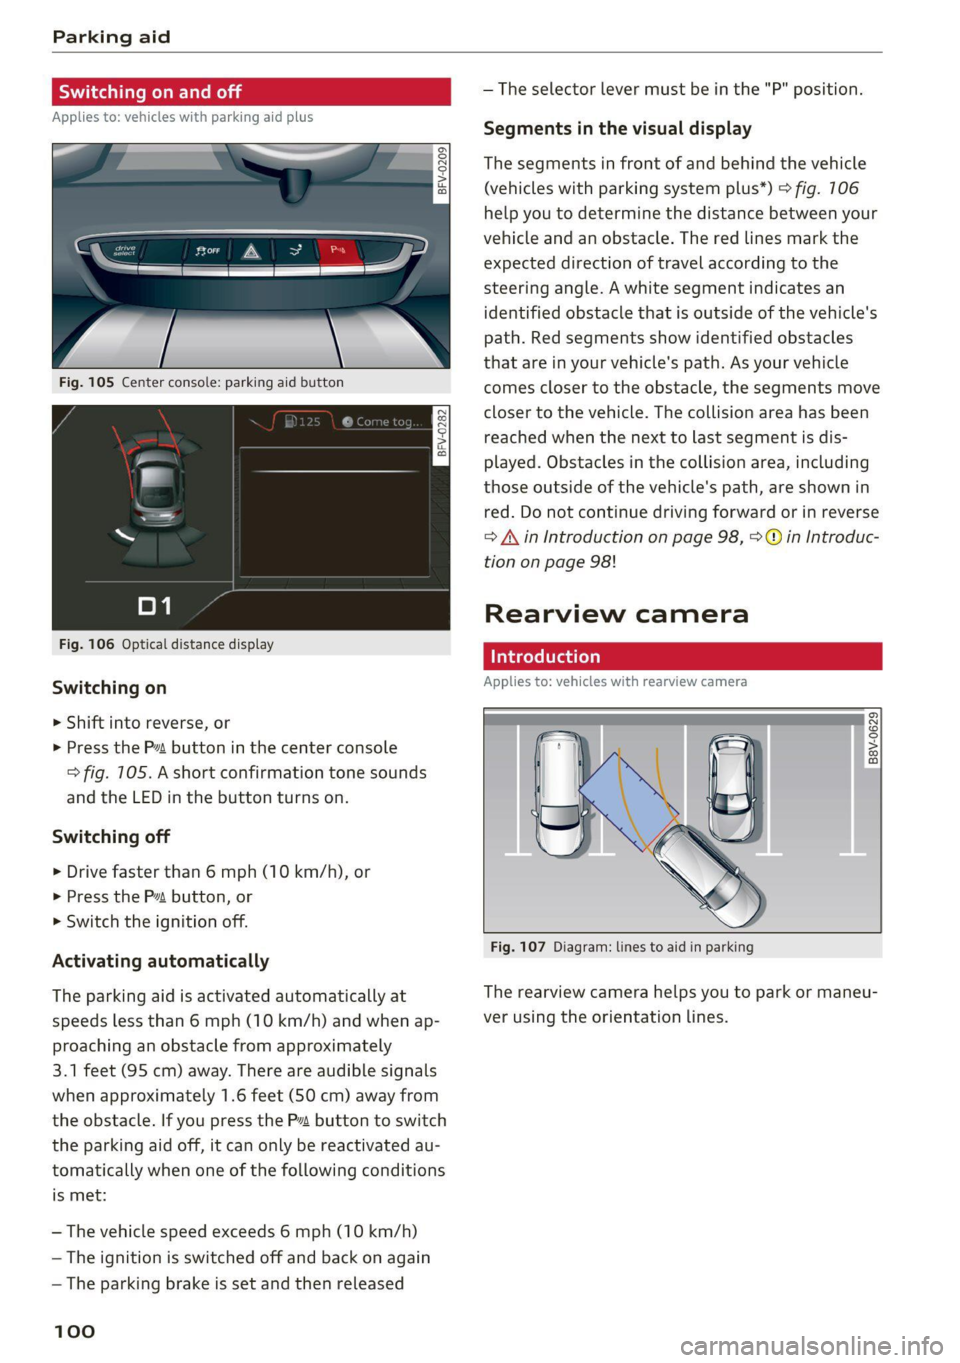
Fig. 105 Center console: parking aid button
Fig. 106 Optical distance display
Switching on
> Shift into reverse, or
> Press the P~ button in the center console
> fig. 105. A short confirmation tone sounds
and the LED in the button turns on.
Switching off
> Drive faster than 6 mph (10 km/h), or
> Press the P button, or
> Switch the ignition off.
Activating automatically
The parking aid is activated automatically at
speeds less than 6 mph (10 km/h) and when ap-
proaching an obstacle from approximately
3.1 feet (95 cm) away. There are audible signals
when approximately 1.6 feet (50 cm) away from
the obstacle. If you press the Pa button to switch
the parking aid off, it can only be reactivated au-
tomatically when one of the following conditions
is met:
— The vehicle speed exceeds 6 mph (10 km/h)
— The ignition is switched off and back on again
— The parking brake is set and then released
100
— The selector lever must be in the "P" position.
Segments in the visual display
The segments in front of and behind the vehicle
(vehicles with parking system plus*) > fig. 106
help you to determine the distance between your
vehicle and an obstacle. The red lines mark the
expected direction of travel according to the
steering angle. A white segment indicates an
identified obstacle that is outside of the vehicle's
path. Red segments show identified obstacles
that are in your vehicle's path. As your vehicle
comes closer to the obstacle, the segments move
closer to the vehicle. The collision area has been
reached when the next to last segment is dis-
played. Obstacles in the collision area, including
those outside of the vehicle's path, are shown in
red. Do not continue driving forward or in reverse
= A in Introduction on page 98, >@ in Introduc-
tion on page 98!
Rearview camera
Introduction
Applies to: vehicles with rearview camera
B8V-0629
Fig. 107 Diagram: lines to aid in parking
The rearview camera helps you to park or maneu-
ver using the orientation lines.
Page 103 of 280
8S1012721BE
Parking aid
General infor ion
Applies to: vehicles with rearview camera
© © 3 g
S £ 0
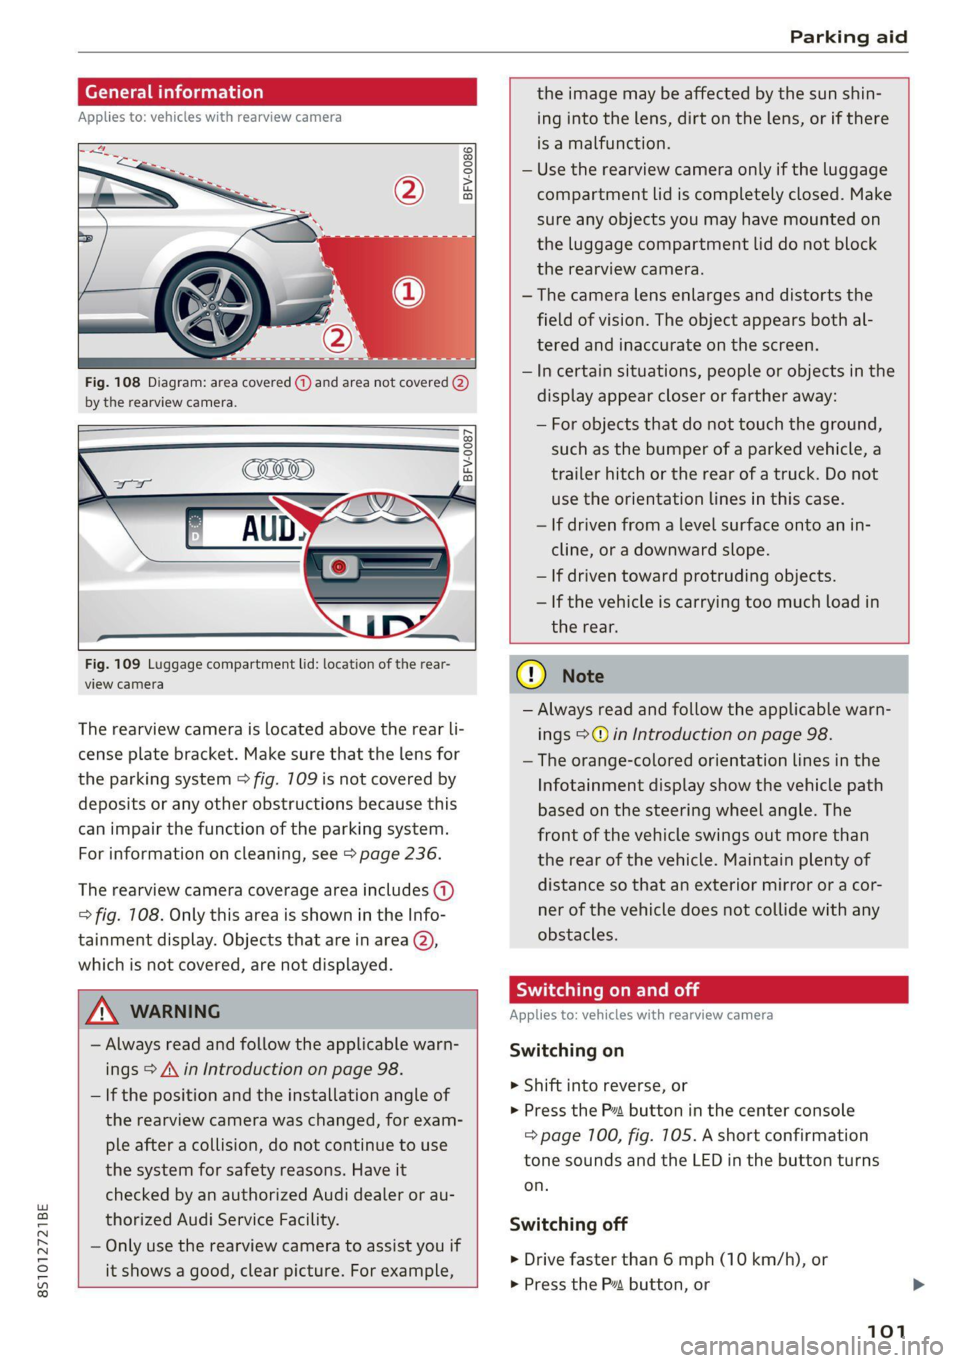
Fig. 108 Diagram: area covered (@) and area not covered @)
by the rearview camera.
Fig. 109 Luggage compartment lid: location of the rear-
view camera
The rearview camera is located above the rear li-
cense plate bracket. Make sure that the lens for
the parking system > fig. 709 is not covered by
deposits or any other obstructions because this
can impair the function of the parking system.
For information on cleaning, see > page 236.
The rearview camera coverage area includes (1)
=> fig. 108. Only this area is shown in the Info-
tainment display. Objects that are in area (2),
which is not covered, are not displayed.
ZA\ WARNING
— Always read and follow the applicable warn-
ings > A\ in Introduction on page 98.
— If the position and the installation angle of
the rearview camera was changed, for exam-
ple after a collision, do not continue to use
the system for safety reasons. Have it
checked by an authorized Audi dealer or au-
thorized Audi Service Facility.
— Only use the rearview camera to assist you if
it shows a good, clear picture. For example,
the image may be affected by the sun shin-
ing into the lens, dirt on the lens, or if there
is a malfunction.
— Use the rearview camera only if the luggage
compartment lid is completely closed. Make
sure any objects you may have mounted on
the luggage compartment lid do not block
the rearview camera.
— The camera lens enlarges and distorts the
field of vision. The object appears both al-
tered and inaccurate on the screen.
—Incertain situations, people or objects in the
display appear closer or farther away:
— For objects that do not touch the ground,
such as the bumper of a parked vehicle, a
trailer hitch or the rear of a truck. Do not
use
the orientation lines in this case.
— If driven from a level surface onto an in-
cline, or a downward slope.
— If driven toward protruding objects.
— If the vehicle is carrying too much load in
the rear.
CG) Note
— Always read and follow the applicable warn-
ings >@ in Introduction on page 98.
— The orange-colored orientation lines in the
Infotainment display show the vehicle path
based on the steering wheel angle. The
front
of the vehicle swings out more than
the rear of the vehicle. Maintain plenty of
distance so that an exterior mirror or a cor-
ner of the vehicle does not collide with any
obstacles.
Sica Re moll
Applies to: vehicles with rearview camera
Switching on
> Shift into reverse, or
> Press the P button in the center console
=> page 100, fig. 105. A short confirmation
tone sounds and the LED in the button turns
on.
Switching off
> Drive faster than 6 mph (10 km/h), or
> Press the P button, or
101
Page 104 of 280
Parking aid
> Switch the ignition off.
iG) Tips
— The visual display in the left part of the dis-
play should help you detect the critical vehi-
cle areas.
— You can change the volume of the signals
and the display > page 102.
Perpendicular parking
Applies to: vehicles with rearview camera
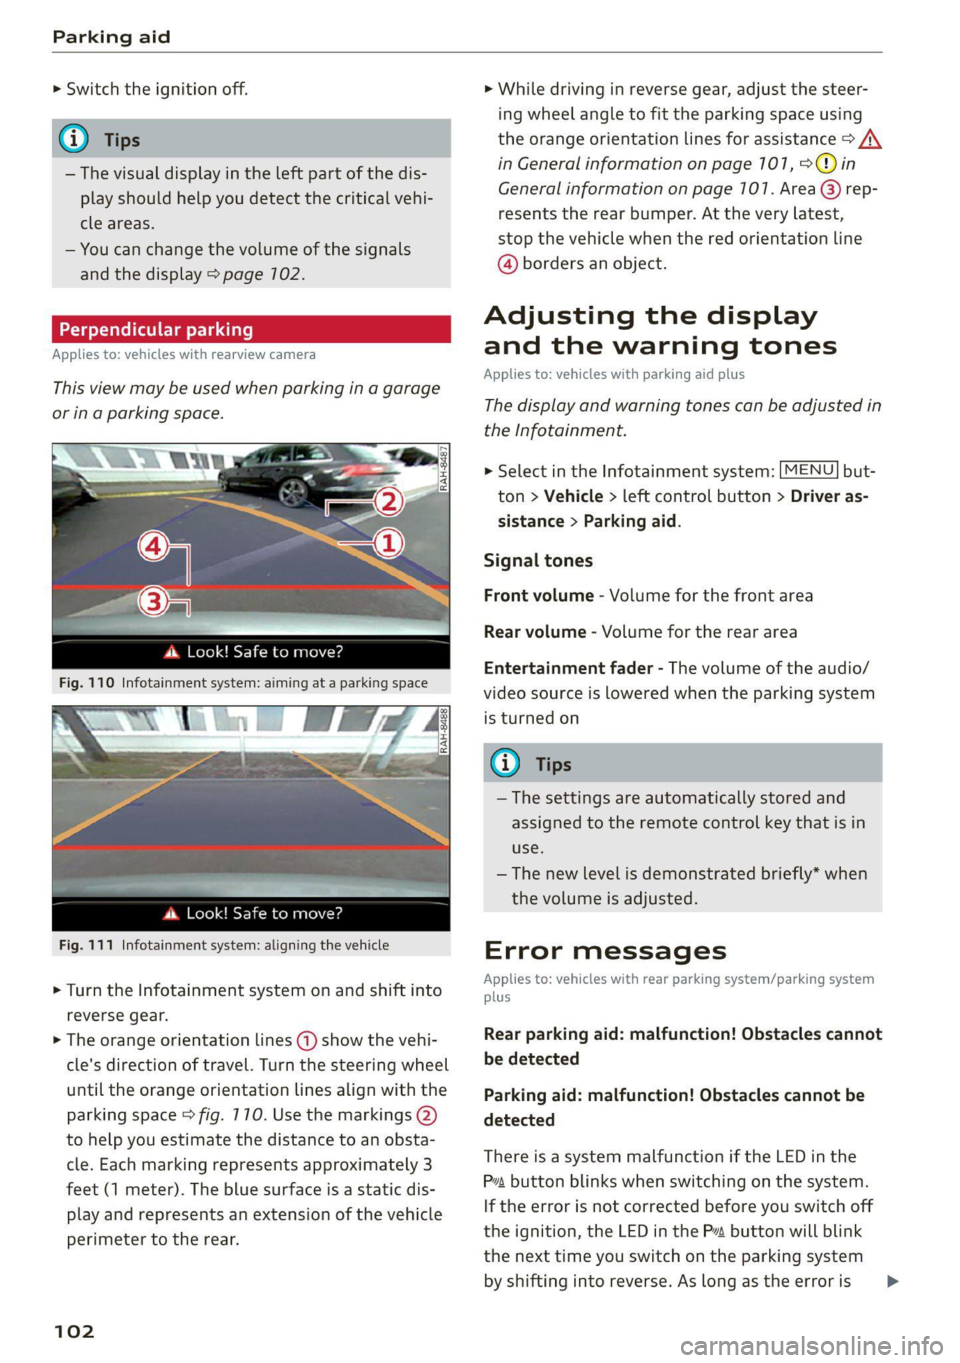
This view may be used when parking in a garage
or ina parking space.
4. Look! Safe to move?
Fig. 110 Infotainment system: aiming at a parking space
ds. Look! Safe to move?
Fig. 111 Infotainment system: aligning the vehicle
> Turn the Infotainment system on and shift into
reverse gear.
> The orange orientation lines @) show the vehi-
cle's direction of travel. Turn the steering wheel
until the orange orientation lines align with the
parking space > fig. 710. Use the markings @)
to help you estimate the distance to an obsta-
cle. Each marking represents approximately 3
feet (1 meter). The blue surface is a static dis-
play and represents an extension of the vehicle
perimeter to the rear.
102
> While driving in reverse gear, adjust the steer-
ing wheel angle to fit the parking space using
the orange orientation lines for assistance > /\.
in General information on page 101, >@)in
General information on page 107. Area @) rep-
resents the rear bumper. At the very latest,
stop the vehicle when the red orientation line
@ borders an object.
Adjusting the display
and the warning tones
Applies to: vehicles with parking aid plus
The display and warning tones can be adjusted in
the Infotainment.
> Select in the Infotainment system: [MENU] but-
ton > Vehicle > left control button > Driver as-
sistance > Parking aid.
Signal tones
Front volume - Volume for the front area
Rear volume - Volume for the rear area
Entertainment fader - The volume of the audio/
video source is lowered when the parking system
is turned on
@ Tips
— The settings are automatically stored and
assigned to the remote control key that is in
use.
— The new level is demonstrated briefly* when
the volume is adjusted.
Error messages
Applies to: vehicles with rear parking system/parking system
plus
Rear parking aid: malfunction! Obstacles cannot
be detected
Parking aid: malfunction! Obstacles cannot be
detected
There is a system malfunction if the LED in the
Pva button blinks when switching on the system.
If the error is not corrected before you switch off
the ignition, the LED in the P button will blink
the
next time you switch on the parking system
by shifting into reverse. As long as the error is >
Page 105 of 280
8S1012721BE
Parking aid
active, you can display the error messages in the
second tab of the driver information system.
Parking aid plus*
If a sensor or speaker is faulty, the P4 symbol
will appear in front of/behind the vehicle in the
Infotainment display. If a rear sensor is faulty,
only obstacles that are in areas (1) and @)
=> page 99, fig. 104 are shown. If a front sensor is
faulty, only obstacles that are in areas @) and @)
are shown.
Drive immediately to an authorized Audi dealer
or authorized Audi Service Facility to have the
malfunction repaired.
103
Page 114 of 280
Multi Media Interface
Selection menu
Requirement: the Selection menu symbol 3 must
appear in the Infotainment system display.
Through the selection menu, you can open addi-
tional functions within a menu item (such as Ra-
dio).
Opening the selection menu
> Press the left control button. Then you can se-
lect and confirm a function using the control
knob.
Options menu
Requirement: the Options menu symbol & must
be displayed in the Infotainment system display.
Using the options menu, you can select and con-
firm context-dependent functions as well as set-
tings within a menu item (such as Radio).
Opening the options menu
> Press the right control button. Then you can se-
lect and confirm a function using the control
knob.
Information about menu paths
This guide shows you at a glance the paths for
opening a desired menu and its settings and
functions.
Example of a path
> Select: [RADIO] button > left control button >
FM.
Following the path
> Press the [RADIO] button.
> Press the left control button.
> Turn the control knob to the FM menu item to
select it.
> Press the control knob to confirm the selected
FM menu item.
The selected and confirmed function is executed.
In this example, the FM frequency band is set.
112
MMI touch
MMI touch control pad
Applies to: vehicles with MMI touch
RAH-8760,
%-wmashire Blvd, Los Angeles
© 21 mi Wilshire Blvc Angele
ba 1)
Resa)
Ei E Locust St
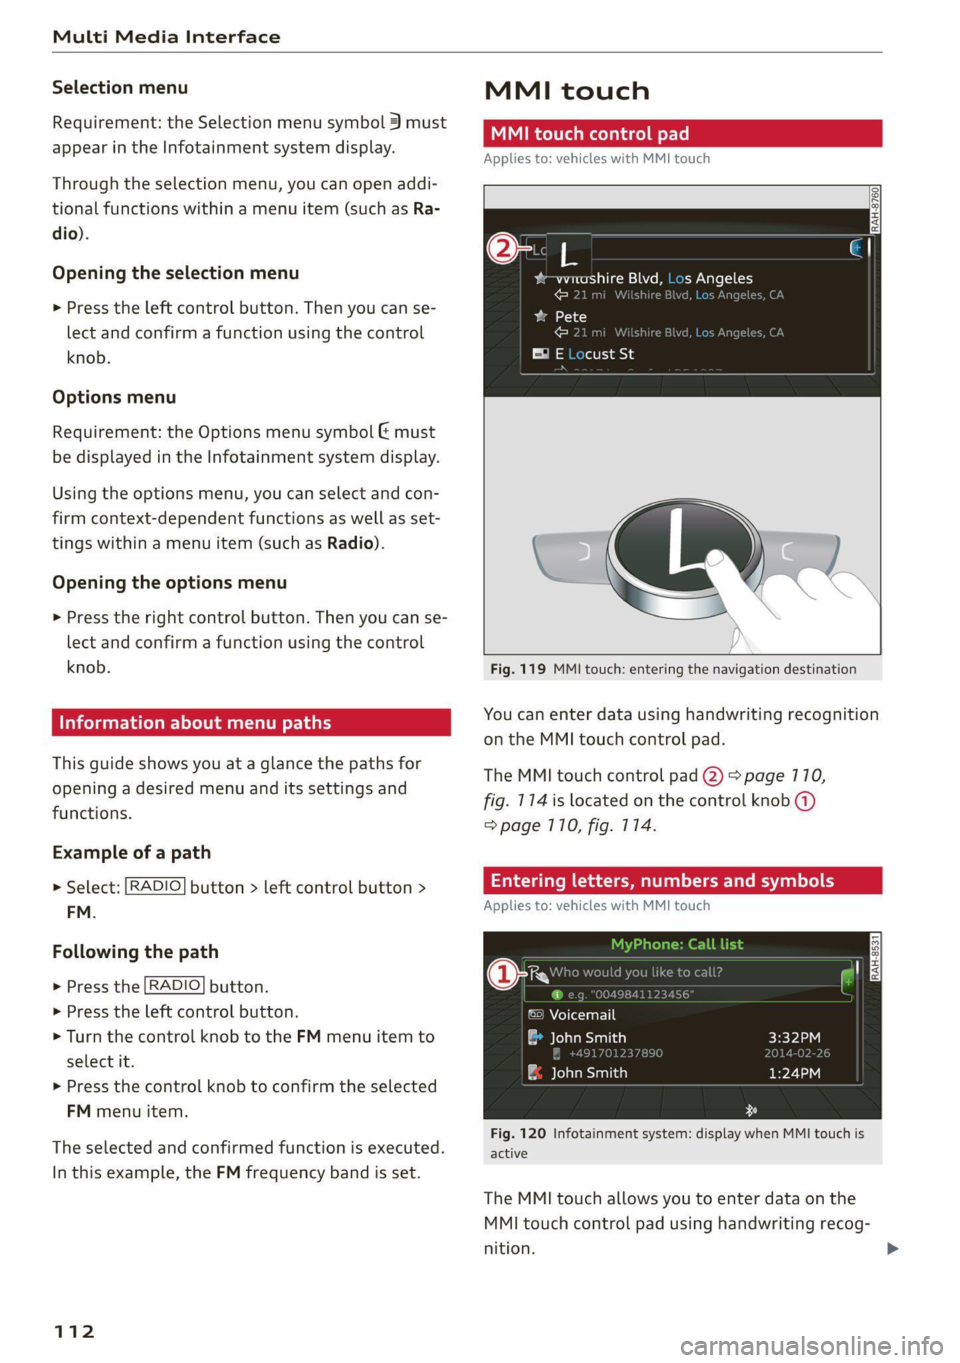
Fig. 119 MMI touch: entering the navigation destination
You can enter data using handwriting recognition
on the MMI touch control pad.
The MMI touch control pad (2) > page 110,
fig. 114 is located on the control knob (@)
=> page 710, fig. 114.
Entering letters, numbers and symbols
Applies to: vehicles with MMI touch
©) Voicemail
a John Smith
| ae elaaesiatien)
Fig. 120 Infotainment system: display when MMI touch is
active
The MMI touch allows you to enter data on the
MMI touch control pad using handwriting recog-
nition.
Page 115 of 280
8S1012721BE
Multi Media Interface
Requirement: it must be possible to enter text or
numbers and the symbol (4) must appear in the
Infotainment system display.
Basic input
> Write in individual upper case or lower case Let-
ters or numbers/characters on the MMI touch
control pad using your finger. A symbol that is
recognized clearly by the system is displayed in
the Infotainment system display 2)
=> page 112, fig. 119, confirmed with an audi-
ble signal if necessary, and transferred to the
input field.
Entering spaces
> Move your finger from Left to right on the MMI
touch control pad.
Deleting characters
> Move your finger from right to left on the MMI
touch control pad.
Deleting characters quickly
> Move your finger quickly from right to left on
the MMI touch control pad.
Selecting the input suggestion
> Press the control knob.
Switching directly to the results list
> Turn the control knob to the left or to the right.
Opening the speller
> Select: the right control button > Open speller.
Text or numbers are entered using the speller
=> page 117.
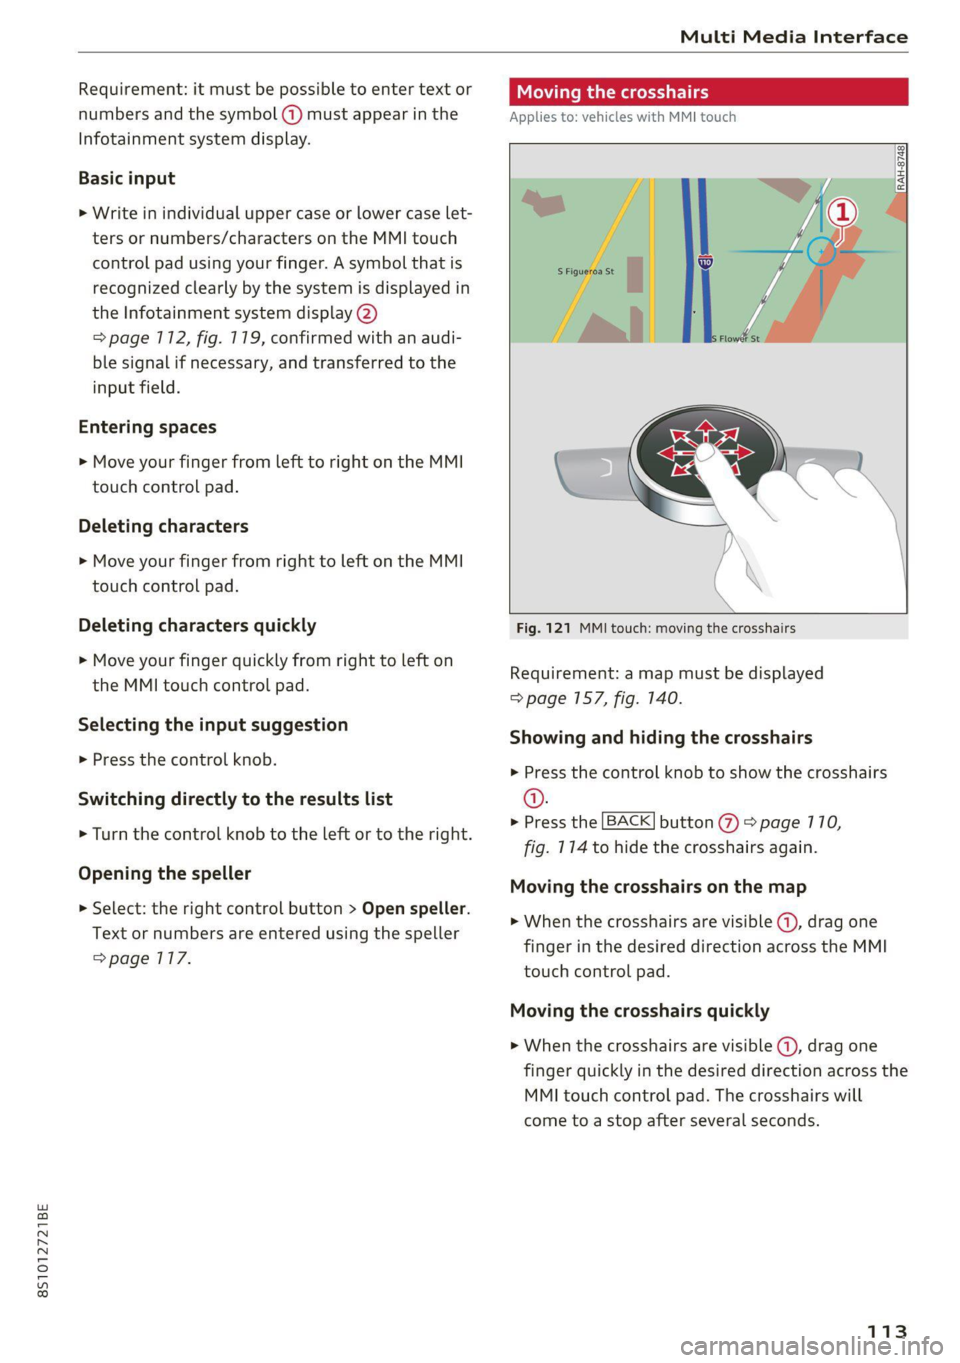
Moving the crosshairs
Applies to: vehicles with MMI touch
Fig. 121 MMI touch: moving the crosshairs
Requirement: a map must be displayed
=> page 157, fig. 140.
Showing and hiding the crosshairs
» Press the control knob to show the crosshairs
@.
> Press the [BACK] button % > page 110,
fig. 114 to hide the crosshairs again.
Moving the crosshairs on the map
> When the crosshairs are visible @, drag one
finger in the desired direction across the MMI
touch control pad.
Moving the crosshairs quickly
> When the crosshairs are visible (4), drag one
finger quickly in the desired direction across the
MMI touch control pad. The crosshairs will
come to a stop after several seconds.
113
Page 116 of 280
Multi Media Interface
Moving the map
Applies to: vehicles with MMI touch
Zooming in/out on the map
Applies to: vehicles with MMI touch
DIRAH-8744
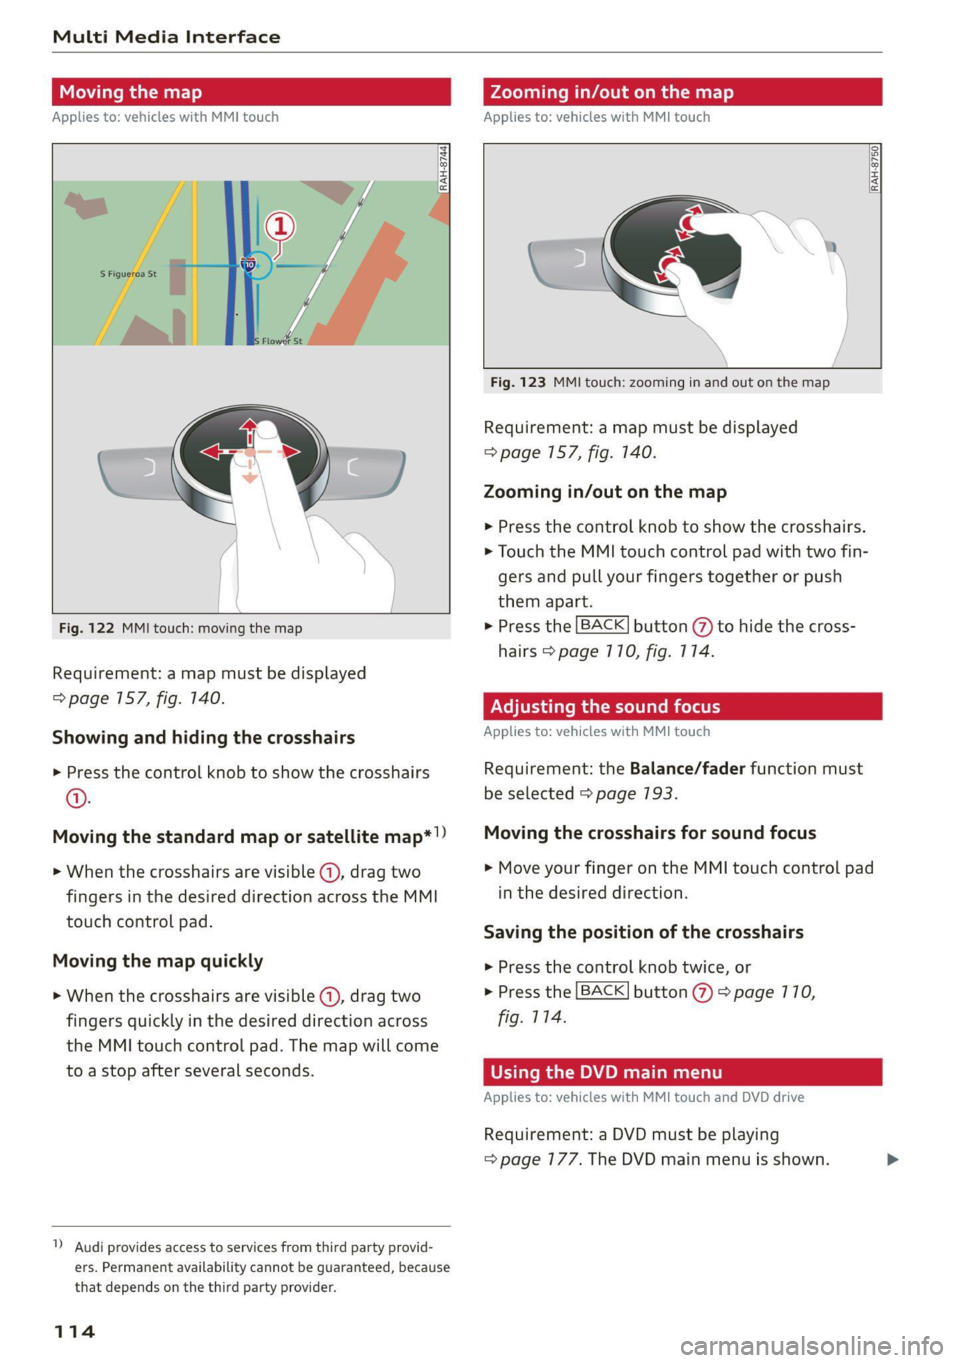
Fig. 122 MMI touch: moving the map
Requirement: a map must be displayed
=> page 157, fig. 140.
Showing and hiding the crosshairs
> Press the control knob to show the crosshairs
@.
Moving the standard map or satellite map*!)
>» When the crosshairs are visible @, drag two
fingers in the desired direction across the MMI
touch control pad.
Moving the map quickly
> When the crosshairs are visible @), drag two
fingers quickly in the desired direction across
the MMI touch control pad. The map will come
to a stop after several seconds.
1) Audi provides access to services from third party provid-
ers. Permanent availability cannot be guaranteed, because
that depends on the third party provider.
114
RAH-8750|
Fig. 123 MMI touch: zooming in and out on the map
Requirement: a map must be displayed
=> page 157, fig. 140.
Zooming in/out on the map
> Press the control knob to show the crosshairs.
> Touch the MMI touch control pad with two fin-
gers and pull your fingers together or push
them apart.
> Press the [BACK] button (%) to hide the cross-
hairs > page 710, fig. 114.
Adjusting the sound focus
Applies to: vehicles with MMI touch
Requirement: the Balance/fader function must
be selected > page 193.
Moving the crosshairs for sound focus
> Move your finger on the MMI touch control pad
in the desired direction.
Saving the position of the crosshairs
> Press the control knob twice, or
> Press the [BACK] button (2) > page 110,
fig. 114.
Using the DVD main menu
Applies to: vehicles with MMI touch and DVD drive
Requirement: a DVD must be playing
= page 177. The DVD main menu is shown.
Page 117 of 280
8S1012721BE
Multi Media Interface
Selecting a menu item
> Move your finger up/down or left/right on the
MMI touch control pad.
Confirming a selection
> Press the control knob.
@) Tips
The volume of the prompts for the MMI touch
can be adjusted separately > page 194.
Control knob with
joystick function
Applies to: vehicles with control knob with joystick function
2
RAH-8515|
© »
&
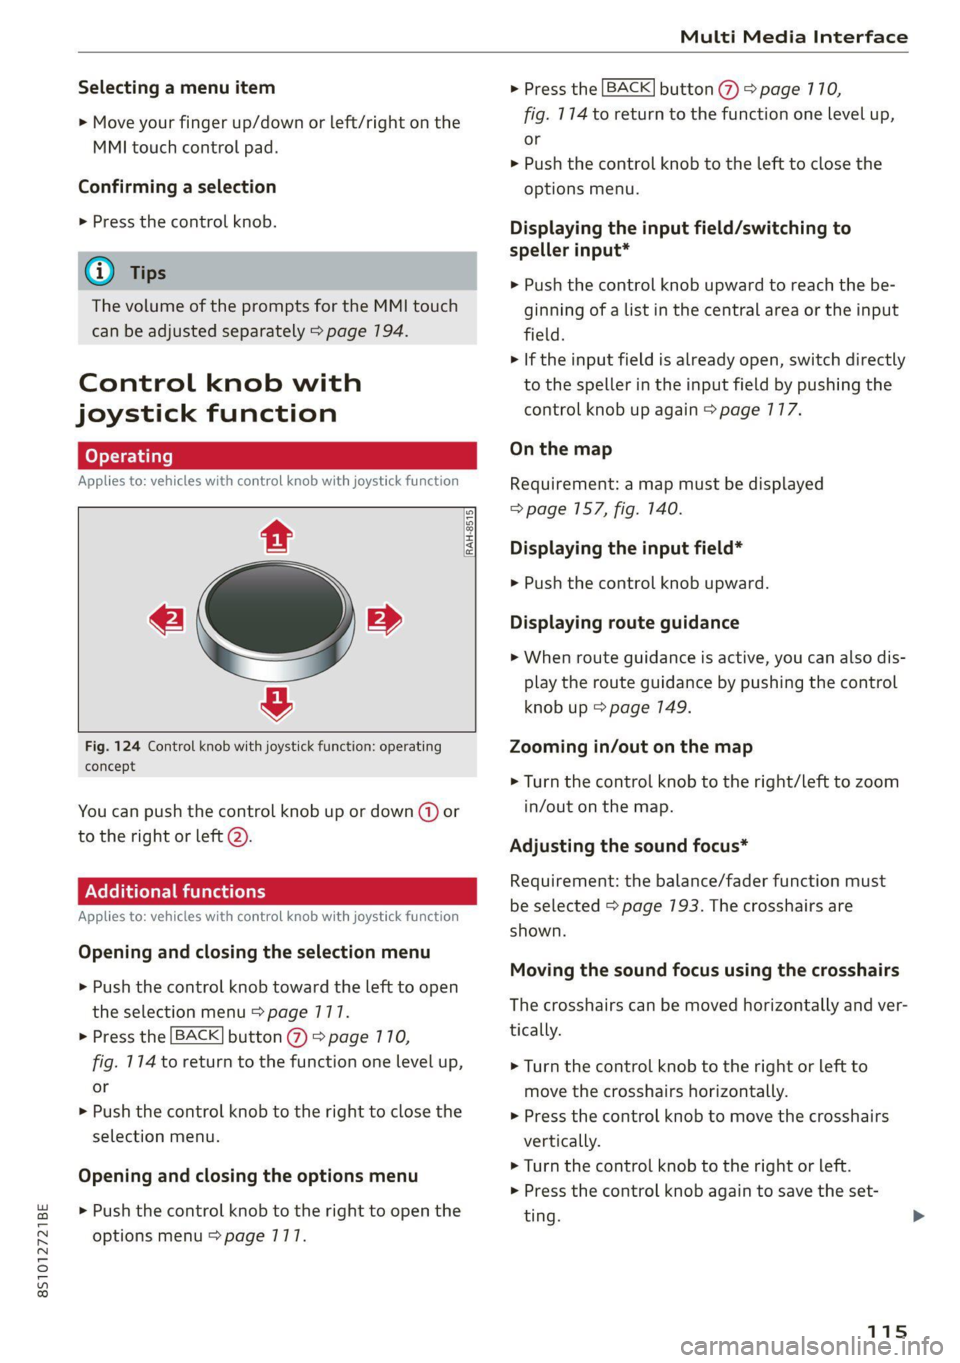
Fig. 124 Control knob with joystick function: operating
concept
You can push the control knob up or down (@) or
to the right or left @).
Additional functions
Applies to: vehicles with control knob with joystick function
Opening and closing the selection menu
> Push the control knob toward the left to open
the selection menu > page 177.
> Press the [BACK] button (7) > page 710,
fig. 114 to return to the function one level up,
or
> Push the control knob to the right to close the
selection menu.
Opening and closing the options menu
> Push the control knob to the right to open the
options menu > page 1717.
> Press the [BACK] button @ > page 110,
fig. 114 to return to the function one level up,
or
> Push the control knob to the left to close the
options menu.
Displaying the input field/switching to
speller input*
> Push the control knob upward to reach the be-
ginning of a list in the central area or the input
field.
> If the input field is already open, switch directly
to the speller in the input field by pushing the
control knob up again > page 177.
On the map
Requirement: a map must be displayed
=> page 157, fig. 140.
Displaying the input field*
> Push the control knob upward.
Displaying route guidance
> When route guidance is active, you can also dis-
play the route guidance by pushing the control
knob up > page 149.
Zooming in/out on the map
> Turn the control knob to the right/left to zoom
in/out on the map.
Adjusting the sound focus*
Requirement: the balance/fader function must
be selected > page 193. The crosshairs are
shown.
Moving the sound focus using the crosshairs
The crosshairs can be moved horizontally and ver-
tically.
> Turn the control knob to the right or left to
move the crosshairs horizontally.
» Press the control knob to move the crosshairs
vertically.
> Turn the control knob to the right or left.
> Press the control knob again to save the set-
ting.
115
Page 118 of 280
Multi Media Interface
Using the DVD main menu
Applies to: vehicles with a DVD drive
Requirement: a DVD must be playing
= page 177. The DVD main menu is shown.
Selecting a menu item
> Move the control knob with joystick function up
or down or to the left or right.
Confirming a selection
> Press the control knob.
Opening the selection/options menu w
the control knob
Applies to: vehicles with control knob with joystick function
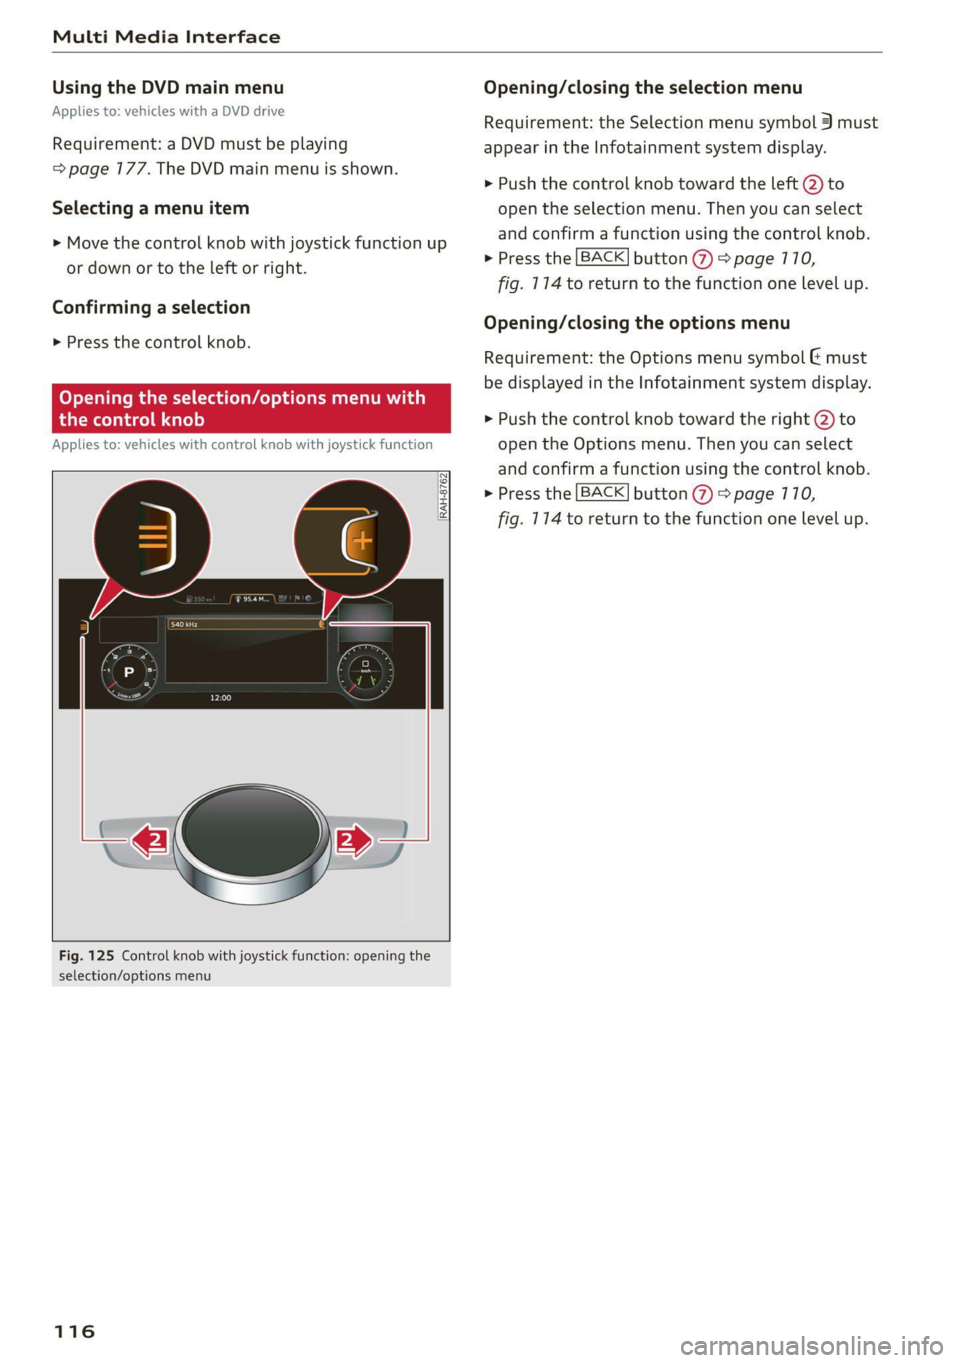
RAH-8762|
Fig. 125 Control knob with joystick function: opening the
selection/options menu
116
Opening/closing the selection menu
Requirement: the Selection menu symbol 3 must
appear in the Infotainment system display.
> Push the control knob toward the left @) to
open the selection menu. Then you can select
and confirm a function using the control knob.
> Press the [BACK] button (7) > page 710,
fig. 114 to return to the function one level up.
Opening/closing the options menu
Requirement: the Options menu symbol & must
be displayed in the Infotainment system display.
> Push the control knob toward the right @) to
open the Options menu. Then you can select
and confirm a function using the control knob.
> Press the [BACK] button @ > page 710,
fig. 114 to return to the function one level up.