center console AUDI TT COUPE 2009 Owners Manual
[x] Cancel search | Manufacturer: AUDI, Model Year: 2009, Model line: TT COUPE, Model: AUDI TT COUPE 2009Pages: 316, PDF Size: 71.16 MB
Page 58 of 316

Clear vision
Coming home situation
In
darkness, the activated system will turn on the headlights, side
marker lights , rear side marker lights , tail lights, and rear license
plate light as soon as the driver's door is opened from inside.
As long as one of the doors or the rear lid remains open, the set of
external lights will keep burning for about four minutes maximum.
To provide light for departure, the set of vehicle lights will keep
burning for about another 30 seconds after all doors and the rear lid
have been closed.
The factory-set time of 30 seconds until the lights are switched off can be adjusted if you prefer a longer or shorter duration. Have the
adjustment done by your authorized Audi dealer or a qualified work
shop. The system can be adjusted to keep the lights burning for a
maximum of 60 seconds.
Leaving home situation
As soon as the vehicle is unlocked by pressing the
CD button on your
remot e control, the set of external l ights is switched on .
The external lights are switched off as soon as the driver's door is
opened from outside . Even if you had the system readjusted to keep
the lights burning for an extended time for coming home, the
external lights will be turned off if you do not open the driver's door
within 60 seconds after unlocking. See chapter "Opening and
Closing" in your Owner's Manual. If the lights are switched off
before you reach the driver's door, press the@ button once more to
turn them on again.
[ i] Tips
• Do not attach any stickers to the windshield in front of the two
light sensors, as this would interfere with both the automatic oper
ation of the headlights and the automatic dimming of the inside
mirror(s). • If
the vehicle is remotely unlocked and locked three times in
succession, leaving home will not turn on the lights a fourth time to
safeguard the battery and lights.
• If you wish to use the coming home/leaving home function regu
larly, you can leave it activated at all times without risking perma
nent strain on the electrical system. As the system is controlled by
light sensors, it will only be energized in darkness .
• Frequent use of the coming home/leaving home function for
approaching and departing a vehicle parked in the dark will strain
the battery. This applies particularly if only short distances are
driven between stops . Occasionally drive longer distances to make
sure the battery is recharged sufficiently.
• If the fog lights have been switched on by the coming
home/leaving home function, they will always be switched off when
you switch on the ignition. •
Instrument panel illumination
The illumination of the instruments, displays and the
center console can be adjusted.
Fig. 45 Instrument
panel illumination
You regulate the brightness of the instruments with the left
thumbwheel
C J=> fig. 45. ~
Page 59 of 316

Ignition ON , light swit ch at @ .
With the ignition switched ON, the g low of instrument needles can
be adjusted to appear brighter or dimmer.
Ignition ON , ligh t switch at :oo ; or io.
With the lights switched on , the brightness of instrument cluster
(i .e. needles, gauges and displays) and center conso le i llu m in ation
can be adjusted .
0 Note
The instrument c luster and center console illumination (gauges and
needles) comes on when you switch on the igni tion and the
vehicle
headlights are off .
Be aware of the followin g difference be tween
models built to US o r Canadian specifications :
• USA models : illumination of the in strument cluster (gauges and
needles), dash and center console around the gearshift lever is
controlled by a light sensor located in the instrument panel. The
instrument panel illum ination will automatically become dimmer
as the daylight fades away and eventually will go out completely
when outside light is very low . This is to remind you , the d river , to
s witch on the headlight s before it gets too dark.
• Canada models : instrument panel illum ination will stay br ight
regardle ss of the inten sity of ambient light . Always be aware of
c hanges in outside light conditions while you are driving . Respond
in time to fading dayli ght by turning the light switch to position
iD
(or "AUTO" if your car is equipped with this feature) to turn on your
headlights. •
Bi-Xenon headlights*
Afte r starting the engi ne, the b i- xeno n headlights are au tomatical ly
adjusted to the load and angle of the vehic le (for example, during
acce lera tion and braking). This prevents oncoming traffi c from
experiencing unnecessary headlight g lare from your bi -xenon head
lig hts .
Con tro ls and eq uip
ment
Clear vision
I f the system is not operating properly, a warning symbo l in the
Au to-Check C ontr ol is displayed
=> page 36 . •
Emergency flasher tfft,,.
T he e mergency flasher m akes other motor ists aware that
y o u or yo ur vehicle are i n an e merge ncy si tuation.
Fig . 46 Center
co nsole : emergency
fla sher sw itch
Press the sw itch ~=:,fig. 46, to s witch t he emergency
flasher on or off.
When the emergency flasher is on, all four turn signal blink at the
same time . The tu rn signal indi cato r lights
¢i Q in the instrument
c luster, as well as the light in the emergency flasher switch
J:&. b link
likewise.
The eme rgency flashe r will automat ically switch on i f you are in an
accident where the airbag has deployed .
[ i ] Tips
You should switch on the emergency flasher when:
• you are the last vehicle standing in a traffic jam so that any other
vehicles coming can see you, or when
• your vehicle has broken down or you are in an emergency s itua -
tion, o r when _,,,
Vehicle care I I irechnical data
Page 96 of 316

On the road
0 Note
Do not stop the engine immediately after hard or extended driving.
Keep the engine running for approximately two minutes to prevent
excessive heat build-up. •
Parking brake
Parking brake
When the parking brake is set, it prevents the vehicle from
rolling away unintentionally.
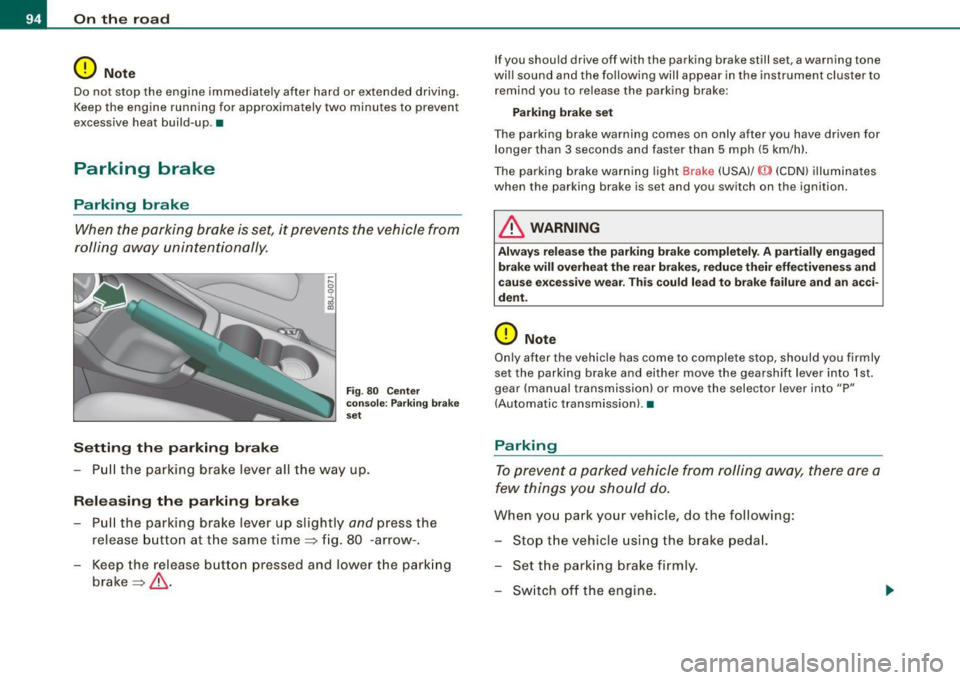
Setting the parking brake
~ ,-.. 0 0
i
Fig . 80 Center
console: Parking brake
set
- Pull the parking brake lever all the way up.
Releasing the parking brake Pull the parking brake lever up slightly
and press the
release button at the same time=> fig. 80 -arrow-.
Keep the release button pressed and lower the parking
brake=>
& -
If you should drive off with the parking brake still set, a warning tone
will sound and the following will appear in the instrument cluster to remind you to release the parking brake:
Parking brake set
The parking brake warning comes on only after you have driven for longer than 3 seconds and faster than 5 mph (5 km/h).
The parking brake warning light Brake (USA)/
{CD) (CON) illuminates
when the parking brake is set and you switch on the ignition.
& WARNING
Always release the parking brake completely . A partially engaged
brake will overheat the rear brakes, reduce their effectiveness and
cause excessive wear. This could lead to brake failure and an acci
dent.
0 Note
Only after the vehicle has come to complete stop, should you firmly
set the parking brake and either move the gearshift lever into 1st .
gear (manual transmission) or move the selector lever into "P"
(Automatic transmission). •
Parking
To prevent a parked vehicle from rolling away, there are a
few things you should do.
When you park your vehicle, do the following:
- Stop the vehicle using the brake pedal.
- Set the parking brake firmly.
- Switch off the engine.
Page 104 of 316

• ..__T_ ra_ n_s_ m_ i_ s _s_ i_ o _ n ___________________________________________________ _
Applies t o vehi cles: with S tr oni c®
Driving Notes
The forward gears are shifted up or down automatically.
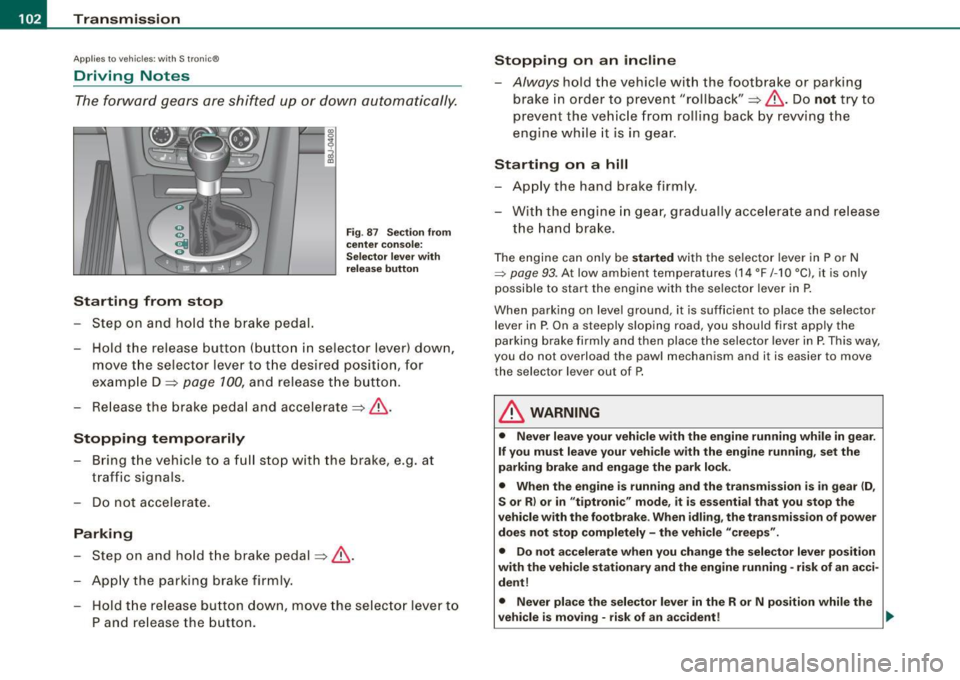
Starting from stop
-Step on and hold the brake pedal.
Fig. 87 Section from
center console:
Selector lever with
release button
- Hold the release button (button in selector lever) down,
move the selector lever to the desired position, for
example D =:>
page 100, and release the button.
- Release the brake pedal and accelerate =:>& .
Stopping temporarily
Bring the vehicle to a full stop with the brake, e.g. at
traffic signals.
Do not accelerate.
Parking
-Step on and hold the brake pedal =:> & .
Apply the parking brake firmly.
- Hold the release button down, move the selector lever to
P and release the button.
Stopping on an incline
-Always hold the vehicle with the footbrake or parking
brake in order to prevent "rollback"=:>& . Do
not try to
prevent the vehicle from rolling back by rewing the
engine while it is in gear.
Starting on a hill
- Apply the hand brake firmly.
- With the engine in gear, gradually accelerate and release
the hand brake.
The engine can only be started with the selector lever in P or N
=> page 93. At low ambient temperatures (14 °F /-1 O °C), it is only
possible to start the engine with the selector lever in P.
When parking on level ground, it is sufficient to place the selector
lever in P. On a steeply sloping road , you should first apply the
parking brake firmly and then place the selector lever in P. This way,
you do not overload the pawl mechanism and it is easier to move
the selector lever out of P.
& WARNING
• Never leave your vehicle with the engine running while in gear.
If you must leave your vehicle with the engine running, set the
parking brake and engage the park lock.
• When the engine is running and the transmission is in gear (D,
S or R) or in "tiptronic" mode, it is essential that you stop the
vehicle with the footbrake. When idling, the transmission of power
does not stop completely -the vehicle "creeps".
• Do not accelerate when you change the selector lever position
with the vehicle stationary and the engine running -risk of an acci
dent!
• Never place the selector lever in the R or N position while the
vehicle is moving -risk of an accident!
~
Page 106 of 316

• ..__T_ ra_ n_s_ m_ i_ s _s_ i_ o _n ___________________________________________________ _
Switching to manual
-Push the selector lever to the right from D. As the trans
mission has switched,
6 5 4 3 2 1 appears in the display,
with the gear that is engaged highlighted.
Upshifting
Tap the selector lever forward (in the tiptronic setting)
=> page 103, fig. 88 G).
Downshifting
- Tap the selector lever backward (in the tiptronic setting)
o.
Switching to manual can be carried out with the vehic le stationary
as well as moving .
When accelerating, the transmission shifts into the next gear in gears 1 , 2, 3, 4 and 5 shortly before the maximum permissible
engine speed is reached.
If you have selected a lower gear than the current one , the transmis
sion will only shift down when the engine cannot be overspeeded.
If kick -down is actuated, the transmission shifts into a lower gear
independently of speed and engine rpm .•
Ap plies to vehicles: w ith S tronic ® and wi th Tipt ro nic co ntrols o n the st eer in g w hee l
Steering wheel with Tiptronic ® controls
The selector paddles allow the driver to keep both hands
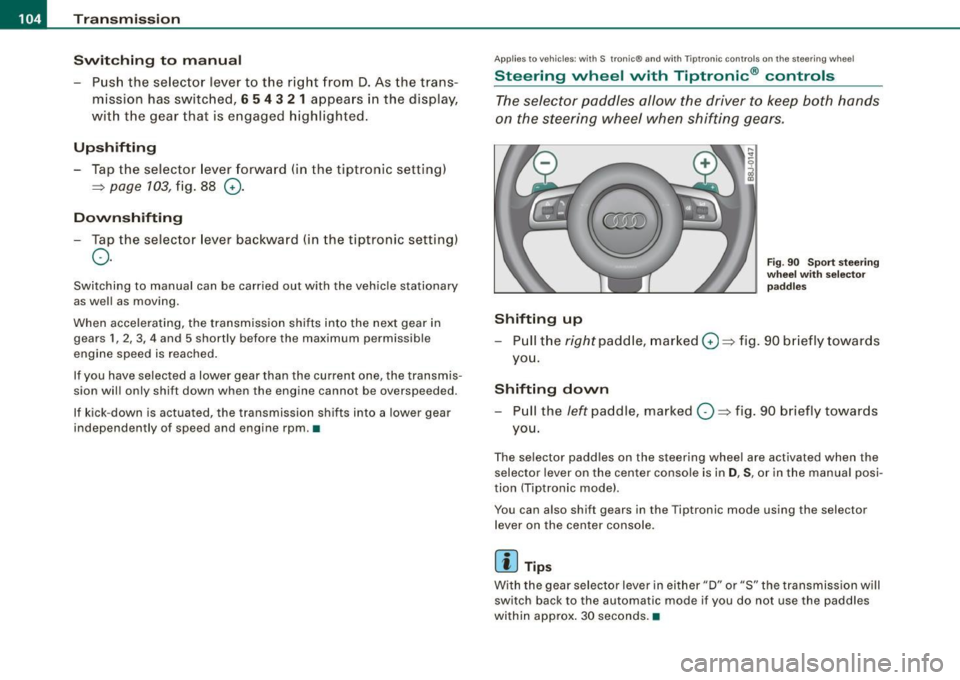
on the steering wheel when shifting gears.
Shifting up
Fig. 90 Sport steering
wheel with selec tor
paddles
- Pull the right paddle, marked 0=> fig. 90 briefly towards
you.
Shifting down
- Pull the left paddle, marked O => fig. 90 briefly towards
you.
The selector padd les on the steering wheel are activated when the
selector lever on the center console is in
D, S, or in the manual posi
tion (Tiptronic mode) .
You can also shift g ears in the Tiptronic mode using the selector
lever on the center console.
[ i ] Tips
With the gear selector lever in ei ther "D" or "S" the transmission will
switch back to the automa tic mode if you do not use the paddles
within approx . 30 seconds. •
Page 153 of 316

& WARNING
Items stored between the safety belt buckle and the center
console can cause the sensors in the buckle to send the wrong
information to the electronic control module and prevent the
Advanced Airbag System from working properly.
• Always make sure that nothing can interfere with the safety
belt buckles and that they are not obstructed.
as Perchlorate Material -special handling may apply, see
www.dtsc.ca.gov/hazardouswaste/perchlorate. When the vehicle or
parts of the restraint system including airbag modules safety belts
with pretensioners are scrapped, all applicable laws and regula
tions must be observed. Your authorized Audi dealer is familiar with
these requirements and we recommend that you have your dealer
perform this service for you. •
Safety first
Knee airbags
Description of knee airbags
Airbag system
The airbag system can provide supplemental protection
to properly restrained front seat occupants.
Fig. 114 Driver 's
airbag
The airbag for the driver is located in the instrument panel under
neath the steering wheel=> fig. 114, the airbag for the passenger is
at about the same height in the instrument panel underneath the
glove compartment.
The knee airbag offers additional protection to the driver's and
passenger's knees and upper and lower thigh areas as a supple
ment to the safety belts.
If the front airbags deploy, the knee airbags also deploy in frontal
collisions above a certain severity=>
page 144, "More importan t
things to know about front airbags".
Besides their normal safety function, safety belts work to help keep
the driver or front passenger in position in case of a frontal collision
so that the airbags can provide protection.
The airbag system is not a substitute for your safety belt. Rather, it
is part of the overall occupant restraint system in your vehicle.
Always remember that the airbag system can only help to protect
you if you are wearing your safety belt and wearing it properly. This •
Vehicle care I I irechnical data