coolant level AUDI TT COUPE 2009 Owners Manual
[x] Cancel search | Manufacturer: AUDI, Model Year: 2009, Model line: TT COUPE, Model: AUDI TT COUPE 2009Pages: 316, PDF Size: 71.16 MB
Page 15 of 316
<£> For the sake of the environment
Upshifting early saves fuel and reduces engine noise. •
Digital clock with date display
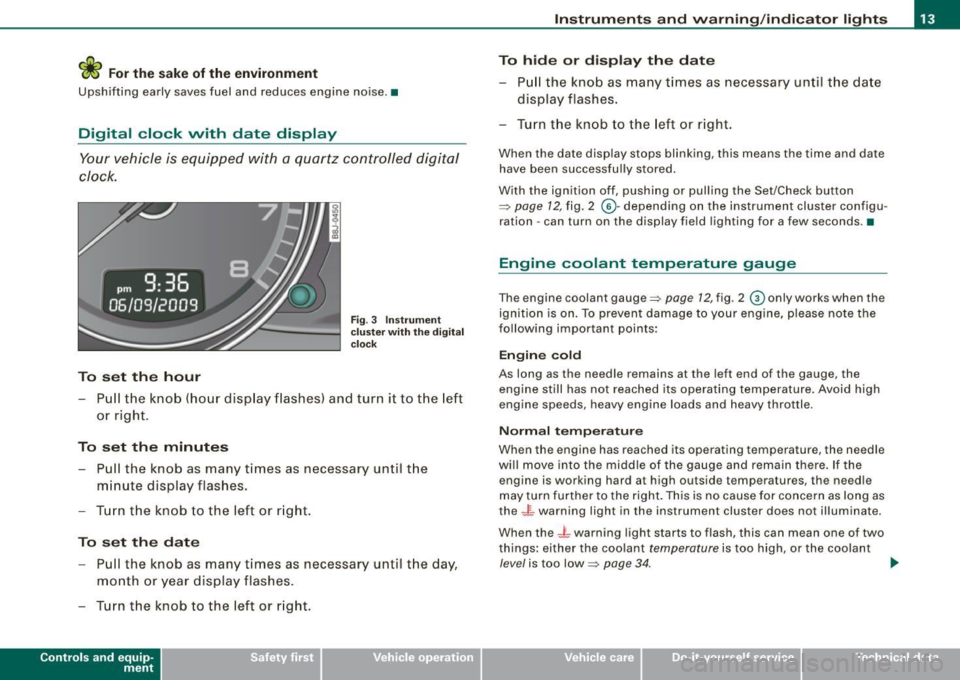
Your vehicle is equipped with a quartz controlled digital
clock.
To set the hour
Fig. 3 Instrument
c luste r with the digital
c lock
- Pull the knob (hour display flashes) and turn it to the left
or right.
To set the minutes
- Pull the knob as many times as necessa ry until the
m in ute display flashes.
- Turn the knob to the left or right.
To set the date
-Pull the knob as many times as necessary until the day,
month or year display flashes.
- Turn the knob to the left or right.
Con tro ls and eq uip
ment
Instruments and warning /indicator lights
To hide or display the date
- Pull the knob as many times as necessary until the date
display flashes .
- Turn the knob to the left or right.
When the date display stops blinking, this means the time and date
have been successfully stored.
With the ignition off, pushing or pulling the Set/Check button
~ page 12, fig. 2 ©-depending on the instrument cluster configu
ration - can turn on the display field lighting for a few seconds .•
Engine coolant temperature gauge
The engine coolant gauge~ page 12, fig. 2 © only works when the
ignition is on. To preven t damage to your engine, please note the
following important points:
Engine cold
As long as the needle remains at the left end of the gauge, the
engine still has not reached its operating temperature . Avoid high
engine speeds, heavy engine loads and heavy throttle.
Normal temperature
When the engine has reached its operating temperature, the needle
will move into the middle of the gauge and remain there. If the
engine is working hard at high outside temperatures, the needle
may turn further to the right. This is no cause for concern as long as
the -~- warning light in the instrument cluster does not illuminate.
When the
_J _ warning light starts to flash, this can mean one of two
things: either the coolant
temperature is too high , or the coolant
level is too low~ page 34. ~
Vehicle care I I irechnical data
Page 16 of 316
Instruments and warning/indicator lights
& WARNING
• Always observe the warning in =;, page 209 , "Engine compart
ment" before opening the engine hood and checking the engine
coolant level.
• Never open the engine hood if you see or hear steam , or if you
see engine coolant dripping from the engine compartment . You
c ould burn your self. Let the engine cool off first so that you cannot
hear or see any steam or engine coolant .
0 Note
• Mounting additiona l lights or accessories in front of the a ir inlets
reduces the co oling effect of the radiat or. At high outside tempera
tures or h igh engi ne load , the eng ine could overheat.
• The fron t spoile r has been designed t o properly dist rib ute the
coo ling air when the veh icle is mov ing . If the spo iler is damaged,
this could red uce the coo ling effect and the engine cou ld then ove r
heat. Ask your authorized Audi deale r for assistance. •
Fuel gauge
The fuel gauge wor ks only when the ignition is on .
When the needle reaches the red area, the warning light in the instrument cluster w ill illu m ina te =;,
page 35 . Thi s means yo u
have approx imate ly 1.9 gallons (7 litres) of fuel left in the tank.
Time
to refuel!
The tota l tank capacity of your vehicle is listed in=;, page 297. Be
awa re of the diffe rent ta nk capaci ties of front -wheel a nd q uat tro®
a ll- w hee l d ri ve models .
0 Note
Never run the tank comple tely dry! An irre gular suppl y of fuel can
cause engine m isf iring and fuel could enter into the exhaust system.
The catalytic converter could then overheat and be
damag ed. •
Speedometer with odometer
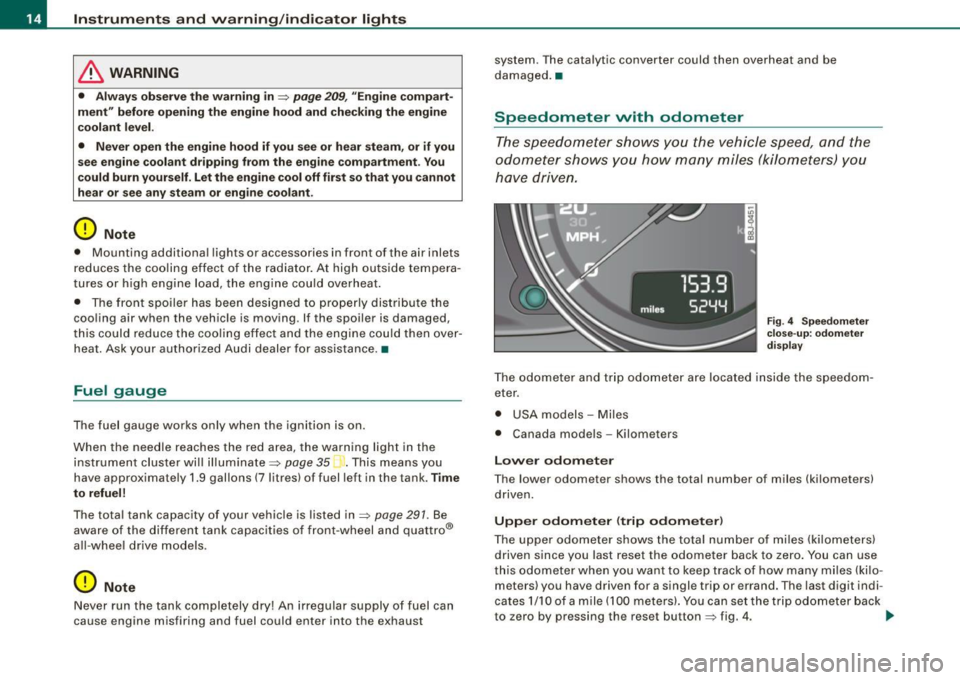
The speedometer shows y ou t he vehicle speed, and the
o dome ter sho ws you ho w ma ny m iles (kilo meters) yo u
hove dri ven.
Fig . 4 Speedomete r
close -up : odomet er
displ ay
T he od ometer an d trip odo mete r are locate d insid e th e spe edom
eter .
• USA model s - Miles
• Canada mode ls - Kilometers
Lower odometer
The lower odometer shows the total number of miles (kilometers)
d riven.
Upper odometer (trip odometer )
The upper o dometer shows the tota l number o f mi les ( kilom eters)
driven since you last reset the odometer bac k to ze ro . You can use
thi s odomete r w hen you want to keep track of how ma ny m iles ( kilo
meters) you have driven for a single trip or errand. The last digit indi
cates 1/10 of a m ile (10 0 meters). You ca n set th e tr ip od o meter back
to zero by pressing the reset button
=;, fig. 4 . ..,,
Page 34 of 316
Driver inf orm atio n syst em
Warnings and symbols
Red symbols
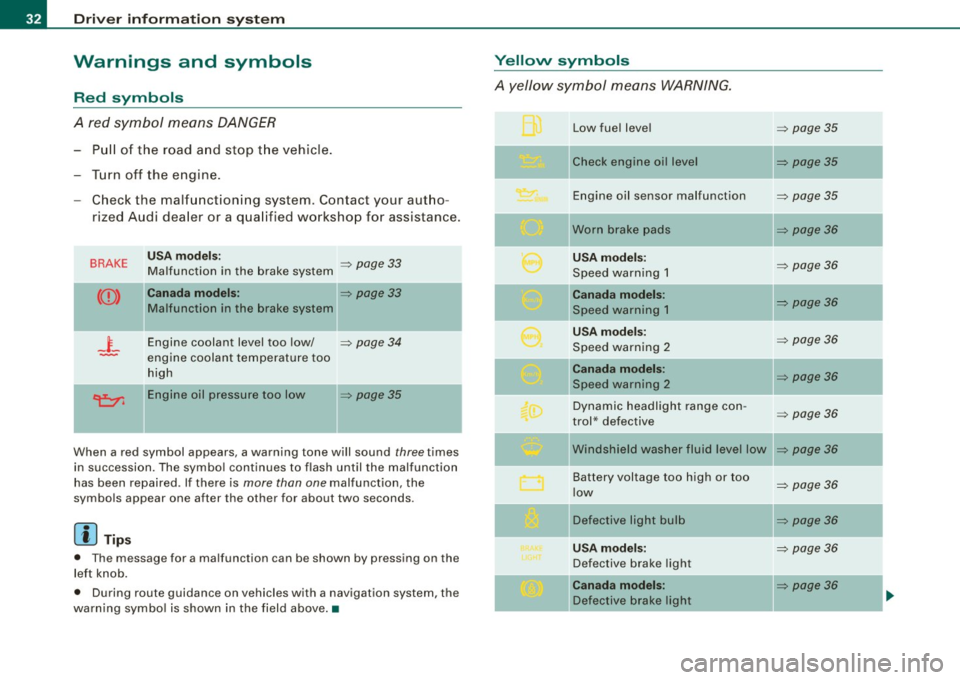
A red symbol means DANGER
- Pull of the road a nd stop t he vehicle .
- Turn off the engine.
- Check the malfunctioning system. Contact your autho -
rized Audi dea ler or a qua lified workshop for assistance .
BRAKE
-
USA models:
Malfunction in the brake system => page 33
Ca
nada m odels : => page 33
Malfunction in the brake system
Engine coolant level too low/
=> page 34
engine coolant temperature too
high
Engine oil pressure too low
=> page 35
When a red symbol appears, a warning tone will sound three times
in succession. The symbol continues to flash until the malfunction
has been repaired . If there is
more than one malfunction, the
symbols appear one after the other for about two seconds.
[ i ) Tip s
• The message for a malfunction can be shown by pressing on the
left knob.
• During route guidance on vehicles with a navigation system, the
warning symbo l is shown in the field above .•
Yellow symbols
A yellow symbol means WARNING .
Low fuel level => page 35
l!check engine oi l level => page35
-
Engine oil sensor malfunction => page 35
-
IIWorn brake pads => page36
USA model s: => page 36 Speed warning 1
IIC an ada model s:
Speed warning 1 => page36
--
USA mod els: => page 36 Speed warning 2
C anad a m od els: => page 36 Speed warning 2
Dynamic headlight range con -
=> page 36 trol* defective
Winds hield washer fluid level low
=> page36
Battery voltage too high or too => page 36 low
Defective light bulb
=> page 36
U SA mod els: => page 36
Defective brake light
C an ada m od els: => page36
Defective brake light
Page 36 of 316
Driver information system
Parking brake set
The parking brake warning light Brake /((D) (Canada models) illumi
nates when the parking brake is set. In addition , a warning tone will
sound after you have driven for longer than 3 seconds and faster
than 3 mph (5 km/h).
L1}. WARNING
• Always observe the warnings in => page 209, "Engine compart
ment", before opening the engine hood and checking the brake
fluid.
• Driving with low brake fluid is a safety hazard! Stop the car and
get professional assistance.
• If the brake system warning/indicator light illuminates
together with the ABS warning/indicator light, then the ABS system is malfunctioning. The rear wheels could quickly lock up
when you apply the brakes. This could lead to loss of control and
your vehicle could slide! Drive carefully to the nearest authorized
Audi dealer and have the malfunction corrected. •
Engine cooling system malfunction ¾
A malfunction in the engine cooling system must be
repaired as soon as possible.
When the _t symbol in the display flashes, then either the
engine coolant
temperature is too high, or the coolant level
is too low. In addition to the symbol, the following message
also appears in the display:
Switch off engine and check coolant level
-Pull off the road and stop the vehicle.
- Turn off the engine.
- Check coolant level
~ page 225.
-Add coolant if necessary ~ page 225.
-Continue driving only after the engine coolant
warning/indicator light goes out.
- Contact your authorized Audi dealer for assistance if
necessary .
If t he engine coolant lev el is correct, then th e radia tor fan may be
the cause of the malfunction.
If the gene rator warning/indicator light should also illuminate
=> page 18, then the fan belt may be damaged.
L1}. WARNING
• If your vehicle should break down for mechanical or other
reasons, park at a safe distance from moving traffic, turn off the
engine and turn on the hazard warning lights
=> page 57, "Emer
gency flasher A" .
• Never open the hood if you see or hear steam or coolant
escaping from the engine compartment -you risk being scalded.
Wait until you can no longer see or hear steam or coolant escaping.
• The engine compartment of any vehicle is a dangerous area.
Before you perform any work in the engine compartment, turn off
the engine and allow it to cool. Follow the warning stickers
=> page 209, "Engine compartment" .
0 Note
Do not continue driving if the-~- symbol illuminates. There is a
malfunction in the engine cooling system -you could damage your
engine .•
Page 87 of 316
Warm and cold
Climate controls
Controls
The air conditioning automatically maintains the selected
temperature in the vehicleinterior throughout each
se ason.
F ig. 76 C limate contro ls
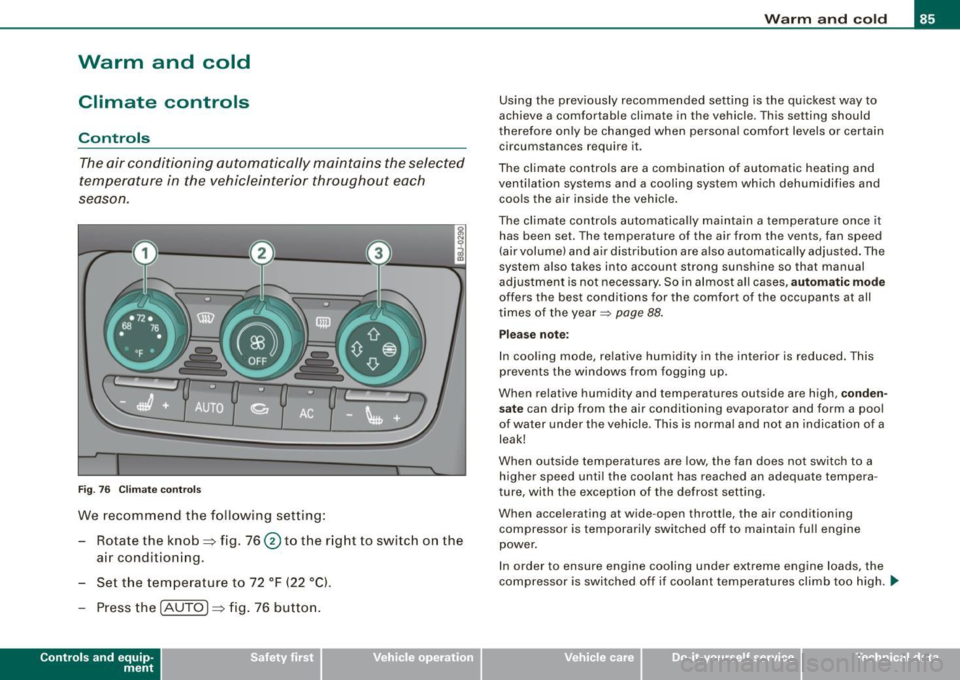
We recommend the following setting:
- Rotate the knob~ fig. 76@ to the right to switch on the
ai r conditioning.
- Set the temperature to 72 °F (22 °C).
- Press the !AUTO
j ~ fig. 76 button.
Con tro ls and eq uip
ment
W arm and cold
Using the previously recommended setting is the quickest way to
achieve a comfortable climate in the vehicle. This setting should
therefore only be changed when personal comfort levels or certa in
circumstances require it.
The climate controls are a combination of automatic heating and
ventilation systems and a cooling system which dehumidifies and cools the air inside the vehic le .
The climate controls automatically maintain a temperature once it has been set. The temperature of the air from the vents, fan speed
(air volume) and air dist ribu tion are a lso automatically adjus ted . The
system also takes into account strong sunshine so that manual
adjus tment is not necessary. So in almost all cases,
a ut omatic mode
offers the best conditions for the comfort of the occupants at all
times of the year~
page 88.
Ple ase not e:
In cooling mode, relative humidity in the interior is reduced. This
prevents the windows from fogging up .
When relative humidity and temperatures outside are high,
conden
s ate
can drip from the air conditioning evaporator and form a pool
of water under the vehicle . This is normal and not an indication of a
leak!
When outside temperatures are low, the fan does no t switch to a
higher speed until the coolant has reached an adequate tempera
ture, with the exception of t he defrost setting .
When accelerating at wide-open throttle, the air conditioning compressor is temporarily switched off to maintain fu ll engine
power.
In order to ensure engine cooling under extreme engine loads, the
compressor is switched off if coolant temperatures climb too high ...
Vehicle care I I irechnical data
Page 227 of 316

Checking and filling -
---------------------=----"=---------
reduce corrosion protection. The resu lting corrosion can cause a
loss of coolant and serious engine damage.
• Do not add any type of radiator leak sealant to your vehicle's
engine coolant. Adding radiator repair fluid may adverse ly affect the
function and performance of your cooling system and cou ld result
in damage not covered by your New Vehicle Limited Warranty. •
Checking the engine coolant level
The engine coolant level can be checked with a quick
gla nce .
Fig . 142 Engine
co mp artm ent : coo lan t
e xpa nsion t ank
Before you check anything in the engine compartment,
always read and heed all WARNINGS=> & in "Working in
the engine compa rtment" on
page 217.
- Switch the ignition of f.
- Read the coo lant l eve l at the coo lant exp ansio n tank
==> fig. 142. With a col d e ngine, it must b e above the
"min" mar k. Wit h a hot engine, it can be a little above t he
indicated range.
The location of the coolant expansion tank can be seen in the
engine compartment i llustration. To obtain an accurate reading, the engine must be switched off.
The expansion tank in your vehic
le is equipped with an e lectric
coolant level sensor.
When the coolant leve l is too low, the warning light in the Auto
Check System =>
page 34 will blink un til you add coolant and the
level has been restored to normal. Even though there is an e lectric
coo la n t level sensor, we still recommend you check the coolant level
from time to time .
Coolant loss
Coolant loss may indicate a leak in the cooling system . In the event
of coo lant loss, the co oling sys tem shou ld be i nspected immedi
ate ly by your authorized Audi dealer . It is not enough merely to add
coo lant .
In a
sealed system , losses can occur only if the boiling point of the
coolant is exceeded as a result of overheating .
0 Note
Do not add any type of radiator leak sea lant to your vehicle's engine
coolant. Adding rad iator repair fluid may adversely affect the func
tion and performance of your coo ling system and could resu lt in
damage not covered by your New Vehic le Limited Warra nty. •
Adding coo lant
Be very careful when adding engine coolant.
Before you check anything in the engine compartment,
always read and heed all WARNINGS==> & in "Working in
the engine compartment" on
page 217 .
-Turn off the engin e.
- Let the engine cool down.
Vehic le care I I irechnical data
Page 229 of 316

_____________________________________________ C_h_ e_ c _ k_in --= g'-a _ n_d _ f_il _li _n -=g =-- ____.•
• the engine compartment heats up because the vehicle is parked
in intense sunlight.
& WARNING
• To reduce the risk of personal injury never touch the radiator
fan.
• The auxiliary electric fan is temperature controlled and can
switch on suddenly even when the engine is not running .
• The auxiliary radiator fan switches on automatically when the
engine coolant reaches a certain temperature and will continue to
run until the coolant temperature drops. •
Brake fluid
Checking brake fluid level
The brake fluid level can be checked with a quick glance.
Fig. 143 Engine
compartment: brake
fluid reservoir
Before you check anything in the engine compartment,
always read and heed all WARNINGS=> & in "Working in
the engine compartment" on
page 217.
-Read the brake fluid level from the brake fluid reservoir
=> fig. 143. The brake fluid level must be between the
"MIN" and "MAX" markings.
The brake fluid reservoir is located behind the rear partition of the
engine compartment on the left side~ page 218.
The fluid level may drop slightly after some time due to the auto
matic adjustment of the brake pads. This is not cause for alarm.
If the brake fluid level falls considerably below the "MIN" mark, the
brake warning/indicator light (U.S. models:
BRAKE, Canadian models:
(Cf))) will come on~ page 19 and~ page 33. Do not continue to
operate the vehicle. The complete brake system should be thor
oughly checked by an authorized Audi dealer or other qualified
facility and the cause corrected. If the brake fluid level is too low, the
brake warning/indicator light will illuminate. Contact an authorized
Audi dealer
immediately. •
Changing brake fluid
Have the brake fluid changed by an experienced techni
cian.
Brake fluid absorbs moisture from the air. If the water content in the
brake fluid is too high, corrosion in the brake system may result
after a period of time . The boiling point of the brake fluid will also
decrease considerably and decrease braking performance.
Therefore, the brake fluid must be changed
every two years. Always
use new brake fluid which conforms to Federal Motor Vehicle Stan
dard "FMVSS 116 DOT 4".
The brake fluid reservoir can be difficult to reach, therefore, we
recommend that you have the brake fluid changed by your autho
rized
Audi dealer. Your dealer has the correct tools, the right brake
fluid and the know-how to do this for you.
~
Vehic le care I I irechnical data
Page 297 of 316
__________________________________________________ C_o_ n _ s_u_ m_ e ___ r_l_ n _f_ o_ r _m...:....:.. a:.;..:. ti .... o:.. n ........ _lllll
& WARNING (continued)
• The engine compartment of any motor vehicle is a potentially
hazardous area. Never reach into the area around or touch the
radiator fan. It is temperature controlled and can switch on
suddenly -even when the engine is off and the ignition key has
been removed. The radiator fan switches on automatically when
the coolant reaches a certain temperature and will continue to run
until the coolant temperature drops .
• Always remove the ignition key before anyone gets under the
vehicle.
• Always support your vehicle with safety stands if it is neces
sary to work underneath the vehicle. The jack supplied with the
vehicle is not adequate for this purpose and could collapse
causing serious personal injury.
• If you must work underneath the vehicle with the wheels on
the ground, always make sure the vehicle is on level ground, that
the wheels are always securely blocked and that the engine
cannot be started .
• Always make sure the transmission selector lever (automatic
transmission) is in "P" (Park position) (automatic transmission) or
Neutral (manual transmission) and the hand brake is firmly
applied.
<£> For the sake of the environment
• Changing the engine settings will adversely affect emission
levels. This is detrimental to the environment and increases fuel
consumption .
• Always observe environmental regulations when disposing of
old engine oil, used brake fluid, dirty engine coolant, spent batteries
or worn out tires.
• Undeployed airbag modules and pretensioners might be classi
fied as Perchlorate Material -special handling may apply, see
www.dtsc.ca.gov/hazardouswaste/perchlorate . When the vehicle or
parts of the restraint system including airbag modules safety belts
Controls and equip ment Safety first Vehicle operation with pretensioners are scrapped, all applicable laws and regula
tions must be observed. Your authorized Audi dealer is familiar with
these requirements and we recommend that you have your dealer
perform this service for you. •
Additional accessories,
modifications and parts replacement
Additional accessories and parts
replacement
Always consult an authorized Audi dealer before
purchasing accessories.
Your vehicle incorporates the latest safety design features ensuring
a high standard of active and passive safety.
This safety could be compromised by non -approved changes to the
vehicle. For this reason, if parts have to be replaced, please observe
the following points when installing additional accessories:
Approved Audi accessories and genuine Audi parts are available
from authorized Audi dealers .
These dealers also have the necessary facilities, tools and trained specialists to install the parts and accessories properly .
& WARNING
Using the wrong spare parts or using non-approved accessories
can cause serious personal injury.
• Use only accessories expressly approved by Audi and genuine
Audi spare parts
• These parts and accessories have been specially designed to
be used on your vehicle.
• Never install accessories such as telephone cradles or
beverage holders on airbag covers or within the airbag deploy-
Vehicle care Do-it-yourself service Tec hn ica l da ta
Page 303 of 316

______________________________________________ A_ l.:.. p _h_ a_ b_e _t_ic _ a _ l _in _ d_e _ x __ _
Automatic transmission ..... ... .. .... . 99
Driving Notes ... .. .... ... .... .... 102
Emergency program .. .... ... .... . 105
Emergency release . . . . . . . . . . . . . . . 106
Ignition key safety lock ....... .... .. 92
Kick-down .. ... .. .... .... ...... .. 105
Launch Control Program ........... 105
Selector lever lock .. ...... ...... .. 101
Selector lever positions ........... 100
Tiptronic ... .. .... .... ........... 103
Tiptronic controls on the steering wheel
104
Average fuel mileage ... .... .... .... .. 26
Average speed . ... .. .... .... .... .... . 26
Avoid damaging the vehicle ......... . 192
B
Battery . ...... ..... ... .... .... . 228, 231
Battery location inside the engine compartment ... .... .... .... 218,219
Charging . .... .... .... ... .... .... 232
Checking battery acid level .... 231, 232
Connecting ... ... ..... ... .... ... . 228
Disconnecting ....... ....... .... . 228
Important warnings when working on the
battery ..... .... ....... ...... .. 229
Replacing the battery . ....... .... . 228
Winter operation . .... .... ... .... . 228
Working on the battery ... .... .... . 229
Battery voltage ......... .... ......... 36
Before driving .. ...... .. ....... ..... 114
Bi -Xenon headlights ........... .. .... . 57
Blended gasoline ... .... .... ... .... . 211
Controls and equip
ment Safety first
Body
cavity sealing .... .. ..... ... ... . 204
Booster seats .... .... .... .... .... ... 165
How do I properly install a booster seat in
my vehicle? . ... ... ....... .. .... 165
Safety instructions ..... .... ... .... 165
Brake fluid Changing the brake fluid .. .... .... 227
Checking the brake fluid level ...... 227
What is the correct brake f luid level? 227
What should I do if the brake fluid warning
light comes on? . ........ ... ..... 227
Brake fluid reservoir ..... .... .... .... 227
Brake system . ... ...... ......... .... 227
Anti-lock brake system ... .... ... .. . 20
Brake Assistan t .... . .. .. .. . ... ... 187
Brake fluid .... ... .... ...... ...... 227
Brake fluid specifications for refi ll and
replacement . ... ..... ... .... .... 227
Brake light defective . .... .... .... .. 37
Brake pads ... ... ..... ... .... ... . 191
General information . .... .. .. .. ... 186
How does the moisture or road salt affect
the brakes? ............... ...... 1 86
Malfunction .... ........... ...... . 33
Warning/indicator lights .. ..... .... . 19
Worn brake pads symbo l .... ...... . 36
Break -in period ........ ............. 190
Brake pads ...... ..... ....... .... 191
Tires .... . ... ... ... ... .... .... ... 190
Bulbs ..... .. .... ..... .. ... ... ...... 278 C
California Proposition 65 Warning . .... 218
Battery specific .... ... .... .... .... 231
Capacities ... .... .... .... ... .... .... 291
Car care ... ..... .. .. .... .... .... .. . . 198
Interior .... ... .. .. .... ........ ... 205
Plastic and vinyl .. ............... . 202
Weatherstrips ... .. .... .. . .... ... . 203
Care of exterior . ..... ....... ....... . 198
Cargo area
See Luggage compartment . ... .... . 121
Cargo net .. .... .. .. .... .... .... .... . 78
Catalytic converter .. .... .... .... ... . 191
CD changer .... ... .. .... .... .... .. .. . 84
Certification .. ....... ....... ..... ... 296
Changing a flat tire ......... .... ... .. 268
Changing engine oi l .. .... ... .... .. .. 223
Chassis Undercoating . ... .... .... .... ... . 205
See also Audi magnetic ride .... .... . 98
Checking Battery acid level .. ....... .... 231, 232
Engine coolant level ...... .... .... 225
Checking tire pressure ..... .... ...... 241
Child restraint Danger of using ch ild restraints in the
front seat ... .... .... .... ... ... . 137
Child restraints What types of child restraint anchors are
avai lable? ... .... .... .... ...... . 171
Where can I get additional information
about child restraints? ........... 171
Vehicle operation Vehicle care Do-it-yourself service Technical data
Page 305 of 316

______________________________________________ A_ l_,_ p _h_ a_ b_e _ t_i c_ a_l _in _ d_e _ x __ lllll
Daytime running lights .. ..... .. .... ... 53
Daytime running lights (Canada) . .... .. 53
Declaration of compliance Cell phone package ............... 296
Electronic immob ilizer . .... ... .... 296
Homelink® universal remote control 296
Remote control key . ... .. .... .... . 296
Tire pressure monitoring sys tem ... 296
de f
What does this mean when it appears in
the trip odometer display? .. ....... 14
Defect ive light bulb warning ...... .... . 36
Defrosting the windows .. .......... ... 88
Determining correct load lim it ... ... .. 243
Digital clock .... .... .... .... ... .... .. 13
Setting the time ................... 13
D igital compass . ...... ... ...... .... .. 67
Dimensions ... .. .... .... ... .... .... 290
Dipstick Reading the dipstick properly
Di rect Shift Gearbox 221
Emergency release . . . . . . . . . . . . . . . 106
Distance .. ...... .... .... ... .... .... . 26
Driver information ..... ... .. .... ..... . 33
Driver information system
Gearshift indicator ... .... .... .... .. 23
Menu button ..................... 28
Menu display . ... .... ...... .... ... 27
Open door or front lid warning ...... 22
Outside temperature display ....... . 22
Red symbols .. .... .... ... ... ... .. . 32
Service interval disp lay .... .... ..... 23
Setting .......................... 29
Controls and equip
ment Safety first
Sound system display
.... .. ..... .. . 22 Emergency starting . ... .. .... .... .... 279
Trip computer ............ ..... .. . 25
Emerge ncy towing ...... .... .... ... . 282
yellow symbo ls ................... 32
Engine
Driver seat Cecking and fil ling locations .. .... . 219
See Seating position .. ..... .... ... 116
Checking and fi lling locations .. ... . 218
Dr iving Coolant ...... .... ... .... .... .... 224
Run-flat tires ..... ... .. ...... .... . 259 Hood .. ...... .... .... ... .... .. .. 216
Dr iving safely .......... ............ . 114 Start
ing ...... .... .... ... .... .. 92, 93
Duplicate key .... ...... ... .. .... .... . 38 Start
ing with jumper cables .... .... 279
Dust filter ........................... 86 Stopping
...... .... ... .... .... .... 93
Engine compart ment .. ...... .... .... 218
E Safety instruc tions .. ...... .... ... . 217
Working in the engine compa rtment . 217
Elapsed time .... .... ........ ....... . 26
Engine coolant system ......... ...... 224
Electro -mecha n ica I power assist .. .. 20, 188 Adding coo
lant ..... ........ ...... 225
Electron ic different ial lock (EDU Check
ing the eng ine coolant level ... 225
How the sys te m works .. ...... .... 184 Radiator fan ..
.... ....... .... .... 226
Warning/indicator lights ...... ...... 20 Te
mpe rature gauge ...... .... .... .. 13
Electronic immobilizer .... ..... .. .. 14, 40 Engine cooling system
Electronic power cont ro l Malfunction
............ ... .. ..... 34
EPC warning/indicator light ......... 17 Engine data
... .. .... .... .... .... ... 29 1
E lectron ic speed limiter . ...... .... .... 25 E
ngine hood
Electronic Stability Program .. .... .... 182 Closing
... .... .... ... .... ...... . 217
Electronic stabilization program (ESP) How to release
the hood . ...... .... 216
Warning/indicator lights .. .... .... .. 17 Engine oil
..... .. .......... ... .. .... 219
Emergency flasher Warning/indicator lights ...... .... .. 18
Emergency flashers .................. 57
Emergency locking .. .... ........ ... .. 45
Emergency operation Adding
......... .... ........ ..... 222
Additives .. .... .... ......... ..... 222
Changing . ..... ... .... .... ... ... . 223
Checking the eng ine oi l leve l ....... 221
Indica tions and condit ions requiring ext ra
checking ....................... 221
Rear lid ...... ... .... .... .... .... . 46
Oil consumption ... ... ...... ...... 221
Emergency release for selector lever ... 106
Oil grades .... .... .... ..... .. .... 2 19
Vehicle operation Vehicle care Do-it-yourself service Technical data