seats AUDI TT COUPE 2009 Owners Manual
[x] Cancel search | Manufacturer: AUDI, Model Year: 2009, Model line: TT COUPE, Model: AUDI TT COUPE 2009Pages: 316, PDF Size: 71.16 MB
Page 4 of 316
Table of contents
Table of contents
Vehicle literature ........ .
About this Owner's Manual .............. ...... . .
Controls and
equipment .. .. ... . .. ... ... . .
Cockpi t ... .......... ...... ..... .
Genera l ill ustration ............. .
Instruments and
warning/indica tor lig hts ....... .
Instruments .............. ..... .
Warning/indicator lights ........ .
Driver informa tion system ..... .
Introduction ............... .. .. .
Gearshift recommendation ...... .
Service interval d isplay .... ..... .
On -Boa rd Diag nos tic sys tem (OBD)
Trip computer ..... ... .. ..... .. .
Menu display ............•......
Speed war ning system ....... .. .
Warnings and symbo ls .... ... .. .
O pening and closing .......... .
Keys .......................... .
Powe r loc king system ......... . . 5 Rear
lid/trunk lid .............. .
45
Transmission . . . . . . . . . . . . . . . . . . . 9 9
Anti-theft a larm system ..... ... .
47 Manua l transmiss ion . . . . . . . . . . . . 99
Power w indows ...... ... .... . .
48 S tronic transmission . . . . . . . . . . . 99
Clear vision ................ ... .
6 Lights ........................ . 51
Home
link® . . . . . . . . . . . . . . . . . . . . . 107
51 Universa I remote control . . . . . . . . 107
9
11
11
1 2
12
1 5
22
2 2
23
23
24
25
27
30
32
38
38
41 In
ter io r ligh ts . . . . . . . . . . . . . . . . . . 59
Vis ion . . . . . . . . . . . . . . . . . . . . . . . . . 59
W iper and washer system . . . . . . . 60
M irrors . . . . . . . . . . . . . . . . . . . . . . . . 64
Digi tal compass . . . . . . . . . . . . . . . . 67
Seats and sto rage . . . . . . . . . . . . . 69
Genera l recommendat ions . . . . . . 69
Adjust ing front sea ts manua lly . . 70
Power seats ........ ......... . .
Lumbar support ............... .
Head restraints ........ ..... .. .
Rear sea ts . ... ... . .. ... ... .. .. .
Luggage compar tment ........ .
Roof rack ..... .......... ....• ..
Cup ho lder ... ... ...... ... .. .. .
Asht ray ................ .... .. .
Cigarette ligh ter /socke t ........ .
Storage ............ ....... ... .
Warm and cold .............. . .
Climate cont ro ls ........... ... .
Rear window defogger
Qiil ...•. ..
Heated seats ................. .
On t he road ... .• ..... .... ... ...
Steering ... ... ... ...... ... ... . .
Ignition lock and ignition switch .
Sta rting and stopping the engine
Par king bra ke ... ... ... .. .. .... .
Acoustic parking system ... .. .. .
Cruise control ................. .
Audi magnetic ride ......... ... . 71
Safety first
................ .
74
74 Driving Safe ly .... ............. .
75 General no tes ................. .
76 Proper occupant seating pos itions
79 D river and passenger side fo otwel l
81 Peda l area .................... .
81 Stow ing luggage .............. .
8 2 Report ing Safety Defects ...... . .
83 Sa fety belts ..... ... ... ....... . .
8 5 General no tes ................. .
85 Why safety be lts? .............. .
89 Safety bel ts ..... ... ... ... ... .. .
90 Safety belt pretensioners ....... .
91
Ai rbag system . ...... .......... .
91 Importa nt t hings to know ...... .
92 Fro nt airbags ................. .
93 Monitoring the Advanced Airbag
94 System ....................... .
95 Knee airbags ..... ............. .
96 Side airbags ... ... ............ .
98 1
13
1 14
1 14
116
120
1 2 0
121
123
125
125
126
129
133
135
13 5
139
146
151
154
Page 5 of 316
Child Safety . . . . . . . . . . . . . . . . . . . . 157
Important things to know . . . . . . . 157
Child safe ty seats . . . . . . . . . . . . . . 162
Instal ling a ch ild safety sea t . . . . . 168
Addi tional Inform ation . . . . . . . . . . 171
Lower anchorages and tether for
chi ldren (LATCH) ............... .
172
t
Vehicle operation . . . . . . . . 181
Intelligent technology . . . . . . . . . . 182
Notice about data recorded by
vehicle control modules . . . . . . . . 182
Electronic Stabilization Program
(ESP) . . . . . . . . . . . . . . . . . . . . . . . . . . 182
Rear spoiler . . . . . . . . . . . . . . . . . . . 185
B raking . . . . . . . . . . . . . . . . . . . . . . .
186
Electro-mechanical power assist . 188
Driving with your quattro® . . . . . . 189
Driving and environment . . . . . . 190
The first 1,000 miles (1,500 km) and
afterwards . . . . . . . . . . . . . . . . . . . .
190
Ca tal ytic converter . . . . . . . . . . . . . 191
Avoid damaging the veh icle . . . . .
192
Operate your vehicle economically
and minimize pollution ........ .
Trailer towing ...........•......
192
194
Table of contents
Vehicle care . . . . . . . . . . . . . . . 197 Do-it-yourself service ... 253
C leaning and protection . . . . . . . 198 What do I do now? . ............ 264
General information . . . . . . . . . . . . 198
Care of exterior . . . . . . . . . . . . . . . . . 198
Care of interior . . . . . . . . . . . . . . . . . 205
Fue l supply and filling your fuel
tank . . . . . . . . . . . . . . . . . . . . . . . . . . . . 211
Gasoline .................. •....
Fuel tank ..................... .
Checking and filling ... ..... ... .
Eng ine hood ........ .......... .
Engine compartment .......... .
Engine oil ........ ... ...... ... . .
E ngine cooling system ......... .
Brake fluid ... ... ...... .... •....
Battery ............ ......... .. .
W indshield /headlight washer
conta iner .. .... ... .... ... ..... .
Tires and whee ls .............. .
Tires ................... · · · · · · ·
T ire pressure monitoring system .
Run-flat tire s ....... ...... ..... .
2 11
2 12
2 16
216
218
219
224
22 7
228
233
234
234
253
258
Vehic le tool kit . . . . . . . . . . . . . . . . . . 264
Tire r epair . . . . . . . . . . . . . . . . . . . . . . 264
What should I be aware of when
changing a tire ?
268
Fuses and bulbs ....... ......... 274
Fuses ... .............. ... ... ... 274
Bulbs ...... ...... ..... ......... 278
Emergency situations . . . . . . . . . . 279
General . . . . . . . . . . . . . . . . . . . . . . . . 279
Starting by pus hing or towing . . . . 279
Starting with jumper cables . . . . . . 279
Use of jumpe r cables . . . . . . . . . . . . 280
Emergency towing with commercial
tow t ruck . . . . . . . . . . . . . . . . . . . . . .
282
Lifting vehicle . . . . . . . . . . . . . . . . . . 284
Technical data
General information 287
288
Explanation
of technical data . . . . 288
Veh ic le ident ification . . . . . . . . . . . . 288
Vehicle care I I irechnical data
Page 48 of 316
Opening and closing
Opening the rear lid
Press the cente r bu tton i::::::5 on t he m ast er ke y or p ull t he
r e lea se b utto n
i::::::5 in t he dr iv er's do or=> pa ge 45, fig. 31 .
Th e re ar lid is un lock ed .
Opening rear lid
- Lift t he re ar lid.
Closing the rear lid
- Pull the re ar lid dow n an d all ow it to drop gent ly=> ,& .
& WARNING
• The rear seat area is too small to safely transport passengers
taller than 4 '11 " (1 .5 m l.
- Persons taller than 4'11 " (1.5
ml as well as children in
booster seats who are too close to the rear window and roof
can suffer severe head and neck injuries when the rear lid is
closed or in a crash .
- The minimum clearance between the passengers' heads and
the rear window must never -under any circumstances -be
less than 1 inch (2 .5 cm) when the passengers sit fully upright .
- Always make sure that rear seat passengers cannot be
struck when the rear lid is closed .
• After closing the rear lid , always pull up on it to make sure that
it is properly closed. Otherwise it could open suddenly when the
vehicle is moving .
• To help prevent poisonous exhaust gas from being drawn into
the vehicle , always keep the rear lid closed while driving. Never
transport objects larger than those which fit completely into the
luggage area , because then the rear lid cannot be fully closed .
• Never leave your vehicle unattended especially with the rear lid
left open . A child could crawl into the car through the luggage
compartment and pull the lid shut , becoming trapped and unable
& WARNING (continued)
to get out. To reduce the risk of personal injury , never let children
play in or around your vehicle. Always keep the rear lid as well as
the vehicle doors closed when not in use.
[ i ] Tips
• I f the rear lid is open or not properly locked wh en the igni tion is
t ur ned on, the doo r and rear li d warning a ppears i n the instrum ent
cluster display.
• If th e rear lid o n a locked ve hic le is un locke d with th e m idd le
button
c::$ on the remote key , the rear lid is automatica lly locked
a ga in im med iat ely aft er closi ng . This is i ndi cate d by th e turn s igna ls
blin king .•
Emergency release for rear lid
If the rear lid cannot b e opened , an em ergency release is
prov ided.
Fig . 33 Acce ss to
emergency rele ase on
the left side of the
luggage compartment
below t he rear window ...
Page 71 of 316
Seats and storage
General recommendations
Why is your seat adjustment so important?
The safety belts and the airbag system can only provide
maximum protection if the front seats are correctly
adjusted.
There are various ways of adjusting the front seats to provide safe
and comfortable support for the driver and the front passenger.
Adjust your seat properly so that:
• you can easily and quickly reach all the switches and controls in
the instrument panel
• your body is properly supported thus reducing physical stress
and fatigue
• the safety belts and airbag system can offer maximum protec
tion
~ page 135.
In the following sections, you will see exactly how you can best
adjust your seats.
There are special regulations and instructions for installing a child safety seat on the front passenger's seat. Always heed the informa
tion regarding child safety provided in~
page 157, "Child Safety".
& WARNING
Incorrect seating position of the driver and all other passengers
can result in serious personal injury.
• Always keep your feet on the floor when the vehicle is in motion
- never put your feet on top of the instrument panel, out of the
window or on top of the seat cushion! This applies especially to
the passengers. If your seating position is incorrect you increase
the risk of injury in the case of sudden braking or an accident. If
Controls and equip
ment
Seats and storage
& WARNING (continued)
the airbag inflates and the seating position is incorrect this could
result in personal injury or even death.
• It is important for both the driver and front passenger to keep
a distance of at least 10 inches (25 cml between themselves and
the steering wheel and/or instrument panel. If you're sitting any closer than this, the airbag system cannot protect you properly. In
addition to this, the front seats and head restraints must be
adjusted to your body height so that they can give you maximum
protection.
• Always try to keep as much distance as possible between your
self and the steering wheel or instrument panel.
• Do not adjust the driver's or front passenger's seat while the
vehicle is moving. Your seat may move unexpectedly, causing
sudden loss of vehicle control and personal injury. If you adjust
your seat while the vehicle is moving, you are out of position. •
Driver's seat
The correct seat position is important for safe and relaxed
driving.
We recommend that you adjust the driver's seat in the
following manner:
- Adjust the seat in fore and aft direction so that you can
easily push the pedals to the floor while keeping your
knee slightly bent:::>
& in "Why is your seat adjustment
so important?".
Adjust the seatback so that when you sit with your back against the seatback, you can still grasp the top of the
steering wheel. _..
I • •
Page 72 of 316
Seats and storage
- Position the head restraint according to the occupant's height ~
page 74. For maximum protection, the top of
the head restraint should be at least at eye level, prefer
ably higher and ideally level with the top of the head
~ page 119, fig. 98.
& WARNING
Never place any objects in the driver's footwell. An object could
get into the pedal area and interfere with pedal function . In case
of sudden braking or an accident, you would not be able to brake
or accelerate! •
Front passenger's seat
Always move the front passenger seat into the rearmost position.
To avoid contact with the airbag while it is deploying, do not
sit any closer to the instrument panel than necessary and
always wear the three-point safety belt provided adjusted
correctly. We recommend that you adjust the passenger's
seat in the following manner :
- Move the front passenger seat into the rearmost position
of t he fore and aft adjustment range~
& in "Why is
your seat adjustment so important?" on
page 69.
- Bring the backrest up to an (a lmost) upright position . Do
not ride with the seat reclined.
- The ideal position for the head restraint is with the upper
edge of the restraint level with the top of your head
~ page 74. You should not lower the top of the restraint
below the level of your eyes. -
Place your feet on the floor in front of the passenger's
seat. •
Adjusting front seats manually
Applies to vehic les: with manua l seat ad justment
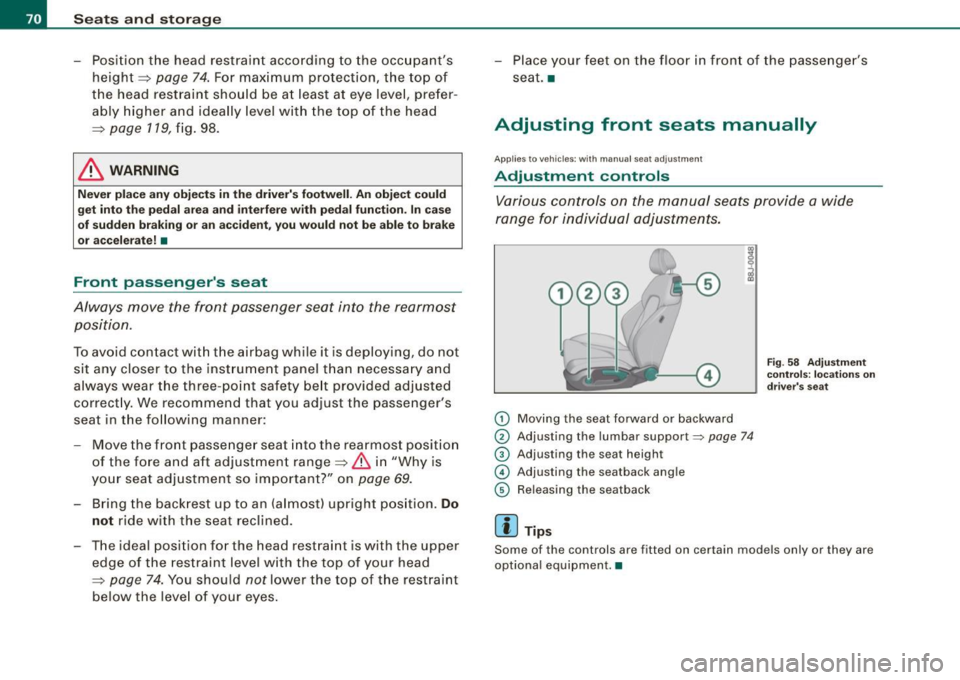
Adjustment controls
Various controls on the manual seats provide a wide
range for individual adjustments.
0 Moving the seat forward or backward
0 Adjusting the lumbar support~ page 74
® Adjusting the seat height
© Adjusting the seatback angle
© Releasing the seatback
[ i ] Tips
Fig. 58 Adjustment
controls: locations on
driver's seat
Some of the controls are fitted on certain models only or they are
optional equipment. •
Page 73 of 316
Applies to vehicles : wit h m anua l seat a djustment
Adjusting the manual seats
Position, angle and shape of the manual seats can be
adjusted to provide safe and comfortable seating.
Reed and heed all WARNINGS=:> & before you adjust your
seat.
Moving the front seats forward or backward
- Lift the lever (D =:> page 70, fig. 58 and slide the seat to
the desired position.
- Release the lever and then move the seat further until
you feel and hear it engage.
Adjusting the seat height
- Pull
the lever 0 up and pump it to raise the seat.
-Push the lever down and pump it to lower the seat.
Adjusting the seatback angle
-Lean forward to take your weight off the seatback.
- Turn the hand wheel© in the direction you want the
seatback to tilt .
Releasing seat back
-Pull the lever ® up.
- Push the seatback forward.
& WARNING
• Never adjust the driver's or front passenger's seat while the
vehicle is moving. If you do this while the vehicle is moving, you
Controls and equip
ment
Seats and storage
& WARNING (continued)
will be out of position . Always adjust the driver's or front
passenger's seat when the vehicle is not moving.
• Be careful when adjusting the seat height. Check to see that no
one is in the way, or serious injury could result!
• To reduce the risk of injury in the case of sudden braking or
accident, front passengers must never ride in a moving vehicle
with the seatback reclined . Safety belts and the airbag system
only offer maximum protection when the seatback is upright and
the safety belts are properly positioned on the body . The more the
seatback is reclined, the greater the risk of personal injury from an
incorrect seating position and improperly positioned safety
belts! •
Power seats
Applies to vehi cles : w it h p ower sea ts
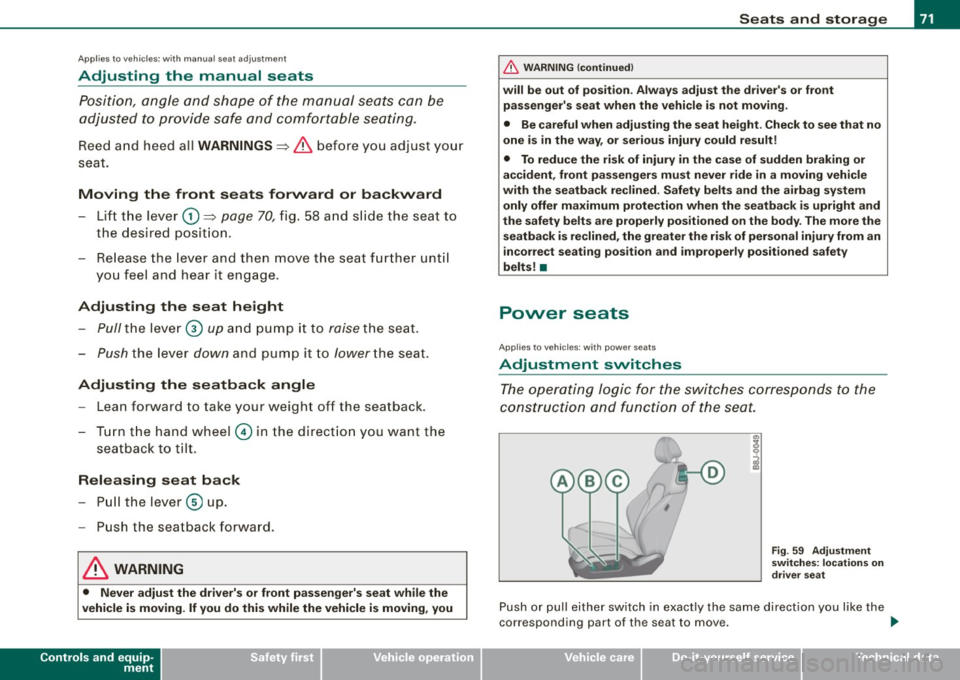
Adjustment switches
The operating logic for the switches corresponds to the
construction and function of the seat.
Fig. 59 Adjustment
switches: locations on
driver seat
Push or pull either switch in exactly the same direction you like the
corresponding part of the seat to move. ..,
I • •
Page 74 of 316
Seats and storage
© Adjusting the lumbar support=:> page 74
@ Seat adjustment =:> page 72
© Adjusting the angle of the seatback =:> page 73
@ Releasing the seatback
& WARNING
• Never adjust the driver's or front passenger seat while the
vehicle is moving. If you do this while the vehicle is moving, you
will be out of position. Always adjust the driver's or front
passenger seat when the vehicle is not moving.
• Be careful when adjusting the seat height. Check to see that no
one is in the way, or serious injury could result!
• Because the seats can be electrically adjusted with the ignition
key removed, never leave children unattended in the vehicle. Unsu
pervised use of the electric seat adjustments may cause serious
injury. •
Applies to vehi cles: with po wer seats
Power seat adjustment
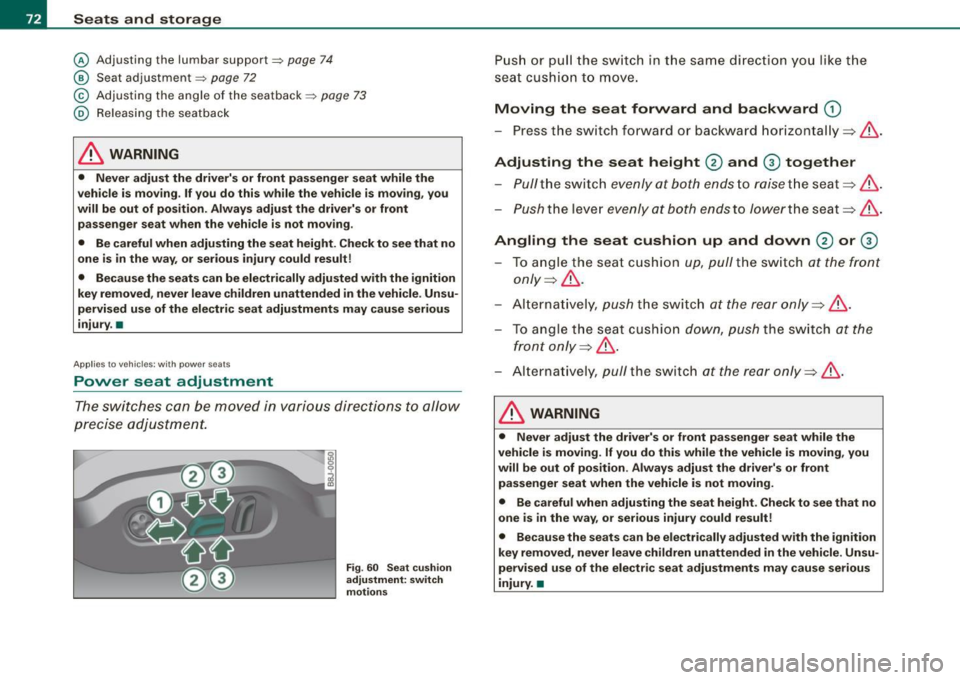
The switches can be moved in various directions to allow
precise adjustment.
Fig . 60 Seat cushion
adjustment: switch
motions
Push or pull the switch in the same direction you like the
seat cushion to move.
Moving the seat forward and backward G)
-Press the switch forward or backward horizontally~& .
Adjusting the seat height 0 and 0 together
Pull the switch evenly at both ends to raise the seat ~& .
-Push the lever evenly at both ends to lower the seat ~& .
Angling the seat cushion up and down 0 or 0
To angle the seat cushion up, pull the switch at the front
only ~& -
Alternatively, push the switch at the rear only ~ &.
To angle the seat cushion
down, push the switch at the
front only~& .
Alternatively, pull the switch at the rear only~& .
& WARNING
• Never adjust the driver's or front passenger seat while the
vehicle is moving. If you do this while the vehicle is moving, you
will be out of position . Always adjust the driver's or front
passenger seat when the vehicle is not moving.
• Be careful when adjusting the seat height. Check to see that no
one is in the way, or serious injury could result!
• Because the seats can be electrically adjusted with the ignition
key removed, never leave children unattended in the vehicle. Unsu
pervised use of the electric seat adjustments may cause serious
injury. •
Page 75 of 316
Applies to vehicles: wi th powe r seats
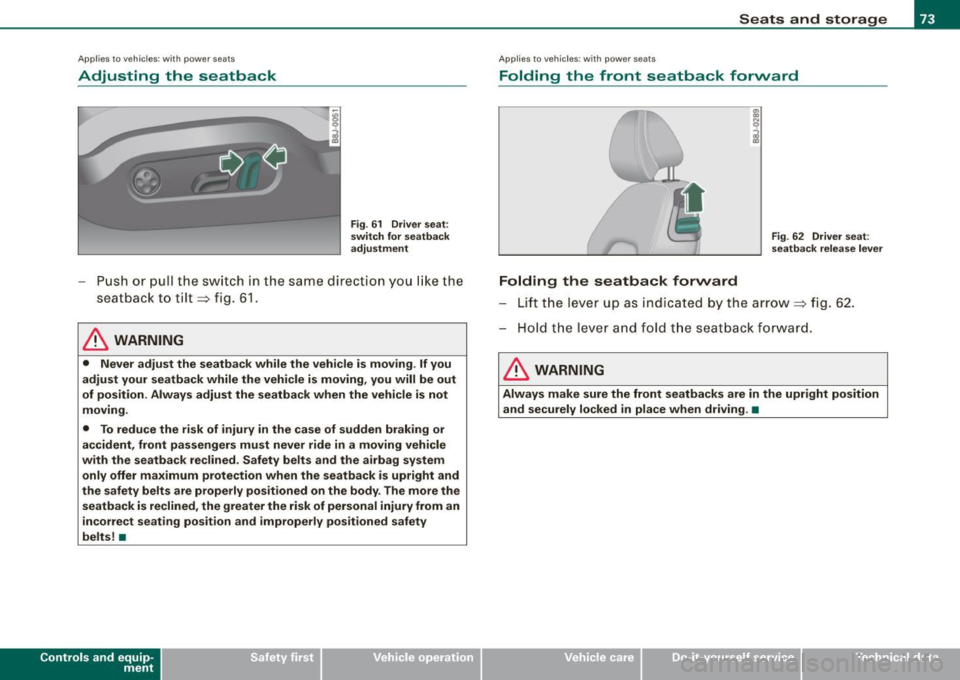
Adjusting the seatback
Fig . 61 Driver seat:
switch for seatback
adjustment
- Push or pull the switch in the same direction you like the
seatback to tilt => fig. 61.
& WARNING
• Never adjust the seatback while the vehicle is moving . If you
adjust your seatback while the vehicle is moving, you will be out
of position . Always adjust the seatback when the vehicle is not
moving.
• To reduce the risk of injury in the case of sudden braking or
accident, front passengers must never ride in a moving vehicle
with the seatback reclined. Safety belts and the airbag system
only offer maximum protection when the seatback is upright and
the safety belts are properly positioned on the body . The more the
seatback is reclined, the greater the risk of personal injury from an
incorrect seating position and improperly positioned safety
belts! •
Con tro ls and eq uip
ment
Seats and storage
A pp lies to vehicles: with power seats
Folding the front seatback forward
Folding the seatback forward
Fig. 62 Driver seat:
seatback release lever
Lift the lever up as indicated by the arrow=> fig. 62 .
Hold the lever and fold the seatback forward.
& WARNING
Always make sure the front seatbacks are in the upright position
and securely locked in place when driving . •
Vehicle care I I irechnical data
Page 76 of 316
Seats and storage
App lies to veh ic les: wi th lumbar suppo rt
Lumbar support
The lumbar support can be adjusted to fit the natural
curvature of the occupant's spine .
Adjusting the curvature
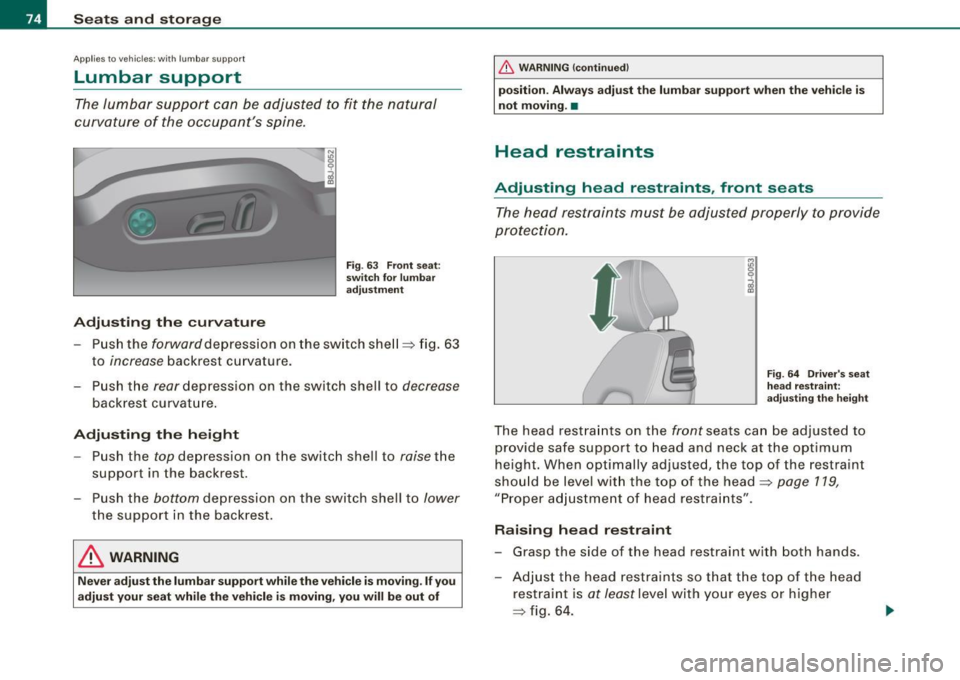
Fig. 63 Front seat:
switch for lumbar
adjustment
- Push the forward depression on the switch shell~ fig. 63
to
increase backrest curvatu re.
- Push the
rear depression on the switch shell to decrease
backrest curvature.
Adjusting the height
- Push the top depression on the sw itch shell to raise the
support in the backrest .
- Push the
bottom depression on the switch shell to lower
the support in the backrest.
& WARNING
Never adjust the lumbar support while the vehicle is moving. If you
adjust your seat while the vehicle is moving, you will be out of
& WARNING (continued)
position. Always adjust the lumbar support when the vehicle is
not moving. •
Head restraints
Adjusting head restraints , front seats
The head restraints must be adjusted properly to provide
protection.
Fig. 64 Driver's seat
head restraint:
adjusting the height
The head restraints on the front seats can be adjusted to
prov ide safe support to head and neck at the opt imum
height. When optimally adjusted, the top of the restra int
should be level with the top of the head~
page 119 ,
"Proper adjustment of head restraints" .
Raising head restraint
- Grasp the side of the head restraint with both hands .
- Adjust the head restraints so that the top of the head
r estraint is
at least level with your eyes or higher
~ fig. 64 .
Page 77 of 316
Lowering head restraint
- Grasp the sides of the head restraint with both hands.
-Press the button
=:> page 74, fig. 64 an d adjust the hea d
restraint .
- Adj us t the head restraints so tha t t he to p of th e he ad
re straint is
at least le vel with your eyes or higher
=:> page 7 4, fig . 64.
Refer to ~ page 119, "Prope r ad justment of head res traints" for
guide lines on how to ad just the height of the front head restraints
to fit the occupant 's body size.
& WARNING
• Driving without head restraint s or with head restraints that are
not properly adju sted increase s the ri sk of serious or fatal neck
injury dramatically .
• Read and heed all WARNINGS~
page 119.
[ i] Tips
Correctly adjusted head restraints and safety belts are an extremely
effective com bination of safety features. •
Controls and equip
ment
Seats and storage
Rear seats
General information
S a fe tr ansp ort atio n of passengers on t he re ar se ats
re quires prope r sa fety p rec autions.
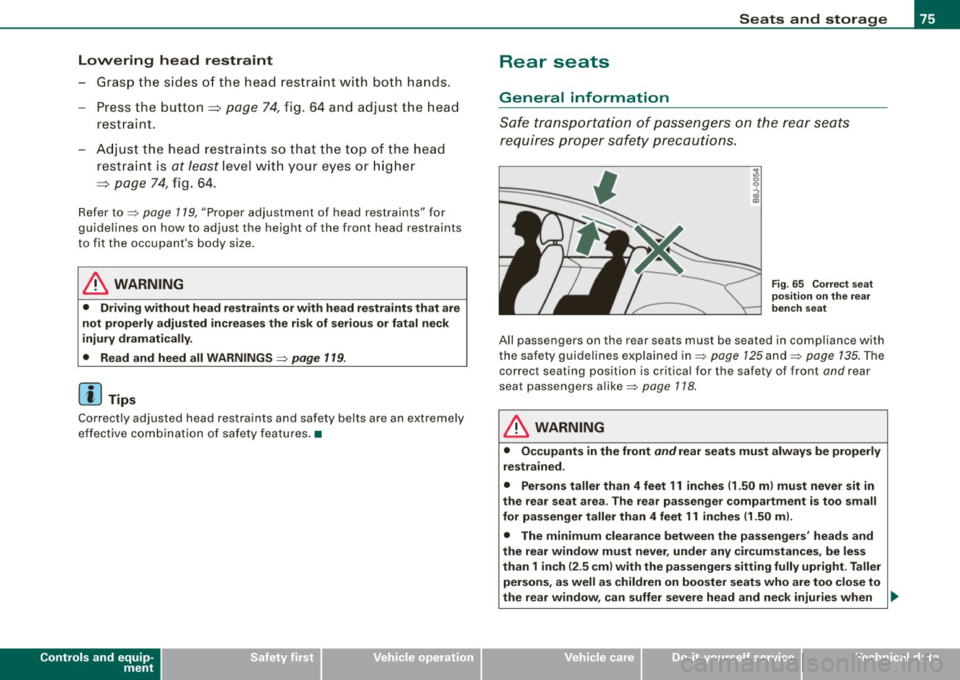
Fig . 6 5 Corre ct se at
po sit ion on the re ar
bench seat
All passengers on the rear seats must be seated in compliance with
the safety guidelines exp lained in~ page 125 and ~ page 135. The
correct seating position is critical for the safety of front and rear
seat passengers alike ~ page
118.
& WARNING
• Occupants in the front and rear seats must always be properly
restrained .
• Per sons taller than 4 feet 11 inche s (1.50
ml must never sit in
the rear seat area . The rear pas senger comp artment is too small
for passenger taller than 4 feet 11 inches (1 .50
ml.
• The min imum clearance between the pas sengers ' head s and
the rear window must never , under any cir cum stance s, be less
than 1 inch (2 .5 cm ) with the pa ssenger s sitting fully upright . Taller
persons , as well a s children on boo ster seats who are too clo se to
the rear windo w, can suffer severe head and neck injurie s when _,,
I • •