AUDI TT COUPE 2014 Owners Manual
Manufacturer: AUDI, Model Year: 2014, Model line: TT COUPE, Model: AUDI TT COUPE 2014Pages: 284, PDF Size: 34.42 MB
Page 91 of 284
Downloaded from www.Manualslib.com manuals search engine 0
N
co
....
\D Lfl
N
Lfl
.... lane
change. In all cases, the side assist will give
a warning for the vehicles it has detected at the
latest when they enter the "blind spot".
© Other vehicles being overtaken
When you are overtaking another vehicle slowly,
with a speed differential of less than 15 km/h,
the warning lamp in the exterior mirror will light
up as soon as the other vehicle enters your blind
spot.
If you are overtaking another vehicle quickly, with
a speed differential of more than 15 km/h, the
warning lamp will not light up.
System limitations
The radar sensors are designed for normal lane
widths and monitor the lanes immediately to the
left and right of your vehicle. In certain situations
the warning lamp on one of the exterior mirrors
may light up even if no vehicle is travelling in an
area that could be critical in the event of a lane
change. For example:
- When you are travelling in a narrow lane or
when you are not travelling in the centre of the
lane. In this case the system may monitor an
other lane and register a vehicle that is not in
fact travelling in an adjacent lane.
- When you are driving into a bend. The side as
sist may react to a vehicle two lanes away.
- If the system detects other objects (such as
crash barriers, etc).
- In poor weather conditions. The functionality of
the side assist is then restricted.
The radar sensors ¢ Fig. 98 must not be obstruc
ted by stickers, bicycle racks, deposits or any oth
er substances which could impair the function of
the system. For notes on cleaning, please refer to
¢page 236.
.&_ WARNING
-Always watch the road and the area sur
rounding the vehicle. The side assist feature
is not a substitute for the full concentration
of the driver. The driver is always responsi
ble for the safety of lane changes and other
manoeuvres. Driver
assist systems
- In certain situations, the system may not
function properly, or the functionality of the
system may be restricted. For example:
- If other vehicles are approaching very
qui ckly, or if you are overtaking other
vehicles quickly. The warning lamp may
not light up in time.
- In poor weather conditions, such as heavy
rain, snow or road spray.
- If you are travelling in very wide lanes, in
tight bends or over crests. The system may
not detect vehicles in the adjacent lane
because they are outside the area covered
by the sensors.
CD CAUTION
Impacts or damage to the bumper, wheel
arches or underbody can cause misalignment
of the sensors. This can impair the functional
ity of the system. Have the systems checked
by a qualified workshop.
� Note
The warning lamps on the exterior mirrors
may not be properly visible if tinted foil is af
fixed to the side windows on the driver's or
passenger's side.
Switching on and off
Applies to vehicles: with Audi side assist
The system can be switched on and off on the in
fotainment system.
... Select the following on the infotainment sys
tem: I MENU I button >Car> left control button
> Driver assist> Audi side assist.
The warning lamps in the exterior mirrors light
up briefly each time the ignition is switched on to
indicate that the system is activated .
89
Page 92 of 284

Downloaded from www.Manualslib.com manuals search engine Driver
assist systems
Adjusting brightness of warning lamp
Applies to vehicles: with Audi side assist
The brightness of the warning Lamp can be ad
justed on the infotainment system.
.. Select the following on the infotainment sys
tem: IM E
N u I
button > Car > left control button
> Driver assist> Audi side assist.
The brightness of the warning lamp in both the
information and warning modes is regulated au
tomatically according to the ambient light level.
If you are in very dark or very light surroundings
when you adjust the brightness of the warning
lamp, the automatic brightness control may al
ready have reached the lowest or the brightest
setting. In such a case it is possible that you
won't notice a difference while you are adjusting
the brightness or that you will only notice it once
the light surroundings have changed.
Please adjust the brightness of the warning lamp
for the information mode so that it does not dis
tract you while you are looking at the road in
front. When you change the brightness, the
warning lamp on the exterior mirror will light up
briefly with the intensity set for the information
mode. The intensity of the lamp in the warning
mode is linked to the intensity in the information
mode and is adjusted automatically.
(CO} Note
- The side assist is not active while the set
tings are being adjusted.
- Your personal settings are stored automati
cally and assigned to the remote control key
which is being used.
Driver messages
Applies to vehicles: with Audi side assist
Should the side assist be deactivated automati
cally, a driver message will appear on the info
tainment display.
@j Audi side
assist: currently unavailable.
Sensor view restricted due to surroundings.
See owner's manual
The radar sensors are blocked. The area in front
of the sensors must not be obstructed by bicycle
90 racks,
stickers, deposits or any other substances.
If necessary, clean the area in front of the sen
sors ¢ page 88, Fig. 98.
@j Audi
side assist: currently unavailable.
See owner's manual
The side assist is temporarily inoperative and
cannot be switched on (for instance if the battery
is not sufficiently charged).
@j Audi
side assist: fault. Please contact
workshop
The system cannot detect vehicles reliably and
will be deacti vated. The sensors are out of align
ment or defective. Have the system checked by a
qualified workshop soon.
Audi drive select (vehicle
set-up functions)
Introduction
Applies to vehicles: with Audi drive select
Drive select allows you to use different set-ups on
your vehicle. The four modes efficiency*, com
fort, auto and dynamic allow the driver, for ex
ample, to change from a sporty mode to a more
comfortable one via the �:11
� button in the centre
console or via the infotainment system. In addi
tion, the individual mode allows you to adapt the
vehicle set-up to suit your personal driving style.
For example, you might choose to combine a
more dynamic engine set-up with a lighter steer
ing response.
Description
Applies to vehicles: with Audi drive select
The possible vehicle set-up in each mode de
pends on which equipment is installed on your
vehicle. The engine and steering are basic parts
of your vehicle which are always included in the
set-up.
Engine and automatic gearbox*
The response of the engine and automatic gear
box* to accelerator pedal movements will be
more spontaneous or balanced, depending on
which mode you select. In efficiency* mode the
automatic gearbox* selects the next gear at
..,.
Page 93 of 284
Downloaded from www.Manualslib.com manuals search engine 0
N
co
....
\D U'l
N
U'l
.... lower engine
speeds and the coasting mode is ac
tivated ¢ page 75. This helps to reduce fuel con
sumption.
Suspension control (Audi magnetic ride)*
The suspension control uses sensors to collect in
formation on steering movements, braking and
acceleration input by the driver, road surface
quality, road speed and vehicle Loading. With
drive select you can choose between dynamic and
comfort-oriented suspension set-ups (dynamic
and comfort modes), or opt for a more balanced
set-up (auto mode).
Steering
The degree of power assistance can be varied.
Various modes are possible ¢ page 92.
The steering response is even more agile on
vehicles with progressive steering*.
Air conditioner*
The air conditioner runs in a particularly econom
ical mode when the efficiency* setting is selec
ted. When this function is selected, eco* is shown
in the display of the automatic air conditioner.
Cruise control system*
The acceleration response is particularly econom
ical in efficiency* mode.
@ Note
- On vehicles with manual gearbox, an E ap
pears in the gear-change indicator when ef
ficiency* mode is activated.
- On vehicles with automatic gearbox, if you
select efficiency* mode when the selector
Lever is in position D, E will automatically
appear on the infotainment display. Driver
assist systems
Selecting the driving mode
Applies to vehicles: with Audi drive select
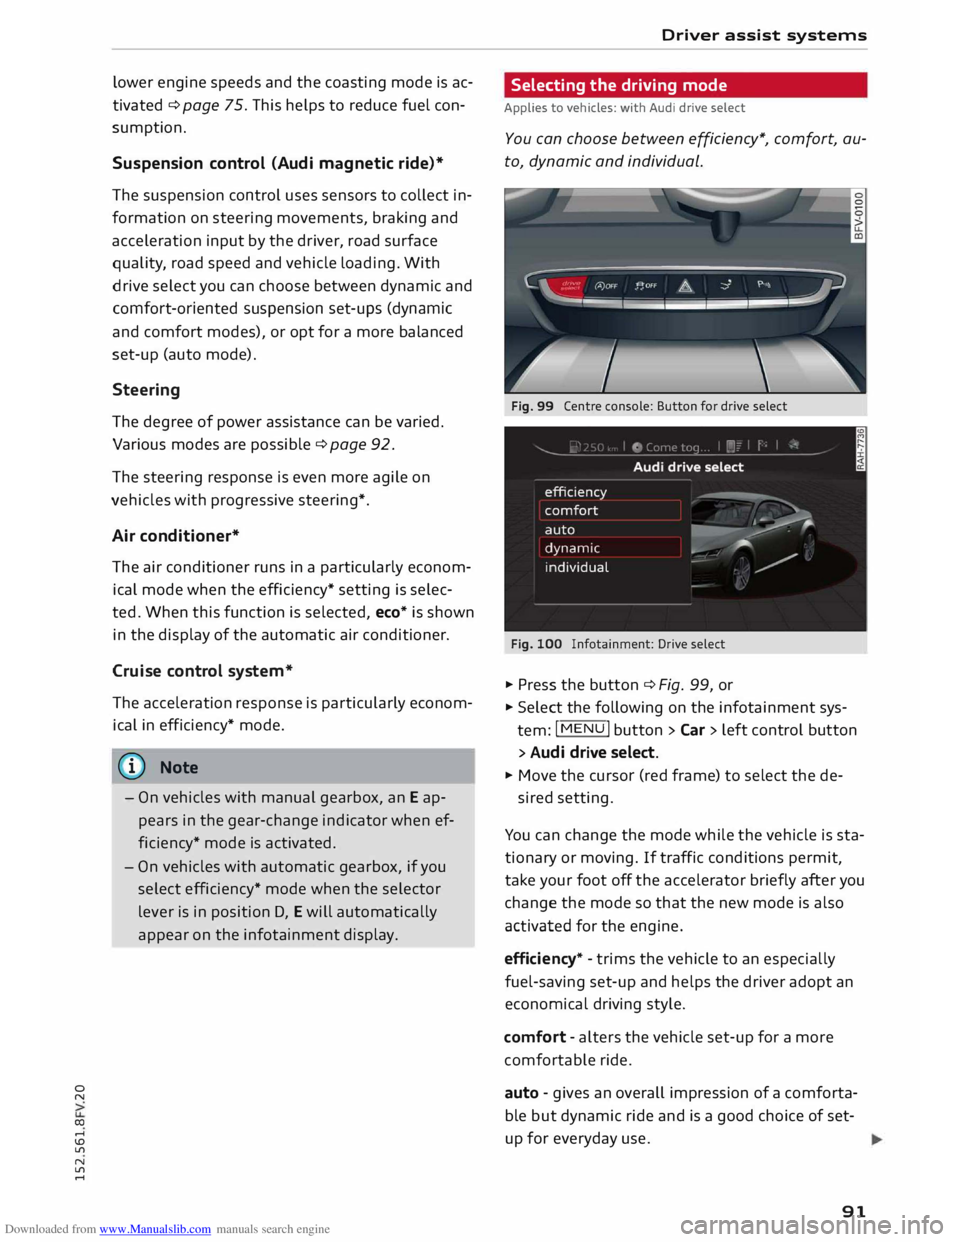
You can choose between efficiency*, comfort, au
to, dynamic and individual.
Fig. 99 Centre console: Button for drive select
Fig. 100 Infotainment: Drive select
� Press the button ¢ Fig. 99, or
� Select the following on the infotainment sys
tem: I MENU
I button >Car> Left control button
> Audi drive select.
� Move the cursor (red frame) to select the de-
sired setting.
You can change the mode while the vehicle is sta
tionary or moving. If traffic conditions permit,
take your foot off the accelerator briefly after you
change the mode so that the new mode is also
activated for the engine.
efficiency* -trims the vehicle to an especially
fuel-saving set-up and helps the driver adopt an
economical driving style.
comfort -alters the vehicle set-up for a more
comfortable ride.
auto -gives an overall impression of a comforta
ble but dynamic ride and is a good choice of set
up for everyday use .
91
Page 94 of 284
Downloaded from www.Manualslib.com manuals search engine Driver
assist systems
dynamic -gives the vehicle a tighter set-up and is
ideal for performance driving.
individual -¢page 92.
The last selected mode is still active when you re
start the vehicle.
Configuring individual mode
You can configure your own personal vehicle set-up .
.,. Press the button ¢ page 91, Fig. 99 > individu-
al > right control button, or:
.,. Select the following on the infotainment sys
tem: IM EN u I
button > Car > left control button
> Audi drive select> individual> right control
button.
The individual* driving mode will automatically
be activated when you have finished configuring
the settings.
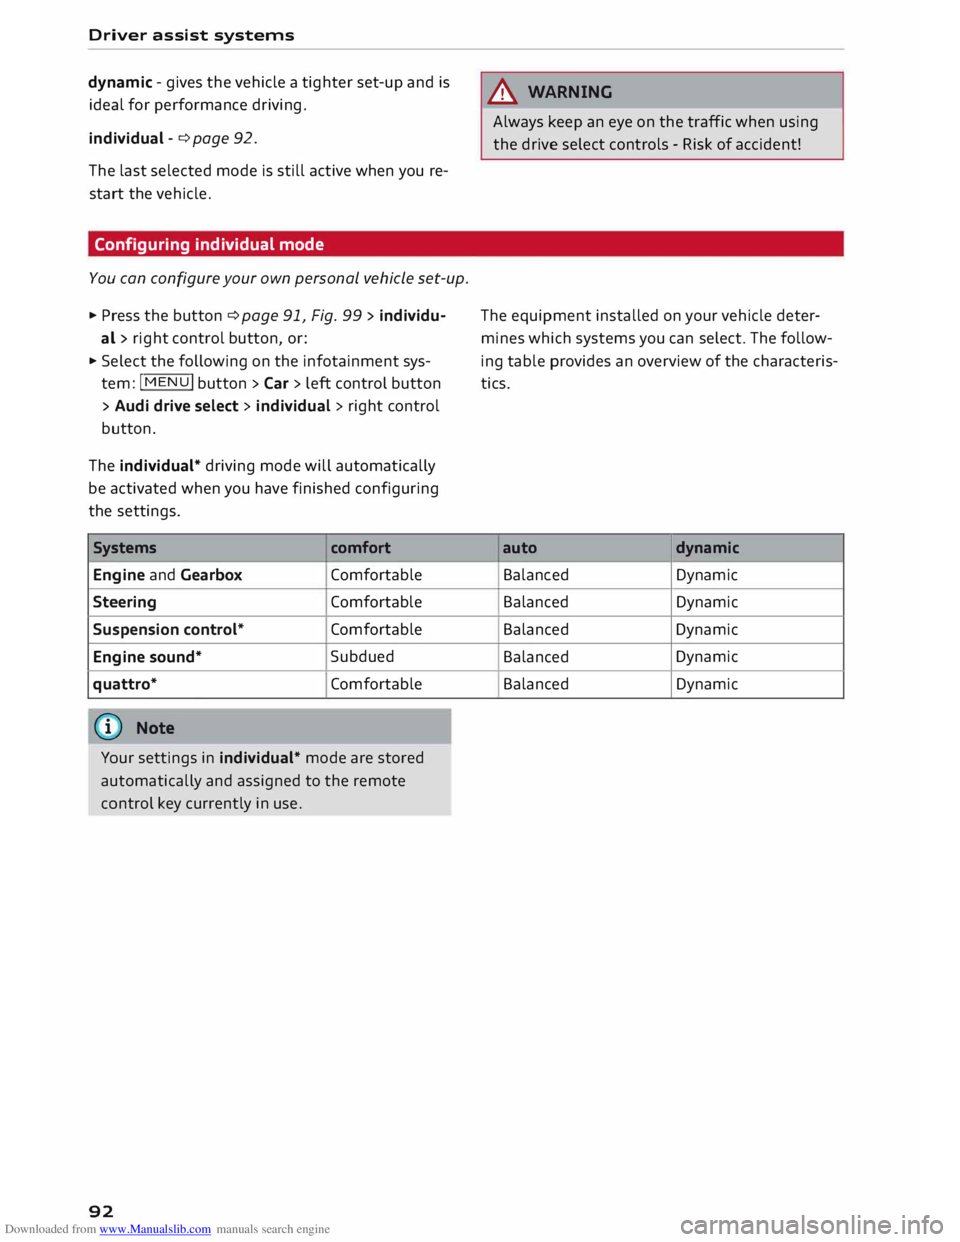
Systems comfort
Engine and Gearbox Comfortable
Steering Comfortable
Suspension control* Comfortable
Engine sound* Subdued
quattro* Comfortable
(©) Note
Your settings in individual* mode are stored
automatically and assigned to the remote
control key currently in use.
92 A
WARNING
Always keep an eye on the traffic when using
the drive select controls - Risk of accident!
The equipment installed on your vehicle deter
mines which systems you can select. The follow
ing table provides an overview of the characteris
tics.
auto dynamic
Balanced Dynamic
Balanced Dynamic
Balanced Dynamic
Balanced Dynamic
Balanced Dynamic
Page 95 of 284
Downloaded from www.Manualslib.com manuals search engine 0
N
co
,-j
\D Lfl
N
Lfl
,-j Parking
aids
General notes
Applies to vehicles: with rear parking aid/parking system
plus/park assist
Various systems are available to help you when
parking or manoeuvring in tight spaces, depend
ing on the equipment fitted on your vehicle.
The rear parking aid gives an acoustic warning if
there are any obstacles behind the car
¢page 93.
When you are parking, the parking system plus
warns you acoustically and optically about obsta
cles detected in front of and behind the vehicle
¢ page 94. On vehicles with park assist, the
area detected at the side of the vehicle ®
¢page 94, Fig. 101 is also monitored.
The park assist helps you to find suitable parking
spaces, to manoeuvre the vehicle into spaces par
allel or perpendicular to the roadside and to drive
out of spaces parallel to the kerb ¢ page 95.
.&_ WARNING
- Always watch the road and the area sur
rounding the vehicle. The electronic systems
cannot replace the full concentration of the
driver. The driver is always responsible for
safety during parking and all other manoeu
vres.
- Please note that certain surfaces, such as
clothing fabrics, cannot be detected or dis
played by the system -risk of accident!
- Sensors have blind spots in which neither
people nor objects are registered. It is par
ticularly important to ensure that there are
no small children or animals near the vehi
cle -risk of accident!
- Always keep a close watch on the area
around the vehicle and make full use of the
rear-view mirrors.
CD CAUTION
- The system may not always be able to de
tect objects such as the following:
- Chains, trailer draw bars, posts or fences Parking
aids
- Objects above the sensors, such as wall
protrusions, etc.
- Objects with certain surfaces or struc
tures, such as wire fences or powder snow
- As your car moves closer to low obstacles,
they may disappear from the sensors' field
of vision. Please note that you will no longer
be warned about these obstacles.
- Impacts or damage to the radiator grille,
bumper, wheel arches or underbody can
cause misalignment of the sensors. This can
impair the effectiveness of the parking aids.
Have the systems checked by a qualified
workshop.
{D) Note
- In certain situations, a warning may be giv
en by the system even if there is no obstacle
within range of the sensors. This can be
caused by the following, for instance:
- Certain road surfaces or long grass
- External ultrasound sources, e.g. from
street cleaning vehicles
- Heavy rain or snow or dense exhaust
fumes
- To familiarise yourself with the system, we
recommend that you practise parking in a
quiet location or a car park. The weather
and light conditions should be good.
- You can adjust the volume of the beeps.
- To ensure that the acoustic parking aid
works properly, the sensors must be kept
clean and free of snow and ice.
- There is a slight delay in the picture display.
Rear parking aid
Description
Applies to vehicles: with rear parking aid
The rear parking aid is an acoustic parking sys
tem.
Description
Sensors are located in the rear bumper. When the
sensors detect an obstacle, you are alerted by
acoustic signals (beeps).
..,.
93
Page 96 of 284
Downloaded from www.Manualslib.com manuals search engine Parking
aids
Please ensure that the sensors are kept free of
stickers, deposits and any other substances which
could impair the function of the system. Notes
on cleaning ¢page 236.
The measuring range of the sensors starts at
about:
I Side
Centre 1.60
m
The acoustic signals sound with increasing fre
quency as you approach the obstacle. A warning
tone will sound continuously when the vehicle is
less than approx. 0.30 m away from the obstacle.
Stop reversing immediately ¢.&. in General notes
on page 93, ¢Q) in General notes on page 93!
The volume of the warning beeps will be gradual
ly reduced after about four seconds if the vehicle
remains at a constant distance from a detected
obstacle (it will not be reduced if the obstacle is
closer than 0.30 m).
Activating
The rear parking aid is activated automatically
when reverse gear is engaged. You will hear a
brief acknowledgement tone.
Parking system plus
Description
Applies to vehicles: with parking system plus/park assist
The parking system plus provides acoustic and
visual assistance when parking.
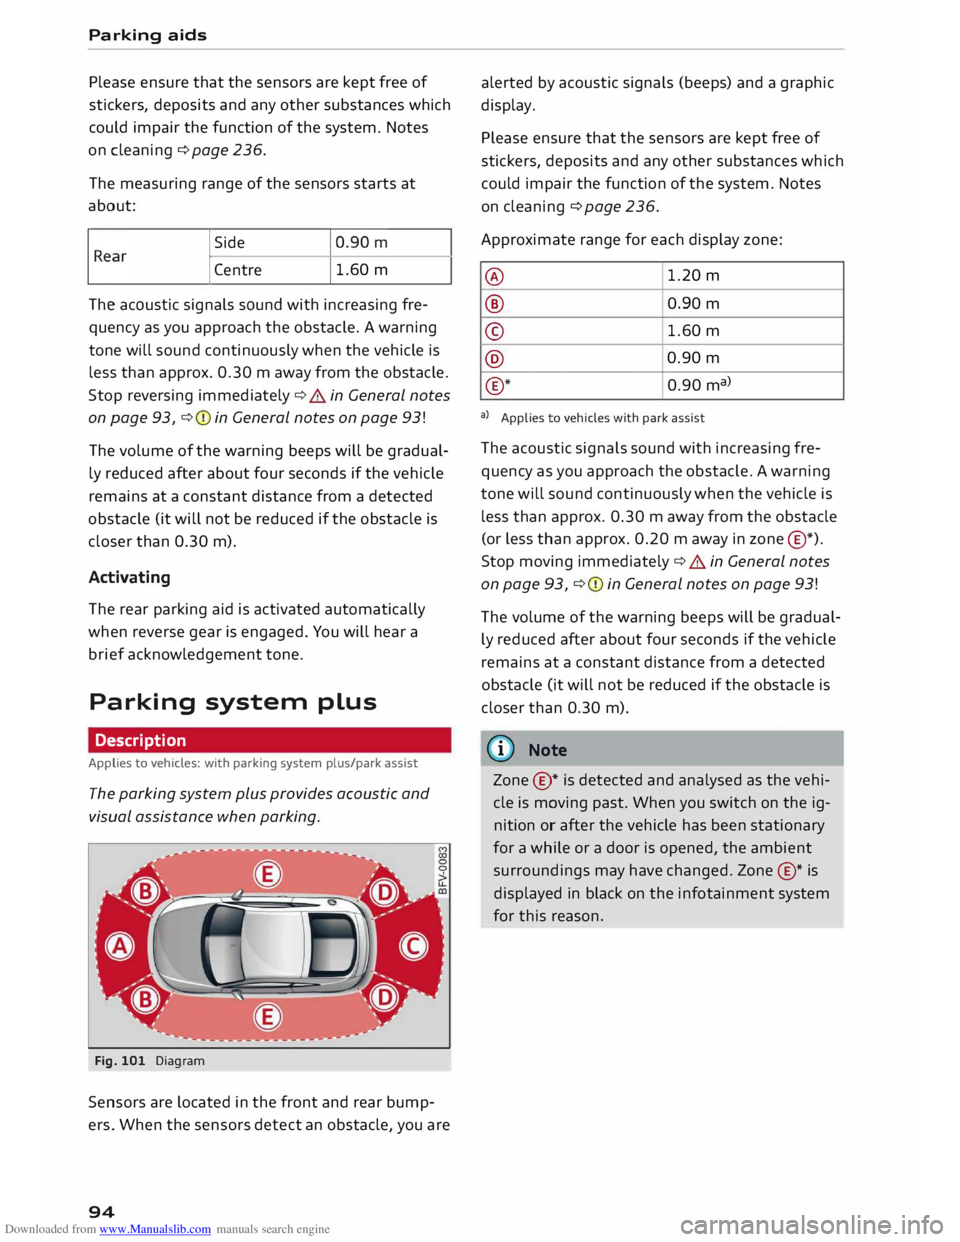
Fig. 101 Diagram
Sensors are located in the front and rear bump
ers. When the sensors detect an obstacle, you are
94 alerted
by acoustic signals (beeps) and a graphic
display.
Please ensure that the sensors are kept free of
stickers, deposits and any other substances which
could impair the function of the system. Notes
on cleaning ¢ page 236.
Approximate range for each display zone:
@ 1.20
m
® 0.90 m
© 1.60
m
@ 0.90
m
® *
0.90 ma)
a) Applies to vehicles with park assist
The acoustic signals sound with increasing fre
quency as you approach the obstacle. A warning
tone will sound continuously when the vehicle is
less than approx. 0.30 m away from the obstacle
(or less than approx. 0.20 m away in zone @*).
Stop moving immediately¢ .&. in General notes
on page 93, ¢Q) in General notes on page 93!
The volume of the warning beeps will be gradual
ly reduced after about four seconds if the vehicle
remains at a constant distance from a detected
obstacle (it will not be reduced if the obstacle is
closer than 0.30 m).
ID Note
Zone ©* is detected and analysed as the vehi
cle is moving past. When you switch on the ig
nition or after the vehicle has been stationary
for a while or a door is opened, the ambient
surroundings may have changed. Zone®* is
displayed in black on the infotainment system
for this reason.
Page 97 of 284
Downloaded from www.Manualslib.com manuals search engine 0
N
co
....
\D L/'l
N
L/'l
.... Switching
on/off
Applies to vehicles: with parking system plus
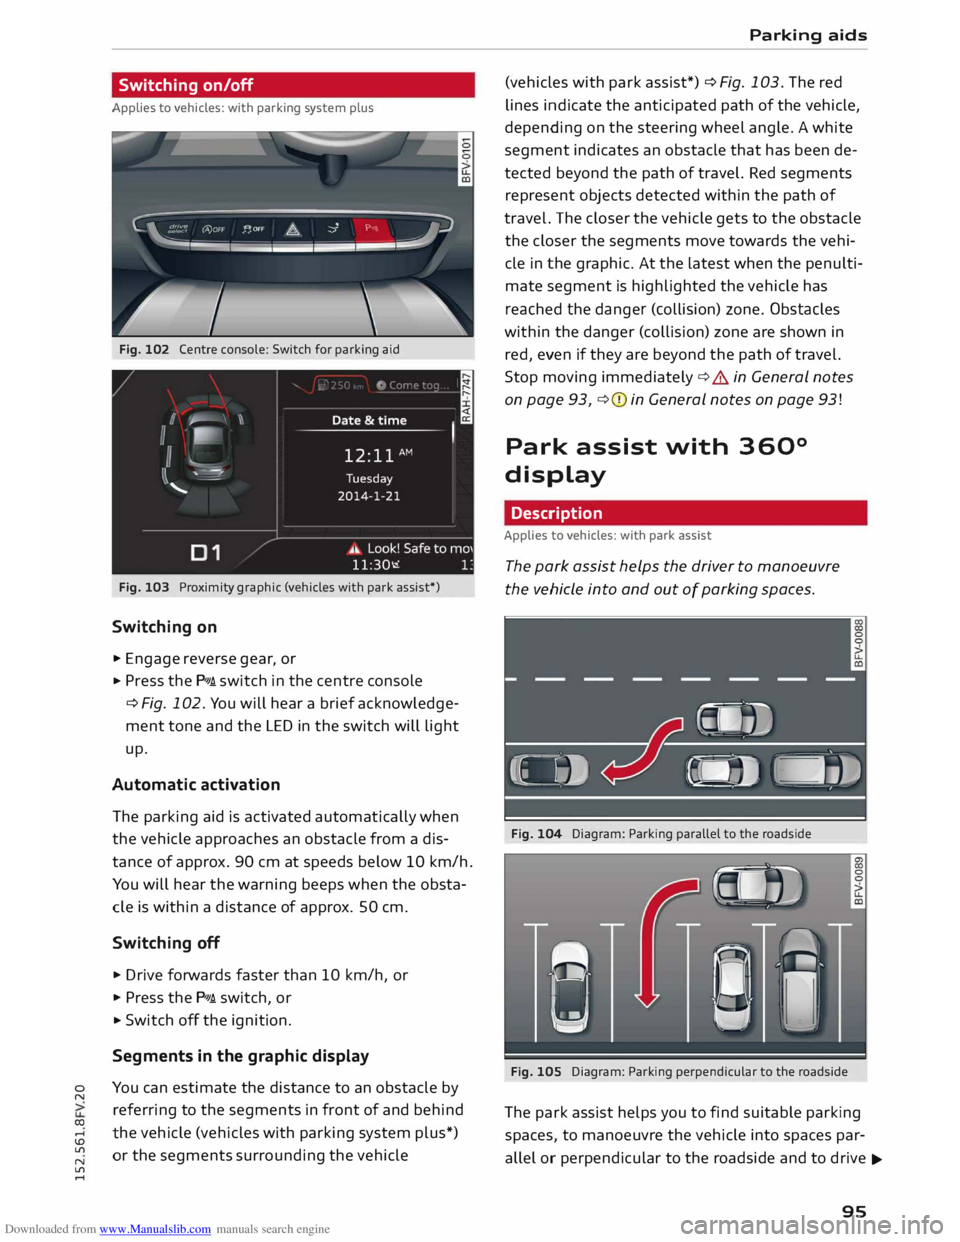
Fig. 102 Centre console: Switch for parking aid
Fig. 103 Proximity graphic (vehicles with park assist*)
Switching on
.,. Engage reverse gear, or
... Press the P111A. switch in the centre console
¢ Fig. 102. You will hear a brief acknowledge
ment tone and the LED in the switch will light
up.
Automatic activation
The parking aid is activated automatically when
the vehicle approaches an obstacle from a dis
tance of approx. 90 cm at speeds below 10 km/h.
You will hear the warning beeps when the obsta
cle is within a distance of approx. 50 cm.
Switching off
... Drive forwards faster than 10 km/h, or
.,. Press the P111A. switch, or
... Switch off the ignition.
Segments in the graphic display
You can estimate the distance to an obstacle by
referring to the segments in front of and behind
the vehicle (vehicles with parking system plus*)
or the segments surrounding the vehicle Parking
aids
(vehicles with park assist*) ¢ Fig. 103. The red
lines indicate the anticipated path of the vehicle,
depending on the steering wheel angle. A white
segment indicates an obstacle that has been de
tected beyond the path of travel. Red segments
represent objects detected within the path of
travel. The closer the vehicle gets to the obstacle
the closer the segments move towards the vehi
cle in the graphic. At the Latest when the penulti
mate segment is highlighted the vehicle has
reached the danger (collision) zone. Obstacles
within the danger (collision) zone are shown in
red, even if they are beyond the path of travel.
Stop moving immediately ¢.&. in General notes
on page 93, ¢(I) in General notes on page 93!
Park assist with 360°
display
Description
Applies to vehicles: with park assist
The park assist helps the driver to manoeuvre
the vehicle into and out of parking spaces.
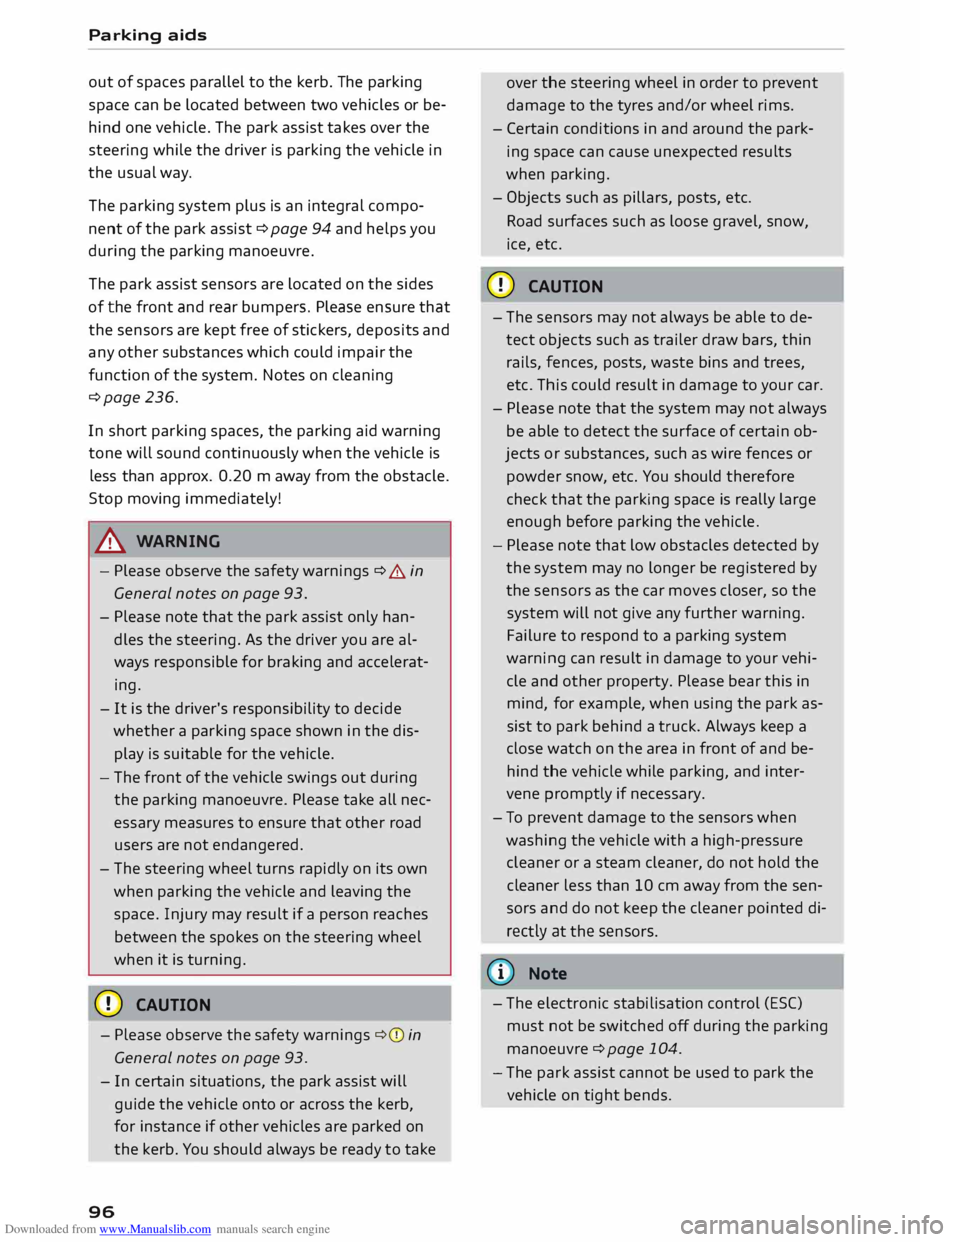
Fig. 104 Diagram: Parking parallel to the roadside
Fig. 105 Diagram: Parking perpendicular to the roadside
The park assist helps you to find suitable parking
spaces, to manoeuvre the vehicle into spaces par
allel or perpendicular to the roadside and to drive ...,.
95
Page 98 of 284
Downloaded from www.Manualslib.com manuals search engine Parking
aids
out of spaces parallel to the kerb. The parking
space can be located between two vehicles or be
hind one vehicle. The park assist takes over the
steering while the driver is parking the vehicle in
the usual way.
The parking system plus is an integral compo
nent of the park assist ¢ page 94 and helps you
during the parking manoeuvre.
The park assist sensors are located on the sides
of the front and rear bumpers. Please ensure that
the sensors are kept free of stickers, deposits and
any other substances which could impair the
function of the system. Notes on cleaning
¢page 236.
In short parking spaces, the parking aid warning
tone will sound continuously when the vehicle is
less than approx. 0.20 m away from the obstacle.
Stop moving immediately!
A WARNING
- Please observe the safety warnings ¢ & in
General notes on page 93.
- Please note that the park assist only han
dles the steering. As the driver you are al
ways responsible for braking and accelerat
ing.
- It is the driver's responsibility to decide
whether a parking space shown in the dis
play is suitable for the vehicle.
- The front of the vehicle swings out during
the parking manoeuvre. Please take all nec
essary measures to ensure that other road
users are not endangered.
- The steering wheel turns rapidly on its own
when parking the vehicle and leaving the
space. Injury may result if a person reaches
between the spokes on the steering wheel
when it is turning.
CD CAUTION
- Please observe the safety warnings ¢0 in
General notes on page 93.
- In certain situations, the park assist will
guide the vehicle onto or across the kerb,
for instance if other vehicles are parked on
the kerb. You should always be ready to take
96 over
the steering wheel in order to prevent
damage to the tyres and/or wheel rims.
- Certain conditions in and around the park
ing space can cause unexpected results
when parking.
- Objects such as pillars, posts, etc.
Road surfaces such as loose gravel, snow,
ice, etc.
CD CAUTION
- The sensors may not always be able to de
tect objects such as trailer draw bars, thin
rails, fences, posts, waste bins and trees,
etc. This could result in damage to your car.
- Please note that the system may not always
be able to detect the surface of certain ob
jects or substances, such as wire fences or
powder snow, etc. You should therefore
check that the parking space is really large
enough before parking the vehicle.
- Please note that low obstacles detected by
the system may no longer be registered by
the sensors as the car moves closer, so the
system will not give any further warning.
Failure to respond to a parking system
warning can result in damage to your vehi
cle and other property. Please bear this in
mind, for example, when using the park as
sist to park behind a truck. Always keep a
close watch on the area in front of and be
hind the vehicle while parking, and inter
vene promptly if necessary.
- To prevent damage to the sensors when
washing the vehicle with a high-pressure
cleaner or a steam cleaner, do not hold the
cleaner less than 10 cm away from the sen
sors and do not keep the cleaner pointed di
rectly at the sensors.
({D Note
- The electronic stabilisation control (ES()
must not be switched off during the parking
manoeuvre ¢page 104.
- The park assist cannot be used to park the
vehicle on tight bends.
Page 99 of 284
Downloaded from www.Manualslib.com manuals search engine 0
N
co
,-j
\D U'l
N
U'l
,-j Switching
on and off
Applies to vehicles: with park assist
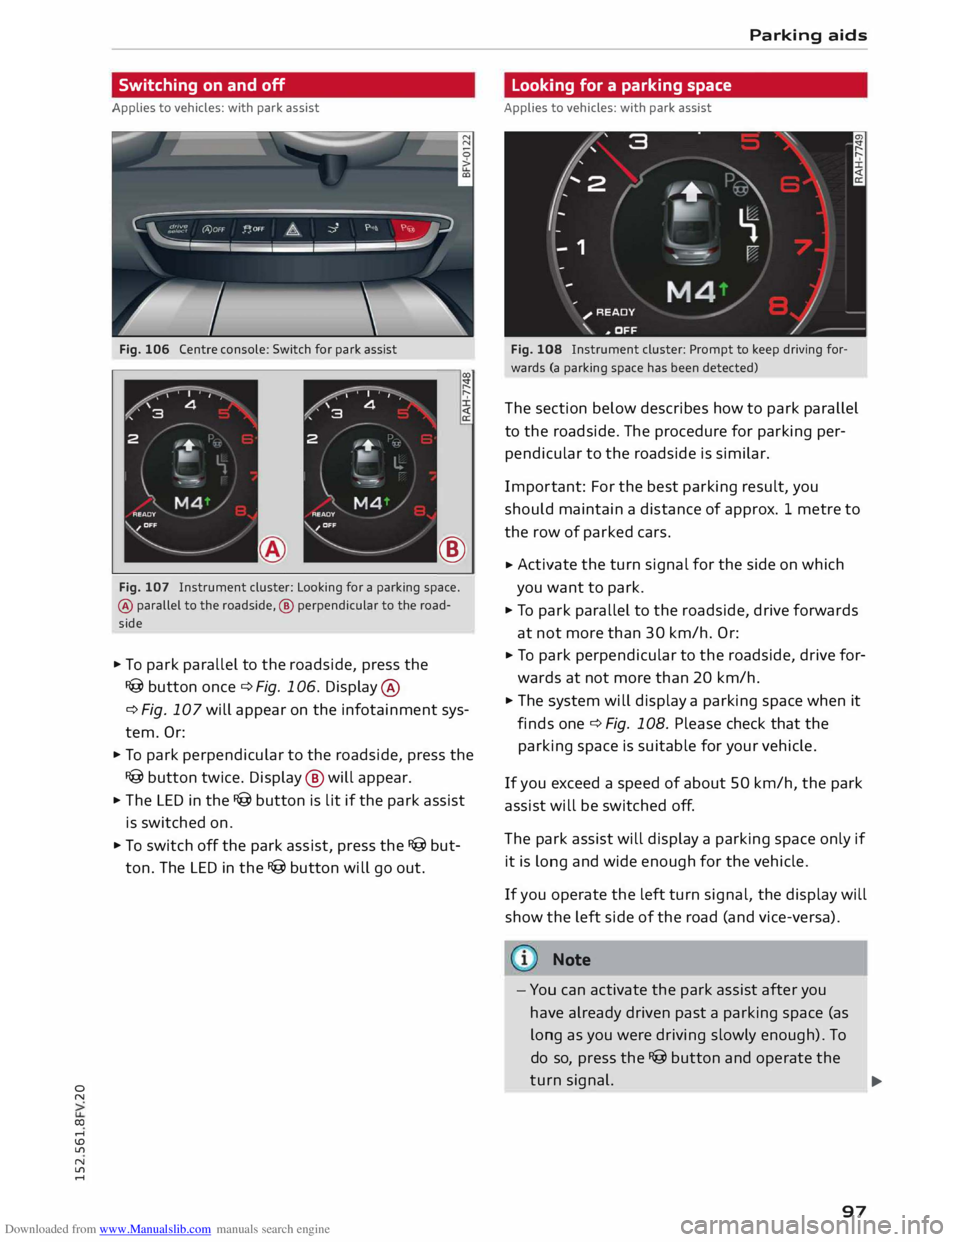
Fig. 106 Centre console: Switch for park assist
®
Fig. 107 Instrument cluster: Looking for a parking space.
® parallel to the roadside, ® perpendicular to the road
side
.. To park parallel to the roadside, press the
I@ button once c::> Fig. 106. Display ®
c:> Fig. 107 will appear on the infotainment sys
tem. Or:
.. To park perpendicular to the roadside, press the
I@ button twice. Display @ will appear.
.. The LED in the I@ button is lit if the park assist
is switched on.
.. To switch off the park assist, press the I@ but
ton. The LED in the I@ button will go out. Parking
aids
Looking for a parking space
Applies to vehicles: with park assist
Fig. 108 Instrument cluster: Prompt to keep driving for
wards (a parking space has been detected)
The section below describes how to park parallel
to the roadside. The procedure for parking per
pendicular to the roadside is similar.
Impor tant: For the best parking result, you
should maintain a distance of approx. 1 metre to
the row of parked cars.
.. Activate
the turn signal for the side on which
you want to park.
.. To park parallel to the roadside, drive forwards
at not more than 30 km/h. Or:
.. To
park perpendicular to the roadside, drive for
wards at not more than 20 km/h.
.. The system will display a parking space when it
finds one c::> Fig. 108. Please check that the
parking space is suitable for your vehicle .
If you exceed a speed of about 50 km/h, the park
assist will be switched off.
The park assist will display a parking space only if
it is long and wide enough for the vehicle.
If you operate the left turn signal, the display will
show the left side of the road (and vice-versa).
Note
- You can activate the park assist after you
have already driven past a parking space (as
long as you were driving slowly enough). To
do so, press the I@ button and operate the
turn signal.
97 ...
Page 100 of 284
Downloaded from www.Manualslib.com manuals search engine Parking
aids
- The best parking results will be achieved if
you position the vehicle as parallel as possi
ble to the line of parked cars or the kerb be
fore you start the actual parking manoeu
vre.
- If there are suitable parking spaces on both
sides of the road (for instance on a one-way
street), you can change the direction of the
turn signals to park on the other side, even
if you have already activated the park assist.
Parking parallel to the roadside
Applies to vehicles: with park assist
The driver is responsible for parking the vehicle.
�' 3 "
I
- IR t;
-
- 1 '"*-� )
,-...-
\ D�
)__
�
READY
\. ,. OFF
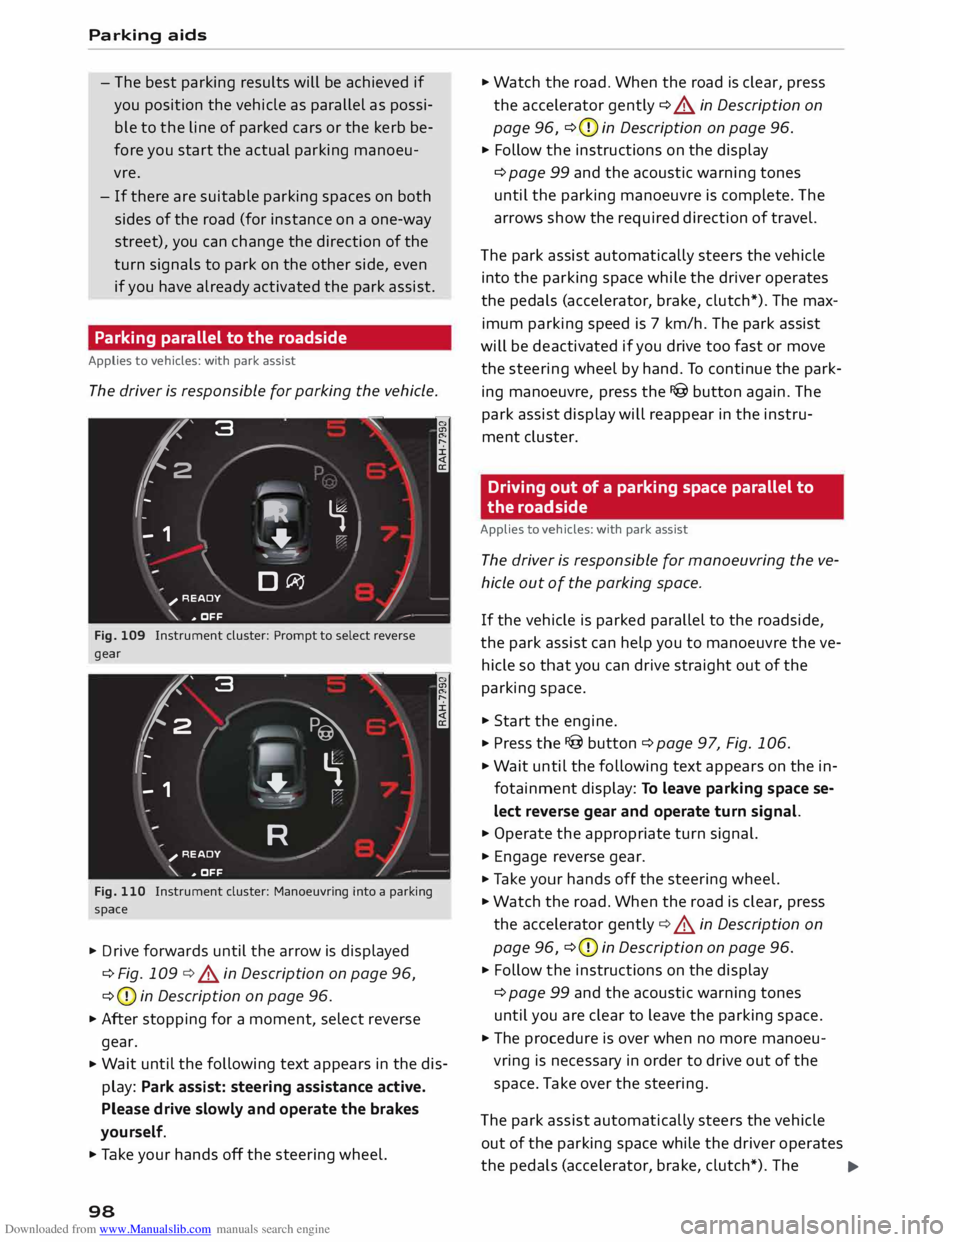
Fig. 109 Instrument cluster: Prompt to select reverse
gear
t' 3
2 ,
I I
-
-
- 1 "
� \
�
"'+-
, -- ':" ' I
R )__
�
READY
_,..-
\. ,. OFF
Fig. 110 Instrument cluster: Manoeuvring into a parking
space
... Drive forwards until the arrow is displayed
¢ Fig. 109 ¢&. in Description on page 96,
¢ (D
in Description on page 96.
... After stopping for a moment, select reverse
gear.
... Wait
until the following text appears in the dis
play: Park assist: steering assistance active.
Please drive slowly and operate the brakes
yourself.
... Take your hands off the steering wheel.
98 ...
Watch the road. When the road is clear, press
the accelerator gently ¢ &. in Description on
page 96, ¢(D
in Description on page 96.
... Follow the instructions on the display
¢ page 99 and the acoustic warning tones
until the parking manoeuvre is complete. The
arrows show the required direction of travel.
The park assist automatically steers the vehicle
into the parking space while the driver operates
the pedals (accelerator, brake, clutch*). The max
imum parking speed is 7 km/h. The park assist
will be deactivated if you drive too fast or move
the steering wheel by hand. To continue the park
ing manoeuvre, press the I@ button again. The
park assist display will reappear in the instru
ment cluster.
Driving out of a parking space parallel to
the roadside
Applies to vehicles: with park assist
The driver is responsible for manoeuvring the ve
hicle out of the parking space.
If the vehicle is parked parallel to the roadside,
the park assist can help you to manoeuvre the ve
hicle so that you can drive straight out of the
parking space .
... Start the engine .
.., Press the !@button ¢page 97, Fig. 106 .
... Wait until the following text appears on the in
fotainment display: To leave parking space se
lect reverse gear and operate turn signal.
... Operate the appropriate turn signal.
... Engage reverse gear .
.., Ta ke your hands off the steering wheel.
... Watch the road. When the road is clear, press
the accelerator gently¢&. in Description on
page 96, ¢(D
in Description on page 96 .
... Follow the instructions on the display
¢ page 99 and the acoustic warning tones
until you are clear to leave the parking space .
... The procedure is over when no more manoeu
vring is necessary in order to drive out of the
space. Take over the steering.
The park assist automatically steers the vehicle
out of the parking space while the driver operates
the pedals (accelerator, brake, clutch*). The
..,.