check engine AUDI TT COUPE 2014 Owner's Manual
[x] Cancel search | Manufacturer: AUDI, Model Year: 2014, Model line: TT COUPE, Model: AUDI TT COUPE 2014Pages: 284, PDF Size: 34.42 MB
Page 95 of 284
Downloaded from www.Manualslib.com manuals search engine 0
N
co
,-j
\D Lfl
N
Lfl
,-j Parking
aids
General notes
Applies to vehicles: with rear parking aid/parking system
plus/park assist
Various systems are available to help you when
parking or manoeuvring in tight spaces, depend
ing on the equipment fitted on your vehicle.
The rear parking aid gives an acoustic warning if
there are any obstacles behind the car
¢page 93.
When you are parking, the parking system plus
warns you acoustically and optically about obsta
cles detected in front of and behind the vehicle
¢ page 94. On vehicles with park assist, the
area detected at the side of the vehicle ®
¢page 94, Fig. 101 is also monitored.
The park assist helps you to find suitable parking
spaces, to manoeuvre the vehicle into spaces par
allel or perpendicular to the roadside and to drive
out of spaces parallel to the kerb ¢ page 95.
.&_ WARNING
- Always watch the road and the area sur
rounding the vehicle. The electronic systems
cannot replace the full concentration of the
driver. The driver is always responsible for
safety during parking and all other manoeu
vres.
- Please note that certain surfaces, such as
clothing fabrics, cannot be detected or dis
played by the system -risk of accident!
- Sensors have blind spots in which neither
people nor objects are registered. It is par
ticularly important to ensure that there are
no small children or animals near the vehi
cle -risk of accident!
- Always keep a close watch on the area
around the vehicle and make full use of the
rear-view mirrors.
CD CAUTION
- The system may not always be able to de
tect objects such as the following:
- Chains, trailer draw bars, posts or fences Parking
aids
- Objects above the sensors, such as wall
protrusions, etc.
- Objects with certain surfaces or struc
tures, such as wire fences or powder snow
- As your car moves closer to low obstacles,
they may disappear from the sensors' field
of vision. Please note that you will no longer
be warned about these obstacles.
- Impacts or damage to the radiator grille,
bumper, wheel arches or underbody can
cause misalignment of the sensors. This can
impair the effectiveness of the parking aids.
Have the systems checked by a qualified
workshop.
{D) Note
- In certain situations, a warning may be giv
en by the system even if there is no obstacle
within range of the sensors. This can be
caused by the following, for instance:
- Certain road surfaces or long grass
- External ultrasound sources, e.g. from
street cleaning vehicles
- Heavy rain or snow or dense exhaust
fumes
- To familiarise yourself with the system, we
recommend that you practise parking in a
quiet location or a car park. The weather
and light conditions should be good.
- You can adjust the volume of the beeps.
- To ensure that the acoustic parking aid
works properly, the sensors must be kept
clean and free of snow and ice.
- There is a slight delay in the picture display.
Rear parking aid
Description
Applies to vehicles: with rear parking aid
The rear parking aid is an acoustic parking sys
tem.
Description
Sensors are located in the rear bumper. When the
sensors detect an obstacle, you are alerted by
acoustic signals (beeps).
..,.
93
Page 98 of 284
Downloaded from www.Manualslib.com manuals search engine Parking
aids
out of spaces parallel to the kerb. The parking
space can be located between two vehicles or be
hind one vehicle. The park assist takes over the
steering while the driver is parking the vehicle in
the usual way.
The parking system plus is an integral compo
nent of the park assist ¢ page 94 and helps you
during the parking manoeuvre.
The park assist sensors are located on the sides
of the front and rear bumpers. Please ensure that
the sensors are kept free of stickers, deposits and
any other substances which could impair the
function of the system. Notes on cleaning
¢page 236.
In short parking spaces, the parking aid warning
tone will sound continuously when the vehicle is
less than approx. 0.20 m away from the obstacle.
Stop moving immediately!
A WARNING
- Please observe the safety warnings ¢ & in
General notes on page 93.
- Please note that the park assist only han
dles the steering. As the driver you are al
ways responsible for braking and accelerat
ing.
- It is the driver's responsibility to decide
whether a parking space shown in the dis
play is suitable for the vehicle.
- The front of the vehicle swings out during
the parking manoeuvre. Please take all nec
essary measures to ensure that other road
users are not endangered.
- The steering wheel turns rapidly on its own
when parking the vehicle and leaving the
space. Injury may result if a person reaches
between the spokes on the steering wheel
when it is turning.
CD CAUTION
- Please observe the safety warnings ¢0 in
General notes on page 93.
- In certain situations, the park assist will
guide the vehicle onto or across the kerb,
for instance if other vehicles are parked on
the kerb. You should always be ready to take
96 over
the steering wheel in order to prevent
damage to the tyres and/or wheel rims.
- Certain conditions in and around the park
ing space can cause unexpected results
when parking.
- Objects such as pillars, posts, etc.
Road surfaces such as loose gravel, snow,
ice, etc.
CD CAUTION
- The sensors may not always be able to de
tect objects such as trailer draw bars, thin
rails, fences, posts, waste bins and trees,
etc. This could result in damage to your car.
- Please note that the system may not always
be able to detect the surface of certain ob
jects or substances, such as wire fences or
powder snow, etc. You should therefore
check that the parking space is really large
enough before parking the vehicle.
- Please note that low obstacles detected by
the system may no longer be registered by
the sensors as the car moves closer, so the
system will not give any further warning.
Failure to respond to a parking system
warning can result in damage to your vehi
cle and other property. Please bear this in
mind, for example, when using the park as
sist to park behind a truck. Always keep a
close watch on the area in front of and be
hind the vehicle while parking, and inter
vene promptly if necessary.
- To prevent damage to the sensors when
washing the vehicle with a high-pressure
cleaner or a steam cleaner, do not hold the
cleaner less than 10 cm away from the sen
sors and do not keep the cleaner pointed di
rectly at the sensors.
({D Note
- The electronic stabilisation control (ES()
must not be switched off during the parking
manoeuvre ¢page 104.
- The park assist cannot be used to park the
vehicle on tight bends.
Page 99 of 284
Downloaded from www.Manualslib.com manuals search engine 0
N
co
,-j
\D U'l
N
U'l
,-j Switching
on and off
Applies to vehicles: with park assist
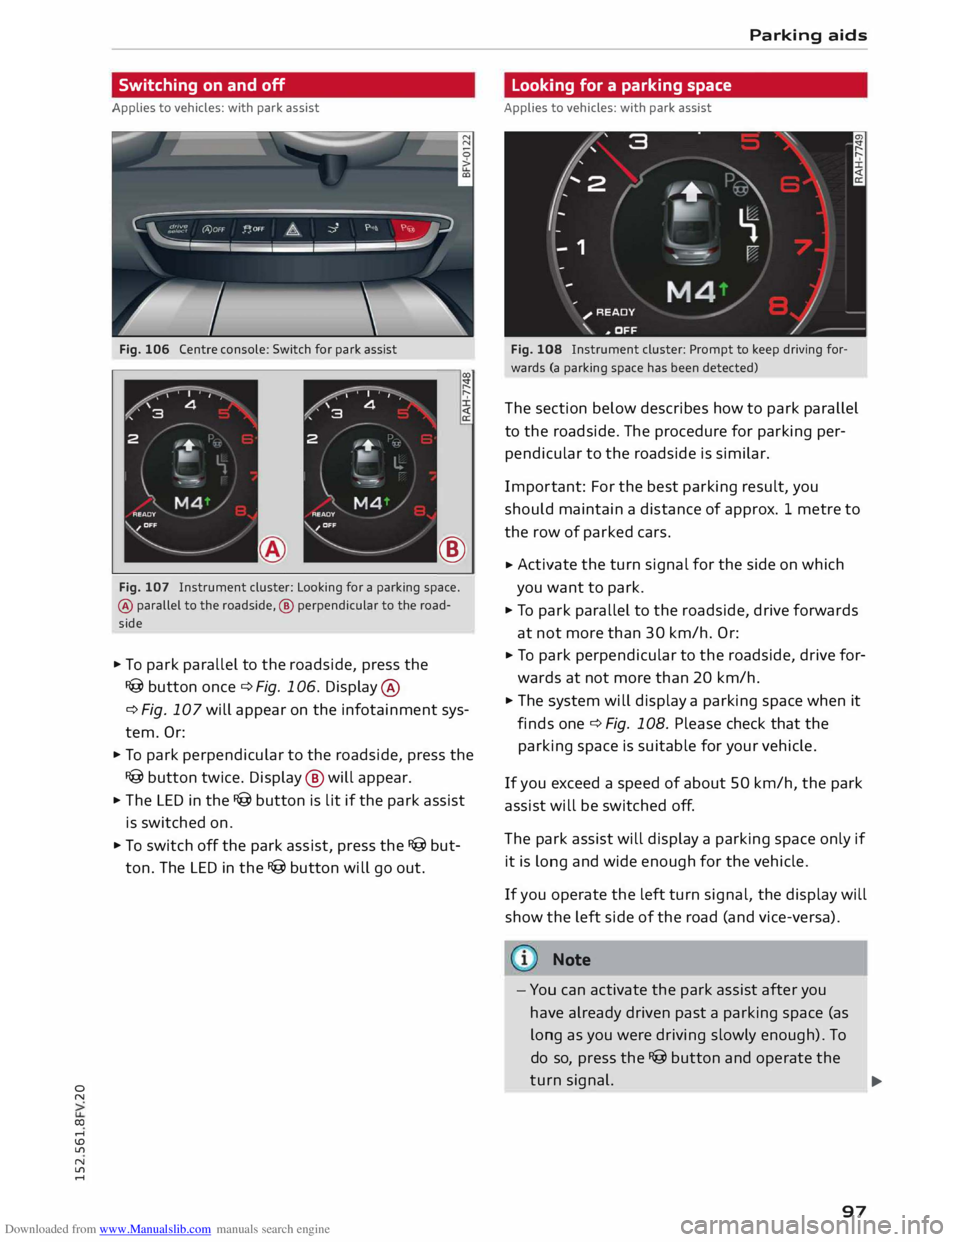
Fig. 106 Centre console: Switch for park assist
®
Fig. 107 Instrument cluster: Looking for a parking space.
® parallel to the roadside, ® perpendicular to the road
side
.. To park parallel to the roadside, press the
I@ button once c::> Fig. 106. Display ®
c:> Fig. 107 will appear on the infotainment sys
tem. Or:
.. To park perpendicular to the roadside, press the
I@ button twice. Display @ will appear.
.. The LED in the I@ button is lit if the park assist
is switched on.
.. To switch off the park assist, press the I@ but
ton. The LED in the I@ button will go out. Parking
aids
Looking for a parking space
Applies to vehicles: with park assist
Fig. 108 Instrument cluster: Prompt to keep driving for
wards (a parking space has been detected)
The section below describes how to park parallel
to the roadside. The procedure for parking per
pendicular to the roadside is similar.
Impor tant: For the best parking result, you
should maintain a distance of approx. 1 metre to
the row of parked cars.
.. Activate
the turn signal for the side on which
you want to park.
.. To park parallel to the roadside, drive forwards
at not more than 30 km/h. Or:
.. To
park perpendicular to the roadside, drive for
wards at not more than 20 km/h.
.. The system will display a parking space when it
finds one c::> Fig. 108. Please check that the
parking space is suitable for your vehicle .
If you exceed a speed of about 50 km/h, the park
assist will be switched off.
The park assist will display a parking space only if
it is long and wide enough for the vehicle.
If you operate the left turn signal, the display will
show the left side of the road (and vice-versa).
Note
- You can activate the park assist after you
have already driven past a parking space (as
long as you were driving slowly enough). To
do so, press the I@ button and operate the
turn signal.
97 ...
Page 136 of 284
Downloaded from www.Manualslib.com manuals search engine Telephone
- To import contacts from your myAudi ac
count l
): Select and confirm Import contacts >
myAudi account. Enter your myAudi user data.
You must have a myAudi account before you can
import contacts from the myAudi account. You
only have to enter your myAudi user data/myAudi
PIN once. When you store a vehicle in your myAu
di account, you will receive the myAudi PIN in the
account.
(D} Note
- Please also observe the notes on Audi con
nect ¢page 145.
- For more information on the myAudi ac
count, please see www.audi.com/myaudi.
- The imported contacts are stored in the lo
cal memory of the directory you are using.
- You can import up to 1000 contacts. You
can call up the memory capacity of the di
rectory any time ¢ page 135.
- Never store important data on SD cards or
USB mass storage devices. Audi shall not ac
cept any liability whatsoever for the loss of
data or media.
- It is not possible to export contacts which
have been downloaded from a mobile
phone.
Other settings
Telephone settings
Applies to vehicles: with telephone
.,. Select: !TEL! button > right control button Tele-
phone settings.
Call options*
Call forward: Forwarding incoming calls to your
mailbox or to another phone number can be acti
vated/deactivated. You can use Check status to
check whether this function is activated or deacti
vated.
l l
The conditions for using Audi connect services must be
met and you must have created an account at
www.audi.co m/myaudi, added a vehicle to the account
and stored contacts.
134 Call
waiting: The warning (beep) that there is an
incoming call during a telephone conversation
can be activated/deactivated. You can use Check
status to check whether this function is activated
or deactivated.
Transmit caller ID: Sending your telephone num
ber in outgoing calls can be activated/deactiva
ted. With the Network-dependent option, the
setting agreed in your mobile network service
contract will be used. The settings apply only to
the Telephone menu in the MMI system. When
the Bluetooth connection has been terminated,
the settings of your mobile phone apply. You can
use Check status to check whether this function
is activated or deactivated.
Bluetooth settings
See ¢ page 188, Bluetooth settings onwards.
Data connection settings*
Refer to¢ page 144, Configuring the data con
nection.
Teleph one mode*
On vehicles with a car telephone kit, you can
choose between three different telephone modes
to optimise the network response. In Automatic
mode, the car telephone automatically switches
between the UMTS network (3G) and the GSM
network (2G) depending on network availability
and reception and on the position of the vehicle.
There may be restrictions when using Google
Earth or Wi-Fi. With Telephony optimised, the
car telephone kit registers with the GSM network
(2G). In this mode, the reception is prioritised for
making and receiving calls. There may be restric
tions when using Google Earth orWi-Fi. When
you select the telephone mode Automatic or Tel
ephony optimised, there may be network restric
tions when you try to use Audi connect services
and make voice calls at the same time. With Data
service optimised, the car telephone registers ..,.
Page 138 of 284
Downloaded from www.Manualslib.com manuals search engine Telephone
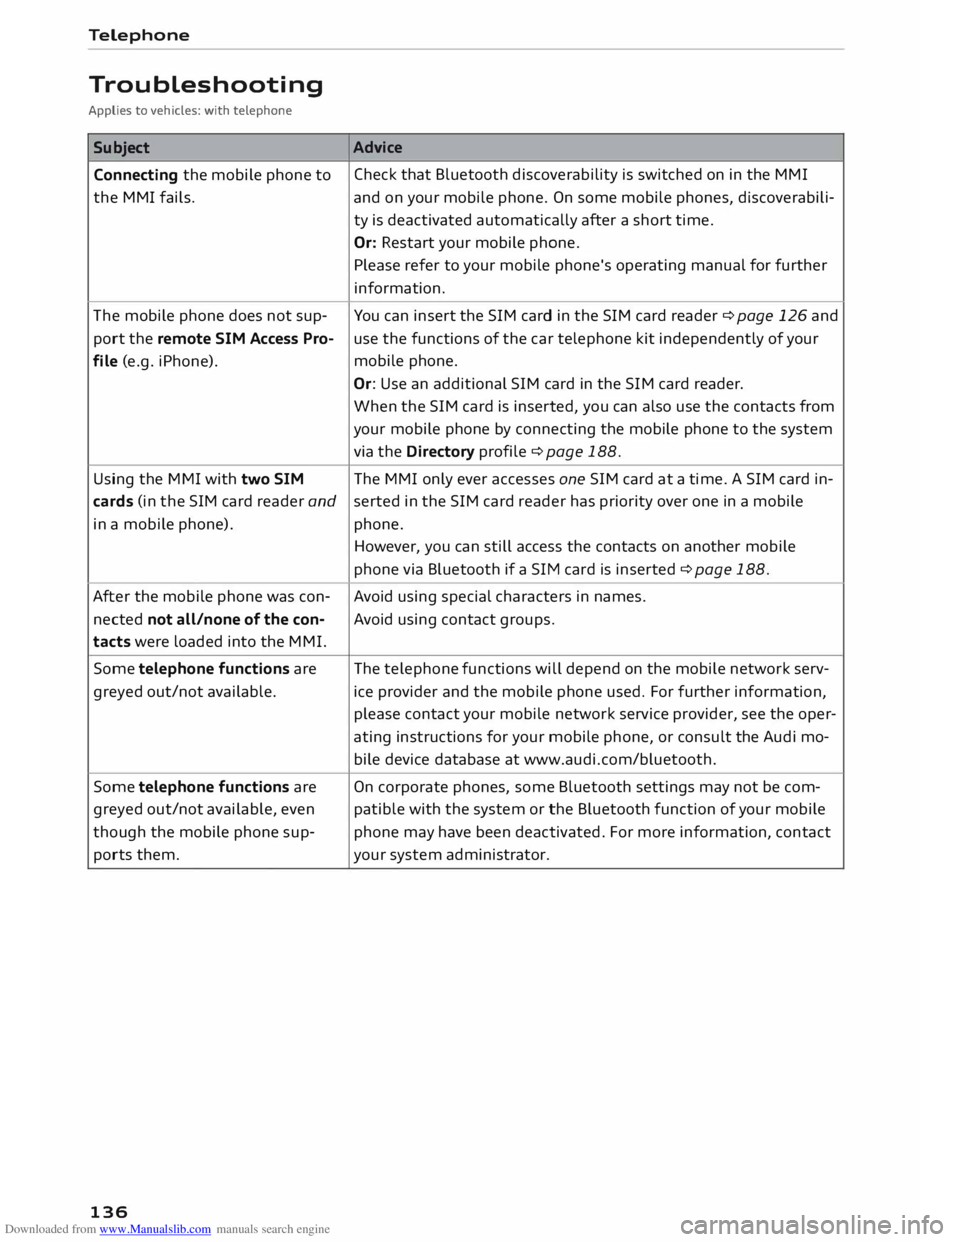
Troubleshooting
Applies to vehicles: with telephone
Subject Connecting the mobile phone to
the MMI fails.
The mobile phone does not sup
port the remote SIM Access Pro
file (e.g. iPhone).
Using the MMI with two SIM Advice
Check that Bluetooth discoverability is switched on in the MMI
and on your mobile phone. On some mobile phones, discoverabili
ty is deactivated automatically after a short time.
Or: Restart your mobile phone.
Please refer to your mobile phone's operating manual for further
information.
You can insert the SIM card in the SIM card reader ¢ page 126 and
use the functions of the car telephone kit independently of your
mobile phone.
Or: Use an additional SIM card in the SIM card reader.
When the SIM card is inserted, you can also use the contacts from
your mobile phone by connecting the mobile phone to the system
via the Directory profile¢ page 188.
The MMI only ever accesses one SIM card at a time. A SIM card in-
cards (in the SIM card reader andserted
in the SIM card reader has priority over one in a mobile
in a mobile phone). phone.
After the mobile phone was con
nected not all/none of the con
tacts were loaded into the MMI.
Some telephone functions are
greyed out/not available.
Some telephone functions are
greyed out/not available, even
though the mobile phone sup
ports them.
136 However,
you can still access the contacts on another mobile
phone via Bluetooth if a SIM card is inserted ¢ page 188.
Avoid using special characters in names.
Avoid using contact groups.
The telephone functions will depend on the mobile network serv
ice provider and the mobile phone used. For further information,
please contact your mobile network service provider, see the oper
ating instructions for your mobile phone, or consult the Audi mo
bile device database at www.audi.com/bluetooth.
On corporate phones, some Bluetooth settings may not be com
patible with the system or the Bluetooth function of your mobile
phone may have been deactivated. For more information, contact
your system administrator.
Page 145 of 284
Downloaded from www.Manualslib.com manuals search engine 0
N
co
....
\D L/'l
N
L/'l
.... installed
in your vehicle. You can then check
whether a new version is available at
www.audi.com/myaudi. You can also have
the new navigation data installed by an Audi
dealer (carries additional charges).
- For more information on the myAudi spe
cial destinations and the navigation map
update service, please see the Operating
Manual for Audi connect at www.audi.com/
myaudi.
Audi connect services for the telephone
Applies to vehicles: with Audi connect
The following Audi connect services are currently
available:
- Creating contacts on your PC via your myAudi
account and loading the contacts into the direc
tory of your MMI system ¢page 133.
Audi connect services in the media menu
Applies to vehicles: with Wi-Fi audio player and Audi connect
- Wi-Fi audio player: To access the media centre
of your player (e.g. smartphone) connected via
Wi-Fi ¢page 172. Additionally, you can use
the Audi MMI connect app to access Internet
radio programmes*.
- Online media: With assistance from the Audi
MMI connect app, this function allows you to
access and operate various online media serv
ices using the MMI.
@ Note
Please contact an Audi dealer for more infor
mation on Wi-Fi audio players and for a list of
supported devices.
Further options
Applies to vehicles: with Audi connect
.,. Select: I MENU I button > Audi connect > right
control button.
The following options are available to you in the
overview of the Audi connect services:
- Login: ¢ page 140
- Connection manager: ¢page 187 Audi
connect
- Licence periods: The validity and the time re
maining on your licences is displayed. If the Li
cence expiry warning function is switched on, a
message will be displayed before the licence ex
pires.
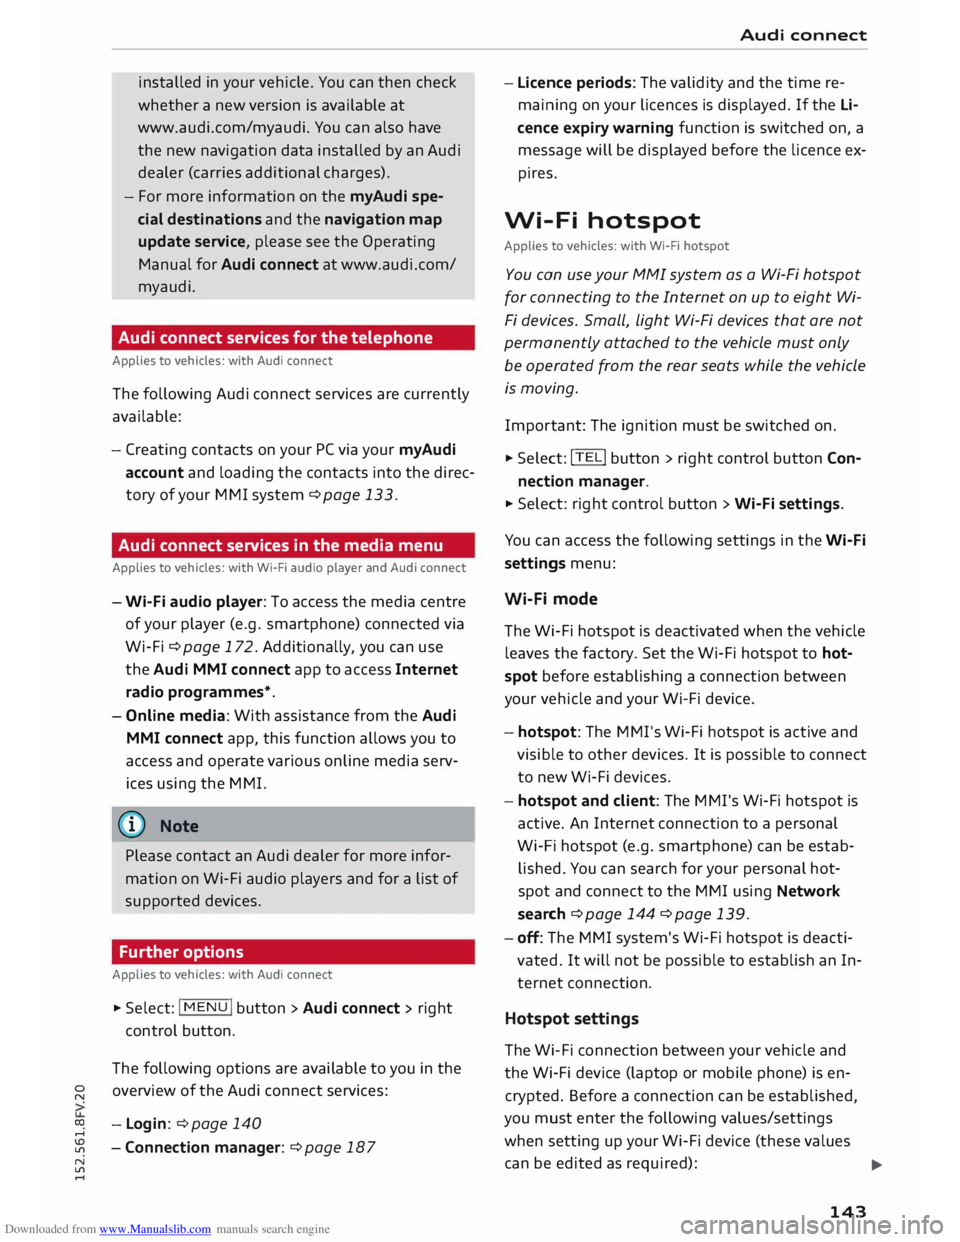
Wi-Fi hotspot
Applies to vehicles: with Wi-Fi hotspot
You can use your MMI system as a Wi-Fi hotspot
for connecting to the Internet on up to eight Wi
Fi devices. Small, light Wi-Fi devices that are not
permanently attached to the vehicle must only
be operated from the rear seats while the vehicle
is moving.
Impor tant: The ignition must be switched on.
.,. Select: !TEL!
button > right control button Con-
nection manager.
.,. Select:
right control button > Wi-Fi settings.
You can access the following settings in the Wi-Fi
settings menu:
Wi-Fi mode
The Wi-Fi hotspot is deactivated when the vehicle
leaves the factory. Set the Wi-Fi hotspot to hot
spot before establishing a connection between
your vehicle and your Wi-Fi device.
- hotspot: The MMI's Wi-Fi hotspot is active and
visible to other devices. It is possible to connect
to new Wi-Fi devices.
- hotspot and client: The MMI's Wi-Fi hotspot is
active. An Internet connection to a personal
Wi-Fi hotspot (e.g. smartphone) can be estab
lished. You can search for your personal hot
spot and connect to the MMI using Network
search ¢page 144 ¢page 139.
- off: The MMI system's Wi-Fi hotspot is deacti
vated. It will not be possible to establish an In
ternet connection .
Hotspot settings
The Wi-Fi connection between your vehicle and
the Wi-Fi device (laptop or mobile phone) is en
crypted. Before a connection can be established,
you must enter the following values/settings
when setting up your Wi-Fi device (these values
can be edited as required):
..,.
143
Page 152 of 284
Downloaded from www.Manualslib.com manuals search engine Navigation
@ Private navigation destination
- Select and confirm a postal address or a naviga
tion destination. If you select a navigation des
tination, route guidance is started immediately.
- If you select a postal address, you can check the
address details again.
- You can then select and confirm Start route
guidance.
Further directory functions in the navigation sys
tem can be found on ¢page 153.
((!) Note
- Addresses which you have imported from
your mobile phone into the MMI can also be
used as navigation destinations.
- If a directory contact is greyed out, no navi
gation destination/postal address has yet
been added for the contact.
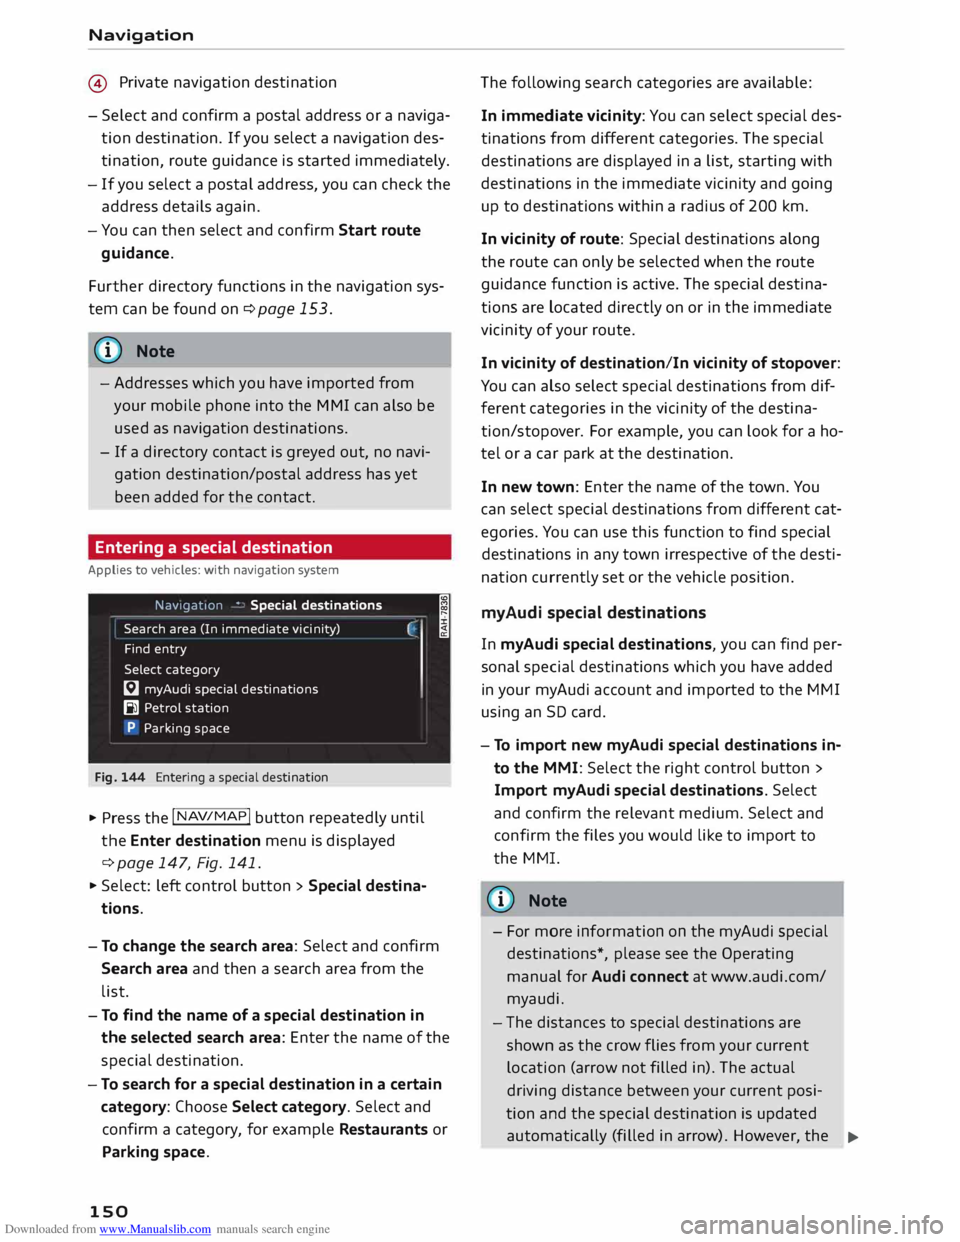
Entering a special destination
Applies to vehicles: with navigation system
Navigation • Special destinations
Search area (In imm ediate vicinity)
Find entry
Select category
[:J myAudi special destinations
B1 Petrol station
P Parking space
Fig. 144 Entering a special destination
.,. Press the I NAV/MAP!
button repeatedly until
the Enter destination menu is displayed
¢ page 147, Fig. 141 .
.,. Select: left control button > Special destina
tions.
- To change the search area: Select and confirm
Search area and then a search area from the
list. I
- To find the name of a special destination in
the selected search area: Enter the name of the
special destination.
- To search for a special destination in a certain
category: Choose Select category. Select and
confirm a category, for example Restaurants or
Parking space.
150 The
following search categories are available:
In immediate vicinity: You can select special des
tinations from different categories. The special
destinations are displayed in a list, starting with
destinations in the immediate vicinity and going
up to destinations within a radius of 200 km.
In vicinity of route: Special destinations along
the route can only be selected when the route
guidance function is active. The special destina
tions are located directly on or in the immediate
vicinity of your route.
In vicinity of destination/In vicinity of stopover:
You can also select special destinations from dif
ferent categories in the vicinity of the destina
tion/stopo ver. For example, you can look for a ho
tel or a car park at the destination.
In new town: Enter the name of the town. You
can select special destinations from different cat
egories. You can use this function to find special
destinations in any town irrespective of the desti
nation currently set or the vehicle position.
myAudi special destinations
In myAudi special destinations, you can find per
sonal special destinations which you have added
in your myAudi account and imported to the MMI
using an SD card.
- To import new myAudi special destinations in
to the MMI: Select the right control button >
Import myAudi special destinations. Select
and confirm the relevant medium. Select and
confirm the files you would like to import to
the MMI.
{(!) Note
- For more information on the myAudi special
destinations*, please see the Operating
manual for Audi connect at www.audi.com/
myaudi.
- The distances to special destinations are
shown as the crow flies from your current
location (arrow not filled in). The actual
driving distance between your current posi-
tion and the special destination is updated
automatically (filled in arrow). However, the
�
Page 164 of 284
Downloaded from www.Manualslib.com manuals search engine Navigation
to happen, you can switch off the on line
traffic information function at any time.
- The online traffic information network is
not yet available in all countries or areas. Further
information can be found on the In
ternet at www.audi.com/connect.
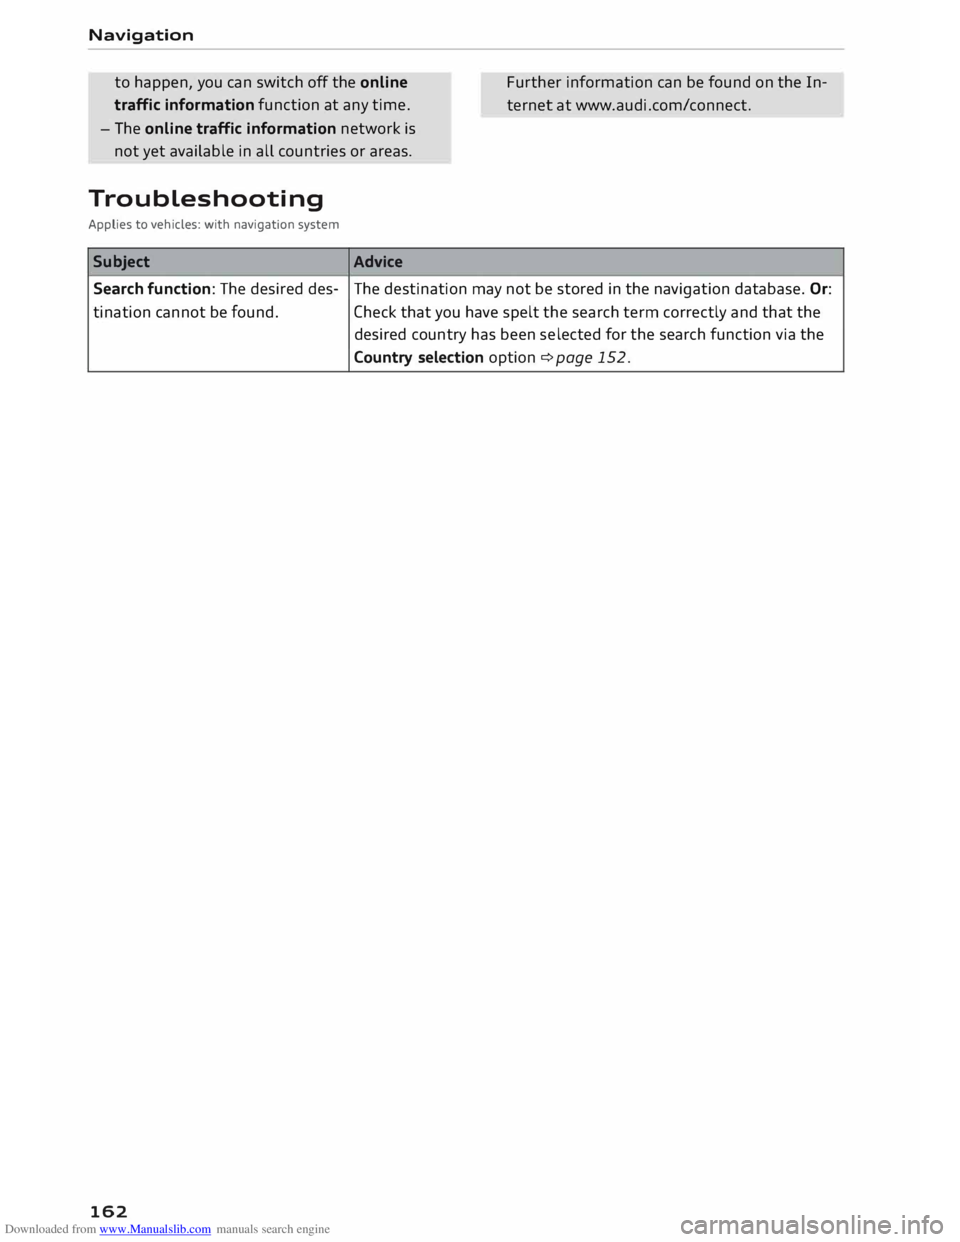
Troubleshooting
Applies to vehicles: with navigation system
Subject Advice
Search function: The desired des-The
destination may not be stored in the navigation database. Or:
ti nation cannot be found.
Check that you have spelt the search term correctly and that the
desired country has been selected for the search function via the
Country selection option ¢ page 152.
162
Page 195 of 284
Downloaded from www.Manualslib.com manuals search engine Before
every trip
The driver is responsible for the safety of the
passengers and the safe operation of the vehicle
at all times.
For your own safety and the safety of your pas
sengers, always note the following points before
every trip:
.,. Make sure that all lights and turn signals are
working properly.
.,. Check the tyre pressures.
.,. Make sure that all windows are clean and give
good visibility to the outside.
.,. Secure all luggage and other items carefully
¢page 201.
.,. Make sure that no objects can interfere with the
pedals.
.,. Adjust
the mirrors and the front seat according
to your body height.
.,. Make sure that children are protected with suit
able safety seats and properly worn seat belts
¢page 195.
.,. Sit in the correct position in your seat. Make
sure that your passengers are sitting in the cor
rect positions ¢ page 46 .
.,. Fasten your seat belt correctly. Make sure that
your passengers do the same ¢page 204.
What factors can impair your safety?
Safety on the road is directly related to how you
drive, and can also be affected by the passengers
in the vehicle.
The driver is responsible for the safety of the ve
hicle and all its occupants. If your ability to drive
is impaired in any way, you endanger yourself and
other road users ¢& . Therefore:
.,. Do not let yourself be distracted by passengers
or by using a mobile phone, etc.
.,. Never drive when your driving ability is im
paired (by medication, alcohol, drugs, etc.).
.,. Obey all traffic regulations and speed limits
and always maintain a safe distance to the vehi-
� de
in front.
� .,.
Always adjust your speed to suit the road, traf-
� fie
and weather conditions.
U'l
N
U'l
.-1 Safe
driving
.,. Take frequent breaks on long trips. Do not drive
for more than two hours without a stop.
.,. If possible, avoid driving when you are tired or
stressed.
A WARNING
- Distractions while driving or any kind of im
pairment to your driving ability increase the
risk of accident and injury .
- Do not place loose objects on the dash pan
el. These objects could fly around the interi
or when the vehicle is moving (under accel
eration or whilst cornering) and distract the
driver -risk of accident!
Correct sitting positions
Correct driving position
The correct driving position is important for safe
driving.
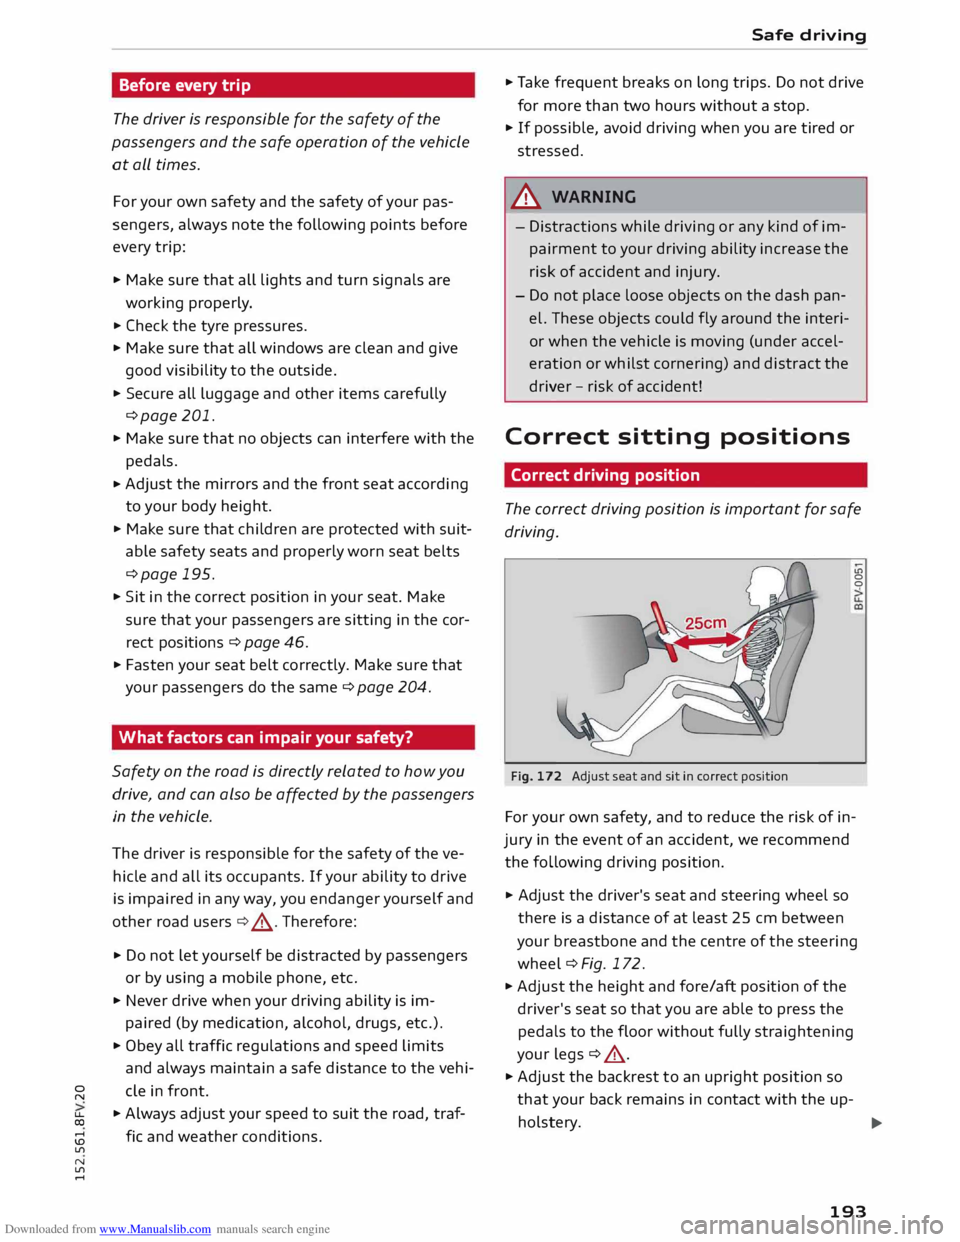
Fig. 172 Adjust seat and sit in correct position LO
0
0
For your own safety, and to reduce the risk of in
jury in the event of an accident, we recommend
the following driving position.
.,. Adjust the driver's seat and steering wheel so
there is a distance of at least 25 cm between
your breastbone and the centre of the steering
wheel¢ Fig. 172.
.,. Adjust the height and fore/aft position of the
driver's seat so that you are able to press the
pedals to the floor without fully straightening
your legs ¢ .&_ .
.,. Adjust the backrest to an upright position so
that your back remains in contact with the up-
holstery. ...,
193
Page 198 of 284
Downloaded from www.Manualslib.com manuals search engine Safe
driving
the manufacturer's instructions and observe any
statutory requirements.
For safety reasons, we recommend that child
seats be installed on the rear seats. You should
only use a child seat on the front passenger seat
in exceptional circumstances.
A WARNING
To avoid serious or fatal injury, children travel
ling in the vehicle must always be protected
with child restraint systems appropriate to
their height, weight and age.
- Children under 1.45 m tall or younger than
12 must not travel in the vehicle if there are
no suitable child seats. Please observe any
other applicable regulations in the country
in which you are travelling.
- Babies and children must never travel on an
other occupant's lap.
- Never allow more than one child to occupy
one child seat.
- Never leave a child without supervision in a
child seat.
- Never allow a child to travel unrestrained or
to stand up or kneel on a seat while the car
is moving. In an accident, the child could be
catapulted through the car, causing possibly
fatal injuries to itself and other occupants.
- To ensure proper protection by the child re
straint, it is important to wear the seat belts
in the correct position ¢ page 206. Always
check that the belt is properly positioned ac
cording to the instructions provided by the
manufacturer of the child seat. Incorrectly
worn seat belts can give rise to injuries even
in a minor collision.
- If children are out of position when the car
is moving, they are at greater risk of injury
during a sudden braking manoeuvre or in an
accident. This is particularly the case if the
child is travelling on the front passenger's
seat and the airbag system is triggered in an
accident. This incorrect sitting position can
result in serious or even fatal injury.
- If you are using a child seat on the front
passenger seat in which the child faces the
196 direction
of travel, you should move the
front passenger seat as far back as possible.
- Child seats in which the child faces the rear
of the car are located directly in the path of
the front passenger's airbag if it inflates. In
this case, the child could sustain serious or
fatal injuries if the airbag were to be de
ployed.
- Applies to vehicles on which the front pas
senger's airbag cannot be deactivated: Do
NOT use a rearward-facing child seat on
the front passenger's seat.
- Applies to vehicles with key-operated
switch for deactivating the front passeng
er's airbag: Do NOT use a rearward-facing
child seat on the front passenger's seat
while the front passenger's airbag is ac
tive. If you have no alternative but to use a
rearward-facing child seat on the front
passenger's seat, the front passenger's
airbag must be deactivated beforehand via
the key-operated switch* ¢ page 211.
Make sure that the front passenger's air
bag is reactivated by means of the key-op
erated switch* as soon as the child seat is
no longer needed on the front passenger's
seat.
- Always replace the child seat with a new one
after an accident as damage not externally
visible may have occurred.
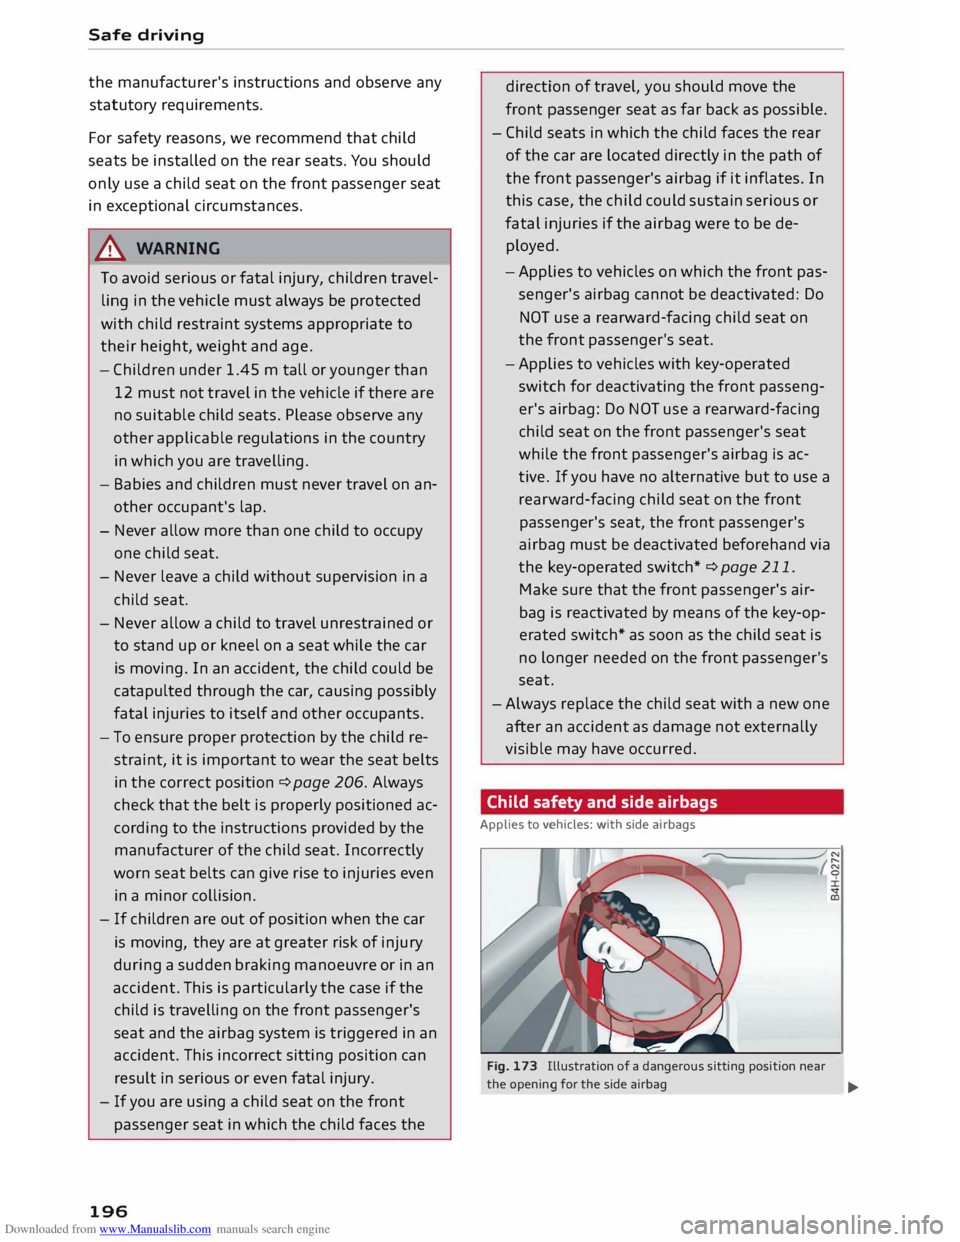
Child safety and side airbags
Applies to vehicles: with side airbags
Fig. 173 Illustration of a dangerous sitting position near
the opening for the side airbag
...