check engine AUDI TT COUPE 2014 Workshop Manual
[x] Cancel search | Manufacturer: AUDI, Model Year: 2014, Model line: TT COUPE, Model: AUDI TT COUPE 2014Pages: 284, PDF Size: 34.42 MB
Page 232 of 284
Downloaded from www.Manualslib.com manuals search engine Checking
and topping up fluids
- Inspection or oil change reminder: After acer
tain mileage, a service reminder will appear on
the infotainment display each time the ignition
is switched on/off¢ Fig. 218. The distance or
time remaining will be shown briefly.
- Inspection or oil change due: When your vehi
cle is due for an inspection, oil change or both,
the corresponding reminder Inspection due!,
Oil change due! or Oil change and inspection
due! will appear briefly after you switch the ig
nition on/off.
Checking the service intervals
You can look up the distance and time remaining
until the next oil change and next service inspec
tion. Select the following on the infotainment
system: I MENU I button > Car > left control button
> Se rvicing & checks > Service intervals. You can
not check the service interval for the first 500 km
or so after resetting the display or when your ve
hicle is new.
CD CAUTION
- Keeping to the correct service intervals is
most important for the service life and re
sidual value of the vehicle (and especially
for the life of the engine). Services must al
ways be carried out promptly, even if the
mileage is low.
- The time until the next oil change is not
counted down if the battery is disconnec
ted. If your vehicle is out of service for an
extended period, please refer to the Service
Schedule for details of the next service
date.
230
Page 234 of 284

Downloaded from www.Manualslib.com manuals search engine Wheels
and tyres
& WARNING
- Use only tyre/rim combinations and match
ing wheel bolts approved by Audi. Otherwise
damage to the vehicle and an accident could
result.
- For technical reasons, it is not possible to
use wheels from other vehicles. In certain
cases, it is not even possible to use wheels
from another vehicle of the same model.
- It is very important to ensure that the tyres
you have chosen have adequate clearance.
When selecting replacement tyres, do not
rely entirely on the nominal tyre size marked
on the tyre; with some makes of tyre the ef
fective tyre size can differ significantly from
the nominal dimensions, even though the
tyres have the same size designation. Inade
quate tyre clearance can result in damage to
the tyres or the vehicle, causing a serious
safety risk.
- Avoid running the car on tyres that are more
than 6 years old. If you have no alternative,
you should drive slowly and with extra care
at all times.
- The use of run-flat tyres on your vehicle is
NOT authorised! Unauthorised use can cause
an accident or damage your vehicle.
- If wheel trims are fitted after the car is pur
chased, ensure that there is an adequate
flow of air for cooling the brakes -risk of ac
cident!
Tyre wear / damage
Fig. 219 Tyre tread: Tread wear indicators
l l
Please observe the applicable regulations in the country in
which you are travelling.
232 Tyre
wear
Inspect the tyres regularly for damage.
- The wear on under or over-inflated tyres is sig
nificantly higher.
- Fast cornering, heavy acceleration and hard
braking all increase tyre wear.
- If you notice excessive tyre wear, have the
wheel alignment checked by a qualified work
shop.
- Have your tyres rebalanced if steering wheel vi
brations indicate an imbalance. Otherwise, the
tyres and other parts of the vehicle may wear
faster.
Tread wear indicators
The original tyres on your vehicle have 1.6 mm
high tread wear indicators ¢ Fig. 219 running
across the tread at regular intervals. The letters
"TWI" or triangles on the sidewall indicate the
positions of the tread wear indicators.
The minimum tread depth 1
) is reached at the lat
est when the tread is worn down to the tread
wear indicators. Replace the tyres with new ones
¢ ,&..
Changing wheels round
Wheels should be changed round regularly to en
sure that the wear is equal on all tyres. Fit the
wheels from the rear axle on the front axle and
vice-versa. All the tyres will then last for about
the same time.
On tyres with a directional tread pattern, note
the direction of rotation indicated on the sidewall
¢page 247.
Concealed damage
Damage to tyres and rims is often not readily visi
ble. If you notice unusual vibrations or the car
pulling to one side, this may indicate that one of
the tyres is damaged. Reduce your speed imme
diately. Inspect the tyres for damage. If no exter
nal damage is visible, drive slowly and carefully
to the nearest qualified workshop and have the
car inspected.
Page 235 of 284
Downloaded from www.Manualslib.com manuals search engine 0
N
co
,-j
\D L/'l
N
L/'l
,-j A
WARNING
Insufficient tread depth or different tread
depths on different wheels reduce safety. This
is particularly evident in vehicle handling,
when there is a risk of aquaplaning in deep
puddles of water and when driving through
corners. Braking is also adversely affected -
risk of accident!
Tyre pressure
Audi V V
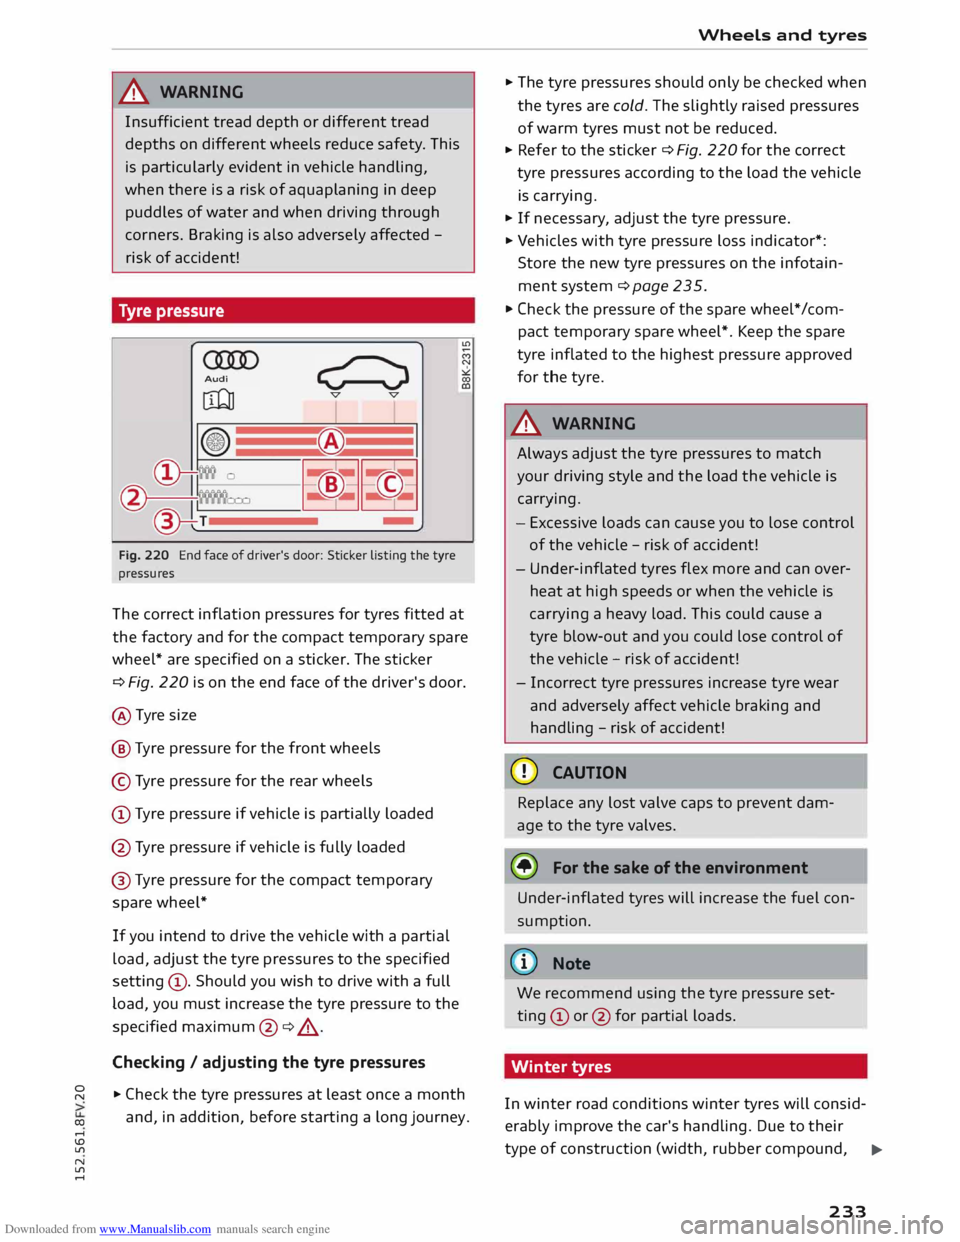
Fig. 220 End face of driver's door: Sticker listing the tyre
pressures
The correct inflation pressures for tyres fitted at
the factory and for the compact temporary spare
wheel* are specified on a sticker. The sticker
¢ Fig. 220 is on the end face of the driver's door.
@ Tyre size
@ Tyre pressure for the front wheels
© Tyre pressure for the rear wheels
(D Tyre pressure if vehicle is partially loaded
@ Tyre pressure if vehicle is fully loaded
@ Tyre pressure for the compact temporary
spare wheel*
If you intend to drive the vehicle with a partial
load, adjust the tyre pressures to the specified
setting (D. Should you wish to drive with a full
load, you must increase the tyre pressure to the
specified maximum @
¢.&,.
.
Checking / adjusting the tyre pressures
.. Check
the tyre pressures at least once a month
and, in addition, before starting a long journey. Wheels
and tyres
.. The tyre pressures should only be checked when
the tyres are cold. The slightly raised pressures
of warm tyres must not be reduced.
.. Refer to the sticker ¢ Fig. 220 for the correct
tyre pressures according to the load the vehicle
is carrying.
.. If necessary , adjust the tyre pressure.
.. Vehicles with tyre pressure loss indicator*:
Store the new tyre pressures on the infotain
ment system ¢ page 235 .
.. Check the pressure of the spare wheel* /com
pact temporary spare wheel*. Keep the spare
tyre inflated to the highest pressure approved
for the tyre.
A WARNING
Always adjust the tyre pressures to match
your driving style and the load the vehicle is
carrying.
- Excessive loads can cause you to lose control
of the vehicle -risk of accident!
- Under-inflated tyres flex more and can over
heat at high speeds or when the vehicle is
carrying a heavy load. This could cause a
tyre blow-out and you could lose control of
the vehicle -risk of accident!
- Incorrect tyre pressures increase tyre wear
and adversely affect vehicle braking and
handling -risk of accident!
CD CAUTION
Replace any lost valve caps to prevent dam
age to the tyre valves.
@ For the sake of the environment
Under-inflated tyres will increase the fuel con
sumption.
@ Note
We recommend using the tyre pressure set
ting (Dor@ for partial loads.
Winter tyres
In winter road conditions winter tyres will consid
erably improve the car's handling. Due to their
type of construction (width, rubber compound,
IJII>
233
Page 236 of 284
Downloaded from www.Manualslib.com manuals search engine Wheels
and tyres
tread pattern), summer tyres give less grip on ice
and snow.
... Winter tyres must be fitted on all four wheels.
... Only use winter tyres of the correct type ap-
proved for your vehicle.
... Please
note that the maximum permissible
speed for winter tyres may be lower than for
summer tyres¢.&_ . Your specialist retailer can
advise you of the maximum speed for your
tyres.
... After fitting the wheels you must always check
the tyre pressures ¢page 233.
Winter tyres lose their effectiveness when the
tread is worn down to a depth of 4 mm. The per
formance of winter tyres is also severely impaired
by ageing, even if the tread is still much deeper
than 4 mm.
.&_ WARNING
- Never exceed the maximum approved speed
for your tyres. This causes the tyres to over
heat and can even result in a blow-out -risk
of accident!
- Always adapt your driving style to the pre
vailing road and traffic conditions. Drive
carefully and reduce your speed on icy or
slippery roads. Even winter tyres lose their
grip on black ice.
@) For the sake of the environment
Summer tyres should be fitted again as soon
as possible; they give better handling on
roads which are free of snow and ice. They are
quieter, do not wear so quickly and reduce
fuel consumption.
(Qj) Note
All-weather tyres can also be used instead of
winter tyres. Please note that winter tyres
with the & symbol are required by law during
the winter season in some countries.
Snow chains
Snow chains will improve braking ability as well
as traction in winter conditions.
234 ...
Snow chains can be used on the front wheels
only. This also applies to vehicles with four
wheel drive* .
... Check that the snow chains are correctly seated
after driving for a few yards; follow the instruc
tions given by the manufacturer .
... Keep your speed below 50 km/h. Please ob-
serve the applicable local regulations.
For technical reasons snow chains may only be
used on tyres with certain wheel rim/tyre combi
nations.
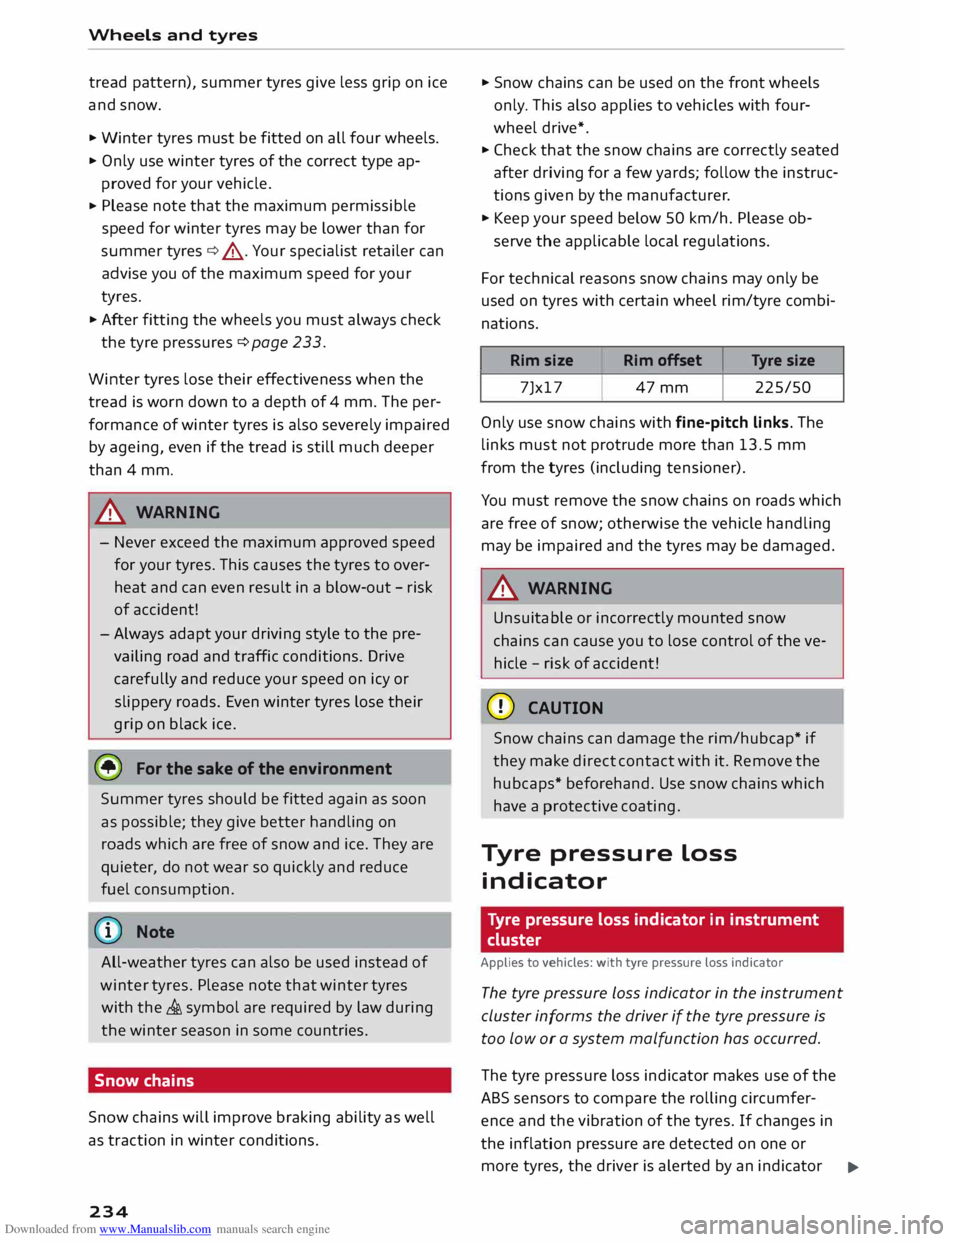
Rim size
Rim offset Tyre
size
7Jx17 47mm 225/50
Only use snow chains with fine-pitch links. The
links must not protrude more than 13.5 mm
from the tyres (including tensioner).
You must remove the snow chains on roads which
are free of snow; otherwise the vehicle handling
may be impaired and the tyres may be damaged.
.&_ WARNING
Unsuitable or incorrectly mounted snow
chains can cause you to lose control of the ve
hicle -risk of accident!
CD CAUTION
Snow chains can damage the rim/hubcap* if
they make direct contact with it. Remove the
hubcaps* beforehand. Use snow chains which
have a protective coating.
Tyre pressure Loss
indicator
Tyre pressure loss indicator in instrument
cluster
Applies to vehicles: with tyre pressure Loss indicator
The tyre pressure Loss indicator in the instrument
cluster informs the driver if the tyre pressure is
too low or a system malfunction has occurred.
The tyre pressure loss indicator makes use of the
ABS sensors to compare the rolling circumfer
ence and the vibration of the tyres. If changes in
the inflation pressure are detected on one or
more tyres, the driver is alerted by an indicator
..,.
Page 237 of 284
Downloaded from www.Manualslib.com manuals search engine 0
N
co
....
\D Lfl
N
Lfl
.... lamp
[Bl and a message on the infotainment dis
play. If only one tyre is affected, the display will
indicate its position.
Each time you change a tyre, change the wheels
round or change the tyre pressures on your vehi
cle (e.g. when switching from partial load to full
load and vice-versa), you must store the new tyre
pressures on the infotainment system
¢ page 235. Monitoring of the tyre pressures is
based on the tyre pressures you have stored. The
inflation pressures recommended for your vehicle
are given on the tyre pressure sticker
¢ page 233, Fig. 220.
The rolling circumference and vibration can
change and cause a tyre pressure warning if:
- The inflation pressure in one or more tyres is
too low.
- The tyre has suffered structural damage.
- The wheels were changed or the tyre pressures
were changed and the new tyre pressures were
not stored ¢ page 235.
- You are driving with the temporary spare
wheel*.
Indicator lamps
RI]- Loss of pressure on one or more tyres¢ A.
Check and change or repair the tyre(s). Check and
adjust the inflation pressures of all four tyres
again and store the new tyre pressures on the in
fotainment system¢ page 235.
ffim (Tyre Pressure Monitoring System) Tyre
pressure: fault. See owner's manual -If� ap
pears and the indicator lamp [Bl in the instru
ment cluster display flashes for approx. one mi
nute and then remains lit after you have switched
on the ignition or while you are driving, there is a
fault in the system. Try to store the correct tyre
pressures ¢ page 235. If the indicator lamp
does not go out or if it comes on again after a
short time, drive to a qualified workshop without
delay and have the fault rectified.
&_ WARNING
- If the tyre pressure loss indicator appears
on the display, slow down immediately and
avoid any severe braking or steering ma- Wheels
and tyres
noe uvres. As soon as you can do so safely,
stop and check the tyres and the tyre pres
sures.
- It is the driver's responsibility to ensure that
the tyre pressures are correct. For this rea
son you must check the tyre pressures regu
larly.
- Under certain conditions (e.g. driving at
high speeds, on ice and snow or on poor
road surfaces) the tyre pressure loss indica
tor may not appear immediately.
- Run-flat tyres* may only be used on vehicles
which were originally equipped with this
type of tyre.
- If a malfunction occurs in the ESC system,
the tyre pressure loss indicator may also be
out of action.
- When driving with snow chains, a system
malfunction can occur.
- The tyre pressure loss indicator on your Audi
is specially matched to tyres with the mark
ing "AO" or "RO" ¢ page 231. We recom
mend that you use these tyres.
Storing tyre pressure settings
Applies to vehicles: with tyre pressure loss indicator
When you change a tyre or the tyre pressure on
your vehicle, you must confirm the change on the
infotainment system.
� Before storing the new tyre pressures, check
that the current pressures on all four wheels
correspond to the specified values and adapt
the pressures to the current load ¢ page 232.
� Switch on the ignition.
� Select the
following on the infotainment sys
tem: I MENU I button >Car> left control button
> Servicing & checks > Tyre pressure loss indi
cator.
@ Note
Do not store the tyre pressures if you are driv
ing with snow chains. Otherwise, a system
malfunction may occur .
235
Page 243 of 284
Downloaded from www.Manualslib.com manuals search engine 0
N
co
,-j
\D L/'l
N
L/'l
,-j Mobility
General notes
... If your vehicle experiences technical problems,
stop the car well away from moving traffic. If
you have a flat tyre, you should park the car on
a level surface. Be particularly careful if you are
on a slope .
... Apply the parking brake .
... Switch the hazard warning lights on .
... Place the warning triangle in a visible location
¢page 241.
... Instruct all passengers to leave the car when it
is safe to do so. They should wait in a safe place
(for instance behind the roadside crash barrier).
A WARNING
You should note the procedure described
above for your own safety and that of other
road users.
Equipment Warning triangle
Applies to vehicles: with warning triangle
Fig. 221 Luggage compartment: Warning triangle
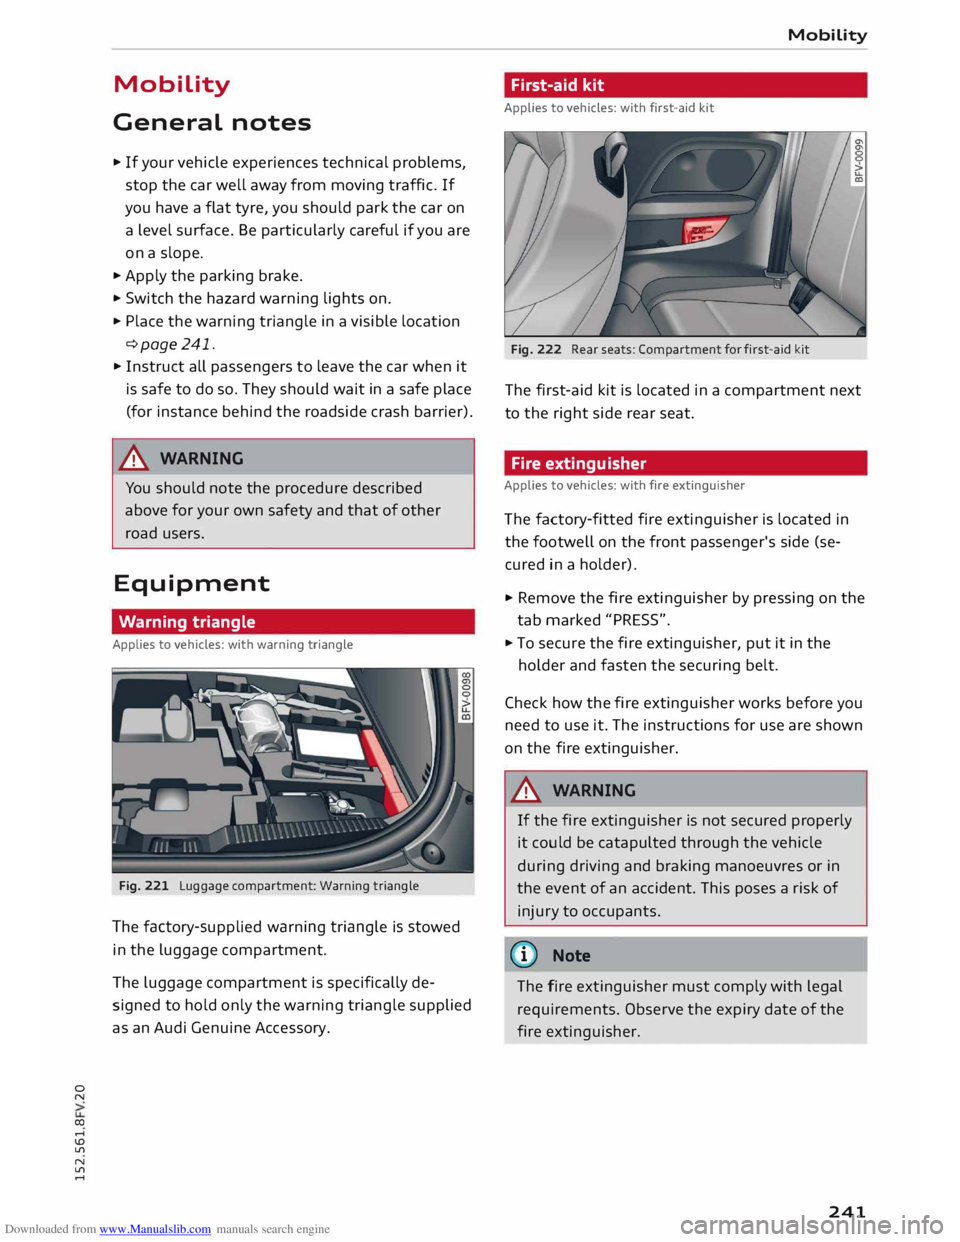
The factory-supplied warning triangle is stowed
in the luggage compartment.
The luggage compartment is specifically de
signed to hold only the warning triangle supplied
as an Audi Genuine Accessory. Mobility
First-aid kit
Applies to vehicles: with first-aid kit
Fig. 222 Rear seats: Compartment for first-aid kit
The first-aid kit is located in a compartment next
to the right side rear seat.
Fire extinguisher
Applies to vehicles: with fire extinguisher
The factory-fitted fire extinguisher is located in
the footwell on the front passenger's side (se
cured in a holder).
... Remove the fire extinguisher by pressing on the
tab marked "PRESS".
... To secure the fire extinguisher, put it in the
holder and fasten the securing belt.
Check how the fire extinguisher works before you
need to use it. The instructions for use are shown
on the fire extinguisher.
A WARNING
If the fire extinguisher is not secured properly
it could be catapulted through the vehicle
during driving and braking manoeuvres or in
the event of an accident. This poses a risk of
injur y to occupants.
� Note
The fire extinguisher must comply with legal
requirements. Observe the expiry date of the
fire extinguisher.
241
Page 244 of 284
Downloaded from www.Manualslib.com manuals search engine Mobility
Tool kit/tyre repair kit/compressor
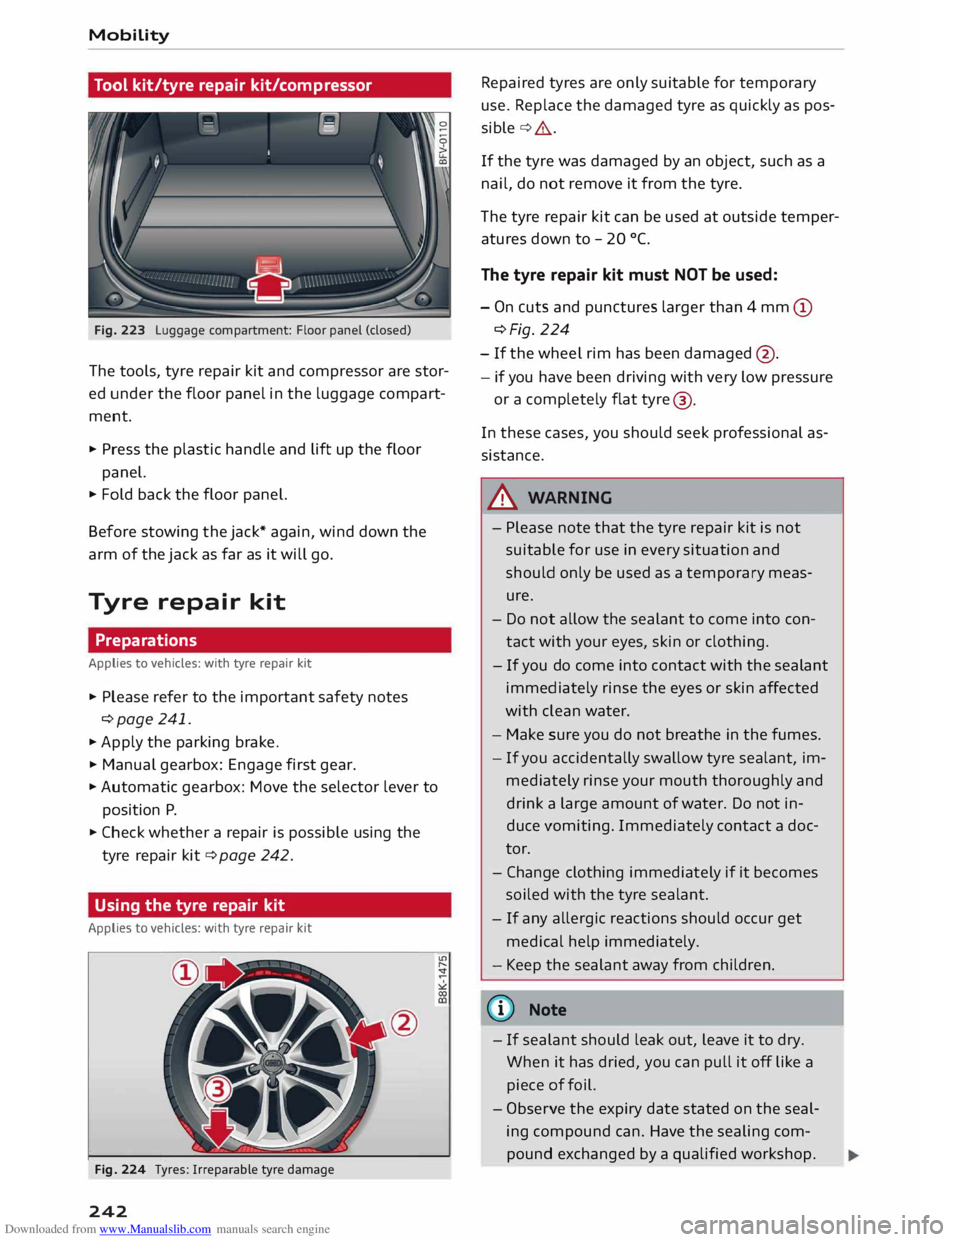
Fig. 223 Luggage compartment: Floor panel (closed)
The tools, tyre repair kit and compressor are stor
ed under the floor panel in the luggage compart
ment.
"' Press the plastic handle and Lift up the floor
panel.
"' Fold back the floor panel.
Before stowing the jack* again, wind down the
arm of the jack as far as it will go.
Tyre repair kit
Preparations
Applies to vehicles: with tyre repair kit
"' Please refer to the important safety notes
¢page 241.
"'Apply the parking brake.
"' Manual gearbox: Engage first gear.
"' Automatic gearbox: Move the selector lever to
position P.
"' Check whether a repair is possible using the
tyre repair kit¢ page 242.
Using the tyre repair kit
Applies to vehicles: with tyre repair kit
Fig. 224 Tyres: Irreparable tyre damage
242 Repaired
tyres are only suitable for temporary
use. Replace the damaged tyre as quickly as pos
sible ¢,&..
If the tyre was damaged by an object, such as a
nail, do not remove it from the tyre.
The tyre repair kit can be used at outside temper
atures down to - 20 °(.
The tyre repair kit must NOT be used:
- On cuts and punctures larger than 4 mm (D
¢Fig. 224
- If the wheel rim has been damaged @.
- if you have been driving with very low pressure
or a completely flat tyre@
.
In these cases, you should seek professional as
sistance.
A WARNING
- Pl ease note that the tyre repair kit is not
suitable for use in every situation and
should only be used as a temporary meas
ure.
- Do not allow the sealant to come into con
tact with your eyes, skin or clothing.
- If you do come into contact with the sealant
immediately rinse the eyes or skin affected
with clean water.
- Make sure you do not breathe in the fumes.
- If you accidentally swallow tyre sealant, im-
mediately rinse your mouth thoroughly and
drink a large amount of water. Do not in
duce vomiting. Immediately contact a doc
tor.
- Change clothing immediately if it becomes
soiled with the tyre sealant.
- If
any allergic reactions should occur get
medical help immediately.
- Keep the sealant away from children.
(©) Note
- If sealant should leak out, leave it to dry.
When it has dried, you can pull it off Like a
piece of foil.
- Observe the expiry date stated on the seal
ing compound can. Have the sealing com
pound exchanged by a qualified workshop.
Page 245 of 284
Downloaded from www.Manualslib.com manuals search engine 0
N
co
....
\D L/'l
N
L/'l
.... -
Please observe the relevant regulations.
Tyre repairs
Applies to vehicles: with tyre repair kit
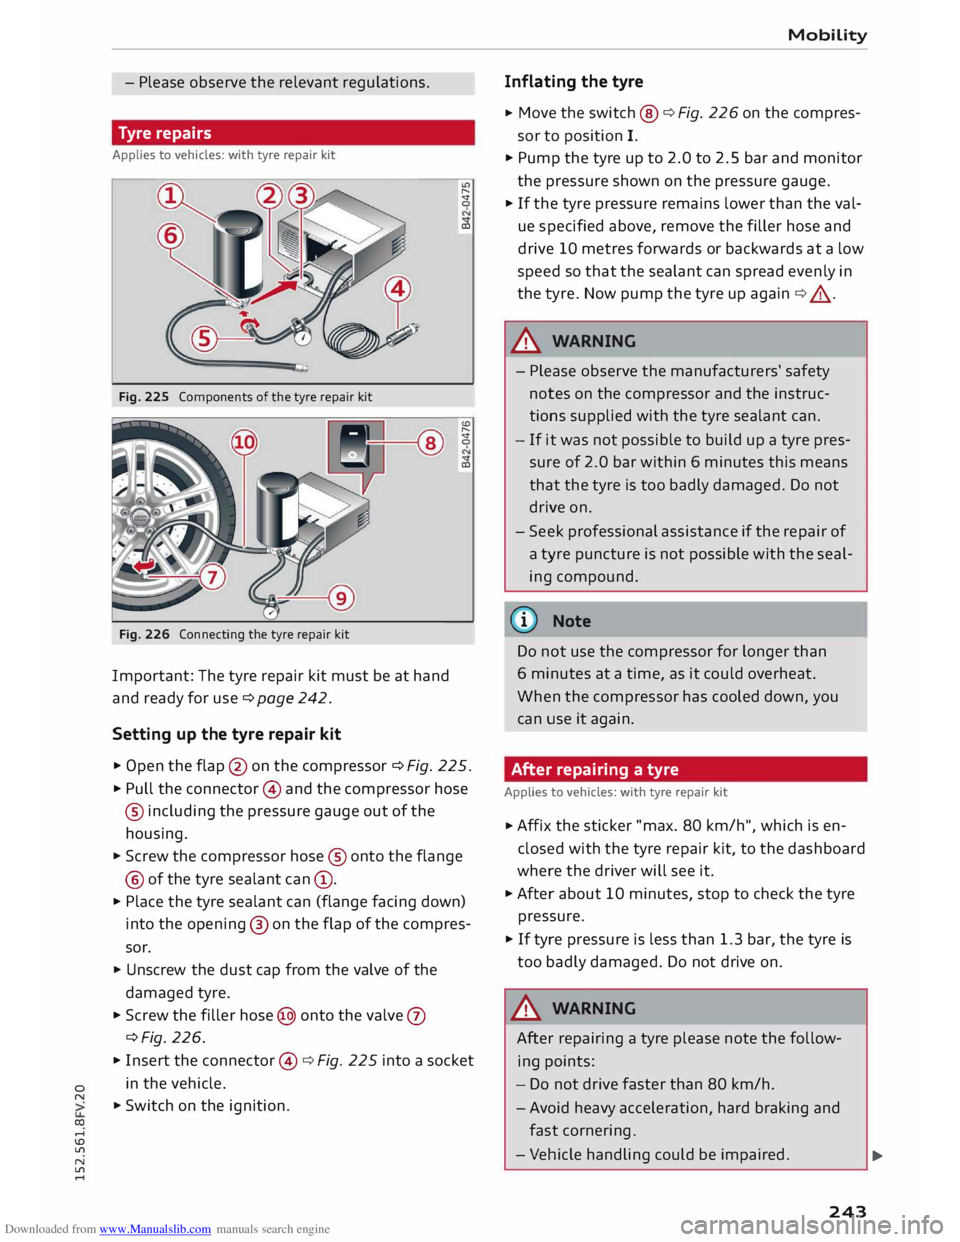
Fig. 225 Components of the tyre repair kit
Fig. 226 Connecting the tyre repair kit
Important: The tyre repair kit must be at hand
and ready for use¢ page 242.
Setting up the tyre repair kit LC'>
.....
'St
0
CD
'St
0
CD
.,. Open the flap @on the compressor ¢ Fig. 225.
.,. Pull the connector @ and the compressor hose
® including the pressure gauge out of the
housing.
.,. Screw the compressor hose® onto the flange
@ of the tyre sealant can (D.
.,. Place
the tyre sealant can (flange facing down)
into the opening ® on the flap of the compres
sor.
.,. Unscrew the dust cap from the valve of the
damaged tyre.
.,. Screw the filler hose@ onto the valve (J)
¢Fig. 226.
.,. Insert the connector @¢ Fig. 225 into a socket
in the vehicle.
.,. Switch on the ignition. Mobility
Inflating the tyre
.,. Move
the switch @¢ Fig. 226 on the compres
sor to position I.
.,. Pump the tyre up to 2.0 to 2.5 bar and monitor
the pressure shown on the pressure gauge.
.,. If the tyre pressure remains lower than the val
ue specified above, remove the filler hose and
drive 10 metres forwards or backwards at a low
speed so that the sealant can spread evenly in
the tyre. Now pump the tyre up again ¢_&..
A WARNING
- Please observe the manufacturers' safety
notes on the compressor and the instruc
tions supplied with the tyre sealant can.
- If it was not possible to build up a tyre pres
sure of 2.0 bar within 6 minutes this means
that the tyre is too badly damaged. Do not
drive on.
- Seek professional assistance if the repair of
a tyre puncture is not possible with the seal
ing compound.
(!)) Note
Do not use the compressor for longer than
6 minutes at a time, as it could overheat.
When the compressor has cooled down, you
can use it again.
After repairing a tyre
Applies to vehicles: with tyre repair kit
.,. Affix
the sticker "max. 80 km/h", which is en
closed with the tyre repair kit, to the dashboard
where the driver will see it.
.,. After about 10 minutes, stop to check the tyre
pressure.
.,. If tyre pressure is less than 1.3 bar, the tyre is
too badly damaged. Do not drive on .
A WARNING
After repairing a tyre please note the follow
ing points:
- Do not drive faster than 80 km/h.
- Avoid heavy acceleration, hard braking and
fast cornering .
- Vehicle handling could be impaired.
.,..
243
Page 249 of 284
Downloaded from www.Manualslib.com manuals search engine 0
N
co
....
\D Lfl
N
Lfl
.... not
possible to tighten the bolts to the re
quired torque using the hexagonal socket -
risk of accident!
CD CAUTION
When removing/fitting the wheel the rim may
hit and damage the brake disc. For this rea
son, please take care and get a second person
to assist you.
Tyres with directional tread pattern
A directional tread pattern can be identified by
arrows on the sidewall that point in the direction
of rotation. Always note the direction of rotation
indicated when mounting the wheel. This is im
portant so that these tyres can give maximum
grip and avoid excessive noise, tread wear and
aquaplaning.
If you ever have a puncture and need to fit the
spare wheel* in the wrong direction, please drive
with extra care because the tyre will not give op
timum performance in this situation. Bear this in
mind particularly when driving on wet roads.
To benefit from the advantages of tyres with this
type of tread pattern, the defective tyre should
be replaced and refitted as soon as possible so
that all tyres again rotate in the correct direction.
After changing a wheel
.,. Fit the hubcap or wheel bolt caps back on, as
required.
.,. Put the tools and jack back in the luggage com
partment.
.,. If the replaced wheel will not fit into the spare
wheel well, stow it safely in the luggage com
partment ¢ page 201.
.,. Check
the tyre pressure of the fitted wheel as
soon as possible.
.,. Adjust the tyre pressures and store them via
the infotainment system.
.,. The wheel bolts should be tightened to 120
Nm. Have this checked as soon as possible with
a torque wrench. Until then, drive with caution.
.,. Have
the flat tyre replaced as quickly as possi
ble. Mobility
Spare wheel
General notes
Applies to vehicles: with compact temporary spare wheel
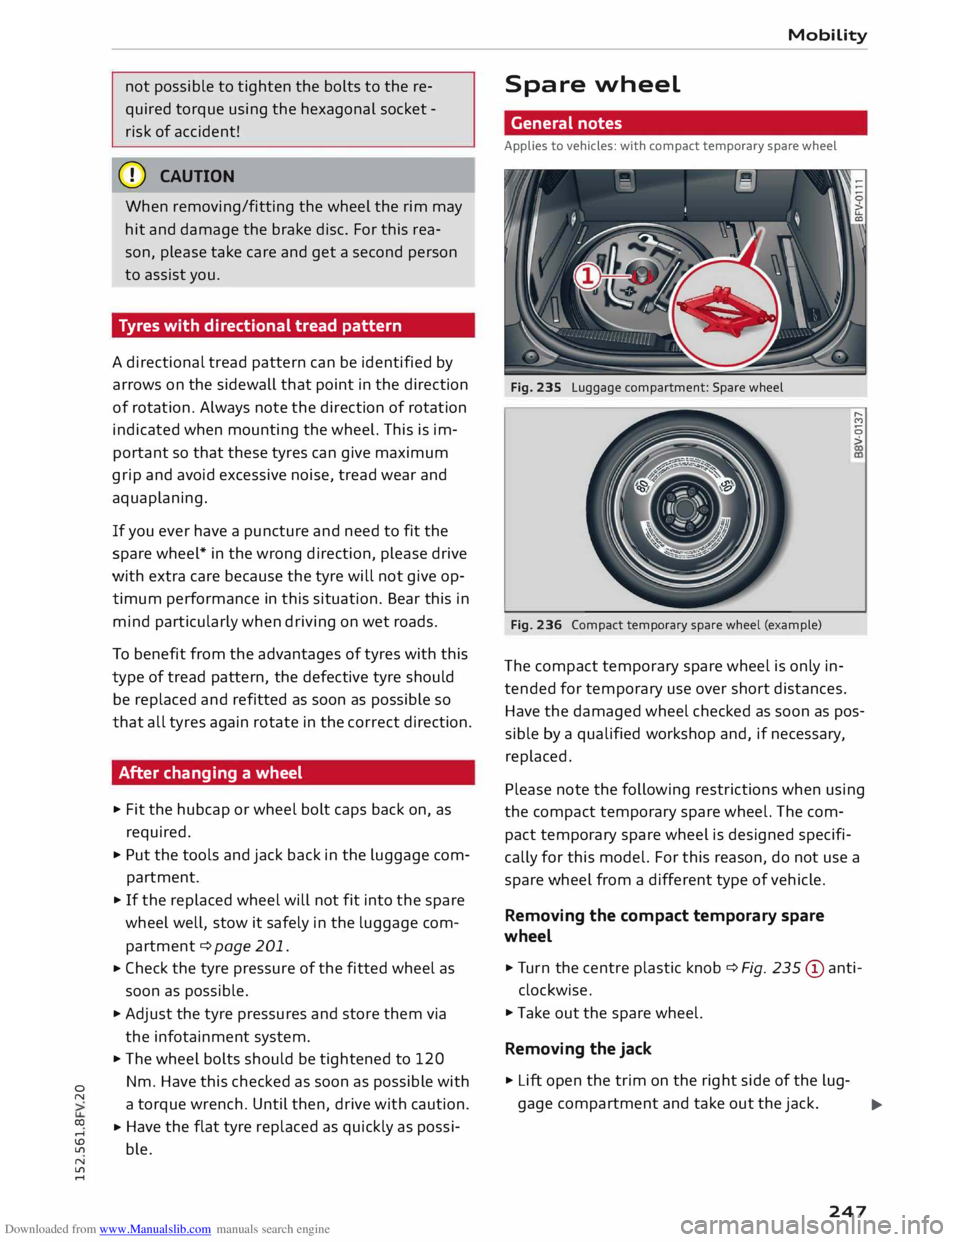
Fig. 235 Luggage compartment: Spare wheel
Fig. 236 Compact temporary spare wheel (example) ......
M
0
>
The compact temporary spare wheel is only in
tended for temporary use over short distances.
Have the damaged wheel checked as soon as pos
sible by a qualified workshop and, if necessary,
replaced.
Please note the following restrictions when using
the compact temporary spare wheel. The com
pact temporary spare wheel is designed specifi
cally for this model. For this reason, do not use a
spare wheel from a different type of vehicle .
Removing the compact temporary spare
wheel
.,. Tur n the centre plastic knob¢ Fig. 235 © anti-
clockwise.
.,. Take out the spare wheel.
Removing the jack
.,. Lift open the trim on the right side of the lug-
gage compartment and take out the jack.
..,..
247
Page 250 of 284
Downloaded from www.Manualslib.com manuals search engine Mobility
Snow chains
For technical reasons, snow chains must not be
used on the compact temporary spare wheel.
Sheu ld you have a puncture on one of the front
wheels when using snow chains, fit the compact
temporary spare wheel in place of one of the rear
wheels. You can then attach the snow chains to
the wheel taken from the rear and use this wheel
to replace the punctured front wheel.
A WARNING
- The tyre pressure must be checked as soon
as possible after fitting the spare wheel-an
incorrectly inflated tyre can increase the risk
of accident. You can find the tyre pressures
here ¢ page 233, Fig. 220.
- Do not drive faster than 80 km/h when the
compact temporary spare wheel is fitted -
higher speeds can cause an accident.
- Avoid heavy acceleration, hard braking and
fast cornering when the compact temporary
spare wheel is fitted -risk of accident!
- Never use two or more compact spare tyres
at the same time -risk of accident!
- No other type of tyre (normal summer or
winter tyres) may be fitted on the compact
temporary spare wheel.
]ump-starting Before starting the engine
If necessary, the engine can be started by con
necting it to the battery of another vehicle.
If the engine fails to start because of a dis
charged battery, the battery can be connected to
the battery of another vehicle to start the engine.
Suitable jump Leads are required.
Both batteries must be rated at 12 Volts. The ca
pacity (Ah) of the booster battery should not be
significantly lower than that of the discharged
battery.
Jump Leads
The jump Leads must be heavy enough to carry
the starter current. Refer to the details given by
the manufacturer.
248 Only
use jump leads with insulated battery
clamps.
Positive cable -usually red.
Negative cable -usually black.
A WARNING
- When it is discharged the battery can freeze
at temperatures around 0°
(. A frozen bat
tery must first be thawed out before con
necting the jump leads, as it could other
wise explode.
- Note the safety warnings referring to work
ing in the engine compartment ¢ page 220.
(© Note
- There must be no contact between the two
vehicles as otherwise current could flow as
soon as the positive terminals are connec
ted and the boosting battery could be dis
charged.
- The disch arged battery must be properly
connected to the vehicle's electrical system.
- Switch off the car telephone if necessary.
Details will be given in the manufacturer's
instructions for the car telephone.