ESP AUDI TT COUPE 2016 Owners Manual
[x] Cancel search | Manufacturer: AUDI, Model Year: 2016, Model line: TT COUPE, Model: AUDI TT COUPE 2016Pages: 322, PDF Size: 52.86 MB
Page 7 of 322
Downloaded from www.Manualslib.com manuals search engine This manual contains important information,
tips, suggestions and warnings for using your ve
hicle.
Keep
this manual in your vehicle at all times. This
is
especially important if you loan your vehicle to
others or sell it.
This
owner's manual describes the equipment
range
specified for thi s model at the time of
printing. Individual equipment options described
may only be availab le at a later date or may only
be offered in certain countries.
Some sections in this manual do not apply to all
vehicles.
When this is the case, the beginning of
the section indicates the validity, for example
"Applies to: vehicles with B iXenon headlights''.
Optional or vehicle-specific equipment is also
identified with an asterisk"*".
The illustrations are designed as a general guide
and on your vehicle may look slightly different
than what is illustrated.
There is a Table of Contents at the beginning of
this owner's manual that lists all of the topics
covered in this book in the order that they ap
pear. There is also an a lphabetical Index at the
end of this owner's manual.
All directions, such as "left", "right", "front" and
"rear", are based on the vehicle's direction of
travel.
* Optional or vehicle -specific equipment
... The section continues on the next page.
c::> .&. Cross reference to a " WARNING " within a
section. If a page number is indicated, the
WARNING is located outside of the section.
_&WARNING
Text with this symbol contains information
about safety and how to reduce the r isk of se
rious personal injury or death.
CD Note
Text with this symbol contains information
about reducing the r is k of damage to your ve
hicle.
- 1
About this Owner's Manual
® For the sake of the environment
Text with this symbol contains information on
protecting the environment.
{!) Tips
Text with this symbol contains additional use
ful information.
5
Page 19 of 322

Downloaded from www.Manualslib.com manuals search engine Drive to an authorized Audi dealer or authorized
Audi Service Facility immediately to have the
malfunction corrected.
~O Audi adaptive light
Applies to: vehicles with Audi adaptive light
rJJ Audi adaptive light: malfunction! See own
er's manual
There is a malfunction in the adaptive lights. The
headlights still function.
Drive to an authorized Audi dealer or authorized
Audi Service Facility immediately to have the
malfunction corrected.
li,D Light/rain sensor
El Automatic headlights: malfunction! See
owner's manual
II Automatic wipers: malfunction! See owner's
manual
The light/rain sensor is malfunctioning.
The low
beams remain switched on at all times
for safety reasons when the light switch is in the
AUTO position. You can continue to turn the
lights on and off using the light switch. You can
still control all wiper functions that are inde
pendent of the rain sensor.
Drive to an authorized Audi dealer or authorized
Audi Service Facility immediately to have the
malfunction corrected.
; Damper control
App lies to: vehicles with Audi drive select
R Suspension: malfunction! You may continue
driving
There is an adaptive damper malfunction.
Drive to an authorized Audi dealer or authorized
Audi Service Facility immediately to have the
malfunction corrected.
Instruments and indicator lights
¢ Q Turn signals
If the. or B indicator light blinks, a turn sig
nal is turned on. If both indicator lights are blink
ing,
the emergency flashers are on.
In
an indicator light blinks twice as fast as usual,
then a turn signal bulb has failed. Replace the
bulb immediately.
CJ! 4f. Rear safety belt
Applies to: vehicles with rear safety belt detection
The respective indicator light will turn on briefly
when a safety belt on the rear seats is fastened
or unfastened.
f!l-If this indicator light turns on briefly, the
safety belt on the rear seat is not fastened.
II-If this indicator light turns on briefly, the
safety belt on the rear seat was fastened.
·-If this indicator light blinks, the safety belt
was unfastened while driving. Above a certain
speed, there will also be a warning tone.
(D Tips
For additional information on safety belts, re
fer to ~page 180.
On-Board Diagnostic
system (OBD)
System indicator light (MIL)
The system indicator light (MIL) Ill in the instru
ment cluster is part of the On Board Diagnostic
System (OBD II).
The
warning/indicator light turns on when the ig
nition is
switched on and turns off once the en
gine is started and is running in idle at a stable
speed. This indicates that the MIL is functioning
correctly.
If the light does not turn off after starting the
engine or turns on while driving, this may indi
cate there is a malfunction in the engine. If the
indicator turns on, the catalytic converter may be
damaged. ..,.
17
Page 22 of 322
Downloaded from www.Manualslib.com manuals search engine Driver information system
Multifunction steering
wheel plus
Operating
Apples to: vehicles with multifunction steering wheel plus
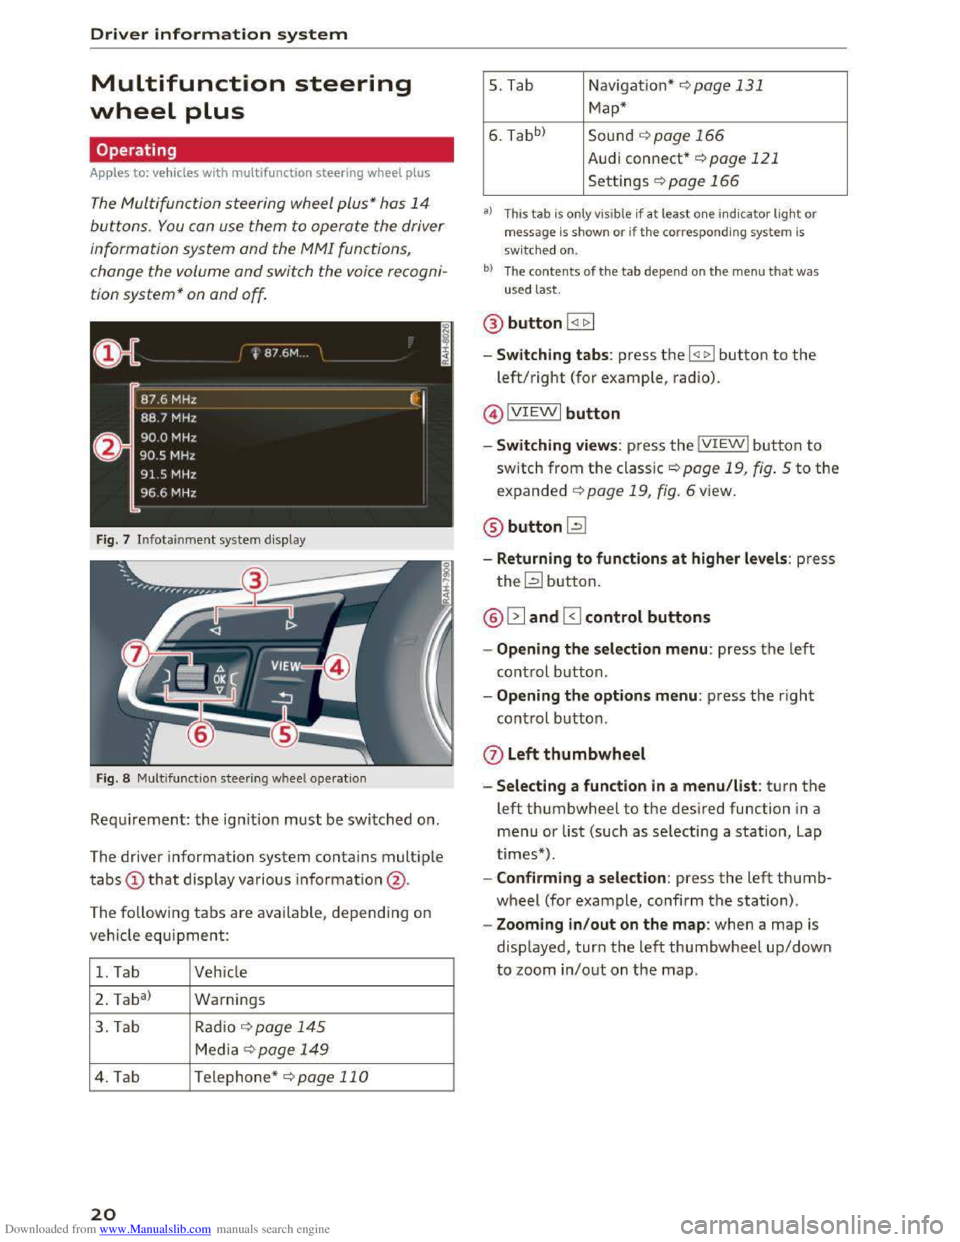
The Multifunction steering wheel plus* hos 14
buttons. You con use them to operate the driver
information
system and the MMI functions,
change the volume and switch the voice recogni
tion system* on and off.
Fig. 7 Infotainment system display
Fig. 8 Multifunction
steering wheel operation
Requ irement: the ignition must be switched on.
The driver information
system contains multiple
tabs CD that display various information @.
The
following tabs are available, depend ing on
vehicle
equipment:
1. Tab Vehicle
2 . Ta
ba)
Warnings
3. Tab
Rad io¢ page 145
Media~ page 149
4. Tab Telephone* ¢page 110
20
5. Tab Navigation*¢ page 131
Map*
6. Tabb >
Sound ¢page 166
Audi connect* ¢page 121
Settings ¢page 166
a) This tab is only visible if at least o ne indicator light or
message is shown or if the correspon ding system is
sw i
tched on.
bl The contents of the tab depen d on the men u that was
used last.
® button I <11> I
- Switching tabs: press the I
left/right (for example, radio).
@IVIEWI button
-Switching views: press the IVIEWI button to
switch from the classic¢ page 19, fig. 5 to the
expanded ¢ page 19, fig. 6 view.
® buttonl2J
-Returning to functions at higher levels: press
the~ button.
@ 12] and 0 control buttons
-Opening the selection menu: press the left
control button.
-Opening the options menu: press the right
control button.
Q) Left thumbwheel
-Selecting a function in a menu/list: turn the
left thumbwheel to the desired function in a
menu or list (such as selecting a station, Lap
times*) .
-
Confirming a selection: press the left thumb
wheel (for example, confirm the station).
-Zooming in/out on the map: when a map is
displayed, turn the left thumbwheel up/down
to zoom in/out on the map.
Page 24 of 322
Downloaded from www.Manualslib.com manuals search engine Driver information system
©button l1<1<1l l1>1>1I
- Selecting the previous/next track or station :
press the ll
- Fast forwarding/rewinding audio files: press
and ho ld the li
loca tion
in the file is reached.
@button0
-Programmable steering wheel button -open
ing a function : press the@ button on th e mul
ti fu nct i
on steering wheel.
- Programmable steering wheel button -re
questing a function : hold dow n the@button.
- Programmable steering wheel button -chang
ing a function : select the first tab >Vehicle
settings > Steering wheel button assignment .
® button l~·"I
-Repeating the last voice guidance : press th e
l~""I button w hen route guidance is active .
-Changing the voice guidance volume: when
route guidance is active, turn the right thumb
wheel upward or dow nward during voice guid
ance.
Multifunction steering
wheel
Operating
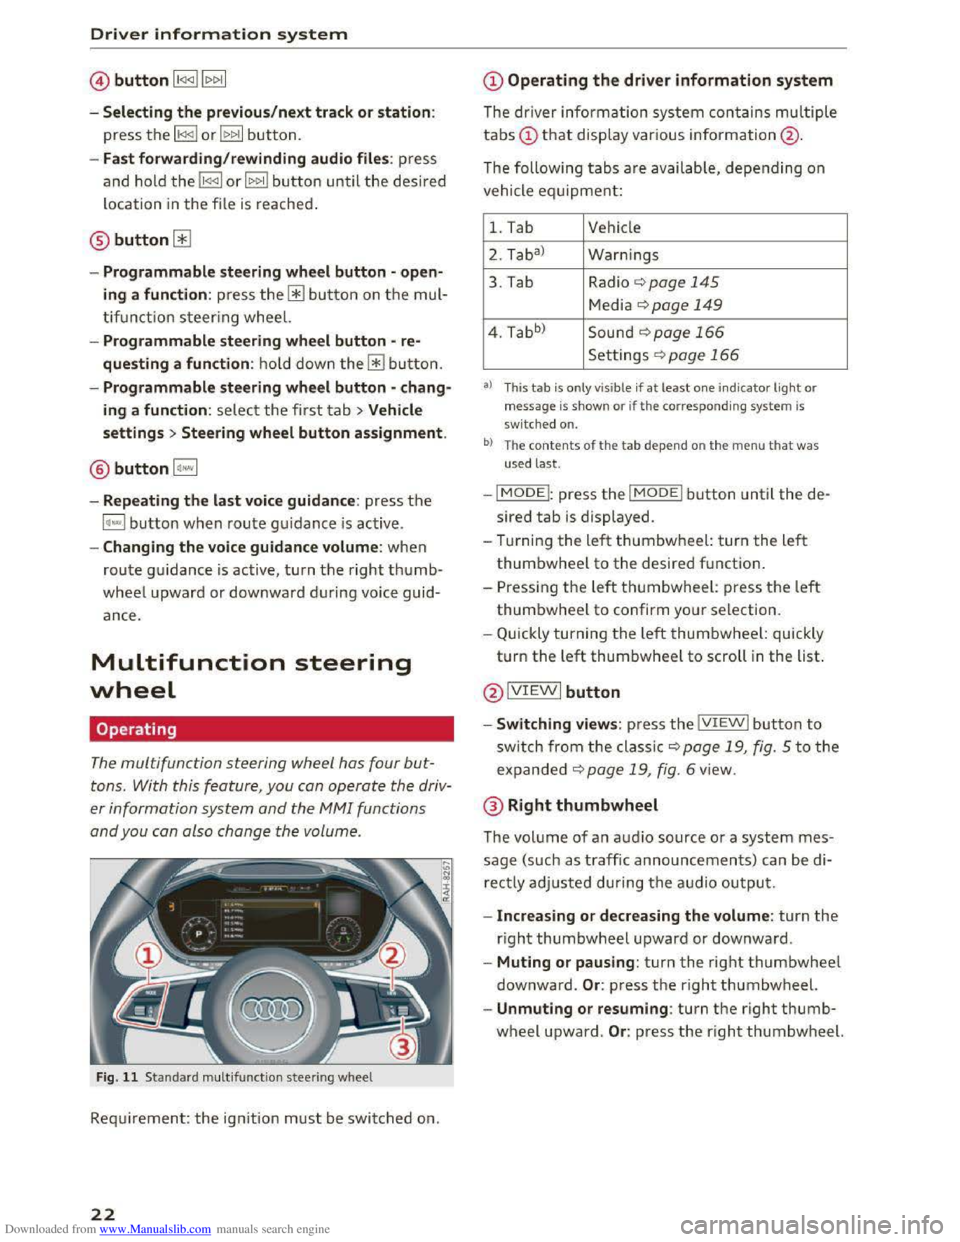
The multifunction steering wheel has four but
tons. With this feature , you can operate the driv
er information system and the M MI functions
and you can also change the volume .
Fig . 11 Standard multifu nction steering wheel
Requirement: the ign ition must be switched on.
22
@Operating the driver information system
The driver information system contains multiple
tabs(!) t h a t display various information@ .
The following t
abs are availab le, depending on
vehicle equipment:
1. Tab Vehicle
2. Taba )
W
arnings
3. Tab Radio 9page 145
Media ¢page 149
4. Tabb )
Sound ¢page 166
Settings r=.>page 166
a) This tab is only v is ible if at least o ne indicator ligh t or
message is show n or if th e c orresponding sys te m is
sw i
tched on.
b ) The co ntents of th e t ab depe nd on th e men u t hat was
u sed l
ast.
-IMODEI: press the I MODEi button until the de
sired tab is displayed.
- Tur ning
the left thumbwheel: turn the le ft
thumbwheel to the desired f unctio n.
-
Pressi ng the left t humbwh eel: press th e left
thumbwheel to confirm your selection.
- Q uick ly turning t he left thumbwheel: quickly
t u rn
the left thumbwheel to scroll in the list.
@ IVIEWI button
-Switching views: press the IVIEWI button to
sw itch from the cla ssic 9 page 19, fig. 5 to the
expanded 9 page 1 9, fig. 6 view .
@Right thumbwheel
The volume of an audi o source or a system mes
sage (such as traffic announcements) can be di
rectly adjusted during th e audio outpu t.
- Increasing or decreasing the volume : turn the
right thumbwheel upward or downwa rd .
- Muting or pausing: turn the right thumbwheel
downward. Or : press the right thum bwheel.
-Unmuting or resuming : turn the right thumb
wheel upward. Or: press the right thumbwh eel.
Page 29 of 322
Downloaded from www.Manualslib.com manuals search engine ..... N
G: CX)
.....
"' U"I
LED and batteries in the remote control key
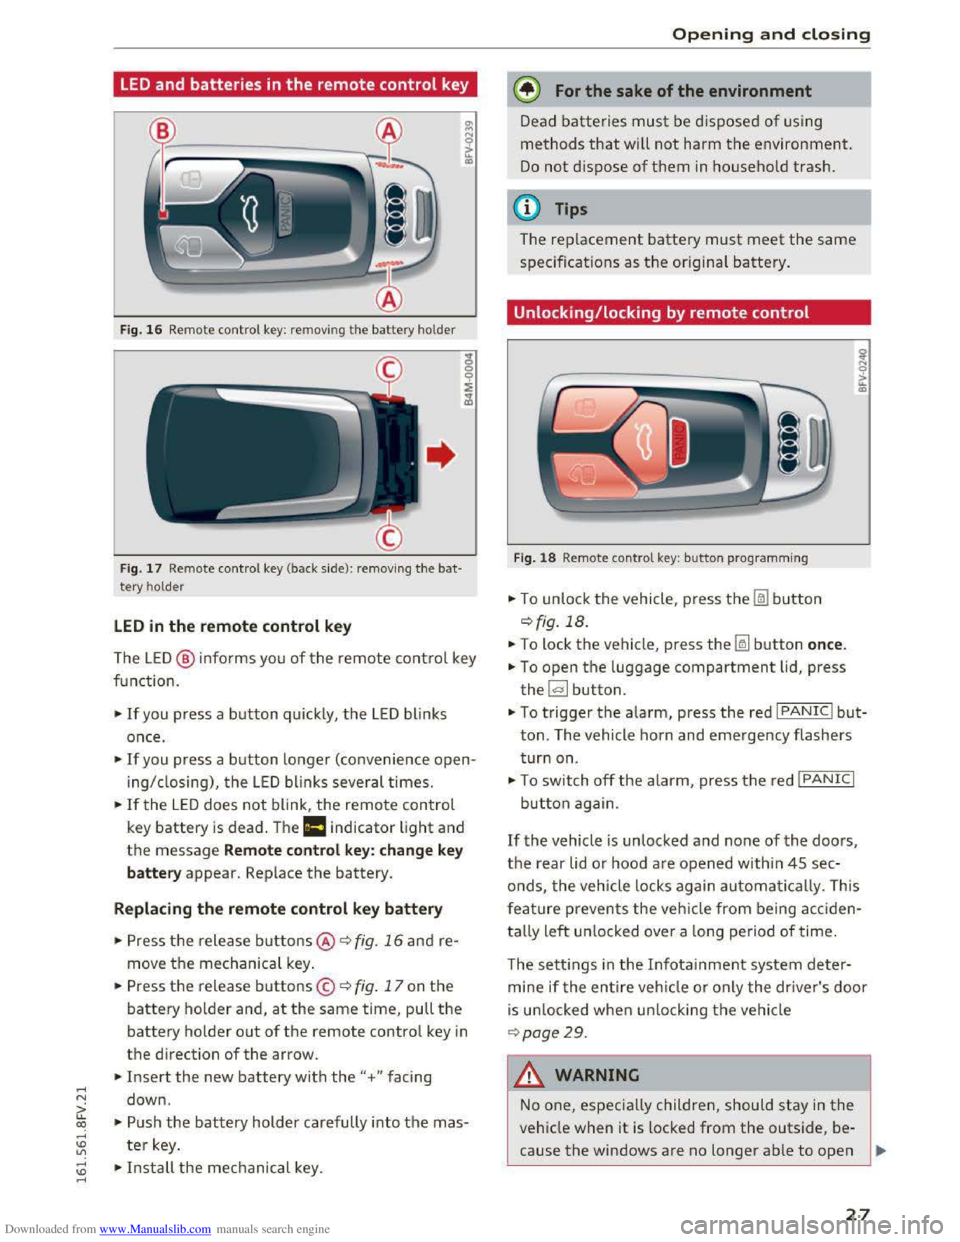
Fig. 16 Rem ote contro l key: rem ov ing the battery hol der
Fig. 17 Remote control key (back side ): remov ing the ba t
tery ho lder
LED in the remote control key
The LE D @ info rms you of the remote control key
function.
•If you press a button quick ly, the LED blinks
once .
• If you press a button longer (convenience open
ing/ closing), the LED blinks several times.
•If the LED does not blink, the remote control
key battery is dead . The Ill indicator light and
the message Remote control key: change key
battery appear. Replace the battery.
Replacing the remote control key battery
• Press the release buttons@ ¢ fig. 16 and re
move the mechanical key.
.. Press the release buttons© ¢ fig. 17 on the
battery holder and, at the same time, pull the
battery holder out of the remote contro l key in
the direction of the arrow .
.. Insert the new battery with the"+ " facing
down .
.. Push the battery holder carefully into the mas
ter key.
~ •Install the mechanical key . .....
Opening and closing
@) For the sake of the environment
Dead batteries must be disposed of using
methods that will not harm the environment.
Do not dispose of them in household trash.
@Tips
The replacement battery must meet the same
specificat ions as th e origina l battery.
Unlocking/locking by remote control
Fig. 18 Remote contro l key : button programming
.. To unlock the vehicle , press the Im button
¢ fig. 18.
.. To lock the vehicle, press the~ button once.
.. To open the luggage compartment lid, press
the~ button .
.. To trigger the alarm, press the red I PANIC I but
ton. The vehicle horn and emergency flashers
turn on.
•To switch off the alarm, press the red I PANIC I
button again .
If the vehicle is unlocked and none of the doors,
the rear lid or hood are opened within 45 sec
onds,
the veh icle locks again automatically. This
f
eature prevents the vehicle from being acciden
tally
left un locked over a long period of time.
T
he setti ngs in the Infota inment system deter
mine if the entire vehicle or only the driver's door
is un locked when un locking the vehicle
¢page 29.
A WARNING
--1
No one, especially children, should stay in the
vehicle when it is locked from the outside, be
cause the windows are no longer able to open
27
Page 31 of 322

Downloaded from www.Manualslib.com manuals search engine ..... N
G: CX)
.....
"' U"I
Central locking switch
Fig. 20 Driver's door: central loc king switch
... To lock the veh icle, press the@! button ¢,&. .
... Press the !ill button to unlock the veh icle .
When locking
the vehicle with the central locking
switch, the
following applies :
- Opening
the door and the lu ggage compart
ment lid from the outside is not possible (f or
sec urity such as when stopped
at a light) .
- The
LED in the central locking switch turns on
when all doors are closed and locked.
-
You can open the doors individually from the
inside
by pulling the door handle .
- In the event of a crash with airbag deployment,
the doors unlock automatically to allow access
to the vehicle .
.&. WARNING
-The power locking switch works with the ig
nition off and automatically locks the entire
vehicle when
the~ button is pressed .
- The centra l loc kin g switc h is inoperative
when
the veh icle is l ocked from the outside.
-
Locked doors make it more difficult for
eme rgency workers
to get into the veh icle,
whic h puts lives at risk. Do not leav e anyone
behi nd i n
the ve hicle , especially children.
@ Tips
Your vehicle locks a u
tomatically when it
reaches a speed of 9 mph (15 km/h) (Auto
Lock) q page 25. You can unlock the vehicle
ag
ain usi ng the [ill button in the ce ntral loc k
ing switch.
.....
"' l) This functio n is not availa ble in all countries . .....
Opening and closing
Setting the central locking system
In the Infotainment system, you can set which
doors the central locking system will unlock .
... Select in the Infotainment system: I MENU! but
ton> Vehicle> left control button >Vehicle set
tings .
Door unlocking
-you can decide if All doors or
only
the Driver door should unlock. The luggage
compartment
lid also unl ocks when All is select
ed. If you select Driver i n a vehicle with a conve n
ience key*, only the doo r whose handle you pull
will un
lock .
If you select Driver , all the doors and luggage
compartment
lid will unlock if you press the@l
button on the remote control key twice.
Fold mirrors * -if you select On, the exterior rear
view mirrors fold in automatically when you press
the l:ru button on the remo te contro l master key
or touch th e s ensor* in th e handle .
Lock when driving l) -if you select On, the vehi
cle locks automatically when driving. All of the
doo rs and the luggage compartment lid lock.
29
Page 33 of 322

Downloaded from www.Manualslib.com manuals search engine ..... N
G: CX)
.....
"' U"I
.....
"' .....
open when driving, which increases the risk
of an accident.
- Never drive with
the luggage compartment
lid ajar or open, because poisonous gases
can enter the vehicle interior and create the
risk of asphyxiation.
- Never leave your vehicle
unattended when
the luggage compartment lid is open. A
child could climb
into the vehicle through
the luggage compartment. If the luggage
compartment lid was then closed, the child
would be
trapped in the vehicle and unable
to escape. To reduce the risk of inju ry, do
not allow children to play in or around the
vehicle. Always keep the luggage compart
ment lid and the doors closed when the ve
hicle is
not in use.
- Always make sure no one is in the luggage
compartment lid's range of motion when it
is closing, especially near the hinges. Fin
gers or hands could be pinched.
@ Tips
-When the vehicle is locked, the luggage
compartment lid can be unlocked separately
by pressing the l.::::11 button on the remote
control key. When the luggage compart
ment lid is closed again, it locks automati
cally.
-
In case of an emergency or a faulty handle,
the luggage compartment lid can be opened
manually from the inside¢ page 31.
Opening and closing
Luggage compartment lid emergency
release
The luggage compartment lid can be released in
an emergency from
the inside.
Fig. 24 The emergency release is accessed on the left side
of
the luggage compartment underneath the rear w indow.
F ig.
25 Sect io n: inside of luggage compartment: emergen
cy re lease
.. Tilt the left rear seat backrest forward.
.,. Pry out the cover¢ fig. 24 using the mechanical
key
9 page 26.
.. Pull the plastic cord in the direction of the ar
row¢ fig. 25 .
31
Page 38 of 322
Downloaded from www.Manualslib.com manuals search engine Lights and Vision
Lights and Vision
Exterior Lighting
Switching lights on and off
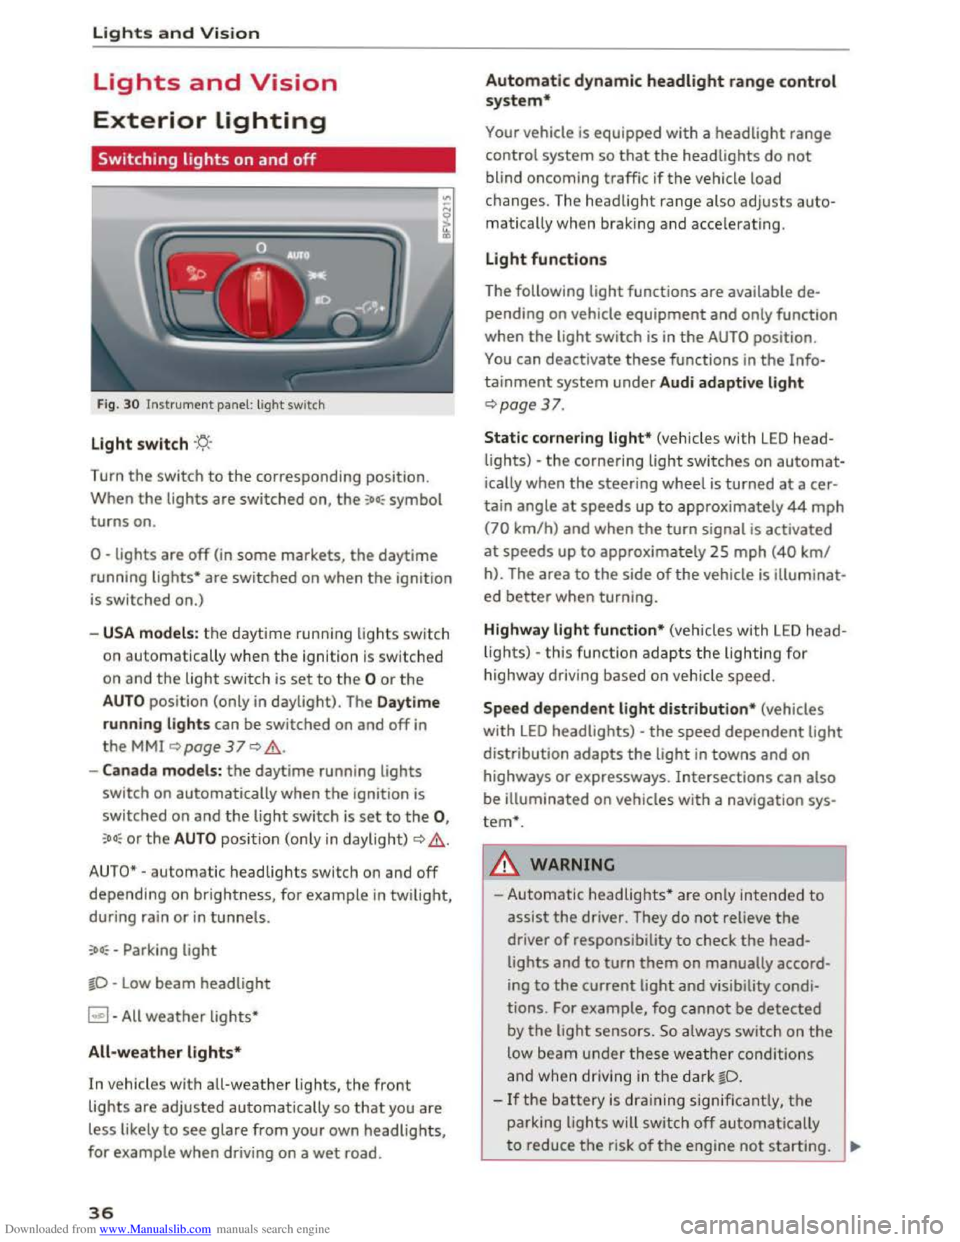
Fig. 30 Instrument panel: light switch
Light switch ·'t/;
Turn the switch to the corresponding position.
When
the lights are switched on, the :oo: symbol
turns on.
0 -lights are off (in some markets, the daytime
running
lights* are switched on when the ignition
is switched on.)
-USA models: the daytime running lights sw itch
on automatica
lly when the ignition is sw itched
on and
the light switch is set to the 0 or the
AUTO position (only in daylight). The Daytime
running lights
can be switched on and off in
the MMI ~page 37 Q &.
-Canada models: the daytime running lights
switch on automatically when the ignition is
switched on and the light switch is set to the 0,
:oo: or the AUTO position (only in daylight) QA .
AUTO* -automatic headlights switch on and off
depending on brightness, for example in twilight,
during rain
or in tunnels.
:oo: -Parking light
~D -Low beam headlight
~ -All weather lights*
All-weather lights*
In vehicles with all-weather lights, the front
lights are adjusted automatically so that you are
less likely
to see glare from your own headlights,
for example when driving on a wet road.
36
Automatic dynamic headlight range control
system*
Your vehicle is equipped with a headlight range
control system
so that the headlights do not
blind oncoming traffic if the vehicle load
changes. The headlight range also
adjusts auto
matically when braking and accelerating .
Light functions
The following light functions are available de
pending on vehicle equipment and only function
when the
light switch is in the AUTO position.
You can deactivate these functions in the Info
tainment system under Audi adaptive light
Qpage 37.
Static cornering light* (vehicles with LED head
lights) -the cornering light switches on automat
ically when the steeri ng wheel is turned at acer
tain angle at speeds up to approximately 44 mph
(70 km/h) and when the turn signal is activated
at speeds up to approxim ately 25 mph (40 km/
h). The area
to the side of the vehicle is illuminat
ed better when turning.
Highway light function* (vehicles with LED head
lights) -this function adapts the lighting for
highwa y driving based on vehicle speed.
Speed dependent light distribution* (vehicles
with LED headlights) -the speed dependent light
distribution adapts the light in towns and on
highways
or expressways. Intersections can also
be illuminated on vehicles
with a navigation sys
tem*.
A WARNING
- Automatic headlights * are only intended to
assist the driver. They do not reliev e the
driver
of responsibility to check the head
lights and to turn them on manually accord
ing to the current ligh t and visibility condi
tions. For example, fog cannot be detected
by
the light sensors . So always switch on the
low beam under these weather conditions
and when
driving in the dark ~D.
-If the battery is dra ining significantly, the
parking lights will switch off automatically
to reduce the risk of the engine not starting . ..,..
Page 39 of 322

Downloaded from www.Manualslib.com manuals search engine Always make sure your vehicle is parked and
adequately lit according to the laws. Avoid
using
the parking lights for several hours.
Switch
on the right or left parking light if
possible.
-
Please observe legal regulations when using
the lighting systems described.
Tips
-The light sensor for the automatic head
lights*
is in the rearview mirror mount.
Therefore, do not place any stickers in this
area on the w indshield.
-
Some functions of the exterior lighting can
be
adjusted ~page 3 7.
-
If yo u turn off the ign ition whil e the exterior
lights are on and open the door, you will
hear a warning tone.
- In some markets, the tail lights will switch
on when the daytime running lights switch
on.
- In cool
or damp weather, the inside of the
headlights, turn signals and tail lights can
fog over due to the temperature difference
between the inside and outside. They will
clear shortly after switching them on. This
does not affect the service life of the light
ing.
Turn signal and high beam lever
The lever operates the turn signals, the high
beoms
and the headlight flasher.
@
,
I
@
Fig. 31 Turn signal and high beam lever
"' 0 0
a'.: CXl
Lights and Vision
Turn signals¢ Q
The turn signals activate when you move the lev
er into a turn signal position when the ignition is
switched on.
@-right turn signal
@
-left turn signal
The turn signal blinks three times if you tap the
lever (convenience turn signal).
High beams and headlight flasher §D
Move the lever to the corresponding position:
®-high beams on
@-high beams off or headlight flasher
The . indicator light in the instrument cluster
turns on.
A WARNING
High beams can cause glare for other drivers,
which increases
the risk of an accident. For
this reason, only use the high beams or the
headlight flasher when they will not create
glare for other drivers.
Adjusting the exterior lighting
The functions are adjusted in the Infotainment
system .
... Select in the Infotainment system: IMENUI but
ton> Vehicle > left control button >V ehicle set
tings > Exterior lighting.
Automatic headlights
You can adjust the following settings in the Au
tomatic headlights
menu:
Activation time -you can adjust ifthe headlights
switch on Early, Medium or Late according to the
sensitivity of the light sensor.
Audi adapti ve light* -you can switch adaptive
light On and Off.
Daytime running lights*
USA models : the daytime running lights can be
switched on or off using the MMI. Select On or
Off. ....
37
Page 42 of 322

Downloaded from www.Manualslib.com manuals search engine Lights and Vision
Dimming the mirrors
Fig. 36 Automatic dimming rearview mirror•
Manual dimming rearview mirror
,...
-0
~ ID
... Pull the lever on the bottom of the mirror back.
Automatic
dimming rearview mirror*
... Press t h e button@ C) fig . 36. The ind icator
light @turns on. Interior and exterior mir rors*
will dim wh
en there is in com ing light (such as
headlights from the rear) .
A WARNING
Electro l
yte fluid can leak from automatic dim
m ing mirrors ifthe glass is broken . Electro
lyte fluid can
irritate skin, eyes and airways.
-
Repeated or long-term exposure to electr o-
lyte fluid can lead
to irritation of the air
ways, especially in people with asthma or
oth e r respiratory co ndi tions. T ak e deep
breaths immediately after leaving the vehi
cle or, if this is not possible, open all of th e
doors
and win dows as wide as possible .
-If electrolyte f luid enters the eyes, flush
t h
em thoroughly with a la rge amount of
clean wa ter for at least 1 5 mi nutes and t hen
seek medical attention.
- If e lectrolyte fluid comes into conta ct w ith
th e skin , flush the affected a rea with clean
water for at least 15 minutes and then clean
with
soap and water and seek medica l at
tention. Clean affected clothing and shoes
thoroughly befo re wearing again .
-
If the fluid was swallowe d and the person is
conscious, flush the mouth with water for at
least 15 m inutes. Do not induce vomiting
unless this is recommended by medical pro-
40
fessiona ls . Seek medical attention immedi
ately.
CD Note
I f t he
glass on an a utomatic dimming mirro r
b reaks,
electrolyte can leak out. T his liquid
damages plastic surfaces. Remove th e liquid
as quickly as possible, for example us ing a
wet sponge.
(!}Tips
-If the light reaching the rearview mirror is
obstructed, the automatic dimming mirror
w ill not function correctly,
- The
automatic dimming m irrors do not dim
when the interio r lighting is turned on or
th e reverse gear is selected .
Sun visors
Fig. 37 S un sh ade
The sun visors can be moved out of their brackets
and turned toward the doors C>fig. 37@ . The
mirror light switches on when the cover over the
vanity mirror@ opens .