AUDI TT COUPE 2017 Owner's Guide
Manufacturer: AUDI, Model Year: 2017, Model line: TT COUPE, Model: AUDI TT COUPE 2017Pages: 322, PDF Size: 79.73 MB
Page 31 of 322
CD
CD
.... N
" N .... 0
0
Ill co
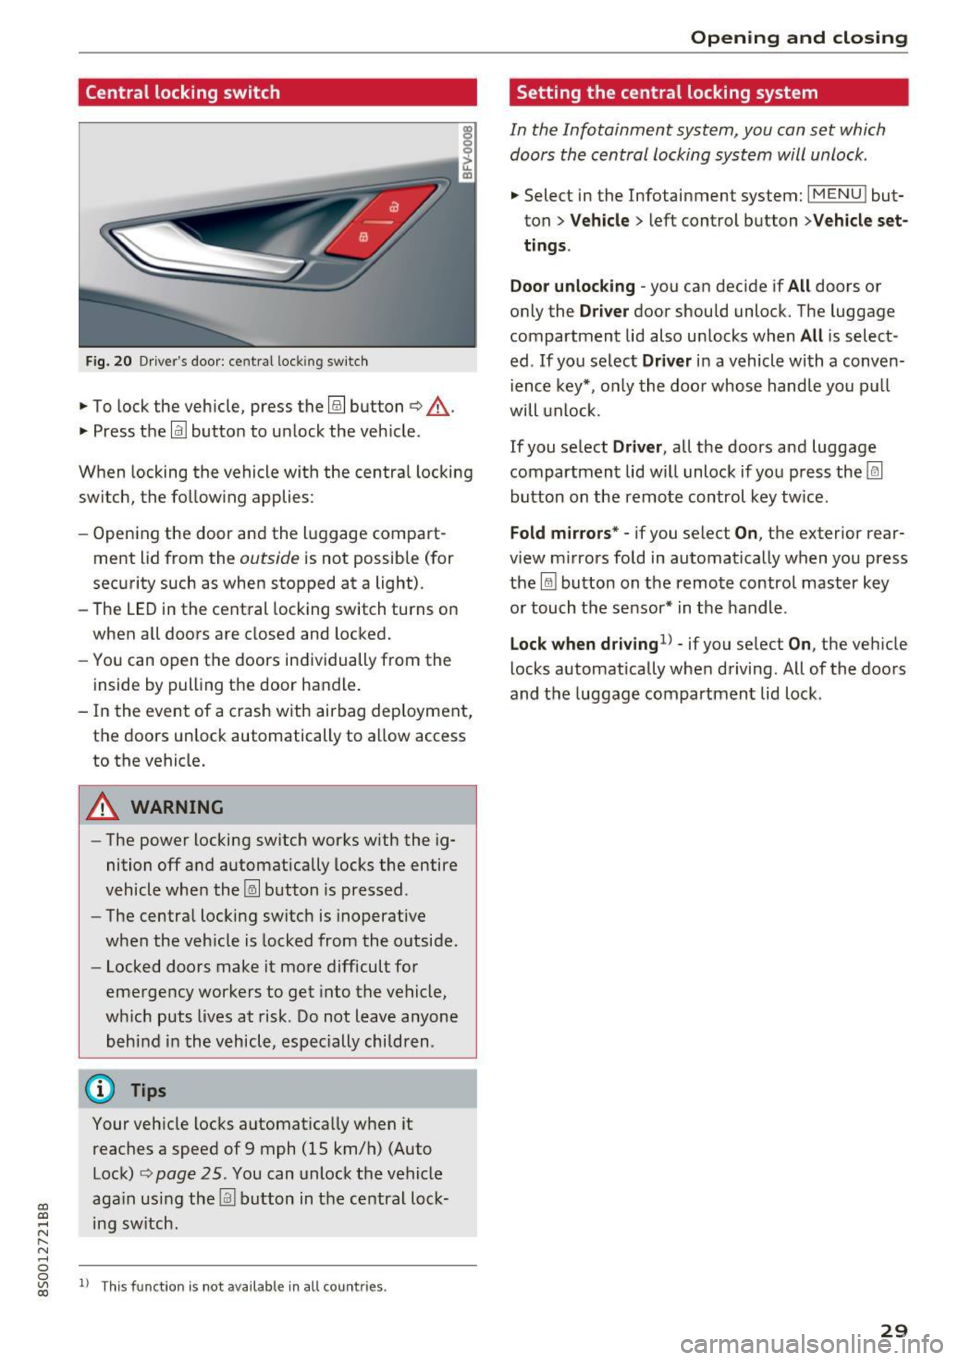
Central locking switch
Fig. 20 Dr ive r's door: cent ral loc king sw itch
.,. To lock the veh icle, press the@! button ¢,&. .
.,. Press the
!ill button to u nlock the veh icle.
When locking the vehicle with the centra l locking
switch, the fo llowing applies :
- Opening the door and the l uggage compart
ment lid from the
outside is not possible (for
sec urity such as when stopped at a light) .
- The LED in the central locking switch turns on
when a ll doors are closed and locked.
- You can open the doors in dividually from the
inside by pulling the door ha ndle .
- In the event of a crash with airbag dep loyment,
the doors un lock automatically to a llow access
to the vehicle.
A WARNING
- The power locking sw itch works w ith the ig
nition off a nd automatically locks the entire
vehicle whe n the ~ button is pressed .
- The centra l loc kin g switc h is inoperative
when the veh icle is locked from the o utside.
- Locked doors make it more difficult for
eme rgency worke rs to get into the ve hicle,
wh ic h puts lives at risk. Do not leav e anyone
behind i n the v ehicle , especially chi ldren .
@ Tips
Your veh icle loc ks a utomat ica lly w hen it
reaches a speed of 9 mph (15 km/h) (Auto Lock)
q page 25 . You can unlock the vehicle
ag ain usi ng the
llil bu tton in the ce ntral loc k
ing sw itch .
ll T hi s fun ctio n is not a vail able in all c oun tries.
Open ing and closing
Setting the central locking system
In the Infotainment system , you con set which
doors the central locking system will unlock .
.,. Select in the Infotainment system: I MENU ! but
ton>
Vehicle > left control button >Vehicle set
ting s.
Door unlocking
-you can decide if All doors o r
only the
Driver door shou ld unlock. T he luggage
compartment lid also un locks when
All is select
ed . If you se lect
Driver i n a vehicle wi th a conve n
i ence key*, o nly the doo r whose handle you p ull
will unlock .
If you se lect
Driver , all the doors and luggage
compartment lid w il l unlock if yo u press the@l
button on the remote control key tw ice.
Fold m irrors* -if you select On , the exterior rear
view m irrors fo ld in automatically when you press
the
lru bu tton on the remo te contro l master key
o r touch t he s ensor* in t he handle .
Lock when dr iving1l -if you se lect On, the veh icle
locks a utomatically whe n driving. All of the doors
and the luggage compartmen t lid lock .
29
Page 32 of 322
Opening and clo sin g
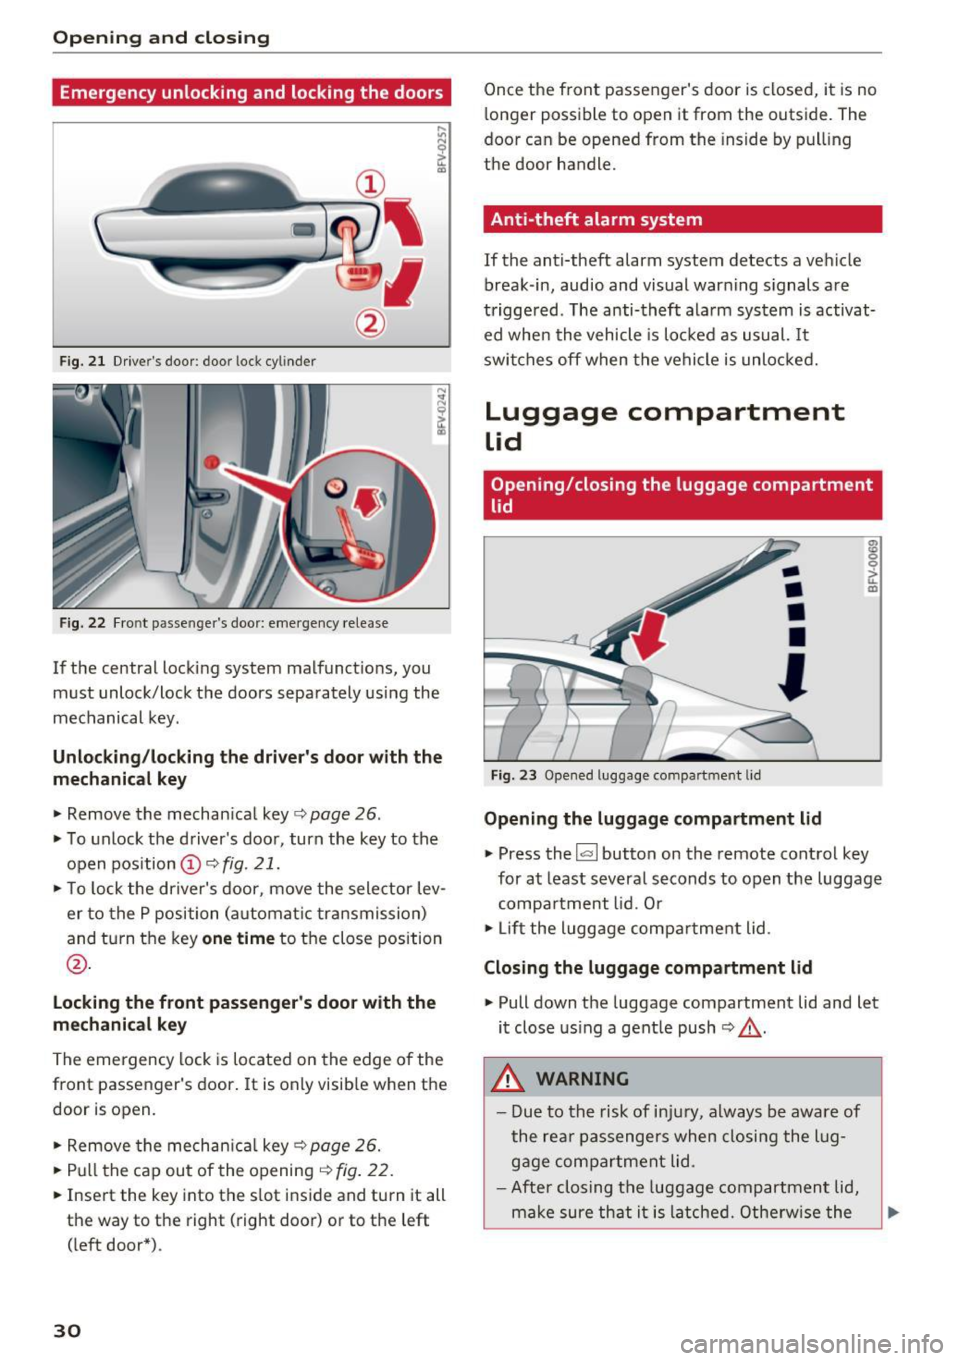
Emergency unlocking and locking the doors
----
F ig. 2 1 Drive r's door : door lock cy linder
F ig. 22 Fr ont p asse nge r's door: eme rgency release
If the central locking system malfunct ions, you
must unlock/lock the doors separately using the
mechanical key .
Unlocking /locking the dri ver's door with the
mechanic al key
• Remove the mechan ical key ¢ page 26.
• To unlock the driver's door, turn the key to the
open position @¢
fig. 21.
• To lock the dr iver's door, move the selector lev
er to the P position (automat ic transmission)
and turn the key
one time to the close position
@ .
Locking the front passenger's door with the
me chanic al key
The emergency lock is located on the edge of the
front passenger 's door.
It is only visible when the
door is open.
• Remove the mechan ica l key ¢
page 26.
• Pull the cap out of the opening¢ fig. 22.
• Inse rt the key into the slot inside and turn it all
th e way to the right (right door) or to the left
( left door*) .
30
Once the front passenger's door is closed, it is no
longer possible to open it from the outside. The
door can be opened from the inside by pul ling
the door handle.
Anti-theft alarm system
If the anti-theft alarm system detects a vehicle
break -in, audio and visual warn ing s ignals are
triggered . The anti-theft alarm system is activat
ed whe n the vehicle is locked as usual. It
switches off when the vehicle is unlocked.
Luggage compartment
lid
Opening/closing the luggage compartment
lid
F ig. 23 Opened luggage compa rtmen t lid
-
•
•
•
'
Opening the luggage compartment lid
m 0 0
~ m
• Press the l<.::< I button on the remote control key
for at least several seconds to open the luggage compa rtment lid . O r
• Lift the luggage compa rtment lid .
Closing the luggage compartment lid
• Pull down the luggage compartment lid and let
it close us ing a gent le push ¢.&, .
.&_ WARNING
-Due to the risk of in ju ry, a lways be aware of
the re ar passengers when closi ng the lug
gage compartment lid .
- After closing the luggage compartment lid,
make sure that it is latche d. Othe rw ise the
Page 33 of 322
CD
CD
.... N
" N ,....,
0
0
Ill co
luggage compartment lid could open sud
denly when driving, which increases the risk
of an accident.
- Never drive with the luggage compartment
lid ajar or open, because poisonous gases
can enter the vehicle interior and create the
risk of asphyxiation.
- Never leave your vehicle unattended when
the luggage compartment lid is open. A
child could climb into the vehicle through
the luggage compartment. If the luggage
compartment lid was then closed, the child
would be trapped in the vehicle and unable
to escape. To reduce the risk of injury, do
not allow children to play in or around the
vehicle. Always keep the luggage compart
ment lid and the doors closed when the ve
hicle is not in use.
- Always make sure no one is in the luggage
compartment lid's range of motion when it
is closing, especially near the hinges. Fin
gers or hands could be pinched.
@ Tips
- When the vehicle is locked, the luggage
compartment lid can be unlocked separately
by pressing the~ button on the remote
control key. The luggage compartment lid
locks automatically when it is closed again.
- In case of an emergency or a faulty handle,
the luggage compartment lid can be opened
manually from the inside¢
page 31.
Opening and closing
Luggage compartment lid emergency
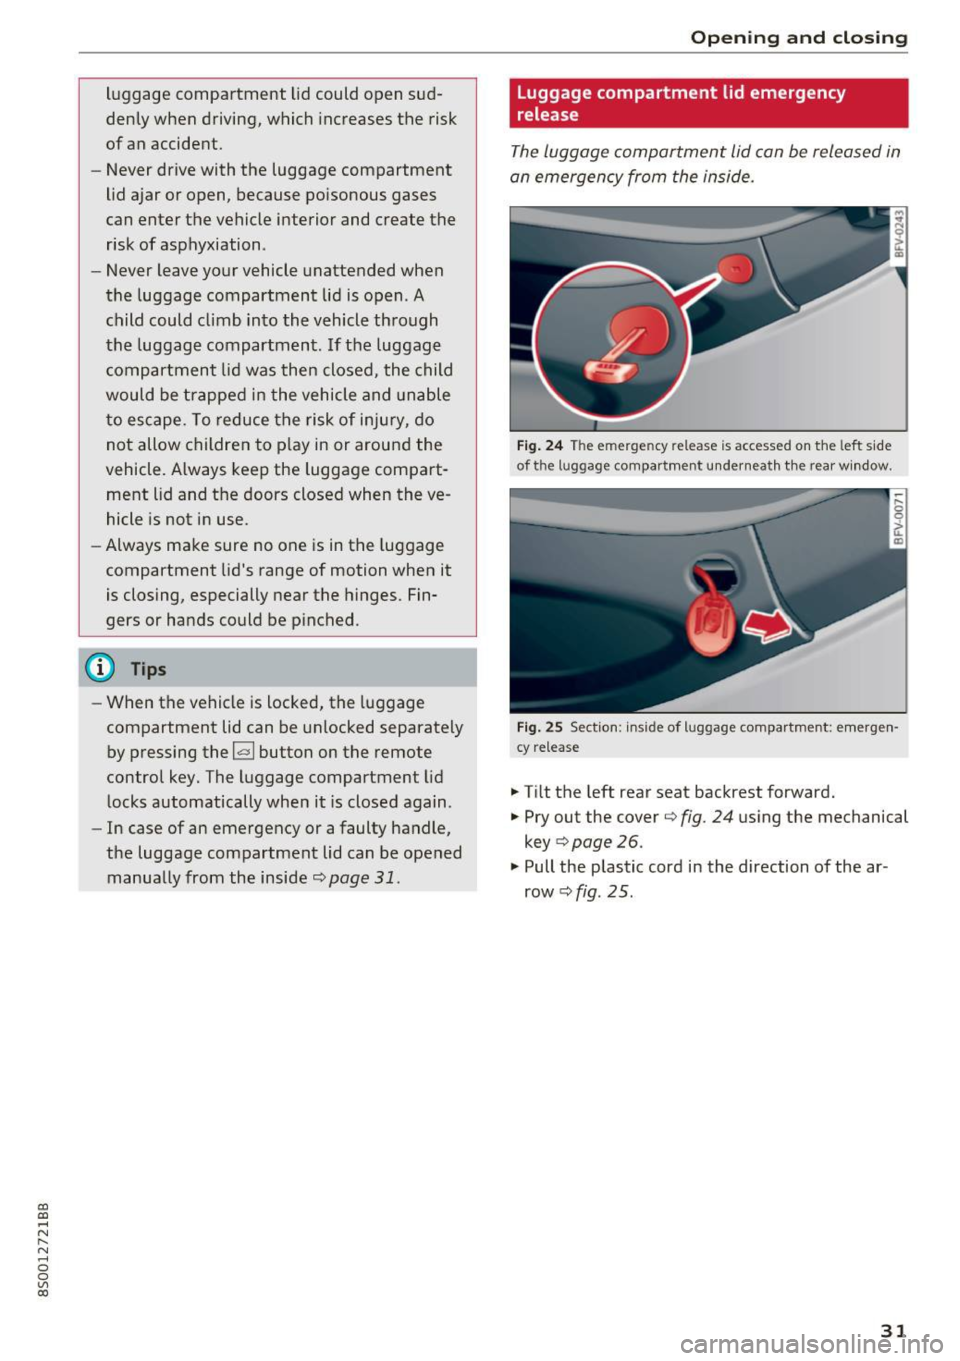
release
The luggage compartment lid can be released in
an emergency from the inside.
Fig. 24 The emergency release is accessed on the left side
of the luggage compartment underneath the rear window.
Fig. 25 Section: inside of luggage compartment: emergen
cy release
.. Tilt the left rear seat backrest forward.
• Pry out the cover¢
fig. 24 using the mechanical
key
9 page 26.
.. Pull the plastic cord in the direction of the ar
row¢
fig. 25.
31
Page 34 of 322

Opening and closing
Power window
Controls
The driver can control all power windows.
Fig. 26 Driver's door: power w indow controls
All power window sw itches have a two-stage
function:
Opening and closing the windows
N
N
M 0 ::':, (X) m
"'To open or close the w indow completely, press
the switch down or pu ll the switch up br iefly to
the second level. The operation will stop if the
switch is pressed/p ulled aga in.
.. To se lect a position in between opened and
closed, press/pull the switch to the first level
until the desired window position is reached.
Power window switches
(D Left doo r
@ Right door
A WARNING
- Pay careful attention when closing the win
dows. Pinching could cause serious injur ies.
- When locking the vehicle from outside, the
vehicle must be unoccupied since the win dows can no longer be opened in an emer
gency .
(D Tips
- You can still open and close the windows for
approximately 10 minutes after turning the i gnition
off. The power windows do not
switch
off until the driver's door or front
passenger's door has been opened.
- When you open the doors, the w indows au
tomatically lower approximately 10 mm.
32
· Convenience opening/closing
All windows can be opened and closed at the
same time.
Convenience opening feature
.. Press the~ button on the remote control key
until all windows reach the desired position.
Convenience closing feature
.. Press the (TI button on the remote control key
until a ll windows are closed~&. or
Convenience closing with the convenience
key*
.. Touch the sensor* on the door handle long
enough until all windows are closed . Do not
place your hand in the door handle when doing
this.
Setting convenience opening in the
Infotainment system
.. Select in the Infotainment system : IMENU! but
ton
>Ve hicle > left control button >V ehicle set
t in gs .
To enable the convenience window opening func
tion, the
Long press to open windows function
must be switched
on .
A WARNING
-Never close the w indows carelessly or in an
uncontrolled manner, because this increas
es the risk of injury.
- For security reasons, the windows can only
be opened and closed with the remote con
trol key at a maximum distance of approx i
mate ly 6 ft (2 m) away from the vehicle.
When pressing the~ button, always watch
the windows while they are closing so that
no one is pinched in the window. The closing
process will stop immediately when the~
button is released.
Page 35 of 322
CD
CD
.... N
" N ...... 0
0
Ill co
Correcting power window malfunctions
You can reactivate the one-touch up/down func
tion if it malfunctions.
~ Pull the power window switch up until the win
dow is completely raised.
~ Release the switch and pull it up again for at
least one second .
Garage door opener
(Homelink)
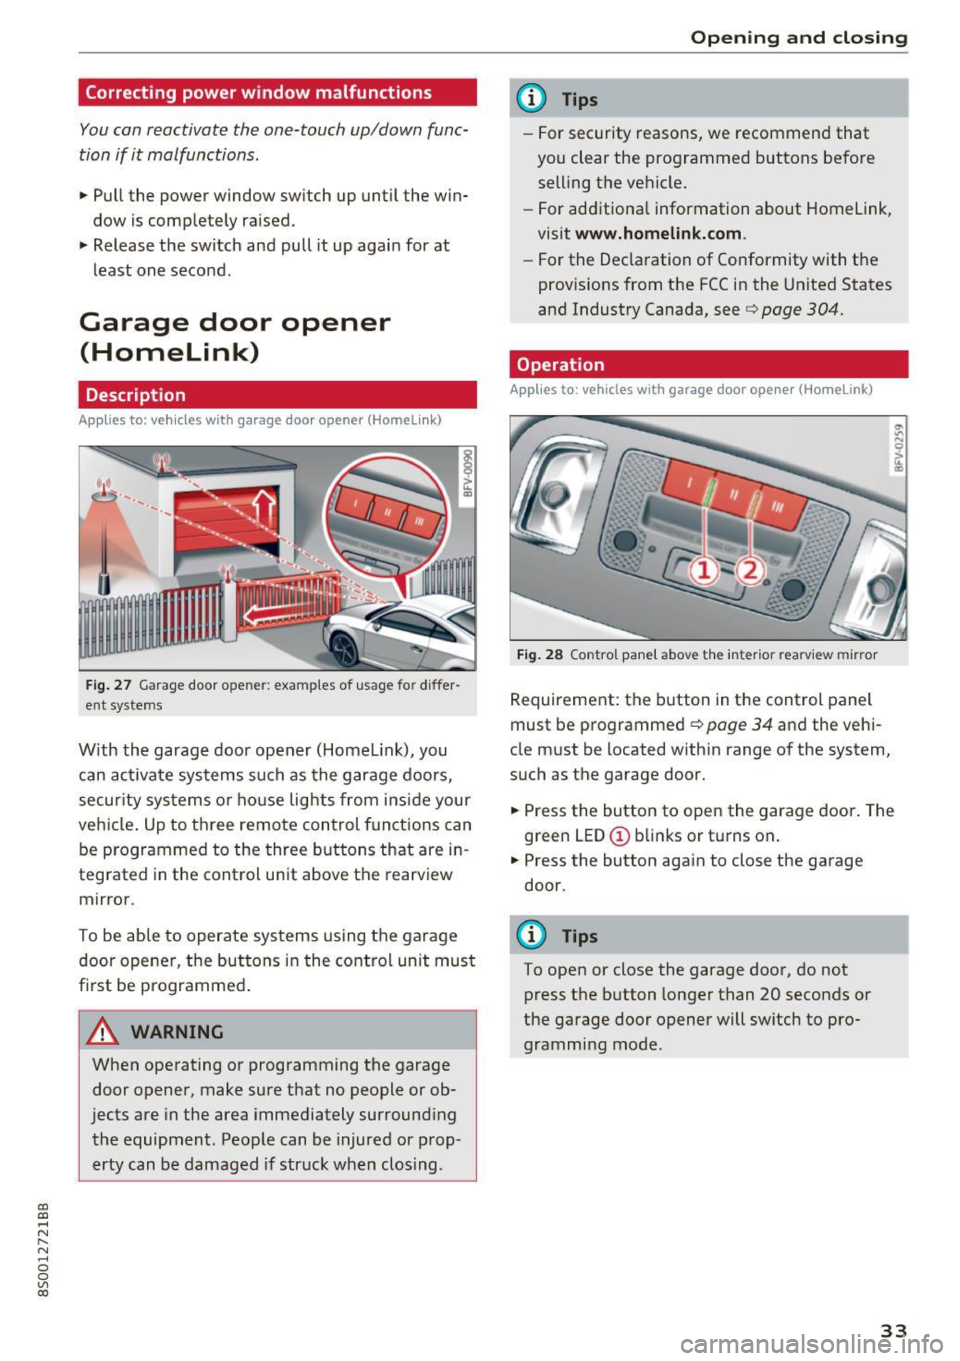
Description
Applies to: vehicles with garage door opener (Homelink)
Fig. 27 Garage door o pen er: examples of usage for differ
ent sy stems
With the garage door opener (Homelink), you
can act ivate systems such as the garage doors,
security systems or house lights from inside your
vehicle. Up to three remote control functions can
be programmed to the three buttons that are in
tegrated in the control unit above the rearview
mirror.
To be able to operate systems using the garage door opener, the buttons in the control unit must
first be programmed .
A WARNING
When operating or programming the garage
door opener, make sure that no people or ob
jects are in the area immediately surrounding
the equipment . People can be injured or prop
erty can be damaged if struck when closing.
Open ing and closing
(D Tips
-For security reasons, we recommend that
you clear the programmed buttons before selling the vehicle.
- For add itiona l information about Homelink,
visit
www.homelink.com.
- For the Declaration of Conformity with the
provisions from the FCC in the United States
and Industry Canada, see ¢
page 304.
Operation
Applies to: vehicles with garage door opener (Home Link)
Fig. 28 Control pane l above the interior rearview mirror
Requirement: the button in the control panel
must be programmed ¢
page 34 and the vehi
cle must be located within range of the system,
such as the garage door.
~ Press the button to open the garage door. The
green LED(!) blinks or turns on.
~ Press the button again to close the garage
door.
(D Tips
To open or close the garage door, do not press the button longer than 20 seconds or
the garage door opener will switch to pro
gramming mode .
33
Page 36 of 322
Opening and closing
Programming the transmitter
Applies to: vehicles with garage door opener (Homelink)
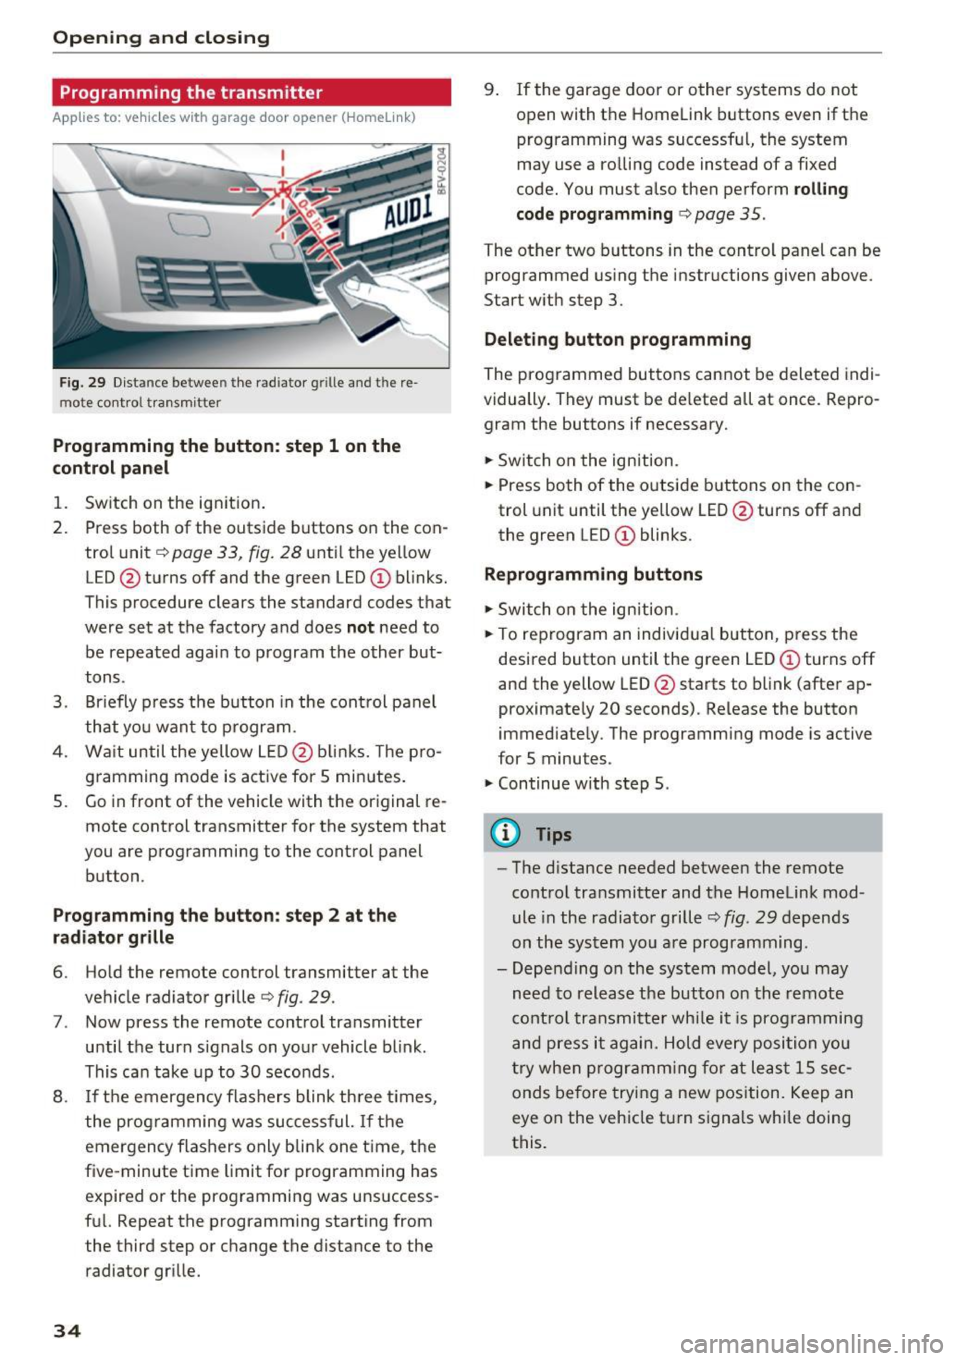
Fig. 29 Distance between t he rad iator grille and the re
mote control transmitter
Programming the button : step 1 on the
control panel
1. Switch on the ignit ion.
2. Press both of the outside buttons on the con
trol unit¢
page 33, fig. 28 until the yellow
LED @turns off and the green LED@ blinks.
This procedure clears the standard codes that
were set at the factory and does
not need to
be repeated again to program the other but
tons.
3. Briefly press the button in the control panel
that you want to program.
4. Wait until the yellow LED@blinks. The pro
gramming mode is active for 5 minutes.
5. Go in front of the vehicle with the original re
mote control transmitter for the system that
you are programming to the control panel
button.
Programming the button: step 2 at the
radiator grille
6. Ho ld the remote control transmitter at the
vehicle radiator grille¢
fig. 29.
7. Now press the remote control transmitter
until the turn signals on your vehicle blink.
This can take up to 30 seconds.
8. If the emergency flashers blink three times,
the programming was successful.
If the
emergency flashers only b link one t ime, the
five-minute time limit for programming has
expired or the programming was unsuccess
ful. Repeat the programming starting from
the third step or change the distance to the
radiator grille.
34
9. If the garage door or other systems do not
open with the Homelink buttons even if the
programming was successfu l, the system
may use a rolling code instead of a fixed
code. You must also then perform
rolling
code programming
c:, page 35.
The other two buttons in the control panel can be
programmed using the instructions given above.
Start with step 3.
Deleting button programming
The programmed buttons cannot be deleted indi
vidually. They must be deleted all at once. Repro
gram the buttons if necessary.
.,.. Switch on the ign ition.
.,.. Press both of the outside buttons on the con
trol unit until the yellow LED @turns off and
the green LED(!) blinks .
Reprogramm ing buttons
.,.. Switch on the ignition .
.,.. To reprogram an individual button, press the
desired button until the green LED @turns off
and the yellow LED@starts to blink (after ap
proximately 20 seconds). Release the button
immediately. The programming mode is active
for 5 minutes.
.,.. Continue with step 5.
(D Tips
- The distance needed between the remote
control transmitter and the Homelink mod
ule in the radiator grille
¢fig. 29 depends
on the system you are programming.
- Depending on the system model, you may
need to release the button on the remote
control transmitter while it is programming
and press it again . Hold every position you
try when programming for at least 15 sec
onds before trying a new position. Keep an
eye on the vehicle turn signals while doing
this.
Page 37 of 322
co
co
.... N
" N .... 0
0
Vl c:o
Rolling code programming
Appl ies to: ve hicles with garage door opener (Homeli nk)
On some systems, programming a rolling code is
also necessary .
Identifying a rolling code
~ Press the button in the control un it that is al
ready programmed again and hold it down.
~ Watch the green LED@¢ page 33, fig. 28. If
the green
LED blinks quickly, the system (such
as a garage door) has a rolling code .
~ Program the rolling code as follows:
Activating the system motor unit
~ Locate the programming button on the system
motor unit. The exact locat ion and color of the
button may vary depend ing on the system man
ufacture r's brand .
~ Press the programming button on the system
motor unit (usually th is w ill activate a "display"
on the motor unit). You now have approximate
ly 30 seconds to program the button in the
contro l pane l.
Programming the button in the control
panel
~ Press the previously programmed button in the
contro l pane l for 2 seconds.
~ To complete ro lling code programming, press
the button again for 2 seconds.
~ On some systems, the button m ight need to be
pressed a third time to end the programming
procedure .
After programming, the system should recognize
the signal and operate when the button in the
control panel is pressed . Now you may program
the other buttons as needed .
(D Tips
- The rolling code can be programmed more
quickly and more easily with the help of a
second person .
- If any diff icu lties occur when programming
the rolling code, it may be helpful to read
the system operating manual.
Opening and closing
35
Page 38 of 322

Lights and Vision
Lights and Vision
Exterior lighting
Switching lights on and off
Fig. 30 Instrument panel: l ight sw itch
Li ght switch ·~ -
I
Tu rn the switch to the corresponding position.
When the lights are switched on, the
;oo: symbo l
turns on .
0 -lights are off (in some markets, the daytime
running lights* are switched on when the ignition
is switched on.)
- USA models : the daytime running lights switch
on automatically when the ignition is switched on and the light switch is set to the
O or the
AUTO position (only in daylight). The D ayt ime
runn ing lights
can be switched on and off in
the MMI
c:;, page 37c:;, &..
-Ca nad a model s: the daytime running lights
switch on automatically when the ignition is
switched on and the light switch is set to the
0 ,
::oo: or the AUTO position (only in daylight) c:;, &. .
AUTO* - automatic headlights switch on and off
depending on br ightness, for example in twilight,
during ra in or in tunnels.
;oo: -Parking lights
io -Low beam headlights
l~"' I -All-wea ther lights*
@il -Rear fog light(s)
All-weather light s*
In vehicles with all-weathe r lights, the front
lights are adjusted automatically so that you are
36
l ess likely to see g lare from your own head lights,
for example when driving on a wet road.
Automatic dynamic headlight range control
system*
You r vehicle is equipped with a headlight range
contro l system so that there is less g lare for on
coming t raffic if the vehicle load changes. The
headlight range also adjusts automatically when
braking and accelerat ing.
Light functions
The following light funct ions may be avai lable
depending on ve hicle equ ipment and only f unc
tion when the light switch is in the AUTO posi
tion.
Static cornering light* (vehicles with LED head
li ghts) -the cornering light switches on automat
ica lly when the steer ing whee l is turned at acer
ta in angle at speeds up to approximate ly 44 mph
(70 km/h) and when the turn s ignal is activated
at speeds up to approximately 25 mph (40 km/ h) . The area to the side of the vehicle is illum inat
ed bette r when turn ing.
H ighway light fun ction * (vehicles with LED head
lights) - this function adapts the lighting for
highway driv ing based on veh icle speed .
Speed dependent light distributio n* (vehicles
with LED headlights) -the speed dependent light
distribution adapts the light in towns a nd on
highways or expressways . Intersections can a lso
be illumina ted on veh icles w ith a navigation sys
tem*.
& WARNING
- Autom atic headlig hts* are o nly inten ded to
assist the driver. They do not relieve the
driver of responsi bility to check the head
lights and to t urn them on manually based
on the current light and vis ibility conditions.
For examp le, fog cannot be detected by the
light sensors. So always switch o n the low
beam under these weather condit ions and
when dr iv ing in the da rk
io.
- The rear fog lights should only be turned on
in acco rdance w it h traffic regulations, to
prevent glare for traffic behind your vehicle . ..,.
Page 39 of 322

CD
CD
.... N
" N ...... 0
0
Ill co
-If the battery has been discharging for a
wh ile, the parking light may sw itch off auto
matically. Always make sure your vehicle is
parked and adequately lit according to the
laws . Avo id using the parking lights for sev
eral hours.
- Always observe legal regulations when us
ing the light ing systems described.
(D Tips
- The light sensor for the automatic head
lights* is in the rearview mirror mount. Do
not place any stickers in th is area on the
windsh ield.
- Some exterior lighting functions can be ad
justed
Qpage 37.
-If you turn off the ignition wh ile the exterior
lights are on and open the door, a warning
tone so unds .
- In some markets, the ta il lights will sw itch
on when the dayt ime run ning lights switch
on.
- In cool or damp weather, the inside of the
headlights, turn signals and tail lights can
fog over due to the temperature difference
between the inside and outs ide. They will
clear short ly after switching them on. This
does not affect the service life of the light
ing.
Turn signal and high beam lever
The Lever operates the turn signals, the high
beams and the headlight flasher.
@
,
t
@
F ig. 31 Turn signal and high bea m lever
N
5 0
~ a:,
Lights and V ision
Turn signals ¢ 9
The turn signa ls act ivate when yo u move the lev
er into a turn signal position when the ignition is
switched on.
(D -rig ht tu rn signal
@ -left turn signal
The turn signa l blinks three times if you tap the
lever (convenience turn signa l).
High beams and headlight flasher
~D
Move the lever to the corresponding position:
@ -high beams on
@-high beams off or headlight flasher
T he
II indicator light in the instrument cluster
turns on.
A WARNING
= H igh beams can cause glare for other drivers,
which increases the risk of an accident. For
this reason, only use the high beams or the
headlight flasher when they will not create
g lare for other dr ivers.
Adjusting the exterior lighting
The functions are adjusted in the Infotainment
system .
.,. Select in the Infotainment system: I MENU ! but
ton> Vehicle > left control button >Vehicle set
tings > Exterior lighting .
Automatic headlights
You can adjust the following settings in the Au
tomatic headlights menu:
Activation time -you can adjust if the headlights
switch on Early, Medium or Late according to the
sensit ivity of the light sensor.
Audi adaptive light * -you can sw itch adaptive
light
On and Off .
Daytime running lights*
USA models: the daytime running lights can be
switched on or off using the MM I. Select
On or
Off .
37
Page 40 of 322
Lights and Vision
Canada models : this function cannot be switched
off . They activate automatica lly each time the ig
n ition is switched on . T his menu item is shown
with a "gray background".
Com ing home , Lea ving home
The com ing home function illum ina tes the area
outside the vehicle when you turn the ignition off
and open the driver 's door . To switch o n the func
tion, select
Entry /ex it lighting .
The leav ing home ill umin ates t he a re a out side
the vehicle when you unlock the vehicle . To
switch on the function, select
Entr y/exi t light
ing .
The com ing home and leaving home f unctions
only operate when it is dark and the lig ht switch
is in the
AU TO position.
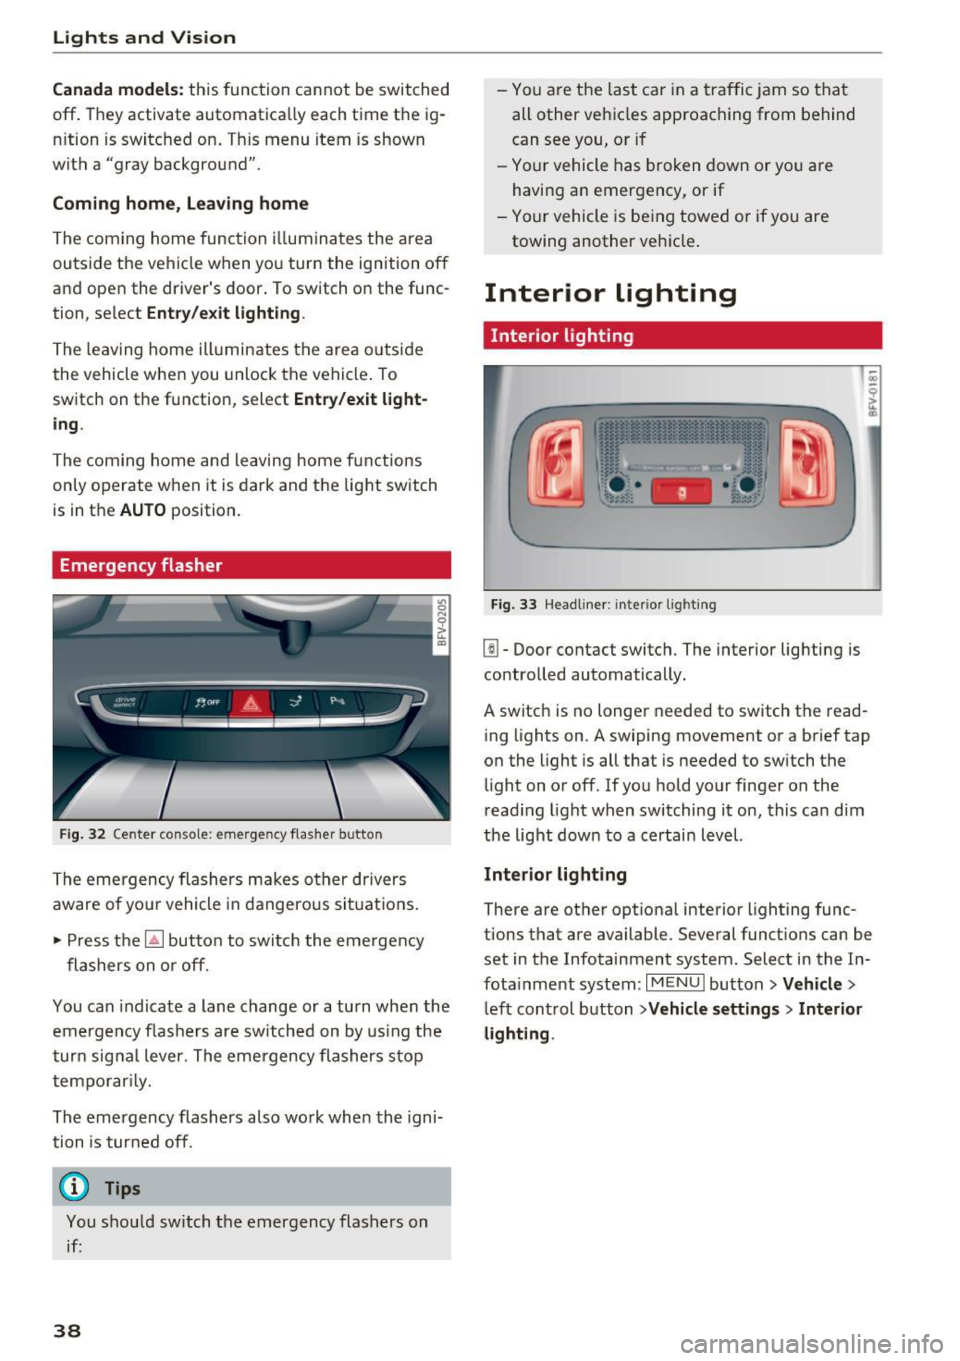
Emergency flasher
Fig. 32 Cente r conso le : eme rge ncy f las her button
The emergency flashers makes other drivers
aware of yo ur vehicle in dangerous si tuat ions .
• Press the ~ button to switc h the eme rgency
flashers on or off.
You can indicate a lane change or a tu rn when the
em ergency fl ash ers are sw itched on by us ing the
tur n sig nal lever. The emergency flashers s top
tempo rar ily.
The emergency flashers also work when the igni
tion is tur ned off.
(D Tips
You s hou ld switch the emergency flashers on
if:
38
- You a re the last c ar in a tra ffic j am so that
all other vehi cles approaching from behind
can see you, or if
- Your vehicle has broken down or yo u are
having an emergency, or if
- You r vehicle is be ing towed or if you are
towing another vehicle .
Interior lighting
Interior lighting
Fig. 33 Head line r: i nte rior light ing
l!I -Door contact switch. The interior lighting is
contro lled automatically.
A switch is no longer needed to switch the read
ing lights on . A swiping movement or a brief tap
o n the light is all that is needed to switch the
li ght on or off. If yo u hold your finger on the
r ead ing light when switching it on, this ca n dim
the light dow n to a certai n level.
Interior light ing
There are othe r optional interior lighting func
tions that are available . Several funct ions can be
set in the Infotainment system . Select in the In
f ota inment system :
I MENU I button >Vehicle >
left con trol button >Vehicle settings > Interior
lighting .