ESP AUDI TT COUPE 2020 Owner's Manual
[x] Cancel search | Manufacturer: AUDI, Model Year: 2020, Model line: TT COUPE, Model: AUDI TT COUPE 2020Pages: 280, PDF Size: 98.79 MB
Page 71 of 280
8S1012721BB
Warm and cold
Warm and cold
Climate control system
The climate control system warms, cools and re-
moves humidity from the air in the vehicle interi-
or. It functions most effectively when the win-
dows are closed. If there is a build-up of heat in-
side the vehicle, ventilation can help to speed up
the cooling process.
Pollutant filter
The pollutant filter removes pollutants such as
dust and pollen from the air.
ZA\ WARNING
Poor visibility can lead to accidents.
— For safer driving, keep all windows free of
ice, snow and fog.
— Become familiar as quickly as possible with
the correct use and function of the climate
control system, especially with the defrost-
ing and defogging function.
— When the temperature is below freezing,
only use the windshield washer system after
the
windshield has been warmed by the cli-
mate control system. The washer fluid could
freeze on the windshield and impair visibili-
ty
@) Note
— If you suspect that the climate control sys-
tem is damaged, switch the system off to
prevent further damage and have it checked
by an authorized Audi dealer or authorized
Audi Service Facility.
— Repairs to the Audi climate control system
require special technical knowledge and
special tools. Have it inspected by an au-
thorized Audi dealership or a qualified elec-
tronics store.
@) For the sake of the environment
Reducing the amount of fuel used also re-
duces the amount of pollutants that enter the
air.
iG) Tips
—To prevent interference with the heating
and cooling output and to prevent the win-
dows from fogging over, the air intake in
front of the windshield must be free of ice,
snow, or leaves.
— Condensation from the cooling system can
drip and form a puddle of water under the
vehicle. This is normal and does not mean
there is a leak.
— The energy management system may tem-
porarily switch off certain functions, such as
the seat heating* or rear window defogger.
These systems are available again as soon as
the energy supply has been restored.
— Certain climate control settings are auto-
matically stored and assigned to the vehicle
key that is in use.
— The flows through the vents under the rear
window. Make sure the openings are not
covered when placing clothing on the lug-
gage compartment cover.
69
Page 72 of 280
Warm and cold
Ti celun aCe rie Meolaideel Nc)
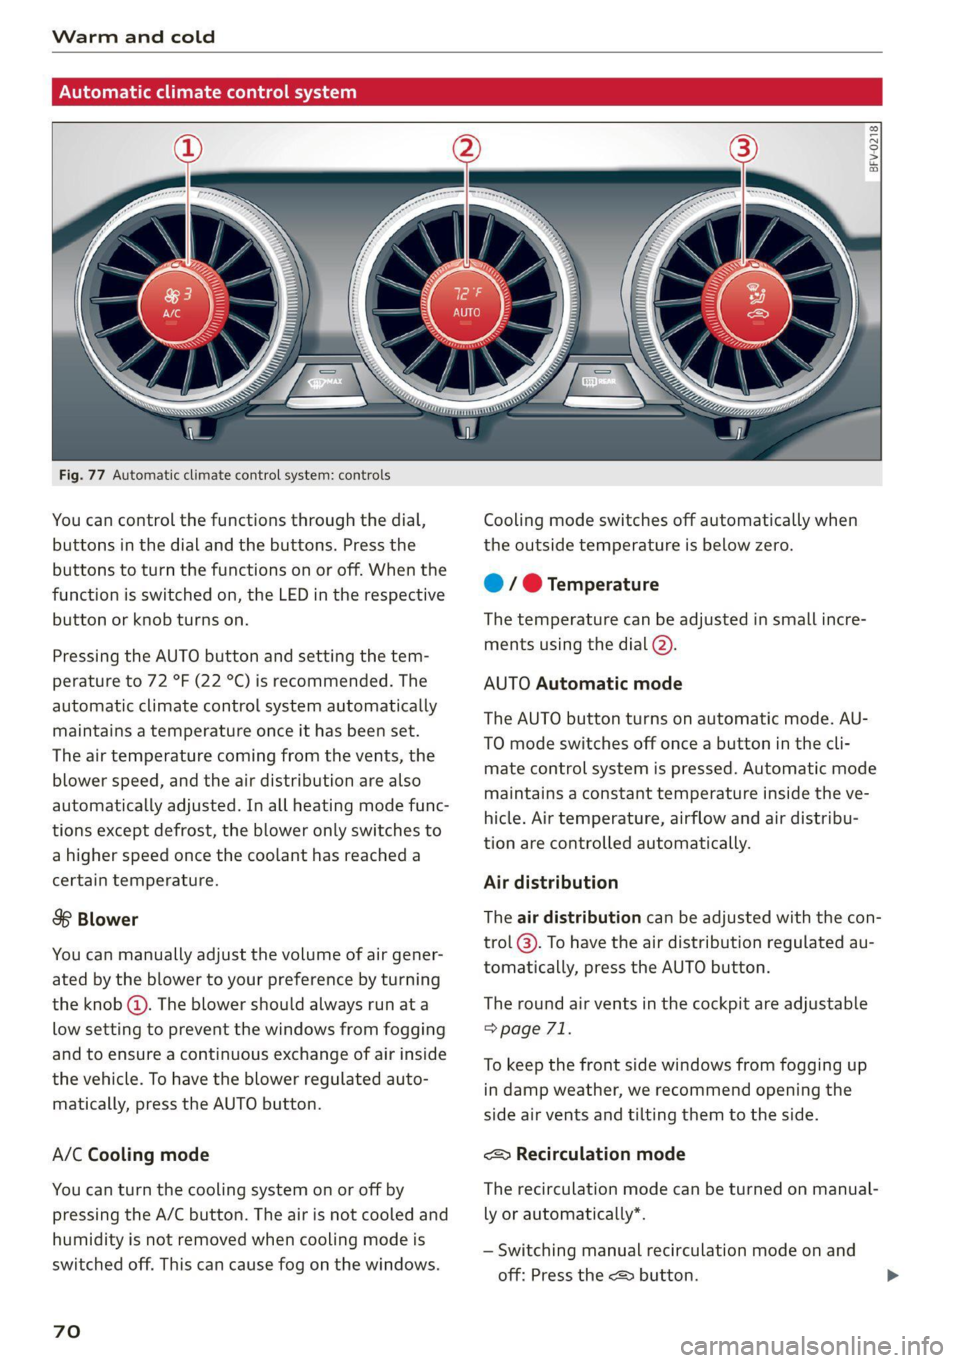
Fig. 77 Automatic climate control system: controls
You can control the functions through the dial,
buttons in the dial and the buttons. Press the
buttons to turn the functions on or off. When the
function is switched on, the LED in the respective
button or knob turns on.
Pressing the AUTO button and setting the tem-
perature to 72 °F (22 °C) is recommended. The
automatic climate control system automatically
maintains a temperature once it has been set.
The air temperature coming from the vents, the
blower speed, and the air distribution are also
automatically adjusted. In all heating mode func-
tions except defrost, the blower only switches to
a higher speed once the coolant has reached a
certain temperature.
$8 Blower
You can manually adjust the volume of air gener-
ated by the blower to your preference by turning
the knob @). The blower should always run at a
low setting to prevent the windows from fogging
and to ensure a continuous exchange of air inside
the vehicle. To have the blower regulated auto-
matically, press the AUTO button.
A/C Cooling mode
You can turn the cooling system on or off by
pressing the A/C button. The air is not cooled and
humidity is not removed when cooling mode is
switched off. This can cause fog on the windows.
70
BFV-0218
Cooling mode switches off automatically when
the outside temperature is below zero.
@ / @ Temperature
The temperature can be adjusted in small incre-
ments using the dial (2).
AUTO Automatic mode
The AUTO button turns on automatic mode. AU-
TO mode switches off once a button in the cli-
mate control system is pressed. Automatic mode
maintains a constant temperature inside the ve-
hicle. Air temperature, airflow and air distribu-
tion are controlled automatically.
Air distribution
The air distribution can be adjusted with the con-
trol @). To have the air distribution regulated au-
tomatically, press the AUTO button.
The round air vents in the cockpit are adjustable
=> page 71.
To keep the front side windows from fogging up
in damp weather, we recommend opening the
side air vents and tilting them to the side.
<& Recirculation mode
The recirculation mode can be turned on manual-
ly or automatically*.
— Switching manual recirculation mode on and
off: Press the <> button.
Page 76 of 280

Driving
Driving
General information
A new vehicle must be broken in within the first
1,000 miles (1,500 km) so that all moving parts
work smoothly together, which helps to increase
the service life of the engine and other drive com-
ponents.
Do not drive higher than two-thirds of the maxi-
mum permitted engine RPM during the first 600
miles (1,000 km) and do not use full accelera-
tion. The engine can be increased RPM gradually
during the next 300 miles (S00 km).
® Note
Your Audi is not designed for towing a trailer.
Damage caused by towing a trailer is not cov-
ered by the warranty.
Reducing the risk of vehicle damage
@) Note
When driving on poor roads, over curbs, and
on steep ramps, make sure that components
that hang below the vehicle, such as the spoil-
er and exhaust system, are not struck because
they could be damaged. This especially ap-
plies
to vehicles with low ground clearance
and vehicles that are heavily loaded.
Driving through water
If you must drive through water, follow these in-
structions:
— Check the stability of the ground, the current,
and the water depth. If the ground is unstable,
there is a strong current, or there are waves,
the water must only reach up to the lower edge
of the body at the most.
— Drive carefully and no faster than at walking
speeds to prevent the front of the vehicle from
creating waves, because they could splash
74
above the lower edge of the body. Oncoming
vehicles could also create waves.
— Do not stop the vehicle while in the water.
— Drive in reverse.
— Do not turn the engine off.
ZA\ WARNING
After driving through water, press the brake
pedal carefully to dry the brakes so that the
full braking effect will be restored.
C) Note
Vehicle components such as the engine, drive
system, suspension, or electrical system can
be severely damaged by driving through wa-
wel
G@) Tips
If possible, avoid driving through salt water
because it increases the risk of corrosion. Use
fresh water to clean any vehicle components
that come into contact with salt water.
aire leaden ated Neade(Talel A
driving
The amount of fuel consumption, the environ-
mental impact, and the wear to the engine,
brakes, and tires depends mostly on your driving
style. Note the following information for efficient
and environmentally-conscious driving:
— Turn off electrical equipment that is not need-
ed, for example seat heating*.
— Anticipate upcoming traffic situations while
driving to avoid unnecessary acceleration and
braking.
— Avoid driving at high speeds.
— Avoid adding extra weight to the vehicle if pos-
sible, for example by not leaving roof racks or
bike racks installed when they are not needed.
— Make sure the tire pressure is correct.
— Have maintenance performed regularly on the
vehicle.
— Do not let the engine run while the vehicle
parked.
— Do not drive with winter tires during the summ-
er.
Page 77 of 280
8S1012721BB
Driving
— Utilize the engine braking effect.
— Avoid driving short distances when possible.
G) Tips
The amount of noise produced by the vehicle
can increase significantly when driving with a
sporty style. Show respect to others around
you and the environment with the way you op-
erate your vehicle, especially at night.
Starting and stopping
the engine
Starting the engine
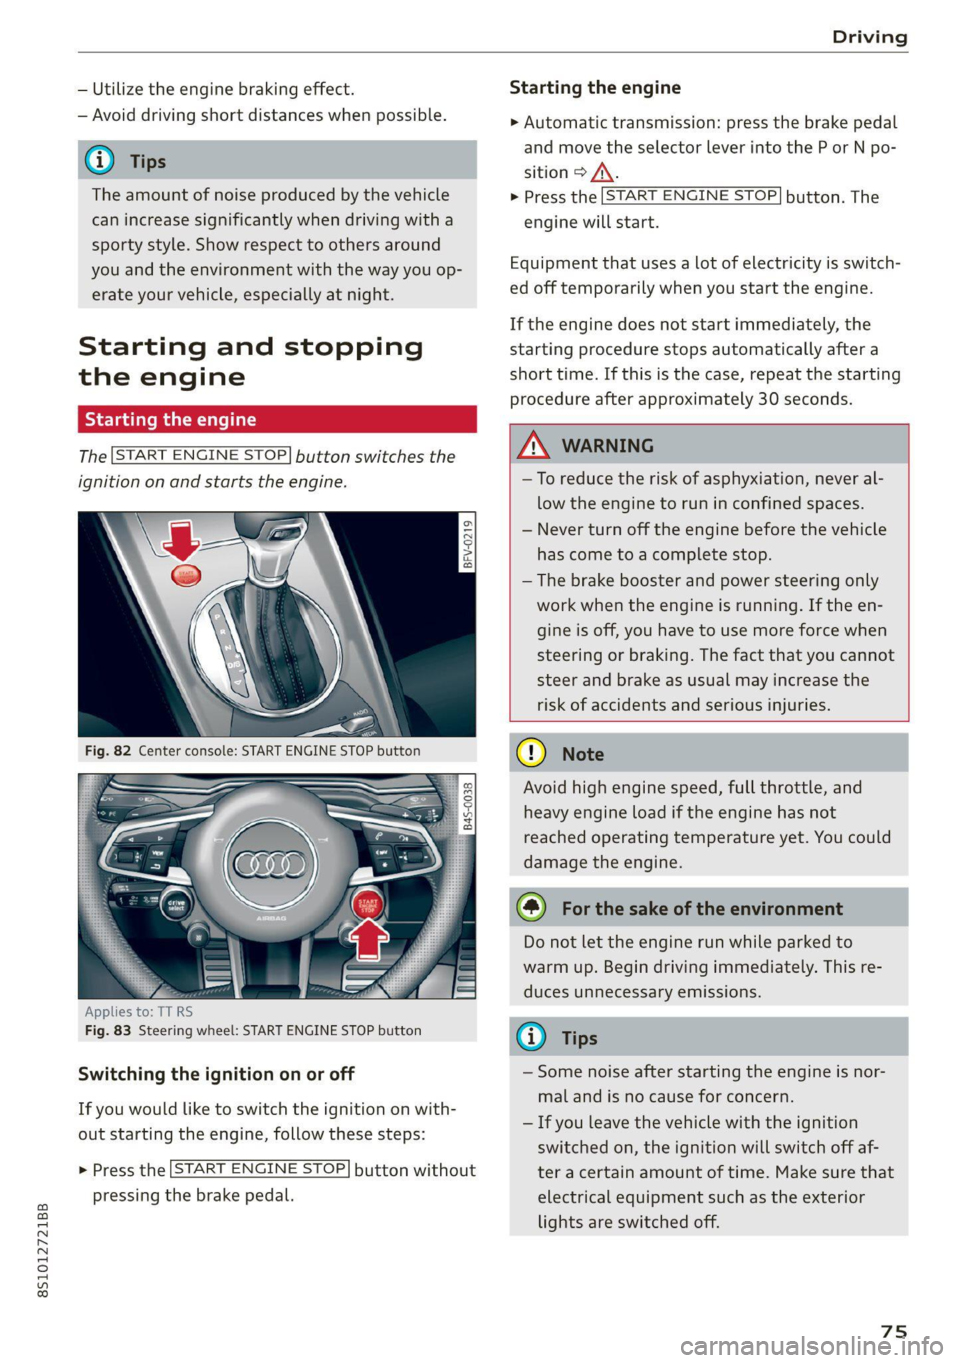
The [START ENGINE STOP] button switches the
ignition on and starts the engine.
a
Sg
x > ie o
Applies to: TT RS
Fig. 83 Steering wheel: START ENGINE STOP button
Switching the ignition on or off
If you would like to switch the ignition on with-
out starting the engine, follow these steps:
> Press the [START ENGINE STOP] button without
pressing the brake pedal.
Starting the engine
> Automatic transmission: press the brake pedal
and move the selector lever into the P or N po-
sition > A\.
> Press the [START ENGINE STOP] button. The
engine will start.
Equipment that uses a lot of electricity is switch-
ed off temporarily when you start the engine.
If the engine does not start immediately, the
starting procedure stops automatically after a
short time. If this is the case, repeat the starting
procedure after approximately 30 seconds.
ZA WARNING
—To reduce the risk of asphyxiation, never al-
low the engine to run in confined spaces.
— Never turn off the engine before the vehicle
has come to a complete stop.
— The brake booster and power steering only
work when the engine is running. If the en-
gine is off, you have to use more force when
steering or braking. The fact that you cannot
steer and brake as usual may increase the
risk of accidents and serious injuries.
() Note
Avoid high engine speed, full throttle, and
heavy engine load if the engine has not
reached operating temperature yet. You could
damage the engine.
@) For the sake of the environment
Do not let the engine run while parked to
warm up. Begin driving immediately. This re-
duces unnecessary emissions.
(i) Tips
— Some noise after starting the engine is nor-
mal and is no cause for concern.
— If you leave the vehicle with the ignition
switched on, the ignition will switch off af-
ter a certain amount of time. Make sure that
electrical equipment such as the exterior
lights are switched off.
75
Page 80 of 280

Driving
> Place the selector lever in the “P” position.
> Turn the engine off > A\.
> Turn the steering wheel when parking on in-
clines so that the wheels will roll into the curb
if the vehicle starts moving.
ZA WARNING
— If the parking brake is set, it can release au-
tomatically when the accelerator pedal is
pressed. To reduce the risk of an accident,
do not inadvertently press the accelerator
pedal and always shift into “P” when the ve-
hicle is stopped.
— Emergency braking should only be used in
an emergency, when the when the standard
brake pedal is malfunctioning or obstructed.
During emergency braking, your vehicle will
brake similar to heavy braking. ESC and the
associated components (ABS, ASR, EDL) can-
not overcome the laws of physics. In corners
and when road or weather conditions are
bad, a full brake application can cause the
vehicle to skid or the rear end to swerve,
which increases the risk of an accident.
— If the power supply fails, you cannot set the
parking brake once it is released. In this
case, park the vehicle on level ground and
secure it by placing the selector lever in the
P position. See an authorized Audi dealer or
authorized Audi Service Facility for assis-
tance.
— If you leave the vehicle, switch the ignition
off and take the vehicle key with you. This
applies particularly when children remain in
the vehicle. Otherwise children could start
the
engine, release the parking brake or op-
erate electrical equipment such as power
windows, which increases the risk of an acci-
dent.
— No one should remain in the vehicle when it
is locked - especially children. Locked doors
make it more difficult for emergency work-
ers to get into the vehicle, which puts lives
at risk.
78
@) Note
Do not leave your vehicle unattended while
the engine is running, because this increases
the risk of an accident.
@) Tips
— Noises when the parking brake is set and re-
leased are normal and are not a cause for
concern.
— The parking brake goes through a self-test
cycle at regular intervals when the vehicle is
stopped. Any noises associated with this are
normal.
Starting to drive
Various convenience and safety functions may be
available when the vehicle begins driving, de-
pending on vehicle equipment.
Starting on hills with the parking brake set
Requirement: the driver's door must be closed.
> To start driving comfortably when on a hill, set
the parking brake and begin driving as usual.
The braking force of the parking brake does not
release automatically until the wheels build up
enough driving force.
Starting on hills with hill hold assist
If you take your foot off of the brake pedal when
driving on hills, the braking force will be held for
several seconds. At that time, you can start driv-
ing without the vehicle rolling backward.
Requirement: the driver's door must be closed,
the engine must be on, and the vehicle must be
traveling uphill.
> To activate hill hold assist, press and hold the
brake pedal for several seconds while the vehi-
cle is stationary.
ZX WARNING
—To reduce the risk of an accident, always
make sure the vehicle is situated safely
while stationary.
— If the parking brake is set, it can release au-
tomatically when the accelerator pedal is >
Page 81 of 280
8S1012721BB
Driving
pressed. To reduce the risk of an accident,
do not inadvertently press the accelerator
pedal and always shift into “P” when the ve-
hicle is stopped.
— If the power supply fails, you cannot set the
parking brake once it is released, or release
it if it is set. In this case, park the vehicle on
level ground and secure it by engaging the
"P” gear. Contact an authorized Audi dealer
or authorized Audi Service Facility for assis-
tance.
ZA WARNING
— If you do not begin driving immediately af-
ter releasing the brake pedal, your vehicle
may begin to roll backward. Press the brake
pedal
or set the parking brake immediately.
— The hill hold assist cannot hold the vehicle
on inclines in every scenario (for example,
on slippery or icy ground).
Sporty driving
Applies to: RS model
When driving in a sporty style, for example ona
driving track, the wear on all vehicle components
is greatly increased, especially on the engine,
transmission, tires, brakes, and suspension. This
can result in increased wear. Also note the fol-
lowing points:
— Make sure the vehicle is in good condition.
Make sure to check the brake pads, tire tread,
and tire pressure (when tires are warm).
— Beforehand, warm up the engine by driving no
higher than two-thirds of the maximum permit-
ted engine RPM. The engine oil temperature
must be brought to a minimum of 140 °F
(60 °C).
— Before stopping the vehicle, allow the engine
and brakes to cool back down to a regular oper-
ating temperature by driving normally.
If necessary, use the following functions:
— Dynamic Audi drive select mode* > page 96
— Launch Control > page 84
— Limit ESC > page 106
@) Tips
Wear caused by load does not constitute a ve-
hicle fault as defined by the terms of the war-
ranty.
Automatic transmission
Introduction
Your vehicle is equipped with an electronically-
controlled DSG transmission called S tronic. Two
independent clutches transfer the power be-
tween the engine and transmission. It allows the
vehicle to accelerate without a noticeable inter-
ruption in traction.
The transmission shifts up or down automatically
depending on which drive program is selected.
When a moderate driving style is used, the
transmission selects the most economical driving
mode. The transmission upshifts at a lower RPM
and downshifts at a higher RPM to improve fuel
efficiency.
The transmission switches to a sporty mode after
a kick-down or when the driver uses a sporty driv-
ing style characterized by quick accelerator pedal
movements, heavy acceleration, frequent
changes in speed, and traveling at the maximum
speed.
If desired, the driver can also select the gears
manually (tiptronic mode) > page 83.
a BS a $
z 5
Pog
a
Le oe
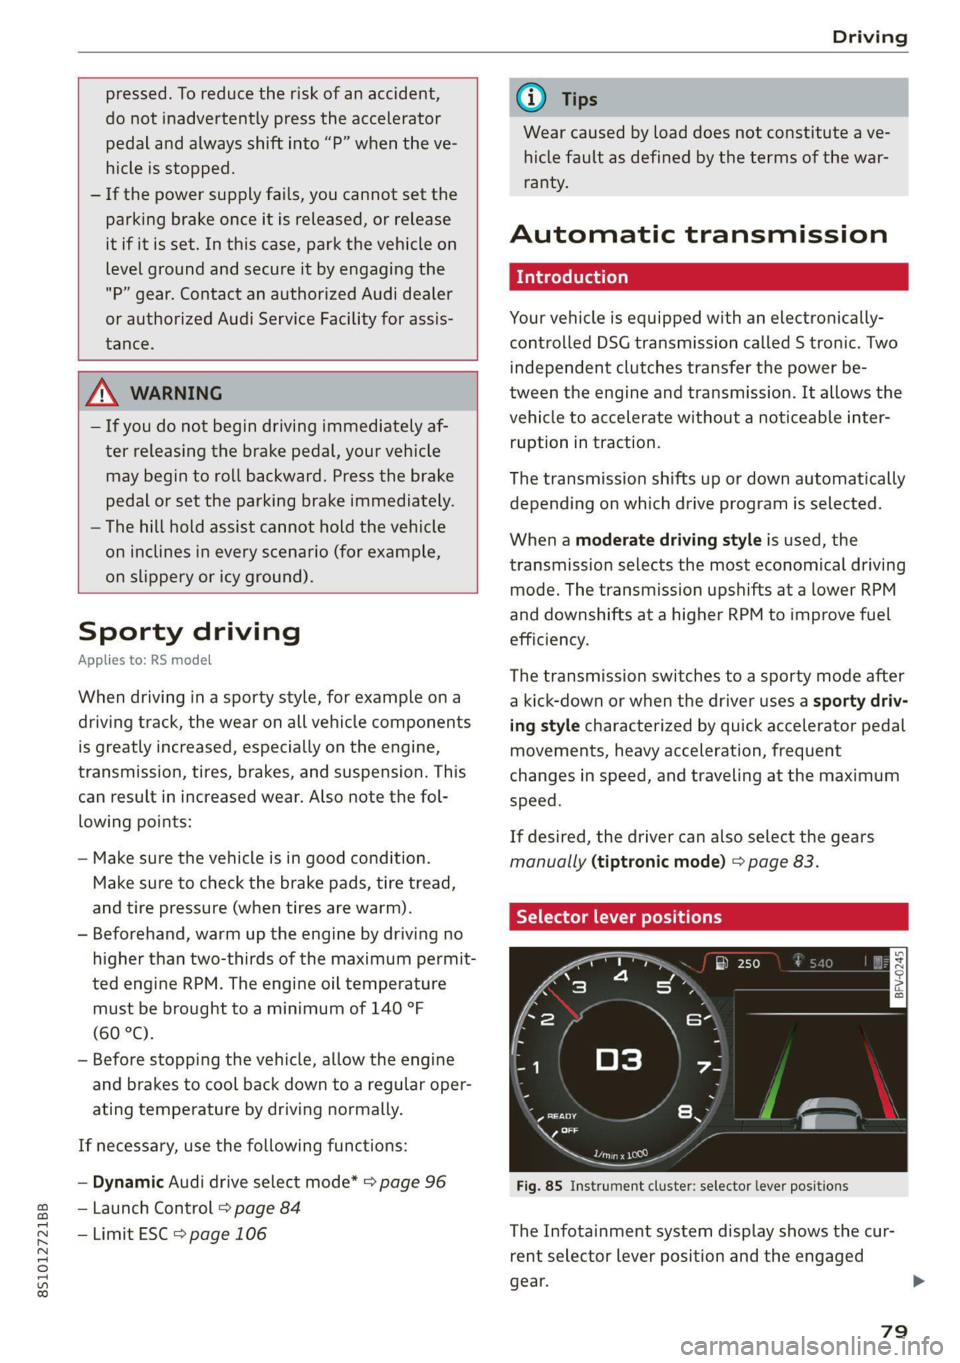
Fig. 85 Instrument cluster: selector lever positions
The Infotainment system display shows the cur-
rent selector lever position and the engaged
gear.
79
Page 86 of 280
Driving
You can shift the gears manually when in “D”
mode. The transmission must be in tiptronic
mode.
Shifting with the selector lever
You can shift into manual shifting mode while the
vehicle is stationary or while driving.
> To switch to manual shifting mode, tilt the se-
lector lever toward the front passenger's side
=> fig. 88. “M” will be displayed in the instru-
ment cluster.
> Upshifting: push the selector lever forward ().
> Downshifting: push the selector lever toward
the rear ().
> To switch back to automatic mode, tilt the se-
lector lever toward the driver's side.
Shifting with the shift paddles
Applies to: vehicles with shift paddles
> Upshifting: press the @) shift paddle > fig. 89.
> Downshifting: press the ©) shift paddle.
> Applies to: RS models: To select the lowest/
highest possible gear, press and hold down the
shift paddle @)/@).
If the shift paddles are tapped while in the D/S
selector lever position, automatic mode switches
off briefly. To switch from manually shifting back
to automatic shifting immediately, tap the shift
paddle @) © fig. 89 for 1 second.
To keep shifting manually, tilt the selector lever
toward the front passenger's side.
@ Tips
— The transmission only allows manual shift-
ing when the engine speed is within the per-
mitted range.
— The transmission automatically shifts up or
down before critical engine speed is
reached.
— Applies to: RS models: When accelerating,
the transmission will not automatically shift
to the next gear shortly before the maxi-
mum permitted engine RPM is reached.
Shift to the next highest gear at the right
time.
84
Kick-down enables maximum acceleration.
When you press the accelerator pedal down be-
yond the resistance point, the automatic trans-
mission downshifts into a lower gear and the en-
gine utilizes its full power, if the vehicle speed
and engine RPM permit. It shifts up into the next
higher gear once the maximum permitted engine
RPM is reached.
ZX WARNING
Please note that the wheels could spin on
slick or slippery roads when kick-down is ac-
tive.
Launch Control
Launch Control provides the best possible accel-
eration when starting from a stop.
Requirements
— The engine must be at operating temperature.
— The steering wheel must not be turned.
— ESC must be limited > page 106.
— Driving program “S” > page 80 or the Audi
drive select* Dynamic mode must be selected
=> page 96.
Using Launch Control
— Press the brake pedal with your left foot and
hold it all the way down for at least one second.
— With the brake pedal pressed, press the accel-
erator pedal all the way down with your right
foot at the same time.
— Once the engine reaches a constant speed, re-
move your foot from the brake pedal.
Once the vehicle has started moving, reactivate
the ESC so that it is fully functional.
Z\ WARNING
Only use Launch Control when road and traffic
conditions allow it and other road users will
not be endangered or impacted by your driv-
ing and the vehicle's acceleration. The driving
wheels could spin and the vehicle could
swerve, especially on slick or slippery road
Page 89 of 280
8S1012721BB
Assist systems
Assist systems
Speed warning system
Applies to: vehicles with speed warning system
The speed warning system helps you to stay be-
low a specified maximum speed that can be set,
changed or deleted in the Infotainment system.
The speed warning system warns you if you are
exceeding the maximum speed that you have set.
A warning tone will sound as soon as your speed
exceeds the stored value slightly. The ow in-
dicator light and a message will appear in the in-
strument cluster display at the same time. The
Ge) indicator light and the message turn off if
the speed falls back below the stored maximum
speed.
Setting a threshold is recommended if you would
like to be reminded when you reach a certain
maximum speed. Situations where you may want
to do so include driving in a country with a gener-
al speed limit or if there is a specified maximum
speed for winter tires.
Setting the warning threshold
> Select in the Infotainment system: [MENU] but-
ton > Vehicle > left control button > Driver as-
sistance > Speed warning > Manual.
G) Tips
Regardless of the speed warning system, you
should always monitor your speed using the
speedometer and make sure you are following
the legal speed limit.
Messages
Applies to: vehicles with speed warning system
Manually set speed limit XX exceeded
The stored speed was exceeded.
Cruise control system
Applies to: vehicles with cruise control system
The cruise control system assists the driver in
maintaining a constant speed above approxi-
mately 15 mph (20 km/h). The system maintains
the desired speed by braking and accelerating.
ZA WARNING
— Always pay attention to the traffic around
your vehicle when the cruise control system
is in operation. As the driver, you are always
responsible for controlling your vehicle
speed and the distance between your vehicle
and
other vehicles.
— For safety reasons, cruise control should not
be used in the city, in stop-and-go traffic, on
winding roads, and when road conditions are
poor (such as ice, fog, gravel, heavy rain,
and conditions that could lead to hydroplan-
ing), because this increases the risk of an ac-
cident.
— Switch the cruise control off temporarily
when driving in turning lanes, highway exits,
or in construction zones.
—To reduce the risk of an accident, you should
only resume the stored speed if it is suitable
for the current traffic conditions.
@) Note
Before driving downhill a long distance ona
steep hill, decrease your speed and select a
lower gear. This makes use of the engine brak-
ing effect and reduces the load placed on the
brakes.
@) Tips
The brake lights turn on when the brakes are
applied automatically.
87
Page 91 of 280
8S1012721BB
Assist systems
Switching the system off
Applies to: vehicles with cruise control system
When you switch the system off completely, the
cruise control speed will be deleted.
Requirement: the system must be switched on.
> To switch the system off, press the lever toward
@ (locked into place) > page 88, fig. 92, or
> Switch the ignition off.
Applies to: vehicles with cruise control system
ICRUISE| / 3) Speed control system: currently un-
available. See owner's manual
If the indicator light turns on and this message
appears, the cruise control system has been deac-
tivated. There is a temporary malfunction, for ex-
ample the brakes are overheating. Switch the
cruise control system on again later.
Audi active lane assist
Applies to: vehicles with Audi active lane assist
Active lane assist detects lane marker lines with-
in the limits of the system using a camera in the
windshield. If you are approaching a detected
lane marker line and it appears likely that you
will leave the lane, the system will warn you with
corrective steering. You can override this steering
at any time. If you pass over a line, the steering
wheel will vibrate lightly. In order for this warn-
ing vibration to occur, it must first be switched
on in the Infotainment system. Active lane assist
is ready for operation when the lane marker line
is detected on at least one side of the vehicle.
The system is designed for driving on express-
ways and highways and so it only activates at
speeds above approximately 40 mph (65 km/h)
(depending on the market).
Applies to vehicles with side assist*: If you acti-
vate a turn signal when active lane assist is ready
and it classifies a lane change as critical because
D_ The corrective steering function is not available in all mar-
kets.
of vehicles traveling alongside you or approach-
ing you, there will be noticeable corrective steer-
ing shortly before you leave the lane. This will at-
tempt to keep your vehicle in the lane.
Applies to vehicles without side assist*: When
the system is ready, it will not warn you if you ac-
tivate the turn signal before crossing the lane
marker line. In this case, it assumes that you are
changing lanes intentionally.
Z\ WARNING
— The system warns the driver that the vehicle
is leaving the lane using corrective steering.
The
driver is always responsible for keeping
the vehicle within the lane.
— The system can assist the driver in keeping
the vehicle in the lane, but it does not drive
by itself. Always keep your hands on the
steering wheel.
— Corrective steering may not occur in certain
situations, such as during heavy braking.
— There may be cases where the camera does
not recognize all lane marker lines. Correc-
tive steering can only take place on the side
of the vehicle where lane marker lines are
detected.
— Other road structures or objects could possi-
bly be identified unintentionally as lane
marker lines. As a result, corrective steering
may be unexpected or may not occur.
— The camera view can be restricted, for exam-
ple by vehicles driving ahead or by rain,
snow, heavy spray light shining into the
camera or by dirt on the window. This can
result in active lane assist not detecting the
lane marker lines or detecting them incor-
rectly.
— In certain situations where visibility is low,
the vehicle may switch internally from “ear-
ly” to “late” steering correction )).
— Under certain conditions such as ruts in the
road, an inclined roadway or crosswinds, the
corrective steering alone may not be enough
to keep the vehicle in the middle of the lane.
89
Page 93 of 280

8S1012721BB
Assist systems
Messages in Infotainment display
If the active lane assist switches off automatical-
ly, the indicator light in the display turns off and
one
of the following messages appears:
Audi active lane assist: currently unavailable.
Camera view restricted due to surroundings.
See owner's manual
This message appears if the camera is unable to
detect the lines. This could happen if:
—The camera field of view > page 90, fig. 94 is
dirty or covered in ice. Clean this area on the
windshield.
— The camera field of view is fogged over. Wait
until the fog has cleared before switching the
active lane assist on again.
— The system has been unable to detect the lanes
for an extended period of time due to road con-
ditions. Switch active lane assist back on when
the lines are more visible.
Audi active lane assist: currently unavailable.
See owner's manual
There is a temporary malfunction that may pre-
vent the active lane assist from switching on. Try
switching the active lane assist on again later.
Audi active lane assist: malfunction! See own-
er's manual
Drive to an authorized Audi dealer or authorized
Audi Service Facility immediately to have the
malfunction corrected.
Audi active lane assist: Please take over steer-
ing!
This message appears if you are not steering by
yourself. If this is the case, active lane assist does
not switch off, but it is “not ready” to provide a
warning. The system can help you keep the vehi-
cle in the lane. However, you are responsible for
driving the vehicle and must steer it yourself.
ZA\ WARNING
Note that messages may be delayed or not
displayed on vehicles with accessories mount-
D_ The corrective steering function is not available in all mar-
kets.
ed on the steering wheel, such as a steering
wheel spinner knob. Always keep your hands
on the steering wheel.
Adjusting the steering time and vibration
warning
Applies to: vehicles with Audi active lane assist
You can adjust individual active lane assist set-
tings in the Infotainment system.
Select in the Infotainment system: [MENU] but-
ton > Vehicle > left control button > Driver assis-
tance > Audi active lane assist
Steering time!)
Early: in this setting, the corrective steering hap-
pens continuously to help keep the vehicle in the
center of the lane.
Late: in this setting, the system provides correc-
tive steering just before a vehicle wheel touches a
detected lane marker line.
Vibration warning
You can switch the additional vibration warning
in the steering wheel on or off.
G) Tips
In certain markets: your settings are stored
automatically and assigned to the remote
control key in use.
Lap timer
Introduction
Applies to: vehicles with lap timer
Lap timer
You can measure and analyze lap times with the
lap timer in the display. The time is measured in
minutes, seconds and 1/10 seconds. With lap
times longer than 60 minutes, the hour is also
shown and the display of 1/10 seconds is re-
moved.
91