low oil pressure AUDI TT ROADSTER 2008 Owners Manual
[x] Cancel search | Manufacturer: AUDI, Model Year: 2008, Model line: TT ROADSTER, Model: AUDI TT ROADSTER 2008Pages: 316, PDF Size: 70.1 MB
Page 18 of 316
Inst rum ent s a nd warning /indi cato r li ghts
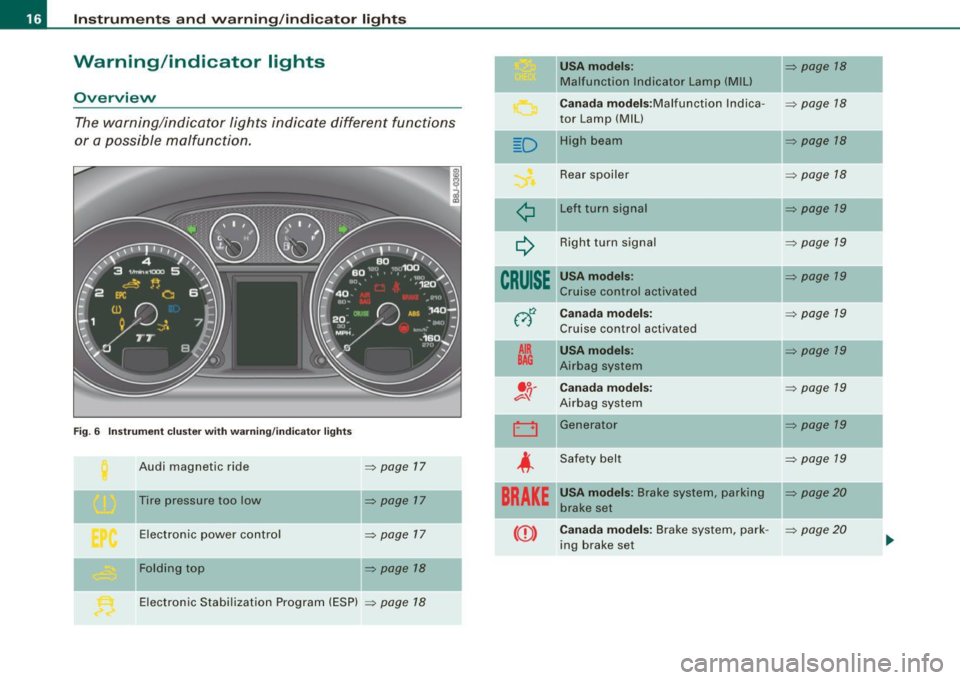
Warning /indicator lights
Ov erview
The warning/indicator lights indicate different functions
or a possible malfunction.
F ig. 6 Inst rum ent cluste r w ith warning/ indicator lig hts
Audi magnetic ride => page 17
Tire pressure too low => page 17
Electronic power control => page 17
-Fol ding top => page 18
II
Electronic Stabi lization Program (ESP) => page 18
D
¢
~
CRUISE
012
A IR
BAG
. o.
e::=- -!J
LJ
-
4
BRAKE
USA model s: => page 18
Malfunction Indicator Lamp (M IU
-
C an ada m od els :Malfunction lndica -=> page 18
tor Lamp (MIU
High bea m
=> page 18
Rear spoiler => page 18
Left turn signa l => page 19
Right turn signal => page 19
USA models: => page 19
Cruise control activated
Cana da mod els: => page 19
Cruis e control activated
USA mod els: => page 19
Airbag system
Ca nada mod els : => page 19
Airbag system
Generator
=> page 19
-
Safety belt => page 19
USA model s: Brake system, parking II=> page 20
brake set
Ca nad a model s: Brake system, park -
=> page 20
ing brake set
Page 32 of 316
Driver inf ormation sy ste m
If Auto Check senses an irregu lar condition or a malfunction
requiring urgent repair, it generates a specific symbol or short message in the instrument cluster center display . You will also hear
an audible warning tone. The displays are color coded in either red
or yellow depending on their level of priority.
The red symbols indicate a
d angerou s conditio n which is addition
a lly signal led by
th ree warning tones. Whereas the ye llow symbols
represent a
W arning which is signalled by one warning tone. In
specific situations, messages for the driver appear in addition to the red symbols~
page 30. •
Driver information messages
Along with some particular warning/indic ator lights and
instrument cluster symbols, additional messages will
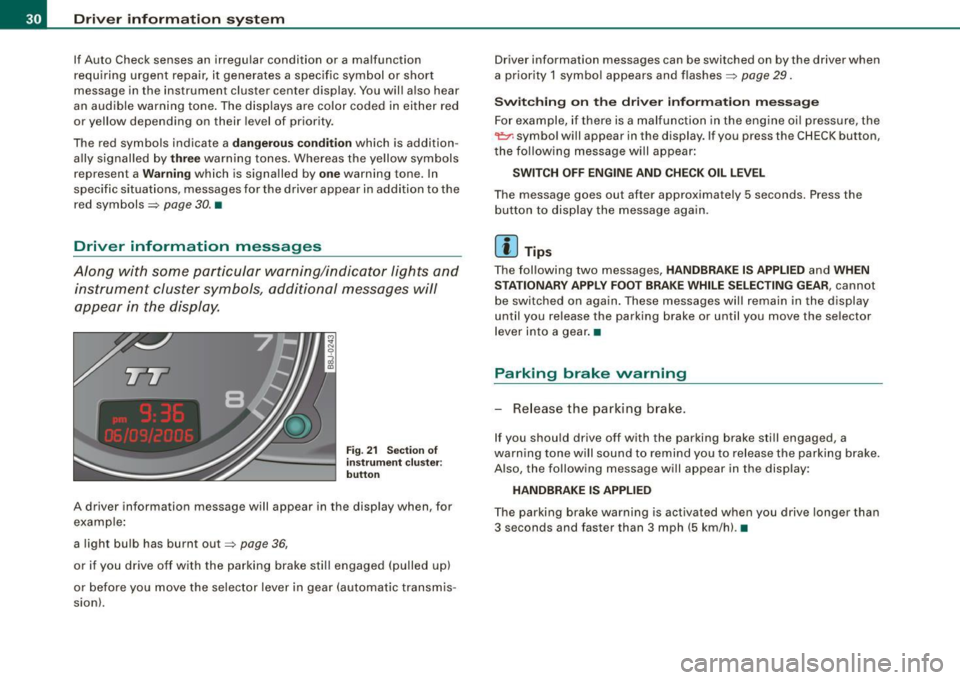
appear in the display .
Fig. 21 Sectio n of
i n strum ent c luster:
b utton
A driver information message will appear in the disp lay when, for
example :
a light bulb has burnt out~
page 36,
or if you drive off with the parking brake still engaged (pulled up)
or before you move the se lector lever in gear (automatic transmis
sion). Driver information messages can be switched on by the driver when
a priority 1 symbo
l appears and flashes~
page 29.
Sw itc hing on th e driv e r inf orm ation m ess ag e
For example, if there is a malfunction in the engine oi l pressure, the
~ symbo l will appear in the display. If you press the CHECK button,
the fo llowing message will appear :
SWITCH O FF ENG IN E AND CHE CK OIL LE VEL
The message goes out after approximately 5 seconds. Press the
button to disp lay the message again.
[ i ] Tips
The fol lowing two messages, HANDBRAKE IS APPLIED and WHEN
S TA TIONARY APPLY FOOT BRA KE WHILE SELE CTIN G G EAR ,
cannot
be switched on again . These messages will remain in the display
until you release the parking brake or until you move the selector
l ever into a gear .•
Parking brake warning
- Release the parking brake.
If you should drive off with the parking brake still engaged, a
warning tone w ill sound to remind you to release the parking brake.
A lso, the following message will appear in the display:
HANDBR AKE IS APPLIED
The parking brake warning is activated when you drive longer than
3 seconds and faster than 3 mph (5 km/h). •
Page 33 of 316
Applies to vehi cles : wi th m anua l tra nsmi ssion
Function test: manual transmission
When the ignition is switched on, the Auto-Check Control automati
cally performs an operational check . If the functions tested are O .K .,
no message is shown in the display.
If one or more faul ts exist, the driver information disappears
approximately 15 seconds after the engine has been started and the
appropriate fault symbol appears in the display.
If malfunctions exist , this is indicat ed by r ed (prio rity
1) or yellow
(priority
2) symbols. A warning signal sounds at the same time. •
Applies to vehicle s: with autom ati c tra nsm iss io n
Function test: automatic transmission
Th e Auto-Check Con trol will automatically p erform a test each tim e
you switch on the ignition. When the selector lever in
P or N, the
following message appears in the display :
WHEN STATIONARY APPLY FOOTBRAKE WHILE SELECTING GEAR.
When you a select a different gear (for example: R, D, etc.), the
messag e will disappear and th e Auto-Check function is display ed .
If the functions tested are O.K., no message is shown in the display .
If there is a malfunction, then the malfunction message will appear
about 15 seconds after the you start the vehicle. At the same time
you will hear a warning tone.
[ i] Tips
On vehicles with automatic transmission*, the driver message
WHEN STATIONARY APPLY FOOTBRAKE WHILE SELECTING GEAR
cannot be shown again. This driver message appears in the display
only un til a gear is engaged. •
Controls and equip
ment
Driver information system
Red symbols
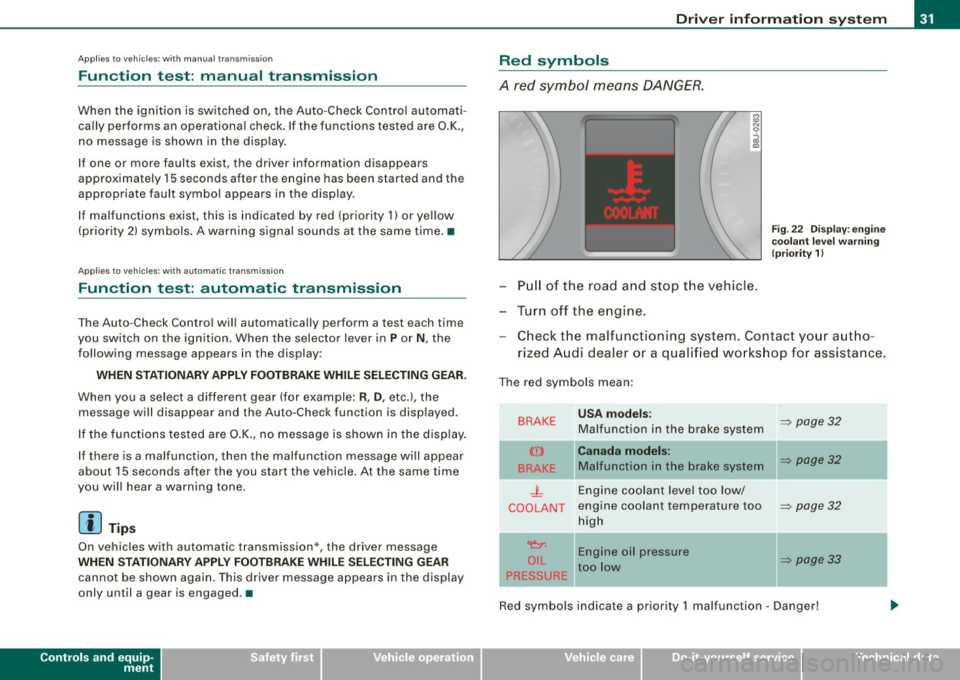
A red symbol means DANGER.
Pull of the road and stop the vehicle.
Turn off the engine.
Fig . 22 Display : engine
coolant level warning
(priority 1)
Check the malfunctioning system . Contact your autho
rized Audi dealer or a qualified workshop for assistance.
The red symbols mean :
BRAKE
(Ci)
BRAKE
.J_
COOLANT
'e:1:
O IL
PRESSURE
-
USA models:
Malfunction in the brake system
Canada models:
Malfunction in the brake system
Engine coolant level too low/
engine coolant tempera ture too
high
Engine oil pressure
too low
-
~ page 32
~ page32
~ page32
~ page33
Red symbols indicate a priority 1 malfunc tion - Danger!
I • •
Page 35 of 316
-Contact your authorized Audi dealer for assistance if
necessary.
If the engine coolant level is correct, then the radiator fan may be
the cause of the malfunction.
If the generator warning/indicator light should also illuminate
=> page 19 , then the fan belt may be damaged.
& WARNING
• If your vehicle should break down for mechanical or other
reasons, park at a safe distance from moving traffic, turn off the
engine and turn on the hazard warning lights
=> page 75, "Emer
gency flasher A".
• Never open the hood if you see or hear steam or coolant
escaping from the engine compartment -you risk being scalded.
Wait until you can no longer see or hear steam or coolant
escaping.
• The engine compartment of any vehicle is a dangerous area.
Before you perform any work in the engine compartment, turn of
the engine and allow it to cool. Follow the warning stickers
=> page 212, "Engine compartment".
0 Note
Do not continue driving if the _F_ symbol illuminates. There is a
malfunction in the engine cooling system -you could damage your
engine. •
Controls and equip
ment
Driver information system
Engine oil pressure malfunction 'l=;:f.
The red engine oil pressure warning symbol requires
immediate service or repair. Driving with a low-oil-pres
sure indication is likely to result in serious damage to the
engine.
If the ~ symbol appears in the display and flashes, the oil
pressure is too low. In addition to the symbol, the following
message also appears in the display:
SWITCH OFF ENGINE AND CHECK OIL LEVEL
Immediate actions
- Pull off the road and stop the vehicle.
- Shut the engine down.
- Check the engine oil level with the dipstick=> page 224.
Dipstick reading checks too low
- Top off oil to the proper level
=> page 225.
- Make sure that the oil pressure warning symbol ~
appears no longer in the display before you start driving
again.
Dipstick reading checks OK
- If the ~ symbol starts flashing again even though the
engine oil level checks OK on the dipstick ,
do not start
driving again and do not let the engine run at idle .
Instead, contact your authorized Audi dealer for assis
tance.
I • •
Page 36 of 316
![AUDI TT ROADSTER 2008 Owners Manual Driver information system
[ i] Tips
• The engine oil pressure symbol 9:::r. is not an indicator for a low
engine oil level. Do not rely on it. Instead, check the oil level](/img/6/57671/w960_57671-35.png "AUDI TT ROADSTER 2008 Owners Manual Driver information system
[ i] Tips
• The engine oil pressure symbol 9:::r. is not an indicator for a low
engine oil level. Do not rely on it. Instead, check the oil level")
Driver information system
[ i] Tips
• The engine oil pressure symbol 9:::r. is not an indicator for a low
engine oil level. Do not rely on it. Instead, check the oil level in your
engine at regular intervals, preferably each time you refuel, and
always before going on a long trip.
• The yellow oil level warning indication · requires oil refill or
workshop service without delay. Do not wait until the red oil pres
sure warning symbol
9:::r. starts to flash before you respond to the
low oil level warning . By then, your engine may already have
suffered serious damage. •
Yellow symbols
A yellow symbol means WARNING.
Yellow symbols mean:
Low fuel level
Check engine oil level Engine oil sensor malfunction
-
Worn brake pads
USA models:
Speed warning 1
Canada models:
Speed warning 1
-
USA models:
Speed warning 2
-Canada models:
Speed warning 2 =>
pag
e35
=> page35
=> page35
-
=> page35
=> page35
=> page35
=> page35
-
=> page35
Dynamic headlight range con
trol* defective => page35
Windshield washer fluid level low
=> page 35
Battery voltage too high or too
low
Defective light bulb
USA models:
Defective brake light
Canada models:
Defective brake light =>
page35
=> page36
=> page36
=> page36
Light/rain
sensor defective (auto-=> page 36
matic headlights) * defective
Adaptive Light* defective =>
page 36
Tire pressure monitoring system * => page 37
Yellow symbols indicate a priority 2 malfunction -Warning!
When a yellow symbol appears, a warning tone will sound
once .
Check the displayed function as soon as possible . If more than one
priority 2 malfunction is detected, all symbols will appear one after
the other for about two seconds.
To display driver information
As an example, the[} symbol appears in the display . If you now
press the button =>
page 12, fig. 2 ©, the following driver message
appears in the display:
PLEASE REFUEL
The driver message in the display goes out after about 5 seconds.
You can display the driver message again by briefly p ressing the
button. •
Page 191 of 316
Faults in the brake syst em
If you shou ld notice a sudden i ncrease in brake pedal travel, then
one of the two brake circuits may have failed=>
& -
Low brake fluid level
Ma lfunctions can occur in the brake system if the brake fluid leve l is
t oo low. The brake fluid level is moni tored e lect ronica lly .
Brake pow er assist unit
The brake p ow er assist un it increas es th e pressure that you
generate with the brake peda l. It works only when the engine is
running.
& WARNING
• You should perform braking maneuver s for the purpose of
c leaning the brake system only if road conditions permit . Other
road users must not be put at ri sk -you may cause an accident!
• Before des cending a steep grade , redu ce speed and sh ift trans
mi ssion into a lower gear or lower driving position . Do not ride the
br akes or hold the pedal down too long or too often . This could
cause the brakes to get hot and diminish braking efficiency .
• Do not "ride the brakes " by resting your foot on the pedal when
you do not intend to brake . Thi s may cause the brakes to overheat,
premature we ar and increased stopping distan ce .
• Under certain cl imatic and operating condit ions such as
pas sing through water , driv ing in heavy rain or after washing the
vehicle, the effectiveness of the brake s can be reduced . In winter ,
ice can ac cumulate on the brake pads , linings , discs and drums .
Cautiously apply brakes for a te st. Brakes will dry and ice coatings
will be cleaned off after a few cautious brake appli cations .
• Driving for an extended period of time on salt -covered road s
without using your brakes can also affect brak ing effic iency . Clean
off accumulated salt coating from brake discs and pads with a few
c autiou s brake applications .
Controls and equip ment Safety first Vehicle operation
Intelligent technology
& W
ARNING (continued )
• If you damage the front spo iler , or if you install a different
s poiler , be sure the air flow to the front brakes is not obstructed.
Otherwise the brake system could overheat redu cing the effective
ness of the entire br ake system.
• Failure of one brake circuit will impair the braking capability
resulting in an increa sed stopping distance. Avoid driving the
vehicle and have it towed to the nearest Audi dealer or qualified
workshop.
• Never let the veh icle roll to a stop with the engine shut off .
• If the b rake booster is not working , for e xample when towing
your vehicle, or because the brake booster has somehow been
damaged , the brake pedal must be pre ssed considerably harder to
make up for the lack of booster assistance . •
Anti- lock brake system (ABS)
ABS p revents the wheel s from loc king unde r br ak ing.
The anti -lock brake sys te m (ABS) makes a major contri but ion to
i ncreasing act ive d riv in g sa fety . You should not expect that brakin g
distances wi ll be
shortened unde r all c ircums tances wi th ABS.
B rak in g distance may even become somewhat
longer , for e xa m ple ,
on gravel or in new snow on s lippery ground, even if you are driving
carefully and slowly.
ABS operation
W hen a veh icle speed o f about 10 mph (20 km/ h) is reac hed , an au to
matic test sequence is run. Some noise from the pum p may be
audible.
I f the speed of a wheel s lows down too much re lative to vehicle
speed and i t starts to lock, br ake pressu re to th is whee l is reduce d.
T his adjustment process can be felt as a
pulsing motion of the b rake
pedal ,
accompanied by some noises. Yo u as the d rive r are in tent io n
a lly being g iven the in fo rmation that the wh eels a re tendin g to lock
Vehicle care Do-it-yourself service Technical data
Page 205 of 316
_____________________________________________ C_ l_ e _a_ n_ in_ g_a _ n_d_ p_ r_ o_ t _e_ c_t _io _ n __ lftlll
•
0 Note
• Never use a power washer to clean the powe r top itself .
• To avoid damaging your vehicle, always make sure that there is
sufficien t distance between the spray head and soft materials like
rubber hoses, plastic parts and sound -deadening materials. Never
aim the spray head at the same point for a long time. This also
applies to cleaning headlights and painted bumpers. Remember:
the closer the nozzle is to the surface of the material, the greater the stress on the material. •
Folding top care
The folding top requires special care.
Keeping your top looking great and making certain that it lasts a
long time depend to a great extent on proper use and care. Remove
bird droppings as soon as possible, since the corrosive chemicals in
them will cause the rubber impregnation in your top to swell and
possibly allow the fabric to leak .
W ith normal soiling, all you need to do is clear the top with a soft
brush and clear water . Always brush in the direction of the fabric
from front to rear.
If the top is very dirty and has spotted areas clean it with a brush
using a convertible top cleaner. Always brush in the direction of the
fabric from front to rear . Rinse with plenty of clear water, and allow
the top to air-dry.
Chamois are not suitable for drying the top.
Never use gasoline, spot remover, benzene, paint thinner or
solvents to remove spots. We recommend that you only use
cleaners especially formulated for use on convertible tops, and that
you follow the produce use directions carefully . Authori zed Audi
deals can provide detailed information.
& WARNING
Always read and heed all WARNINGS and the information on
:=> page 200.
0 Note
Never use a high -pressure power washer to clean the folding top. •
Applies to ve hicles: w ith win d def le cto r
Wind deflector
Clear the wind deflector with water or, if it is heavily soiled, a chem
ically neutral cleaning solution.
& WARNING
Always read and heed all WARNINGS and the information on
=> page 200. •
Waxing
Wax protects the vehicle's paint.
-Use a manually applied car wax occasionally to protect
the paint.
A good wax coating protects the vehicle paint to a large extent
against the environmental factors listed under ~ page 200,
"Washing" and even against slight scratches.
You can use a liquid car wax to protect your paint as soon as one
week after your vehicle has been delivered.
Even if you regularly use a waxing process in automatic car washes ,
we recommend that you manually apply a coat of wax to give the .,_
Vehicle care
I t •
Page 226 of 316
-L~C~ h~ e~c ~k ~in ~ g~a~ n~d ~ f ~i~ ll ~in ~ g~------------------------------------------
Engine oil consumption
The engine in your vehicle de pen ds on an ade quate
amount of oil to lubric ate and co ol all of its moving parts.
In order to provide effective lubrication and cooling of interna l
engine components, al l internal co mbustion engines consume a
certain amount of oil. Oil consumption varies from engine to engine
and may change sign ificant ly over the life of the engine . Typ ical ly,
engines with a specified break -in period (see=>
page 192) consume
more oil duri ng the brea k-in period than they consume afte r oil
consumption has stabi liz ed.
Unde r no rmal conditions, the rate of oil consumption depends on
the quality and viscosity of t he oil, the RPM ( revo lutions per m inute)
at which the engine is operated, the ambient temperature and road
co nd itions. Further factors are the amount of oi l dilut io n from water
condensation or fue l residue and the oxidation leve l of the oil. As
any e ng ine is subject to wear as mil eage builds up, the o il consump
tion may increase over time until replacement of worn components
may become necessary .
With all these var iables com ing into p lay, no standard rate of oil
consu mption can be es tab lished or speci fied. There is no a lternative
t o regular and frequent checking of the oi l leve l, see Note.
If the yellow engine oi l level warning symbol in the instrumen t
cluster _ lights up, y ou should check the oil level as soon as
possible
with the oil dipstick=> page 224. Top off the oil at your
ea rlies t conve nience =>
page 225.
ln. WARNING
Before you check anything in the engine compartment , alway s
re ad and heed all WARNINGS =>
& in "Working in the engine
c ompartment" on
page 220.
0 Note
D riving with an insufficient o il level is lik ely to cause seve re damage
to the engine .
[ i ] Tips
• The oil pressure warning display 't!:r. is not an indicator of the oil
level. Do not rely on it. Instead , check the oil level in your engine at
regular intervals , preferab ly ea ch time you refuel , and alw ays before
going on a long trip.
• I f you have the impression your engine consumes excessive
a m oun ts o f oi l, we recommend tha t you consu lt your Audi dealer to
have the cause of your concern properly diagnosed . Keep in mind
that the acc urate measure ment o f oil co nsum ptio n requires grea t
care and may take some time . Your Audi dea ler has instructions
about how to measu re oil consump tion accurately. •
Checking the engine oil level
Fig . 151 Illust rat ion of
principle 1 : Marker s on
oil dip stic k
~
Page 248 of 316
-~_T_ ir_e_ s_ a_ n_d _ w_ h_ e_e _l_s _________________________________________________ _
& WARN ING (continued )
• Driving with underinflated tires bend more , letting them get
too hot re sulting in t read separation , sudden t ire failure and loss
of control.
• Excessive speed and /overloading can cau se heat bu ild-up ,
sudden tire failure and lo ss of control.
• If the tire pressure is too low or too high , the tires will wear
prematurely and the vehicle will not handle well .
• If the tire is not flat and you do not have to change a wheel
immediately, drive at reduced speed to the nearest service station
to che ck the tire pres sure and add air as required .
0 Note
Driving without valve stem caps can cause damage to the tire
va lves. To prevent this, always ma ke sure that fact ory insta lled valve
stem caps on all whee ls are securely mounted on the valve .
<£> For the sake of the environment
Underinflated tires will also increase the fue l consumption. •
Tires and vehicle load limits
There are limits to the amount of load or weight that any vehicle and
any tire can carry. A vehicle that is overloaded will not handle well
and is more difficu lt to stop. Overload ing can not only lead to loss
of vehicle contro l, but can a lso damage important parts of the
veh ic le an d ca n lead to sudden t ire fa ilu re , inc lud ing a bl owout a nd
sudden deflation that can cause the vehicle to crash.
Yo ur saf ety a nd that of you r passenge rs also de pends on making
sure that load limits are not exceeded . Vehicle load includes every
body and eve ryt hing in and on the vehic le . Th ese load limi ts are technica
lly referred to as the vehicle's
Gross Vehicle We ight Rating
("GVWR").
Th e "GVWR" includes the weight of the basic vehicle, all factory
insta lled accessories, a ful l tank of fuel, oil, coolant and other f luids
p lus max imum load. The ma ximu m load inc ludes the numbe r of
passengers that the vehicle is intended to carry ("seating capacity")
w it h an assu med we ight o f 150 lbs (68 kg) for eac h pass enger at a
designated seating position and the total weight of any luggage in
t he vehicle.
T he
Gross Axle Weight Rating ("GAWR"l is the maximum load that
can be a pplied a t eac h of the vehic le's two a xles .
T he Gross Veh icle Weigh t Rat ing a nd the Gross A xle We igh t R ating
are listed on the safety comp liance stic ker label located on the
dr iver's s ide B -p illar . You r Aud i has 2 sea ting pos it io n s. Eac h seating
posit ion has a safety belt=>
page 137, "Safety belts".
T he fact that the re is a n up per lim it to yo ur vehicle's G ross Veh ic le
We ig ht Rating means that the to tal we ight o f what ev e r is be ing
ca rried in the ve hicle is lim ited. The mo re pas se ngers in the vehic le
or passe ngers w ho ar e heav ier t han th e sta ndard weights assumed
mean that less weight can be carried as luggage.
T he ti re p ress ure labe l on yo ur Aud i al so list s the maxi mum
combined weight of a ll of the occupants and luggage or other cargo
th at the vehicle can car ry. F or the lo ca tio n of t he label =>
page 242,
fig . 160.
& WARNING
Overloading a vehicle can cause loss of vehicle control , a crash or
other accident, serious personal injury , and even death .
• Carrying more weight than your vehicle was des igned to carry
will prevent the vehicle from handling properly and increase the risk of the loss of vehi cle control .
• The brakes on a vehicle that has been overloaded may not be
able to stop the vehicle within a safe distance. .,_
Page 258 of 316
_L_T~ir ~e :..:s~ a~n~ d~ w~ h ~e~e~ l~ s '.,_ ______________________________________________ _
Wheel bolts
W heel b olts mus t al wa ys be tigh te n ed to t he cor rect
to rqu e.
The design of wheel bolts is matched to the factory instal led rims . If
d ifferen t rims are fitted, the co rrect w heel bo lts wit h th e rig ht length
and correctly shaped bolt heads m ust be used. This ensures that
w hee ls are fitt ed s ecure ly a nd th at t he brake sys te m funct ions
correctly .
I n certain circums tances, yo u may no t use w heel b olts fr om a
differ ent vehicle -even if it is the same model::::;,
page 296.
&_ WARNING
Improperly tightened or maintained wheel bolts can become loose
causing loss of control , a collision and serious personal injury.
• Always keep the wheel bolts and the threads in the wheel hubs
clean so the wheel bolts can turn easily and be properly tightened.
• Never grease or oil the wheel bolts and the threads in the wheel
hubs. They can become loose while driving if greased or oiled,
even if tightened to the specified torque .
• Only use wheel bolts that belong to the rim being installed.
• Never use different wheels bolts on your vehicle.
• Always maintain the correct tightening torque for the wheel
bolts to reduce the risk of a wheel loss. If the tightening torque of
the wheel bolts is too low , they can loosen and come out when the
vehicle is moving . If the tightening torque is too high, the wheel
bolts and th reads can be damaged and the wheel can become
loose .
0 Note
The specified torque for the wheel bolts is 90 ft lb (120 Nm) with a
t ole ranc e of ± 7,4 ft lb(± 1 0 Nm). To rque whee l bolts diag onally.
After changing a wheel, the torque must be checked as soon as possible with a to
rque wrench -preferab ly by an authorized Audi
dea ler o r qu alif ied wo rksh op.•
Low aspect ratio tires
Yo ur Audi is fac tory-equip ped wi th l ow asp ect rati o tires. Th ese tires
have been thorough ly tested and been selected specifically for your
mod el for thei r su per b p erfo rma nce, road feel an d handl in g u nder
a variety of driving conditions . Ask your author ized Aud i dea ler for
mo re deta ils.
T he low aspec t ra tio o f th ese t ires is ind icate d by a numera l o f 55 or
less in the t ire's size designation. The numera l represents the ratio
of the ti re's s idewa ll height in re la ti on to its tread w idth e xpress ed
in percentage. Conventiona l tires have a height/width ratio of 60 or
mo re .
The performan ce of low -aspect -ratio t ires is part icularly sensitive to
improper inflation pressure . It is therefore important that low
aspect ratio tires are inflated to the specified pressure and that the
inflation pressure is regularly checked and maintained. Tire pres
sures should be checked at least once a month and alway s before a
long trip::::;,
page 244, "Checking tire p ressure".
What you can do to a void tire and rim damage
L ow a spect ratio tires can be damaged more easi ly by impact with
potho les, curbs, gull ies or ridges on the road, particularly if the t ire
is underinflated.
In orde r to minimi ze the occurrence o f im pact da mage to th e tire s
of your vehicle, we recommend that you observe the fo llowing
p reca utions:
• Always ma intain reco mm ende d inflat io n pressu res . C heck your
tire p ressure every 2, 000 miles (3 ,000 km) and add ai r if neces sary .
• D rive car eful ly on roads with potholes, deep gullies or ridges.
Th e impact from d riving th ro ugh o r ove r such o bstac les can
dama ge you r tires . Impact w ith a curb may also cause da mage to
your tires . .,_