key AUDI TT ROADSTER 2011 User Guide
[x] Cancel search | Manufacturer: AUDI, Model Year: 2011, Model line: TT ROADSTER, Model: AUDI TT ROADSTER 2011Pages: 260, PDF Size: 64.11 MB
Page 45 of 260
- engine compartment
-lu ggage compar tment
- doors
- ignition
When the system is activated, the alarm will
be triggered if one of the doors, the engine
h ood or the rear lid are opened, or if the ign i
tion is turned on.
The anti-theft alarm system wi ll also go off
when the battery is disconnected.
You can a lso trigger the alarm by pressing the
PANIC button on your remote-control key.
This will alert other peop le in case of emer
gency. Press the
PANIC button again to turn
off the alarm .
How is the anti-theft alarm switched off
when triggered?
The alarm system is switched off when you
unlock the vehicle using the remote-control
key or when the ignition is sw itched on . The
a larm w ill also switch itse lf off when it comes
to the end of its cycle.
Emergency flasher
The emergency flasher will blink briefly when
the doors, engine hood and rear lid are prop
erly closed .
If the emergency flashers do not blink, check
the doors, engine hood and rear lid to make
sure they are properly closed. If you close a
door, the hood or the rear lid with the ant i
theft alarm switched on, the emergency flash
e rs will bli nk only after you have closed the
door or lid .
@ Tips
-For the anti-theft alarm system to func
tion properly, make sure all vehicle doors
and windows are closed before leaving
the vehicle .
- When you open the vehicle from the
driver's door using the key, the centra l
l ocking switch will work only after you
have switched on the ignition.
Opening and closing 43
Power windows
Controls
The driver can operate all windows .
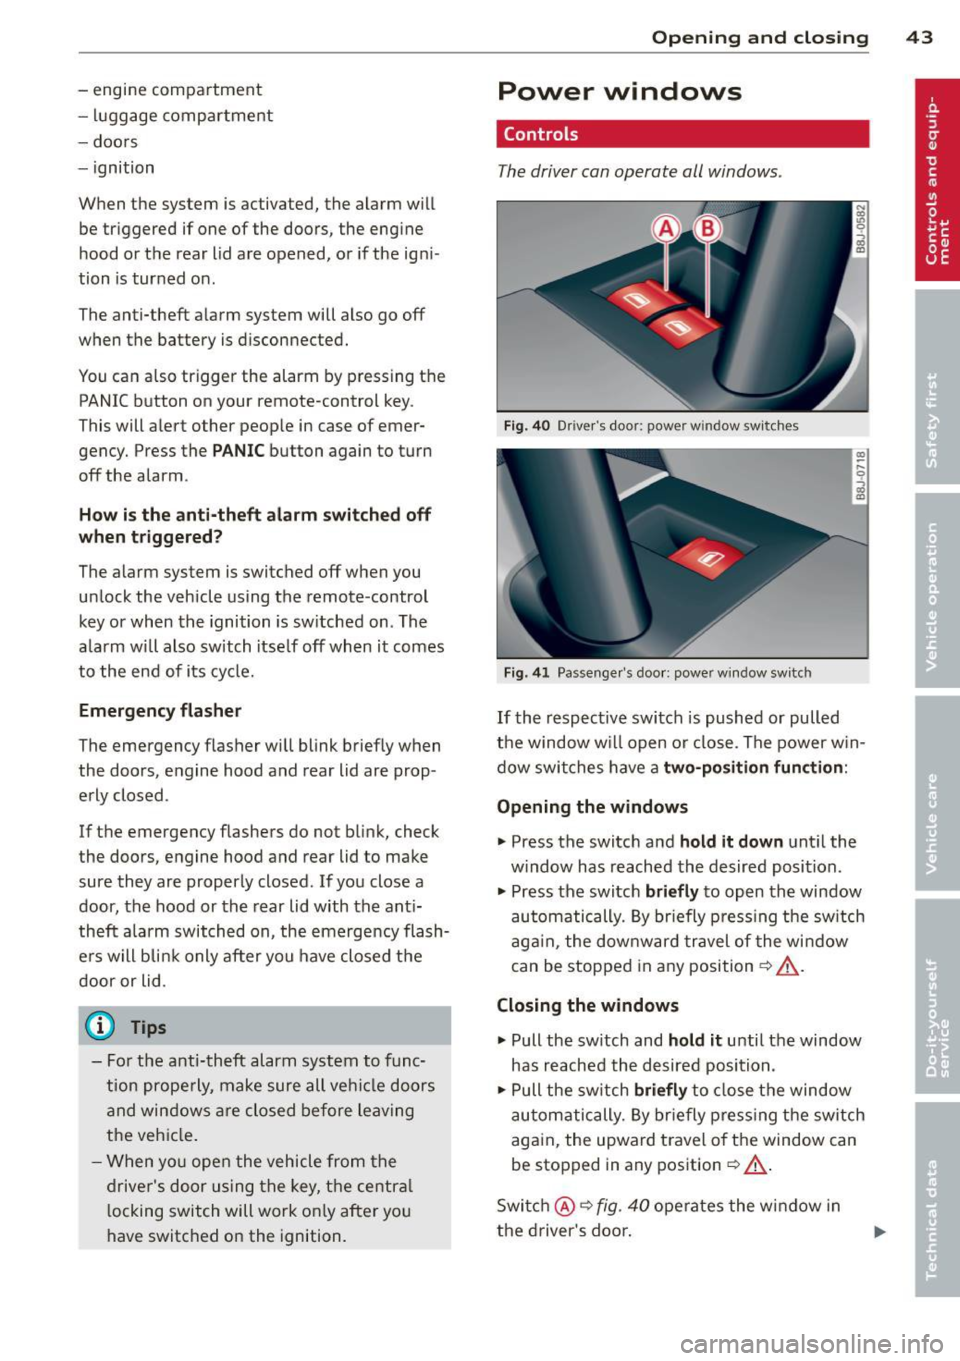
Fig. 40 Driver's door: power w indow switches
Fig. 41 Passenger's door: power window switch
If the respective switch is pushed or pulled
the window w ill open or close. The power win
dow switches have a
two-position function :
Opening the windows
.,. Press the switch and hold it down unt il the
w indow has reached the desired position.
.. Press the switch
briefly to open the window
automatically. By briefly pressing the switch
again , the downward travel of the window
can be stopped in any position¢ _&..
Closing the windows
.,. Pull the sw itch and hold it until the window
has reached the desired position.
.,. Pull the switch
briefly to close the window
automatically. By briefly pressing the switch
again, the upward travel of the window can
be stopped in any position
~ _&. .
Switch @¢
fig. 40 operates the window in
the driver's door.
Page 46 of 260
44 Opening and clo sing
Switch @ operates the window in the front
passenger's door .
.&_ WARNING
-Do not leave children unattended in the
vehicle, especially with access to vehicle
keys . Unsupervised use of the keys can
result in starting of t he engine and use
of vehicle systems such as power win
dows , etc. which cou ld result in serio us
mJury .
- Remember -you can still open or close
the power w indows for about ten m i
nu te s after the ignition is sw itche d off.
Only whe n eit her of the fron t doo rs a re
opened are the power windows sw itched
off.
- B e care ful when closing the windows .
C heck to see that no one is in the way, or
serious injury could result!
- Always remove the ignition key whenever
yo u leave yo ur vehicle.
- If you lock you r vehicle from the ou ts ide,
no one, especially children, sho uld re
main in the vehicle .
- Do not stick any thing on the windows o r
the windshie ld that may interfere with
the driver 's fie ld of vision .
(!} Tips
-When the doors a re opened, the w in
dows are a utomat ically lowered 10 mm.
- The w indows can still be ope ned and
closed for abou t ten m in utes after the
i gnition has been turned off. The power
win dows are not sh ut off until one of the
front doors is opened.
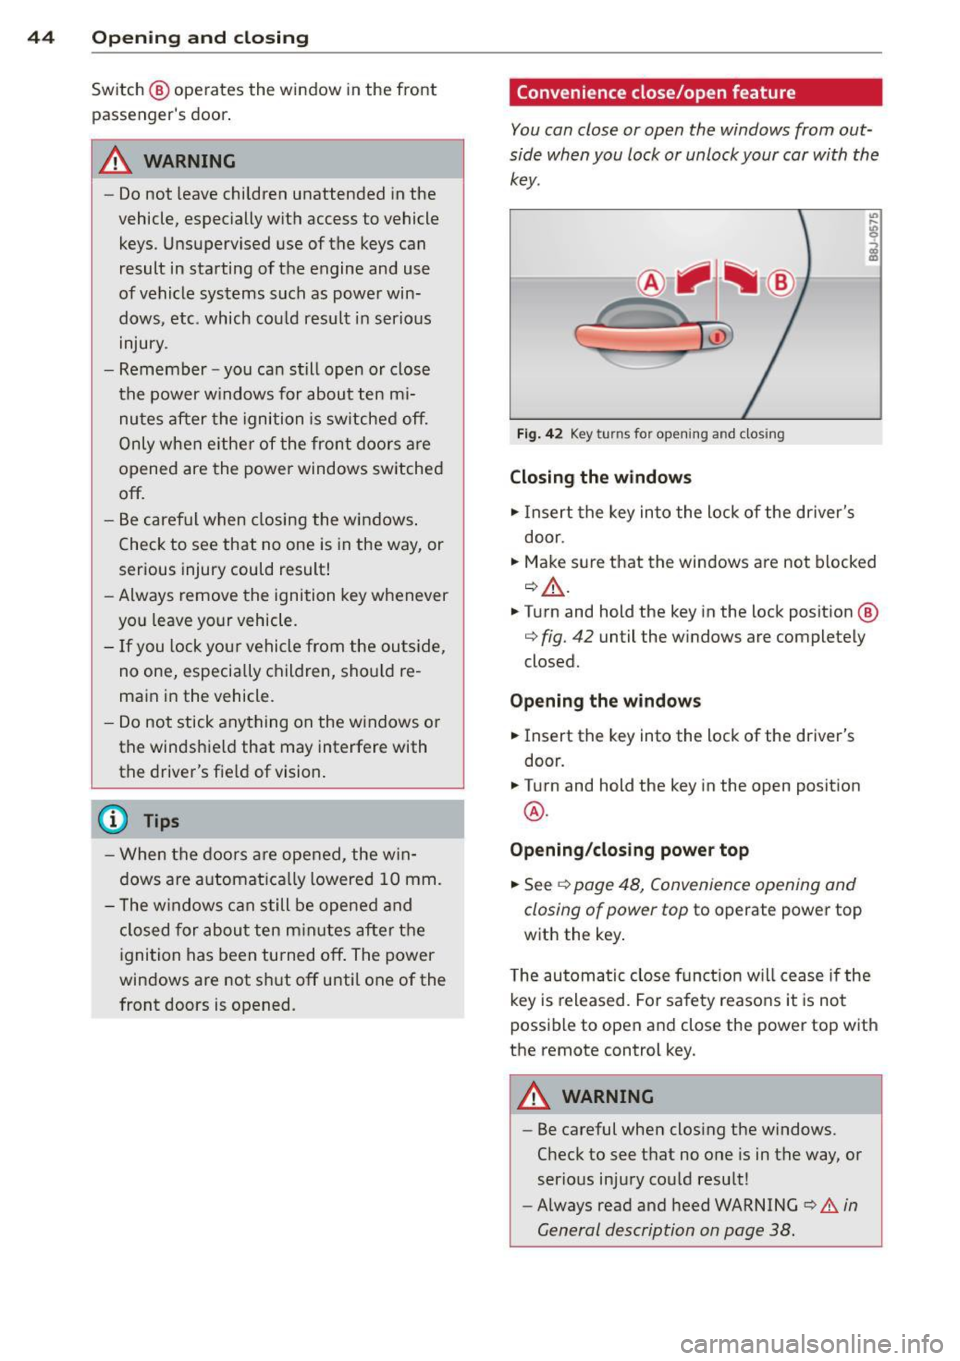
Convenience close/open feature
You can close or open the windows from out
side when you lock or unlock your car with the
key.
r
F ig. 4 2 Key turns fo r op enin g an d clos ing
Closing the windows
.,. Insert the key in to the lock of the driver's
door.
.,. Make s ure that the windows a re not blocked
~.&. .
.,. Turn and hold the key in the lock position @
q fig. 42 until the windows are completely
closed.
Opening the window s
.,. Insert the key into the lock of the driver's
door.
.,. Turn and hold the key in the open posit ion
@ .
Opening /closing power top
.,. See ¢ page 48, Convenience opening and
closing of power top
to operate power top
with the key .
T he automatic close function w ill cease if the
k ey is released . Fo r sa fe ty reaso ns it is no t
possible to open and close the power top with
the remote control key .
.&_ WARNING
-
-
- Be careful when clos ing the windows.
Check to
see t h at no one is in the way, or
serio us inju ry co uld resu lt!
- Always read and heed WARNING
~.&. in
General description on page 38 .
Page 50 of 260
48 Convertible top
that the top will be opened by the wind.
T his can result in injuries and damage to
the vehicle.
@ Tips
The indicator light for the convertib le top
goes o ut as soon as it is correctly latched.
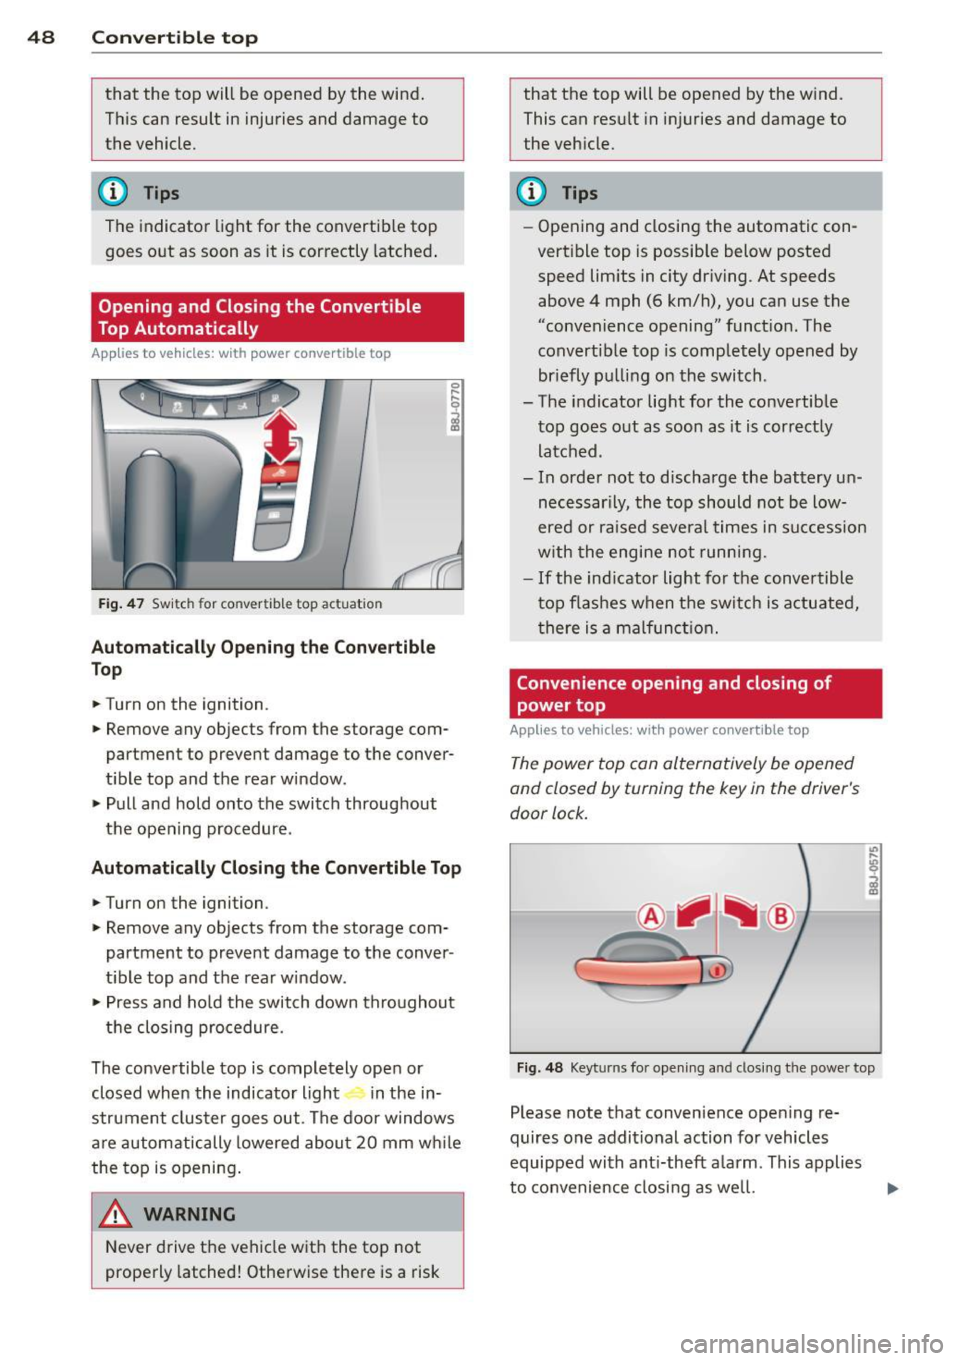
Opening and Closing the Convertible
Top Automatically
App lies to vehicles: with power convertible top
Fig. 47 Sw it ch for co nver tible top actuat ion
Automatically Opening the Convertible
Top
.. Turn on the ignition .
.. Remove any objects from the storage com
partment to prevent damage to the conver
t ible top and the rear window.
.,. Pull and hold onto the switch throughout
the opening procedure .
Automatically Closing the Convertible Top
.. Turn on the ignition .
.. Remove any objects from the storage com
partment to prevent damage to the conver
t ible top and the rear window .
.. Press and hold the switch down thro ughout
the closing procedure.
The convertible top is completely open or closed when the indicator light in the in-
strument cluster goes out. The door windows
are automatically lowered about 20 mm w hile
the top is opening .
_& WARNING
Never drive the vehicle with the top not
properly latched! Otherwise there is a risk
-
that the top will be opened by the w ind.
This can res ult in injuries and damage to
the veh icle.
(D Tips
- Opening and closing the automatic con
vertible top is possible below posted
speed lim its in c ity driving . At speeds
above 4 mph (6 km/h), you can use the
"convenience opening" funct ion . The
convertible top is completely opened by
br iefly pulling on the switch .
- The indicator light for the convertible
top goes out as soon as it is cor rectly
latched .
- In orde r not to discharge the battery un
necessar ily, the top should not be low
ered or raised several times in succession
w ith the engine not running.
-If the ind icator light for the convertible
top flashes when the switch is actuated,
th ere is a malfunct ion.
Convenience opening and closing of
power top
Applies to vehicles: with power convertible top
The power top con alternatively be opened
and closed by turning the key in the driver's
door lock.
C
r
Fig. 48 Keyt urns for open ing and clos ing t he powe r top
Please note that convenience ope ning re
quires one additional action for vehicles
equipped with ant i-theft a larm . This applies
to convenience closing as well.
Page 51 of 260
Convenience opening
• Press the unlock button @ on the remote
control key to unlock the vehicle.
• Turn the key in the driver door
once to posi
tion @
c::> fig. 48.
• Within two seconds turn the key a second
time and hold it in th is position until the
power top has completely retracted .
Convenience closing
• Turn the key in the driver door once to posi
tion @
c::> fig. 48.
• Within two seconds tu rn the key a second
time and hold it in th is position until the
power top has completely closed .
Opening or closing motion stops
immediately
as soon as you re lease the key. For safety rea
sons, it is no t possible to activa te the conven
ience feature with the remote control.
.,&. WARNING
When open ing and closing the power top
make sure to keep yourself a nd others
clear of al l moving parts. Risk of injur y!
Wind Deflector
The wind deflector reduces turbulence in the
passenger compartment and makes driving
more comfortable.
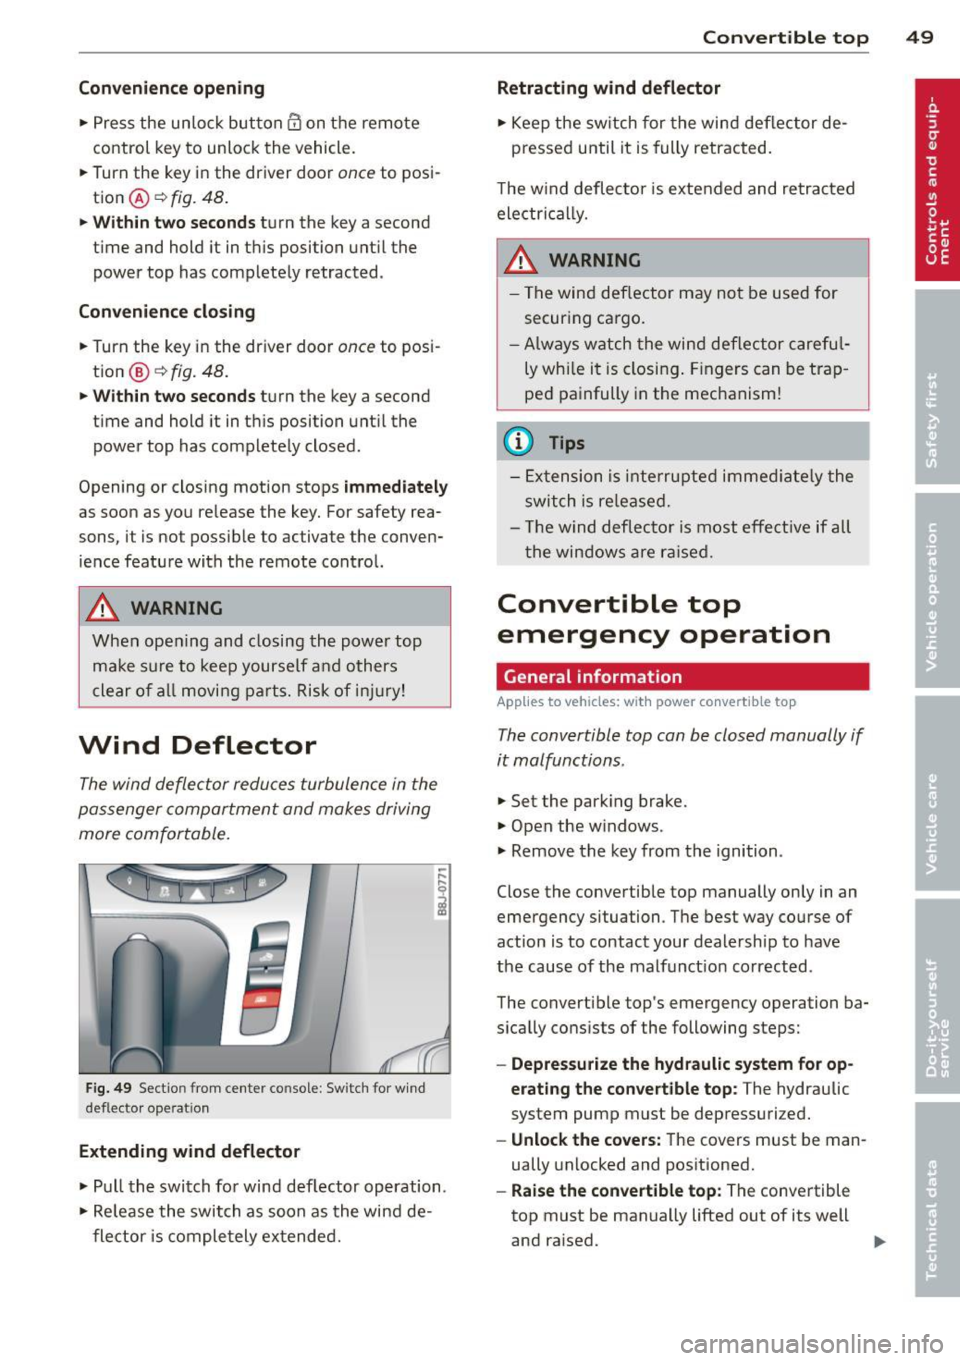
F ig. 49 Sect io n fr om center co nsole : Sw itch for w ind
def lec tor ope ra ti on
Extending wind deflector
• Pull the switch fo r wind deflector operation.
• Re lease the switch as soon as the wind de
flector is completely extended.
Convertible top 49
Retracting wind deflector
• Keep the switch for the wind deflector de
pressed until it is fully retracted.
T he w ind deflecto r is extended and retracted
electri cal ly.
.,&. WARNING
--
- The wind def lector may not be used for
securing cargo .
- Always watch the wind deflector careful
ly whi le it is closing. Fingers can be trap
ped painfully in the mechanism!
(0 Tips
-Extension is interrupted immed iate ly the
switch is released.
- Th e wind deflecto r is most effect ive if all
the windows are raised.
Convertible top
emergency operation
, General information
Applies to vehicles: with power convertible top
The convertible top can be closed manually if
it malfunctions .
.,. Set the parking brake.
.,. Open the w indows .
.,. Remove the key from the ignition.
Close the convertible top manually only in an
emergency situation. The best way course of
action is to contact your dealersh ip to have
the cause of the malfunct ion corrected .
The convertible top's emergency operation ba
sically consists of the following steps:
- Depressurize the hydraulic system for op
erating the convertible top :
The hydraulic
system pump must be depressuri zed.
- Unlock the covers: The covers must be man
ually unlocked and positioned.
-Raise the convertible top: The convertible
top must be manually lifted out of its well
and ra ised. .,.
Page 52 of 260
50 Convertible top
-Lock the conve rtible top: The latches for
the convertible top must be locked with the
emergency lock key.
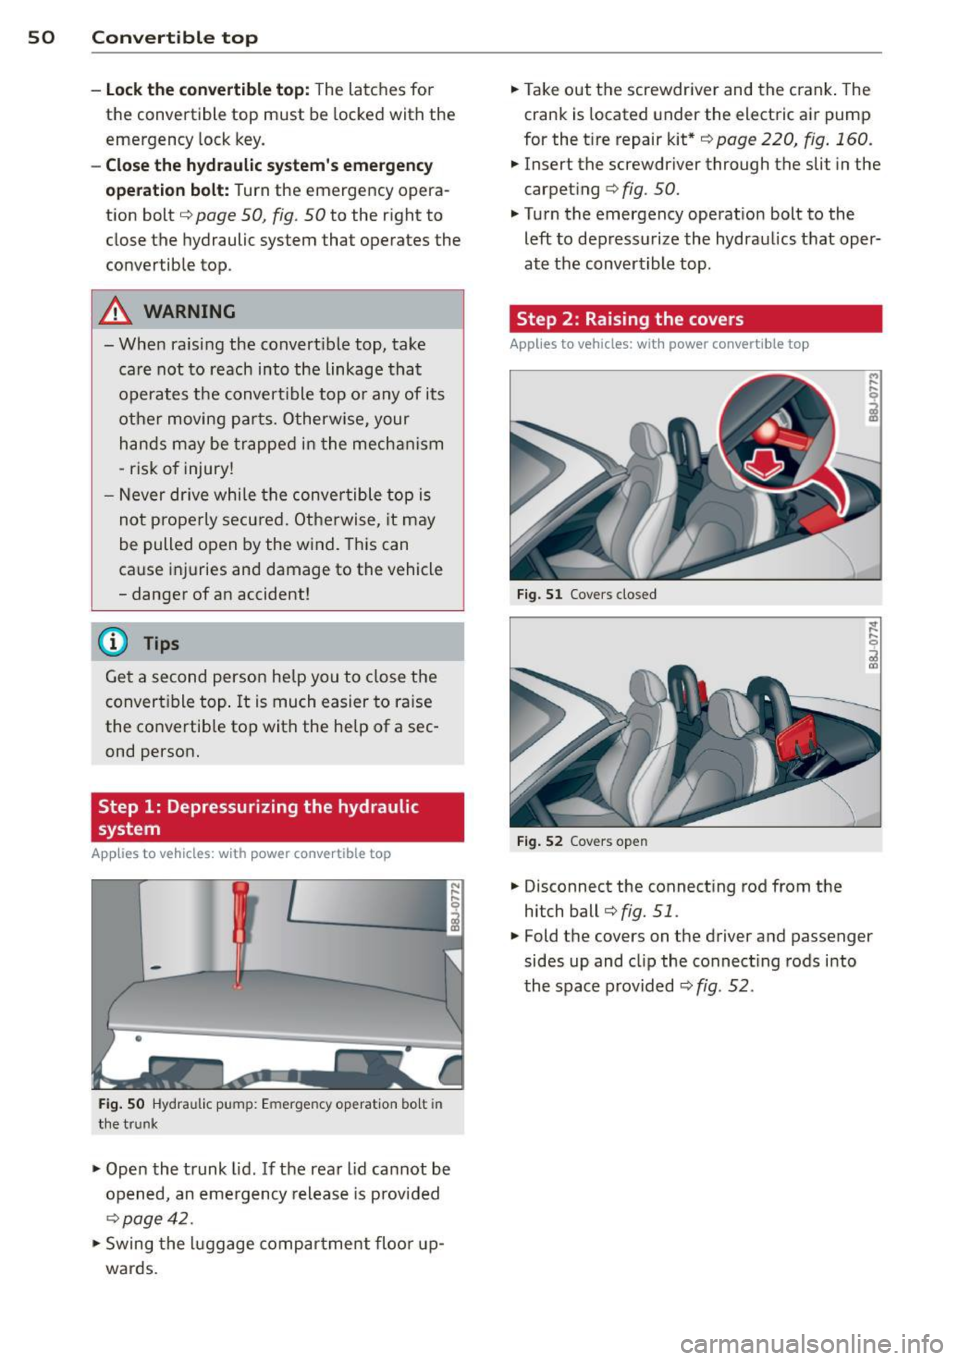
-Close the hydraulic system's emergency
operation bolt:
Turn the emergency opera
tion bolt
c:> page 50, fig. 50 to the r ight to
close the hydraulic system that operates the
convertible top .
A WARNING
-When ra ising the convert ible top, take
care not to reach into the linkage that
operates the convert ible top or any of its
other moving parts. Otherwise, your
h ands may be trapped in the mecha nism
- risk of injury!
- Never drive while the convertible top is
not properly secu red. Otherwise, it may
be pulled open by the wind. This can
cause injuries and damage to the vehicle
- danger of an accident!
(D Tips
Get a second person help you to close the
convert ible top . It is much easier to raise
the co nvertib le top with the help of a sec
ond person.
Step 1: Depressurizing the hydraulic
system
Applies to vehicles: with power convertible top
-
Fig. SO Hydraulic pu mp: Emerge ncy operation bo lt in
the trun k
.,. Open the trunk lid. If the rear lid cannot be
opened, an emergency release is provided
c:>page42 .
.,. Swing the luggage compartment floor up
wards.
-
.,. Take out the screwdriver and the crank . The
crank is located under the electric air pump
for the t ire repair kit*
c:> page 220, fig. 160 .
.,. Insert the screwdriver through the slit in the
carpet ing
c:> fig. 50.
.,. Turn the emergency operation bolt to the
left to depressurize the hydraulics that oper
at e the convertible top.
Step 2 : Raising the covers
Applies to vehicles: with power convertible top
Fig. 51 Covers closed
Fig. 52 Covers ope n
.,. Disconnect the connect ing rod from the
hitch ball
c:>fig. 51 .
.,. Fold the covers on the driver and passenger
sides up and cl ip the connect ing rods into
the space provided
c:> fig. 52 .
Page 58 of 260
56 Clear vis ion
Notes on the se feature s
- The turn signals only work with the ignition
swit ched on . The indicator lights
(I or IN in
the instr ument cl uster ¢
page 13 also b link .
- After you have turned a corner, the turn sig-
nal switches off a utomat ica lly.
- T he
high beam works only when the head
lights are on. The indicator light . in the
instrument cluster illuminates when the
high beams a re on.
- The
headlight flasher wo rks on ly as long as
yo u hold the lever -even if there are no
lights switched on. The indicator light . in
the instrument cl uster illum inates when you
use the headlight f lasher.
(D Note
Do not use the high beam or headlight
flasher if you know that these cou ld be
blind ing oncoming traffic.
Emergency flasher
The emergency flasher makes other motorists
aware that you or your vehicle are in an emer
gency situation.
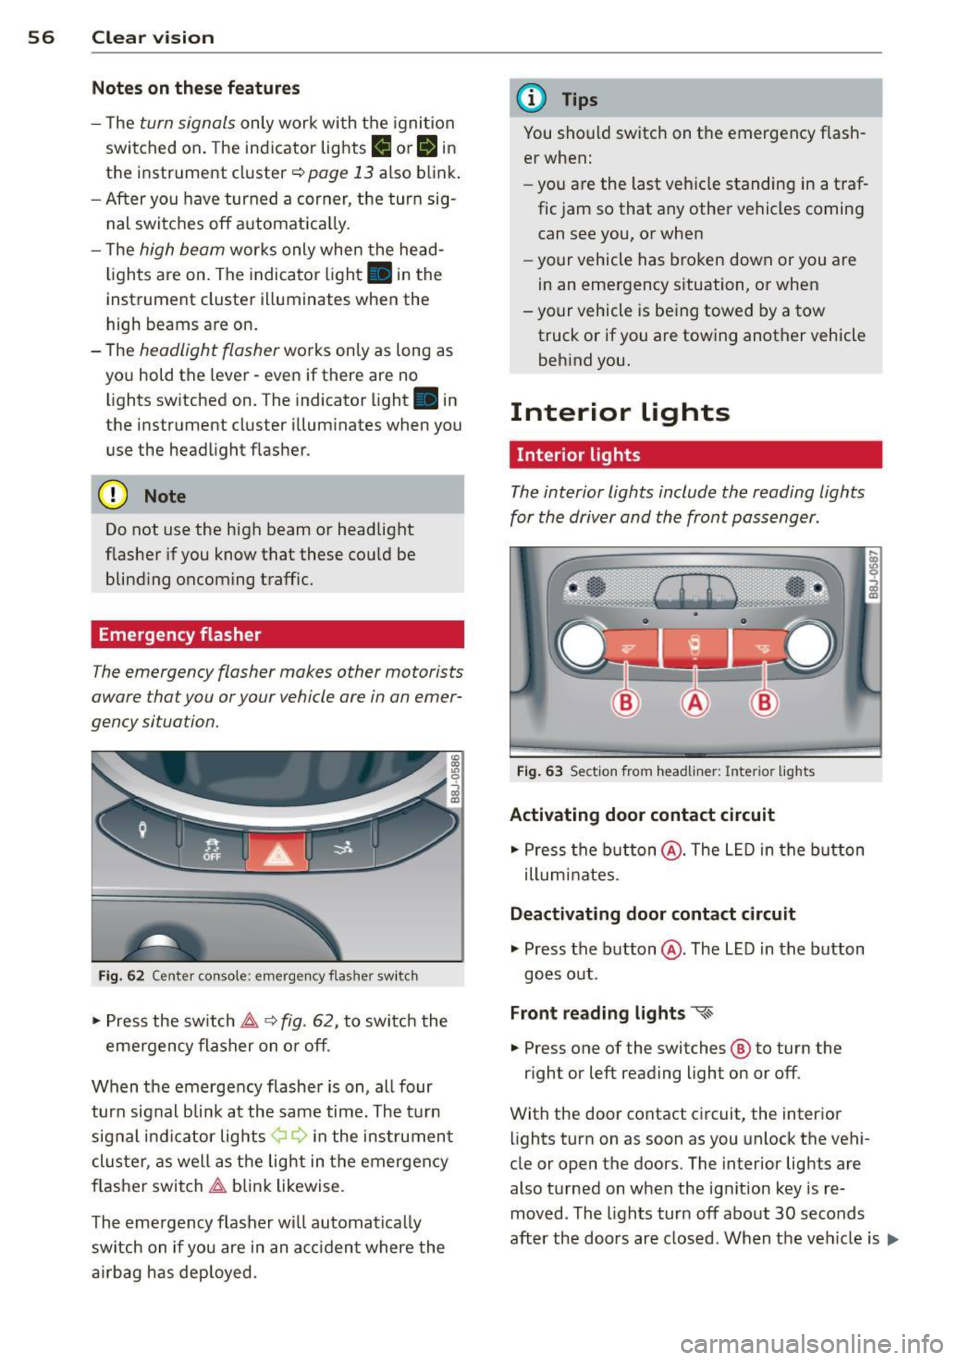
F ig . 6 2 Cente r console: emerge ncy flas her sw itch
,. Press the switch ~ ~ fig. 62, to switch the
eme rgency flasher on or off .
When the emergency f lashe r is on, a ll four
turn sig nal bli nk at the same time. The t urn
sig nal i ndi ca tor lights ¢ Q in the ins trument
cluster, as well as the lig ht in t he emergen cy
f lasher switch ~ blink likewise .
The emergency flasher w ill automat ica lly
switch on if you are in an a cciden t where the
a irbag has deployed.
(D Tips
You should switch on t he emergency f lash
er when:
- you are the last veh icle standing in a traf
fic jam so that any other vehicles coming can see you, or when
- your vehicle has broken down or you are
in an emergency s ituation, or when
- your vehicle is being towed by a tow
truck or if you are tow ing another vehicle
beh ind you.
Interior lights
' Interior lights
The interior lights include the reading lights
for the driver and the front pass enger.
F ig . 63 Sect ion from headliner: Interio r lights
Activating door contact circuit
,. Press the b utton @. The L ED in the b utton
illum inates.
Deactivating door contact circuit
,. Press the button @. The LED in the button
goes o ut.
Front reading lights "<~
.. Press one of the switches ® to turn the
r ight or left reading light on or off.
With the door contact circuit, the interior lights turn on as soon as you unlock the vehi-
cle or open the doors. The interior lig hts are
also t urned on when the ign ition key is re
moved . The lights turn off about 30 seconds
after the doo rs ar e closed. When the ve hicle is
lilJJ,
Page 70 of 260
68 Seats and st o ra ge
belts and the airbag system only offe r
maximum protection when the seat back
is u pright and the safety belts are prop
erly positioned on the body . The more
the seatback is reclined, the greater the
risk of personal injury from an incorrect
seating pos it ion and improperly posi
t ioned s afety be lts!
Power seats
Adjustment switches
App lies to vehicles: with power seats
The operating logic for the switches corre
sponds to the construction and function of
the seat.
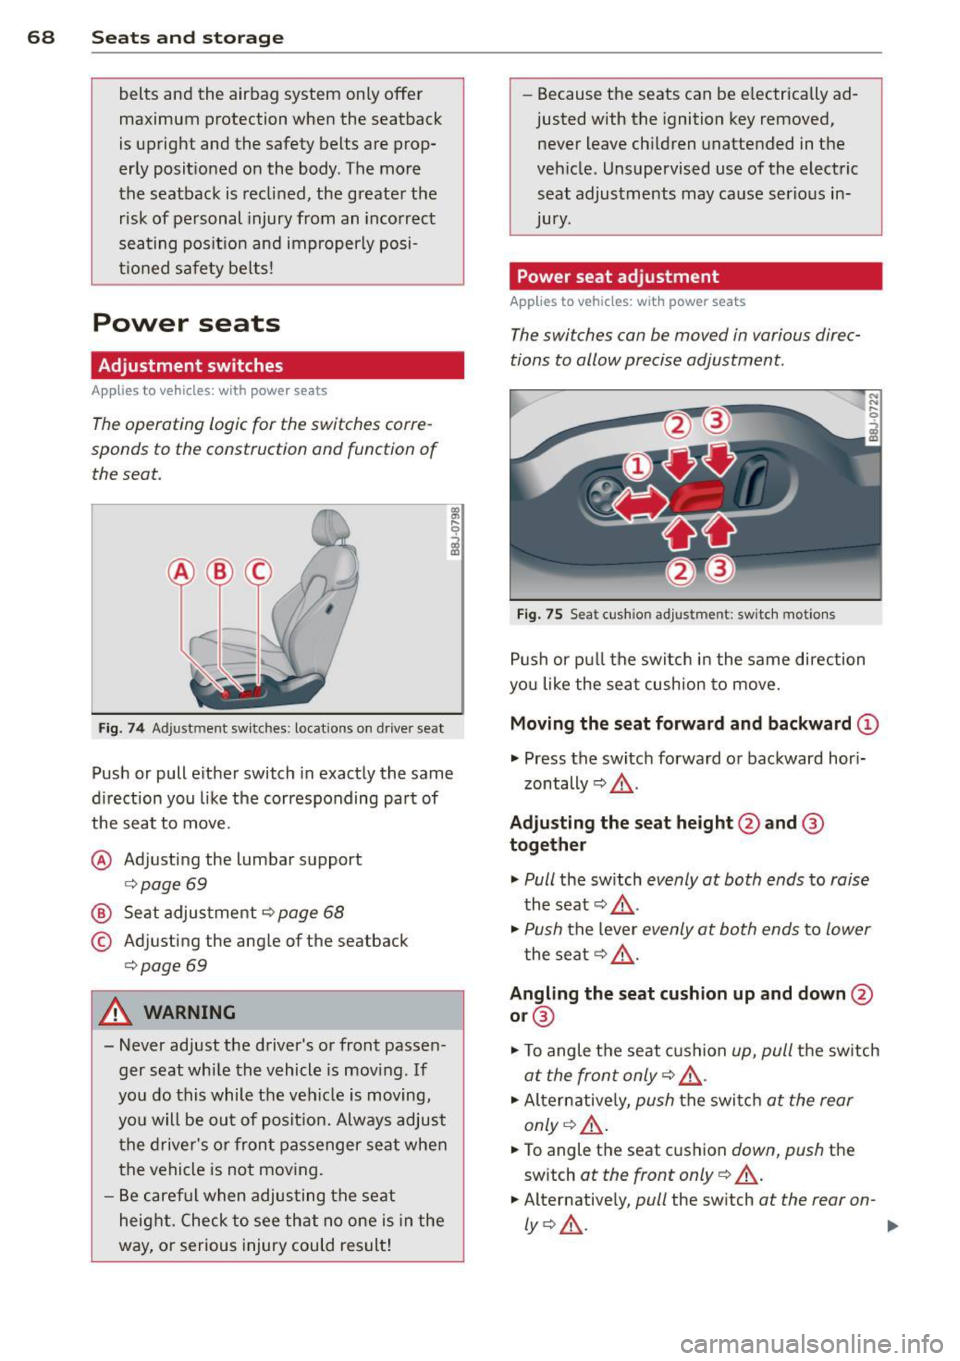
F ig . 7 4 Adju stm en t sw it c h es: locat io ns o n dr ive r seat
Push or pull e ither switch in exactly the same
d irection you like the corresponding part of
the seat to move.
@ Adjusting the lumba r support
¢ page 69
@ Seat adjus tment¢ page 68
© Adjusting the ang le of the seatback
¢ page 69
A WARNING
- Never adjust t he d river's o r front passe n
ger seat wh ile the vehicle is moving . If
yo u do this while t he veh icle is moving,
yo u will be ou t of posi tion. Always adjust
t h e dr ive r's or front passenger se at when
the vehicle is not mov ing.
- B e caref ul when adju sting t he seat
heig ht. Check to see that no one is in the
way, or serious injury could result! -
Because the seats can be e lectrically ad
justed with the ignition key removed,
never leave chi ldren unattended in the
veh icle . Unsupervised use of the electric
seat adjustments may ca use serio us in
Jury .
Power seat adjustment
Applies to vehicles: wit h power seats
The switches can be moved in various direc
tions to allow precise adjustment.
Fig. 75 Sea t cus hion ad ju st me nt: s wit c h m oti on s
P ush or p ull the switch i n the same direction
yo u like the sea t cushion to move.
Moving the seat forward and backward ©
.., Press the switc h forward or backward hor i-
zontally ¢& .
Adju sting the seat height@and @
together
.., Pull the sw itch evenly at both ends t o raise
the seat ¢ A.
.., Push the lever evenly at both ends to lower
t he sea t¢ & -
Angling the seat cushion up and down@
or @
.., To angle t he seat cushion up, pull the sw itch
at the fron t only ¢& .
.., Altern ative ly, push the switc h at the rear
only ¢& .
.., To angle the seat c ushion down, push the
sw itch
at the front only¢ A.
.., Alternative ly, pull the sw itch at the rear on-
ly ¢& . ....
Page 71 of 260
A WARNING
-Never adjust the driver's or front passen
ger seat while the vehicle is moving . If
you do this while the vehicle is moving,
you will be out of posit ion . Always adjust
the driver's or front passenger seat when
the vehicle is not moving .
- Be careful when adjusting the seat
height. Check to see that no one is in the
way, or serious injury could result!
- Because the seats can be elect rically ad
jus ted wi th the ign it ion key removed,
never leave children unattended in the
vehicle. Unsupervised use of th e electric
seat adj ustments may cause serious in
jury .
Adjusting the seatback
Applies to vehicles: with power seats
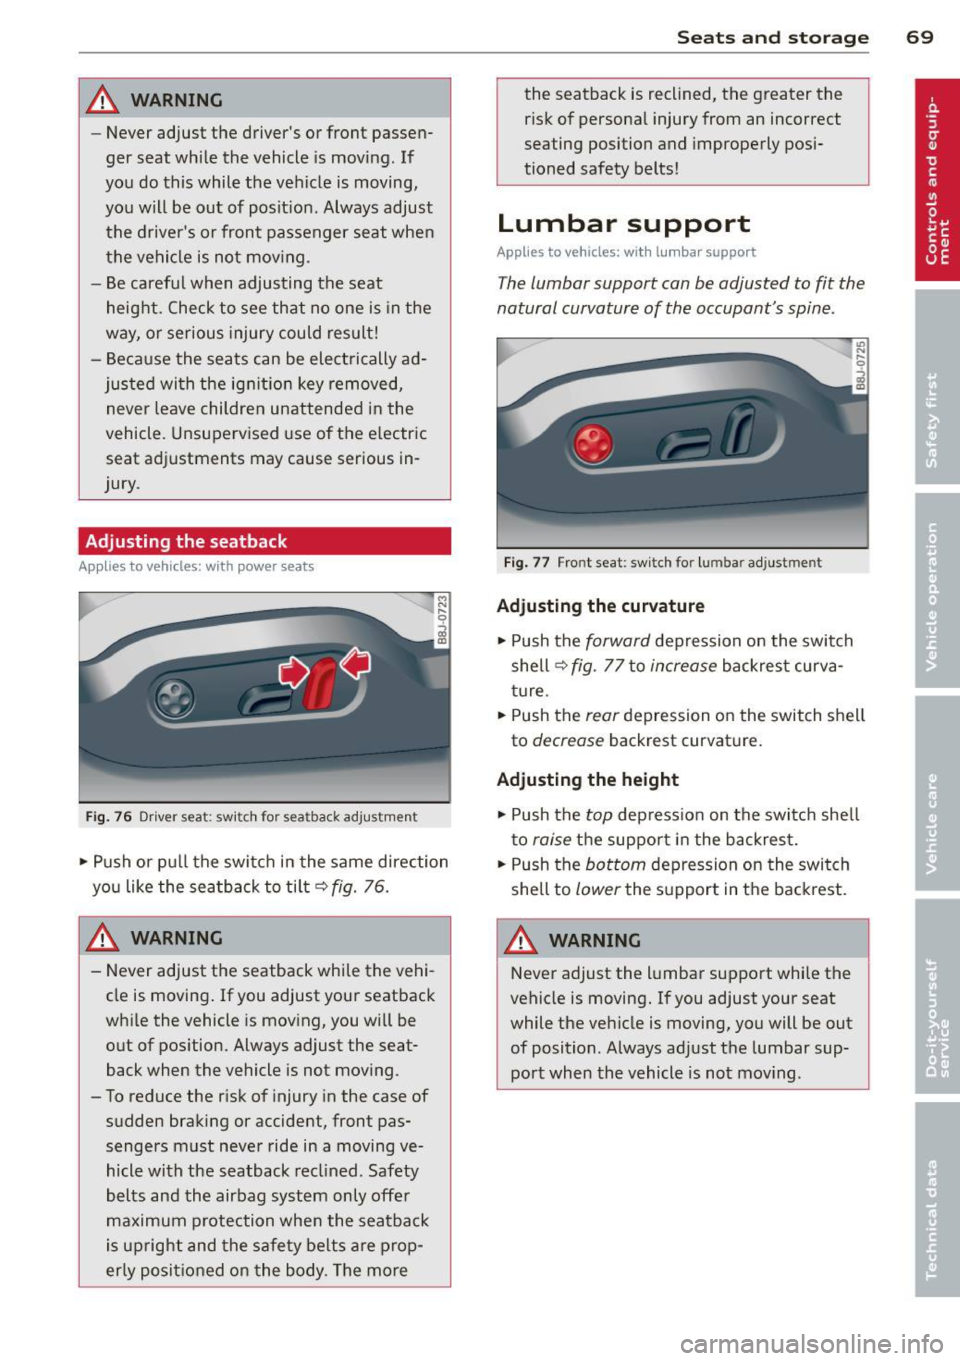
Fig. 76 Drive r s eat: swit ch for seatb ack adju stment
~ Push or pu ll the switc h in the same direction
you like the seatback to tilt ~
fig. 76.
A WARNING
- Never adjust the seatback while the vehi
cle is moving . If you adjust your seatback
whi le the vehicle is moving, you will be
out of pos ition. Always adjust the seat
back when the vehicle is not mov ing .
- To reduce the risk of injury in the case of
sudden braking or accident, front pas
sengers must never ride in a moving ve
hicle with the seatback recl ined . Safety
belts and the airbag system only offer
maximum p rotection whe n the seatback
is upright and the safe ty be lts are prop
erly posit ioned on the body . The more
S ea ts a nd s to rage 69
the seatback is reclined, the greater the
risk of persona l injury from an incorrect
seating position and improperly posi
tioned safety belts!
Lumbar support
Applies to vehicles: with lumbar support
T he lumbar support can be adju sted to fit the
natural curvature of the occupant 's spine .
Fig . 77 Fro nt seat: sw it c h fo r lumb ar adju stmen t
Adju sting the cur vatur e
~ Push the forward depression on the switch
shell
~ fig . 7 7 to increase backrest curva
ture .
~ Push the re ar depression on the switch shell
to
d ecr eas e backrest curvat ure.
Adju sting the height
~ Push the top dep ression on the switc h shell
to
raise the support in the backrest.
~ Push the bottom depression on the swi tch
shell to
low er the s upport in the backrest .
A WARNING
Never adjust the lumbar suppo rt while the
vehicle is moving.
If you adjust your seat
while the ve hicle is moving, you will be out
of position . Always adjust the lumbar sup
port when the vehicle is not mov ing .
Page 75 of 260
Before you purchase any accessories, always
read and follow the information in
c::> page 243, Additional accessories and parts
replacement.
A WARNING
The outlet plus any appliances plugged in
to it remain functional even if the ignition
is switched off or the ignition key is re
moved. Never leave children inside the ve
hicle without supervision.
(D Note
To avo id damag ing the socket, only use
plugs that fit properly.
@ Tips
When the engine is off and accessories are still plugged in and are on, the vehicle bat
tery can still be dra ined.
Storage
General
A WARNING
- Always remove objects from the instru
ment panel. Any items not put away
cou ld slide around inside the vehicle
wh ile driving or when accelerating or
when applying the brakes or when driv ing around a corner.
-
- When you are driving make sure that
anything you may have placed in the cen
ter console or other storage locations cannot fall out into the footwells . In case
of sudden braking you would not be able
to brake or accelerate.
S ea ts a nd s to rage 73
Glove compartment
The glove compartment is illuminated and
can be locked .
i
----------- i
•
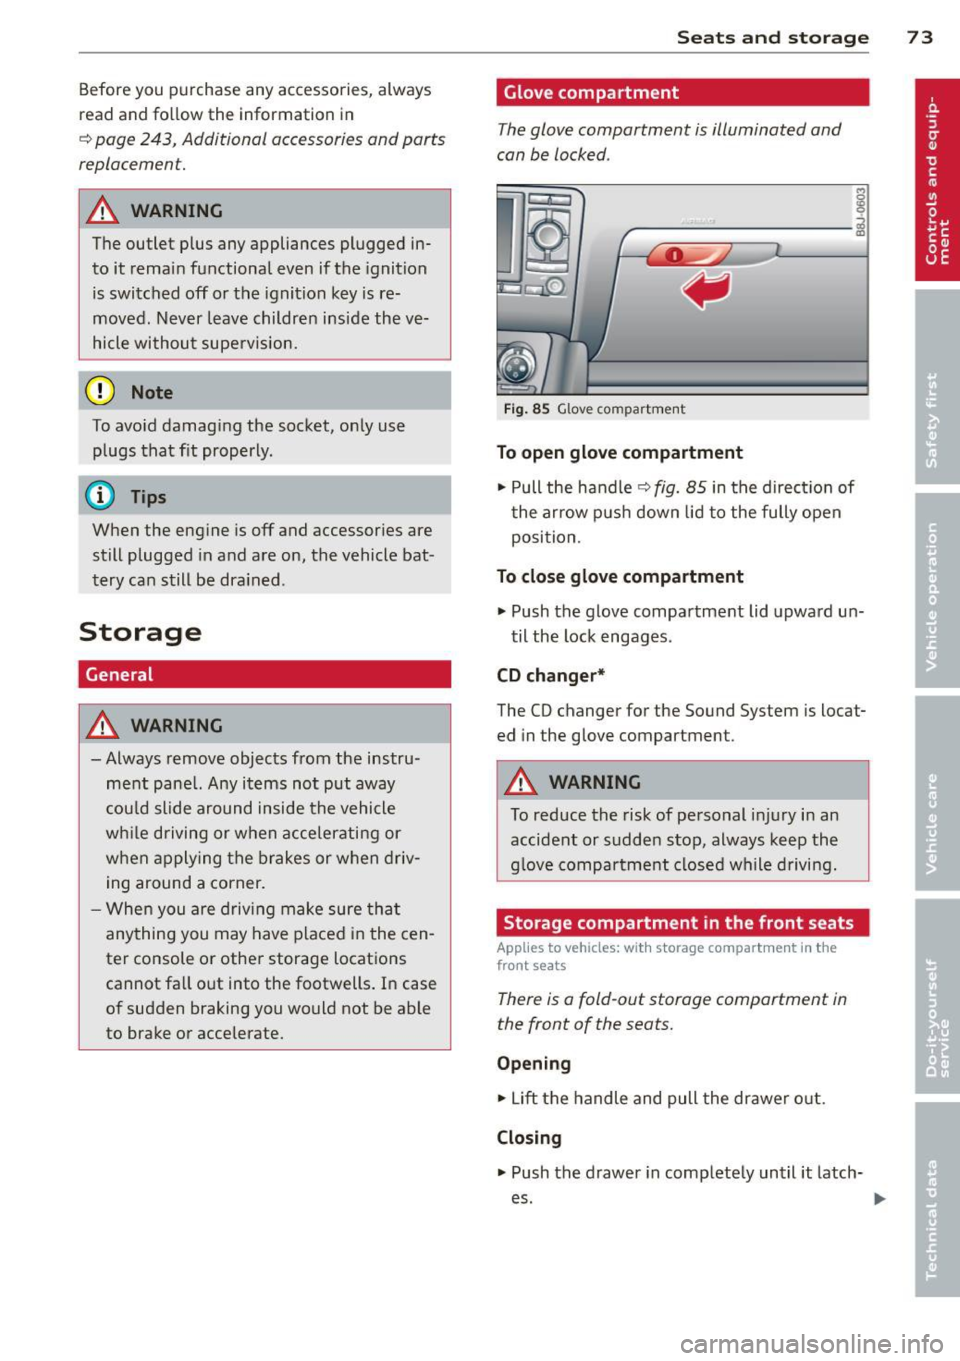
Fig . 85 Glove compartment
To open glo ve com partment
.,. Pull the handle c::> fig. 85 in the direct ion of
t he arrow pus h down lid to the fully open
position.
To clo se glove compartment
.,. Push the glove compartment lid upward un-
til the lock engages .
CD ch anger*
The CD changer for the Sound System is locat
ed in the glove compartment .
A WARNING
To reduce the risk of personal injury in an
accident or sudden stop, always keep the
glove compartment closed wh ile driving.
Storage compartment in the front seats
Applies to vehicles: with storage compartment in the
front seats
There is a fold-out storage compartment in
the front of the seats.
O pen ing
.,. Lift the handle and pull the drawer o ut.
Closin g
.. Push the drawer in completely until it latch
es.
Page 82 of 260
80 On the road
On the road
Steering
Adjusting the steering wheel column
The steering wheel position can be continu
ously adjusted in height and distance .
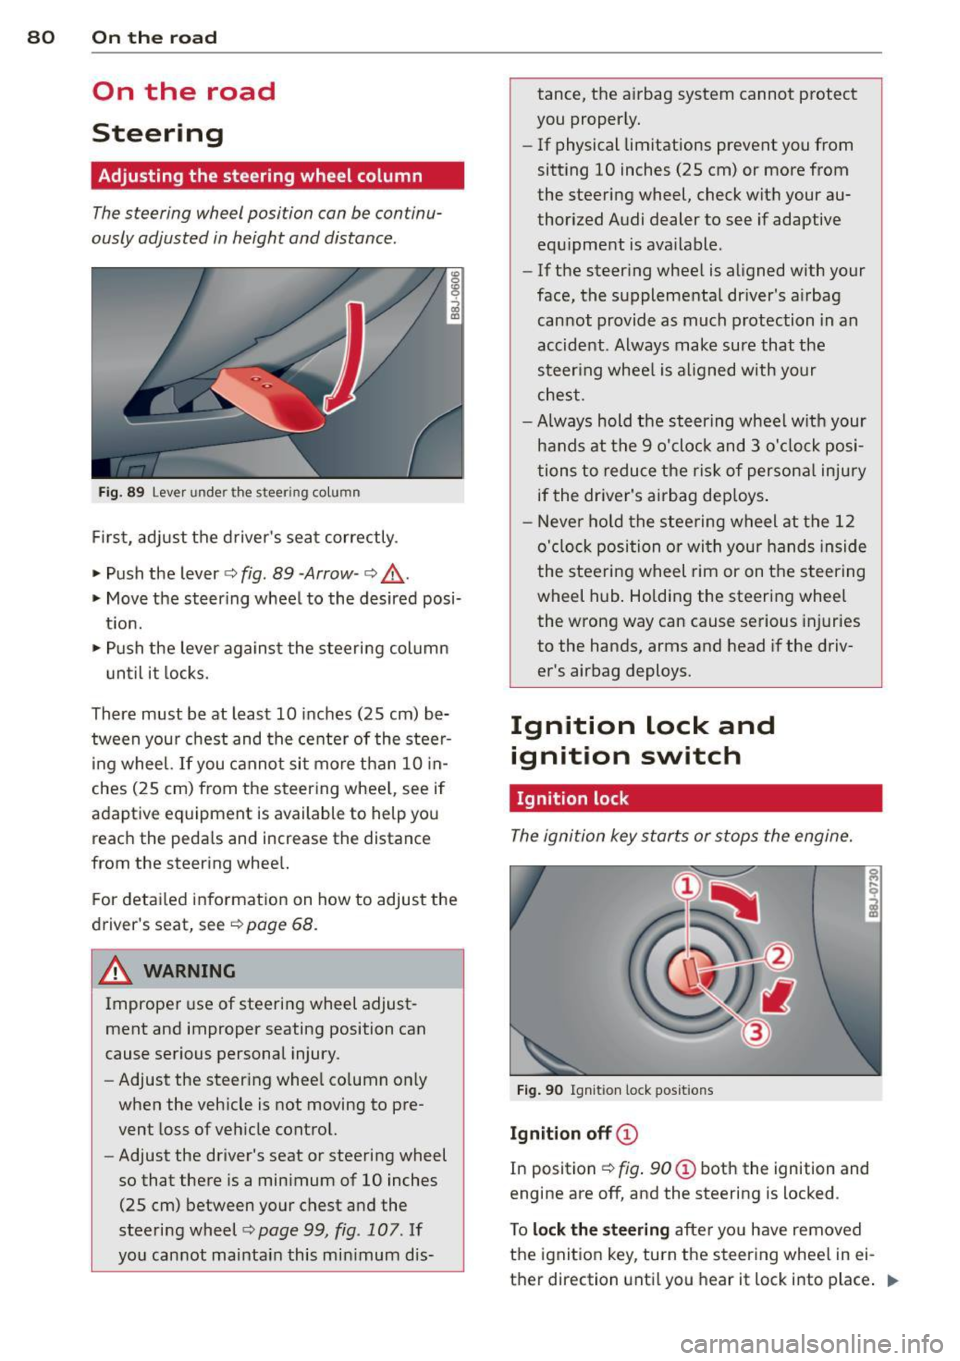
Fig. 89 Lever under the steer ing co lu m n
First, adjust the driver's seat correctly .
• Push the lever
c::> fig . 89 -Arrow -c::> ,&.
• Move the steer ing wheel to the desired posi
t ion.
• Push the lever against the steering column
until it locks.
There must be at least 10 inches (25 cm) be
tween your chest and the center of the steer
i ng wheel. If you cannot sit more than 10 in
ches (25 cm) from the steering whee l, see if
adaptive equipment is available to help you reach the pedals and increase the distance
from the steering whee l.
F or detai led information on how to adjust the
driver's seat, see
c::> page 68.
A WARNING
Improper use of steeri ng wheel adjust
ment and improper seating position can
cause serious personal injury.
- Adjust the steer ing whee l co lumn on ly
when the vehicle is not moving to pre
vent loss of veh icle control.
- Adjust the driver's seat or steering wheel
so that there is a minimum of 10 inches
(25 cm) between your chest and the
steering wheel
¢ page 99 , fig. 107. If
yo u cannot maintain this min imum dis- tance, the airbag system cannot protect
you proper ly.
- If physical limitations prevent you from
sitting 10 inches (25 cm) or more from
the steering wheel, check with your au
thorized Audi dealer to see if adaptive equ ipment is ava ilable .
- If the steer ing wheel is aligned with your
face, the supplementa l driver's a irbag
cannot provide as much protection in an
accident . Always make sure that the
steer ing wheel is aligned with your
chest.
- Always hold the steering wheel w ith your
hands at the 9 o'clock and 3 o'clock posi
tions to reduce the risk of persona l injury
if the driver's airbag dep loys .
- Never hold the stee ring wheel at the 12
o'clock position or with your hands inside
the steeri ng wheel rim or on the steering
wheel hub . Holding the steering wheel
the wrong way can cause serious injuries
to the hands, arms and head if the driv
er's airbag deploys.
Ignition lock and
ignition switch
Ignition lock
The ignition key starts or stops the engine.
Fig . 90 Ign iti on lock pos it ions
Igniti on off ©
In pos ition c::> fig . 90 @ both the ignition and
engine are off , and the steering is locked .
T o
loc k th e steering after you have removed
the ignition key, turn the steering whee l in ei
ther direction until you hear it lock into place .
1)),-