key AUDI TT ROADSTER 2011 Owner's Manual
[x] Cancel search | Manufacturer: AUDI, Model Year: 2011, Model line: TT ROADSTER, Model: AUDI TT ROADSTER 2011Pages: 260, PDF Size: 64.11 MB
Page 83 of 260
You should always lock the steering whenever
you leave your vehicle . This makes a vehicle
theft even more difficu lt ¢ & .
Ignition ke y safe ty lock
After switching off the ignition, the ig nit ion
key can only be removed from the ign ition
l ock when the selector lever is in the "P"
(Park) position . After you have removed the
key, the selector lever is locked and cannot be
moved.
Ignition on @
If it is difficult to turn the key after you have
inse rted it into the ignition lock, turn the
steering whee l back and forth. This will take
the load
off the steering lock mechan ism and
you will be able to turn the key freely and start the engine.
Starting the engin e@
In this position the engine starts . While the
engine is starting, the power supply to the headlights and other e lectr ica l consumers is
tempo rarily interrupted to conserve battery
power . After the engine has started, release
the key and it will return to posit io n @ .
Before the starter can be operated again the
key must be turned back to position@. The
non-r epeat lock prevents you from damag ing
the sta rter when the engine is runn ing .
A WARNING
-Never remove the key from the ign ition
lock whi le the vehicle is moving. The
steering wheel will lock causing loss of
control.
- If you have to leave your ve hicle -even
f or just a m in ute -always remove the ig
ni tion key and take it with you. This is es
pecially important if yo u a re going to
leave chi ldren behind in the vehicle. The
children cou ld start the engine or use
other vehicle controls. Unsupervised use
of vehicle controls (for example, power
windows) can cause serious personal in
jur ies .
-
On th e ro ad 81
(D Tips
If the vehicle battery has been disconnect
ed and then reconnected, then yo u must
l eave the key in posit ion @ for about 5
seconds before you can start the engine.
Starting and stopping
the engine
' Starting the engine
The engine can only be started with an origi
nal Audi key .
.,. Se t the par king brake.
.,. Move the selector lever in P or
N q ,& .
.,. Tu rn the ignition key to position ®
~ page 80, fig. 90 -do not depress the gas
peda l when starting the engine!
.,. Let go of the key as soon as the engine
starts.
A cold engine may at first be loud after it has
been started. This is due to the hydraulic
valves bu ild ing up the oil pressure. Th is nor
mal and no need for concern .
If the engine does not start immediately, stop
trying after 10 seconds and then try to restart
the engine about 30 seconds later.
A WARNING
-Never start or let the eng ine run in a con-
fined o r enclosed area . Exhaust fumes
from the engine contain carbon monoxide,
a colorless and odo rless gas. Ca rbon mon
oxide can be f atal if inhaled.
- Never leave the engine id ling unattend
ed. An una ttended veh icle with a runn ing
engine poses a danger o f personal injury
or theft .
(D Note
-Avo id high engine speeds, fast accelera
tion or heavy engine loads while the en
gine is still cold. This could damage the
engine.
- The engine cannot be started by pushing
or towing the vehicle . .,..
Page 84 of 260
82 On the road
@ For the sake of the environment
To avoid unnecessary e ngine wea r and to
reduce exhaust emissions, do not let your
veh icle stand and warm up. Be ready to
drive off immediately after start ing your
veh icle . Maintain moderate speed until the
engine is comp letely warm . Remember,
the engine performs best at operating
temperature .
Stopping the engine
• Turn the ig nition key to position ©
<=> page 80, fig. 90.
&_ WARNING
- Never turn off the eng ine unti l th e vehi
cle has come to a complete stop.
- The brake booster and servotronic on ly
work when the engine is running . With
the ignition turned off, yo u have to apply
more force when steering or braking.
S ince you cannot steer and stop norma l
ly, this can lead to accidents and ser ious
injuries .
-The radiator fan can continue to run for up to 10 min utes eve n after yo u have
turned off the eng ine and rem oved the
ign iti on key. The r ad iator fa n can also
t u rn on again if th e e ngine coola nt hea ts
up because of inte nse sunlight or hea t
build -up in t he engine compartment.
(D Note
Do not stop the engi ne immed iate ly afte r
hard or extended driving . K eep the eng ine
r u nning for app rox imately two minu tes to
prevent e xcessive heat build-up .
Parking brake
Parking brake
When the parking brake is set , it prevents the
vehicle from rolling away unintentionally .
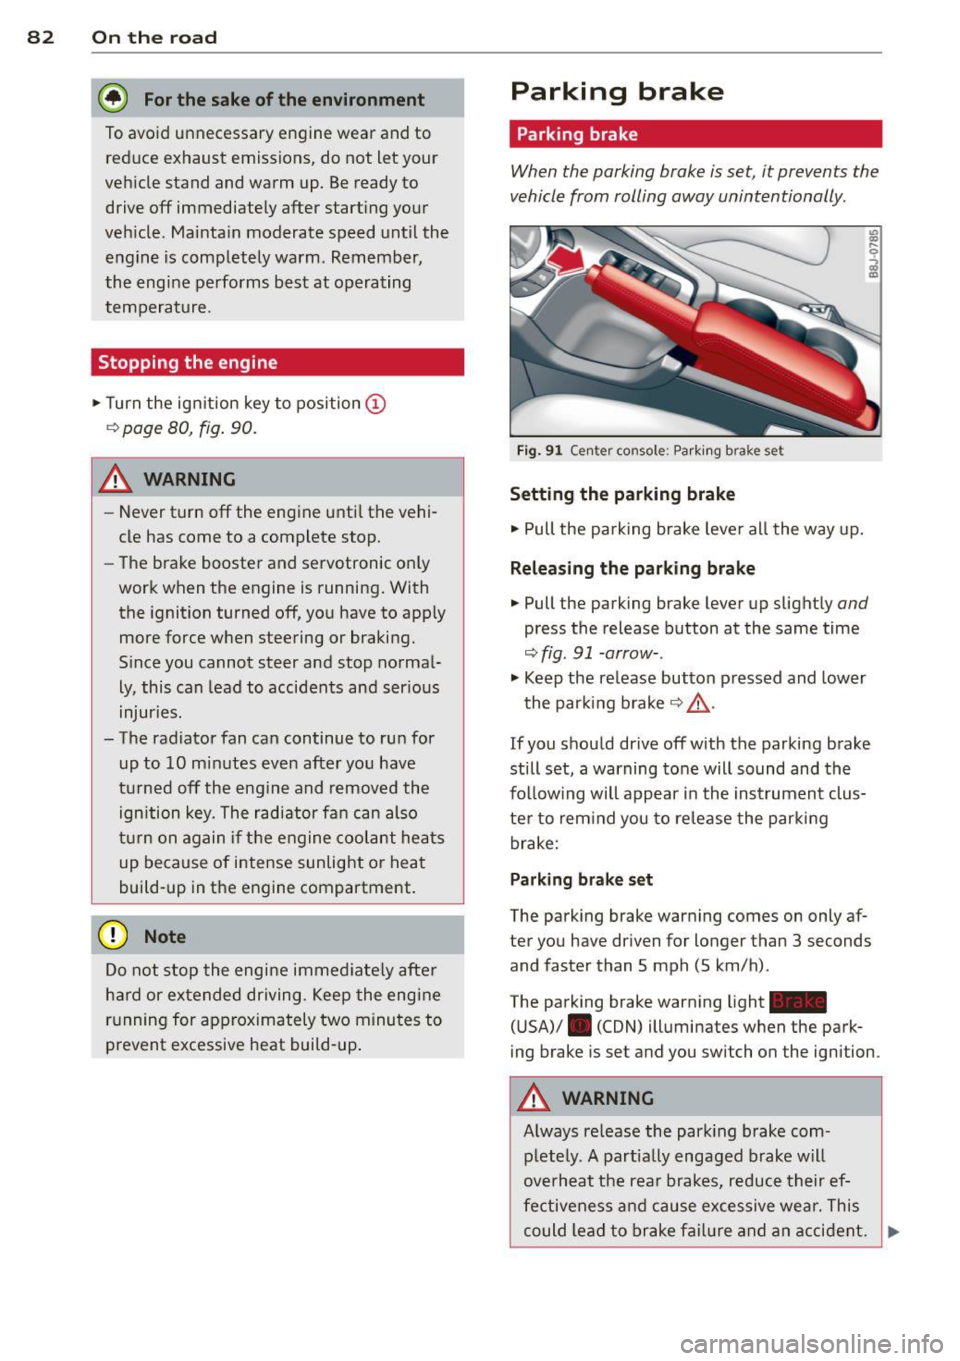
Fig. 9 1 Ce nte r co nso le: P ark ing b rak e s et
Setting the parking brake
• Pull the pa rking brake leve r all the way up.
Releasing the parking brake
• Pull the p arking brake lever up slight ly and
press the release button at the same time
<=> fig. 91 -arrow- .
• Keep the re lease button p ressed and lower
the par kin g brake <=>.&, .
If you should drive off with the parking brake
still set, a warning tone will sound and the
fol low ing will appear in the instrument clus
te r to rem ind you to re lease the par kin g
brake:
Parking brake set
The parking brake war ning comes on only af
ter you have dr iven for longer than 3 seconds
and faster than S mph (5 km/h) .
The parking brake warning light -
( U SA)/ . (CON) illuminates when the park
ing brake is set and you switch on the igni tion .
&_ WARNING
Always re lease the park ing b rake com -
plete ly. A part ially engaged brake w ill
overheat the rea r brakes, reduce their ef
fe ctive ne ss and cau se excessive wea r. This
could lead to brake f ailur e and an accident. .,..
Page 85 of 260
(D Note
Only after the vehi cle has come to com
plete stop, should you f irm ly set the park
ing brake and either move the selector lev
er into "P".
Parking
To prevent a parked vehicle from rolling
away, there are a few things you should do.
When you park your vehicle, do the following:
.,. Stop the vehicle using the brake pedal.
... Set the parking b ra ke firmly .
... Switch
off the engine.
... Move the selector lever into the P position
¢ A .
... Remove the ign it ion key from the ignit ion
lock.
What else you should do when pa rking
your vehicle on an incline or decline
Turn the steering wheel so that if the vehicle
should start to roll, it will roll into the curb.
If you are parking on a decl ine (the front of
your vehicle facing downhill), turn the front
wheels to the right so that they point
toward
the curb.
If you are parking on an incline (the font of
your vehicle facing uph ill), turn the front
wheels to the left so that they po int
away
from the curb.
A WARNING
Th is is how you can reduce the risk of in
jury when leaving your veh icle.
- Never park the vehicle where it can come
in contact with d ry grass, sp illed fuel or
any othe r flammable mater ials .
- Never allow anyone -especially small
children -to remain in the vehicle whe n
it is locked . Locked doors ma ke it more
difficult for rescuers to access the pas
senge r compartmen t in the event of an
eme rgency. Danger to life!
- Never leave c hildren unsupervised in the
vehicle. Children co uld re lease the par k-
-
On th e ro ad 83
ing brake or move the gearsh ift leve r out
of gear. The vehicle could start to ro ll
away and cause an acc ident.
- No matter what the season is, the tem
perature in a parked ve hicle can reach
dangerous leve ls.
Acoustic parking
system
' Rear acoustic park assist
Applies to vehicles: with 4-channel acoust ic park assist
Acoustic park assist gives a warning about
obstacles behind the vehicle .
Description
The rea r acoustic pa rk ass ist (4-channel
a coustic park ass ist) de termines the dista nce
of the vehicle from an obstacle using ult ra
son ic sensors. The sensors are in the rear
bumper. The volume and the pitch of the
c hi mes can be adjusted throug h the men u dis
play¢
page 21.
T he range at wh ich the sensors start to meas
u re is
about :
To the side
Activation
2 feet (0.60 m)
5 feet (1.60 m)
T he park ing ass ist is activated when
rever se
g ear
is engaged. A br ief tone confirms th at
the sys tem is activated .
Backing up
Distance warning whe n backing up sta rts
whe n an obstacle is detected in the range of
t he pa rk ass ist system. As the distance de
c reases, the t ime inte rva l between the audible
tones becomes shorte r.
When the distance is less than 1 foot (0.30
m), the tone becomes continuous. At this
po in t you sho uld s top bac king up .
Please note that low objects already signalled
by a war ning ca n disappear from the system's
de te ction range and will not continue to be
s ignalled . .,._
Page 90 of 260
88 Transmi ssion
engaged, the engine shou ld never be
speeded up unintentionally (e.g. manual ly from under the hood). Otherwise the
vehicle will immediately start to move -
sometimes even if the parking brake is
firmly applied -risk of an accident!
- Before yo u or other persons open the
hood and work on a running eng ine, the
selector lever must be move d to P and
t h e parking bra ke applie d firm ly -ris k of
an a cciden t! Fo llow the w arning stickers
¢ page 17 2, Engine compartment.
@ Tips
If you have inadvertently shifting into N
while the veh icle is moving, yo u should re
move your foo t from the accelerato r and
wait until t he engine speed has dropped to
id le before shifting back to Dor S.
Selector lever lock
The selec tor lever lo ck prevent s a gear from
being engaged accidentally and unintention
ally setting the vehicle in motion .
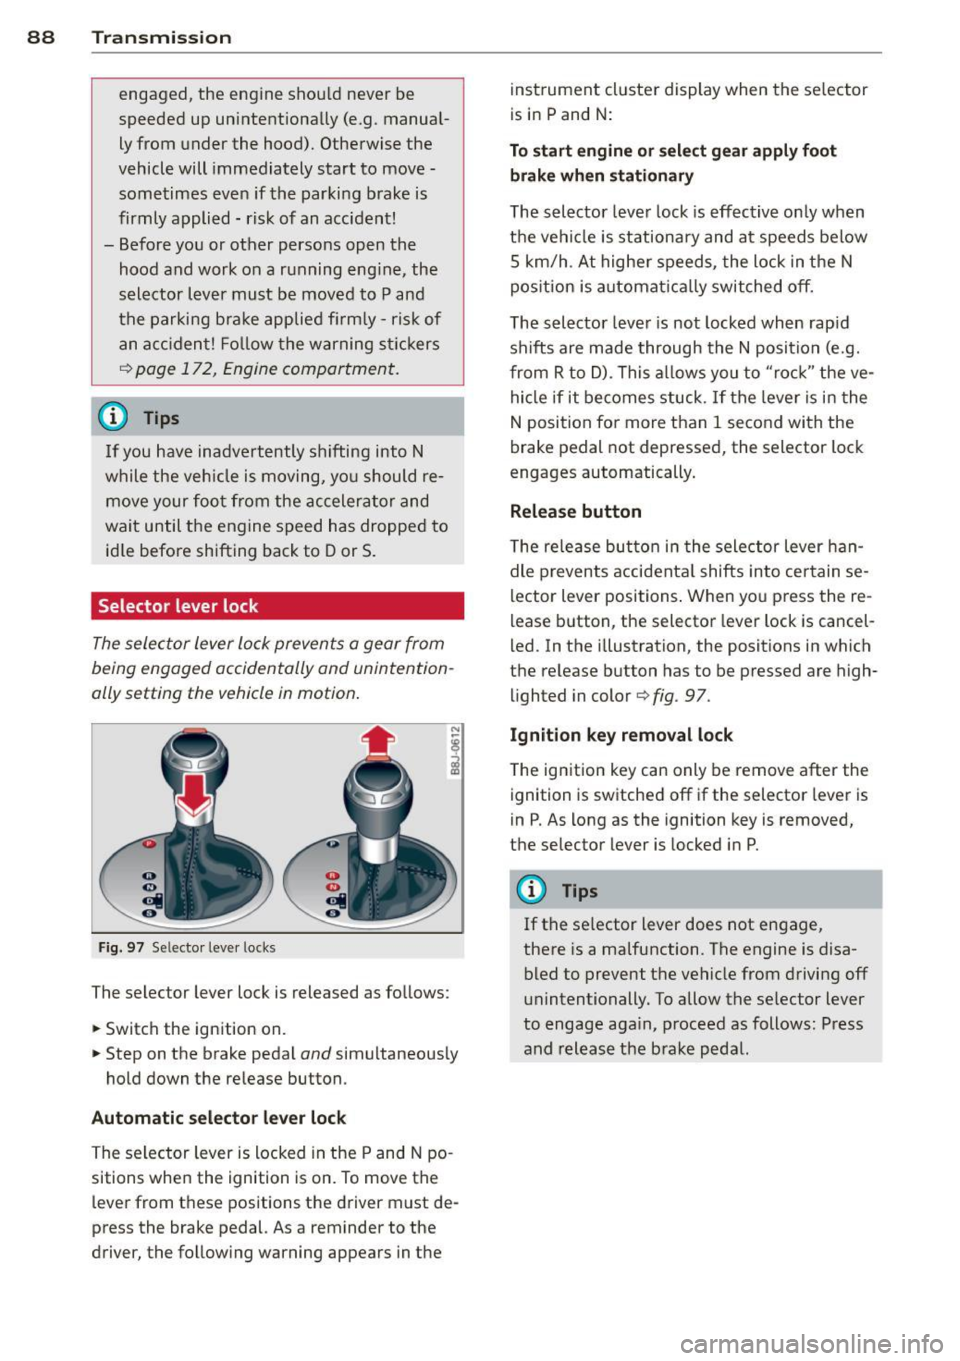
Fig . 97 Se lecto r leve r locks
The selector lever lock is released as follows:
• Switch the ignition on.
• Step on the brake pedal
and simultaneous ly
hold down the re lease button .
Automatic selector lever lock
The selector lever is locked in the P and N po
sitions when the ignition is on. To move the
l ever from t hese positions the driver m ust de
press the brake pedal. As a reminder to the
driver, the follow ing warning appears in t he inst
rument cluste r display when the se lector
is in P and N:
To start engine or select gear apply foot brake when stationary
The selector leve r lock is eff ective o nly when
t h e vehi cle is stationary and at speeds be low
5 km/h . At hig he r sp eeds, the lock in the N
pos ition is a utomat ica lly switched off.
The selector leve r is not locked when rap id
sh ifts are made through the N posi tion (e.g.
from R to D) . This a llows you to "ro ck" the ve
hi cle if it becomes stuck. If the leve r is i n the
N position fo r more than 1 second with the
brake pedal not depressed, the selector lock
engages automatically.
Release button
T he re lease bu tton in t he sele ctor lever han
dle p revents acci dent al shifts into cer tain se
lector lever positions . When yo u press the re
l ease b utton , the selector lever lock is cancel
led. In the illustration , the posit ions in which
the re lease button has to be p ressed are high
li ghted in color
¢ fig . 97 .
Ignition key removal lock
The ign ition key can only be remove after the
ignit ion is switched off if the selector lever is
i n P. As long as the ignition key is removed,
the selector lever is locked i n P.
(D Tips
If t he se lector lever does not engage,
the re is a malfuncti on. The engine is disa
bled to prevent the vehicle from driving off
unintentionally. To allow the se lector lever
to engage aga in, p roceed as follows: P ress
and release the b ra ke pedal.
Page 97 of 260
Programming the Homelink®
transmitter
The transmitter is programmed in two phas
es. For rolling code transmitters, a third
phase is also necessary.
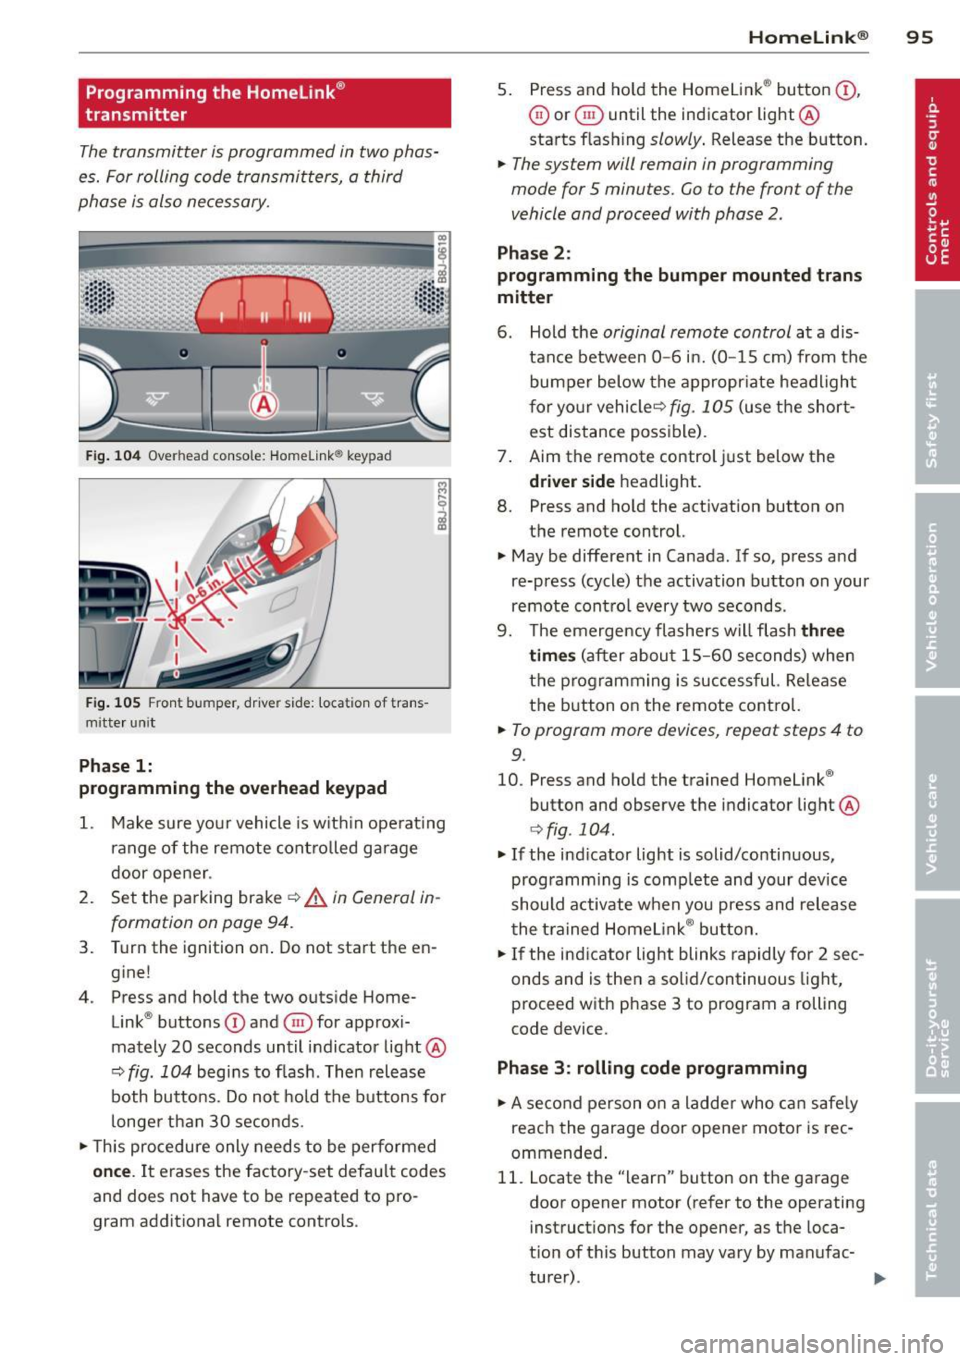
F ig . 104 Overhead console: Homelink ® keypad
Fig. 105 Front bumper, driver side: locat ion of trans
mitte r unit
Phase 1:
programming the overhead keypad
1. Make sure your vehicle is w ith in operat ing
ra nge of the remote controlled garage
door opener .
2. Set the parking brake~&.
in General in
formation on page 94.
3. Turn the ignition on . Do not start the en
g ine!
4 . Press and hold the two outside Home
Link ® buttons
(D and @for approxi
mately 20 seconds until indicator light@
~ fig. 104 begins to flash . Then release
both buttons . Do not hold the buttons for
longer than 30 seconds.
.. This procedure only needs to be performed
once. It erases the factory-set default codes
and does not have to be repeated to pro
gram additional remote controls .
Homelin k® 95
5. Press and ho ld the Homelink ® button (D ,
@ or§ until the indicator light@
starts flashing
slowly . Release the button.
.. The system will remain in programming
mode for 5 minutes.
Go to the front of the
vehicle and proceed with phase 2 .
Phase 2:
programming the bumper mounted trans
mitter
6. Hold the original remote control at a d is
tance between
0 -6 in. (0 -15 cm) from the
bumper below the appropr iate headlight
for your vehicleQ
fig . 105 (use the short
est distance possible) .
7. Aim the remote control just below the
driver side headligh t.
8. Press and hold the activation button on
the remote control.
.. May be different in Canada . If so, press and
re-press (cycle) the activation button on your
remote control every two seconds .
9. The emergency flashers will flash
three
times
(after about 15-60 seconds) when
the programming is successful. Re lease
the button on the remote control.
.. To program more devices, repeat steps 4 to
9.
10. Press and hold the trained Homelink ®
button and observe the indicator light @
Qfig . 104.
.. If the indicator light is solid/continuous,
programm ing is complete and your device
should activate when you press and release
the trained Homelink ® button.
.. If the indicator light blinks rapidly for 2 sec
onds and is then a solid/continuous light,
proceed w ith phase 3 to program a rolling
code device.
Phase 3: rolling code programming
.. A second person on a ladder who can safely
reach the garage door opener motor is rec
ommended .
11. Locate the "learn" button on the garage
door opener motor (refer to the operating
instructions for the opener, as the loca
tion of this button may vary by manufac
turer) .
Page 98 of 260
96 Homelink®
12. Press and release the learn button on the
garage door opener motor.
• Note: once the button is pressed, there are
30 seconds in which to initiate the next
step.
13 . On the Homel ink ® keypad inside the vehi
cle, firmly press and hold the Homelink ®
button previously programmed in phases
1 and 2 for two seconds and release. Re
peat this sequence
twice .
• Some vehicles may require the press/hold/
release sequence up to t hree times to com
plete the training process.
• HomeLink ® should now activate your rolling
code equipped device.
If the 5 minute time limit is exceeded, the
emergency flashers will flash one time to in
d icate that the process has been terminated.
In this case, repeat steps 4 through 9 .
If the emergency flashers do not flas h
three
times (after about 15-60 seconds), program
ming was not successful. In this case, repeat
steps 4 through 9.
Remote control units for garage door openers
i n Canada are set to stop transmitting radio
frequency signals after two seconds. This time
may not be sufficient for the Homelink ® sys
tem to learn the radio frequency s ignal. Per
form all other steps as described above .
Operating the Homelink® transmitter
The HomeLink ® transmitter works in the
same manner as the original handheld re
mote control that came with the system .
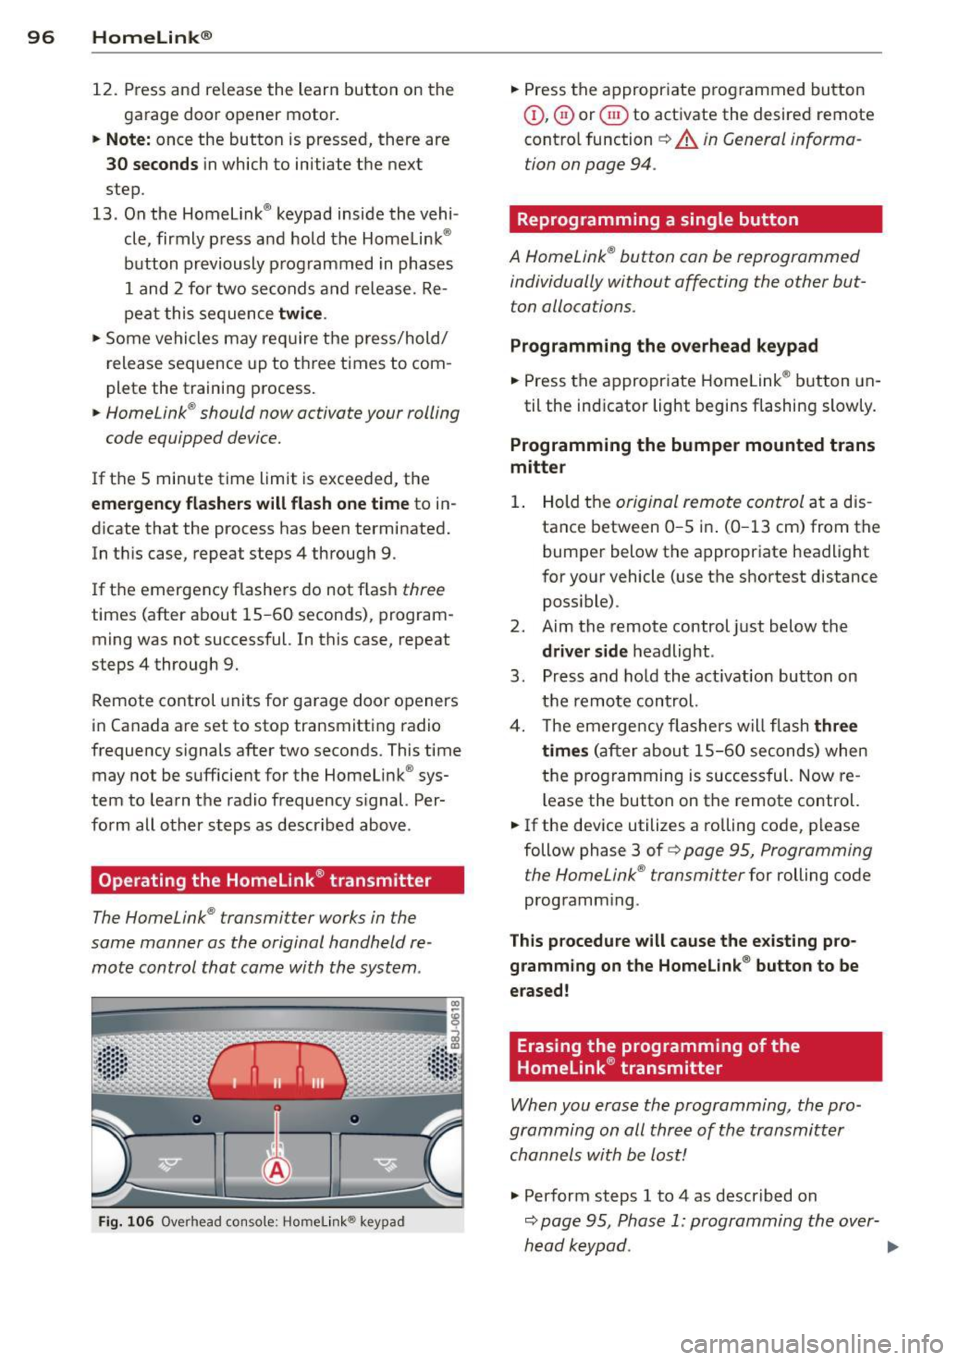
Fig. 106 Overhead console: Homelin k® keypad
• Press the appropr iate p rogrammed button
(D, ® or@ to activate the desired remote
contro l function
~ A in General informa
tion on page 94.
Reprogramming a single button
A HomeLink ® button can be reprogrammed
individually without affecting the other but
ton allocations.
Programming the overhead keypad
• Press the appropriate Homelink ® button un-
til the indicator light begins flashing slowly.
Programming the bumper mounted trans
mitter
1. Hold the original remote control at a dis
tance between
0-5 i n. (0 -13 cm) from the
bumper below the appropriate headlight
for your vehicle (use the shortest distance
possible) .
2. Aim the remote control just below the
driver side headlight .
3 . Press and hold the act ivation button on
the remote control.
4. The emerge ncy flashers will flash
three
times
(after about 15-60 seconds) when
the programming is successful. Now re
l ease the button on the remote control.
• If the device utilizes a rolling code, please
follow phase 3 of
c:> page 95, Programming
the HomeLink ® transmitter
for rolling code
programm ing .
This procedure will cause the existing pro
gramming on the Homelink ® button to be
erased!
Erasing the programming of the
Homelink ® transmitter
When you erase the programming, the pro
gramming on all three of the transmitter
channels with be lost!
.,. Perform steps 1 to 4 as described on
c:> page 95, Phase 1: programming the over-
head keypad . ..,.
Page 112 of 260
110 Safety belts
-Never strap more than one person, in
cluding small children, into any single
safety belt.
- Neve r place a safety belt over a child sit
t ing on your lap.
- Always keep feet in the footwell in front
of the seat while the vehicle is being driv
en.
- Never let any person ride with feet on
the instrument panel or sticking out the
window or on the seat.
- Never remove a safety belt while the ve
hicle is moving. Doing so will increase
your risk of being injured or killed.
- Never wear belts twisted.
- Never wear belts over rigid or breakable
objects in or on your clothing, such as
eye glasses, pens, keys, etc., as these
may cause injury.
- Never wear the shoulder part of the belt
under your arm or otherwise out of posi
tion.
- Several layers of heavy clothing may in
terfere with correct positioning of belts
and reduce their effectiveness.
- Always keep belt buckles free of anything
that may prevent the buckle from latch
ing securely.
- Never use comfort clips or devices that
create slack in the shoulder belt. Howev
er, special clips may be required for the
correct use of some child restraint sys
tems.
- Never allow safety belts to become dam
aged by being caught in door or seat hardware.
- Torn or frayed safety belts can tear and
damaged belt hardware can break in an
accident. Inspect belts regularly.
If web
bing, bindings, buckles, or retractors are
damaged, have belts replaced by an au
thorized Audi dealer or qualified work
shop.
- Safety belts that have been worn and
loaded in an accident must be replaced
with the correct replacement safety belt by an a uthor ized Audi dealer or qualified
workshop . Replacement may be necessa- ry
even if damage cannot be clearly seen.
Anchorages that were loaded must also be inspected.
- Never remove, modify, disassemble, or
try to repai r the safety belts yourself.
- Always keep the belts clean. Dirty belts
may not work properly and can impair
the function of the inertia reel
c::> page 172, Safety belts.
Safety belts
Fastening safety belts
Seat first -everybody buckle up!
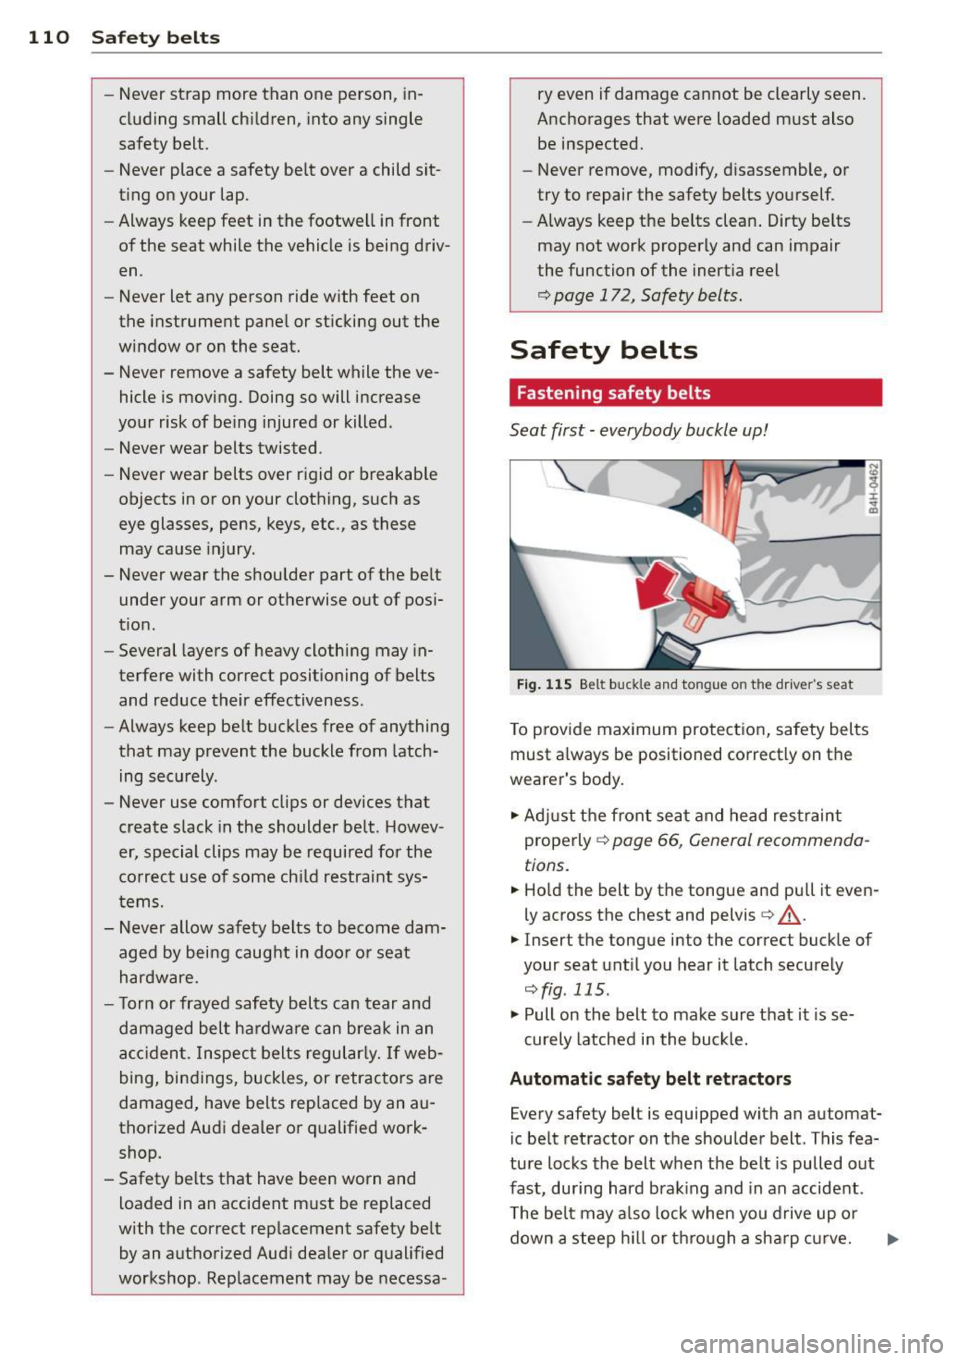
Fig. 115 Belt buckle and tongue on the driver's seat
To provide maximum protection, safety belts
must always be positioned correctly on the
wearer's body.
.,. Adjust the front seat and head restraint
properly
c::> page 66, General recommenda
tions.
.,. Hold the belt by the tongue and pull it even
ly across the chest and pelvis
c::> .&_.
.,. Insert the tongue into the correct buckle of
your seat until you hear it latch securely
c::>fig . 115.
.,. Pull on the belt to make sure that it is se-
curely latched in the buckle.
Automatic safety belt retractors
Every safety belt is equipped with an automat
ic be lt retractor on the shoulder belt . This fea
ture locks the belt when the belt is pulled out
fast, during hard braking and in an accident .
The belt may also lock when you drive up or
down a steep hill or through a sharp curve.
Page 113 of 260
During normal driving the belt lets you move
freely.
Safety belt pretensioners
The safety belts are equipped with a belt p re
tensione r that helps to t igh ten the safety be lt
and remove s lack when the pretensione r is ac
tivated. The function of the pretensioner is monitored by a warning light
¢ page 16.
Switchable locking feature
Every safe ty belt excep t the one on the driver
seat is eq uipped w ith a switchab le locking fea
ture that
mu st be used when the safety belt is
used to attach a child seat . Be s ure to read the
important informat ion about th is f eature
c:;, page 144.
A WARNING
Improperly positioned safety belts can
cause serious injury in an accident
¢ page 111, Safety belt position .
-Safety belts offer optimum protection
only when the seatback is upright and
belts are properly positioned on the
body .
-
-Never attach the safety belt to the buck
le for another seat . Attach ing the belt to
the wrong buckle will reduce safety belt effect iveness and ca n cause seri ous per
sonal in jury.
- A passenger who is no t properly rest rain
ed can be se rio usly inju red by the safety
belt itself when it moves from the stron
ger parts of the body into critical areas
like the abdomen .
- Always lock the convert ible locking re
tractor when yo u are secur ing a chi ld
seat in the vehicle
c:;, page 146 .
Safety belts 111
Safety belt position
Correct belt position is the key to getting
maximum protection from safety belts .
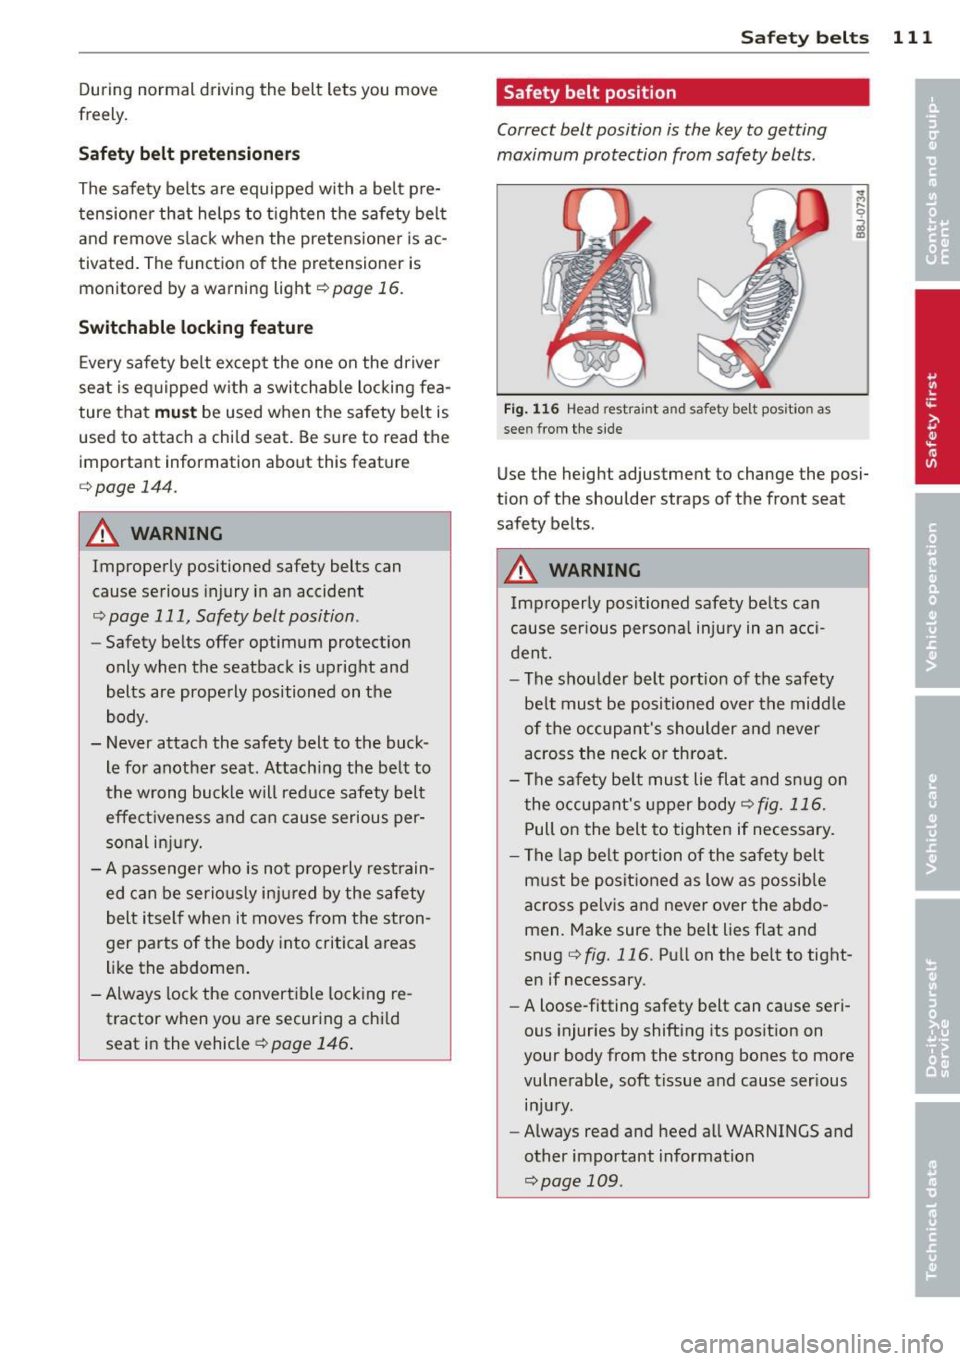
Fig . 1 16 Head restra int a nd safety be lt pos it io n as
see n fr om t he side
Use the height adjustment to change the posi
tion of the shoulder straps of the fro nt seat
safety belts .
A WARNING
Imp roperly posit ioned safety be lts can
cause ser ious persona l injury in an acci
dent.
- The shou lder belt portion of the safety
be lt must be posi tioned over the midd le
of the occupant's shoulder and never
across the neck or throat.
- The safety be lt must lie fla t and sn ug on
the occupant's upper body¢
fig. 116.
Pull on the belt to tighten if necessary.
-
- The lap be lt po rtion of the safety belt
must be posit ioned as low as possib le
across pelvis and never over the abdo
men. Make sure the belt lies flat and
snug ¢
fig. 116 . Pull on the belt to tight
en if necessary .
- A loose-fitting safety belt can cause seri
ous injuries by shifting its pos it ion on
your body from the strong bones to more
vulne rable , soft tissue and cause ser ious
in jury .
- Always read and heed all WARNINGS and
other important information
¢page 109.
Page 157 of 260

Energy management
Starting ability is optimized
Energy management controls the distribution
of electrical energy and thus optimizes the
availability of electrical energy for starting the engine .
If a vehicle with a conventional energy system
is not driven for a long period of time, the bat
tery is discharged by idling current consumers
(e.g. immobilizer). In ce rtain c ircumstances it
can result in there being insuff icient ene rgy
avai lab le to start the engine .
Intell igent energy management in your vehi
cle handles the d istribution of electrical ener
gy. Starting ab il ity is markedly imp roved and
the life of the battery is extended .
Basically, energy management consists of
batt ery diagno sis, idlin g current man ag e
m ent
and dyn ami c en ergy manag emen t.
Batter y diagnosis
Battery diagnosis continuously determines
the state of the battery . Sensors determ ine
battery vo ltage, battery current and battery
temperature. This determ ines the current
state of charge and the powe r of the battery.
Idling curr ent man agement
Idling current management reduces energy
consumption while the vehicle is stand ing .
W ith the ignition switched off, it cont ro ls the
energy s upply to the various electr ical compo
nents . Data from battery diagnosis is consid
ered.
D epending on the batte ry's state of charge,
i nd ividua l consumers are gradual ly t urned off
to prevent excess ive d ischarge of the battery
and thus maintain starting capability .
Dynam ic en ergy management
While the vehicle is being driven, dynamic en
e rgy management dist ributes the energy gen
e rated according to the needs of the individu
a l components.
It reg ulates cons umption, so
that more electrical energy is not being used
Int ellig ent technolog y 155
than is being generated and ensures an opti
mal state of charge for the battery.
(0 Tips
- But even energy management canno t
negate the limits of physics . Consider
that the power and life of a battery are
limited .
- If starting ability is threatened, you are
informed by a warning
r::!)poge 156,
Driver notification in the instrument
cluster display.
What you should know
The highest priority is given to maintaining
starting capability.
The battery is severe ly taxed in short -distance
driving, in city traffic and during the cold time
of year. Abundant electrical energy is re quired, but only a little is generated .
It is also
critical if the engine is not running and electri
cal components are turned on . In this in
stance energy is be ing consumed but none is
being generated.
It is in precisely these situations that you will
notice energy management actively regulat
ing the d istribution of energy .
Vehicle stands for an e xtended peri od
If you do not drive your vehicle over a period
of several days or weeks, e lectr ical compo
nents are gradually cut back or switched off.
This reduces energy consumption and ma in
ta ins start ing capability over a longer period .
Take into considerat ion that when you unlock
your vehicle, some convenience functions, such as the remote key or power seat adjust
ment, may not be available . The conven ience
funct ions w ill be available again when you
tu rn o n the ignition and start the engine .
With the engine turned off
If you listen to the radio, for example, w ith
the engine turned off, the battery is being d is-
charged.
~
•
•
Page 175 of 260
you have the engine washed, the anti-corrosion treatment is a lmost always removed as
wel l. It is therefore essential to have a long
lasting corrosion protection reapplied to all
surfaces, seams, joints and components in the
engine compartment .
A WARNING
Be aware: The engine compartment of any
motor vehicle is a potentially hazardous
area.
- Before working in the engine compart
ment, be sure to read the informat io n
c::.>page 172.
- Before reaching into the front plenum
pane l, always remove the ignition key.
O therw ise, the windshield wipe r system
cou ld unintentiona lly be switched on,
poss ibly causing pe rsonal injury from the
moving wiper linkage .
- Never reach into the area around or
touch the radiator fan. The auxiliary fan
is temperature controlled and can switch
on suddenly- even when the ign it ion is
off.
- Do not wash, wax or dry the engine w ith
the engine running. Moving or hot parts cou ld injure you .
- Do not clean the underside of the chas sis, fenders, wheel covers, or other hard
to reach parts w ithout protecting your
hands and arms. You may cut yourse lf on
sharp-edged metal parts .
- Always read and heed all WARNINGS and
other information
c::.> page 162.
Cleaning and protec tion 173
•
•