remove seats AUDI TT ROADSTER 2014 Owners Manual
[x] Cancel search | Manufacturer: AUDI, Model Year: 2014, Model line: TT ROADSTER, Model: AUDI TT ROADSTER 2014Pages: 244, PDF Size: 60.87 MB
Page 64 of 244
62 Seats and storage
seating position and improperly posi
tioned safety be lts!
Power seats
Adjustment switches
App lies to vehicles: wit h power seats
The operating logic for the switches corre
sponds to the construction and function of
the seat.
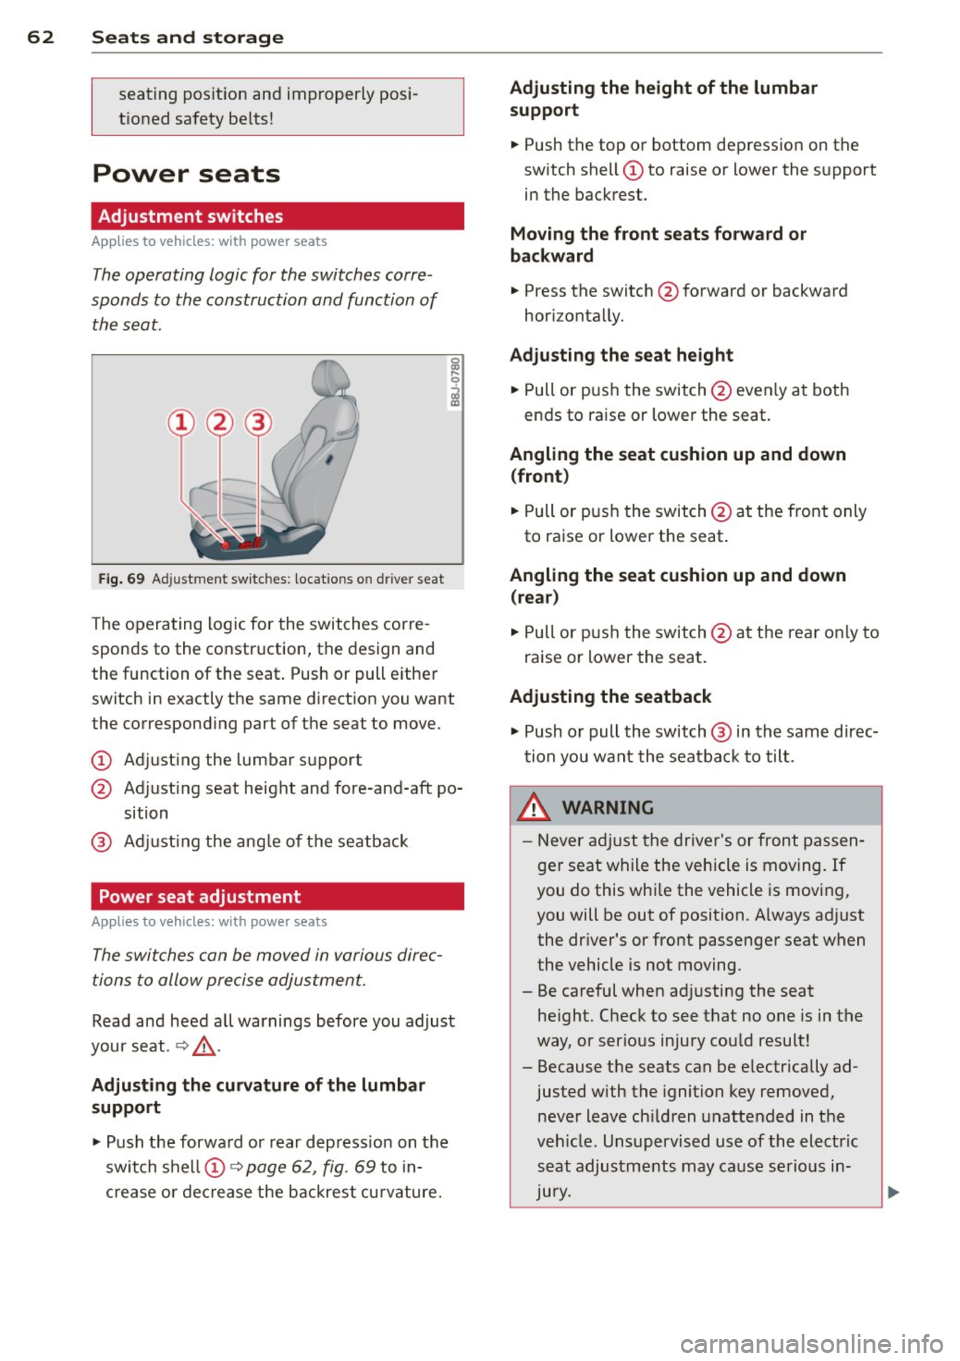
Fig. 69 Adjustment switches: locations on driver seat
The operating logic for the switches corre
sponds to the construction, the design and
the function of the seat. Push or pull either
switch in exactly the same direction you want
the corresponding part of the seat to move.
CD Adjusting the lumbar support
@ Adjusting seat height and fore-and-aft po
sition
@ Adjusting the angle of the seatback
Power seat adjustment
Applies to vehicles: with power seats
The switches can be moved in various direc
tions to allow precise adjustment.
Read and heed all warnings before you adjust
your seat. ¢&_ .
Adjusting the curvature of the lumbar
support
.,. Push the forward or rear depress ion on the
switch shell CD¢
page 62, fig. 69 to in
crease or decrease the backrest curvature.
Adjusting the height of the lumbar
support
.,. Push the top or bottom depression on the
switch shell CD to raise or lower the support
in the backrest.
Moving the front seats forward or
backward
.,. Press the switch @forward or backward
horizontally.
Adjusting the seat height
.,. Pull or push the switch @even ly at both
ends to raise or lower the seat.
Angling the seat cushion up and down (front )
.,. Pull or push the switch @at the front only
to raise or lower the seat.
Angling the seat cushion up and down (rear)
.,. Pull or push the switch@at the rear only to
raise or lower the seat .
Adjusting the seatback
.,. Push or pull the switch @ in the same direc
tion you want the seatback to tilt.
,&. WARNING
-Never adjust the driver's or front passen
ger seat while the vehicle is moving.
If
you do this while the vehicle is moving,
you will be out of position. A lways ad just
the dr iver's or front passenger seat when
the vehicle is not moving.
- Be careful when adj usting the seat
height. Check to see that no one is in the
way, or serious injury could result!
- Because the seats can be e lectrically ad
justed with the ignition key removed,
never leave ch ildren unattended in the
vehicle. Unsupervised use of the electric
seat adjustments may cause serious in
Jury.
Page 67 of 244
Cigarette lighter/
socket
Cigarette lighter
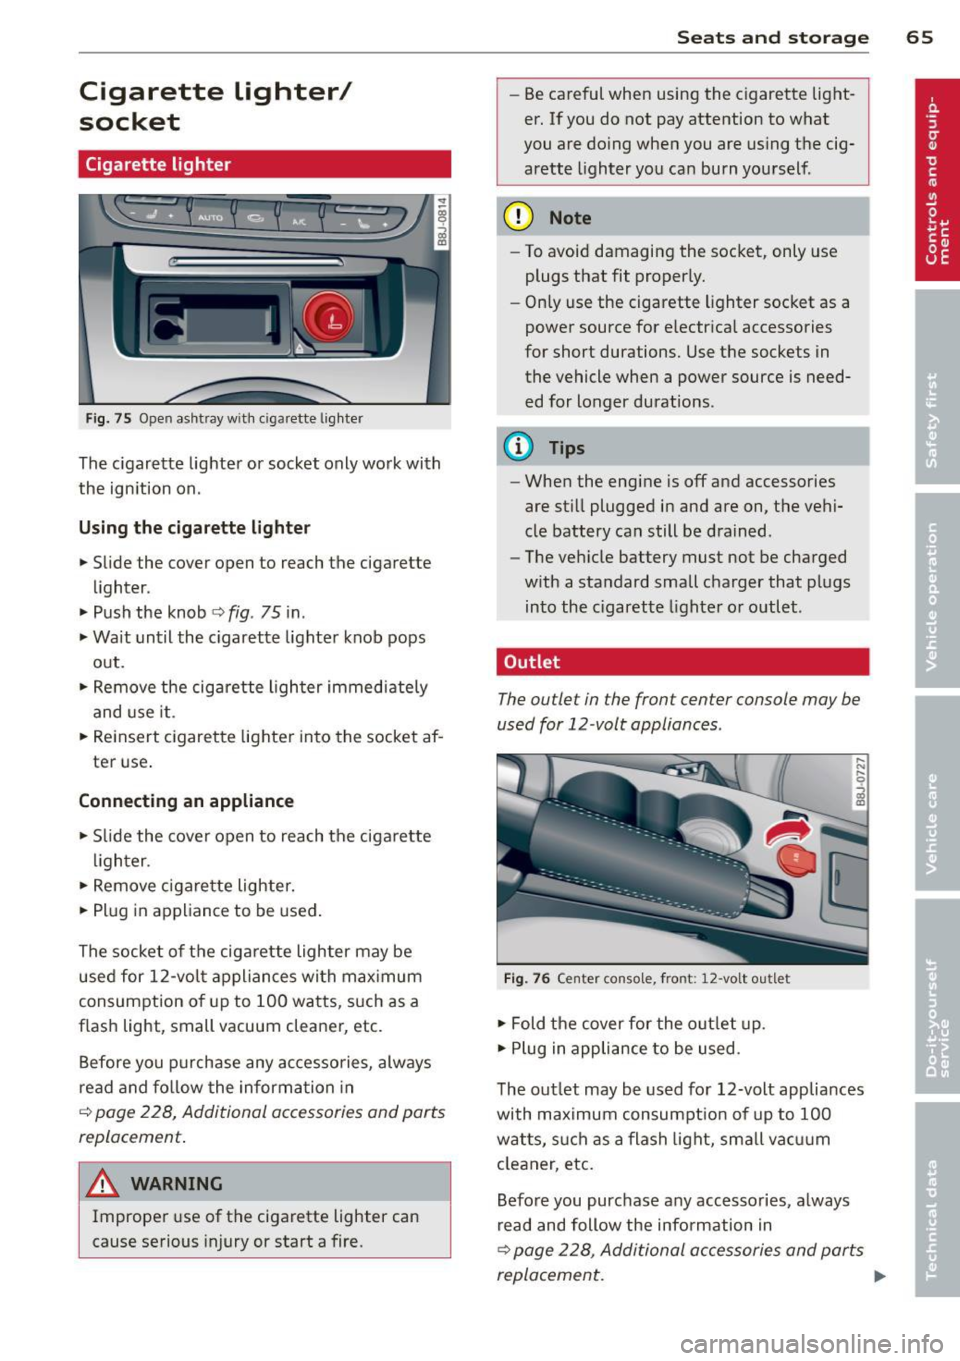
Fig. 75 Open ashtray with cigar ette ligh ter
The cigarette lighter or socket only work with
the ignition on.
Using the cigarette lighter
.,. Slide the cover open to reach the cigarette
lighter.
.,. Push the knob¢
fig. 75 in .
.,. Wait until the cigarette lighter knob pops
out .
.,. Remove the cigarette lighter immediately
and use it.
.,. Reinsert cigarette lighter into the socket af
ter use.
Connecting an appliance
.,. Slide the cover open to reach the cigarette
lighter.
.,. Remove cigarette lighter .
.,. Plug in appliance to be used.
The socket of the cigarette lighter may be used for 12-volt appliances with maximum
consumption of up to 100 watts, such as a
f lash Light, small vacuum cleaner, etc.
Before you purchase any accessories, always
read and follow the information in
¢ page 228, Additional accessories and parts
replacement .
A WARNING
-
Improper use of the cigarette lighter can
cause serious injury or start a fire.
Seats and storage 65
-Be careful when using the cigarette light
er. If you do not pay attention to what
you are doing when you are using the cig
arette lighter you can burn yourself .
(D Note
-To avoid damaging the socket, only use
plugs that fit properly.
- Only use the cigarette lighter socket as a
power source for e lectrical accessories
for short durations. Use the sockets in the vehicle when a power source is need
ed for longer durations.
@ Tips
- When the engine is off and accessories
are still plugged in and are on, the vehi
cle battery can still be drained.
- The vehicle battery must not be charged
with a standard small charger that plugs
into the cigarette lighter or outlet .
, Outlet
The outlet in the front center console may be
used for 12 -volt appliances .
Fig. 76 Center console, front: 12 -volt outlet
.,. Fold the cover for the outlet up.
.,. Plug in appliance to be used .
"'
" 0
i
The outlet may be used for 12-volt appliances
with maximum consumpt ion of up to 100
watts, such as a flash light, small vacuum
cleaner, etc.
Before you purchase any accessories, always
read and follow the info rmation in
¢ page 228, Additional accessories and parts
replacement.
Page 68 of 244
66 Seats and st o rage
A WARNING
The outlet p lus any appliances plugged in
to it rema in functional even if the ignition
is switched off or the ignition key is re
moved. N ever leave children inside the ve
hicle withou t supe rvision.
@ Note
To avo id damag ing the socket, only use
plugs that fit properly .
(i) Tips
When the engine is off and accessor ies are
still plugged in and are on, the vehicle bat
tery can still be dra ined .
Storage
General
A WARNING
- Always remove objects from the instru
ment panel. Any items not put away
cou ld slide around inside the vehicle
wh ile driving or when accelerating or
when applying the brakes or when driv ing around a corner.
- When you are drivi ng make sure tha t
anything you may have placed in the cen
ter console or other storage locations cannot fa ll out into the footwells. In case
of sudden braking you would not be able
to brake or accelerate.
-
Glove compartment
The glove compartment is illuminated and
can be locked .
§
___ .;.;._ _______ i
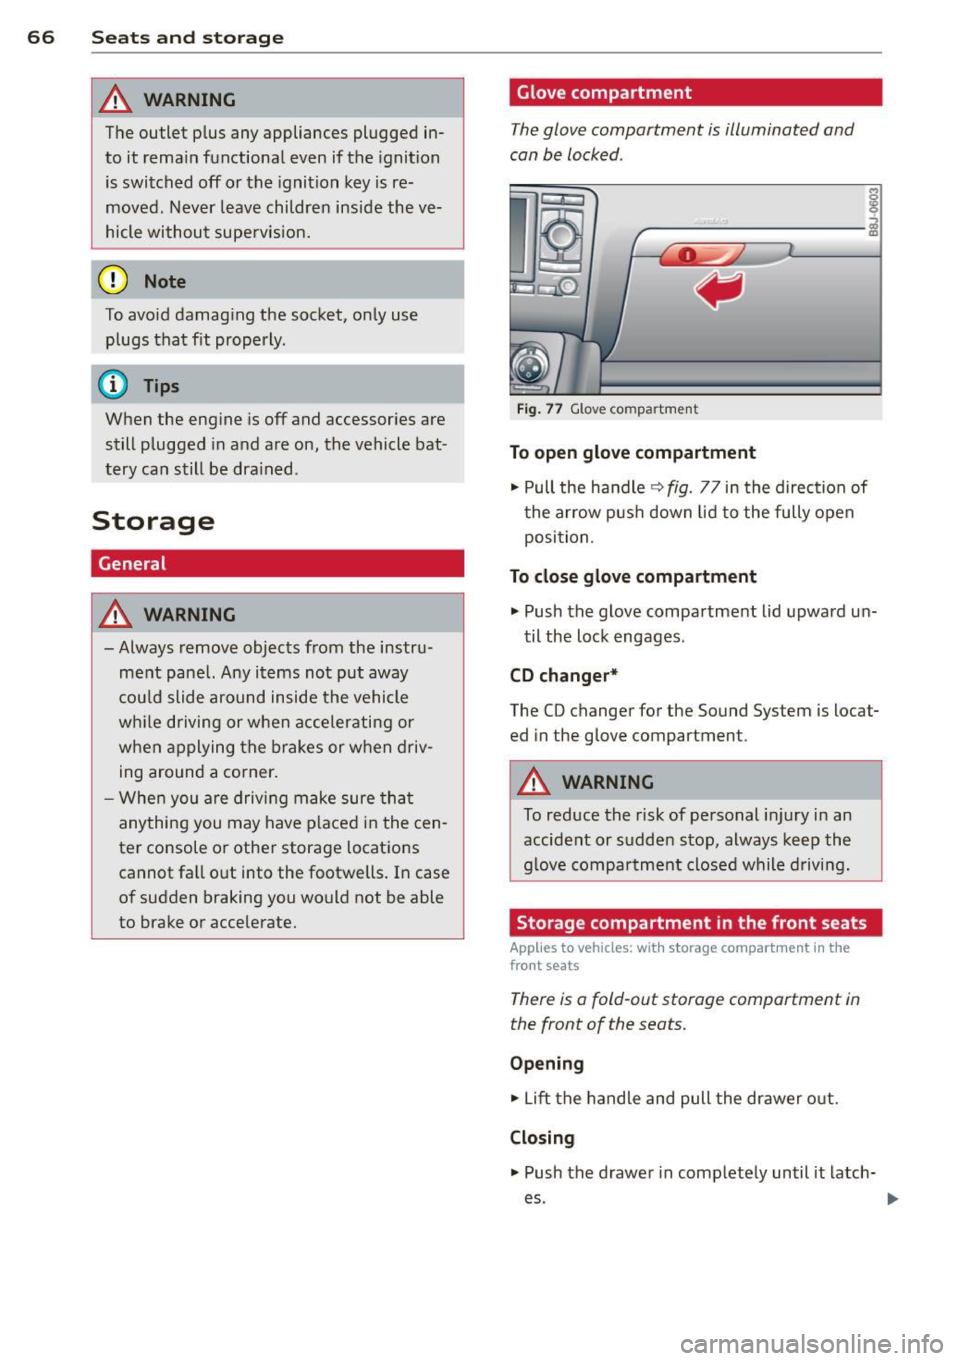
Fig . 77 G love compartme nt
To open glove compartment
• Pull the handle~ fig. 77 in the direct ion of
t he ar row push down lid to the fully open
position .
To close gl ove compartment
• Push the glove compartment lid upward un-
til the lock engages .
CD changer *
The CD changer for the Sound System is locat
ed in the glove compartment.
A WARNING
-To reduce the risk of personal i njury in an
accident or sudden stop, always keep the
g love compartment closed while driving.
Storage compartment in the front seats
Applies to vehicles: w ith storage compartment in the
front seats
There is a fold-out storage compartment in
the front of the seats.
Op ening
• Lift the handle and pull the drawer o ut.
Clo sin g
-
.. Push the drawer in completely until it latch
es .
Page 107 of 244
During normal driving the belt lets you move
freely.
Safety belt pretensioners
The safety belts are equipped with a belt p re
tensione r that helps to t igh ten the safety belt
and remove s lack when the pretensione r is ac
tivated. The function of the pretensioner is monitored by a warning light
q page 15.
Switchable lo cking feature
Every safe ty belt excep t the one on the driver
seat is eq uipped w ith a switchab le locking fea
ture that
mu st be used when the safety belt is
used to attach a child seat . Be s ure to read the
important informat ion about th is feature
q page 138.
A WARNING
Improperly positioned safety belts can
cause serious injury in an accident
¢ page 105, Safety belt position .
-Safety belts offer optimum protection
only when the seatback is upright and
belts are properly positioned on the
body .
-
- Never attach the safety belt to the buck
le for another seat . Attach ing the belt to
the wrong buckle will reduce safety belt
effect iveness and ca n cause serious per
sonal in jury.
- A passenger who is no t properly rest rain
ed can be serio usly inju red by the safety
belt itself when it moves from the stron-
ger parts of the body into critical areas
like the abdomen .
- Always lock the convert ible locking re
tractor when yo u are secur ing a chi ld
seat in the vehicle
¢ page 140.
Safety belts 105
Safety belt position
Correct belt position is the key to getting
maximum protection from safety belts .
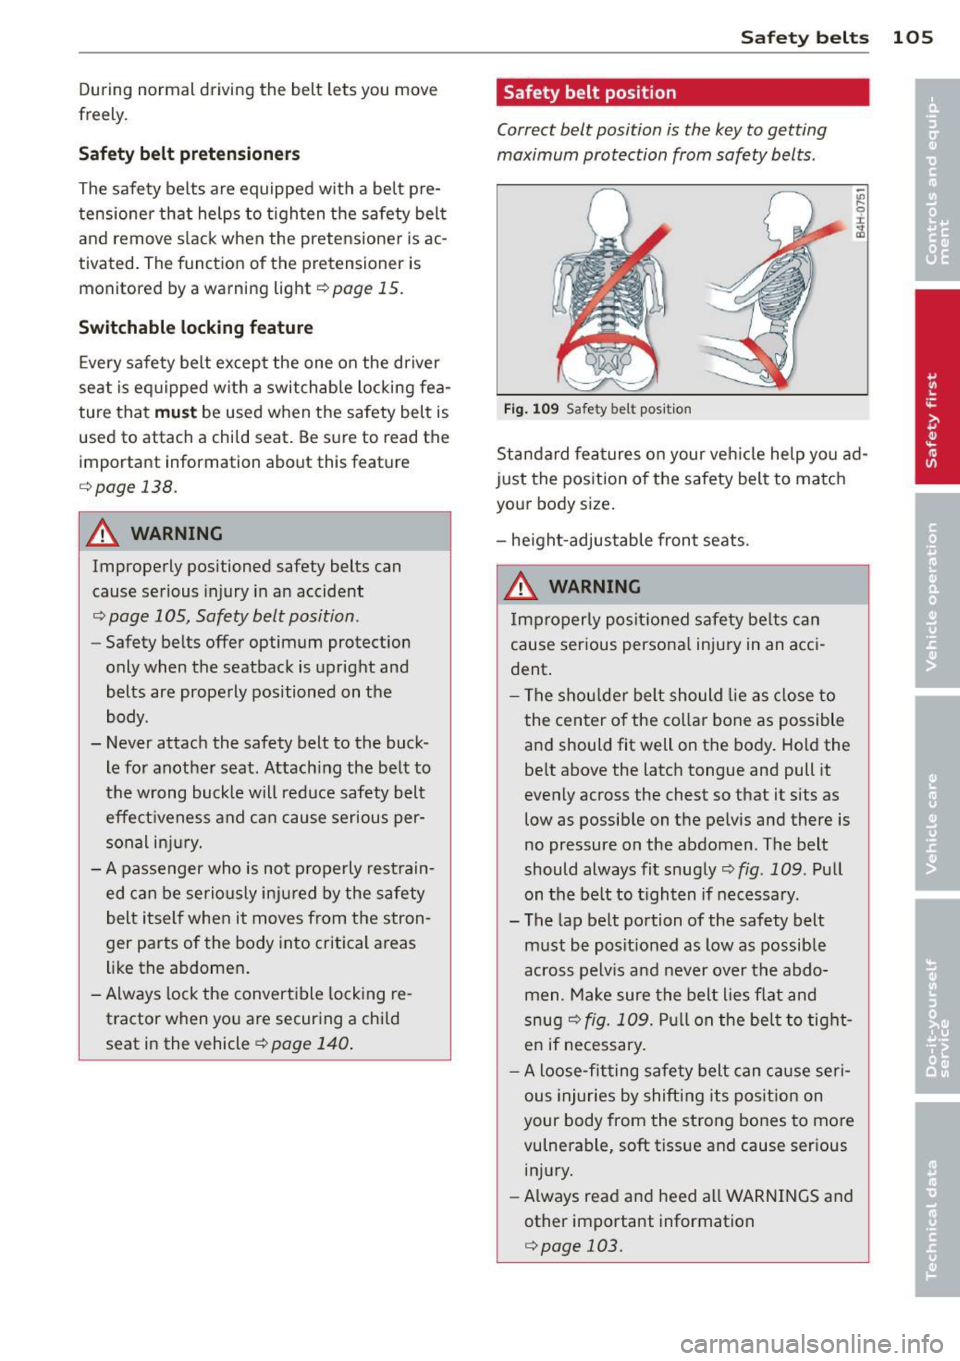
Fig . 1 09 Safety belt po sit ion
;;;
9 r ., a,
Standard fea tures on your veh icle he lp you ad
just the position o f the safety bel t to matc h
your body size .
- he ight-adjustable fron t seats.
A WARNING
Improperly posit ioned s afety be lts c an
cause serious persona l injury in an acci
dent .
-
-The s hou lder belt should lie as close to
the center o f the collar bone as possible
a nd should fit well on the body. Hold the
be lt above the latch tongue and pull it
evenly across the chest so that it sits as
low as possib le on the pelv is and there is
no pressure on the abdomen . The belt
should always fit snugly¢
fig. 109 . Pull
on the belt to t ighten if necessary.
- The lap belt portion of the safety belt
must be posit ioned as low as possible
across pelvis and never over the abdo
men . Make sure the belt lies flat and
snug
q fig. 109. Pu ll on the be lt to tight
e n if necessary.
- A loose-fitting safety belt can cause seri
ous injuries by shifting its pos it ion on
your body from the strong bones to more
vulnerable, soft tissue and cause ser ious
injury.
- Always read and heed all WARNINGS and
other important information
¢ page 103.
Page 118 of 244
116 Airbag sys te m
components is detected . The function of the
airbag indicator light is described in greater
deta il below . Because the front passenger
seat contains important parts of the Ad
vanced A irbag System, you must take care to
prevent it from be ing damaged . Damage to
the seat may prevent the Advanced Airbag for
the front passenge r seat from doing its job in
a crash .
The front Ad vanced Airb ag System
consists of the following:
- Crash sensors in the front of the veh icle that
measure ve hicle acceleration/decele ra tion
to provide info rmation to the Advanced Air
bag System abo ut the severi ty of the crash.
- An electron ic co ntro l unit, with integra ted
crash sensors for front and side impacts .
T he cont ro l unit "decides " whethe r to fire
the front airbags based on the information received from the crash sensors . The contro l
unit a lso "decides" whether the safety belt
pre tensioners should be activated.
- An Advanced Ai rbag with gas generator for
the driver ins ide the steer ing whee l hub.
- An Advanced Airbag with gas generator in
s ide the inst rument panel for the front pas
senger.
- A weight -sens ing mat under the upholstery
padd ing of the front passenger seat cush ion
that measures the total we ight on the seat.
The information reg istered is sent continu
ous ly to the electron ic control unit to regu
late deployment of the front Advanced Air
bag on the passenger s ide.
- An airbag monito ring system and indicator
li ght in the instrument cluster
9 page 119.
- T he PASSENGER AIR BAG OFF light comes
on and stays on in the cente r of the instru
ment pane l
9 page 120, fig. 115 and tells
yo u when the front Advanced A irbag on the
passenge r side has been turned off.
- A senso r be low the safety bel t latch fo r the
fron t se at passenge r to me asu re the tension
on the safety belt . The tension on the safety
belt and the weight registe red by the
weight -sensing mat help the control unit
"decide" whether the front a irbag for the front passenge
r seat should be turned off or
not
¢ page 110, Child restraints on the
front seat -some important things to
know.
- A sensor in the safety be lt latch fo r the driv
er and for the front seat passenger that
senses whether that safety belt is latched or not and transmits this informa tion to the
electronic control un it .
.&_ WARNING
D amage to the fron t passenger seat can
p revent the fro nt airbag from wor king
pr operly.
- I mp roper repai r or disassembly of the
front passenge r and dr ive r sea t will pre
vent the Advanced Airbag System from
functioni ng p roperly.
- Repairs to the front passenge r seat mus t
be pe rformed by qu alifie d and p roperly
trained workshop personne l.
- Never remove the front p assenger o r
d river seat from the vehicle .
-Never remove th e upholstery from the
front passenger seat.
- Neve r d isassemble o r remove parts from
the sea t or discon nect wires from it.
- Never carry sha rp objects in yo ur poc kets
or p lace t hem on the seat. If the weight
sensing ma t in the passenger seat is
punctured it cannot work p roperly.
- Neve r carry things on y our la p or ca rry
objects on the passenger seat. S uc h
items can increase the weight registere d
by the weight -sensing mat and send the
wrong information to the airbag control
un it.
- Never store items under the front pas
senger seat. Parts o f the Advanced Air
bag System under the passenger seat
could be damaged, preventing them and
the airbag system from working proper ly.
- Never p lace seat covers or rep lacement
up ho lstery that have not been specifica l
ly approved by Audi on the front seats .
- Seat covers can prevent the Advanced
-
Ai rbag System from recognizing chi ld .,..
Page 216 of 244
214 Fuses and bulbs
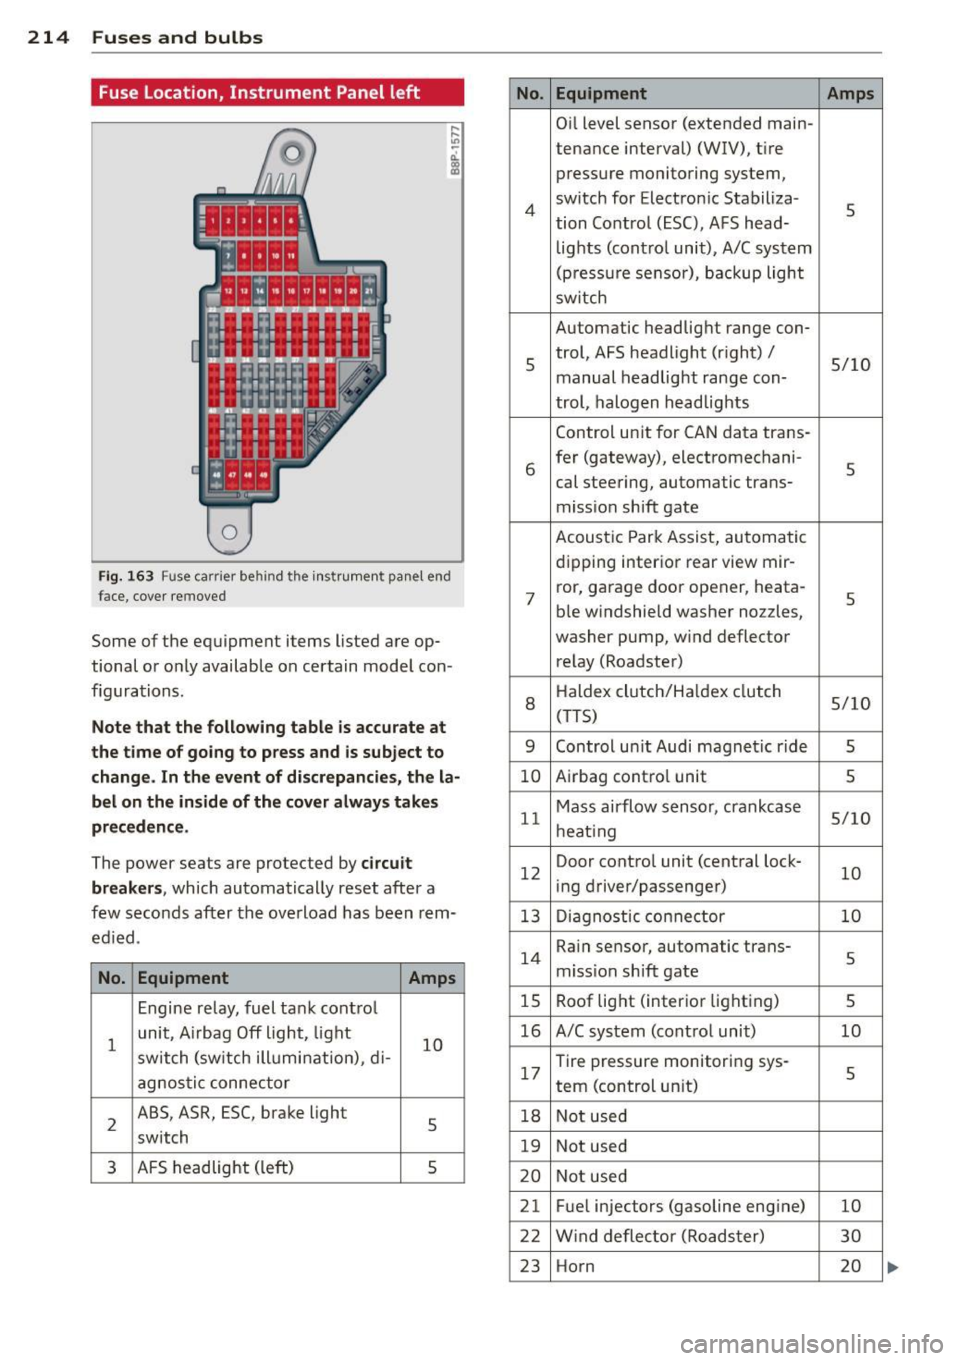
Fuse Location, Instrument Panel left
0
Fi g. 163 Fuse carrier behind the instrument panel end
face, cove r removed
Some of the equipment items listed are op
tional or only available on certain model con
figurations .
Note that the following table is accurate at
the time of going to press and is subject to
change. In the event of discrepancies, the la
bel on the inside of the cover always takes
preceden ce .
The power seats are protected by circuit
breaker s,
which automatically reset after a
few seconds after the overload has been rem
ed ied.
No . Equipment Amps
Engine relay, fuel tank control
1
unit, A irbag Off light, light
10 switch (sw itch illumination), d i-
agnos tic connector
2
ABS, ASR, ESC, brake light
5 switch
3 AFS headlight (left) s
No.
4
5
6
7
8
9
10
11
12
13
14
15
16
17
18
19
20
21
22
23
Equipment Amps
Oil level sensor (extended main-
tena nce interval) (WIV), tire
pressure monitoring system,
switch for Electronic Stabiliza-
s tion Control (ESC), AFS head-
lights (control unit), A/C system
(pressure sensor), backup light
sw itch
Automatic headlight range con-
trol, AFS headlight (right) /
5/10
manual headlight range con-
trol, halogen headlights
Control unit for CAN data trans-
fer (gateway), electromechani-
s cal steering, automatic trans-
mission shift gate
Acoustic Park Assist, automatic
dipping interior rear view mir- ror, garage door opener, heata-
s ble windshield washer nozzles,
washer pump, wind deflector
relay (Roadster)
H aldex clutch/Ha ldex clutch
5/10 (T TS)
Control un it Audi magnetic ride
s
Airbag contro l unit s
Mass airflow sensor, crankcase 5/10
heating
Door control unit (central lock-
10 ing driver/passenger)
Diagnostic connector
10
Rain sensor, automatic trans-
s miss ion shift gate
Roof light (interior lighting)
5
A/C system (control unit) 10
Tire pressure monitoring sys-
5 tern (control un it)
Not used
Not used
Not used
Fuel injectors (gasoline engine)
10
Wind deflector (Roadster) 30
Horn 20