steering AUDI TT ROADSTER 2014 Owners Manual
[x] Cancel search | Manufacturer: AUDI, Model Year: 2014, Model line: TT ROADSTER, Model: AUDI TT ROADSTER 2014Pages: 244, PDF Size: 60.87 MB
Page 11 of 244
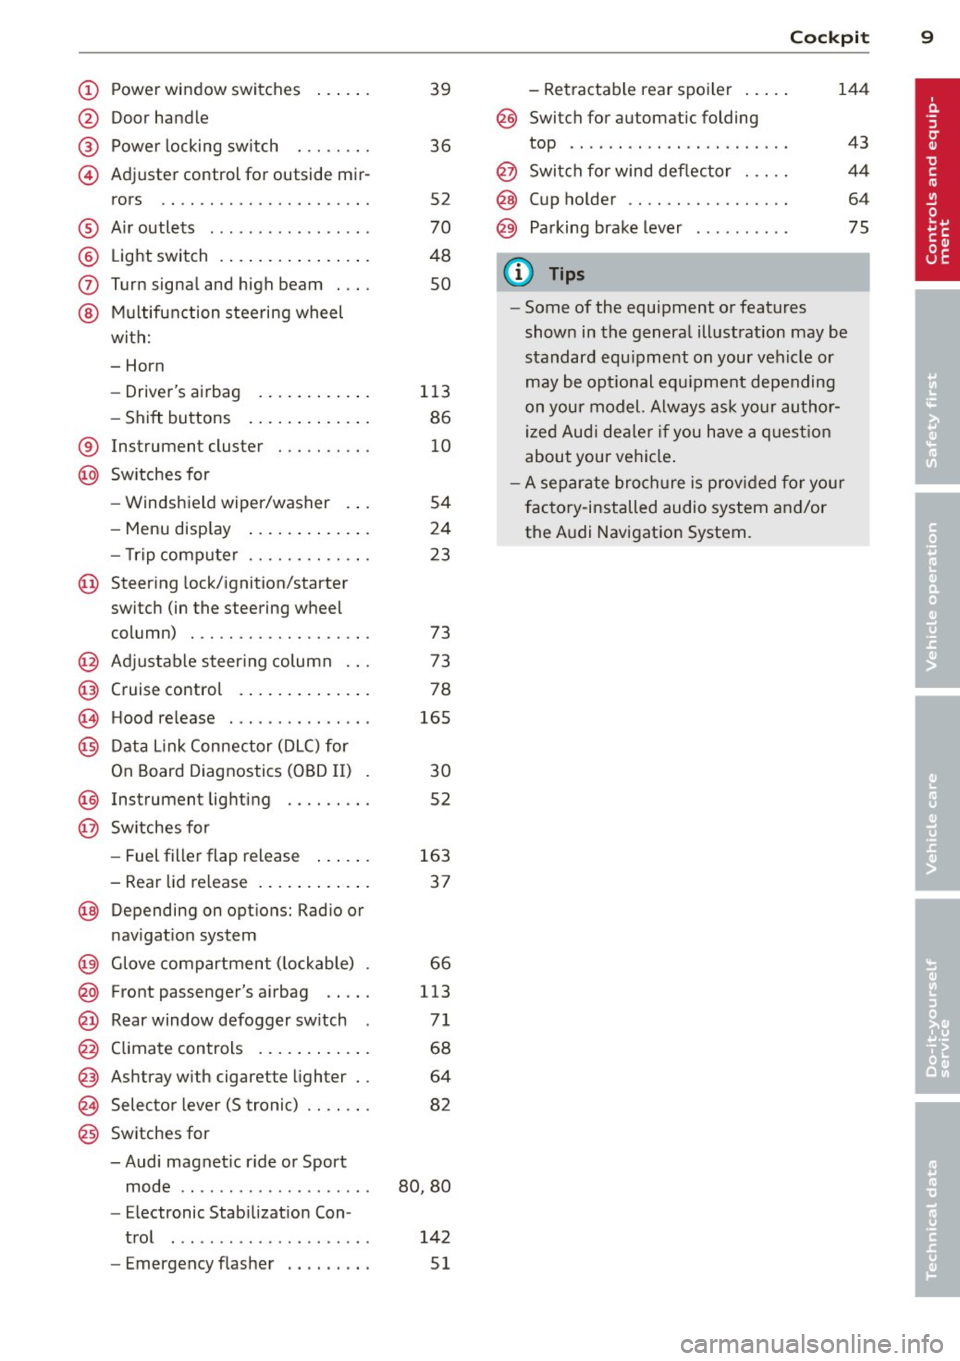
(!) Power window switches
@
®
©
Door handle
Power locking sw itch
Adjuster control for outside mir- rors ... . ............. .... .
® Air outlets ............... . .
@ Light switch . ... .... ... .. .. .
(J) Turn signa l and high beam . .. .
@ Mu ltifunction stee ring wheel
with:
- Horn
- Drive r's ai rbag .... ... .. .. .
- Shift buttons ..... ... .. .. .
® Instrument cluster
@ Sw itches for
- Windshield wiper/washer
- Menu disp lay ..... ... .. .. .
39
36
S2
70
48
so
113
86
10
S4
24
- T rip computer . . . . . . . . . . . . . 23
© Steering lock/ignition/starter
switch (in the steering wheel
column) . . . . . . . . . . . . . . . . . . . 73
@ Adjustab le s teer ing column . . . 73
@ Cruise control . . . . . . . . . . . . . . 78
€3J H ood re lease . . . . . . . . . . . . . . . 165
@ Data L ink Connector (DLC) for
On Board Diagnostics ( OBD II) 30
@ Instrument lighting . . . . . . . . . 52
@ Switches for
- Fuel filler flap release 163
- Rea r lid re lease . . . . . . . . . . . . 3 7
@ Depending on opt ions: Rad io or
nav igat ion system
@ Glove compar tment ( lockable) 66
@ Front passenger's a irbag . . . . . 113
@ Rear window defogger sw itch 7 1
@ Climate controls . . . . . . . . . . . . 68
@ Ashtray w ith cigarette lighter . . 64
@ Selecto r l ever (5 troni c) . . . . . . . 82
@) Switches for
- Audi magnet ic r ide or Sport
mode . . . . . . . . . . . . . . . . . . . . 80, 80
- Electronic Stab ilizat ion Con-
tro l . . . . . . . . . . . . . . . . . . . . . 142
- Emergency flasher . . . . . . . . . 51
Cockpi t 9
- Retractable rear spo iler .. ...
@ Switch for automatic folding
144
top . ... .. .. .. .. . .. .... ... .
@ Swi tch for wind deflector .... .
@ C up ho lder .. .. .. .......... .
@ Pa rking brake lever
(D Tips
- Some of the equipment or features
show n in the genera l illustration may be
standard equ ipme nt on your vehicle or
may be opt ional equ ipment depending
on you r model. Always as k yo ur au tho r
ized Aud i de aler if you have a quest ion
abou t your vehi cle.
- A separate bro ch ure is p rov ided for yo ur
facto ry-installed audio system and/or
the A udi Navigation System.
43
4 4
64
75
Page 19 of 244
Instrument s and warnin g/indic ator ligh ts 17
- The yello w oil level warning indic ation
II require s oil refill o r work shop se rv
i c e without del ay. Do not w ait until the
r ed o il p ressure warning symbol.
sta rts to flash befo re you respond to
th e l ow oil l eve l warning
I'll . By th en,
your engine ma y alr eady ha ve suff ere d
s eriou s damag e.
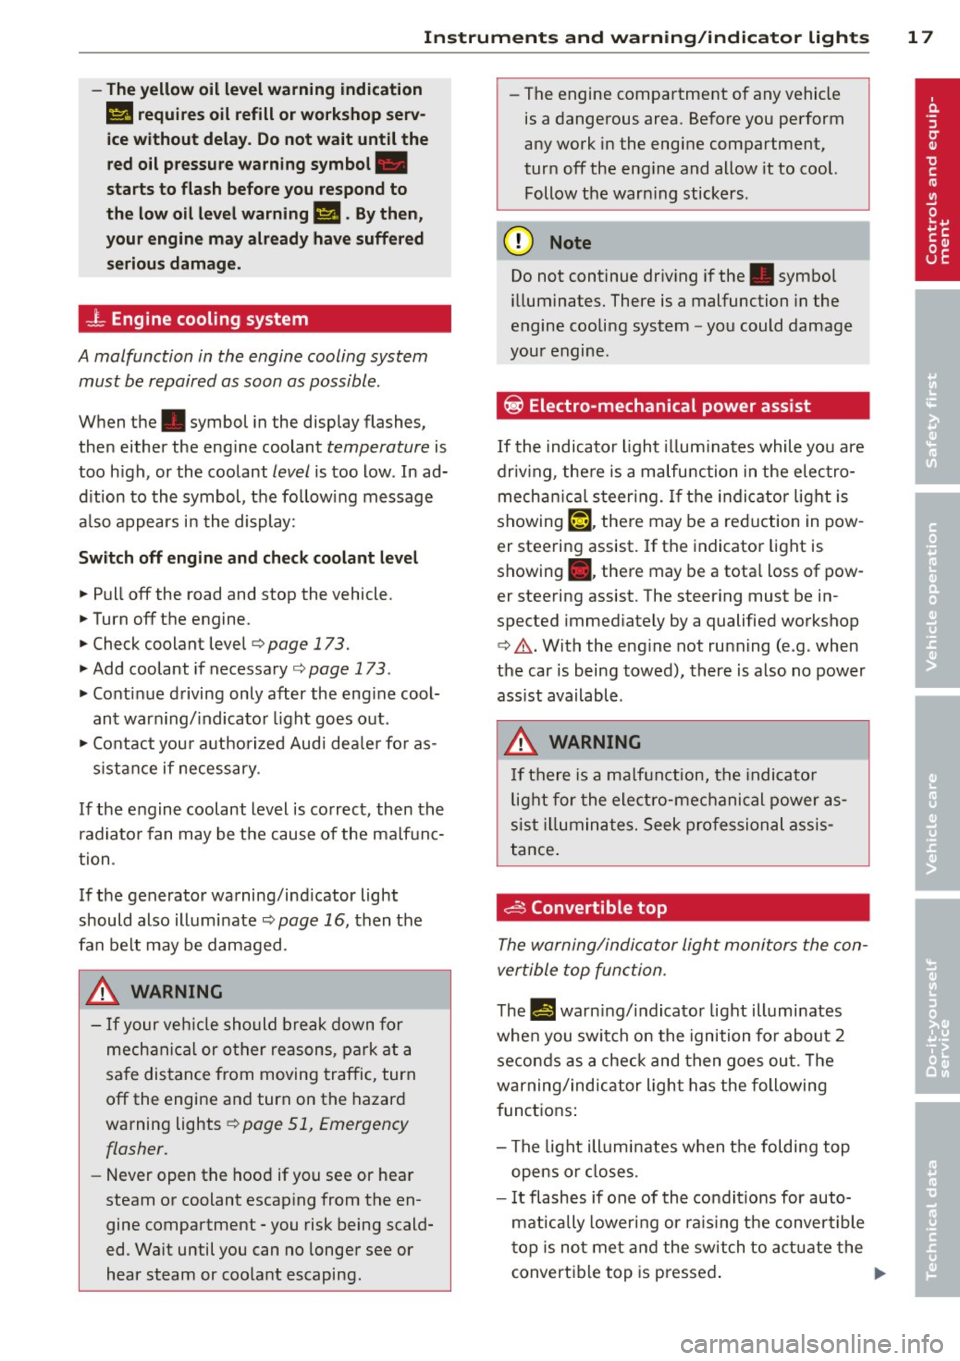
_L Engine cooling system
A malfunction in the engine cooling system
must be repaired as soon as possible .
When the. symbol in the display flashes,
then either the eng ine coolant
temperature is
too h igh, or the coolant
level is too low . In ad
d ition to the symbol, the fo llowing message
a lso appears in the display:
Sw it c h off engin e and ch eck coo lant l evel
~ Pull off the road and stop the vehicle.
~ Turnoff the engine.
~ Check coolant level ¢ page 173.
~ Add coolant if necessary ¢ page 173 .
~ Conti nue driving only after the eng ine cool
ant warn ing/ indicator light goes out .
~ Contact you r authorized Audi dea le r fo r as-
s istance if necessary .
If the engine coolant level is correct, then the
radiato r fan may be the cause of the malfunc
tion .
If the generator warning/ind icator light
should also illuminate ¢
page 16, then the
fan belt may be damaged .
A WARNING
-If your veh icle should break down for
mechanical or other reasons, park at a
sa fe distance from moving traffic, turn
off the engine and turn on the hazard
warning lights ¢
page 51, Emergency
flasher.
- Never open the hood if you see or hear
steam or coolant escaping from the en
gine compartment - you risk being scald
ed . Wait until you can no longer see or
hear steam or coolant escaping . -
The engine compartment of any vehicle
is a dangerous area . Before you perform
any work in the engine compartment,
turn off the eng ine and allow it to cool.
Follow the warn ing stickers .
(D Note
Do not continue dr iv ing if the . symbol
ill uminates. There is a malfunction in the
engine cooling system -you could damage
your engine .
~ Electro-mechanical power assist
If the indicato r light illum inates while you are
driv ing , there is a malfunction in the electro
mecha nica l steering. If the indi cator light is
showing
'".[-1. there may be a reduction in pow
er steering assist. If the indicator light is
showing ., ther e may be a tota l loss of pow
er steering assist. The stee ring must be in
spected immed iately by a qualified workshop
¢ .&. .With the eng ine not running (e.g . when
the car is being towed), there is also no power
ass ist available .
A WARNING
-
If there is a ma lfunction, the indicato r
l ight for the electro-mechanical power as
sist il l uminates. Seek pro fessional assis
tance.
~ Convertible top
The warning/indicator light monitors the con
vertible top function .
The !I warning/ indicator light illumi nates
when you switch on the ignition for about 2 seconds as a check and then goes out. The
warning/indicator ligh t has the following
functions :
- The light illumi nates when the foldi ng top
opens or closes.
- I t flashes if one of the cond it ions for auto
mat ically lower ing or ra is ing the convertible
top is no t met and the switch to actuate the
convertible top is pressed . .,..
Page 51 of 244
light sensor checked as soon as possible at a
dealership.
Adaptive light *
The benefit of adaptive l ight is that the curve
and the edge of the road are better i llum inat
ed . The adaptive light is contro lled automati
cally, depending on vehicle speed and steering
wheel angle.
When driving a round bends, the head lights
are contro lled according to steering wheel an
g le . So that there is no black area ahead of the
ve hic le, the two main beams pivot at different
angles. The system works above a speed of
about 6 mph (10 km/h).
Com ing home /le avi ng home function *
The function is swit ched on when the switch is
in the AUTO* position and the function is
shown as active in the driver information sys
tem.
The
coming hom e function illuminates the
area around the vehicle when the ign ition is
switched off and the driver's door is ope ned.
The length of time the lights remain on can be
set in the menu display
( Illumination > Exte
rior lights > coming home ).
The leavi ng home function i lluminates the
area around the vehicle when unlocking it.
A WARNING
- Never use dayt ime running l ights to see
where you are going. They are not bright
enough and w ill not let you see far
enough ahead for safety, especially at
dusk or when it is dar k. Always switch on
the low beams at dusk or when i t is dar k.
- Automatic headlights a re only intended
to assist the dr iver. They do not re lieve
t he driver of his responsibi lity to check
t he headlights and to turn them on man
ually according to the current light and
visibility conditions. For example, fog
and rain cannot be detected by the light
sensors. So a lways switch on the head
lights under these weather cond itions
and when driving in the dark
jO .
Clear vis ion 49
- Crashes can happen when you cannot see
the road ahead and when you cannot be
seen by other motorists.
- Always turn on the headlights so that
youcanseeahe adandsothatothe ~
can see your car from the back .
- Please observe legal regulat ions w hen
using the ligh ting systems des cribed.
(D Tips
- T he light sensor for head light control is
located in the rear view mirror mount.
Do not apply any stickers to t he wind
shield in th is area to preven t malfunc
tions or fa ilures.
- Some exter io r l ighting funct ions can be
adjusted in t he driver i nformat ion sys
t em
~page 24.
- I f you remove the igni tion from t he igni
t ion lock while the headligh ts are s till
on, a buzzer wi ll sound as long as the
driver's door is o pen to remind yo u to
t u rn off the lights.
- Always observe the specific local regula
tions for your area as to when to use your
lights.
- With automatic headlights, the high
beam f unction is also available, but w ith
one restrict ion: If you have not sw itched
the high beams back to low beams dur
ing automatic headlight operation (for
example, after d riving throug h a tunnel),
only the low beams come on the next
t ime au tomati c headlights a re swi tched
on. To use the high beams , you firs t have
t o pull the hig h beam lever back and
then push the lever fo rward again .
- In coo l or damp weather, the inside of
the headlights, turn signals an d tail
lights can fog over due to the tempera
t u re difference between the inside and
outside. They w ill clear shortly after
switching them on. This does not affect
the se rv ice life of the lighting.
Page 52 of 244
50 Clear vis ion
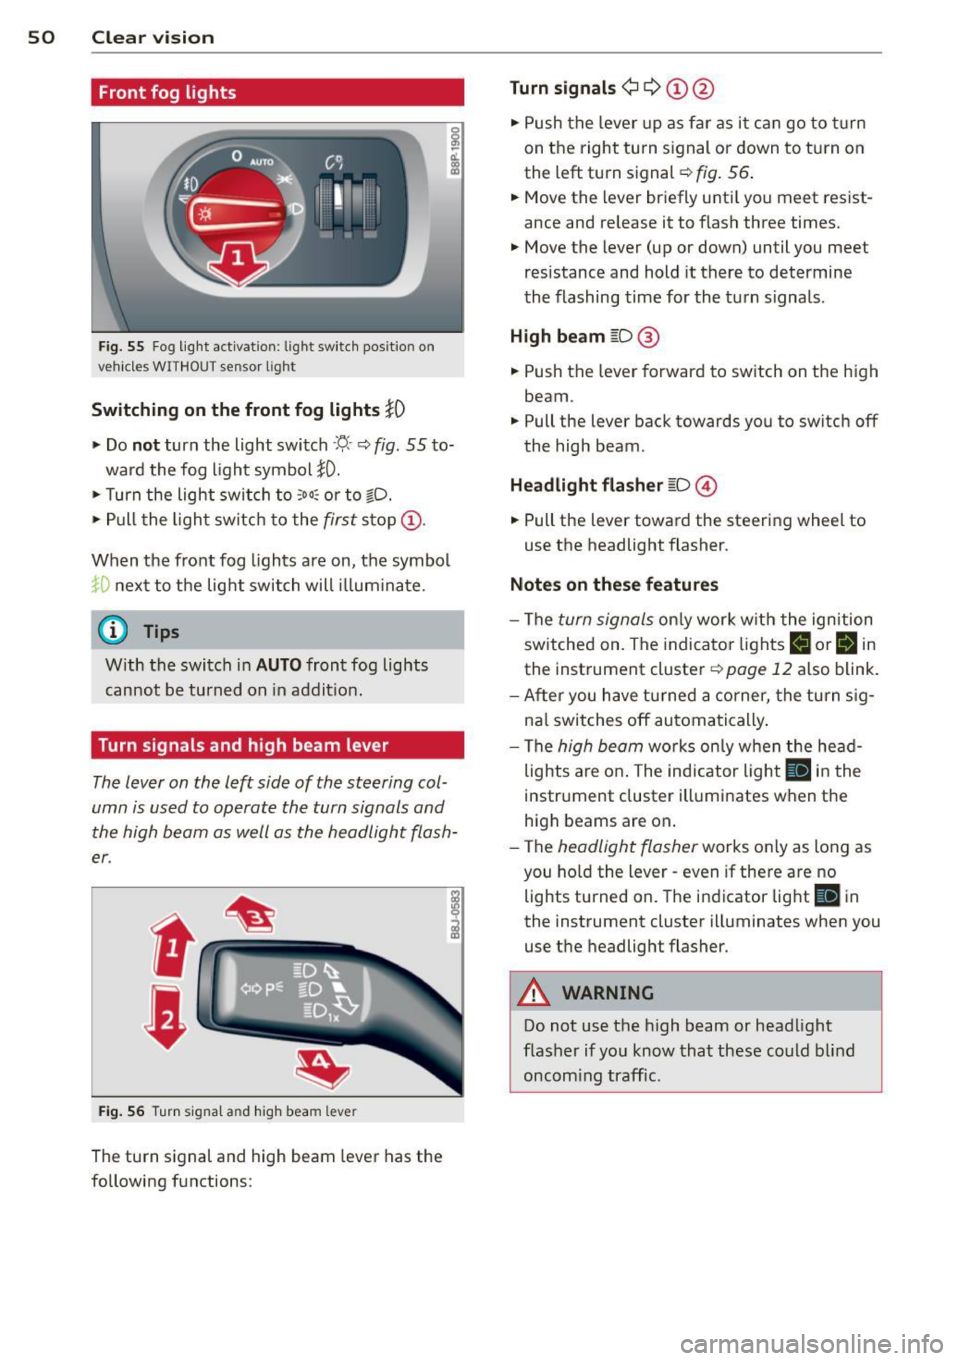
Front fog lights
F ig. 55 Fog light act ivation: light switch pos itio n on
veh icles WITHOUT sensor light
Switching on the front fog lights iO
.,. Do no t turn the light switch ·'t/- · ¢ fig. 55 to-
ward the fog light symbol
}D.
.,. Turn the light switch to :o o: or to io .
.,. Pull the ligh t switch to the first stop @.
When the front fog lights are on, the symbol
}D next to the light switch will i llum ina te.
@ Tips
With the switch in AUTO front fog lights
cannot be turned on in addit ion.
Turn signals and high beam lever
The lever on the left side of the steering col
umn is used to operate the turn signals and
the high beam as well as the headlight flash
er .
Fig. 56 Tu rn signa l and hig h beam lever
The turn signal and high beam lever has the
following functions:
Turn signals ¢ Q ©@
.,. Push the lever up as fa r as it ca n go to t urn
on the right turn s ignal or down to tu rn on
the left turn signal ¢
fig. 56 .
.,. Move the lever briefly unti l you meet res ist
ance and release it to flash three times .
.,. Move the lever (up or down) until you meet
resistance and hold it there to determine
the flashing time for the turn signals .
High be am gD @
.,. Push the lever forward to switch on the high
beam.
.,. Pull the lever back towards you to switch off
the high beam.
Headlight fla sh er gD @
.,. Pull the lever toward the steering whee l to
use the headlight flasher.
Not es on thes e features
- The turn signals on ly work wi th the ignition
sw itched on. The indicator lights
F-1 or rl in
the instrument cluster¢
page 12 also blink.
- After you have turned a co rner, the turn s ig-
na l switches off automa tically .
- The
high beam works on ly w hen the he ad
lights a re on . The indicator light
II in t he
instrument cluster illuminates when the
high beams are on.
- The
headlight flasher works only as long as
you ho ld the lever - even if there a re no
lights turned on. The indicator light
II in
the instrument cluster illuminates when you
use the headlight flasher.
A WARNING
-
Do not use the h igh beam or head light
flasher if yo u know that these could b lind
oncom ing traffic.
-
Page 56 of 244
54 Clear vis ion
@ Tips
- Switching off the dimming function of
the inside rear view mirror also deact i
vates the automatic dimming f unction of
the exterior m irrors.
- The automatic dimming mirrors do not dim when the interior lighting is turned
on or the reverse gear is selected .
-Automat ic dimming for the m irror only
operates properly if the light striking the inside mirror is not hindered in any way.
Sun visors
Using the sun visors makes driving safer.
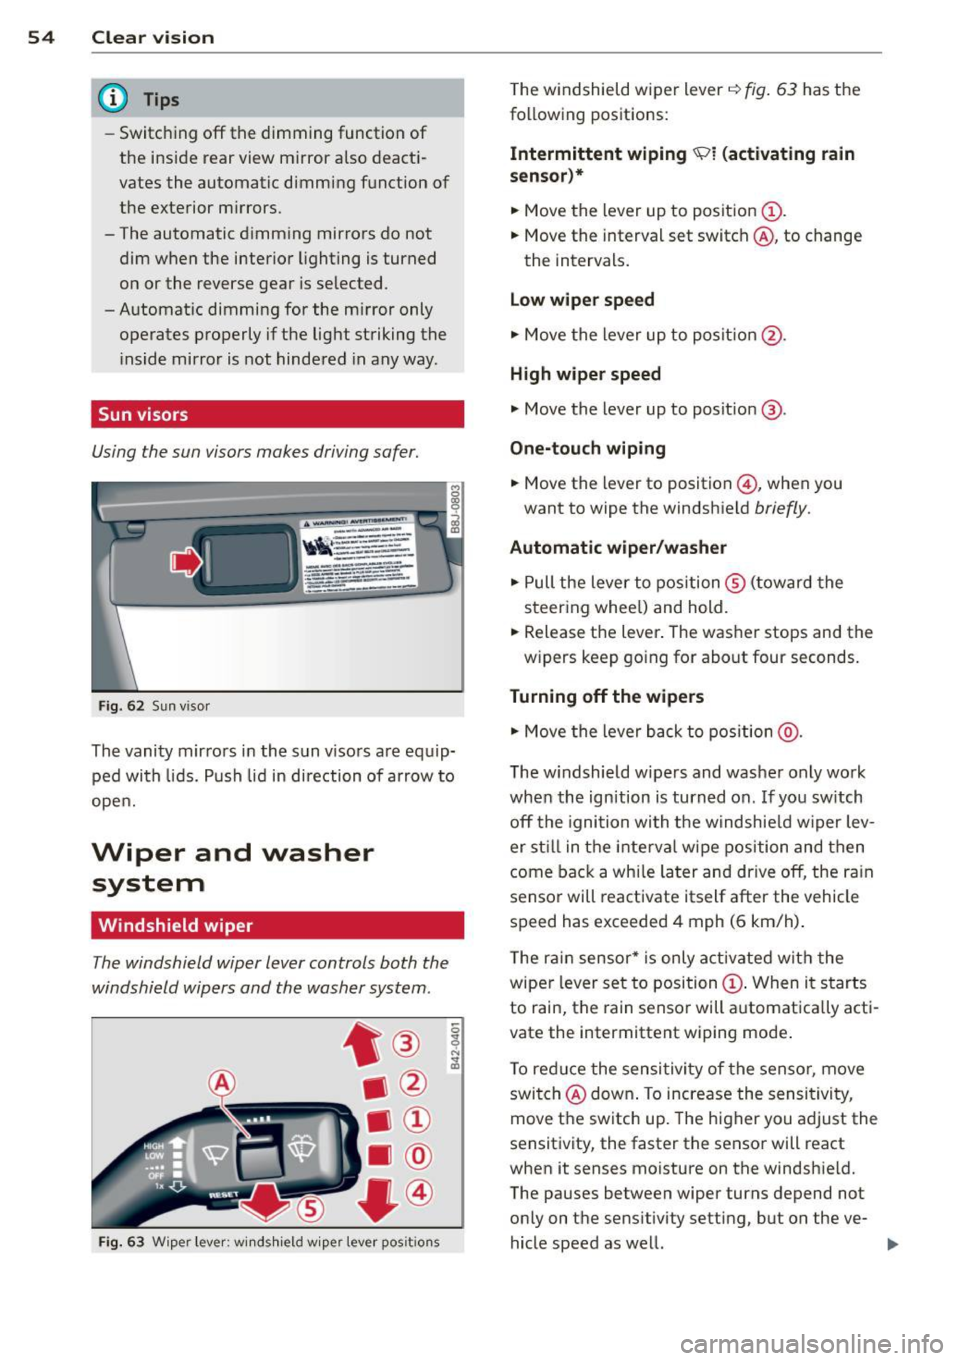
Fi g. 62 Sun v iso r
The vanity mirrors in the sun v isors are equ ip
ped with lids. Push lid in direction of a rrow to
open.
Wiper and washer system
Windshield wiper
The windshield wiper lever controls both the
windshield wipers and the washer system .
Fig. 63 Wiper lever: win ds hield w iper lever pos it ions
T he windshield wiper lever i=:> fig. 63 has the
following positions:
Int ermittent wiping ~l (activating rain
s e nsor)*
.. Move the lever up to position (D .
.. Move the interval set switch @, to change
the intervals.
Low wiper spe ed
.. Move the lever up to posit ion @.
High w ipe r speed
.. Move the lever up to posit ion @.
One-touch wip ing
.. Move the lever to position @ , when you
want to wipe the windshield
briefly.
Automat ic wip er/ washer
.. Pull the lever to position ® (t oward the
steering whee l) and hold .
.. Release the lever . The washer stops and the
w ipers keep going for about four seconds.
Turning off the wipers
.. Move the lever back to position @ .
The w indshield w ipers and washer only work
when the ignition is turned on . If you sw itch
off the igni tion with the windshie ld w iper lev
er st ill in the inte rva l wipe position and then
come back a whi le later and drive off, the ra in
sensor will reactivate itself after the vehicle speed has exceeded 4 mph (6 km/h) .
T he rai n sensor* is only activated with the
wiper lever set to position
(D . When it starts
to rain, the rain senso r will a utomat ically acti
vate the intermittent wiping mode .
T o reduce the sensi tivity of the sensor, move
swi tch @ down . To increase the sensi tivity,
move the switc h up. The higher you adjust the
sensitivity, the faster the senso r will react
when it senses moisture on the windsh ield.
The pauses between wiper turns depend not only on the sensitivity setting, but on the ve-
hicle speed as well. ..,.
Page 62 of 244
60 Seats and stor age
Seats and storage
General recommen
dations
Why is your seat adjustment so
important?
The safety belts and the airbag system can
only provide maximum protection if the front
seats are correctly adjusted.
There are various ways of adjusting the front
seats to provide safe and comfortable support
for the driver and the front passenger. Adjust
you r seat prope rly so that :
- you can easily and quickly reach all the
switches and controls in the instrument
panel
-your body is properly supported thus reduc
ing physical stress and fatigue
- the safety be lts and airbag system can offer
maximum protection
¢ page 109.
In the following sections, you will see exactly
how you can best adjust your seats .
There are special regulations and instructions
for installing a child safety seat on the front
passenger's seat. Always heed the informa
tion regarding child safety provided in
¢ page 130, Child Safety.
A WARNING
Incorrect seating position of the driver and
all other passengers can result in serious
personal injury.
- Always keep your feet on the floor when
the vehicle is in motion -never put your
feet on top of the instrument panel, out
of the window or on top of the seat cush
ion! This applies especially to the passen
gers .
If your seating position is incorrect
you increase the risk of injury in the case
of sudden braking or an acc ident.
If the
airbag inflates and the seating position
is incorrect this could result in personal
injury or even death.
- It is important for both the driver and
front passenger to keep a distance of at least 10
inches (25 cm) between them
selves and the steering wheel and/or in
strument panel. If you're sitting any
closer than this, the airbag system can not protect you properly . In addition to
this, the front seats and head restraints
must be adjusted to your body height so
that they can give you maximum protec
tion.
- Always try to keep as much distance as
possible between yourself and the steer
ing wheel or instrument panel.
- Do not adjust the driver's or front pas
senger's seat whi le the vehicle is moving.
Your seat may move unexpectedly, caus
ing sudden loss of vehicle control and
personal injury. If you adjust your seat
while the vehicle is moving, you are out of position.
Driver's seat
The correct seat position is important for safe
and relaxed driving.
We recommend that you adjust the driver's
seat in the following manner :
.,. Adjust the seat in fore and aft direction so
that you can easily push the peda ls to the
floor whi le keeping your knee slightly bent
i::> A in Why is your seat adjustment so im
portant? on page 60 .
.,. Adjust the seatback so that when you sit
with your back against the seatback , you can
still grasp the top of the steering wheel.
.,. Position the head restraint according to the
occupant 's height
<=:> page 63 . For maxi
mum protection, the top of the head re
straint shou ld be at least at eye level, pref
erably higher and ideally level with the top
of the head
¢ page 95, fig. 102.
A WARNING "--
Never place any objects in the driver's foot-
well. An object could get into the pedal
area and interfere with pedal function. In
case of sudden braking or an accident, you
would not be able to brake or accelerate!
Page 75 of 244
On the road
Steering
Adjusting the steering wheel column
The steering wheel position can be continu
ously adjusted in height and distance.
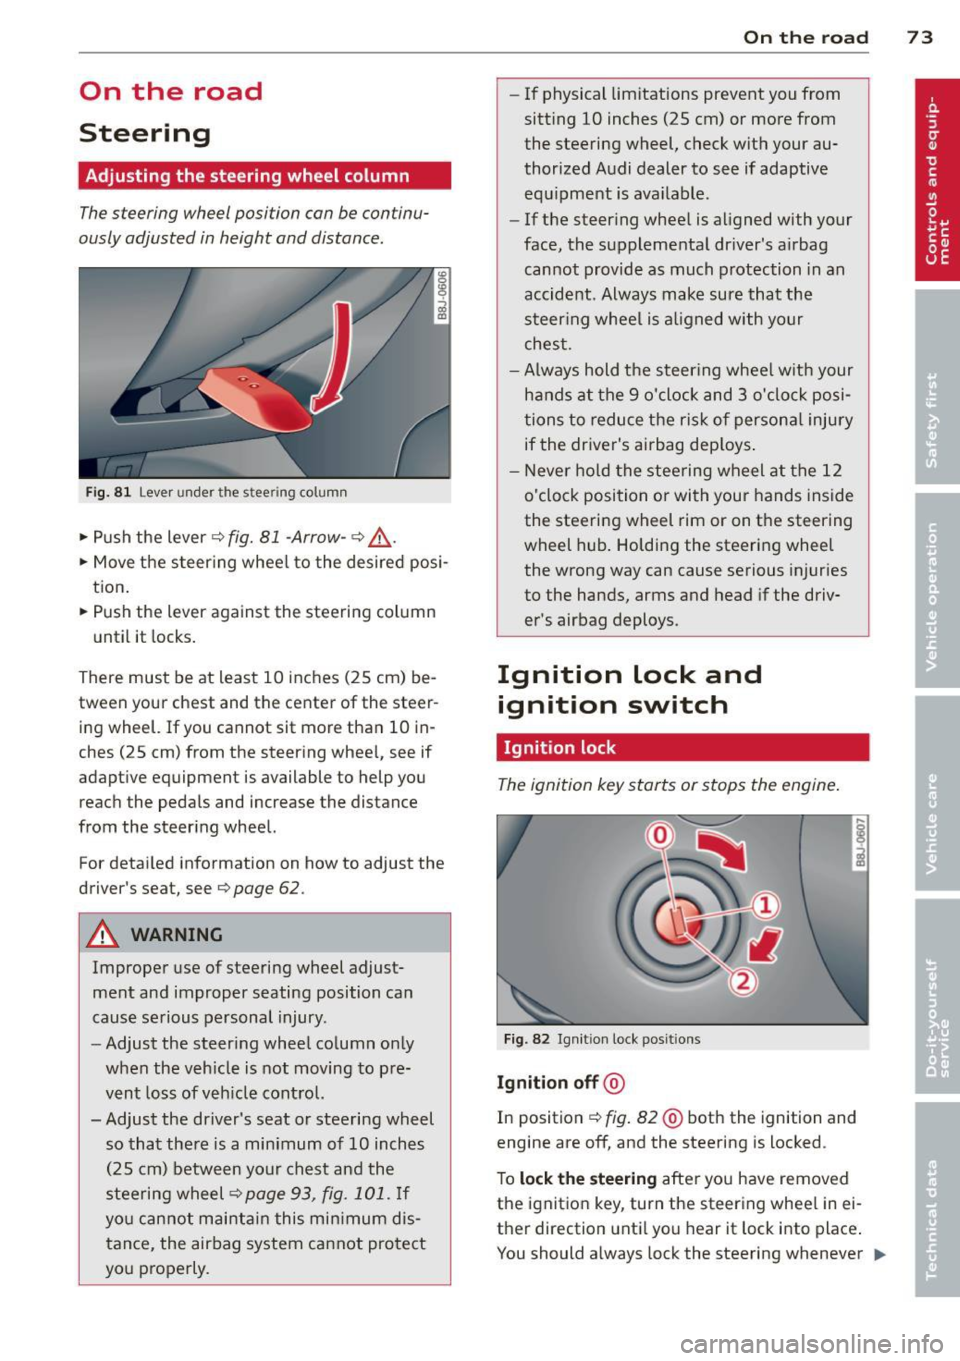
Fig. 81 Lever under the stee ring column
• Push the lever¢ fig. 81 -Arrow- ¢,&. .
• Move the steer ing wheel to the desired posi
tion.
• Push the lever against the steering column
until it locks.
There must be at least 10 inches (25 cm) be tween your chest and the center of the steer
ing wheel. If you cannot sit more than 10 in
ches (25 cm) from the steering wheel, see if
adaptive equipment is available to help you
reach the pedals and increase the distance
from the steering wheel.
For detailed information on how to adjust the
driver's seat, see
¢ page 62.
A WARNING
Improper use of steering wheel adjust
ment and improper seating position can
cause serious personal injury.
- Adjust the steering wheel column only
when the vehicle is not moving to pre
vent loss of vehicle control.
- Adjust the driver's seat or steering wheel so that there is a minimum of 10 inches
(25 cm) between your chest and the
steering wheel
¢page 93, fig. 101. If
you cannot maintain this minimum dis
tance, the airbag system cannot protect
you properly.
On the road 73
-If physical limitations prevent you from
sitt ing 10 inches (25 cm) or more from
the steering wheel, check with your au
thorized Audi dealer to see if adaptive equipment is ava ilable .
- If the steering wheel is aligned with your
face, the supplemental dr iver 's airbag
cannot provide as much protection in an
accident. Always make sure that the
steering wheel is al igned with your
chest .
-Always hold the steer ing wheel w ith your
hands at the 9 o'clock and 3 o'clock posi
tions to reduce the risk of persona l injury
if the driver's airbag deploys .
- Never hold the steering wheel at the 12
o'clock position or with your hands inside
the steering wheel rim or on the steering
wheel hub. Holding the steering wheel
the wrong way can cause serious injuries
to the hands, arms and head if the driv
er's airbag deploys.
Ignition lock and ignition switch
Ignition lock
The ignition key starts or stops the engine.
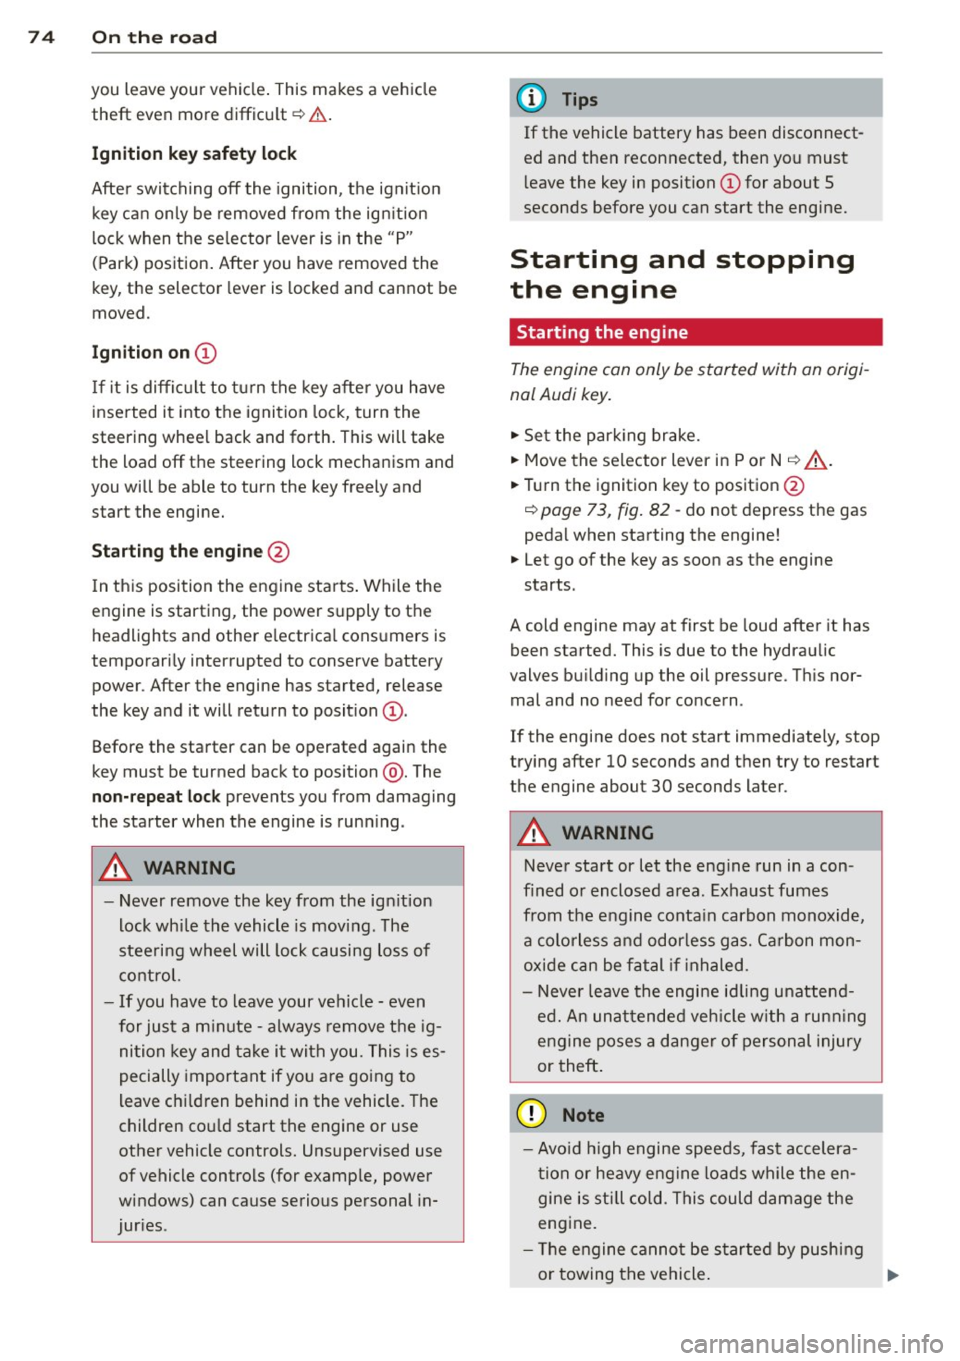
Fig. 82 Ignit ion lock posit ions
Ignition off @
In position ~ fig. 82@ both the ignition and
engine are off, and the steering is locked .
To
lock the steering after you have removed
the ignition key , turn the steering wheel in ei
ther direction until you hear it lock into place .
You should always lock the steering whenever ..,.
Page 76 of 244
74 On the road
you leave your vehicle. This makes a vehicle
theft even more difficult ¢ .&. .
Ignition key saf ety lock
Afte r swi tching off the ignition, t he ig nit ion
key can on ly be removed from the ig nition
lock when the se lector lever is in the "P"
(Park) position . After you have removed the
key, the selector lever is locked and cannot be
moved.
Ignition on @
If it is diffic ult to tu rn the key after you have
inserted it into the ignition lock, turn the
steering wheel back and forth. This will take
the load
off the steering lock mechanism and
you will be able to turn the key freely and
start the engine.
Starting the engine @
In this position the engine starts . While the
engine is starting , the power supply to the
headlights and other e lectrica l consumers is
temporari ly interrupted to conserve battery
power. After the engine has started, release
the key and it will return to posit ion
(D .
Before the starter can be operated again the
key must be turned back to position @. The
non -repeat loc k prevents you from damaging
the starter when the engine is runn ing .
A WARNING
-Never remove the key from the ign it ion
lock whi le the vehicle is moving. The
steeri ng wheel will lock causing loss of
c ontrol.
- If you have to leave your vehicle - even
for just a m inute -always remove t he ig
nition key and take it with you. This is es
pecially important if you a re going to
leave chi ldren behind in the vehicle. The
children co uld start the engine or use
other vehicle controls. Unsupervised use
of vehicle controls (for examp le, power
windows) can cause serious personal in
jur ies .
(D Tips
If the vehicle battery has been disconnect
ed and then reconnected, then you must
l eave the key in position
(D for about 5
seconds before you can start the engine.
Starting and stopping
the engine
Starting the engine
The engine can only be started with an origi
nal Audi key.
.,. Set the park ing brake.
.,. Move the selector lever in P or
N ~ &_ .
.,. Turn the ignition key to position @
¢ page 73, fig. 82 -do not depress the gas
pedal when starting the engine!
.,. Let go of the key as soon as the engine
starts .
A cold engine may at first be loud after it has
been started. This is due to the hydraulic
valves bu ild ing up the oil pressure . Th is nor
mal and no need for concern .
If the engine does not start immediate ly, stop
trying after 10 seconds and then try to restart
the engine about 30 seconds later .
A WARNING
-Never start or let the engine run in a con-
f ined or enclosed area. Exhaust fumes
from the engine conta in carbon monoxide,
a colorless and odorless gas. Carbon mon
oxide can be fatal if inhaled .
- Never leave the engi ne idling unattend
ed. An unat tended veh icle w ith a runn ing
engine poses a danger of personal injury
or theft .
(D Note
-Avo id h igh engine speeds, fast accelera
tion or heavy engine loads while the en
gine is still cold. This could damage the
engine.
- T he engine cannot be started by pushing
or towing the vehicle . ..,.
Page 77 of 244
@ For the sake of the environment
To avoid unnecessary engine wear and to reduce exhaust emissions, do not let your
vehicle stand and warm up. Be ready to
drive off immediately after start ing your
veh icle. Mainta in moderate speed until the
engine is completely warm . Remember,
the engine performs best at operating
temperature .
Stopping the engine
.,. Turn the ignition key to position @
¢page 73, fig. 82.
_& WARNING
-Never turn off the engine before the ve
hicle has come to a complete stop. The
full function of the brake booster and the
power steering is not guaranteed. You
must use more force to turn or brake if
necessary . Because you cannot steer and
brake as you usually would, this could
lead to crashes and serious injur ies.
- The radiator fan can continue to run for
up to 10 minutes even after you have
turned off the eng ine and removed the
ignition key. The radiator fan can also
turn on again if the engine coolant heats
up because of intense sunlight or heat
build-up in the engine compartment .
(D Note
Do not stop the engine immediately after
hard or extended driving. Keep the engine
r un ning for approximately two minutes to
prevent excessive heat build-up.
On the road 75
Parking brake
Parking brake
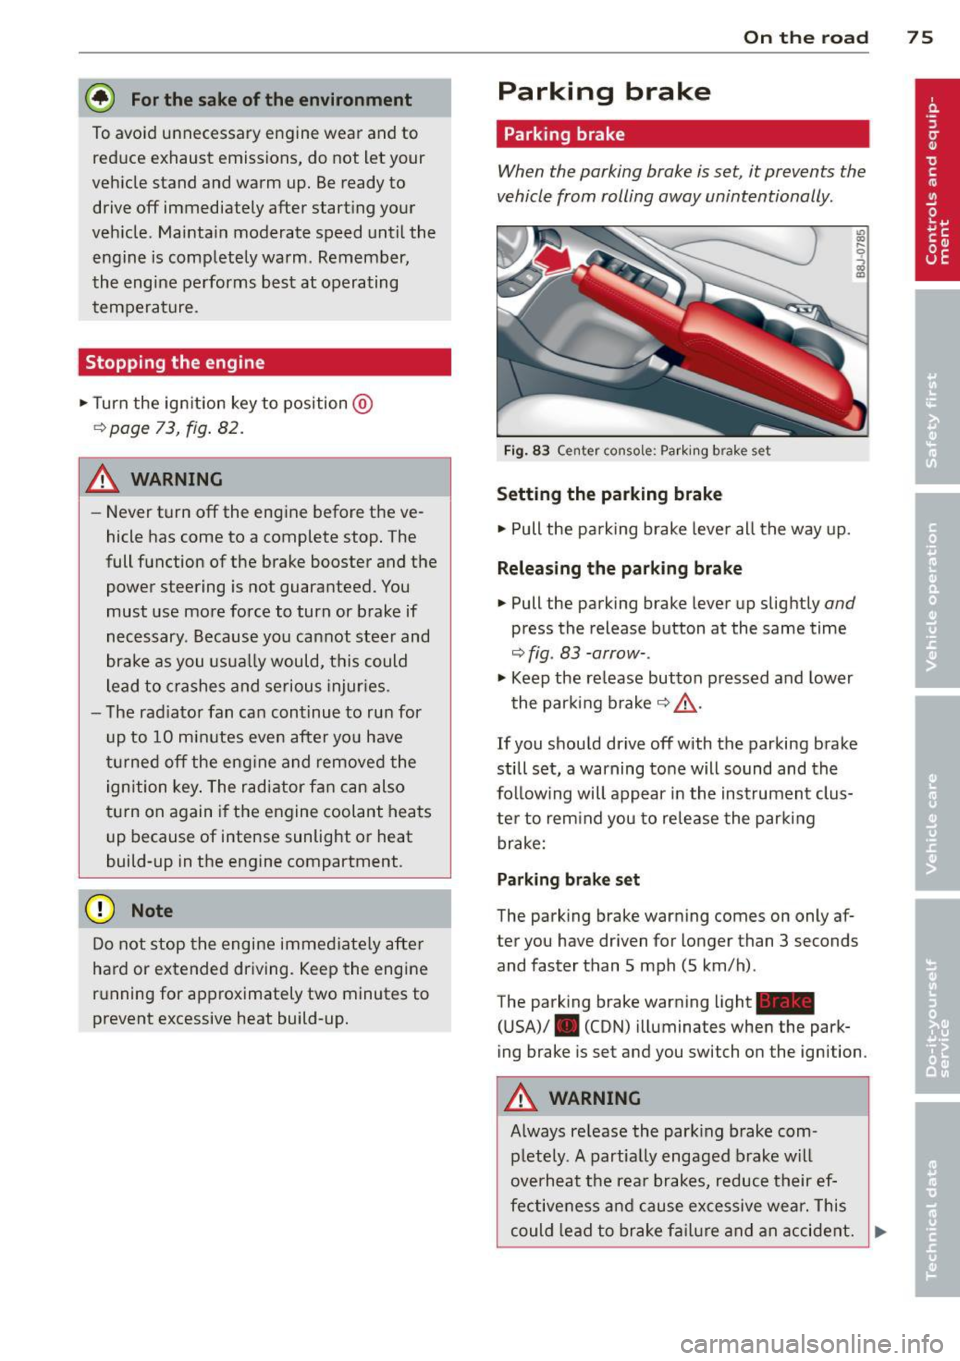
When the parking brake is set, it prevents the
vehicle from rolling away unintentionally .
Fig. 83 Center console: Parki ng b rake set
Setting the parking brake
.. Pull the parking brake lever all the way up.
Releasing the parking brake
.. Pull the parking brake lever up slightly and
press the release button at the same time
¢ fig. 83 -arrow-.
.,. Keep the re lease button pressed and lower
the parking brake¢&_ .
If you should drive off with the parking brake
still set, a warning tone will sound and the
follow ing will appear in the instrument clus
ter to rem ind you to release the parking
brake:
Parking brake set
The parking brake warning comes on only af
ter you have driven for longer than 3 seconds
and faster than 5 mph (5 km/h) .
The parking brake warning light_
(USA)/ . (CON) illuminates when the park
ing brake is set and you switch on the ignition .
A WARNING
Always re lease the park ing brake com -
pletely. A partially engaged brake will
overheat the rear brakes, reduce their ef
fectiveness and cause excessive wear. This
could lead to brake failure and an accident. .,.
Page 88 of 244
86 Transmis sion
If you have selected a lower gear than the cur
rent one, the transmission w ill only shift down
when the engine cannot be overspeeded.
I f kick-down is actuated, the transmiss ion
shifts into a lower gear independently of
speed and engine rpm .
Steering wheel with Tiptronic controls
Applies to vehicles: with S tro nic
The selector paddles allow the driver to keep
both hands on the steering wheel when shift
ing gears.
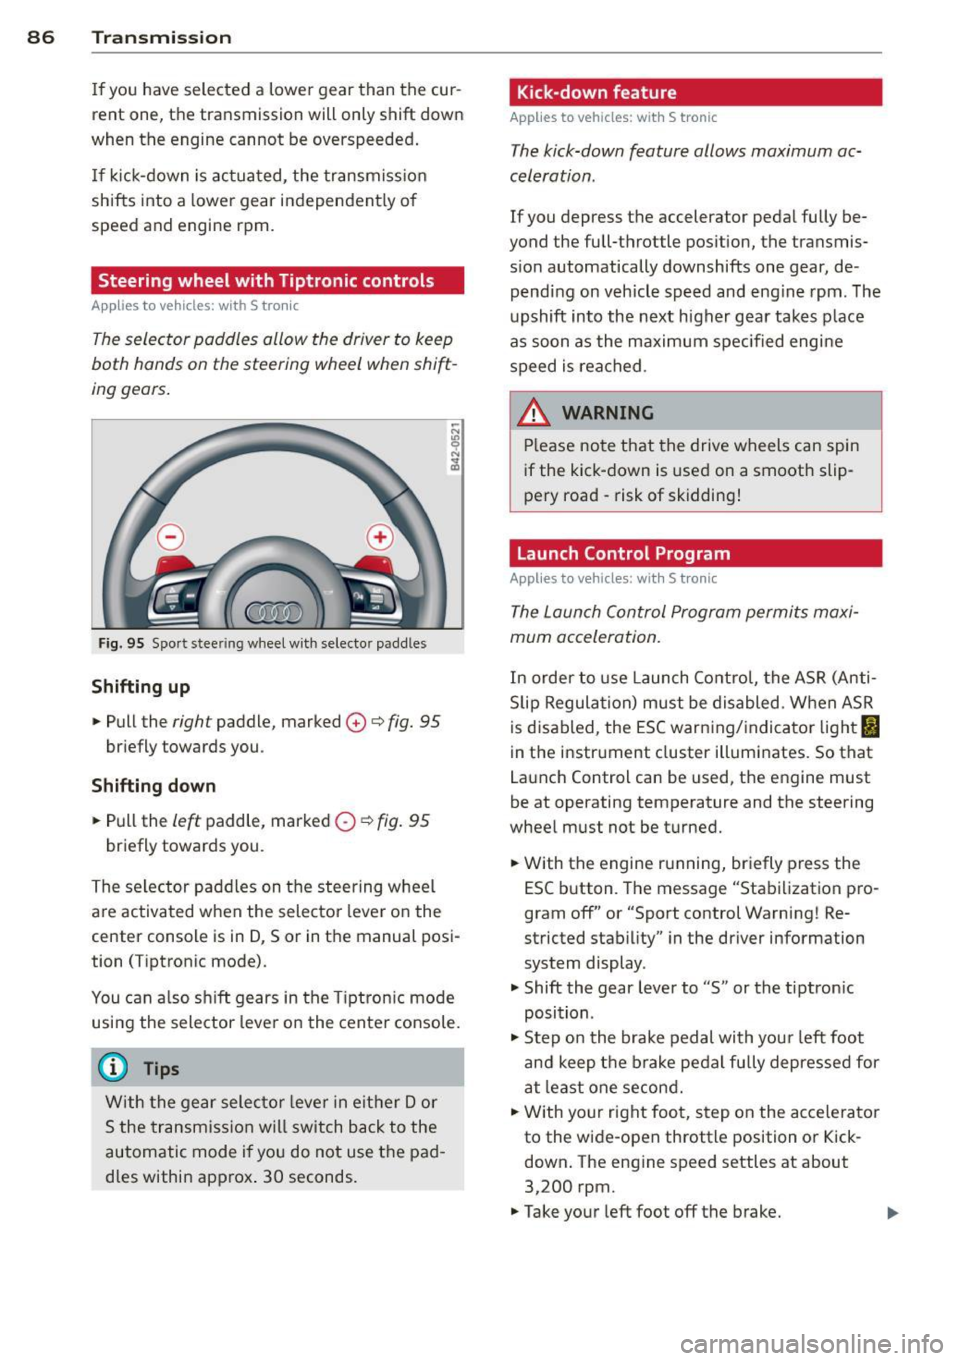
Fig. 95 Spo rt stee ring wheel w ith selecto r paddle s
Shifting up
.,. Pull the right paddle, marked 0 ¢ fig. 95
briefly towards you .
Shifting down
.,. Pull the left paddle, marked O ¢ fig. 95
briefly towards you .
The selector paddles on the steering wheel
are activated when the selector lever on the
center console is in D, 5 or in the manual posi
tion ( Tiptronic mode).
You can also shift gears in the Tiptronic mode
using the selector lever on the center console.
(D Tips
With the gear selector lever in either Dor
5 the transmission will switch back to the
automatic mode if you do not use the pad
dles within approx . 30 seconds.
Kick-down feature
Applies to vehicles: w it h S tronic
The kick-down feature allows maximum ac
celeration.
If you depress the accelerator pedal fully be
yond the full-throttle position, the transmis·
sion automatically downshifts one gear, de·
pending on vehicle speed and eng ine rpm. The
upshift into the next higher gear takes place
as soon as the maximum specified engine
speed is reached.
.&_ WARNING i-==
Please note that the drive wheels can spin
if the kick-down is used on a smooth slip·
pery road -risk of skidding!
Launch Control Program
Applies to veh icles: w it h S t ronic
The Launch Control Program permits maxi
mum acceleration.
In order to use Launch Control, the ASR (Anti
S lip Regulation) must be disabled . When ASR
is disabled , the ESC warning/indicator light
fl
in the instrument cluster illuminates. So that
Launch Control can be used, the engine must
be at operating temperature and the steering
wheel must not be turned.
.,. With the engine running, briefly press the
ESC button . The message "Stabilization pro
gram off" or "Sport control Warning! Re
stricted stability" in the driver information
system display .
.,. Shift the gear lever to "5" or the tiptronic
position .
.,. Step on the brake pedal with your left foot
and keep the brake pedal fully depressed for
at least one second.
.,. With yo ur right foot, step on the accelerator
to the wide-open throttle position or Kick·
down. The eng ine speed settles at about
3,200 rpm .
.,. Take your left foot off the brake. ..,.