ECO mode AUDI TT ROADSTER 2015 Owner's Manual
[x] Cancel search | Manufacturer: AUDI, Model Year: 2015, Model line: TT ROADSTER, Model: AUDI TT ROADSTER 2015Pages: 244, PDF Size: 60.74 MB
Page 88 of 244
86 Transmis sion
& WARNING ,-
- Always adapt your driving to the traffic
flow.
- Only use Launch Control when road and
traffic conditions allow it and other driv
ers will not be endangered or annoyed by
your driving and the acceleration of the
vehicle .
- Make sure that ESC remains enabled.
With the ESC disabled, the vehicle could
brake away, particularly on a slick and
slippery road - risk of skidding!
- Once acce lerat ion is finished, switch ASR
on again by briefly pushing the ESC but
ton.
(j) Tips
- The transmission temperature may in
crease significantly after using the Launch Control Program. If that hap
pens, the program may not be available
for a few minutes.
It will be available
again after a cool-down period.
- When accelerating using the Launch
Control program, all vehicle parts are
subject to heavy loads . This can result in
increased wear.
Back-up program
In the event of a system malfunction, there is
a back-up program.
In the event of system malfunction, the auto
matic transmission switches to the fail-safe
mode. Al l of the selector lever position dis
plays for the automatic transmission are high
lighted with a light background in the instru
ment cluster display . In some cases you can
not use reverse gear any more.
If the transmission switches to fail-safe mode, you should take the vehicle to an au
thorized Audi dealership as soon as possible
to have the condition corrected .
Clutch is overheating
• Clutch is overheating! Please stop vehi
cle!
If the symbols are illum inated, the clutch is
overheating and could be damaged if you con
t inu e to drive. Stop the vehicle and allow the
transmission to cool with the se lector lever in
the P position while the engine runs at idle. If
the warning does not turn off, do not continue driving. See your authorized Audi dealer or
qualified repair facility for assistance. Other
wise serious transmission damage could re
sult . Once the indicator light has turned off,
drive to your authorized Audi dealer or quali
fied repa ir facility immed iately to have the
malfunction corrected .
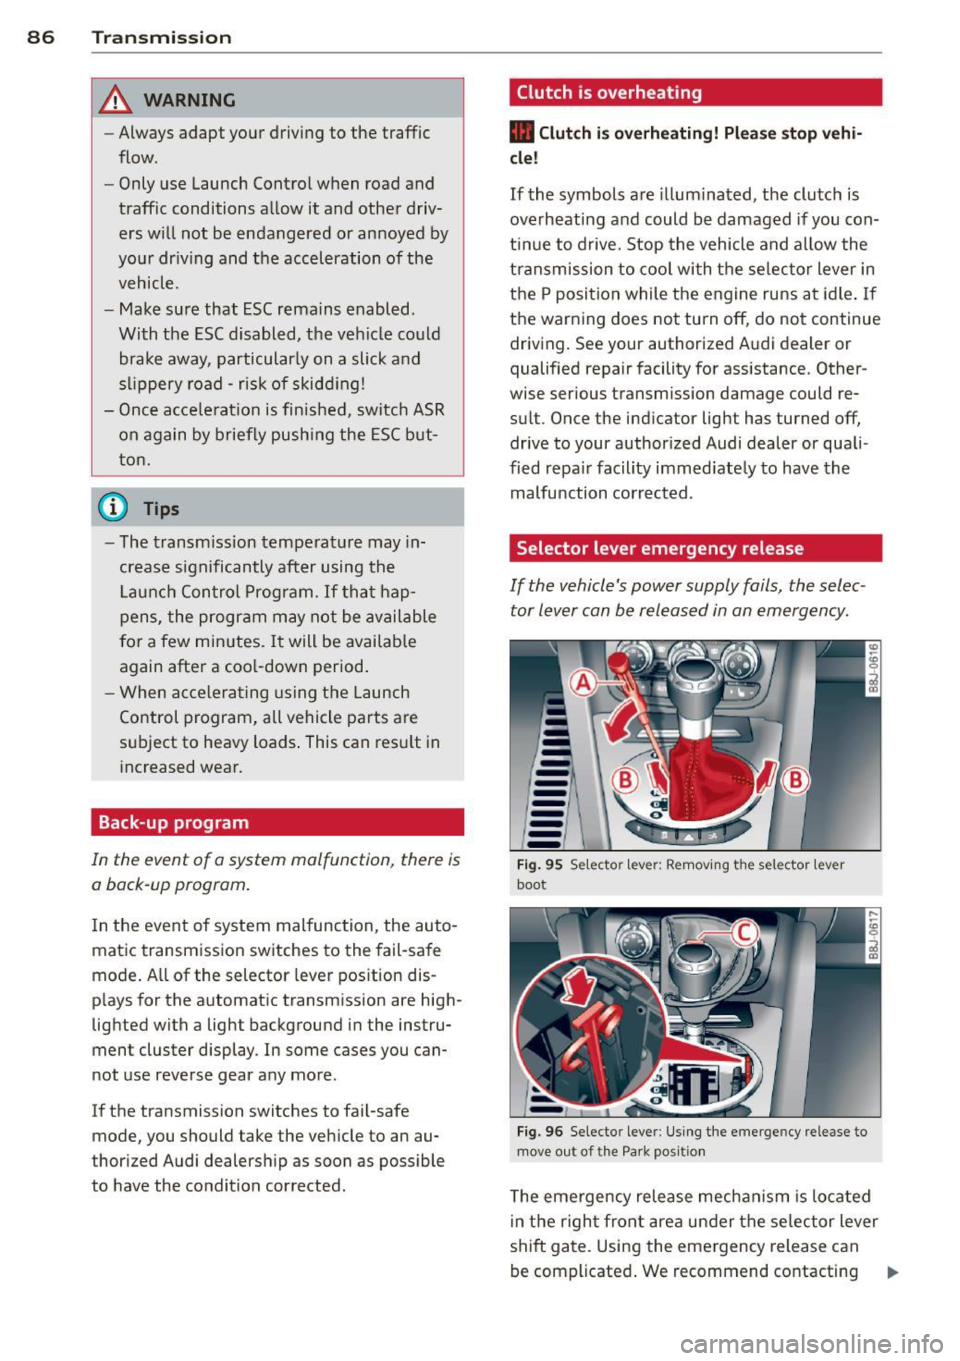
Selector lever emergency release
If the vehicle's power supply fails, the selec
tor lever can be released in an emergency.
--
-
-
-
-
---Fig. 95 Selecto r lev er: Remov ing the selector le ver
boot
Fig. 96 Selecto r lever : Using the emerge ncy release to
move out of the Park positio n
The emergency release mechanism is located
i n the right front area under the selector lever
shift gate. Using the emergency release can
be complicated. We recommend contacting ..,_
Page 90 of 244
88 Homelin k
Homelink
Universal remote
control
General information
The Homelink universal remote control can
be programmed with hand-held transmitters
from existing equipment .
You must first program the Homelink trans
mitter before you can use the system
~ page 88 , Programming the Homelink
transmitter.
In order to program the Homelink transmit
ter for devices utilizing rolling code, a second
person on a ladder who can safely reach the
garage door opener motor is recommended.
It is also necessary to locate the "learn" but
ton on your garag e door open er motor . Refer
to the ope rating instructions for the opener ,
as the location and color of this bu tton may
vary by manufacturer .
You can still use the original remote control
for the device at any time.
A WARNING
-
- Never use the Homelink transmitter
with any garage door opener that does
have not the safety stop and reverse fea
ture as required by federal safety stand
ards. This includes any garage door open
er model manufactured before April 1,
1982.
- A garage door opener which cannot de
tect an object, signaling the door to stop
and reverse does not meet current feder
al safety standards. Using a garage door
opener without these features increases
risk of serious injury or death.
- For safety reasons never release the
parking brake or start the engine while
anyone is standing in front of the vehicle.
- A garage door or an estate gate may
sometimes be set in motion when the
Homelink remote control is being pro
grammed. If the device is repeatedly ac- tivated, this can overstrain motor and
damage its electrical components - an
overheated motor
is a fire hazard!
- To avoid possible injuries or property
damage, please always make absolutely
certain that no persons or objects are lo
cated in the range of motion of any
equipment being operated.
(!) Tips
- If you would like more information on
Homelink, where to purchase the Home
Link compatible products, or would like
to purchase the Homelink Home Light
ing Package, please call toll-free :
1-800-355-3515.
- For Declaration of Compliance to United
States FCC and Industry Canada regula
tions ~
page 228.
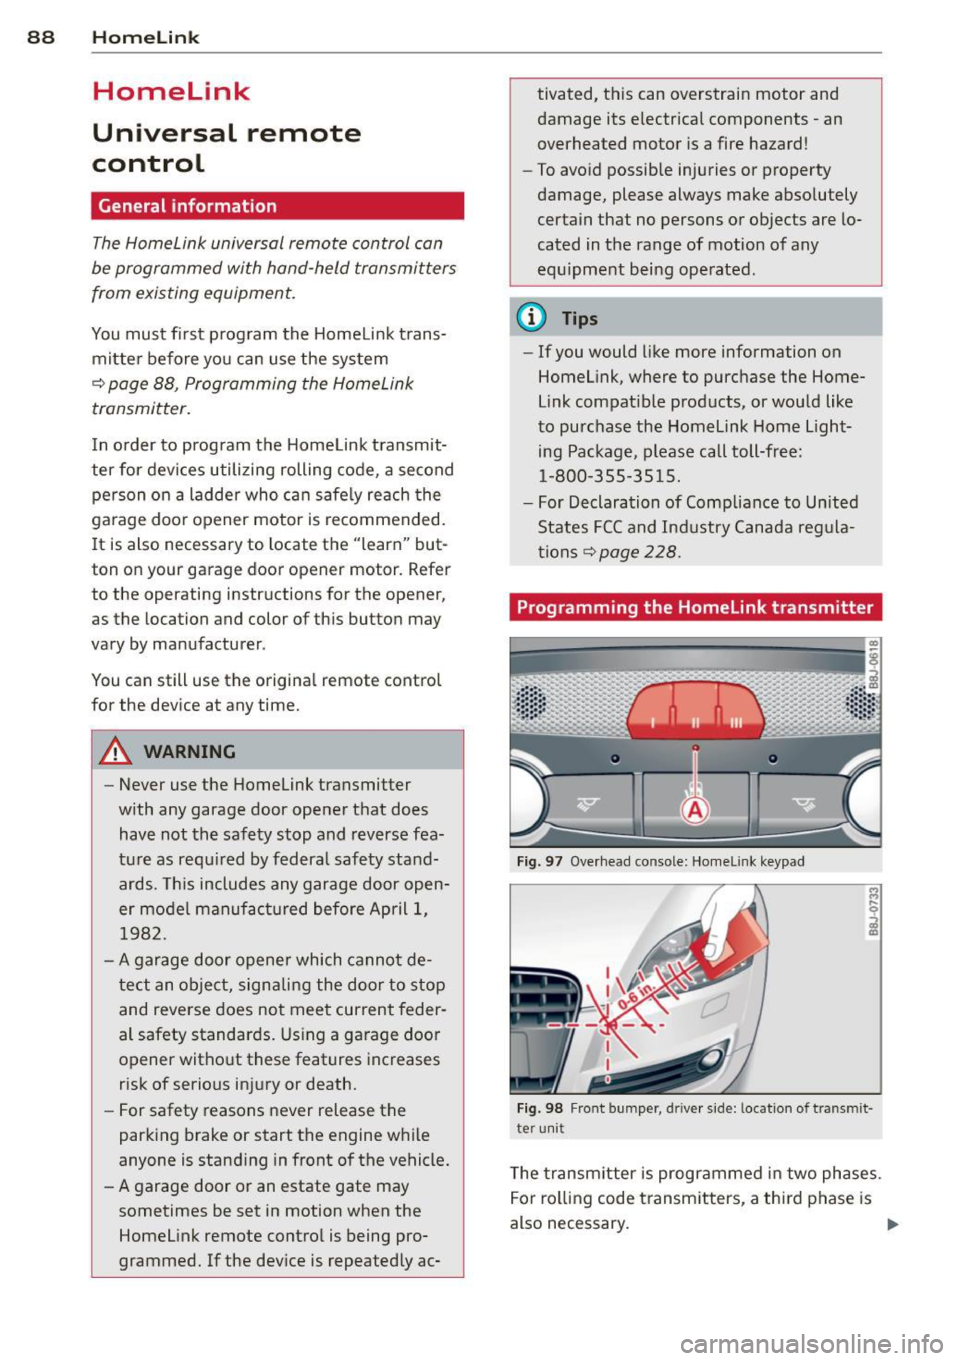
Programming the Homelink transmitter
Fig. 97 Overhead co nsole: Homelink keypad
Fig. 98 Front bumper , driver side: lo catio n of tra n smi t
te r unit
The transmitter is programmed in two phases.
For rolling code transmitters, a third phase is
also necessary.
ll-
Page 91 of 244
Phase 1:
p rogramming th e overh ead keypad
1. Make sure yo ur vehicle is wit hin ope rating
range of the remote contro lled garage
door opener .
2. Set the parking brake
q A in General in
formation on page 88 .
3. Tur n the ignition on . Do not sta rt the en
g ine!
4. P ress and hold the two o utside Home Link
b uttons
(D and @for app rox ima tely 20
seconds until indicator light @
q fig . 97
begins to flash. Then release both but
tons . Do not hold the buttons for longer
than 30 seconds.
.,. This procedure only needs to be performed
once . It erases the factory-set defau lt codes
and does not have to be repeated to pro
gram add it ional remote controls .
S. Pr ess and hold t he Home link button (D ,
® or@ unt il the indicato r ligh t@
starts flashing
slowly . Release the bu tton.
.,. The system will remain in programming
mode for 5 minutes . Co to the front of the
vehicle and proceed with phase 2 .
Phase 2:
programming the bumper mounted trans
mitter
6. Hold the original remote control at a dis
tance between 0 -6 in . (0 -15 cm) from the
bumper below the appropriate head light
for your vehicle
q fig . 98 (use th e sho rtest
d istance possible) .
7. A im t he remote con trol jus t be low the
driver side head ligh t.
8 . Pr ess and hold the activa tion button on
the remote cont ro l.
.,. May be different in Canada.
If so, press and
re -press (cycle) the act ivat ion button on your
remote control every two seconds.
9 . The emergency flashers will flash
three
time s
(after about 15 -60 seconds) when
the prog ramm ing is successful. Release
the butto n on the re m ote control.
.,. To program more devi ces, repeat steps 4 to
9.
Homelink 89
10. Press and ho ld the t rained Home link b ut
ton and observe t he indicator light @
qfig. 97.
.,. If the ind icator light is solid/contin uous,
programm ing is comp lete and your device
should activate w hen you press and release
t he t ra ined Homel ink button .
.,. If the ind icator light blinks rapidly fo r 2 sec
onds and is t hen a so lid/continuous light,
p roceed w it h phase 3 to progr am a roll ing
code device.
Phase 3: rolling code programming
.,. A second pe rson o n a ladde r who can safely
reach th e garage door opene r motor is rec
ommended .
11. Loc ate t he "lea rn" bu tton on t he g arage
doo r opener motor ( re fer to the operating
inst ruct ions for the opener, as t he loca
t ion of t his button may va ry by man ufac
turer) .
12 . Press and release the learn b utton on the
garage door opener motor .
.,. Note : once the b utton is p ressed, there are
30 seconds in w hich to initiate the next
step.
13 . On t he Home link keypad ins ide t he ve hi
cl e, firmly press and hold t he Home link
bu tton prev iously progr ammed in phases
1 and 2 fo r two seconds and release . R e
peat this seque nce
twice.
.,. Some vehicles may require the press/ho ld/
re lease sequence up to three t imes to com
plete t he trai ning process .
.,. Homelink should now activate your rolling
code equipped device .
If the S minute time limit is exceeded , the
emergency flashers will flash one time to in
dicate that the p rocess has been te rm ina ted .
In this case, repeat steps 4 t hrough 9.
If the emergency flashers do not flash
three
times (afte r about lS -60 seconds) , program
ming was not successful. In this case, repeat
steps 4 through 9 .
Remote contro l units for garage door openers
in Canada are set to stop transmitting radio
fr eque ncy signa ls afte r two seconds . This t ime
Ill-
Page 92 of 244
90 Homelink
may not be s ufficient for the Homelin k sys
tem to learn t he radio frequency signal. Per
form all other steps as described above.
Operating the Homelink transmitter
The Homelink transm itter works in the same
manner as the orig inal handheld remote con
trol that came with the system .
.. Press the appropriate prog rammed button
Q) ,@ or @ ¢ page 88, fig . 97 to activate
the des ired remote control functio n ¢ .&.
in
General information on page
88 .
Reprogramming a single button
A Homel ink button can be rep rogrammed in
d iv idually wi tho ut affec ting t he o ther bu tton
a llo cat io ns.
Programming the overhead keypad
.. Press the appropriate Homel ink button u n-
t il the indicato r light begins flashing slowly .
Programming the bumper mounted trans
mitter
1. Hold the original remote control at a dis
tance between
0 -5 in . (0 -13 cm) from the
bumper below the app ropriate head light
fo r you r vehicle (use the shortest distance
possib le).
2. A im the remote control just below the
driver side head light.
3. P ress and hold the activation button on
the remote contro l.
4 . The emergency flashers will flash
three
tim es
(after about 15 -60 seconds) when
the programm ing is successful. Now re
lease the bu tton on the remote control.
.. If the device ut ilizes a roll ing code, p lease
fo llow p hase 3 of¢
page 88, Programming
the HomeLink transmitter
f or roll ing code
programming .
This procedure will cau se the exi sting pro
gramming on the Homelink button to be
e ra sed! Erasing the programming of the
Homelink transmitter
When you e
rase the prog ramming, the p ro
gramming on all three of the transmitte r
c h anne ls with be lost!
.. Per form steps 1 to 4 as described on
¢ page 89, Phase 1: programming the over
head keypad .
When completed, the Home link system will
be in the prog ramming mode and is then
ready to learn the codes for remote controlled
devices .
(D Tips
- Programmed buttons cannot be erased
individually .
- F or se curity reasons you are advise d to
erase the programming of the Homelink
system before yo u sell yo ur vehicle .
Page 93 of 244
Driving Safely
General notes
Safe driving habits
Please remember -safety first!
This chapter contains important information,
tips, instructions and warnings that you need
to read and observe for your own safety, the
safety of your passengers and others . We have
summarized here what you need to know
about safety belts, airbags, child restraints as
well as child safety. Your safety is for us
priori
ty number 1.
Always observe the information
and warnings in this section - for your own
safety as well as for that of your passengers.
The information in this section applies to all
model versions of your vehicle . Some of the
features described in this sections may be
standard equipment on some models, or may
be optional equipment on others. If you are
not sure, ask your authorized Audi dealer.
A WARNING
- Make certain that you follow the instruc
tions and heed the WARNINGS in this
Manual. It is in your interest and in the
interest of your passengers.
- Always keep the complete Owner's Liter
ature in your Audi when you lend or sell
your vehicle so that this important infor
mation will always be available to the
driver and passengers.
- Always keep the Owner's literature handy
so that you can find it easily if you have
questions.
Safety equipment
The safety features are part of the occupant
restraint system and work together to help
reduce the risk of injury in a wide variety of
accident situations .
Your safety and the safety of your passengers
should not be left to chance. Advances in
technology have made a variety of features
available to help reduce the risk of injury in an
Driving Safely 91
accident. The following is a listing of just a
few of the safety features in your Audi:
- sophisticated safety belts for driver and all
passenger seating positions,
- safety belt pre-tensioners,
- front airbags,
- knee airbags for the front seats,
- side airbags in the front seats,
- LATCH anchorages for child restraints,
- adjustable steering column.
These individual safety features can work to
gether as a system to help protect you and
your passengers in a wide range of accidents.
These features cannot work as a system if
they are not always properly adjusted and
properly used!
Safety is everybody's responsibility!
Important things to do before driving
Safety is everybody's job! Vehicle and occu
pant safety always depends on the informed and careful driver.
For your safety and the safety of your passen
gers,
before driving always:
~ Make sure that all lights and signals are op
erating correctly .
~ Make sure that the tire pressure is correct.
~ Make sure that all windows are clean and af
ford good visibility to the outside.
~ Secure all luggage and other items carefully
c::> page 65.
~ Make sure that nothing can interfere with
the pedals.
~ Adjust front seat, head restraint and mirrors
correctly for your height .
~ Instruct passengers to adjust the head re
straints according to their height .
~ Make sure to use the right child restraint
correctly to protect children¢
page 129,
Child Safety.
~ Sit properly in your seat and make sure that
your passengers do the same¢
page 59,
General recommendations. .,..
•
•
Page 124 of 244
122 Airbag sys te m
- Never modify t he front bumper or parts
of the veh icle body .
- Always make sure that the side airbag
can inflate without interference:
- Never install seat covers or replace
ment upholstery ove r the front seat
backs that have not been spec ifi cally
approved by A udi.
- Never use add itiona l seat cushions that
cover the areas whe re the side airbags
inflate .
- D amage to the o rigina l seat covers or
to the seam in the area of the side air
bag module must always be repaired
immediately by an authorized Audi
dealer.
- The airbag system can be activated only once . Afte r an airbag has inf lated, it
must be replaced by an author ized Audi
dealer or qualified technic ian who has
the techn ica l information, tra ining and
special equipment necessary.
- The airbag system can be deployed only
once. After an a irbag has been deployed,
it must be replaced w ith new replace
ment parts designed and approved espe
cially for your Aud i model version. Re
placement of complete a irbag systems
or airbag componen ts must be per
formed by qualified workshops only .
Make sure that any airbag service act ion
is entered in your Audi Warranty
& Main
tenance booklet under
AIRBAG REPLACE
MENT RECORD.
-For safety reasons in severe accidents,
the a lternator and starter are separated
from the vehicle battery with a pyrotech
nic circuit interrupter.
- Work on the pyrotechnic cir cuit inter
rupter must on ly be performed by a
qua lified dealer - risk of an accident !
- If the vehicle or the c ircuit interrupter
is sc rapped, all applicable safety pre
cautions must be followed.
{® For the sake of the environment
Undeployed airbag modules and preten
s ioners might be classif ied as Perchlorate
Materia l -special handling may app ly, see
www .dtsc.ca.gov/hazardouswaste/per
ch lorate . When the veh icle or parts of the
restraint system including airbag modu les
and safety belts with pretensioners are
scra pped, all applicab le laws and regu la
tions must be obse rved. Your authorized
A udi dealer is familia r with these require
ments and we recommend that you have
your dealer perform this service fo r you .
· Other things that can affect Advanced
Airbag performance
Chang ing the veh icle's suspens io n system can
change the way that the Advanced Airbag Sys
tem perfo rms in a c rash. For examp le, using
t ir e- rim combinat ions not approved by A udi ,
lower ing the veh icle, c hanging the st iffness of
the suspens ion, including the spr ings, suspen
sio n struts, shock absorbers etc . can change
the forces that ar e measured by the airbag
sensors and sent to the electronic contro l
unit. Some suspension changes can, for exam
ple, increase the force levels measured by the
senso rs and make the airbag system deploy in
c rashes in which it wou ld no t deploy if the
c h anges had not been made. Other kinds of
c h anges may reduce the fo rce leve ls meas
u red by the sensors and p reven t the airbag
from dep loying when it should.
A WARNING
Changing the vehicle's suspension includ
i ng use of unapproved tire-rim combina
tions can change Advanced Airbag per
fo rmance and increase the r isk of serious
personal injury in a crash .
- Never install suspension components
that do not have the same performance characterist ics as the components origi
na lly installed on your vehicle .
- Never use tire-rim combinations that
have no t been approved by Audi.
Page 133 of 244
typical 1 year-old chi ld, the Advanced Airbag
System compares the weig ht meas ured by the
weight sensing mat with t he informat ion stor
ed in the electron ic control unit.
The electronic control unit a lso registers the
tension on the front passenger safety be lt.
The tens ion on the safety belt for the front
passenger seat will be different for an adult
who is properly using the safety belt as com
pared to the tension on the be lt when it is
used to attach a child restraint to the seat.
The sensor below the latch for the safety be lt
for the front seat passenger measu res the
tension on the be lt. T he inp ut from this sen
sor is then used with the we igh t to "decide",
whether there is a chi ld restraint with a typica l
1 year-old child o n the front passenger seat
and whether or not the airbag must be turned
off.
Child restraints and Advanced Airbags
Regardless of the child restraint that you use,
make sure that it has been ce rtified to meet
United States Federal Motor Vehicle Safety
Standa rds and has been certified by its manu
facture r fo r u se wi th a n air bag. If in excep
tional c ircu ms tances you m ust use it on the
front passenger seat, caref ully read all of the
i n formation on c hild safety and Advanced Air
bags and heed all of the app licable WARN
INGS. Make certain that the child restraint is
correctly recognized by the weig ht-sensing
mat inside the front passenger seat, that the
fro nt passenger airbag is tur ned off and that
the airbag status is a lways correctly signaled
by the
PASSENGER AIR BAG OFF light.
Many types and models of child restra ints
h ave been ava ilable over the years, new mod
e ls are introduced regularly incorporating new
and improved designs a nd older models a re
t aken out of p rod uction. Child restrain ts are
not standardized . Ch ild restra ints o f the same
type typically have different weights and sizes
and diffe rent 'footprints,' the size and shape
of the bottom of the child restraint that sits
on the seat, when they are installed on a vehi
cle seat. These differences make it virtually
Child Sa fet y 131
impossible to certify comp liance with the re
quirements for advanced airbags with eac h
and every child restra int that has ever been
sold in the past or will be sold over the course
of the useful life of your veh icle.
Fo r th is reason, the United States National
Highway Traffic Safety Adm inistrat ion has
published a list of spec ific type, makes and
models of child restraints that must be used
to certify compliance of the Advanced Airbag
System i n your veh icle with the suppression
requirements of Federal Motor Vehicle Safety
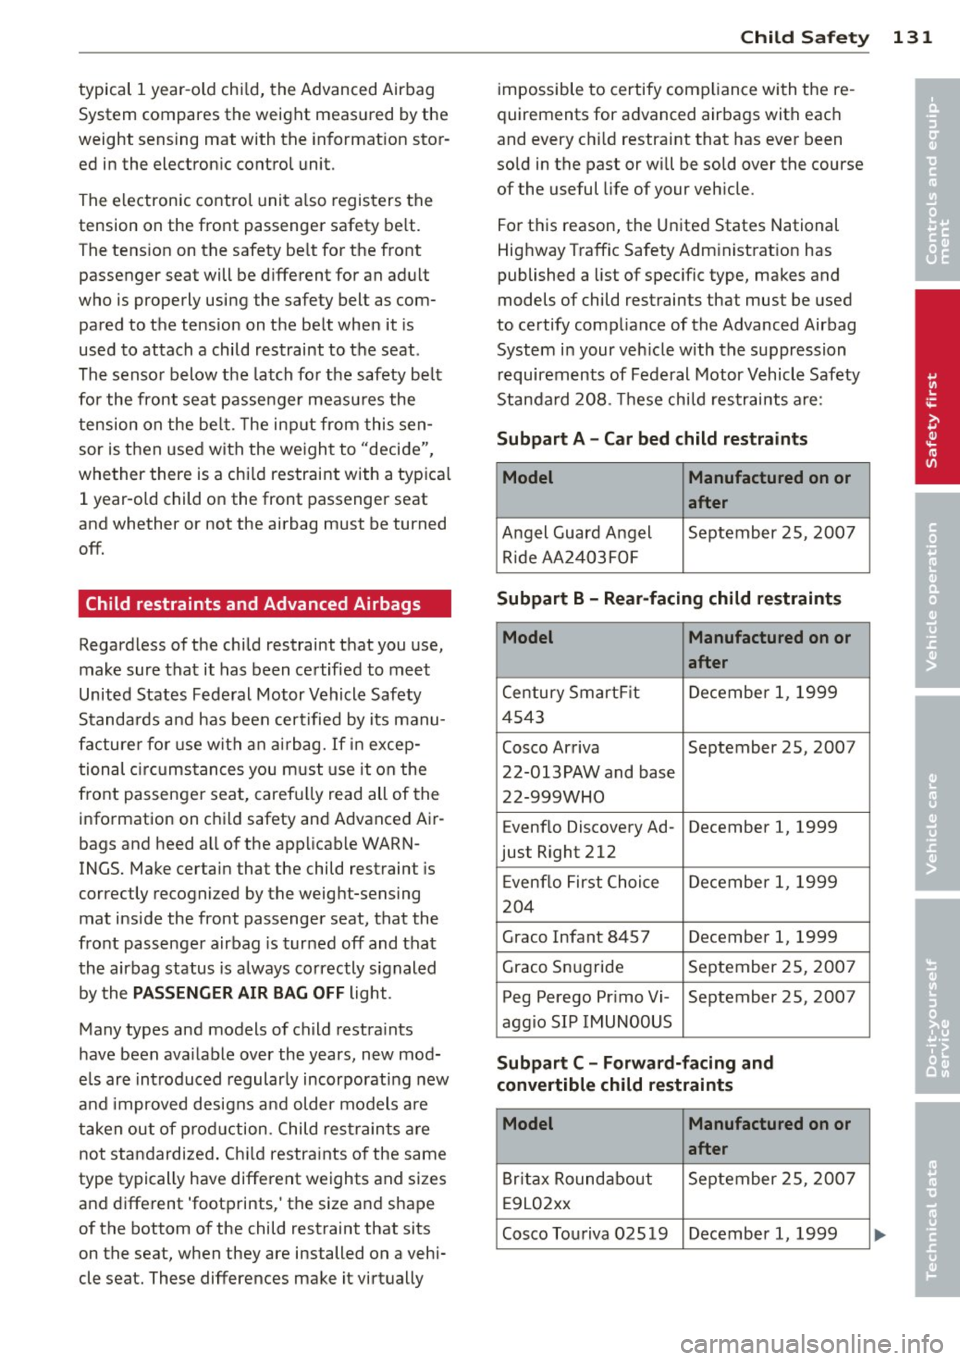
Standard 208. These child re straints are:
Subpart A -Car bed child restraints
Model Manufactured on or
after
Angel Guard Angel September 2S, 2007 R ide AA 2403FOF
Subpart B - Rear-facing child restraints
Model Manufactured on or
after
Ce ntury Smart Fit Decembe r 1, 1999
4S 43
Cosco Ar riva September 2S, 2007
22-013PAW and base
22-999WHO
Evenflo Discovery Ad -December 1, 1999
just Right 212
E ven flo First Choice Decembe r 1, 1999
20 4
Graco Infant 8457 December 1, 1999
Graco Snugride September 25, 2007
Peg Perego Primo Vi- September 25, 2007
aggio SIP IMUNOOUS
Subpart C -Forward-facing and
convertible child restraints
Model Manufactured on or
after
Br itax Roundabout September 2S, 2007
E 9L02xx
Cosco Touriva 02519 December 1, 1999
•
•
Page 154 of 244
152 Driving and en vironm ent
Avoid full throttle
Driving at moderate speeds saves fuel and
improves your mileage .
"'Try and keep well below your car 's maximum
speed.
Accelerating gently reduces fuel consump
tion, engine wear, and does not disturb the
environment. F ue l consumption, exhaust emissions and en
gine no ise increase disproportionately at high
speeds. If you drive at approximately three
quarters of top speed, fuel consumption will be reduced by one half. Never dr ive faster
than the posted speed limit and weather con
d itions permit .
Reducing unnecessary idling
Even when your car is just idling it burns up
fuel.
"'Shut the engine off when you are not driv ing
the vehicle .
"'Do not warm up the veh icle by letting the
engine run at idle .
It makes sense to shut
off the e ngine in traff ic
jams, when waiting for trains to pass at ra il
road crossings , or at traff ic lights that have
l ong wa its on red. Turning the engine
off fo r
just
30-40 seconds saves more fue l than is
burned s tarting the eng ine again .
It takes a long time for the engine to warm up
fully when it is running at idle . Howeve r, wear
and nox ious em issions are especially high
when the engine is warming up. So you should
drive away as soon as you start the engine and
avoid running at high RPMs while the engine
is sti ll warming up.
([) Note
Do not leave engine idling unattended af
ter starting . If warning lights should come
on to indicate improper operation, they
wou ld go unheeded. Extended idling also
produces heat, which cou ld result in over- heating or other damage to the vehicle or
other property .
Regular maintenance
A badly tuned engine unnecessarily wastes a
lot of fuel.
"' Have your ve hicle serviced at reg ular in ter -
vals.
By having your veh icle regu la rly serviced by an
Audi dealer he lps to ensure that it runs p rop
erly and economically. The condition of your
vehicle not only affects its sa fety and ability to
hold its val ue, it also affects
fuel con sum p
tion .
Check your oil e ach time you fill your t ank .
The amount of o il used is related to engine
load and speed .
It is normal for the oil consumption of a new
engine to reach its lowest value after a certa in
mileage has been driven.
You must drive your veh icle about 3,000 m iles
(5,000 kilometres) before you can properly
assess oil consumpt ion.
This also app lies to fue l cons umption and en
gine output.
(D Note
- Have your vehicle maintained proper ly
and in accordance with the service rec
ommendations in your Warranty
& Main
tenance booklet. Lack of proper ma inte
nance as well as improper use of the ve
hicle will impair the function of the
em iss ion contro l system and cou ld lead
to damage.
- Do not alter or remove any component of
the Emission Control Sys tem unless ap
proved by the manufacturer.
- Do not alte r or remove any device, such
a s hea t sh ie lds, switches, ig nition w ires,
valves, which are designed to protec t
your vehicle's Emission Control System
and other impo rtant vehicle compo
nents .
Page 173 of 244
@ For the sake of the environment
-Before changing your oil, first make sure
you know where you can properly dispose
of the used o il.
- Always dispose of used engine oil proper
l y. Do not dump it on garden soi l, wood
ed areas, into open streams or down
sewage dra ins.
- Recycle used engine oil by taking it to a
used engine oil collection facility in your
area, or contact a service station .
Engine cooling system
Coolant
The engine coolant performs two functions: it
keeps the engine from overheating and it pro tects the engine from freezing in the winter.
The cooling system is sea led and generally re
q uir es lit tle atten tion .
The cooling system has been filled at the fac
tory with a pe rmanent coo lant which does not
need to be c hanged. The coolant consists of a
mixture o f spec ial ly conditioned water and the
manuf acturer 's glyco l-basedcoolan t addi -
tiv e G13 antifreeze with ant icorros ion addi
tives (50% for USA models ; 60% for Canadian
mod els) . This mixture both assures the neces
sary
frost protection and p rotects metal com
ponents in the engine's coo ling system from
corrosion and scaling . It a lso raises the boil
i ng point of the coolant .
Do not reduce the concentration o f the coo l
ant in the summer by adding plain water.
The
proportion of coolant add it ive must be at
l e a st 50 % but not mor e than 60 %
to main
tain antifreeze protection and coo ling efficien
cy .
If the coolant frost protect io n is too low,
the coolant cou ld free ze and dam age the veh i
cle heating and eng ine cooling system.
For yea r-round driving, antifreeze is added at
the fac to ry for tempera tures down to:
-- 31°F( -35°C)USA
- -40 °F ( -40 °C) Canada.
Checkin g and fillin g 171
If you must add coo lant, use a mixture of wa
ter and coolant additive . Mix ing the coo lant
additive with distilled water is recommended.
_& WARNING
Before you c heck anything in the engine
compartment, always read and heed a ll
WARNINGS
c> .& in Working in the engine
comportment on page 164.
Q) Note
- Before winter sets in, have the coo lant
checked to see if the coolant additive in
your vehicle is sufficient to meet the cli mate condi tions. This is especi ally impor
tan t if you live i n a region wher e th e win
ter is ex treme ly co ld . If necessary, i n
crease t he p ropo rtion of coo lant add itive
to 60% .
- Whe n ad ding coolant additive t o yo ur
c ooling sys tem, reme mbe r:
- We recommend using on ly coolant ad
d itive G12++ or G13 for your vehicle .
This coolant additive is availab le at au
thor ized Audi dealers . O ther types of
a ntifreeze can s ignifica ntly reduc e cor
rosion prote ction. The result ing cor ro
sion can cau se a loss o f coolan t and se
rio us engine d amage .
- Do not add any ty pe of rad iator leak seal
a nt to yo ur vehicle 's engine c oolant .
A dd ing radia tor repair fl uid may adverse
ly affect the f unction and pe rformance of
your coolin g system and co uld resu lt in
damage not covered by your New Ve hicle
L imited Warranty.
-
•
•
Page 176 of 244
17 4 Che cking and filling
Brake fluid
Checking brake fluid level
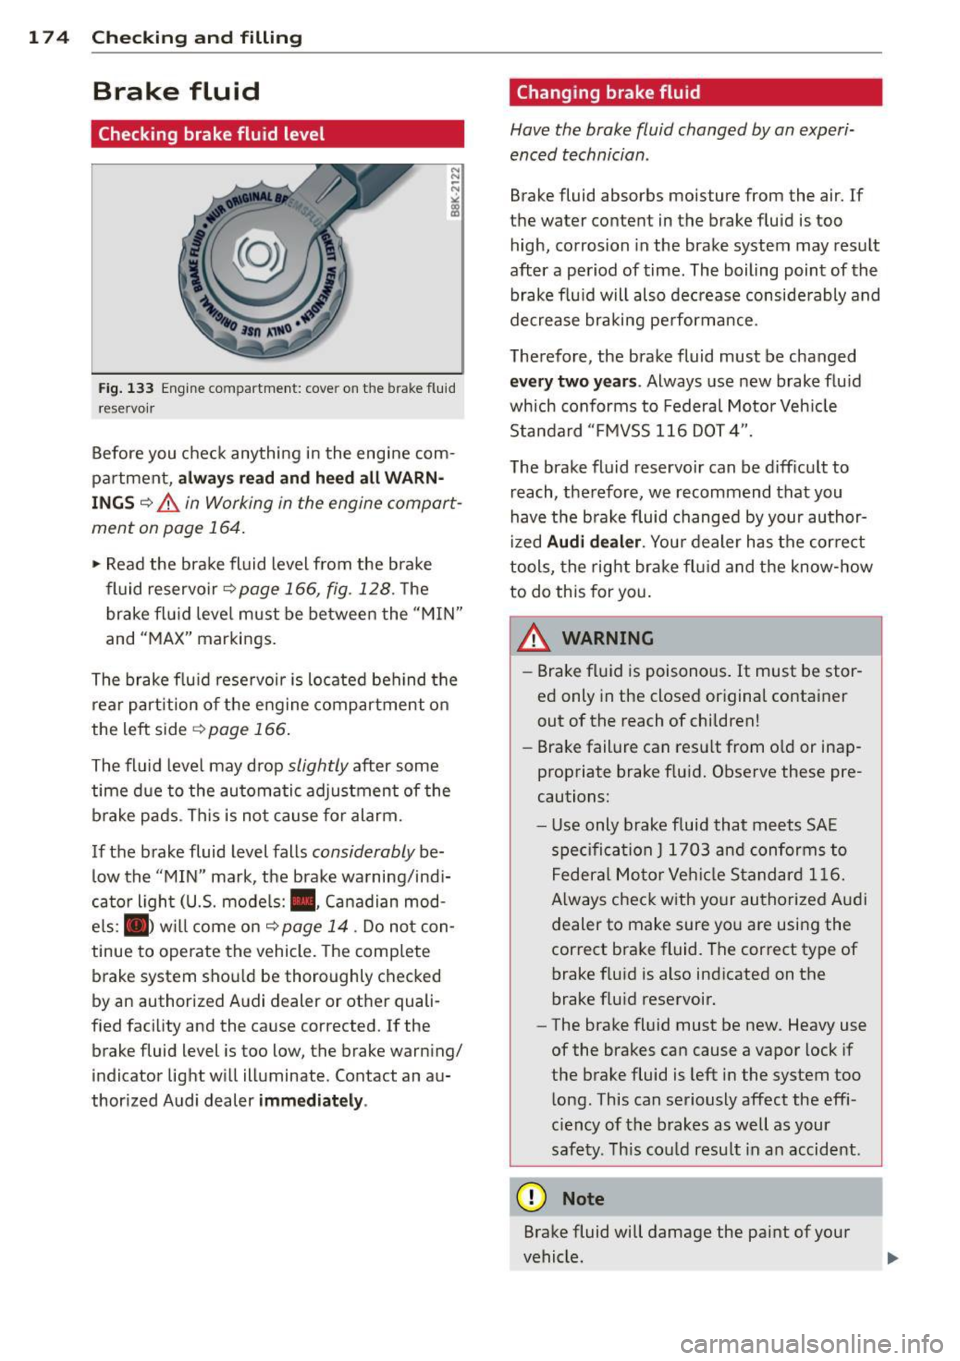
Fig . 133 Engine compa rtment: cove r on the brake fluid
reservo ir
Before you check anything in the engine com
partment,
a lw ays read and h eed all WA RN
ING S ¢&. in Working in the engine compart
ment on page 164.
,.. Read the brake fluid level from the brake
fluid reservoir¢
page 166, fig . 128. T he
brake flu id leve l must be between the "MIN"
and "MAX" markings.
The brake flu id rese rvo ir is located behind the
rear part ition of the eng ine compartment o n
the left side ¢
page 166.
The fluid level may drop slightly after some
time due to the automatic adjustment of the b rake pads . This is not cause for alarm.
If the brake fluid level falls
considerably be
low the "MIN" mark, the brake warning/indi
cator light (U.S. models: . , Canadian mod
e ls: . ) w ill come on
¢page 14. Do not con
tinue to operate the vehicle. The comp lete
brake system shou ld be thoroughly checked
by an authorized A udi dealer or other quali
fied facility and the cause corrected.
If the
brake fluid level is too low, the brake warn ing/
indicator light w ill illuminate. Contact an au
thor ized Audi dealer
imm ediatel y.
Changing brake fluid
Have the brake fluid changed by an experi
enced technician .
Brake fluid absorbs moisture from the air. If
the water content in the brake fluid is too high, corrosion in the brake system may result
after a period of time . The boiling point of the
brake flu id will also decrease conside rably and
decrease braking pe rformance.
Therefore, the brake fluid must be changed
eve ry two y ears. Always use new brake flu id
which conforms to Federal Motor Veh icle
Standard "F MVSS 116 DOT 4".
The brake fluid reservoir can be diff icult to
reach, therefore, we recommend that you
have the brake fluid changed by your author
ized
Audi dealer . Your dealer has the correct
tools, the right brake fl uid and the know -how
to do this for you.
A WARNING
- Brake fluid is poisonous . It must be stor
ed only in the closed original container
out of the reach of children!
- Brake failure can resu lt from o ld or inap
propriate brake flu id. Observe these pre
cautions:
- Use only brake f luid that meets SA E
specifica tion
J 1 7 03 and conforms to
Federa l Moto r Ve hicl e Standard 1 16.
Always check with yo ur authorized Aud i
dealer to make sure yo u are using the
correct brake fluid. The correct type of brake f lu id is also ind icated on the
brake flu id reservoir.
- The brake fluid must be new. Heavy use
of the brakes can cause a vapor lock if
the brake fluid is left in the system too
l ong. This can seriously affect the effi
c iency of the brakes as well as your
safety. This cou ld resu lt in an accident.
(D Note
Brake fluid will damage the paint of your
vehicle .