ECO mode AUDI TT ROADSTER 2015 User Guide
[x] Cancel search | Manufacturer: AUDI, Model Year: 2015, Model line: TT ROADSTER, Model: AUDI TT ROADSTER 2015Pages: 244, PDF Size: 60.74 MB
Page 56 of 244
54 Clear vision
@ Tips
-Switching off the dimming function of
the inside rear view mirror also deact i
vates the automatic dimming f unction of
the exterior m irrors.
- The automatic dimming mirrors do not
dim when the interior lighting is turned
on or the reverse gear is selected .
-Automat ic dimming for the m irror only
operates properly if the light striking the inside mirror is not hindered in any way.
Sun visors
Using the sun visors makes driving safer.
Fig. 61 Sun viso r
The vanity mirrors in the sun v isors are equip
ped with lids. Push lid in direction of arrow to
open.
Wiper and washer system
Windshield wiper
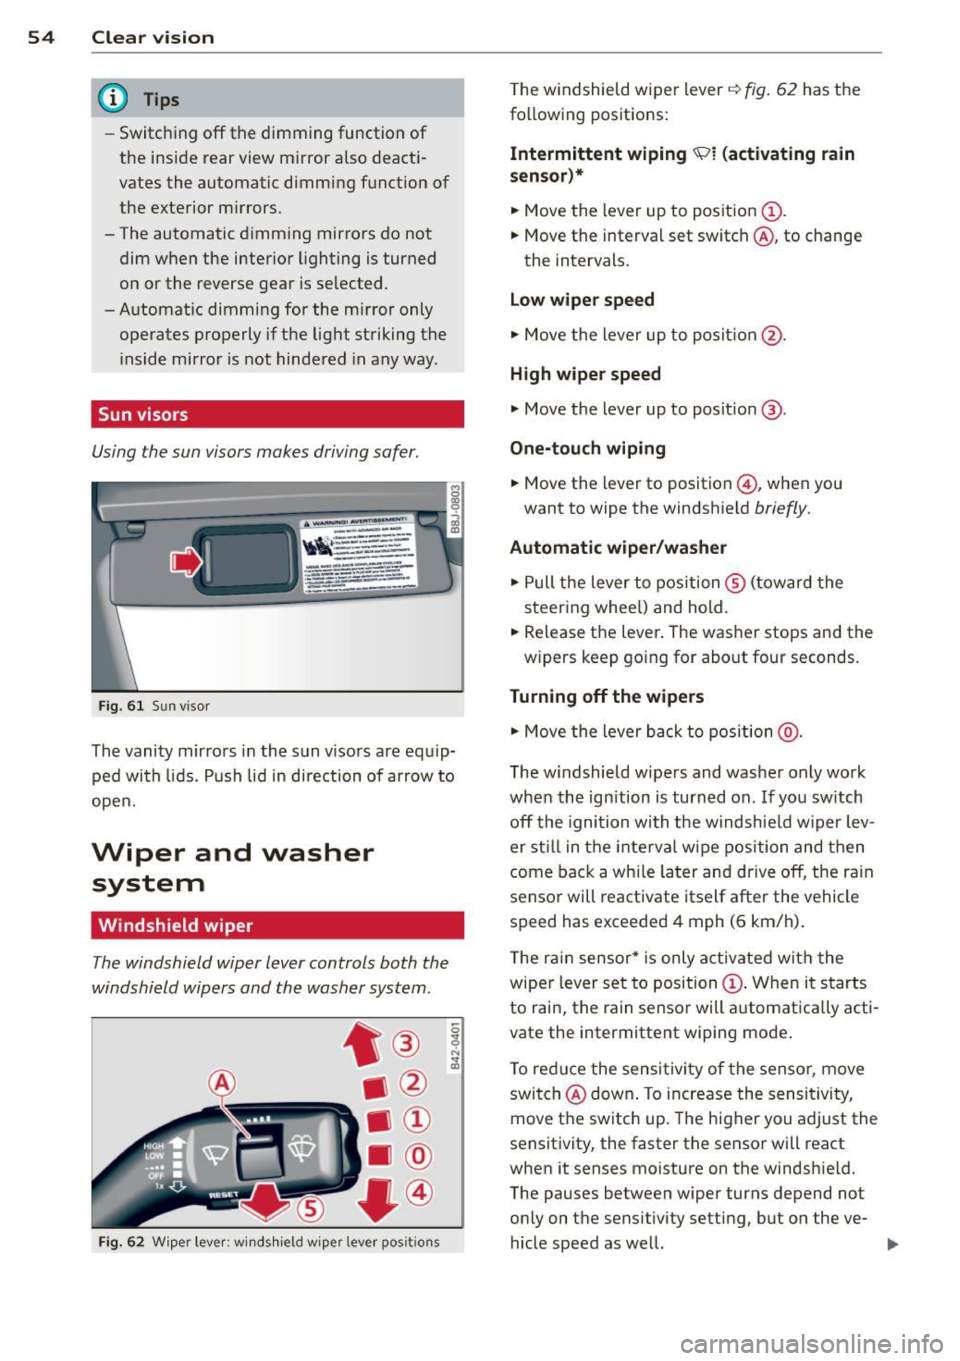
The windshield wiper lever controls both the
windshield wipers and the washer system .
Fig. 62 Wiper lever: wind shi eld w iper lever pos it ions
T he windshield wiper lever i=:> fig. 62 has the
following positions:
Intermittent wiping ~l (activating rain
sensor)*
.. Move the lever up to position (D.
.. Move the interval set switch @, to change
the intervals.
Low wiper speed
.. Move the lever up to position @.
High wiper speed
.. Move the lever up to posit ion @.
One-touch wiping
.. Move the lever to position @, when you
want to wipe the windshield
briefly.
Automatic wiper/washer
.. Pull the lever to position ® (to ward the
steering whee l) and hold .
.. Release the lever . The washer stops and the
w ipers keep going for about four seconds.
Turning off the wipers
.. Move the lever back to position @ .
The windshield w ipers and washer only work
when the ignition is turned on. If you switch
off the igni tion with the windshie ld wipe r lev
er still in the interval wipe position and then
come back a while later and drive off, the ra in
sensor will reactivate itself after the vehicle
speed has exceeded 4 mph (6 km/h).
Th e rai n sensor* is only activated with the
wiper lever set to position
(D. When it starts
to rain, the rain senso r will a utomat ically acti
vate the intermittent wiping mode .
To reduce the sensitivity of the sensor, move
swi tch @ down. To increase the sensitivity,
move the switc h up. The higher you adjust the
sensitivity, the faster the sensor will react
when it senses moisture on the windshield.
The pauses between wiper turns depend not
only on the sensitivity setting, but on the ve-
hicle speed as well. ..,.
Page 60 of 244
58 Clear vision
-To help prevent damage to the wiper
arms or oth er components, do not at
tempt to move the wipers by hand.
@ Tips
- Commercial hot waxes applied by auto
matic car washes aff ect the cleanability
of the glass surface .
- The front wiper blades are different
lengths; the blade on the driver's side is
longer .
Digital compass
Activating or deactivating the compass
Applies to vehicles: with digital compass
Fig. 65 Inside re ar view mirro r: di gital compass ac ti
va ted
• To activate or deactivate , hold the@
¢ fig. 65 button down until the red display
appears or disappears.
The digital compass only works with the igni
tion turned on . The directions are displayed as
initials:
N (North), NE (Northeast) , E (East),
SE (Southeast) , S (South), SW (Southwest),
W (West), NW (Northwest).
The compass has to be recalibrated if the dis
play is wrong or inaccurate
¢ page 58.
(j) Tips
-To avoid inaccurate directions, do not al
low any remote controls, electrical sys
tems, or metal parts close to the mirror.
- The correct magnetic deflection zone
must be set in order to display the direc
tions correctly.
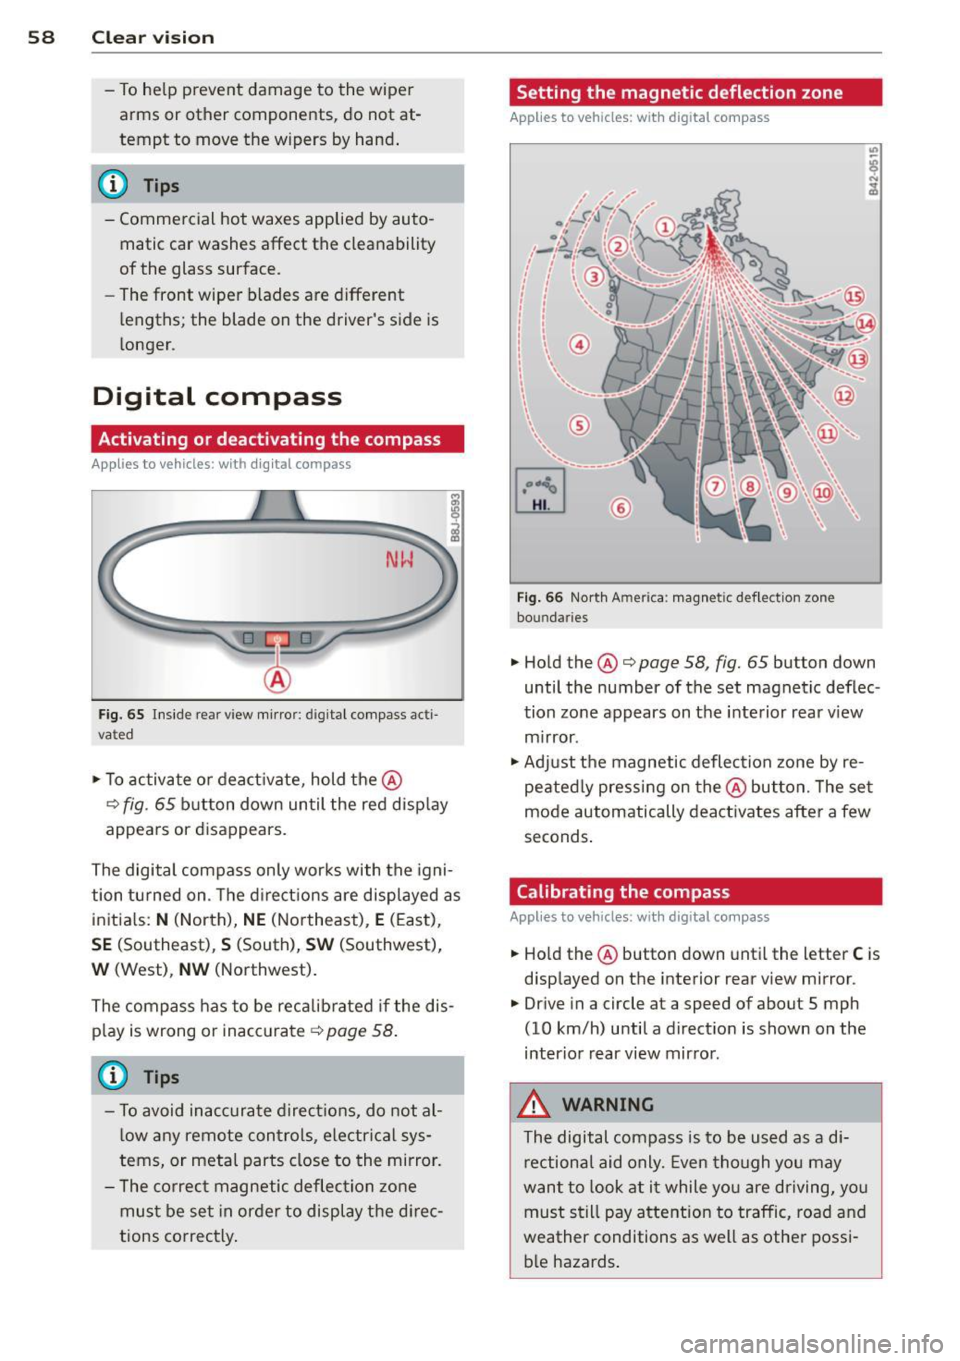
Setting the magnetic deflection zone
Applies to vehicles: with digital compass
Fig. 66 North A meri ca : magn etic defle ction zo ne
bo undaries
• Hold the@¢ page 58, fig. 65 button down
until the number of the set magnetic deflec
tion zone appears on the interior rear view
mirror .
• Adjust the magnetic deflection zone by re
peatedly pressing on the@button. The set
mode automatically deactivates after a few
seconds.
Calibrating the compass
Applies to vehicles: with digital compass
• Hold the @button down until the letter C is
displayed on the interior rear view mirror .
• Drive in a circle at a speed of about S mph
(10 km/h) until a direction is shown on the
interior rear view mirror.
_&. WARNING
The digital compass is to be used as a di
rectional aid only. Even though you may
want to look at it while you are driving, you
must still pay attention to traffic, road and
weather conditions as well as other possi
ble hazards.
-
Page 62 of 244
60 Seats and stor age
Front passenger's seat
Always move the front passenger seat into
the rearmost position .
To avoid contact with the airbag while it is de
p loying, do not sit any closer to the instru
ment panel tha n necessary and always wear
the three-point safety belt provided ad justed
correctly . We recommend that you adjust the
passenger's seat i n the follow ing ma nner:
• Bring the back rest up to an (a lmost) upr ight
pos it ion.
Do not r ide w ith the seat reclined .
• The idea l position fo r the head restra int is
with the upper edge of the rest ra in t l eve l
with the top o f your head
¢ page 62. You
sho uld
not lower the top o f the restra int be
l ow the level of your eyes .
• Place your feet on the floor in front of the
passenger's seat .
Adjusting front seats
manually
Adjustment controls
Applies to vehicles: with manual seat adjustment
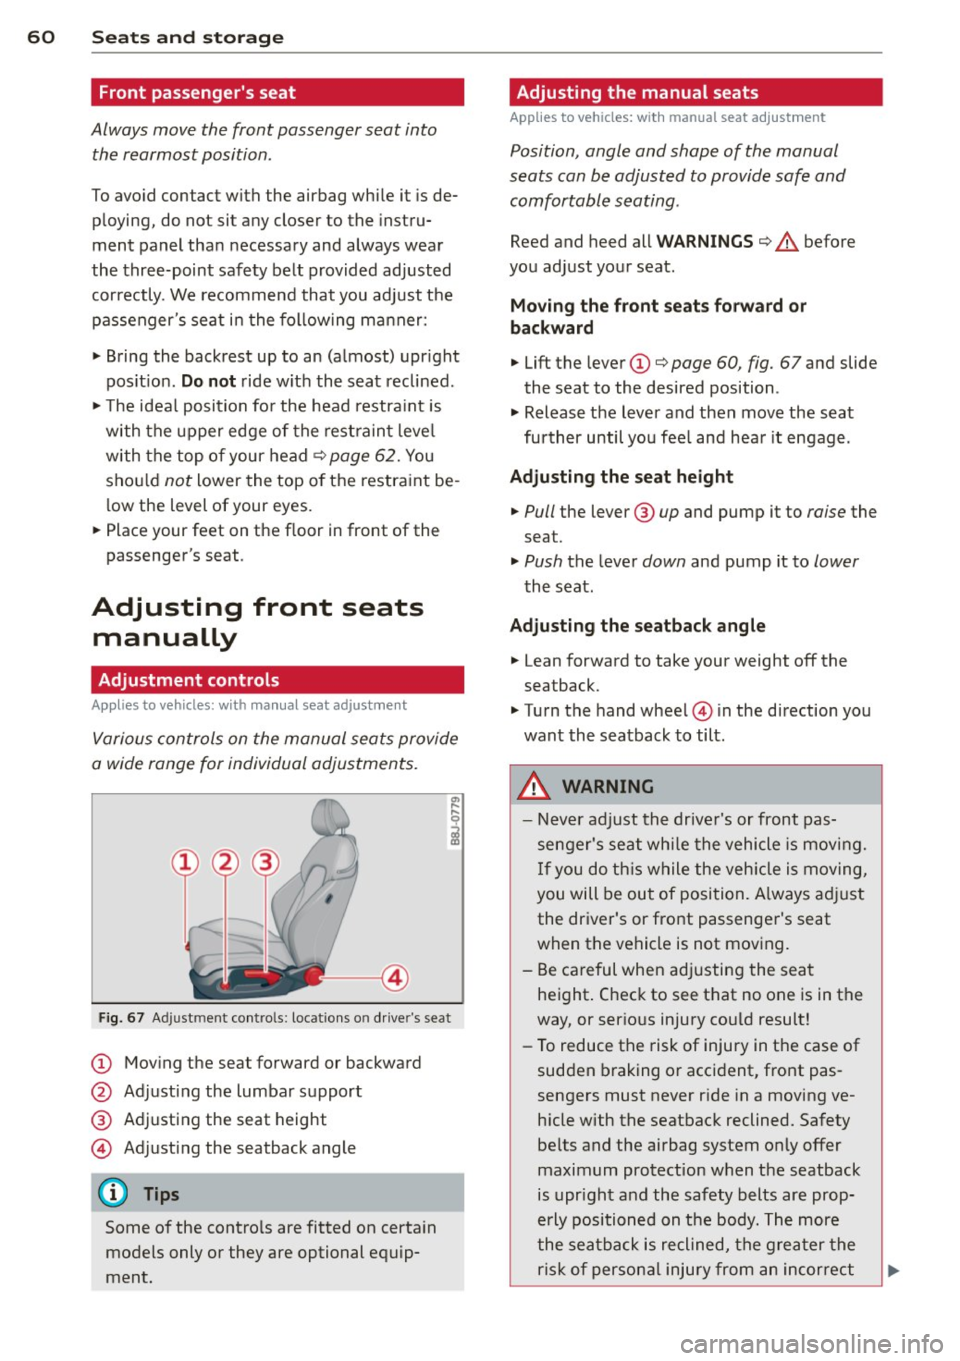
Various controls on the manual seats provide
a wide range for individual adjustments.
Fig . 67 Adj ust ment contro ls : locat ions o n dr ive r's seat
CD Mov ing the seat forward or backward
@ Ad justing the lumbar support
® Adjusting the seat height
© Adjusting the seatback angle
Some of the contro ls are fitted on certa in
models only or they are optional equip
ment.
Adjusting the manual seats
Applies to vehicles: with manual seat adjustment
Position, angle and shape of the manual
seats can be adjusted to provide safe and
comfortable seating .
Reed and heed all WARNINGS¢.&. before
you adjust your seat.
Moving the front seats forward or
backward
• Lift the leve r CD¢ page 60 , fig. 67 and slide
the seat to the desired position .
• Release the lever and then move the seat
fu rther until you fee l and hea r it engage.
Adjusting the seat height
• Pull the lever ® up and pump it to raise the
seat.
• Push the lever down and pump it to lower
the seat .
Adjusting the seatback angle
• Lean forward to take your weight off the
seatback.
• Turn the hand wheel © in the d irection you
want the seatback to tilt.
,&. WARNING ,--
- Never adjust the drive r's or front pas
senger's seat whi le the vehicle is moving.
If you do th is w hile the veh icle is moving,
you will be out of posi tion. A lways ad just
the dr iver's or front passenger's seat
when the vehicle is not moving.
- Be ca reful when adjustin g the seat
height . Check to see that no one is in the
way, or ser ious injury cou ld result!
- To reduce the risk of injury in the case of
sudden b raking o r accident, front pas
sengers must never r ide in a moving ve
h icle with the seatback reclined. Safety
be lts and the airbag system only offer
maximum protection when the seatback
is upr ight and the safety belts are prop
erly positioned on the body. The more
the sea tba ck is reclined, the gre ater the
risk of person al injury from a n incorrect
Page 69 of 244
Warm and cold Climate controls
Controls
W arm and cold 6 7
The air conditioning automatically maintains the selected temperature in the vehicle interior
throughout each season .
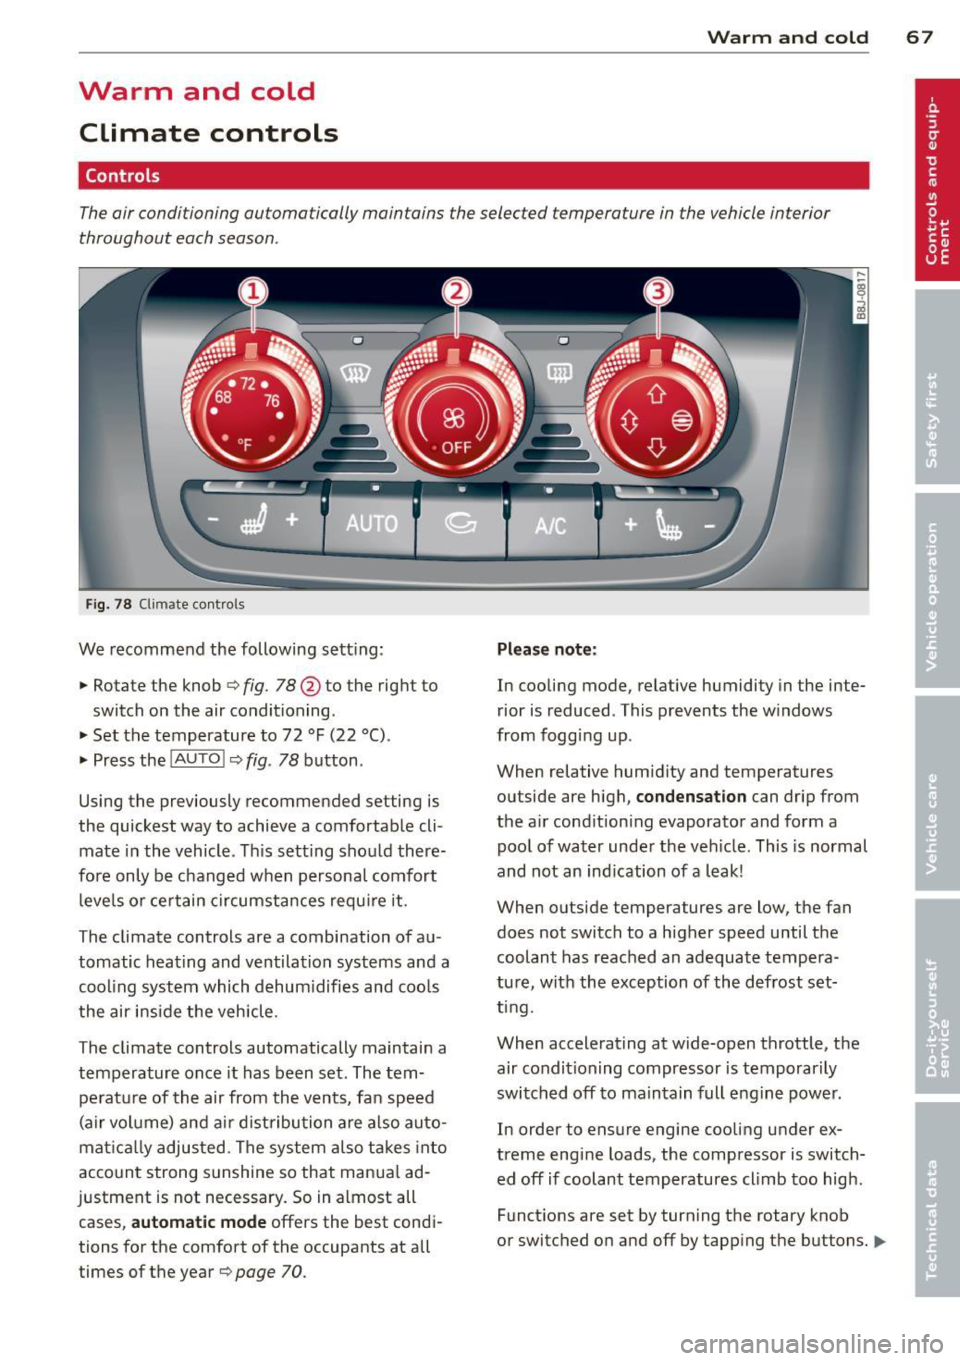
Fig. 78 Climate contro ls
We recommend the following sett ing :
• Rotate the knob
c::> fig. 78 @ to the right to
switch on the air conditioning .
• Set the temperature to 72 °F (22 °() .
• Press the
!AUTO I c::> fig . 78 button .
Using the previously recommended setting is
the quickest way to achieve a comfortable cli
mate in the vehicle . Th is setting should there
fore only be changed when persona l comfort
l eve ls o r certain circumstances requ ire it .
The climate controls are a combination of au
tomatic heating and ventilation systems and a
coo ling system which dehum idifies and coo ls
the air inside the vehicle .
The climate controls automatically maintain a temperature once it has been set. The tempe rat ure of the air from the v ents, fan speed
(air vo lume) and ai r distribu tion are also auto
mat ica lly adjusted . The system also takes into
account strong sunshine so that manua l ad
justment is not necessary . So in almost all
cases,
a utomatic mode offers the best cond i
tions for the comfort of the occupants at all
times of the year
c::> page 70 .
Plea se note:
In cooling mode, relative humidity in the inte
rior is reduced . This prevents the w indows
from fogg ing up .
When relative hum idity and temperatures
outside are high,
condensation can drip from
the a ir cond ition ing evaporator and form a
poo l of water under the veh icle. This is normal
and not an ind ication of a leak!
When outside temperatures are low, the fan
does not switch to a higher speed until the coolant has reached an adequate tempera
tu re , with the exception of the defrost set
t ing.
When accelerating at wide-open throttle, the
air condit ioning compressor is temporar ily
switched off to maintain full engine power.
In order to ensure engine cooling under ex
treme engine loads, the compressor is switch
ed off if coolant temperatures cl imb too high .
Funct ions are set by turn ing the rotary knob
or switched o n and off by tapp ing the buttons.
1111-
Page 72 of 244
70 Warm and cold
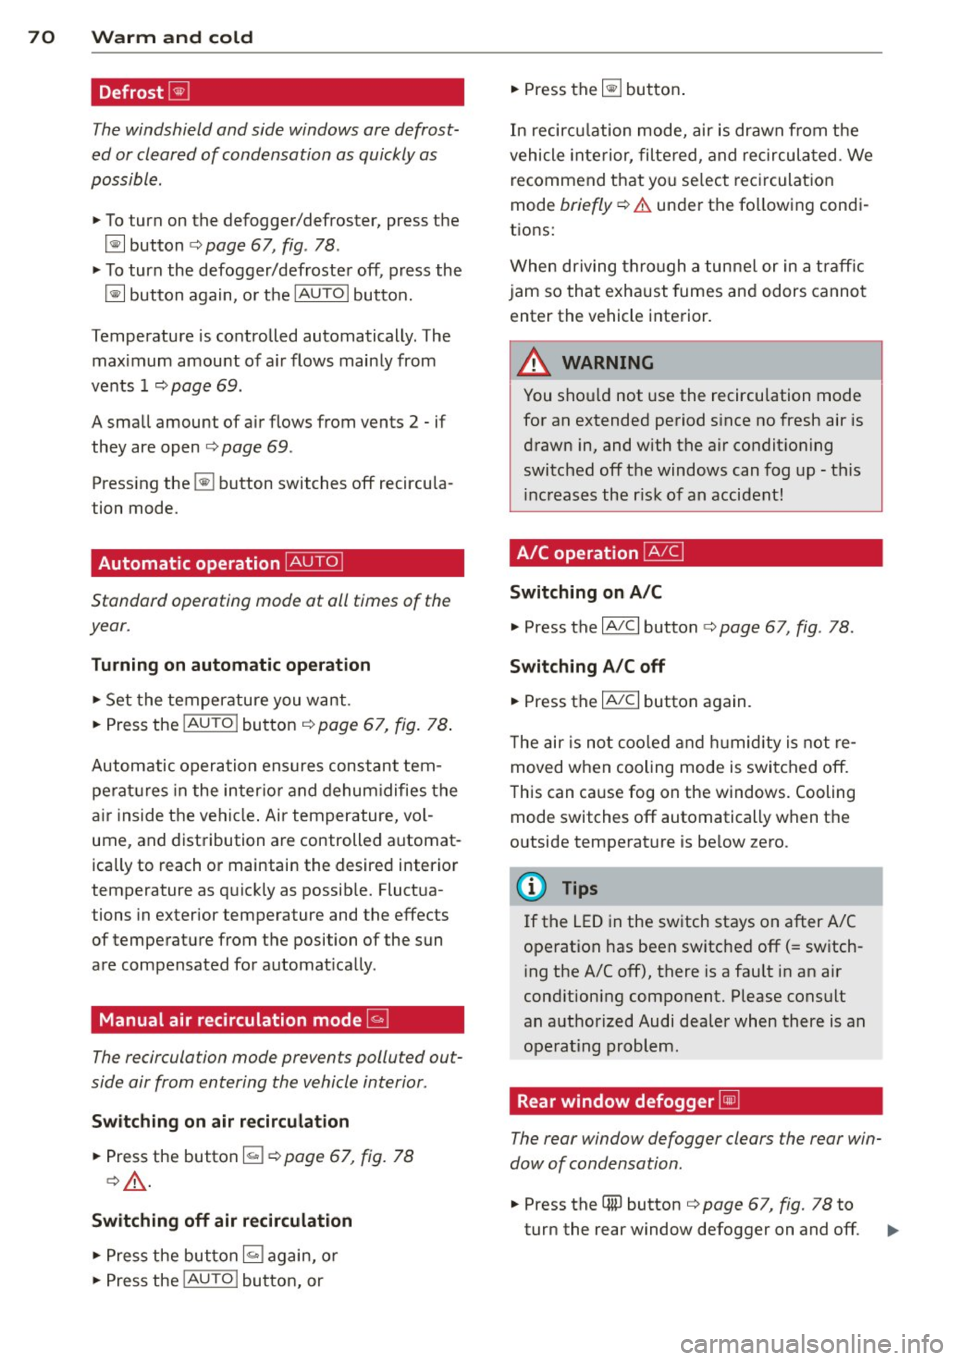
Defrost~
The windshield and side windows ore defrost
ed or cleared of condensation as quickly as
possible .
• To turn on the defogger/defroster, press the
~ button <=> page 67, fig . 78 .
• To turn the defogger/defroster off, press the
~ button again, o r the IAUTOI button.
Temperature is controlled automatically . The
maximum amount of a ir flows mainly from
vents 1 <=>
page 69.
A small amount of air flows from vents 2 - if
they are open <=>
page 69.
Press ing the ~ button switches off recircu la
tion mode.
Automatic operation ~
Standard operating mode at all times of the
year.
Turning on automatic operation
• Set the temperature you want.
• Press the
!AUTO ! button <=> page 67, fig. 78.
Automatic operation ensures constant tem
perat ures in the inter ior and dehum idifies the
ai r inside the vehicle . Air temperature, vol
ume, and distribution are controlled automat
ica lly to reach or maintain the desired interior
temperature as quickly as possib le. Fluctua
tions in exterior temperature and the effects
of temperature from the position of the sun
are compensated for automat ically .
Manual air recirculation mode~
The recirculation mode prevents polluted out
side air from entering the vehicle interior.
Switching on air recir culation
• Press the button I;]<=> page 67, fig. 78
<=>A .
Switching off air recirculation
• Press the button ~ again, or
• Press the
!AU TO ! button, or •
Press the~ button .
In recircu lation mode, air is drawn from the
vehicle interior, filtered, and recirculated. We
recommend that you se lect recirculation
mode
briefly <=>.&. under the fo llowing condi
tions:
When driving through a tunnel or in a traff ic
jam so that exhaust fumes and odors cannot
enter the vehicle interior.
A WARNING
You shou ld not use the recirculation mode
for an extended period since no fresh air is
drawn in, and with the air condit ioning
switched off the windows can fog up - this
i ncreases the r isk of an accident!
A/C operation ~
Switching on A/C
• Press the IA/Cl button <=> page 67 , fig . 78 .
Switching A/C off
• Press the IA/Cl button again.
T he air is not coo led and humidity is not re
moved when cooling mode is switched off.
This can cause fog on the windows. Cooling mode switches off automatically when the
outside temperature is be low zero .
(D Tips
If the LED in the switch stays on after A/C
operation has been switched off(= switch
ing the A/C off), there is a fault in an air
cond itioning component. Please consult
an authorized Audi dealer when there is an
operating problem .
Rear window defogger~
The rear window defogger clears the rear win
dow of condensation.
• Press the QW button <=> page 67, fig. 78 to
turn the rear window defogger on and off.
Page 73 of 244

The rear window defogger works only when
the engine is running. The indicator light in
the button illuminates when the rear w indow
defogger is turned on .
The rear window defogger is switched off au
tomatically after approx . 10 minutes .
@) For the sake of the environment
As soon as the rear window is clear, yo u
should switch the rear window de fogger
off . The reduced power consumption has a
beneficial effect on fuel consumption.
Heated seats~
Applies to vehicles: with heated seats
The seat cushion and the seotbock of the
front seats con be heated electrically .
.,. Press the heated seats b utton I-J + I
Q page 67, fig. 78 to set the level of heating
desired .
The range of controls goes from 1 to 3. The heat setting se lected is shown by LEDs above
the button .
A WARNING
Individuals with reduced sensitivity to pain
or temperature could develop burns when
using the seat heating function. To reduce
the risk of inju ry, these individuals should
not use seat heat ing .
(D Note
To avo id damage to the heating elements
in the seats, do not kneel on the seats or
place heavy loads on a small area of the
seat .
Using the climate controls economically
Economical use of the climate controls helps
to save fuel .
When climate control is working in coo ling
mode, engine performance is reduced and
fuel consumption is affected . To keep the time
Warm and c old 71
the air conditioning is on as short as possible,
you should do the following:
.,. If you would like to save fuel, switch the ai r
condi tioning off .
.,. If you open the windows while driving,
switch the air conditioning off .
.,. If the veh icle is extremely hot d ue to the
heat of the sun, br iefly open doors and w in
dows .
@) For the sake of the environment
When you save fuel, you reduce emissions
from the vehicle.
Page 76 of 244
7 4 On the road
@ For the sake of the environment
To avoid unnecessary engine wear and to reduce exhaust emissions, do not let your
veh icle stand and warm up. Be ready to
drive off immediately after start ing your
veh icle. Maintain moderate speed until the
engine is comp letely warm. Remember,
the engine performs best at operating
temperature.
Stopping the engine
• Turn the ign ition key to position@
~ page 72, fig. 81.
&_ WARNING
-Never turn off the engine before the ve
hicle has come to a complete stop. The
full function of the brake booster and the
power steering is not guaranteed. You
must use more force to turn or brake if
necessary. Because you cannot steer and
brake as you usually would, this could
lead to crashes and serious injuries.
- The radiator fan can continue to run for
up to 10 minutes even after you have
turned off the engine and removed the
ignition key . The radiator fan can also
turn on again if the engine coolant heats up because of intense sunlight or heat
build-up in the engine compartment.
(D Note
Do not stop the engine immediate ly after
hard or extended driving. Keep the engine
running for approximately two minutes to
prevent excessive heat build-up.
Parking brake
Parking brake
When the parking brake is set, it prevents the
vehicle from rolling away unintentionally.
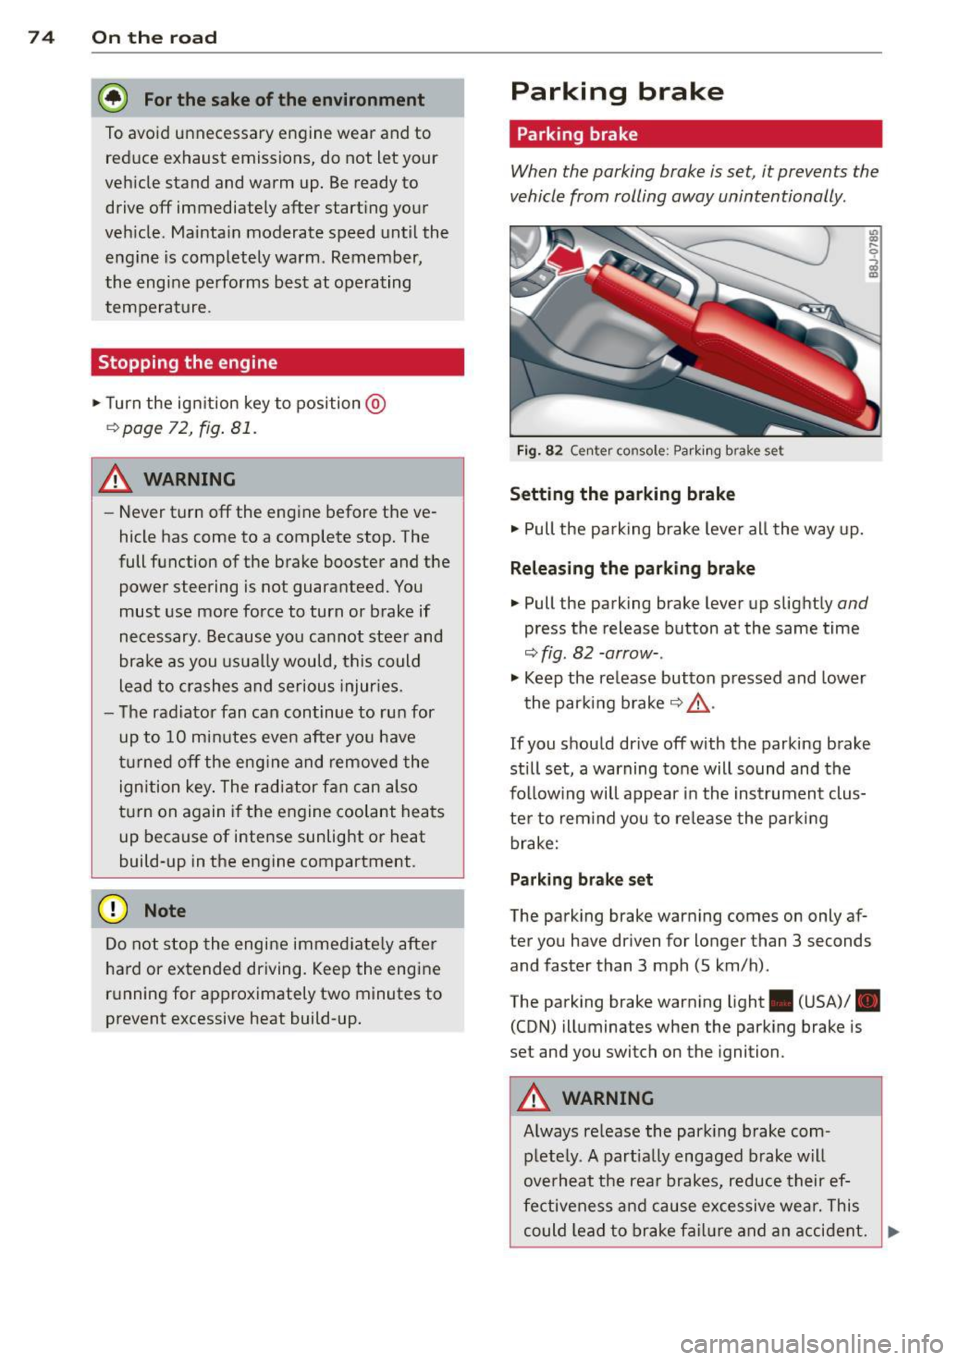
Fi g. 82 Center console: Park ing brake set
Setting the parking brake
• Pull the pa rking brake lever all the way up.
Releasing the parking brake
• Pull the parking brake lever up slightly and
press the release button at the same time
~fig. 82 -arrow-.
• Keep the release button pressed and lower
the parking brake~.&,.
If you should drive off with the parking brake
still set, a warning tone will sound and the
fol low ing will appear in the instrument clus
ter to remind you to release the parking
brake:
Parking brake set
The parking brake warning comes on only af
ter you have driven for longer than 3 seconds
and faster than 3 mph (5 km/h).
The parking brake warning light . (USA)/ .
(CON) illuminates when the parking brake is
set and you switch on the ignition.
&_ WARNING
Always release the park ing brake com-
pletely. A partially engaged brake will
overheat the rear brakes, reduce their ef
fectiveness and cause excessive wear. This
could lead to brake failure and an accident. .,..
Page 78 of 244
![AUDI TT ROADSTER 2015 User Guide 76 On the road
ignition, assum ing that you have not changed
or reset the setting.
The speed warning symbo l
ID] (USA models)/
1aj (Canada models) in the warning 1 displ ay
appears AUDI TT ROADSTER 2015 User Guide 76 On the road
ignition, assum ing that you have not changed
or reset the setting.
The speed warning symbo l
ID] (USA models)/
1aj (Canada models) in the warning 1 displ ay
appears](/img/6/57664/w960_57664-77.png)
76 On the road
ignition, assum ing that you have not changed
or reset the setting.
The speed warning symbo l
ID] (USA models)/
1aj (Canada models) in the warning 1 displ ay
appears when you exceed the maximum
speed. It goes o ut when the speed fa lls below
the stored max imum speed .
The speed wa rning symbo l w ill also go out i f
the speed
exceeds the sto red max imum speed
by more than about 25 mph (40 km/h) for at
l east 10 seconds. The stored maxim um speed
is deleted .
Sett ing speed warning 1
¢page 76 .
Speed warning 2
Sto ring warning 2 is re commended if you al
ways
want to be reminded of a certa in speed,
for exam ple when yo u are traveling i n a cou n
try th at has a general maximum speed limi t,
or if you do not want to exceed a specified
speed for winter tires.
The speed w arning 2 symbol,
lDJ (USA mod
e ls)/
lDJ (Canada models) appea rs in the dis
p lay when you exceed the stored speed limit .
Unlike warning 1, it will not go out unti l th e
vehicle speed drops below the stored speed limit.
Setting s peed warn ing 2
¢ page 77 .
@ Tips
Even t hough your vehicle is equ ipped wi th
a speed w arni ng sys tem, yo u shou ld st ill
watch the s peedomete r to make sure you
are not driving faster than the speed lim it.
Speed warning 1: setting a speed limit
Warning threshold 1 is set by the button .
Fig. 8 3 Sectio n of instru ment clus ter: Set/C heck b ut
to n
Storing the max imum speed
.,. Dr ive at the desired ma ximum speed.
.,. Press the knob buttonc>fig .
83 unti l the
speed warn ing
symbo1 1m1 (U SA mode ls)/ 181
(Canada models) appears.
Resetting the maximum speed
.,. Dr ive the veh icle at a spee d of at least
3 mph ( 5 km/h)
.,. Press the knob for more than 2 seconds.
T he speed warning symbol
ID] (USA mode ls)/
k•j
cate that the maximum speed has been stored
s uccessfully .
The maxim um speed remains stored until it is
c h anged by pressing the button aga in b rief ly
or unt il it is deleted by a lengthy push on the
button.
Page 79 of 244
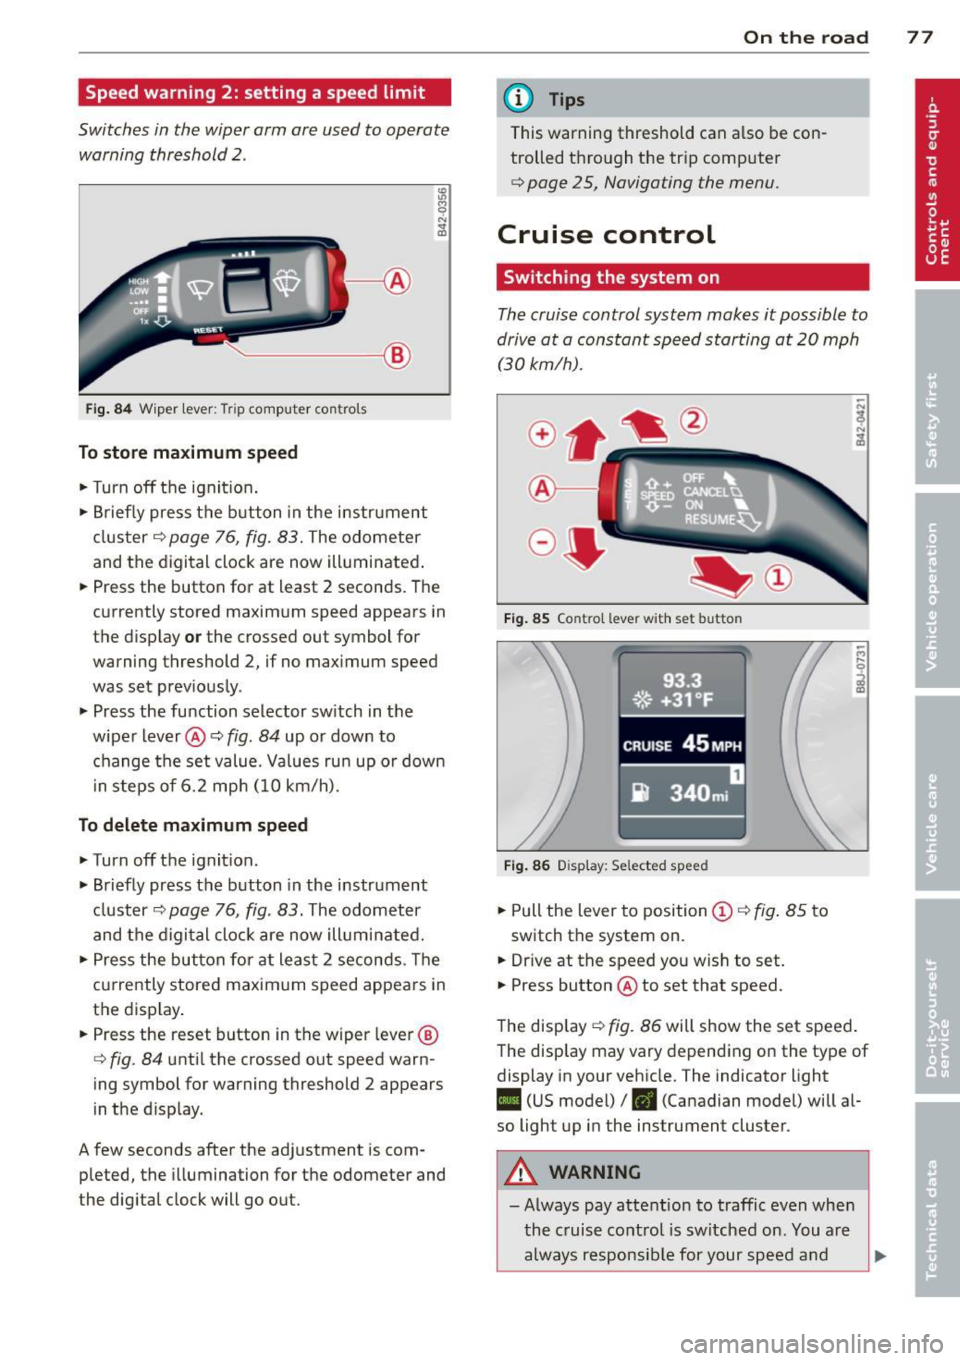
Speed warning 2: setting a speed limit
Switches in the wiper arm are used to operate warning threshold
2 .
'----I ®
Fig. 84 W iper lever: Trip computer controls
To store maximum speed
.. Turn off the ignit ion .
.. Briefly press the button in the instrument
cluster¢
page 76, fig. 83. The odometer
and the digital clock are now illuminated .
.. Press the button for at least 2 seconds. The
currently stored maximum speed appears in
the display
or the crossed out symbol for
warning threshold 2, if no maximum speed
was set previously .
.. Press the function selector switch in the
wiper lever@¢
fig. 84 up or down to
change the set value. Values run up or down
i n steps of 6.2 mph (10 km/h).
To delete maximum speed
.. Turn off the ignition.
.. Briefly press the button in the instrument
cluster ¢
page 76, fig. 83. The odometer
and the digital clock are now illuminated.
.. Press the button for at least 2 seconds. The
currently stored maximum speed appears in
the display.
.. Press the reset button in the wiper lever®
¢
fig . 84 until the crossed out speed warn
ing symbol for warning threshold 2 appears
in the d isplay.
A few seconds after the adjustment is com pleted, the illumination for the odometer and
the digital clock will go out.
On the road 77
@ Tips
This warning threshold can a lso be con
trolled through the trip computer
¢ page 25, Navigating the menu.
Cruise control
Switching the system on
The cruise control system makes it possible to
drive at a constant speed starting at
20 mph
(30kmlh).
®-
Fig. 85 Co ntro l leve r w ith set b utto n
Fig. 86 Display : Se lected speed
.. Pull the lever to position @¢ fig. 85 to
switch the system on .
.. Dr ive at the speed you w ish to set .
.. Press button @ to set that speed.
The display ¢
fig. 86 will show the set speed .
The display may vary depending on the type of
display in your vehicle. The indicator light
II (US model) /. (Canadian model) will al
so light up in the instrument cluster .
A WARNING
-Always pay attention to traffic even when
the cruise control is switched on. You are
always responsible for your speed and
Page 87 of 244
If you have selected a lower gear than the cur
rent one, the transmission will only shift down
when the engine cannot be overspeeded .
If kick-down is actuated, the transmission
shifts into a lower gear independent ly of
speed and engine rpm .
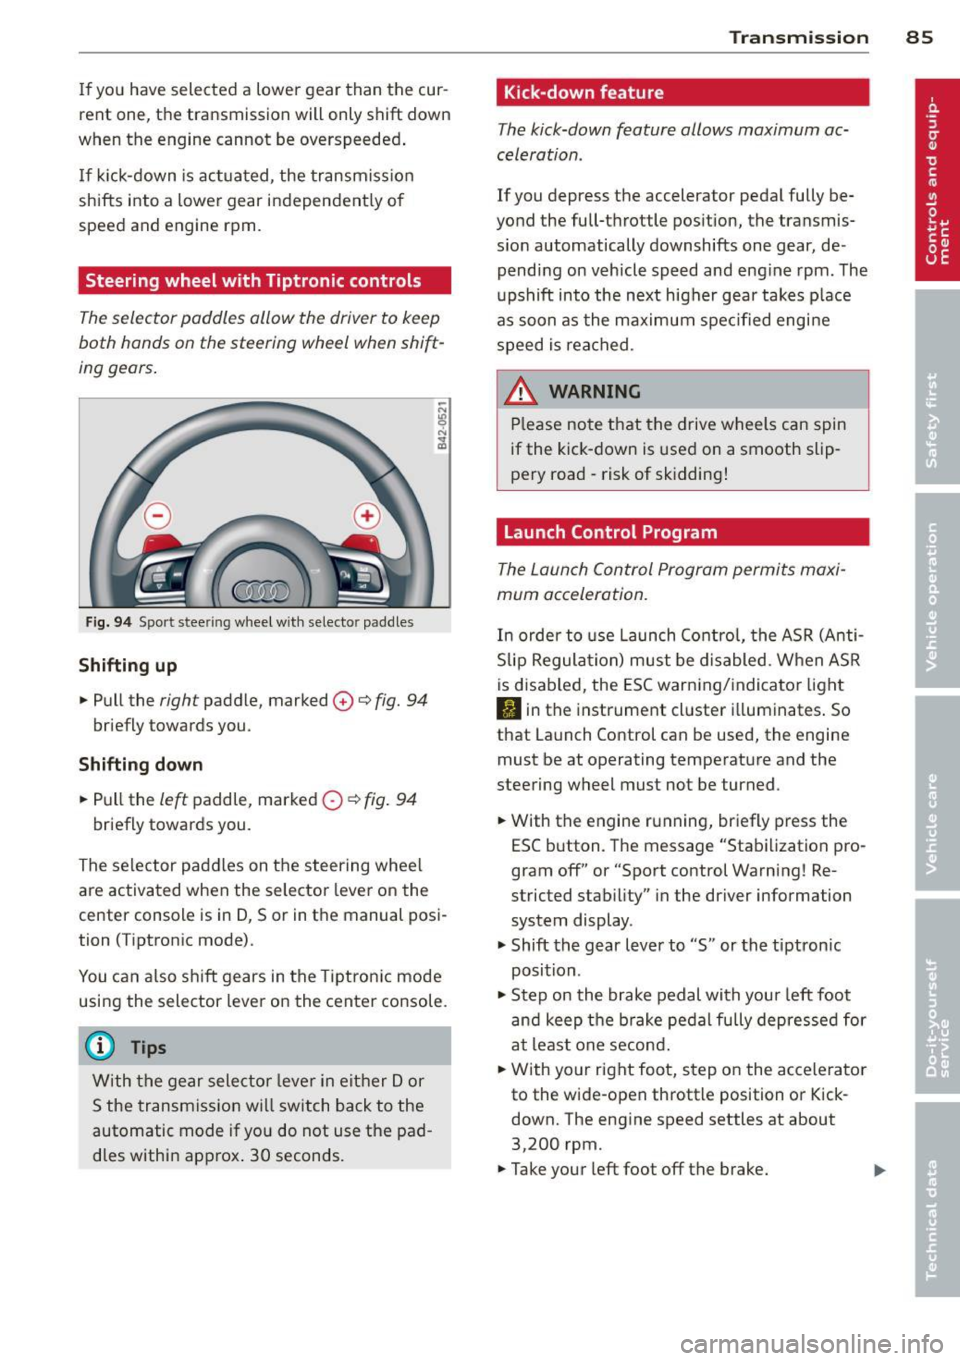
Steering wheel with Tiptronic controls
The selector paddles allow the driver to keep
both hands on the steering wheel when shift
ing gears.
Fig. 94 Sport stee ring wheel with selecto r paddles
Shifting up
.,. Pull the right paddle, marked 0 ¢ fig. 94
briefly towards you .
Shifting down
.. Pull the left paddle, marked 0 ¢ fig. 94
briefly towards you.
The selector paddles on the steering wheel
are activated when the selector lever on the
center console is in D, Sor in the manual posi
tion (Tiptronic mode).
You can also shift gears in the Tiptronic mode
using the selector lever on the center console.
@ Tips
With the gear selector lever in either Dor
S the transmission will switch back to the
automatic mode if you do not use the pad
dles within approx . 30 seconds.
Transmission 85
Kick -down feature
The kick-down feature allows maximum ac
celeration .
If you depress the accelerator pedal fully be
yond the full-throttle position, the transmis
sion automatically downshifts one gear, de
pending on vehicle speed and engine rpm. The
upshift into the next higher gear takes place
as soon as the maximum specified engine
speed is reached.
_&. WARNING
Please note that the drive wheels can spin
if the kick-down is used on a smooth slip
pery road -risk of sk idding!
Launch Control Program
The Launch Control Program permits maxi
mum acceleration.
In order to use Launch Control, the ASR (Anti
Slip Regulation) must be disabled. When ASR
is disabled, the ESC warning/indicator light
I) in the instrument cluster illuminates. So
that Launch Control can be used, the engine must be at operating temperature and the
steering wheel must not be turned .
.. With the engine running, briefly press the
ESC button . The message "Stabilization pro
gram off" or "Sport control Warning! Re
stricted stability" in the driver information
system display.
.. Shift the gear lever to "S" or the tiptron ic
position .
.. Step on the brake pedal with your left foot
and keep the brake pedal fully depressed for
at least one second .
.. With your right foot, step on the accelerator
to the wide-open throttle position or Kick
down. The engine speed settles at about
3,200 rpm.
.. Take your left foot off the brake.