tow AUDI TT ROADSTER 2015 Owner's Manual
[x] Cancel search | Manufacturer: AUDI, Model Year: 2015, Model line: TT ROADSTER, Model: AUDI TT ROADSTER 2015Pages: 244, PDF Size: 60.74 MB
Page 148 of 244
146 Intellig ent technolog y
-If the power steering system should fail,
or if the eng ine is not running (for exam
ple, while being towed), yo u wi ll st ill be
able to steer the veh icle. However, more
effort will be requ ired to do so .
- If the power steering system is not func
tioning properly, contact your authorized
Audi dealer immediately .
Driving with your
quattro
App lies to vehicles: with all-wheel drive
With all-wheel drive, all four wheels are driv
en.
General information
W ith all-whee l drive , power is distributed to
a ll four wheels . This happens automa tica lly
depending on your dr iv ing sty le and the road
conditions at the time. See also ~
page 141.
The all-wheel drive concept is designed for
high engine powe r. You r vehicle is exception
ally powerful and has ex ce ll ent dr iving charac
teristics bot h under normal driving conditions
and on snow and ice. Always read and fo llow
safety precautions ¢
.&..
Winter ti re s
When dr iving in the w inte r, your ve hicle w ith
a ll-wheel d rive has an advantage, even with
regular tires . In winter road conditions it may
be advisable to mount winter tires (or all-sea
son tir es) for improv ed driveability and brak
ing: these tires must be mounted on
a ll fo ur
wheels . See also ¢ page 195, Win ter tires.
Snow cha in s
Where tire chains are mandatory on certain roads, this normally a lso applies to vehicles
with a ll-wheel drive¢
page 196, Snow
chains.
Replacing whe els /t ires
Vehicles wit h all-wheel drive mus t always
have tires of the same size . Also avoid tires
with different tread depths. For details see page
q page 191, New tires and replacing
tires and wheels .
Off-Road driving ?
Your Aud i does no t have enough g round clear
ance to be used as an off-road vehicle. It is
therefore bes t to avoid rough tracks and un
even terrain as much as possib le . Also refer to
¢ page 150 .
A WARNING
-Always ad just your dr iv ing to road and traf-
f ic conditions. Do not let the extra safety
afforded by all-wheel drive tempt you into
taking extra risks.
- Although the all-wheel drive is very ef
fective, always remember that braking capacity is lim ited by tire t raction . You
should therefore not d rive at excessive
speeds on icy or slippe ry road surfaces.
- On wet road surfaces, be careful not to
d rive too fast because the front whee ls
could begin to slide o n top of the water
(aquaplan ing). If th is should occur, yo u
will have no warning from a s udden in
crease in eng ine speed as wit h a front
wheel drive vehicle. Always drive at
speeds which are su ited to the road con
d itions. -risk of crash.
Energy management
Starting ability is optimized
Energy management controls the distribution
of electrical energy and thus optimizes the
availability of electrical energy for starting the engine.
If a vehicle with a conventional energy system
is not driven for a long per iod of t ime, the bat
te ry is discharged by idling cur rent consume rs
(e .g. immobili zer) . In cert ain circumstances it
can resu lt in the re being insufficient energy
available to start the eng ine.
Intelligent energy management in you r vehi
cle h andles the dis trib ution of e lectr ica l ene r
gy. Start ing ability is ma rkedly improved and
the life of the battery is extended . .,._
Page 152 of 244
150 Driving and en vironm ent
Avoid damaging the
vehicle
When you are driving on poor roads, or over
curbs, steep ramps, etc ., make certain that
low-lying parts such as spoilers and exhaust
system parts do not bottom out and get dam
aged.
This is especially true for vehicles with low
slung chassis (sports chassis) and fully loaded
vehicles .
Driving through water
on roads
Note the following to avoid vehicle damage
when driving through water, for example on
flooded roads:
- T he water must not be any highe r tha n the
bottom of the vehi cle body.
- Do no t drive faster than wa lking speed.
_& WARNING
After d riving through water, m ud, slush,
etc., the brakes may be slow to take effect
because o f wet brake ro tors and pads . Dry
the brakes fi rst by braking carefully to re
store the full braking effect.
(]) Note
Vehicle components such as the engine,
transmiss ion, suspension or electrical sys
tem can be severely damaged by driving
through water.
- Check the depth o f the water before driv
ing through it.
- Do not stop the veh icle, dr ive in reverse
or switch the engine
off when driving
through water.
- Keep in mind that oncoming vehicles may c reate waves that raise the water
l evel and make it too deep for your vehi
cle to drive through safely.
- Avoid driving thro ugh salt water because
it can ca use corrosion.
-
Catalytic converter
It is very important that your emission con
trol system (catalytic converter) is function
ing properly to ensure that your vehicle is run
ning in an environmentally sound manner.
.. Always use lead-free gasoline¢ page 160,
Fuel supply .
.. Never run the tank down all the way to emp
ty.
.. Never put too much moto r o il in yo ur eng ine
¢ page 169, Adding engine oil ~-
.. Never try to push- or tow-st art you r vehicle.
The catalytic co nverter is an efficient "clean
u p" dev ice built into the exhaust system of
t h e vehi cle. The cata lytic conve rter bu rns
many of the pollutan ts in the exha ust gas be
f ore they are re leased into the atmosphere.
T he exclusive use of unleaded fuel is critically
impor tant for the life of the catalyt ic convert
er and prope r funct ion ing of the engi ne.
A WARNING
- Do not park or operate the vehicle in
areas where the hot exha ust system may
come in contact with dry g rass, brush,
fue l spill or other material wh ich can
cause a fire.
- Do not app ly additiona l undercoating or
r u stproofing on or near the exhaust
manifold, exhaust pipes, catalytic con
verter or heat sh ields. Dur ing driv ing, the
substance used fo r undercoating could
overheat and cause a fire.
(D Note
- Be aware that just one tank filling with
leaded fuel will already ser iously de-
grade the performance of the catalytic
converte r.
- Do not exceed the correct engi ne oil level
¢page 169.
-Do not drive until the fuel tank becomes
completely empty . The engine co uld mis-
fire. Unburned fuel could also get into ..,.
Page 155 of 244
Fewer short trips
Fuel consumption will always be relatively
high on short trips.
11-Try to avoid driving short distances with a
cold eng ine.
The engine and catalyt ic converte r have to
reac h their optimal
operating temperature to
reduce fuel consumption and noxious emis
sions effective ly .
- Just after starting, a co ld eng ine in a mid
s iz e car burns the fuel at a poor rate of 6-8
miles per gallon (30-40 l/l00km). Half a
mile dow n the road, the m ileage improves
to 12 MPG (20 l/100 km) .
It will take the
engine no less than
two and a half mil es
(4 km) of d riving to warm up to its proper
oper ating tempe ra tu re and ope ra te at an
eco nomic mileage. This explains why taking
the car for shor t tr ips is a rather wastef ul
convenience.
- T he
outside temperature is also cr it ica l in
t hi s re gard . You r car cons umes more fuel in
the winter than in t he summer .
Trailer towing
General information
Your Audi TT Roadster is not designed to tow
a trailer.
Towing a tra iler with yo ur Audi TI Roadster is
n ot recommended and can cause damage to
the car . Damaged caused by towing a trailer is
n ot covered by your Aud i War ranty .
Driving and environment 153
•
•
Page 191 of 244
Determining correct load limit
Use the example below to cal
culate the total weight of the
passengers and luggage or oth
er things that you plan to trans
port so that you can make sure
that your vehicle will not be overloaded.
Steps for Determining
Correct Load Limit
1. Locate the statement "THE
COMBINED WEIGHT OF OC
CUPANTS AND CARGO
SHOULD NEVER EXCEED XXX KG OR XXX LBS"on your vehi
cle's placard (tire inflation pressure label)
¢ page 184,
fig . 136 .
2. Determine the combined
weight of the driver and pas sengers that will be riding in
your vehicle .
3 . Subtract the combined
weight of the driver and pas sengers from
"XXX" kilo
grams or
"XXX" pounds
shown on the sticker
¢ page 184 , fig. 136.
4. The resulting figure equals
the available amount of car
go and luggage load capaci
ty. For example, if the
"XXX"
amount equals 1400 lbs.
Tires and wheels
and there will be five 150 lbs. passengers in your vehi
cle, the amount of available
cargo and luggage load ca pacity is 650 lbs. (1400-7 50
(5
X 150) = 650 lbs.)
5 . Determine the combined
weight of luggage and cargo
being loaded on the vehicle .
That weight may not safely exceed the available cargo
and luggage load capacity
calculated in Step
4.
6. If your vehicle will be towing
a trailer, load from your trail
er will be transferred to your
vehicle. Consult this manual
to determine how this reduces the available cargo
and luggage load capacity of
your vehicle.
,...Check the tire sidewall
(¢ page 191 , fig. 140) to de
termine the designated load rating for a specific tire.
189
•
•
'
Page 206 of 244
204 What do I do now ?
What do I do now?
Trunk escape handle
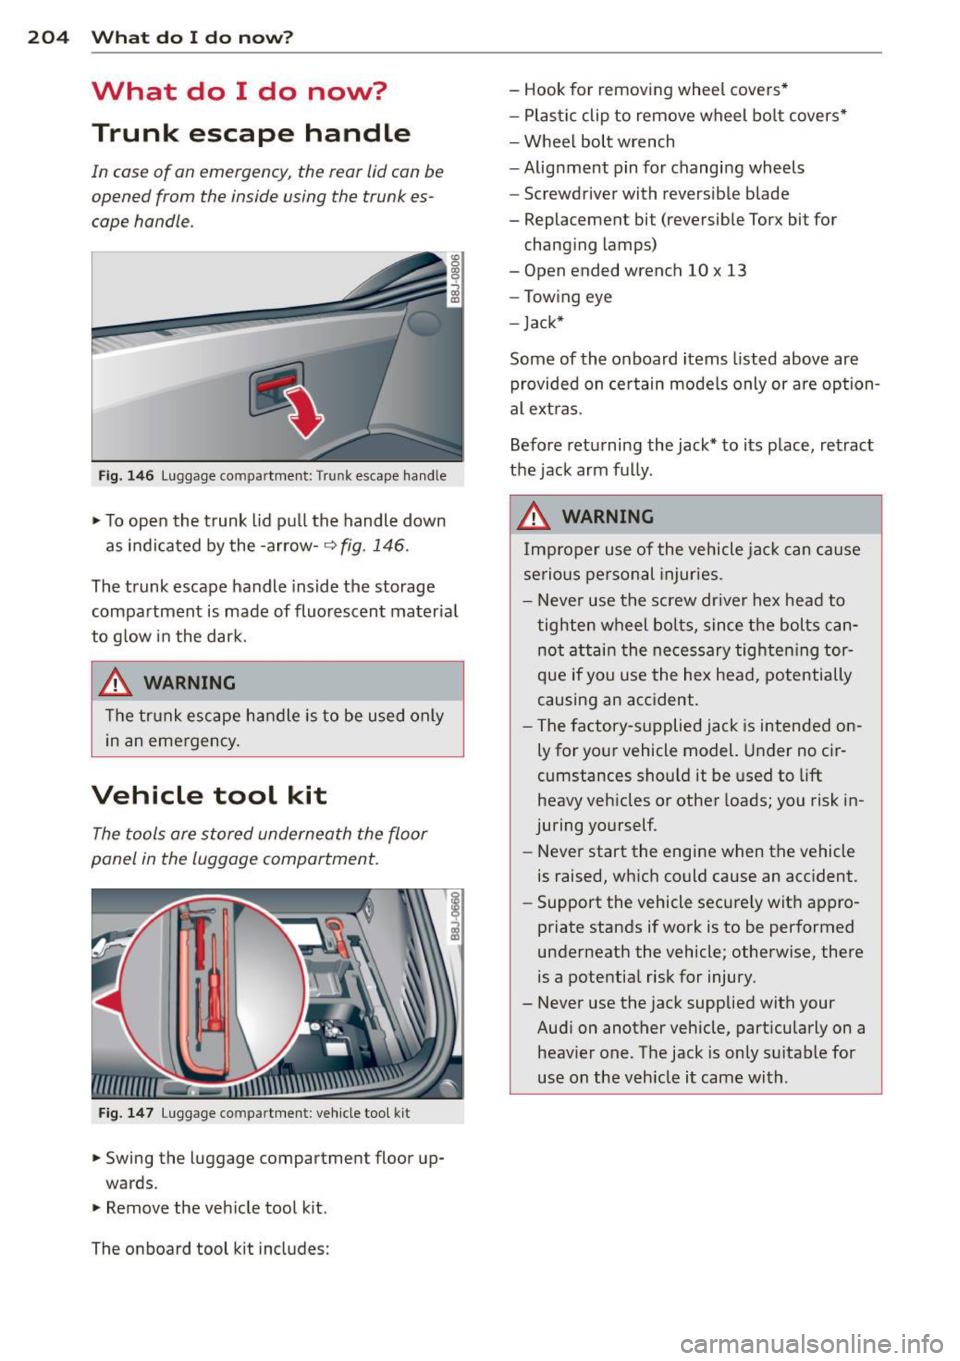
In case of an emergency, the rear lid can be
opened from the inside using the trunk es
cape handle.
Fig. 1 46 Luggage compartment: Trunk escape handle
... To open the trunk lid pu ll the handle down
as indicated by the -arrow-~
fig. 146.
The trunk escape handle inside the storage
compartment is made of fluorescent materia l
to g low in the dark.
A WARNING
The trunk escape handle is to be used only
in an emergency.
Vehicle tool kit
The tools are stored underneath the floor
panel in the luggage compartment.
Fig. 1 47 Luggage co mpa rtment : veh icle too l kit
... Swing the luggage compartment floor up
wards .
... Remove the veh icle tool k it.
The on board tool kit includes: -
Hook for removing wheel covers *
- Plastic clip to remove wheel bo lt covers•
- Wheel bolt wrench
-Alignment pin for changing wheels
- Screwdriver with reversible blade
- Replacement bit (reversible Torx bit for
chang ing lamps)
- Open ended wrench 10 x 13
- Towing eye
- Jack*
Some of the on board items listed above are
provided on certain mode ls only or are option
al ext ras.
Before returning the jack* to its place, retract
the jack arm fully .
A WARNING
Im proper use of the vehicle jac k can cause
serious personal injuries .
- Never use the screw driver hex head to tighten wheel bo lts, since the bolts can
not attain the ne cessary tighten ing tor
que if you use the hex head, potentially
causing an accident.
- The factory-supplied jack is intended on ly for your vehicle model. Under no cir
cumstances should it be used to lift
heavy vehicles or other loads; you risk in
juring yourself.
- Never start the engine when the vehicle
is raised, wh ich could cause an acc ident.
- Support the vehicle secure ly wit h appro
priate stands if work is to be performed
underneath the vehicle; otherwise, there
is a potential risk for injury.
- Never use the jack supplied with your
Audi on another vehicle, part icularly on a
heavier one. The jack is only su itable for
use on the veh icle it came with .
Page 218 of 244
216 Emergency situations
Emergency situations
General
This chapter is intended for trained emer
gency crews and working personnel who
have the necessary tools and equ ipment to
perform these ope rations.
Starting by pushing or
towing
Q;) Note
Vehicle s with an automati c transmission
cannot be started by pushing or towing .
Starting with jumper
cables
If necessary, the engine can be started by
connecting it to the battery of another vehi
cle.
If the engine should fail to start because of a
discha rged or wea k batte ry, the battery can be
connected to the battery o f
another vehicle,
using a
pair of jumper cables to start the en
g ine .
Jumper cables
Use only jumper cab les of sufficiently
large cross section to safely carry the starter
cur rent. Refer to the manufacturer's specifica
ti ons.
Use on ly jumper cables which have
insulated
termina l clamps and are properly marked for
d istinction :
plus(+) cable in most cases colo red red
minu s(-) cable
in most cases colo red black .
_& WARNING
Batterie s contain elec trici ty, a cid, and ga s.
Any of th ese c an cause ve ry seri ous or f ata l
inju ry . Follow the instructions below fo r
safe han dling of your ve hicle's battery.
- Alw ays s hield yo ur eyes and avoid lean
ing over the batte ry w henever possib le . -
A discharged battery can a lready freeze
at temperatures just be low 32 °F (0 °C).
Before connect ing a jumper cab le, the
frozen battery must be thawed com
p letely, othe rwise it cou ld explode .
- Do not allow batte ry acid to contact eyes
or skin . Fl ush any contacted a rea wi th
water immediat ely .
- Imp roper use of a booster battery to
s tart a vehicle may cause an explosion.
- Vehicle batter ies generate explosive gas
es . Keep sparks, flame and lighted ciga
rettes away from ba tte ries .
- Do not try to jump start a ny ve hicle w ith
a low ac id leve l in the battery .
- The vo ltage of the booster batte ry m ust
a lso have a 12-Vo lt rat ing . The capacity
(A h) of the booster batte ry should not b e
lowe r than that of the discharged bat
tery . U se o f batt erie s of d iffe ren t voltage
or subs tanti ally diffe ren t "Ah" rat ing
may c ause an exp losion and person al in
ju ry .
- N ever ch arge a fr ozen bat te ry. Gas t rap
ped in the ice may ca use an ex plosion .
- N ever ch arge o r use a batt ery th at has
been fro zen. T he battery case may have
be weakened.
- Us e of batt erie s of di ffere nt vo lta ge or
substan tially differen t ca pa city (Ah) rat
i ng may cause an exp losion and injury.
T he capac ity (Ah) of the booster battery
should not be lower than that of the dis
charged batte ry.
- Before you check anything in the engine
compartment, always read and heed a ll
W ARNI NGS
c::;,page 164, Working in the
engine compartment .
@ Note
-App lying a hig her voltage booster ba t
tery will cause expens ive damage to se n
sitive electronic components, such as
cont ro l units , relays, rad io, etc.
- There must be no electrical contact be
twee n the vehicles as otherwise current
cou ld already start to flow as soo n as th e
posi tive (+) term inals are connect ed. ""
Page 220 of 244
218 Emergency sit uat ions
instructions of the jumper cable
manufacturer. If in doubt, call for road
service.
- Jumper cables must be long enough so
that the vehicles do not touch.
- When connecting jumper cables, make
sure that they cannot get ca ught in any
moving parts in the eng ine compart
ment.
- Before you check anything in the engine
compartment, always read and heed all
WARNINGS
¢ page 164, Working in the
engine compartment.
@ Note
Improper hook-up of jumper cables can ru
in the generator.
- Always connect POSITIVE(+) to POSI TIVE(+), and NEGATIVE( -) to NEGATIVE
( - ) ground post of the battery manager
control unit.
- Check that all screw plugs on the battery
cells are screwed in firmly . If not, tighten
plugs prior to connecting clamp on nega
tive battery terminal.
- Please note that the procedure for con nect ing a jumper cable as desc ribed
above applies spec ifically to the case of
you r vehicle being j ump s tarted. When
you are giv ing a jump star t to anothe r ve
hicle, do
not connect the negat ive (-) ca
ble to the negative(-) terminal on the
discharged battery ©- Instead, securely
connect the negative(-) cable to either a
solid metal component that is firmly
bo lted to the engine block or to the en
gine block itself. If the battery that is be
i ng charged does not vent to t he outside,
escaping batte ry gas cou ld ig nite and ex
plode!
Emergency towing
with commercial tow
truck
General hints
Your Audi requires special handling for tow
ing.
T he following information is to be used by
commercial tow truck operators who know
how to operate their equipment safely.
- Nev er tow your Audi , towing will cau se
damage to the engine and tr an smi ssion .
- Ne ver wrap th e safet y chain s or winch ca
ble s ar ound the brak e lines.
- To prevent unne ces sary damage , your Audi
must be tran sp o rt ed with a car carrier
(flatbed truck ).
- To load th e vehi cle on t o the flat bed , u se
the t owing loop found in t he vehicle tools
and attach to the front o r rear ancho rage
¢page 219 and ¢page 220 .
A WARNING
-A vehicle being towed is not safe for pas-
sengers. Never allow anyone to ride in a
vehicle be ing towed, for any reason.
-
Page 221 of 244
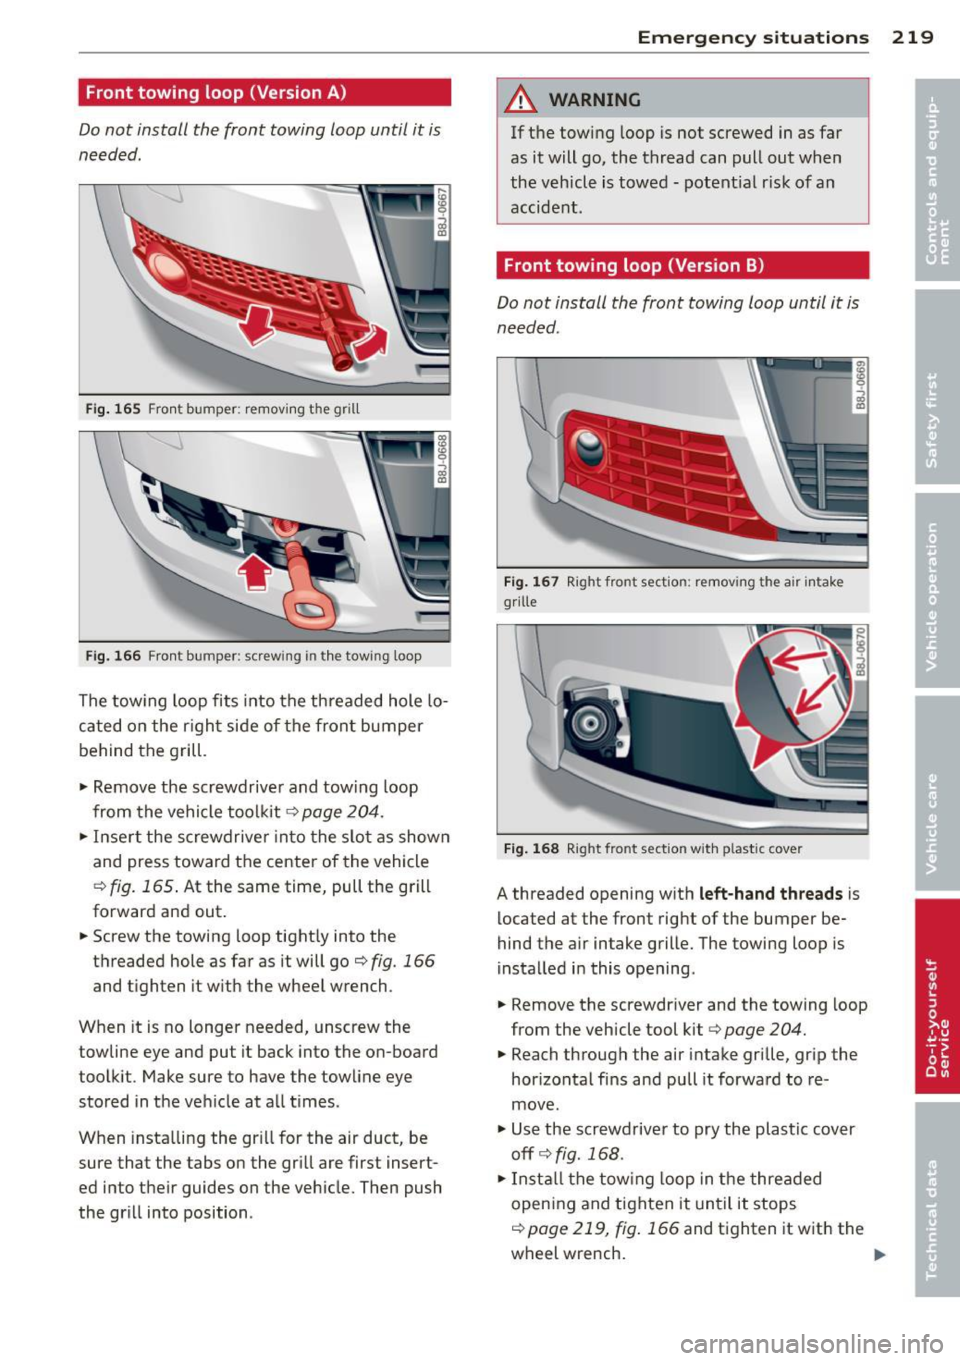
Front towing loop (Version A)
Do not install the front towing loop until it is
needed.
Fig. 165 Fro nt bumper: removing t he grill
Fi g. 166 Fron t bumper: screw ing in t he tow ing loop
The tow ing loop fits into the threaded hole lo
cated on the righ t side of the fron t bumper
behind the grill.
"' Remove the screwdriver and towing loop
from the vehicle tool kit ¢
page 204.
"'Inse rt the screwdrive r into the slo t as shown
and press toward the center of the vehicle
c;, fig. 165 . At the same time, pull the grill
forward and out.
"' Screw the towing loop tightly into the
threaded hole as far as it will go
c;, fig. 166
and tighten it w ith the wheel wrench .
When it is no longer needed, unscrew the
towline eye and put it back into the on -board
toolkit . Make sure to have the towline eye
stored in the ve hicle at all times .
When insta lling the gr ill for the air duct, be
sure that the tabs on the grill are first insert
ed into their guides on the veh icle. Then push
the gr ill into position .
Emergency situations 219
A WARNING
If the tow ing loop is not screwed in as far
as it will go, the thread can pull out when
the vehicle is towed -potential risk of an
accident .
Front towing loop (Version B)
Do not install the front towing loop until it is
needed.
Fig. 167 Right front sectio n: remov ing the air intake
g ri lle
Fig. 168 Right fro nt sect ion w it h plast ic cove r
A threaded opening w ith left-hand threads is
located at the front right of the bumper be·
hind the air intake grille. The towing loop is
i nstalled in this opening .
"' Remove the screwdr iver and the towing loop
from the vehicle tool kit
c:> page 204.
"'Reach through the air intake grille, grip the
hor izonta l fins and pull it forward to re·
move .
"' Use the screwdrive r to pry the plastic cover
offr=;,fig. 168.
"'Install the towing loop in the threaded
opening and tighten it unt il it stops
c;, page 219, fig . 166 and tighten it with the
wheel wrench.
...
Page 222 of 244
220 Emergency situations
Remove the towing loop when you are done
using it and place it back in the vehicle tool
kit. Always keep the towing loop in the vehi
cle .
When installing the air intake grille, insert the
tabs on the grille in the mounts on the vehicle
f ir st. Then press the grille in to secure it.
A WARNING
If the towing loop is not tightened until it
stops when installing, the threads may be
pulled out when tow ing the vehicle and
that could cause an accident .
Rear towing loop
Do not install the rear towing loop until it is
needed.
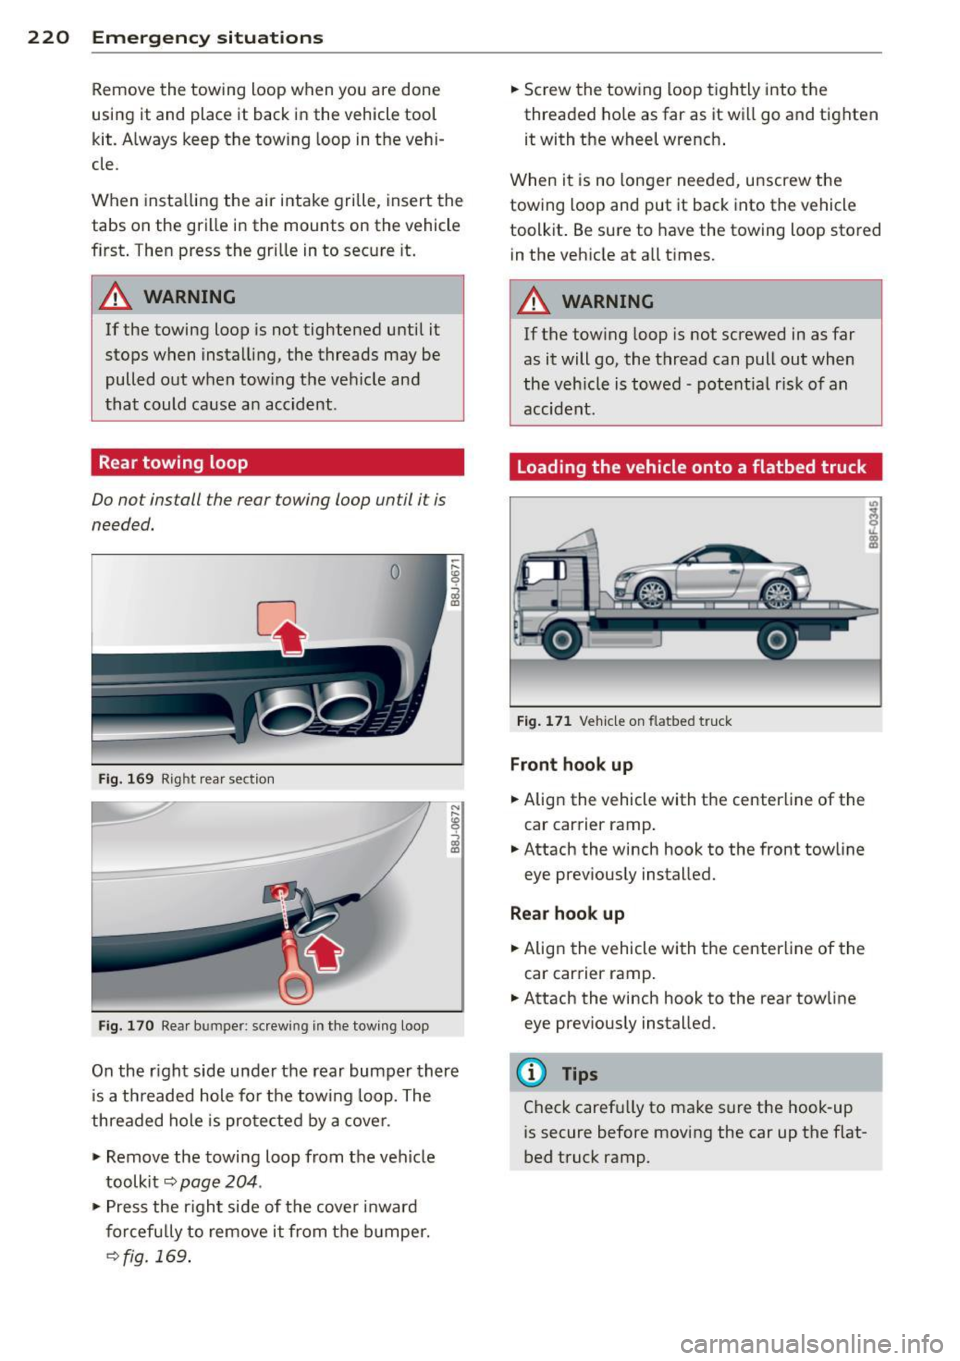
Fig. 169 Right rear section
Fig. 170 Rear bum per: screw ing in the towing loop
On the r ight side under the rear bumper there
is a threaded hole for the towing loop. The
threaded hole is protected by a cover.
"' Remove the towing loop from the vehicle
toolkit ~
page 204 .
"'Press the right side of the cover inward
forcefully to remove it from the bumper.
~fig. 169.
"' Screw the towing loop tightly into the
threaded hole as far as it will go and tighten
it with the wheel wrench .
When it is no longer needed, unscrew the
towing loop and put it back into the vehicle
toolkit . Be sure to have the towing loop stored
in the vehicle at all times.
A WARNING
-If the towing loop is not screwed in as far
as it will go, the thread can pull out when
the veh icle is towed -potent ial risk of an
accident.
Loading the vehicle onto a flatbed truck
Fig. 171 Vehicle on flatbed t ruck
Front hook up
"' Align the vehicle with the centerline of the
car carrier ramp .
"' Attach the winch hook to the front towline
eye previously installed.
Rea r hook up
"' Align the vehicle with the centerline of the
car carrier ramp.
"' Attach the winch hook to the rear towline
eye previously installed.
(D Tips
Check carefu lly to make sure the hook-up
is secure before moving the car up the flat
bed truck ramp.
Page 234 of 244
232 Index
E
Efficiency program ....... .. .. .. .... .. 27
F ue l economy messages ... .. .. .... .. 27
Memory levels . . . . . . . . . . . . . . . . . . . . . 23
Other equipment .. ......... .. .. .. .. 2 7
E lapsed time ... .... ....... .. .. .. .. .. 23
Electro -mechanical power assist . . . 17 , 145
Elect ronic differential lock (EDL) . . . . . . . 141
Warn ing/ indicato r lights ... .. .. .... .. 18
E lect roni c immobili ze r . . . . . . . . . . . . 12, 33
Electronic power co ntrol
EPC warning/ind icator light .. .. .. .... 19
Electronic speed limiter . . . . . . . . . . . . . . . 30
E lect ron ic S tabilization Control ( ESC) .. . 141
War ning/ indica tor l ights . .. .. .. .. .. .. 17
E mergency flasher . . . . . . . . . . . . . . . . . . . 51
War ning/ indicator lights . ...... .. .. .. 21
Emergency locking . . . . . . . . . . . . . . . . . . . 3 7
E mergency opera tion
Conve rtible top .......... .. .. .. .. .. 44
Rear lid . . . . . . . . . . . . . . . . . . . . . . . . . . . 38
E mergency sta rting .. ... ... .. .. .. .. . 216
Emergency towing ......... .. .. .. .. . 218
Ene rgy management ....... .. .. .. .. . 14 6
B att ery power . . . . . . . . . . . . . . . . . . . . 148
D river notification . . . . . . . . . . . . . . . . . 148
Eng ine
C he ckin g and fill ing locations . .. .. .. . 166
Coolan t .. .. ............. .... .. .. . 17 1
D ata .... .. ... ... .... ... .. .. .... . 224
Hood . ..... ... . ...... ... .. .. .... . 164
Starting . . . . . . . . . . . . . . . . . . . . . . 72, 73
Starting with jumper cab les .. .. .... . 216
Stopping . ................. ...... .. 74
E ng ine compartmen t ....... .. .. .. .. . 166
Safety instructions ... ... .. .. .. .... . 164
Working in the engine compa rtment .. 164
E ng ine cooling system ...... .. .. .. .. . 17 1
A dding coolant ........... .. ...... . 17 2
Chec king the eng ine coolan t leve l .. .. . 172
M alfunc tion . . . . . . . . . . . . . . . . . . . . . . . 17
Radiato r fan . .. .. ..... ... .. .. .... . 173
Temperature ga uge .. ... .. .. .. .... .. 11
E ng ine hood
C losing .. ............... .... .... . 164
H ow to release the hood ... .. .. .... . 164 E
ngine oi l .. .... .. ... .. ..... .... . .. 166
Adding ... .... .. .. ... ..... ... .. .. 169
Additives . ... .. .. ... .. ..... ... .. .. 169
Changi ng ..... .. ............. .... 170
Checking the engine oil level ..... .... 169
Indications and conditions requir ing ex -
tra checking ... .. ... .. .. ... ..... .. 169
Oil consumpt io n .. .......... ...... . 168
Oil g rades . .. .... ............. .. .. 166
Recommende d oi l c he ck interv als . .. .. 169
Spec ifi cat ion an d viscosity .. ... .. .. .. 166
T emperature display . .. ..... .... . .. . 26
En gine o il level .. .. ................ .. 19
Engine oi l pressure (ma lfunction) .. .. .. . 16
En gine oi l sensor defective . . . . . . . . . . . . 20
Engine oil temperature indicator ........ 26
Engine speed limitation .. ..... ... .. .. . 19
En vironment
Br eak-in per io d ... ............. .. .. 149
Catalytic converter . .. .. ..... ... .. .. 150
Disposing of your veh icle ba ttery ... .. 175
Driving at high speeds . . . . . . . . . . . . . . 152
Driving to minimi ze po llution and noise 151
Fuel ...... .... .. .. ............... 162
Fuel economy .... ................. 151
Leakage from your vehicle ..... ... ... 164
L etting the vehicle stand a nd warm up . 152
Proper disposal of d rained brak e flu id . 174
P roper d isposal of d rained eng ine cool-
an t ...... .... .. ................. 172
Proper disposal of d rained eng ine
oi l . . . . . . . . . . . . . . . . . . . . . . . . . 169, 170
Recycling used engine oil ..... ... .. .. 169
Un leaded fuel .. .. ............. .. .. 160
What shou ld I do with an o ld battery? . 175
EP C
refer to Elect ronic power co ntrol ... .. . 19
E SC (Electronic Stab ilizat io n Control)
Warning/ind icator lights ........ .. .. . 17
Event Data Recorder (EDR) ........ .... 141
E xhaust tail pipes
Cleaning . ..... .. ... .. ..... .... . .. 156
E xpansion tank . . . . . . . . . . . . . . . . . . . . . 172
Exterior m irrors
Adjust ing . .... .. ............. .... . 52
Dimming ...... .. ..... ....... ... .. . 53
Heating ....... .. ..... ....... ... .. . 52