language AUDI TT ROADSTER 2016 Owners Manual
[x] Cancel search | Manufacturer: AUDI, Model Year: 2016, Model line: TT ROADSTER, Model: AUDI TT ROADSTER 2016Pages: 306, PDF Size: 31.82 MB
Page 125 of 306
Downloaded from www.Manualslib.com manuals search engine Calling
up the selection/options menu with
the control buttons
You can use the selection menu to call up further
functions for individual menu items (e.g. radio).
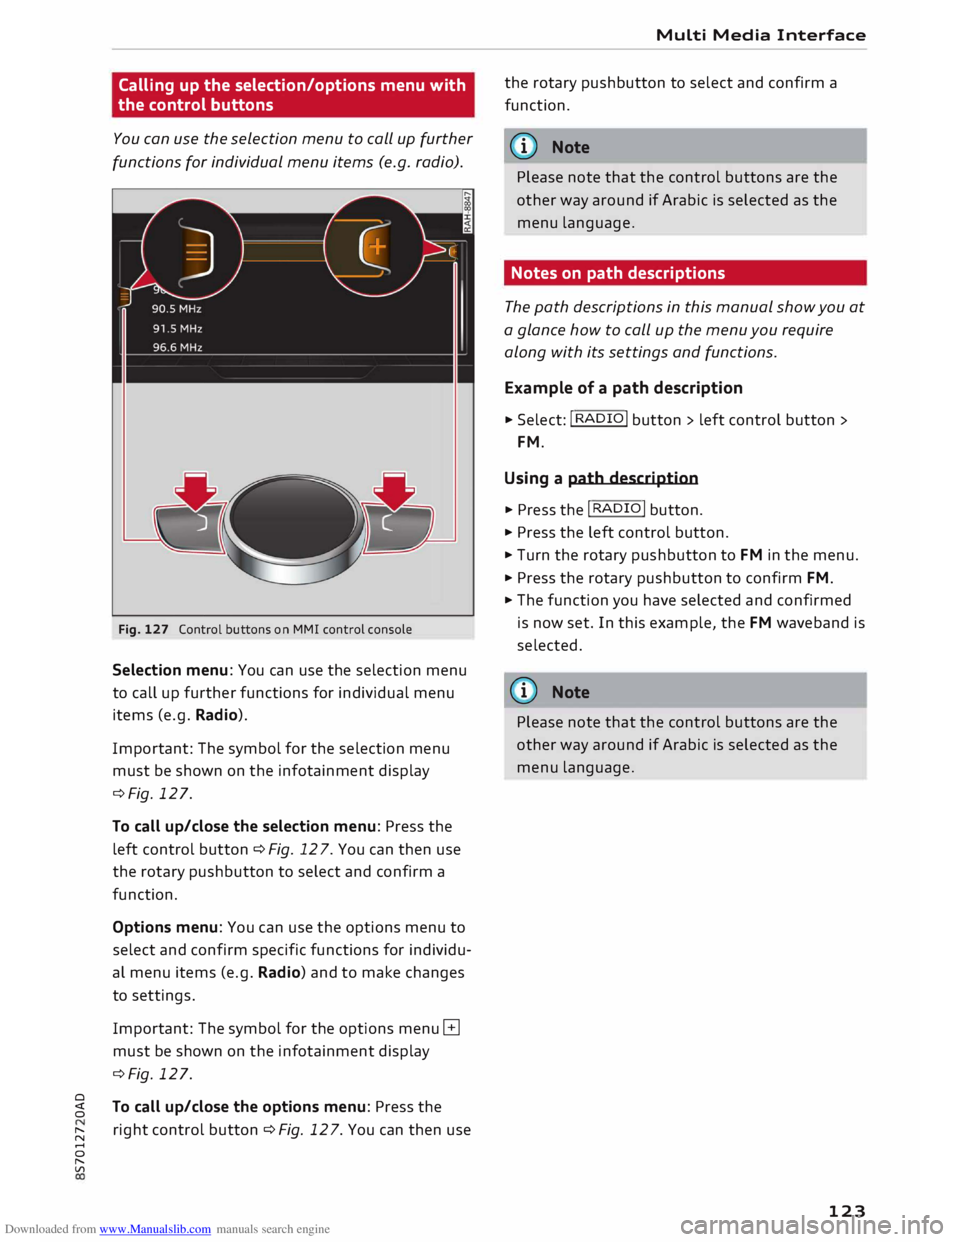
Fig. 127 Control buttons on MMI control console
Selection menu: You can use the selection menu
to call up further functions for individual menu
items (e.g. Radio).
Important: The symbol for the selection menu
must be shown on the infotainment display
¢Fig. 127.
To call up/close the selection menu: Press the
left control button ¢ Fig. 12 7. You can then use
the rotary pushbutton to select and confirm a
function.
Options menu: You can use the options menu to
select and confirm specific functions for individu
al menu items (e.g. Radio) and to make changes
to settings.
Important: The symbol for the options menu G
must be shown on the infotainment display
¢Fig. 127.
0
� To
call up/close the options menu: Press the
� right
control button ¢ Fig. 12 7. You can then use
......
0
"
Vl Multi
Media Interface
the rotary pushbutton to select and confirm a
function.
{(D Note
Please note that the control buttons are the
other way around if Arabic is selected as the
menu language.
Notes on path descriptions
The path descriptions in this manual show you at
a glance how to call up the menu you require
along with its settings and functions.
Example of a path description
.,. Select: I RADIO! button> left control button>
FM.
Using a path description
.,. Press the I RADIO I button .
.,. Press the left control button .
.,. Turn the rotary pushbutton to FM in the menu .
.,. Press the rotary pushbutton to confirm FM .
.,. The function you have selected and confirmed
is now set. In this example, the FM waveband is
selected.
@ Note
Please note that the control buttons are the
other way around if Arabic is selected as the
menu language.
123
Page 128 of 306
Downloaded from www.Manualslib.com manuals search engine Multi
Media Interface
Zooming in/out on map
Applies to: vehicles with MMI touch
Fig. 132 Zooming in/out on map
Important: A map must be displayed
¢page 178, Fig. 159.
- To zoom in/out on the map: Press the rotary
pushbutton to bring up the crosshairs. Place
two fingers on the MMI touch pad and move
them apart/together ¢ Fig. 132.
To hide the crosshairs, press the I
BACK !
button
(J) ¢page 121, Fig. 123.
Adjusting the sound focus
Applies to: vehicles with MMI touch
Important: The Balance/fader option must be se
lected ¢ page 217.
- To move the crosshairs of the sound focus:
Move your finger in the desired direction on the
MMI touch pad.
- To store the location of the crosshairs: Press
the rotary pushbutton twice. Or: Press the
!BACK !
button (J) ¢page 121, Fig. 123.
Operating the DVD main menu
Important: A video DVD must be playing
¢ page 200 and the DVD main menu must be
displayed.
- To select a menu option: Move your finger up/
down or to the left/right on the MMI touch
pad.
- To confirm your selection: Press the rotary
pushbutton.
126 (I))
Note
- You can set the volume of the MMI touch*
spoken cues according to your own prefer
ences ¢page 218, fv1fv1I touch volume*.
- Please note the direction of writing/delet
ing characters if the menu language is set to
Arabic.
Rotary pushbutton with
joystick function
Using the rotary pushbutton with joystick
function
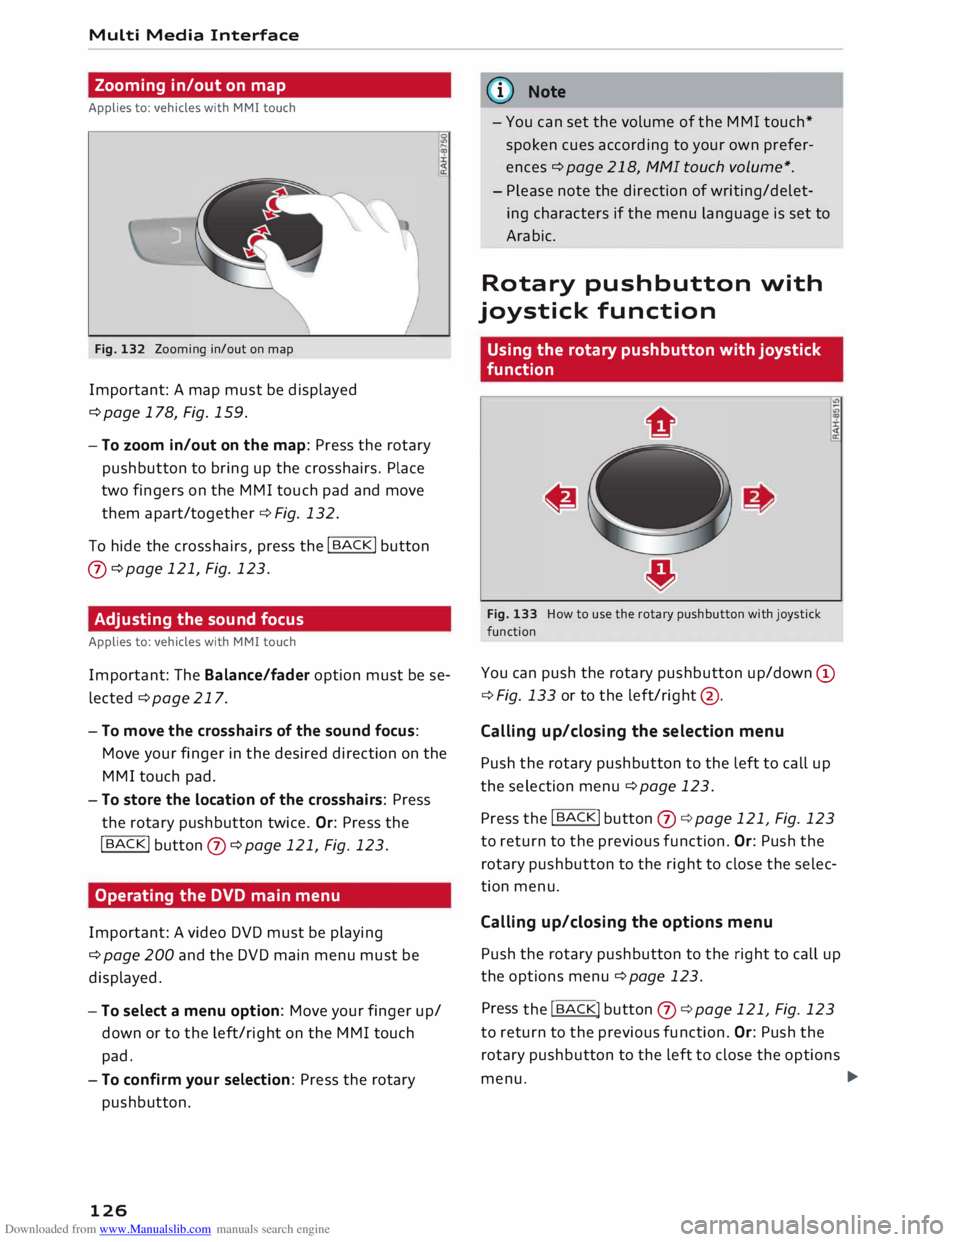
Fig. 133 How to use the rotary pushbutton with joystick
function
You can push the rotary pushbutton up/down @
¢ Fig. 133 or to the left/right @.
Calling up/closing the selection menu
Push the rotary pushbutton to the left to call up
the selection menu¢ page 123.
Press the I
BACK !
button (J) ¢ page 121, Fig. 123
to return to the previous function. Or: Push the
rotary pushbutton to the right to close the selec
tion menu.
Calling up/closing the options menu
Push the rotary pushbutton to the right to call up
the options menu ¢page 123.
Press the I BACK!
button (J) ¢ page 121, Fig. 123
to return to the previous function. Or: Push the
rotary pushbutton to the left to close the options
menu. �
Page 129 of 306
Downloaded from www.Manualslib.com manuals search engine Displaying
the entry field*
Push the rotary pushbutton upwards to access
the entry field or the beginning of a list in the
central area.
Switching to the speller*
If the entry field is already open, you can switch
directly to entry via the speller by pushing the ro
tary pushbutton upwards again¢ page 128,
Speller for Letters/numbers.
On the map
Important: A map must be displayed
¢page 178, Fig. 159.
- To display the entry field*: Push the rotary
pushbutton upwards.
- To display the route: If route guidance is ac
tive, you can have the route displayed by push
ing the rotary pushbutton upwards
¢page 170.
- To zoom in/out of the map: Turn the rotary
pushbutton to the left/right to make the map
scale larger or smaller.
Adjusting the sound focus*
Important: The balance/fader option must be se
lected ¢ page 217. The cross hairs must be dis
played.
- To adjust the sound focus using the cross
hairs: The crosshairs can be moved horizontal
ly. Turn the rotary pushbutton to the left or
right. To move the crosshairs vertically, press
the rotary pushbutton. Turn the rotary push
button to the left or right. Press the rotary
pushbutton again to save the setting.
Operating the DVD main menu
Important: A video DVD must be playing
¢page 200.
- To select a menu option: Move the rotary push
button with joystick function up or down, or to
the left or right.
- To confirm your selection: Press the rotary
� pushbutton.
0
N
,.....
N
......
0
,.....
Vl
CX) Multi
Media Interface
G}) Note
Please note that the control buttons are the
other way around if Arabic is selected as the
menu language.
Calling up the selection/options menu with
the rotary pushbutton
Applies to: vehicles with joystick function
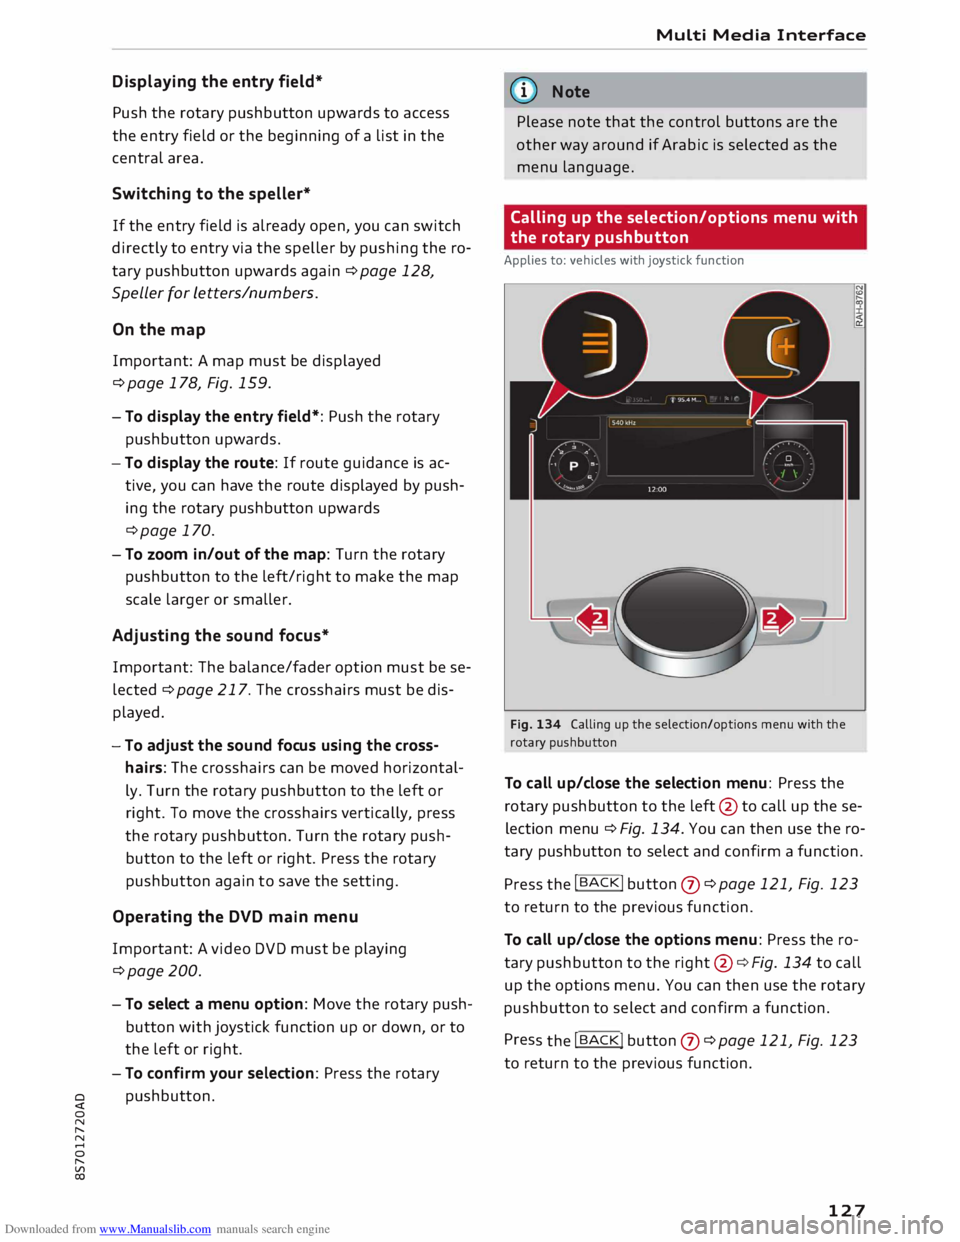
Fig. 134 Calling up the selection/options menu with the
rotary pushbutton
To call up/close the selection menu: Press the
rotary pushbutton to the left
@ to
call up the se
lection menu ¢ Fig. 134. You can then use the ro
tary pushbutton to select and confirm a function.
Press the !BACK!
button (J) ¢page
121, Fig. 123
to return to the previous function.
To call up/close the options menu: Press the ro
tary pushbutton to the right
@¢
Fig. 134 to call
up the options menu. You can then use the rotary
pushbutton to select and confirm a function.
Pres s the !BACK!
button
(J) ¢page
121, Fig. 123
to return to the previous function.
127
Page 131 of 306
Downloaded from www.Manualslib.com manuals search engine 0
N
,.....
N
....
0
,.....
Vl
CX) CD
@ ®
@
®
®
0
®
®
@
@
@ Symbol
/ marking
I LIST! or�
Entry field
Results list +
E
!!&? !
laoul
! 123!�ABC!
Character selection
•
Media Interface
Description
To switch to the results list.
The current entry is displayed.
Menu Language Arabic: A vertical line on the left/right side of the
cursor indicates where the next character will be inserted.
A list of suggestions for the letters already entered is displayed.
To switch from lower case to upper case letters and vice versa.
Menu Language Arabic: To show additional Arabic characters.
To open further speller options (e.g. Close speller, Clear entry field
or Switch to Cyrillic characters).
To display punctuation marks and special characters (e.g. hyphen or
full stop).
To display diacritics (e.g. a,�. n, o) or the Cyrillic alphabet.
Menu Language Arabic: To switch between Arabic and Latin charac-
ters.
To switch the speller from letters to numbers and vice versa
To enter a space in the entry field .
The character selected will be highlighted.
The entry suggestion* can be accepted by pushing the rotary push-
button upwards.
To delete the character to the left of the cursor.
Menu Language Arabic: Note the direction of writing.
Calling up the search function
Diacritics are not available for every letter. .,.
Select: !MENU
! button > the desired menu item
(e.g. Telephone) .
Search function
You can enter search terms in any order using
the search function.
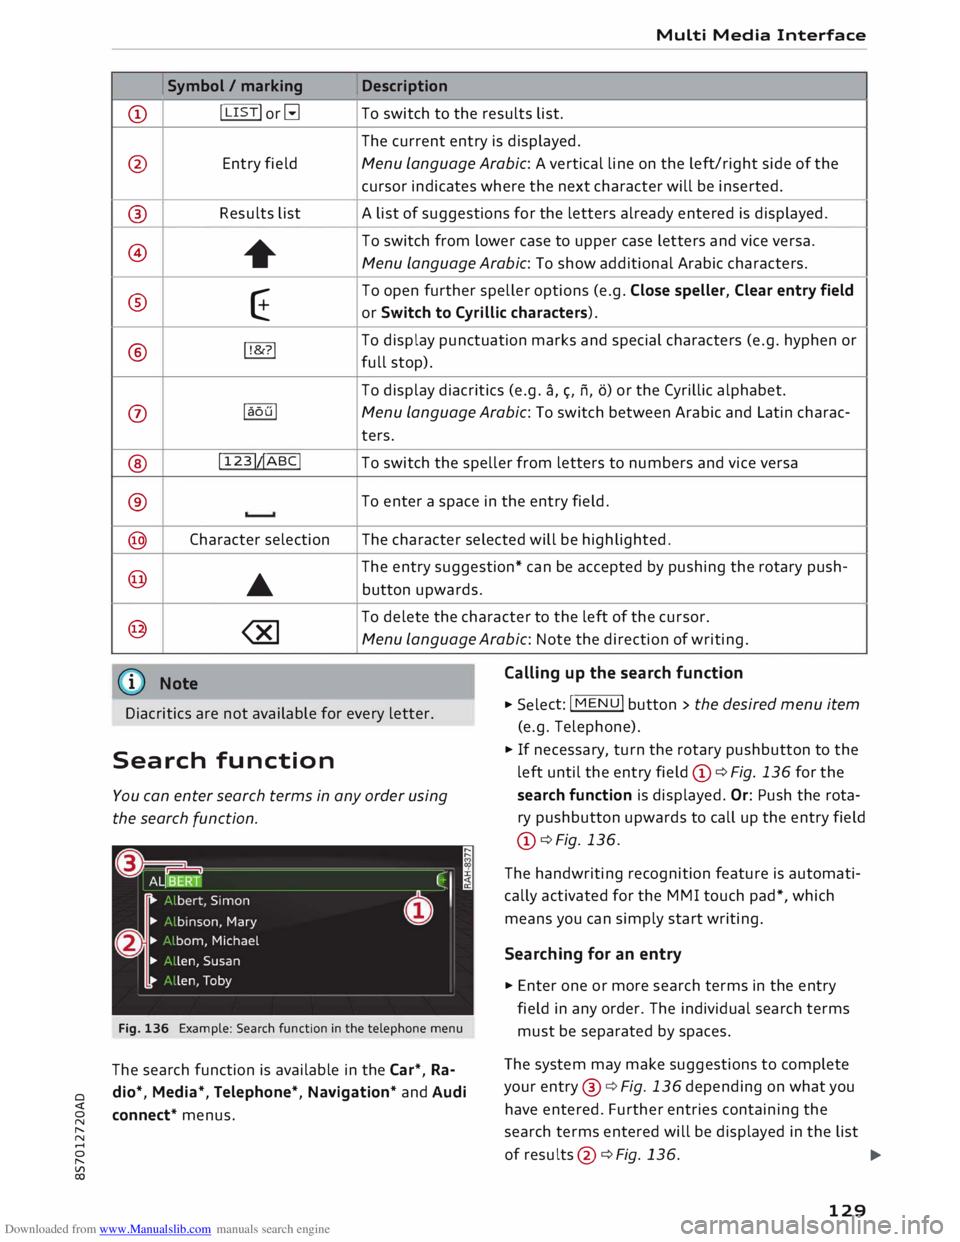
Fig. 136 Example: Search function in the telephone menu
The search function is available in the Car*, Ra
dio*, Media*, Telephone*, Navigation* and Audi
connect* menus. .,.
If necessary, turn the rotary pushbutton to the
left until the entry field CD¢ Fig. 136 for the
search function is displayed. Or: Push the rota
ry pushbutton upwards to call up the entry field
CD ¢ Fig. 136.
The handwriting recognition feature is automati
cally activated for the MMI touch pad*, which
means you can simply start writing.
Searching for an entry
.,. Enter one or more search terms in the entry
field in any order. The individual search terms
must be separated by spaces.
The system may make suggestions to complete
your entry @¢ Fig. 136 depending on what you
have entered. Further entries containing the
search terms entered will be displayed in the list
of results
@¢
Fig.136.
1)11,,
129
Page 139 of 306
Downloaded from www.Manualslib.com manuals search engine 0
N
,.....
N
......
0
,.....
Vl
CX) Speech
dialogue system
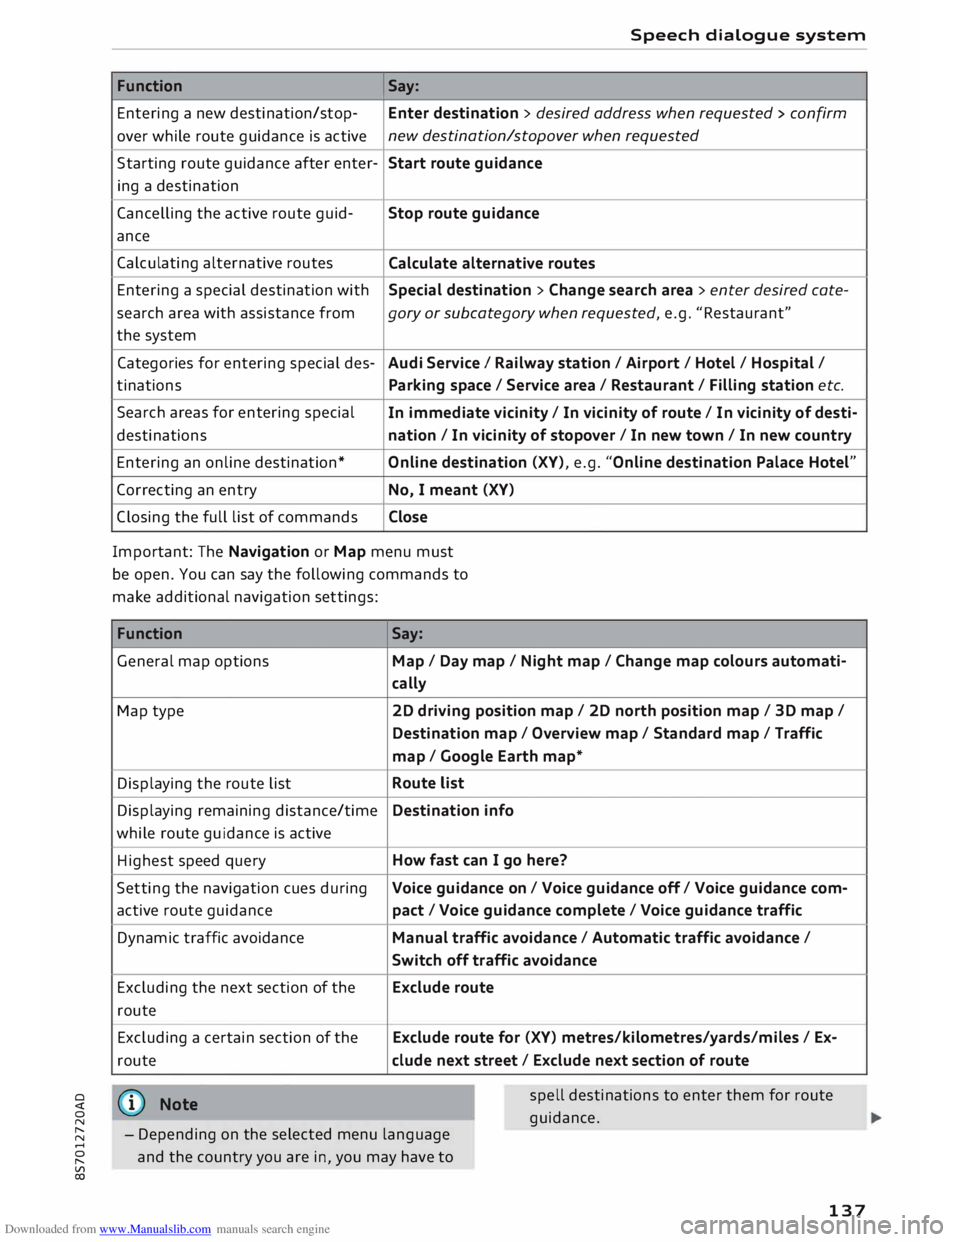
Function Say:
Entering a new destination/stop- Enter destination > desired address when requested > confirm
over while route guidance is active new
destination/stopover when requested
Starting route guidance after enter-
Start route guidance
ing a destination
Cancelling the active route guid-
Stop route guidance
ance
Calculating alternative routes
Calculate alternative routes
Entering a special destination with
Special destination > Change search area > enter desired cote-
se arch area with assistance from
gory or subcategory when requested, e.g. "Restaurant"
the system
Categories for entering special des-
Audi Service I Railway station/ Airport / Hotel / Hospital /
ti nations
Parking space/ Service area / Restaurant/ Filling station etc.
Search areas for entering special
In immediate vicinity/ In vicinity of route / In vicinity of desti-
destinations nation/ In vicinity of stopover / In new town/ In new country
Entering an online destination*
Online destination (XV), e.g. "Online destination Palace Hotel"
Correcting an entry
No, I meant (XV)
Closing the full list of commands Close
Important: The Navigation or Map menu must
be open. You can say the following commands to
make additional navigation settings:
Function
General map options
Map type
Displaying the route list
Displaying remaining distance/time
while route guidance is active
Highest speed query
Setting the navigation cues during
active route guidance
Dynamic traffic avoidance
Excluding the next section of the
route
Excluding a certain section of the
route
@ Note Say:
Map / Day map / Night map/ Change map colours automati-
cally
2D driving position map/ 2D north position map/ 3D map/
Destination map/ Overview map/ Standard map/ Traffic
map/ Google Earth map*
Route list
Destination info
How fast can I go here?
Voice guidance on/ Voice guidance off/ Voice guidance com-
pact / Voice guidance complete/ Voice guidance traffic
Manual traffic avoidance/ Automatic traffic avoidance /
Switch off traffic avoidance
Exclude route
Exclude route for (XV) metres/kilometres/yards/miles/ Ex-
elude next street / Exclude next section of route
spell destinations to enter them for route
guid ance.
- Depending on the selected menu language
and the country you are in, you may have to
137
Page 141 of 306
Downloaded from www.Manualslib.com manuals search engine CD
CAUTION
Please always observe the information ¢(0 in
Wi-Fi hotspot on page 166.
Natural commands
Applies to: vehicles with speech dialogue system Speech
dialogue system
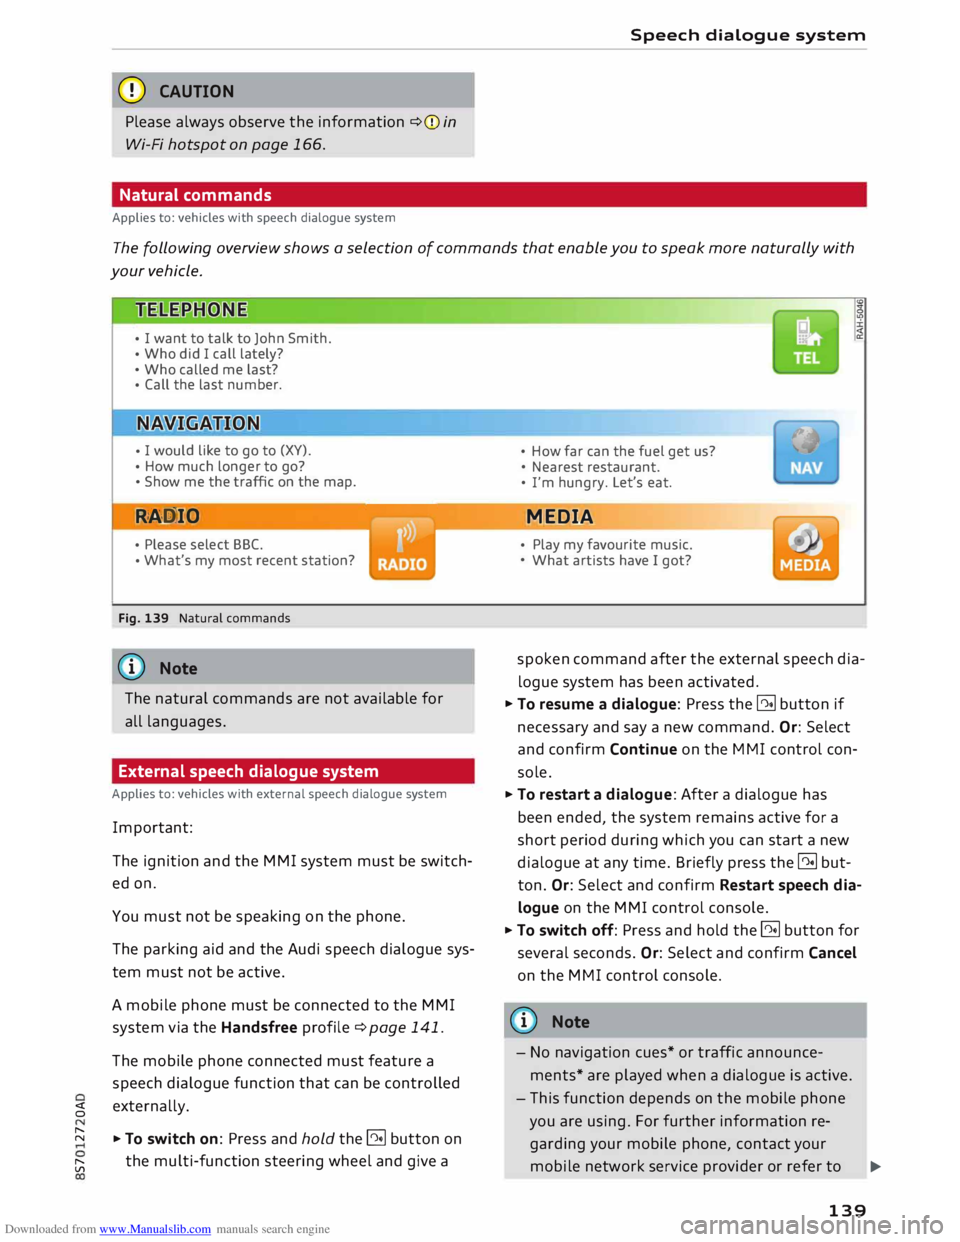
The following overview shows a selection of commands that enable you to speak more naturally with
your vehicle.
• I want to talk to John Smith.
• Who did I call lately?
• Who called me last?
• Call the last number.
• I
would like to go to (XY).
• How much longer to go?
• Show me the traffic on the map.
RAD IO
• Please select BBC.
• What's
my most recent station?
Fig. 139 Natural commands
ijj} Note
The natural commands are not available for
all languages.
External speech dialogue system
Applies to: vehicles with external speech dialogue system
Important: The ignition and the MMI system must be switch
ed on.
You must not be speaking on the phone.
The parking aid and the Audi speech dialogue sys
tem must not be active.
A mobile phone must be connected to the MMI
system via the Handsfree profile¢ page 141.
The mobile phone connected must feature a
speech dialogue function that can be controlled
� externally.
� � To switch on: Press and hold the@!l button on
[;:j the
multi-function steering wheel and give a •
How far can the fuel get us?
• Nearest restaurant.
• I'm hungry. Let's eat.
MEDIA
• Play my favourite music.
• What artists have I got?
spoken command after the external speech dia
logue system has been activated.
� To resume a dialogue: Press the @!l button if
necessary and say a new command. Or: Select
and confirm Continue on the MMI control con
sole.
� To restart a dialogue: After a dialogue has
been ended, the system remains active for a
short period during which you can start a new
dialogue at any time. Briefly press the @!l but
ton. Or: Select and confirm Restart speech dia
logue on the MMI control console.
� To switch off: Press and hold the @!l button for
several seconds. Or: Select and confirm Cancel
on the MMI control console.
@ Note
- No navigation cues* or traffic announce
ments* are played when a dialogue is active.
- This function depends on the mobile phone
you are using. For further information re
garding your mobile phone, contact your
mobile network service provider or refer to
..,_
139
Page 154 of 306
Downloaded from www.Manualslib.com manuals search engine Telephone
The
following options may be available depend
ing on which menu you have selected:
Storing an e-mail as a template
There are already ten e-mail templates stored on
the MMI. You can store up to ten additional tem
plates.
- Create an e-mail.
- Select and confirm Store as template.
Continue with last edited e-mail
You can continue with the e-mail you last edited.
Reply*
You can reply to an e-mail you have selected in
the Inbox.
Reply to all*
You can reply to all the recipients of an e-mail
you have selected in the Inbox.
Forward
You can forward an e-mail you have selected to
another recipient.
Delete this message*
You can delete an e-mail you have selected.
Read 1
>
You can have the MMI read an opened e-mail to
you.
E-mail settings*
Activate E-mail notifications to have a notifica
tion displayed when a new e-mail is received. An
envelope symbol� is displayed in the status line
of the infotainment display if there are any new
e-mails.
Connection manager
Refer to¢ page 213.
Telephone settings
Refer to ¢page 155.
l l
Not available in all languages.
152 (I))
Note
Messages deleted using the MMI are also au
tomatically deleted on the mobile phone con
nected.
Listening to voicemail
messages Applies to: vehicles with telephone
... Select: I MENU I button >Telephone > left con
trol button. Select and confirm Call list/Direc
tory/Favourites > Mailbox.
- To enter the mailbox number: Enter the num
ber desired. Select and confirm OK.
- To dial the mailbox number: Select and con
firm Mailbox.
(I)) Note
- This service must be set up and activated by
your mobile network service provider before
you can use it. For more information, con
tact your service provider.
- The mailbox number depends on your serv
ice provider.
Emergency call functions
Applies to: vehicles with telephone
... Select: !MENU! button> Telephone > left con
trol button > Enter number > enter emergency
number (e.g. 112) > OK.
A WARNING
- Since your telephone operates via radio
waves, a connection cannot be guaranteed
under all circumstances. Do not rely solely
on your telephone when a vital communica
tion (e.g. medical emergency) is involved.
- Always follow the directions of the emer
gency operators when making an emergency
call and do not end the call before you are
requested to do so.
Page 165 of 306
Downloaded from www.Manualslib.com manuals search engine Show
on map
You can have selected content displayed on the
map and use it for route guidance.
Read 1
)
You can have the MMI read out some types of
content.
Start route guidance
If an entry contains a location (e.g. in City
events), this can be used as a navigation destina
tion in the MMI.
Refresh
The content of the Audi connect service selected
is updated.
Change search area
The search area selected can be changed at any
time. For more information on search areas,
please refer to ¢ page 172, Entering a special
destination.
Cl osing an Audi connect service
You can close an Audi connect service at any time
and go back to the overview, regardless of which
function you have chosen ¢ Fig. 152.
Parking information
Applies to: vehicles with Audi connect
Information on places to park and parking fees in
the search area selected (e.g. In immediate vi
cinity).
� Select and confirm Parking information.
You can use the right control button to sort the
car parks by distance or by availability.
Travel information
Applies to: vehicles with Audi connect
Information on landmarks in the search area se
lected.
� Select an confirm a landmark to have details
� displayed.
0
N
,.....
N
......
0
,.....
� 1}
Not available in all languages. Audi
connect
Fuel prices
Applies to: vehicles with Audi connect
Information on filling stations with the cheapest
fuel prices for your vehicle in the search area se
lected.
� Select and confirm Fuel prices.
You can use the right control button to sort the
fuel prices by price or by distance.
Weather
Applies to: vehicles with Audi connect
Information on the current weather and weather
forecasts for the search area selected (e.g. In im
mediate vicinity).
� Select and confirm Weather.
Flight information
Applies to: vehicles with Audi connect
Information on flights and current arrival/depar
ture times in the search area selected.
� Select and confirm Flight information.
You can use the right control button to select the
information you require.
City events
Applies to: vehicles with Audi connect
Information on events of different categories in
the search area selected.
� Select and confirm City events > left control
button > a category.
Online news
Applies to: vehicles with Audi connect
With this service, you can call up the latest head
lines from your preferred news providers in the
MMI.
Important: You must have subscribed to news
feeds via your myAudi account and your vehicle
must be connected to myAudi ¢page 162.
..,_
163
Page 207 of 306
Downloaded from www.Manualslib.com manuals search engine 0
N
,.....
N Display
DVD menu
To select a menu option: Select and confirm a
menu option. Or: Move your finger on the MMI
touch pad* and press the rotary pushbutton.
Audio track1
)
You can adjust the audio track (language and au
dio format) manually. It depends on the video
DVD whether different Languages and audio for
mats are available.
Subtitles 1
>
You can select subtitles manually. It depends on
the video DVD whether different languages are
available.
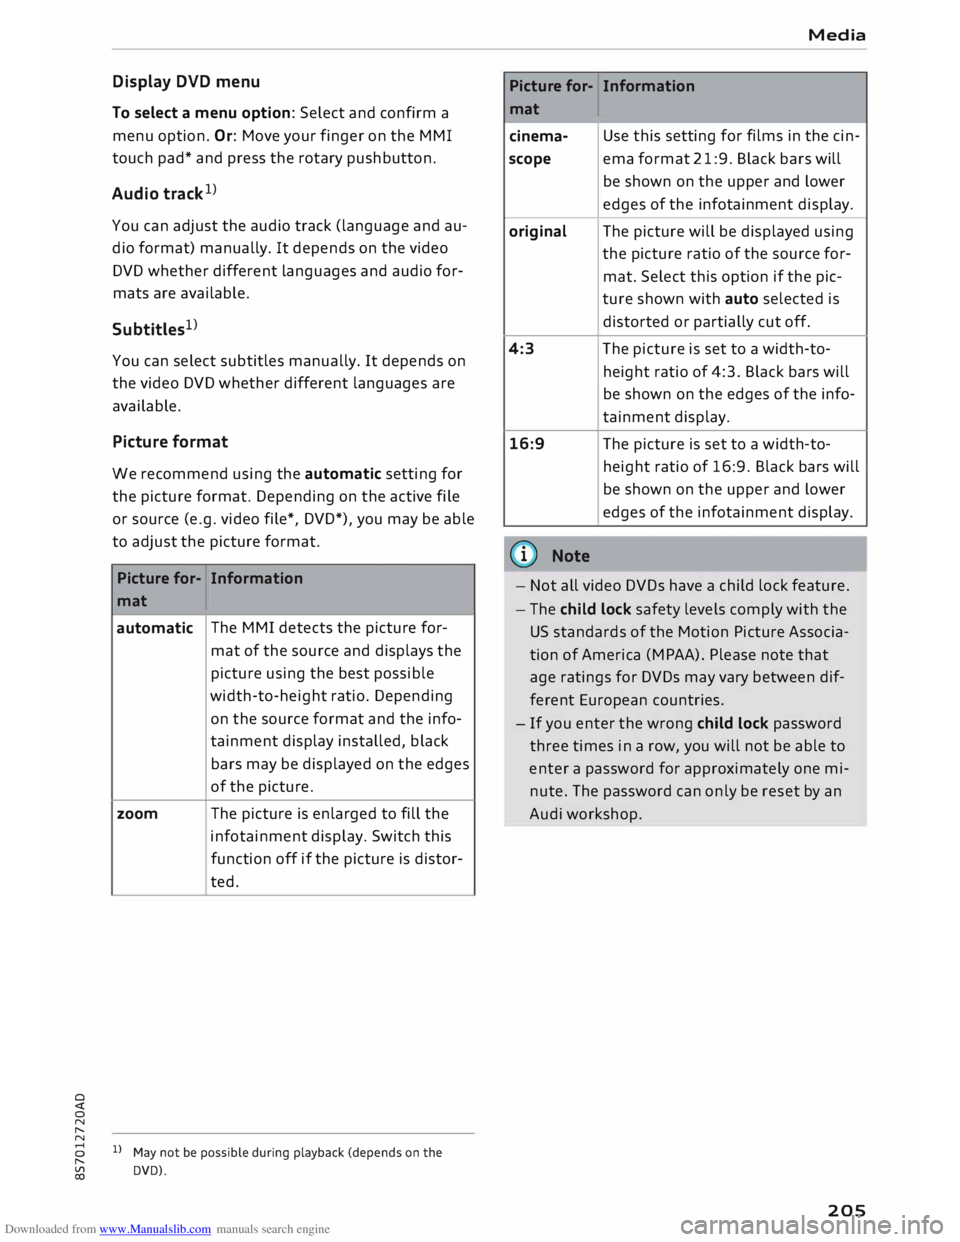
Picture format
We recommend using the automatic setting for
the picture format. Depending on the active file
or source (e.g. video file*, DVD*), you may be able
to adjust the picture format.
Picture for-Information
mat
automatic The
MMI detects the picture for-
mat of the source and displays the
picture using the best possible
width-to-height ratio. Depending
on the source format and the info-
tainment display installed, black
bars may be displayed on the edges
of the picture.
zoom The picture is enlarged to fill the
infotainment display. Switch this
function off if the picture is distor-
ted.
8 1}May not be possible during playback (depends on the
,.....
� DVD). Media
Picture for-
Information
mat
cinema- Use
this setting for films in the cin-
scope ema format 21:9. Black bars will
be shown on the upper and Lower
edges of the infotainment display.
original The picture will be displayed using
the picture ratio of the source for-
mat. Select this option if the pie-
ture shown with auto selected is
distorted or partially cut off.
4:3 The
picture is set to a width-to-
height ratio of 4:3. Black bars will
be shown on the edges of the info-
tainment display.
16:9 The
picture is set to a width-to-
height ratio of 16:9. Black bars will
be shown on the upper and Lower
edges of the infotainment display.
(© Note
- Not all video DVDs have a child lock feature.
- The child lock safety levels comply with the
US standards of the Motion Picture Associa
tion of America (MPAA). Please note that
age ratings for DVDs may vary between dif
ferent European countries.
- If you enter the wrong child Lock password
three times in a row, you will not be able to
enter a password for approximately one mi
nute. The password can only be reset by an
Audi workshop.
205
Page 208 of 306
Downloaded from www.Manualslib.com manuals search engine Media
Supported media and file formats
Overview
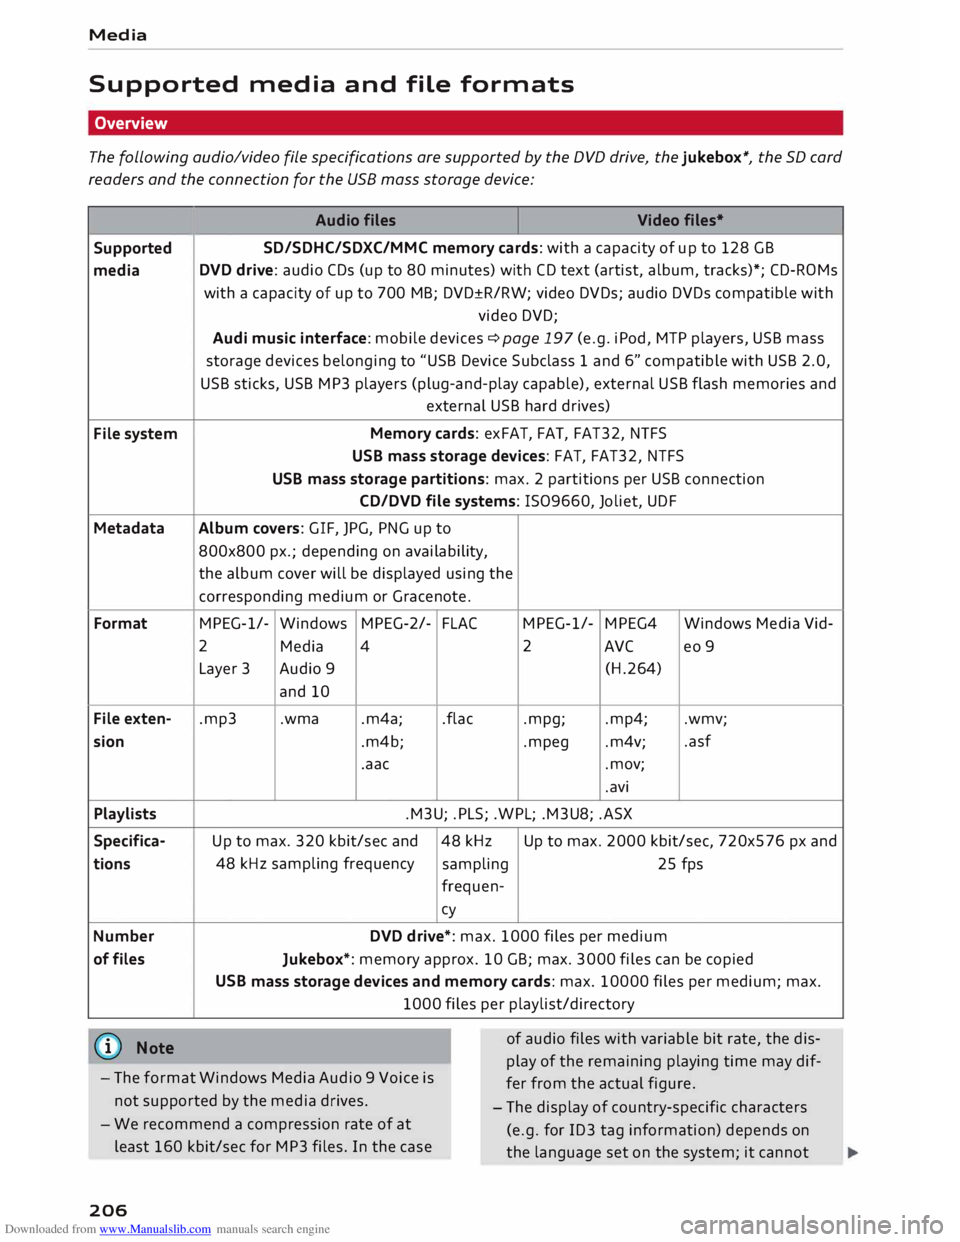
The following audio/video file specifications are supported by the DVD drive, the jukebox*, the SD card
readers and the connection for the USB mass storage device:
Audio files
Video files•
Supported SD/SDHC/SDXC/MMC
memory cards: with a capacity of up to 128 GB
media DVD
drive: audio CDs (up to 80 minutes) with CD text (artist, album, tracks)*; CD-ROMs
with a capacity of up to 700 MB; DVD±R/RW; video DVDs; audio DVDs compatible with
video DVD;
Audi music interface: mobile devices �page 197 (e.g. iPod, MTP players, USB mass
storage devices belonging to "USB Device Subclass 1 and 6" compatible with USB 2.0,
USB sticks, USB MP3 players (plug-and-play capable), external USB flash memories and
external USB hard drives)
File system Memory
cards: exFAT, FAT, FAT32, NTFS
USB mass storage devices: FAT, FAT32, NTFS
USB mass storage partitions: max. 2 partitions per USB connection
CD/DVD file systems: !509660, Joliet, UDF
Metadata Album covers:
GIF, JPG, PNG up to
800x800 px.; depending on availability,
the album cover will be displayed using the
corresponding medium or Gracenote.
Format MPEG-1/-
Windows MPEG-2/-
FLA( MPEG-1/-
MPEG4
Windows Media Vid-
2 Media 4 2
AVC
eo 9
Layer 3 Audio 9
(H.264)
and 10
File exten- .mp3 .wma
.m4a; .flac
.mpg; .mp4;
.wmv;
sion .m4b; .mpeg .m4v; .asf
.aac .mov;
.avi
Playlists .M3U; .PLS; .WPL; .M3U8; .ASX
Specifica- Up to max. 320 kbit/sec and 48 kHz Up
to max. 2000 kbit/sec, 720x576 px and
tions 48
kHz sampling frequency
sampling 25 fps
frequen-cy
Number DVD drive*: max. 1000 files per medium
of files
Jukebox*: memory approx. 10 GB; max. 3000 files can be copied
USB mass storage devices and memory cards: max. 10000 files per medium; max.
1000 files per playlist/directory
(@ Note
- The format Windows Media Audio 9 Voice is
not supported by the media drives. of
audio files with variable bit rate, the dis
play of the remaining playing time may dif
fer from the actual figure.
- The display of country-specific characters
(e.g. for ID3 tag information) depends on
the language set on the system; it cannot
-
We recommend a compression rate of at
least 160 kbit/sec for MP3 files. In the case
206