roof AUDI TT ROADSTER 2016 Owners Manual
[x] Cancel search | Manufacturer: AUDI, Model Year: 2016, Model line: TT ROADSTER, Model: AUDI TT ROADSTER 2016Pages: 306, PDF Size: 31.82 MB
Page 4 of 306
Downloaded from www.Manualslib.com manuals search engine Table
of Contents
Notes on this Owner's Manual 5
Quick reference ................. . 6
6
6
6
6
6
6
6
7
7
FAQs
............................. .
Before you set off ................... .
Breakdowns and emergencies ......... .
Useful functions .................... .
Using the infotainment system ........ .
Communication .................... .
Navigation ........................ .
Entertainment ..................... .
Tips and tricks ..................... .
Controls and displays . . . . . . . . . . . . 8
View of cockpit . . . . . . . . . . . . . . . . . . .
8
Controls at a glance . . . . . . . . . . . . . . . . . .
8
Instruments and warning/
indicator lamps . . . . . . . . . . . . . . . . . . 10
Instruments . . . . . . . . . . . . . . . . . . . . . . . . 10
Warning and indicator lamps . . . . . . . . . . 11
Driver information system . . . . . . 20
Overview . . . . . . . . . . . . . . . . . . . . . . . . . . .
20
Multi-function steering wheel plus...... 21
Multi-function steering wheel . . . . . . . . . . 23
Rev counter . . . . . . . . . . . . . . . . . . . . . . . . 24
Mileage recorder . . . . . . . . . . . . . . . . . . . .
24
On-board computer . . . . . . . . . . . . . . . . . . 25
Sport view . . . . . . . . . . . . . . . . . . . . . . . . . 25
Setting off. . . . . . . . . . . . . . . . . . . . . . . .
27
Doors and windows . . . . . . . . . . . . . . 27
Central locking system . . . . . . . . . . . . . . .
27
Boot lid . . . . . . . . . . . . . . . . . . . . . . . . . . . .
33
Electric windows ................... .
Garage door opener (Homelink) ....... . 34
35
Soft top (folding roof) .......... .
39
39
41
41
Soft
top .......................... .
Windbreak ........................ .
Manual operation of the soft top
Lights and vision ................ .
44
44
47
2 Exterior
lights ..................... .
Interior lights ...................... .
Clear vision . . . . . . . . . . . . . . . . . . . . . . . . .
48 Windscreen
wipers . . . . . . . . . . . . . . . . . .
50
Digital compass . . . . . . . . . . . . . . . . . . . . . 52
Seats and storage . . . . . . . . . . . . . . . .
54
General notes . . . . . . . . . . . . . . . . . . . . . . .
54
Front seats . . . . . . . . . . . . . . . . . . . . . . . . .
54
Ashtray . . . . . . . . . . . . . . . . . . . . . . . . . . . . 56
Cigarette lighter and electrical socket . . . 56
Storage . . . . . . . . . . . . . . . . . . . . . . . . . . . . 57
Luggage compartment . . . . . . . . . . . . . . . 58
Heating and cooling . . . . . . . . . . . . . 60
Air conditioner . . . . . . . . . . . . . . . . . . . . . .
60
Driving ............................ 66
General notes . . . . . . . . . . . . . . . . . . . . . . .
66
Steering . . . . . . . . . . . . . . . . . . . . . . . . . . .
68
Starting and stopping the engine . . . . . . .
68
Start/stop system . . . . . . . . . . . . . . . . . . .
71
Electro-mechanical parking brake. . . . . . .
74
Moving off. . . . . . . . . . . . . . . . . . . . . . . . .
75
Automatic gearbox . . . . . . . . . . . . . . . . . .
76
Driver assistance . . . . . . . . . . . . . . . . . 86
Driver assist
systems . . . . . . . . . . . . 86
Speed warning function . . . . . . . . . . . . . . .
86
Cruise control system . . . . . . . . . . . . . . . . 86
Speed limiter . . . . . . . . . . . . . . . . . . . . . . .
88
Camera-based traffic sign recognition . . .
90
Audi active Lane assist (Lane departure
warning feature) . . . . . . . . . . . . . . . . . . . .
92
Lap timer . . . . . . . . . . . . . . . . . . . . . . . . . .
94
Sport displays . . . . . . . . . . . . . . . . . . . . . . .
96
Audi side assist (lane change assist
feature) . . . . . . . . . . . . . . . . . . . . . . . . . . .
97
Audi drive select (vehicle set-up
functions) . . . . . . . . . . . . . . . . . . . . . . . . . . 100
Parking aids . . . . . . . . . . . . . . . . . . . . . . 103
General notes . . . . . . . . . . . . . . . . . . . . . . . 103
Rear parking aid . . . . . . . . . . . . . . . . . . . . .
104
Parking system plus . . . . . . . . . . . . . . . . . .
104
Reversing camera . . . . . . . . . . . . . . . . . . . .
106
Park assist with 360°
display . . . . . . . . . .
108
Page 41 of 306
Downloaded from www.Manualslib.com manuals search engine 0
N
,.....
N
......
0
,.....
Vl
CX) Soft
top (folding roof)
Soft top
General notes
The soft top opens and closes automatically.
When the top opens, it folds away completely in
to the storage box. The soft top can be opened or
closed at a speed of up to SO km/h.
In normal conditions the soft top is windproof
and waterproof. In extremely bad weather (such
as torrential or continuous rain), a few droplets
of water may possibly form inside the car. This is
quite normal, and no cause for concern.
To preserve the appearance of the soft top and
keep it waterproof, please follow the instructions
for cleaning and care ¢page 263, Care of vehi
cle and cleaning. You should also note the fol
lowing points:
- Open and stow the soft top only when it is
clean and dry. Pressure creases can form if the
soft top is stowed when damp, and mildew or
other damage can occur if left for long periods.
To avoid scratching or damaging the soft top,
do not use sharp objects to remove ice and
snow. A normal ice scraper can be used to clear
the rear window.
- Do not leave the soft top open for weeks at a
time to prevent any discolouration in the folds
of the fabric.
- Do not open the soft top at temperatures be
low O 0
C. The fabric loses its elasticity at sub
zero temperatures.
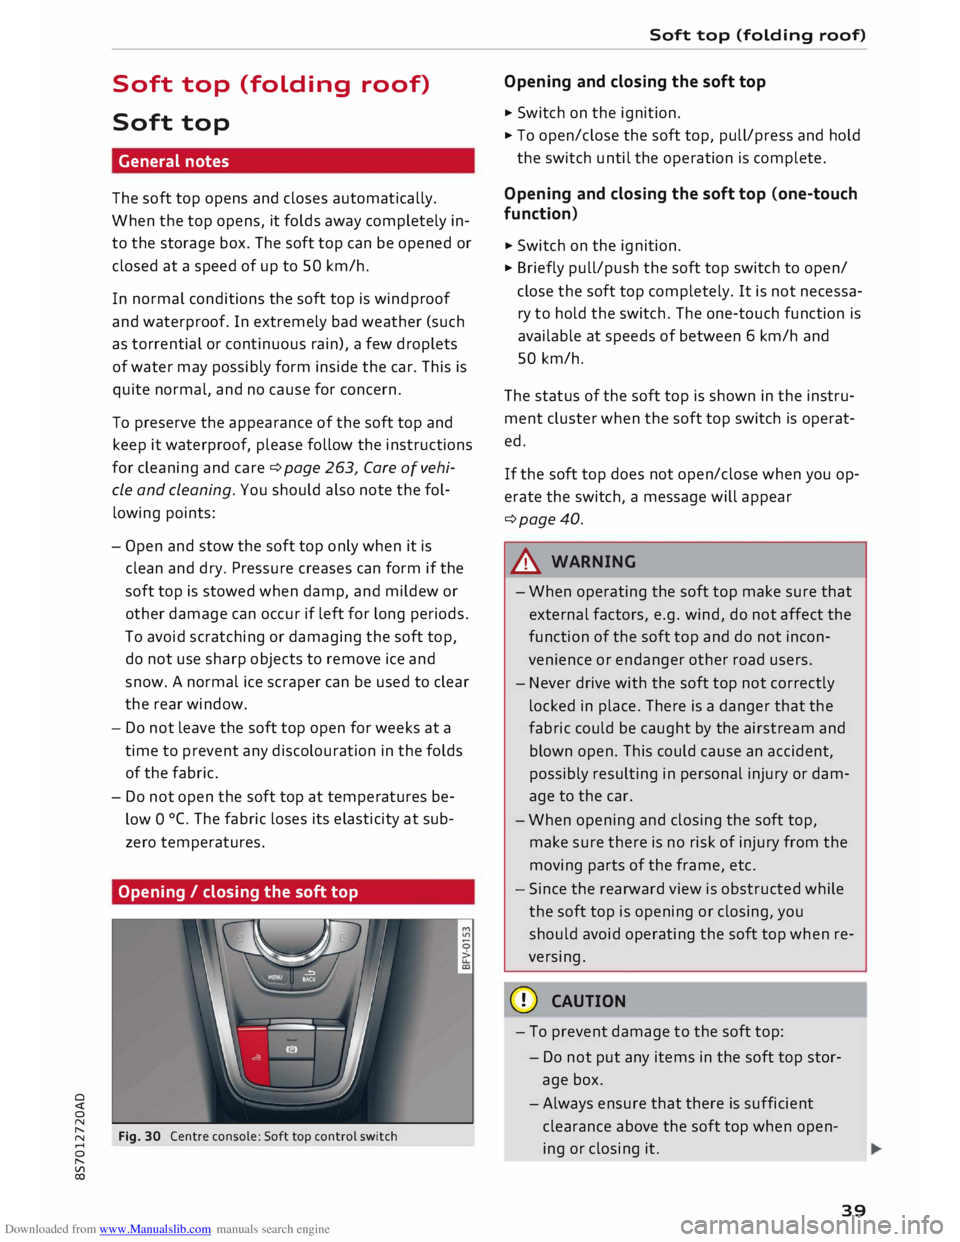
Opening / closing the soft top
Fig. 30 Centre console: Soft top control switch Soft
top (folding roof)
Opening and closing the soft top
� Switch on the ignition.
� To open/close the soft top, pull/press and hold
the switch until the operation is complete.
Opening and closing the soft top (one-touch
function)
� Switch on the ignition.
� Briefly pull/push the soft top switch to open/
close the soft top completely. It is not necessa
ry to hold the switch. The one-touch function is
available at speeds of between 6 km/h and
SO km/h.
The status of the soft top is shown in the instru
ment cluster when the soft top switch is operat
ed.
If the soft top does not open/close when you op
erate the switch, a message will appear
¢page 40.
A WARNING
- When operating the soft top make sure that
external factors, e.g. wind, do not affect the
function of the soft top and do not incon
venience or endanger other road users.
- Never drive with the soft top not correctly
locked in place. There is a danger that the
fabric could be caught by the airstream and
blown open. This could cause an accident,
possibly resulting in personal injury or dam
age to the car.
- When opening and closing the soft top,
make sure there is no risk of injury from the
moving parts of the frame, etc.
- Since the rearward view is obstructed while
the soft top is opening or closing, you
should avoid operating the soft top when re
versing.
CD CAUTION
- To prevent damage to the soft top:
- Do not put any items in the soft top stor-
age box.
- Always ensure that there is sufficient
clearance above the soft top when open
ing or closing it .
39
Page 42 of 306
Downloaded from www.Manualslib.com manuals search engine Soft
top (folding roof)
� Note
- To avoid draining the vehicle battery, do not
operate the soft top repeatedly with the en
gine switched off.
-A message will be displayed in the instru
ment cluster if a soft top malfunction oc
curs ¢ page 40.
- The soft top can also be operated manually
in the event of a malfunction ¢page 41,
Manual operation of the soft top. The cause
of the fault should be traced and rectified
by a qualified workshop as soon as possible.
- If you park the car with the soft top open,
remember that this leaves the interior ex
posed to intruders and to potential damage
in sudden adverse weather. Lock any be
longings you leave behind in the luggage
compartment. Close the soft top before you
leave the vehicle unattended.
- The windows in the doors are automatically
lowered slightly while the soft top is open
ing/closing.
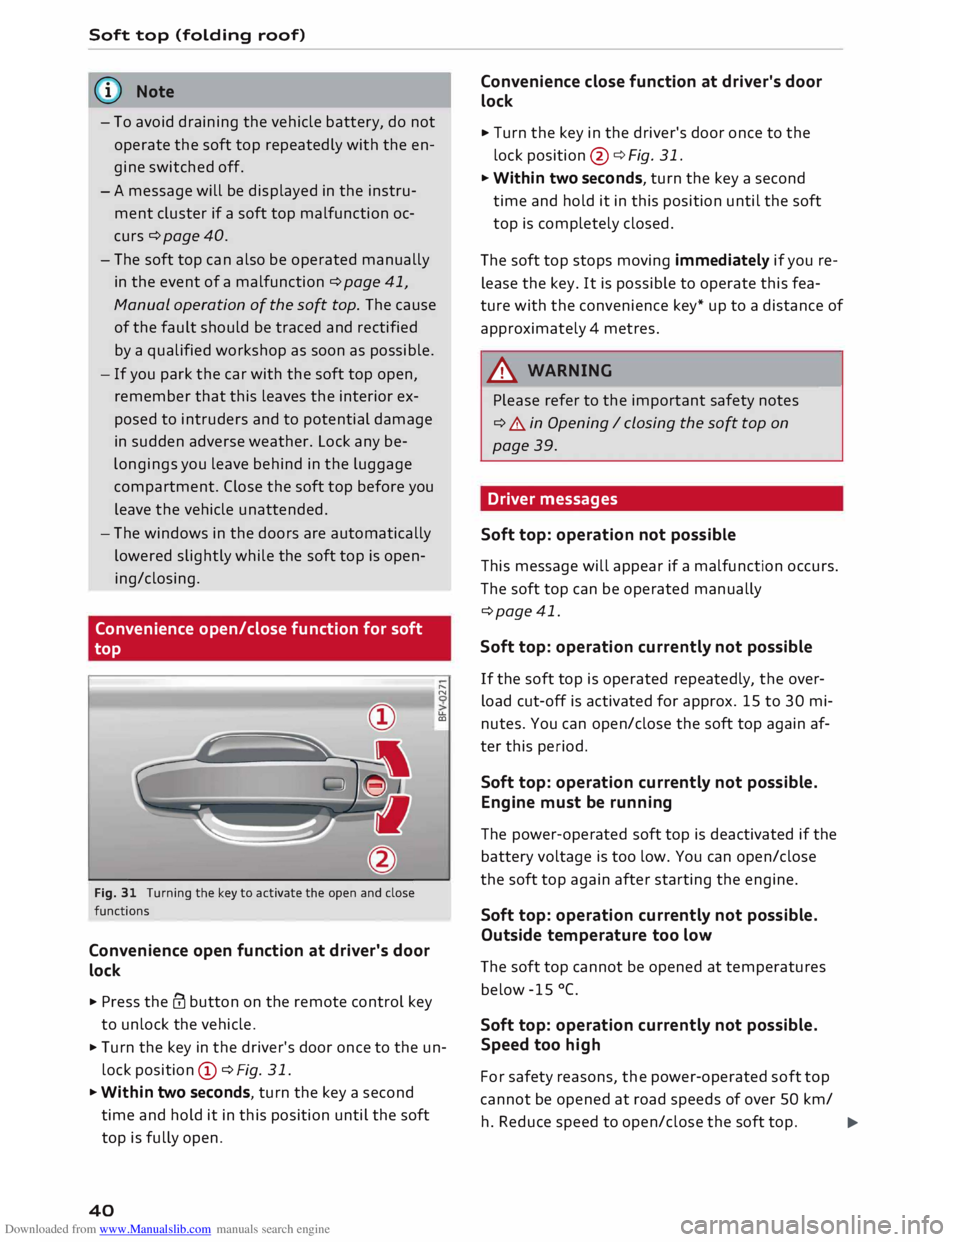
Convenience open/close function for soft
top
Fig. 31 Turning the key to activate the open and close
functions
Convenience open function at driver's door
lock
.. Press the@ button on the remote control key
to unlock the vehicle. .....
N
u..
a:,
.. Turn the key in the driver's door once to the un
lock position CD ¢Fig. 31.
.. Within two seconds, turn the key a second
time and hold it in this position until the soft
top is fully open.
40 Convenience
close function at driver's door
lock
.. Turn the key in the driver's door once to the
lock position @¢ Fig. 31.
.. Within two seconds, turn the key a second
time and hold it in this position until the soft
top is completely closed.
The soft top stops moving immediately if you re
lease the key. It is possible to operate this fea
ture with the convenience key* up to a distance of
approximately 4 metres.
A WARNING
Please refer to the important safety notes
¢ A in Opening I closing the soft top on
page 39.
Driver messages
Soft top: operation not possible -
This message will appear if a malfunction occurs.
The soft top can be operated manually
¢page 41.
Soft top: operation currently not possible
If the soft top is operated repeatedly, the over
load cut-off is activated for approx. 15 to 30 mi
nutes. You can open/close the soft top again af
ter this period.
Soft top: operation currently not possible.
Engine must be running
The power-operated soft top is deactivated if the
battery voltage is too low. You can open/close
the soft top again after starting the engine.
Soft top: operation currently not possible.
Outside temperature too low
The soft top cannot be opened at temperatures
below -15 °C.
Soft top: operation currently not possible.
Speed too high
For safety reasons, the power-operated soft top
cannot be opened at road speeds of over 50 km/
h. Reduce speed to open/close the soft top.
�
Page 43 of 306
Downloaded from www.Manualslib.com manuals search engine 0
N
,.....
N
....
0
,.....
Vl
CX) Soft
top: not secure. Speed too high
This message will appear if you exceed a speed of
SO km/h while the soft top is opening or closing.
Reduce speed and open or close the soft top
again.
Soft top: fault. You can continue driving
(limited functionality). See owner's manual
This message will appear if a system malfunction
occurs. Try to open or close the soft top again. If
the message still appears, drive to a qualified
workshop (but do not exceed SO km/h) and have
the fault rectified.
,8. WARNING
Never drive with the soft top not correctly
Locked in place. There is a danger that the
fabric could be caught by the airstream and
blown open. This could cause an accident,
possibly resulting in personal injury or dam
age to the car.
Windbreak
Applies to: vehicles with windbreak
The windbreak reduces draughts inside the vehi
cle for greater comfort when driving with the
soft top open.
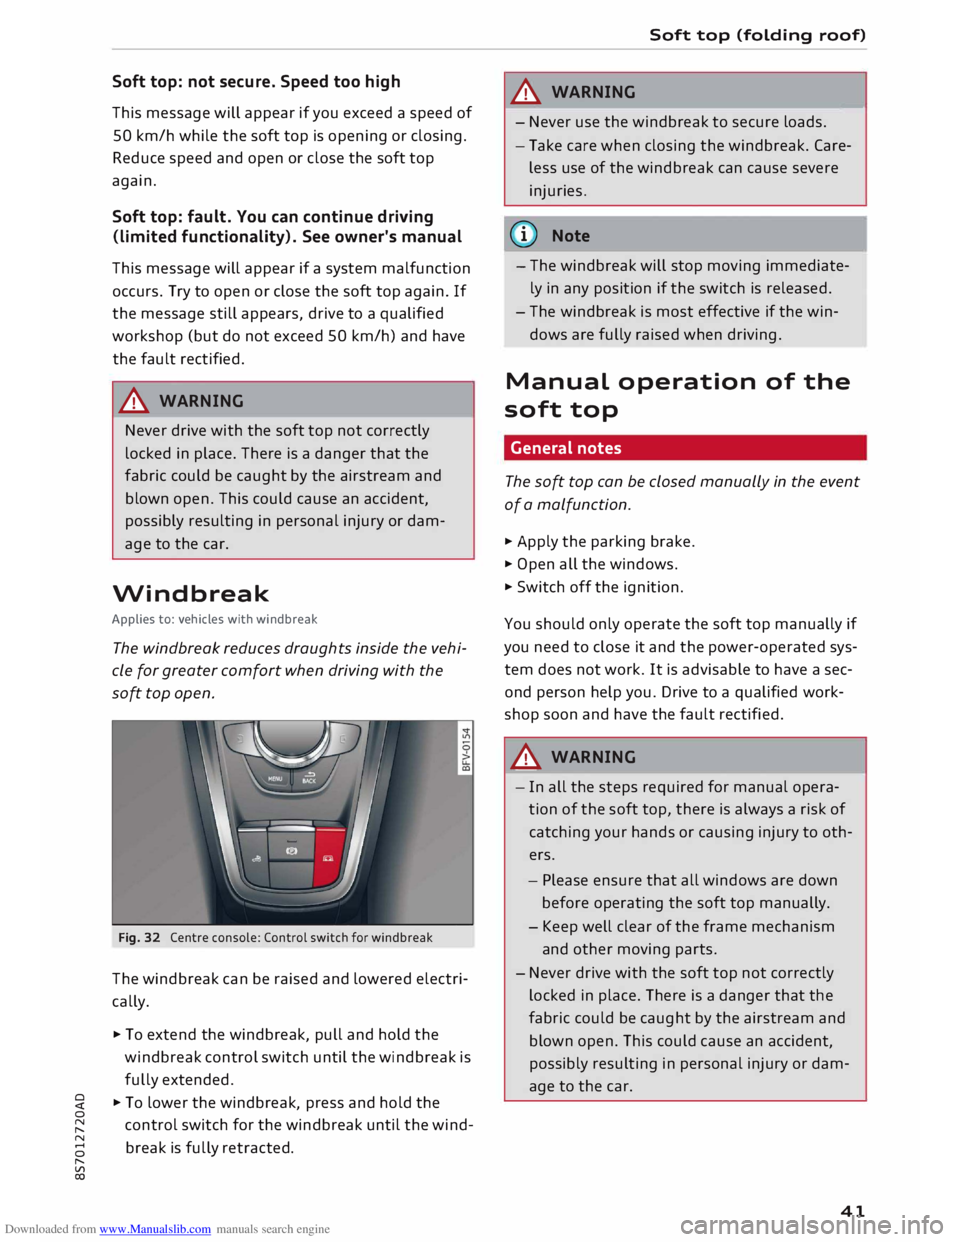
Fig. 32 Centre console: Control switch for windbreak
The windbreak can be raised and Lowered electri
cally.
""To extend the windbreak, pull and hold the
windbreak control switch until the windbreak is
fully extended.
""To Lower the windbreak, press and hold the
control switch for the windbreak until the wind
break is fully retracted . Soft
top (folding roof)
,8. WARNING
-
- Never use the windbreak to secure Loads.
- Take care when closing the windbreak. Care-
less use of the windbreak can cause severe
injuries.
{(D) Note
- The windbreak will stop moving immediate
ly in any position if the switch is released.
- The windbreak is most effective if the win
dows are fully raised when driving.
Manual operation of the
soft top
General notes
The soft top can be closed manually in the event
of a malfunction.
""Apply the parking brake.
"" Open all the windows.
"" Switch off the ignition.
You should only operate the soft top manually if
you need to close it and the power-operated sys
tem does not work. It is advisable to have a sec
ond person help you. Drive to a qualified work
shop soon and have the fault rectified.
,8. WARNING
- In all the steps required for manual opera
tion of the soft top, there is always a risk of
catching your hands or causing injury tooth
ers.
- Please ensure that all windows are down
before operating the soft top manually.
- Keep well clear of the frame mechanism
and other moving parts.
- Never drive with the soft top not correctly
Locked in place. There is a danger that the
fabric could be caught by the airstream and
blown open. This could cause an accident,
possibly resulting in personal injury or dam
age to the car.
41
Page 44 of 306
Downloaded from www.Manualslib.com manuals search engine Soft
top (folding roof)
Step 1: Raising the covers
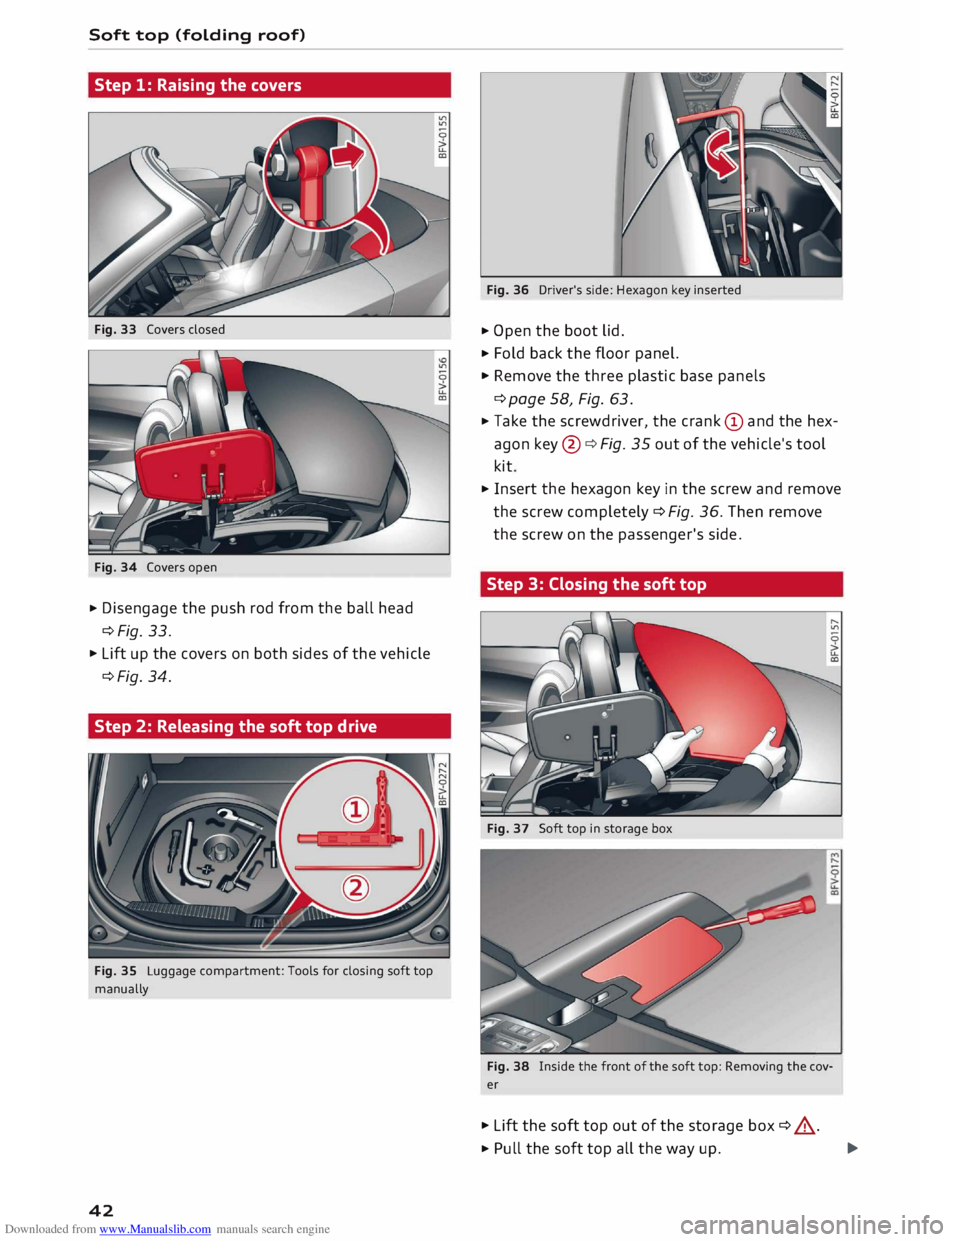
Fig. 33 Covers closed
Fig. 34 Covers open
.., Disengage the push rod from the ball head
¢Fig. 33 .
.., Lift up the covers on both sides of the vehicle
¢Fig. 34.
Step 2: Releasing the soft top drive
Fig. 35 Luggage compartment: Tools for closing soft top
manually
42 Fig.
36 Driver's side: Hexagon key inserted
.., Open the boot lid.
.., Fold back the floor panel.
.., Remove the three plastic base panels
¢ page 58, Fig. 63 .
.., Take the screwdriver, the crank (D and the hex
agon key@¢ Fig. 35 out of the vehicle's tool
kit
.., Insert the hexagon key in the screw and remove
the screw completely¢ Fig. 36. Then remove
the screw on the passenger's side.
Step 3: Closing the soft top
Fig. 37 Soft top in storage box
Fig. 38 Inside the front of the soft top: Removing the cov
er
.., Lift the soft top out of the storage box ¢ ,&. .
.., Pull the soft top all the way up.
.,..
Page 45 of 306
Downloaded from www.Manualslib.com manuals search engine 0
N
,.....
N
......
0
,.....
Vl
CX) ...
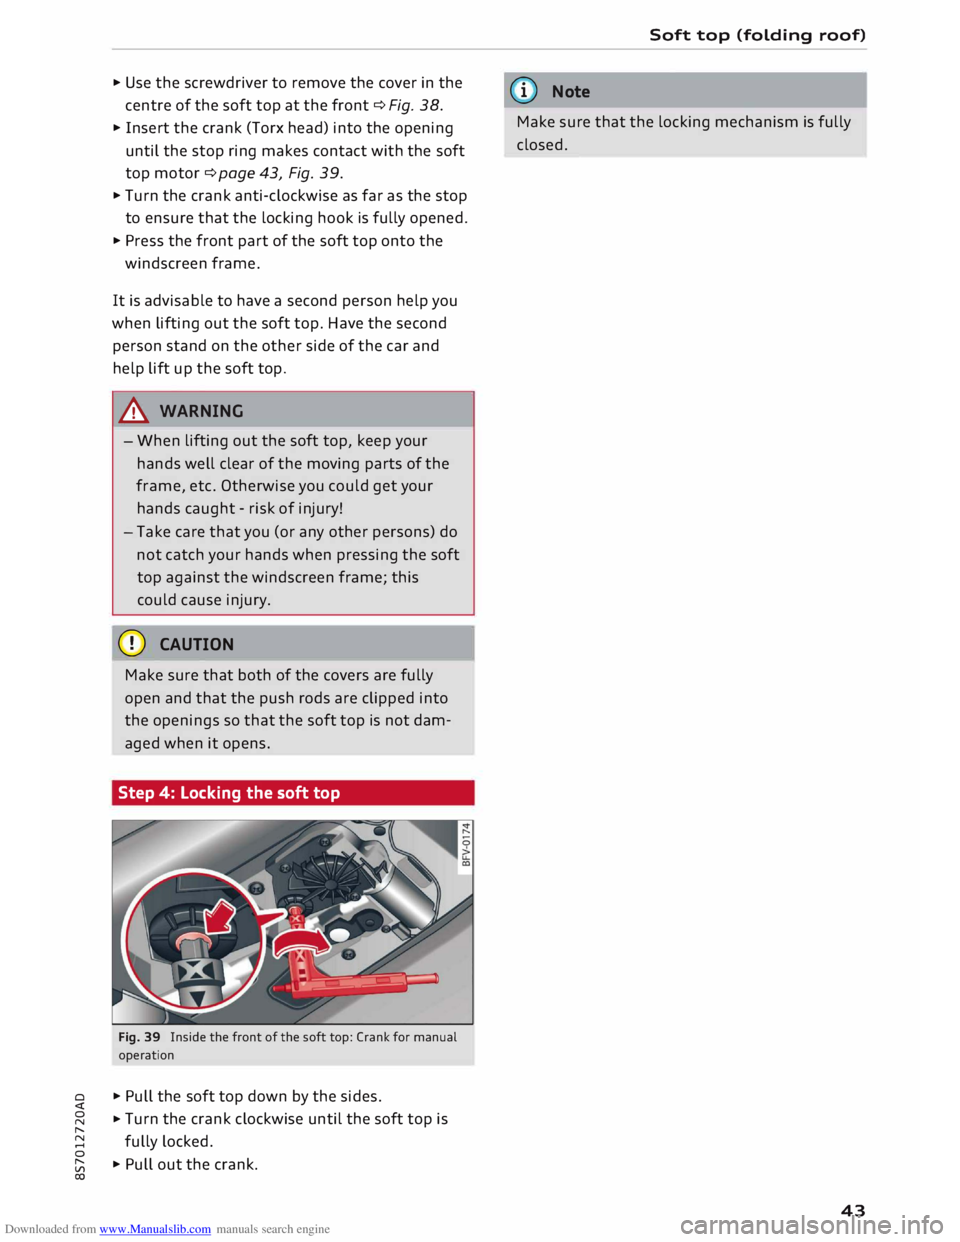
Use the screwdriver to remove the cover in the
centre of the soft top at the front ¢ Fig. 38.
... Insert the crank (Torx head) into the opening
until the stop ring makes contact with the soft
top motor ¢ page 43, Fig. 39 .
... Turn the crank anti-clockwise as far as the stop
to ensure that the locking hook is fully opened .
... Press the front part of the soft top onto the
windscreen frame.
It is advisable to have a second person help you
when lifting out the soft top. Have the second
person stand on the other side of the car and
help lift up the soft top.
& WARNING
- When lifting out the soft top, keep your
hands well clear of the moving parts of the
frame, etc. Otherwise you could get your
hands caught -risk of injury!
- Take care that you (or any other persons) do
not catch your hands when pressing the soft
top against the windscreen frame; this
could cause injury.
CD CAUTION
Make sure that both of the covers are fully
open and that the push rods are clipped into
the openings so that the soft top is not dam
aged when it opens.
Step 4: Locking the soft top
Fig. 39 Inside the front of the soft top: Crank for manual
operation
... Pull the soft top down by the sides.
... Turn
the crank clockwise until the soft top is
fully locked.
... Pull out the crank. Soft
top (folding roof)
ijj) Note
Make sure that the locking mechanism is fully
closed.
43
Page 159 of 306
Downloaded from www.Manualslib.com manuals search engine 0
N
,.....
N
......
0
,.....
Vl
CX) Export
contacts
Refer to ¢page 154, Importing/exporting con
tacts.
Download directory
To update the contacts in the MMI, you can
download the contacts from your mobile phone
manu ally. Depending on the mobile phone you
are using, the Bluetooth connection may have to
be disconnected and re-established before you
can update the contacts.
Hiding contacts without a number
If this function is switched on� and if no num
ber has been stored for a contact, the contact is
displayed greyed out in the direc tory.
Seat belt microphone
Applies to: vehicles with seat belt microphone
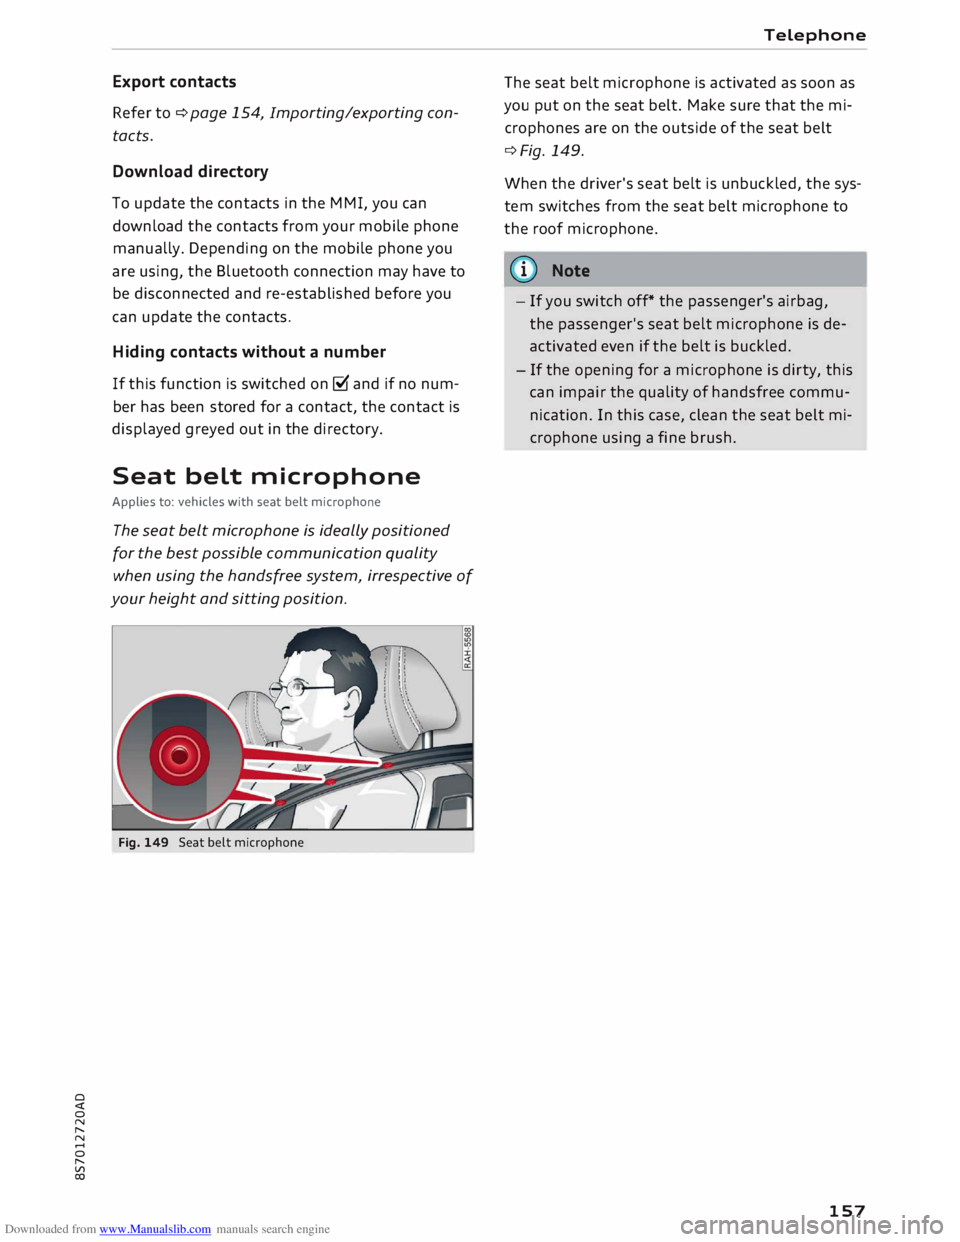
The seat belt microphone is ideally positioned
for the best possible communication quality
when using the handsfree system, irrespective of
your height and sitting position.
Fig. 149 Seat belt microphone Telephone
The seat belt microphone is activated as soon as
you put on the seat belt. Make sure that the mi
crophones are on the outside of the seat belt
¢Fig. 149.
When the driver's seat belt is unbuc kled, the sys
tem switches from the seat belt microphone to
the roof microphone.
@ Note
- If you switch off* the passenger's airbag,
the passenger's seat belt microphone is de
activated even if the belt is buckled.
- If the opening for a microphone is dirty, this
can impair the quality of handsfree commu
nication. In this case, clean the seat belt mi
crophone using a fine brush.
157
Page 265 of 306
Downloaded from www.Manualslib.com manuals search engine 0
N
,.....
N
......
0
,.....
Vl
CX) Care
of vehicle and
cleaning
General notes
Regular and careful care helps to maintain the
value of the vehicle. This may also be one of the
requirements for upholding any warranty claims
in the event of corrosion or paint defects.
Qualified workshops carry stocks of suitable car
care materials. Please follow the instructions for
use on the packaging.
A WARNING
- Cleaning products and other materials used
for car care can damage health if misused.
- Car care products can contain toxic substan
ces and must always be kept in a safe place
out of reach of children.
@ For the sake of the environment
- Please choose care products that are not
harmful to the environment.
- Surplus cleaning materials should not be
disposed of together with ordinary house
hold waste.
Washing the vehicle
The longer residues are allowed to remain on the
vehicle, the more damage they can do to the
paintwork. High temperatures (for instance in di
rect sunlight) further intensify the damage.
Before washing, soak heavy dirt with plenty of
water.
Stubborn dirt, such as bird droppings or resinous
tree sap, is best removed with plenty of water
and a micro-fibre cloth.
After the period when salt is put on the roads,
have the underside of the vehicle washed thor
oughly.
High-pressure cleaners
When cleaning the vehicle with a high-pressure
cleaner, always follow the operating instructions
for the equipment. This applies particularly to Care
of vehicle and cleaning
the operating pressure and the spraying dis
tance. Do not point the spray jet directly at the
seals on the windows, doors, bonnet or boot lid,
or at the tyres, rubber hoses, insulating material,
sensors* or camera lenses*. Maintain a distance
of at least 40 cm.
Do not use a high-pressure cleaner to remove
snow and ice.
Never use high-pressure cleaners with a round
jet nozzle or "dirt blasters".
The water must not be hotter than 60 °C.
Automatic car washes
Spray the vehicle with water before washing.
Ensure that the windows are closed and that the
windscreen wipers are switched off. Follow the
car wash operator's rules and recommendations,
especially if any accessories are attached to your
vehicle.
If possible use a brush less car wash.
Washing by hand
Clean the car with a soft sponge or brush, start
ing on the roof and working down. Use solvent
free cleaning agents.
Washing matt-painted vehicles by hand
To avoid damaging the paintwork when washing
the car, first remove any dust, sand and grit. In
sects, grease stains and fingerprints are best re
moved using a special cleaning agent for matt
painted surfaces.
Apply the product with a micro-fibre cloth. Do
not apply too much pressure to avoid damaging
the paintwork.
Rinse the car thoroughly with water. Then clean
the car with a neutral shampoo and a soft micro
fibre cloth.
Rinse the car with Lots of water again and then
let it dry in the air. Remove any water stains with
a chamois.
263
Page 301 of 306
Downloaded from www.Manualslib.com manuals search engine 0
N
,.....
N
......
0
,.....
Vl
CX) Reset
see Restart (MMI) . . . . . . . . . . . . . . . . . . .
218
Reset button (trip recorder) . . . . . . . . . . . . . . 24
Restart (MMI) . . . . . . . . . . . . . . . . . . . . . . . . 218
Rev counter . . . . . . . . . . . . . . . . . . . . . . . . 10, 24
Reverse gear (automatic gearbox) . . . . . . . . . 77
Reversing camera
see Parking aids . . . . . . . . . . . . . . . . . 104, 106
Rewind (audio/video
file) . . . . . . . . . . . . . . . 200
Rims ............................... 257
Ring tone settings . . . . . . . . . . . . . . . . . . . .
156
Roaming see Data connection . . . . . . . . . . . . . . . . . .
166
Roof load . . . . . . . . . . . . . . . . . . . . . . . . . . . .
288
Rotary pushbutton with joystick function . .
126
Route criteria . . . . . . . . . . . . . . . . . . . . . . . .
176
Route guidance
see Navigation . . . . . . . . . . . . . . . . . . . . . . 169
Running in
New brake pads . . . . . . . . . . . . . . . . . . . . . 115
New engine . . . . . . . . . . . . . . . . . . . . . . . . . 66
New tyres . . . . . . . . . . . . . . . . . . . . . . . . . . 254
s
Safe driving . . . . . . . . . . . . . . . . . . . . . . . . . . 220
Safelock mechanism . . . . . . . . . . . . . . . . . 27, 32
Safety Airbag system . . . . . . . . . . . . . . . . . . . . . .
235
Child seats . . . . . . . . . . . . . . . . . . . . . . . . .
223
Correct sitting position . . . . . . . . . . . . . . . 221
Luggage . . . . . . . . . . . . . . . . . . . . . . . . . . . 227
Pedal area . . . . . . . . . . . . . . . . . . . . . . . . . . 226
Seat belts . . . . . . . . . . . . . . . . . . . . . . . . . . 230
Telephone . . . . . . . . . . . . . . . . . . . . . . . . . .
141
Safety features . . . . . . . . . . . . . . . . . . . . . . .
220
Safety systems (warning lamp) . . . . . . . . . . . 16
Saving fuel
Recuperation . . . . . . . . . . . . . . . . . . . . . . . .
25
Screen see Audi virtual cockpit (instrument
cluster) . . . . . . . . . . . . . . . . . . . . . . . . . . 21,
23
Screwdriver . . . . . . . . . . . . . . . . . . . . . . . . . . 270
SD card readers . . . . . . . . . . . . . . . . . . . . . . .
192
SDS see Speech dialogue system . . . . . . . . . . . 132
Search areas (special destination) . . . . . . . . 172 Index
Search function . . . . . . . . . . . . . . . . . . . . . . .
129
Media ............................. 202
Navigation . . . . . . . . . . . . . . . . . . . . . . . . . 170
Radio . . . . . . . . . . . . . . . . . . . . . . . . . . . . .
185
Telephone . . . . . . . . . . . . . . . . . . . . . . . . . .
154
Seat belt microphone . . . . . . . . . . . . . . . . . .
157
Seat belts . . . . . . . . . . . . . . . . . . . . . . . . . . .
230
Adjusting seat belts . . . . . . . . . . . . . . . . . .
233
Belt tensioners . . . . . . . . . . . . . . . . . . . . . .
234
Cleaning . . . . . . . . . . . . . . . . . . . . . . . . . . .
265
During pregnancy. . . . . . . . . . . . . . . . . . . . 233
Putting on . . . . . . . . . . . . . . . . . . . . . . . . . 232
Securing child seats . . . . . . . . . . . . . . . . . . 226
Taking off . . . . . . . . . . . . . . . . . . . . . . . . . . 234
Warning lamp . . . . . . . . . . . . . . . . . . . . . . .
15
Seat heating . . . . . . . . . . . . . . . . . . . . . . . . . .
63
Seats Adjusting . . . . . . . . . . . . . . . . . . . . . . . . . . .
54
Bucket seat adjustment . . . . . . . . . . . . . . . .
55
Correct sitting position . . . . . . . . . . . . . . . 221
Selection menu . . . . . . . . . . . 21, 123, 126, 127
Multi-function steering wheel. . . . . . . . . . . 23
Selective wheel torque control . . . . . . . . . . 113
Selector lever (automatic gearbox)
Manual release . . . . . . . . . . . . . . . . . . . .
84, 85
Positions . . . . . . . . . . . . . . . . . . . . . . . . . . . . 77
Self-help . . . . . . . . . . . . . . . . . . . . . . . . . . . . 269
Serial number (IMEi) . . . . . . . . . . . . . . . . . .
156
Service interval display.. . . . . . . . . . . . . . . .
252
Service intervals . . . . . . . . . . . . . . . . . . . . . . 247
Service position
see Wiper blades, changing . . . . . . . . . . . .
51
Settings Directory . . . . . . . . . . . . . . . . . . . . . . . . . . .
156
Map............................... 180
Media ............................. 203
Navigation .. . . . . . . . . . . . . . . . . . . . . . . . 176
Radio . . . . . . . . . . . . . . . . . . . . . . . . . . . . . 188
System . . . . . . . . . . . . . . . . . . . . . . . . . . . . 212
Telephone . . . . . . . . . . . . . . . . . . . . . . . . . .
155
Shift light display . . . . . . . . . . . . . . . . . . . . . . 24
Shuffle see Random playback . . . . . . . . . . . . . . . .
203
Side assist . . . . . . . . . . . . . . . . . . . . . . . . . . . .
97
Adjusting brightness . . . . . . . . . . . . . . . . . .
99
Area covered by sensors . . . . . . . . . . . . . . .
98
299