headlights AUDI TT ROADSTER 2017 Owners Manual
[x] Cancel search | Manufacturer: AUDI, Model Year: 2017, Model line: TT ROADSTER, Model: AUDI TT ROADSTER 2017Pages: 314, PDF Size: 76.54 MB
Page 7 of 314
This Owner's Manual applies to all versions of
this model. It manua l contains important infor
mat ion, tips, suggestions and warn ings for using
your vehicle.
Keep this manual in your vehicle at all times . This
is especially important if you loan your vehicle to
others or sell it.
This owner's manua l describes the
equipment
range
specified for th is mode l at the time of
printing. Individua l equipment options described
may on ly be available at a later date or may only
be offered in certain countries.
Some sect ions in this manua l do not apply to all
vehicles. When this is the case, the beginning of
the sect ion ind icates the
validity, for example
"Applies to: vehicles with B iXenon headlights".
Opt ional or vehicle-specific equipment is also
identified with an asterisk
"*".
The illustrations are designed as a general guide
and on your vehicle may look slightly different
than what is illustrated.
All
directions , such as "left", "right", "front" and
"rear", are based on the vehicle's direction of
travel.
* Optional or vehicle
-specific equipment
... The section continues on the next page.
c::> .& Cross reference to a "WARNING"w ith in a
section. If a page number is indicated, the
WARN ING is located outs ide of the section.
_& WARNING
Text with this symbol contains information
about safety and how to reduce the risk of se
rious personal injury or death.
(D Note
Text with this symbol contains informat ion
about reducing the ris k of damage to your ve
hicle.
@ For the sake of the environment
-
~ Text with this symbol contains informat ion on ....
~ protecting the environment.
N .... 0 r---
"' c:o
About this Owner 's Manual
{!) Tips
Text with this symbol contains additional use
ful information.
5
Page 18 of 314
Instruments and indicator lights
jj Tank system
D Please r efu el
If the indicator light turns on for the first time
a nd the message appears, there are about 1.9
ga l (7
L) of fue l left in the tank.
II] Plea se refuel immediately
If the indicator light turns on the message ap
pears , the fue l tank is almost empty . Refuel the
veh icle immediate ly.
D Tank s ystem: ma lfunction! Please contact
Service
If t h e ind icator lig ht tur ns on and th is mess age
appears, there is a mal func tion in the tank sys
tem .
D rive to an a uth o rized Aud i dea le r or authorized
Aud i Serv ice Facility immediately to have t he
malfunct ion cor re cted.
@ For the sake of the environment
Fue l sho uld never enter the sewe r system or
come into con ta ct w ith the gr ound.
(D Tips
More informat ion on refueling is ava ilable on
page
~ page 232.
~ Washer fluid level
(,-5 JJlea se add w asher fluid
F ill the washer fluid for the w indshield washer
system and the headlight washe r system* when
the ign ition is switc hed off ~
page 244.
"V! Windshield wipers
iii Windshield wipers : malfun ction ! Plea se
contact Service
There is a malfunction wi th the windshie ld w ip
e rs.
Dr ive to an autho rized Aud i dea ler or authorized
Aud i Serv ice Facility immediately to have the
malfunct io n corrected.
16
-:(f>:-Bulb failure indicator
If the II ind icator light tu rns on, a bulb has
failed . T he mess age indi cates the loc ation of the
bulb.
Replace the bu lb immediate ly .
Vehicle lights: malfunct ion! Please contact
S ervice
There is a ma lfunction in the headlights or the
li ght sw itch. Drive to an author iz ed Audi dealer or
authori zed Aud i Serv ice Facility immediately to
have the malfunction cor rected .
A WARNING
-Light bulbs a re under p ressure and can ex
plode when b ulbs are replaced, wh ich in
creases the risk of inju ry .
- With gas-discharge lamps* (xenon head
lights), the high-vo ltage component must
be handled appr opria tely. Ot he rw ise, there
is a risk of fatal injury.
~(D Headlight range control system
II Headlight range control : malfunction! See
owne r's manual
There is a ma lf u n ction in the headlight range
contro l system , which may cause gla re for o ther
drivers.
D rive to an author ized A udi dealer or autho rized
A udi Se rvice Fac il ity immed iate ly to have the
malfunction correc ted .
§0 Audi adaptive light
App lies to : vehicles wi th Audi ada ptive ligh t
II Audi adaptive light: malfunction! See own
er 's manual
-
The re is a ma lfunction in the adap tive lights. The
he adlig hts st ill func tion.
D rive to an au thorized A udi dealer or autho rized
A udi Se rvice Fac ility immediate ly to have the
malfunction cor rec ted .
Page 19 of 314
CD
CD
.... N
" N .... 0 r--. V, co
@:.D Light/rain sensor
l!I Automatic headlights: malfunction! See
owner' s manual
El Automatic wipers : malfun ction! See owner 's
manual
The light/ra in sensor is malf unct ion ing.
The low beams remain switched on at all times
for safety reasons when the light switch is in the
AUTO position. You can continue to turn the
lights on and off using the light switch . You can
still cont rol a ll wipe r functions that a re inde
pendent of the ra in se nsor.
Drive to an authorized Aud i dea ler or a ut horized
Audi Service Facility immediately to have t he
malfunction corrected .
; Adaptive dampers
Applies to: vehicles with Audi drive select
B Suspension : malfunction! You may continue
driving
There is an adaptive damper malf unct ion.
Drive to an aut horize d Aud i dea le r or a uthorized
Aud i Service Facility immediately to have t he
malfunct ion corrected.
¢i ¢ Turn signals
If t he B or Ill indicator light b links, a t urn sig
n a l is turned on. If both indicator lig hts are blink
i ng, the eme rgency flash ers a re on .
On-Board Diagnostic
system (OBD)
Malfunction indicator lamp (MIL)
The malfunction indica to r l amp (MIL) ¢.j in the
in str ument cluster is part of the O n Board Diag
n os tic Sys tem ( OBD II).
The warning/indicator light turns on w hen the ig
ni tion is switched o n and turns off once the e n
g ine is s tarted an d is runn ing in id le at a stab le
speed. This indica tes th at the MIL is functioning
cor re ct ly.
Instruments and indicator lights
If the light does not turn off after starting the
engine
or turns on while driving, this may in di
cate there is a malfunction in the engine.
If the
indicato r turns on, the cata lytic conve rter may be
damaged .
Drive
with reduced engine performan ce (avo id
high speeds for extended per io d s of t ime and/o r
fast acceleration) and have the ma lfunction cor
rected. See an author ized Audi dealer or author
ized Audi Service Facility.
The in dicator may turn on if the e lectron ic speed
li miter is faulty. For add it iona l information, see
¢ page 72, Electronic speed limiter.
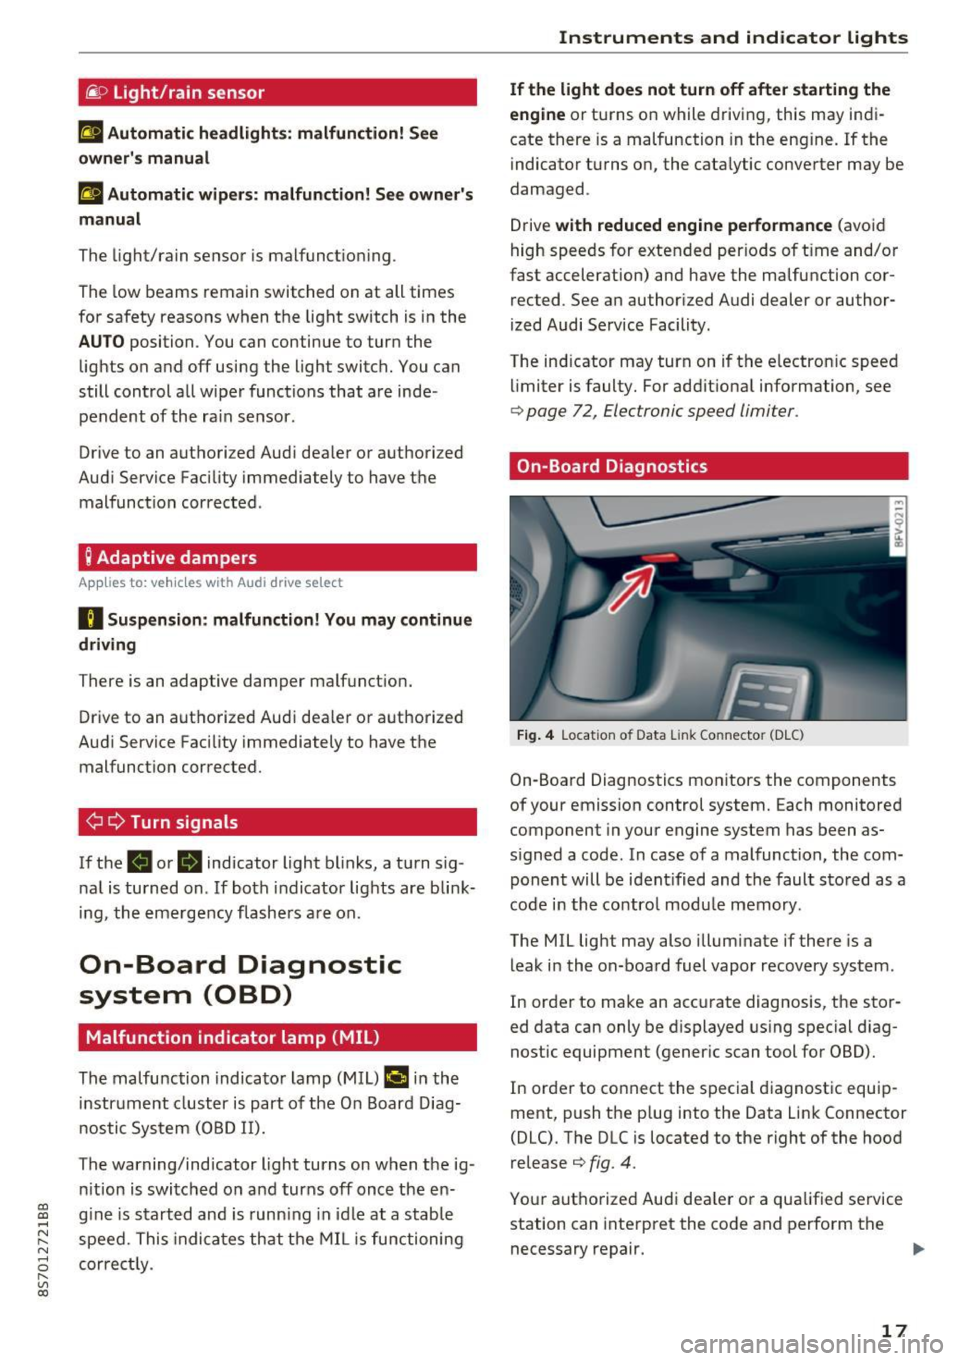
On-Board Diagnostics
Fig. 4 Location of Data Link Connector (DLC)
On-Boa rd Diagnostics mo nitors the components
of your emission control system. Each monitored
component in your engine system has been as
s igned a code. In case o f a malfunction, the com
ponent will be i dent ified and the faul t st o red as a
co de i n t he co ntro l mo dule mem ory.
The MIL lig ht may also illum inate if there is a
leak in the on-boa rd fuel vapor recovery system .
In or de r to ma ke an acc urate diagnosis, the sto r
ed data can only be d isplayed using special d iag
nostic equipment (gener ic scan to ol for OBD).
In order to co nnect the s pecial diagnost ic equi p
ment, push the p lug into the Data Link Connector
(DLC). T he DLC is located to the right of the hood
re lease
¢ fig. 4.
You r aut horize d Aud i dea le r or a qua lified se rvice
station can inte rpret the code and perform the
necessary repair.
IJJI,
17
Page 41 of 314
CD
CD
.... N
" N ...... 0
" V, co
Lights and Vision
Exterior Lighting
Switching lights on and off
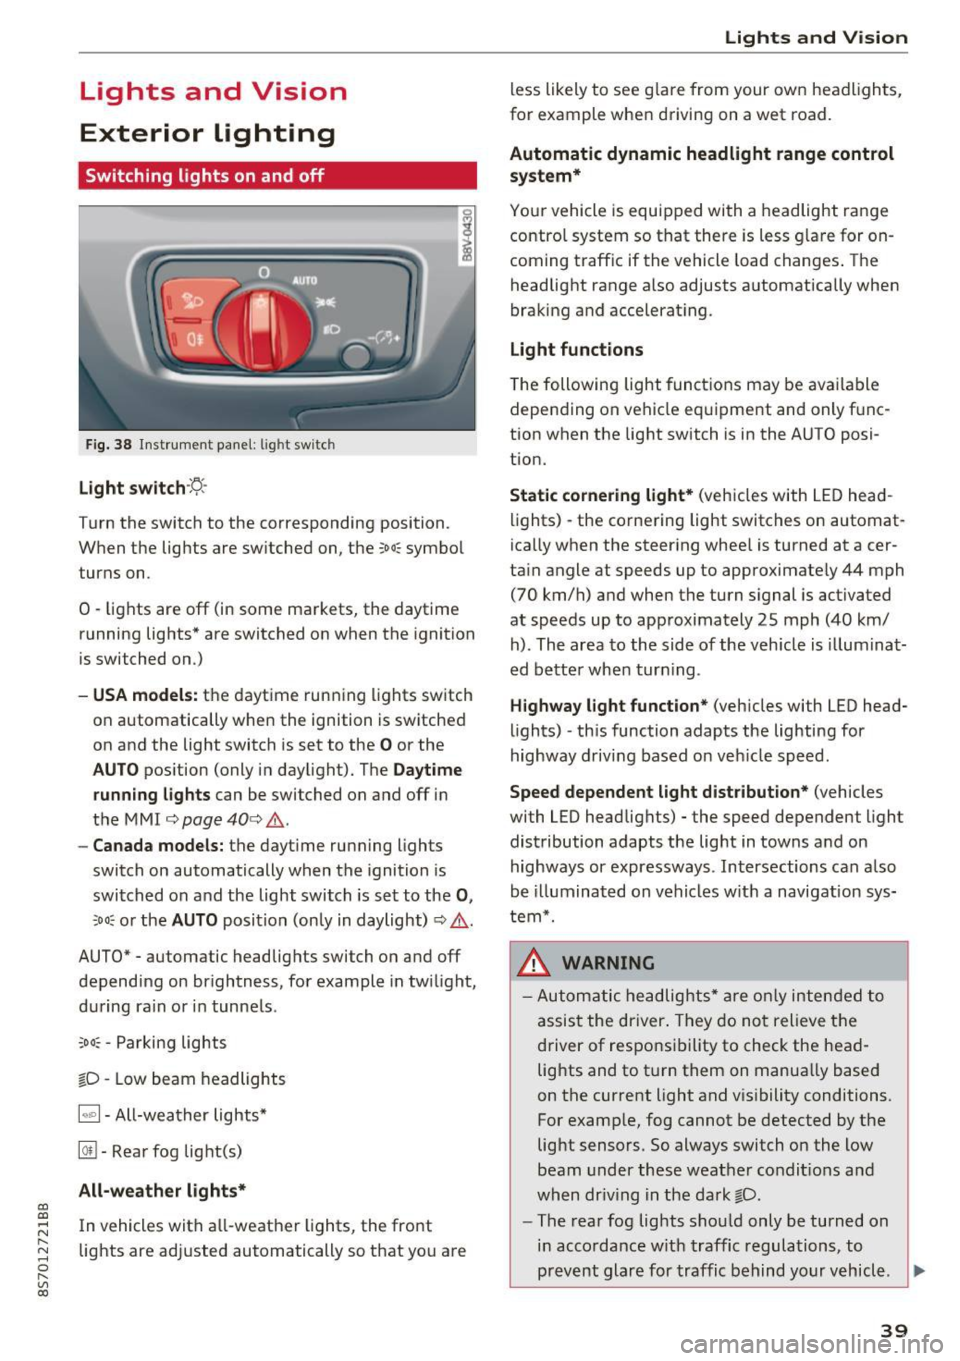
Fig. 38 Instrument panel: l ig ht switc h
Light switch ·:<'>'.·
Turn the switch to the corresponding position.
When the lights are switched on, the
;oo: symbol
turns on.
0 · lights are off (in some markets, the daytime
running lights* are switched on when the ignition
is switched on.)
-USA model s: the daytime running lights sw itch
on automatically when the ignition is switched
on and the light switch is set to the
O or the
AUTO pos ition (only in daylight). The D aytime
runn ing lights
can be switched on and off i n
the MMI
¢ page 40 ¢ &.
- Canada models: the dayt ime running lights
switch on automatically when the ignition is
switched on and the light switch is set to the
0 ,
;oo: or the AUTO posit ion (only in daylight) ¢ & .
AUTO* - automatic headlig hts switch on and off
depending on brightness, for example in tw ilight,
during ra in or in tunne ls .
~oo: -Parking lights
gD -Low beam headlights
IQ., 1-All-weather lights*
@il -Rear fog lig ht(s)
All-weather light s*
In vehicles with all-weather lights, the front
lights are adjusted automatically so that yo u are
Lights and V ision
less likely to see g lare from your own headlights,
for example when driving on a wet road.
Automatic dynamic headlight range control
system*
Your vehicle is equipped with a headlight range
contro l system so that there is less g lare for on
coming traff ic if the vehicle load changes . The
headlight range also adjusts automatically when
braking and accelerat ing .
Light function s
The following light funct ions may be avai lable
depending on vehicle eq uipment and only f unc
tion when the lig ht switch is in the AUTO posi
tion.
Static cornering light * (vehicles with LED head
li ghts) - the cornering light switches on automat
ica lly when the steer ing whee l is turned at acer
ta in angle at speeds up to approximate ly 44 mph
(70 km/h) and when the turn signal is activated
at speeds up to approximately 25 mph (40 km/
h) . The area to the side of the veh icle is illumina t
ed bette r when turn ing .
Highway l ight function * (vehicles with LED head
lights) -th is function adapts the lighting for
highway driving based o n veh icle speed.
Speed dependent light distribution* (vehicles
with LED headlights) - the speed dependent l ight
distribution adapts the lig ht in towns a nd on
highways or expressways . Intersections can a lso
be illuminated on vehicles w ith a navigation sys
tem*.
_& WARNING
- Autom atic headlights * are only inten ded to
a ssis t the driver . They do no t relieve t he
d river of respo nsibility to check the head
lig hts and to t urn them on manua lly based
on the current light and v is ibility conditions.
For example, fog cannot be detected by the
light sensors . So always switch on the low
beam under these weather condit ions a nd
when dr iv ing in the da rk
gD .
-The rear fog lights shou ld only be turned on
i n acco rdanc e w ith traffic regulations, to
prevent glare for traffic behind yo ur v ehicl e.
~
39
Page 42 of 314
Lights and Vision
-If the battery has been discharging for a
wh ile, the parking light may switch off auto
matically. Always make sure your vehicle is
parked and adequately lit according to the
laws. Avo id using the parking lights for sev
era l hours.
- Always observe legal regulations when us ing the light ing systems described.
(D Tips
- The light sensor for the automatic head
lights* is in the rearview m irror mount. Do
not place any stickers in th is area on the
windsh ield.
- Some exterior lighting functions can be ad
ju sted
c:::;, page 40.
-If you turn off the ignition wh ile the exter ior
lights are on and open the-door, a warning
tone so unds.
- In some markets, the tail lights will sw itch
on when the daytime runn ing lights sw itch
on .
- In cool or damp weather, the inside of the
headlights, turn s ignals and tail lights can
fog over due to the tempe rature d ifference
betwee n the inside and ou ts ide. They will
clea r short ly after sw itch ing them on. This
does not affect the service life o f the light
i ng.
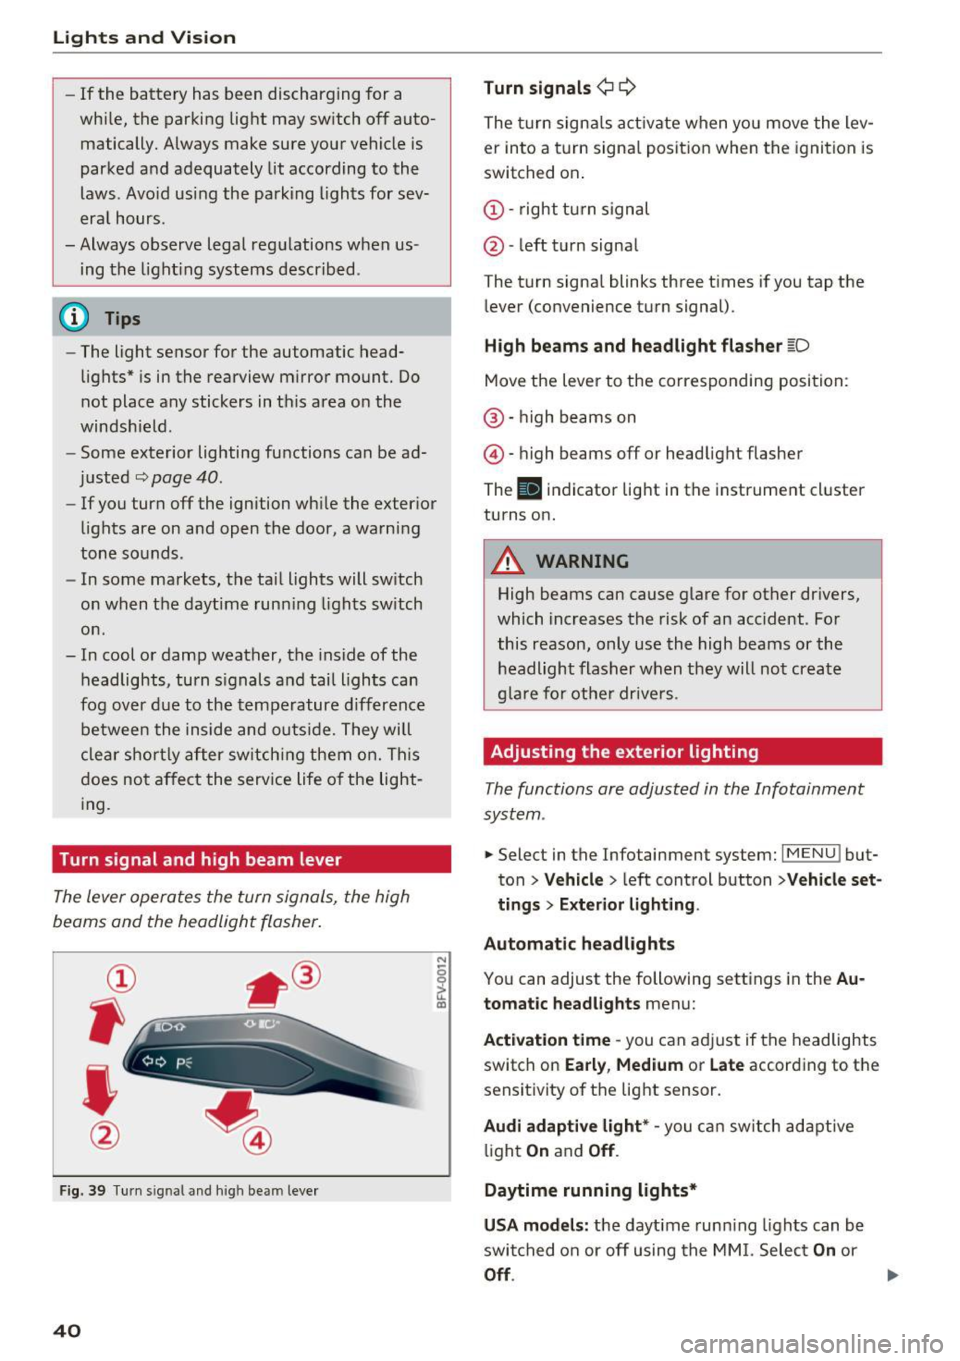
Turn signal and high beam lever
The lever operates the turn signals, the high
beams and the headlight flasher.
®
,
I
@
F ig . 39 Tu rn sig nal a nd high beam lever
40
N
c 0
ct a,
Turn signals ¢ Q
The turn sign als act ivate when yo u move the lev
er into a turn signa l posit ion when the igni tion is
switched on.
(D -right tu rn signal
@ -left t urn signa l
The tu rn signa l blinks three t imes i f you tap the
l ever (convenience t urn signal).
High beams and headlight fla sher l[D
Move the lever to the correspondin g position:
@ · high beams on
@ · high beams off or head light flasher
The
El i ndicator lig ht in the instrume nt cl uster
turns on.
_8 WARNING
High beams can cause glare for other dr ivers,
which inc reases the risk of an accident . Fo r
this reason, only use the high beams or the headlight flasher when t hey will no t create
g la re for ot he r drive rs.
Adjusting the exterior lighting
The functions are adjusted in the Infotainment
system .
.. Select in the Infotainment system: IMENU! but
ton>
Veh icle > left control button >Vehicle set
tings > Exterior light ing.
Automatic headlights
You can adjust the following sett ings in the Au
tomatic headlights
menu:
Act ivation time -you can a dju st if the headlights
switch on
Early , Medium or Late according to the
sensit ivity of th e lig ht sensor.
Audi adaptive light* -you c an switch adapt ive
li ght
On an d Off .
Daytime running lights*
USA models: the daytime runn ing lights can be
swi tched on or off using the MM I. Selec t
On or
Off.
Page 45 of 314
CD
CD
.... N
" N ...... 0
" V, co
Dimming the mirrors
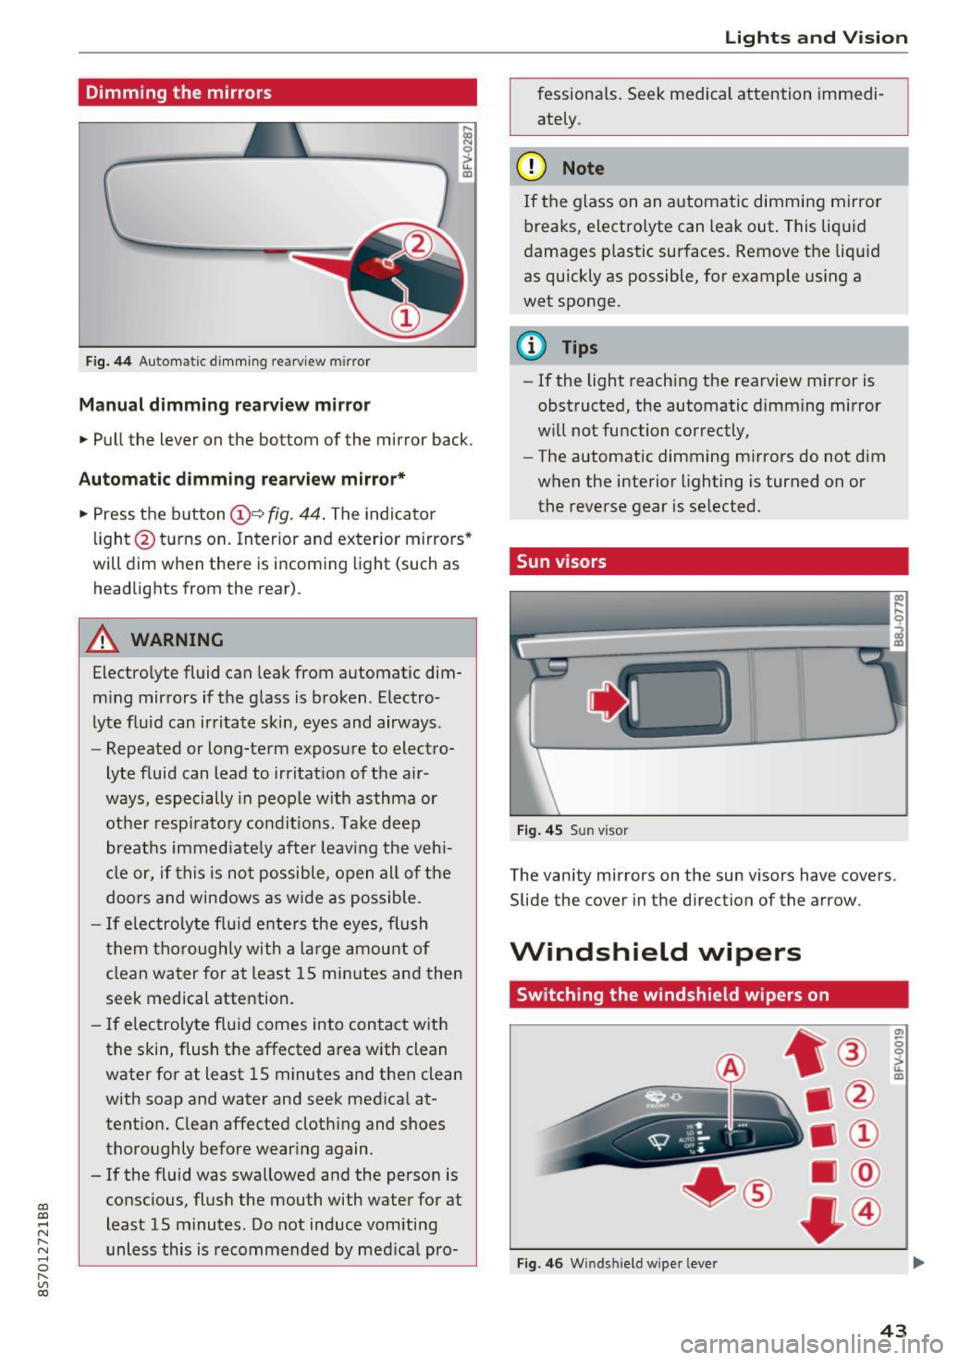
Fig . 44 Automat ic dimm ing rearview mirror
Manual dimming rear view mirror
• Pull the lever on the bottom of the mirror back.
Automatic dimming rea rvie w mirror*
• Press t he button @~
fig. 44 . The indicato r
li ght @turns on. In terior and exterior mirrors"
will dim when there is incoming light (such as
headlights from the rear).
A WARNING
Electrolyte fluid can leak from automat ic dim
m ing mirrors if t he g lass is b roken . Electro
lyte fluid can ir ritate skin, eyes and airways .
- Repeated or long-term exposure to elect ro-
lyte fluid can lead to irritat ion of the a ir
ways, especially in peo ple with asthma or
ot he r resp irato ry condi tions. Take deep
breat hs immed iate ly after leaving the veh i
cl e or, if this is n ot possib le, open all of t he
doo rs and windows as wide as possible.
- If elec troly te flu id ente rs the eyes, flush
t hem thorough ly with a large amou nt o f
cl ean water for at least 15 mi nutes and then
seek medical attention.
- If elec troly te f lu id comes into con tact wit h
the skin, flush t he affected area with clean
water for at least 15 minutes a nd then clean
with soap and water and seek medical at
tent ion. Clean affected cloth ing and shoes
thoroughly before wear ing again .
- If the fluid was swallowed and the person is
conscious, flus h the mouth with water for at
least 15 minutes. Do not induce vomiting
unless this is recommended by med ica l pro-
Lights and V ision
fessionals. Seek medical attention immedi
ately .
(D Note
If the glass on an a utomat ic dimmi ng mirror
breaks, electro lyte can leak out. This liquid
damages plastic sur faces. Remove t he liqu id
as quickly as possible, for example using a
wet sponge.
@ Tips
- If the light reaching the rearview mirror is
obstructed, the automatic dimming mirror
w ill not function correctly,
- The automatic dimming m irrors do not dim
w hen the interior lighting is turned on or
the reverse gear is selected.
Sun visors
Fi g. 4 5 Su n visor
The vanity mirrors on the sun visors have covers.
Slide the
cover in the direction of the arrow.
Windshield wipers
Switching the windshield wipers on
Fig. 4 6 W indshi eld wiper leve r
(7)
-0 0 :,;.. u. m
43
Page 46 of 314
Lights and Vi sion
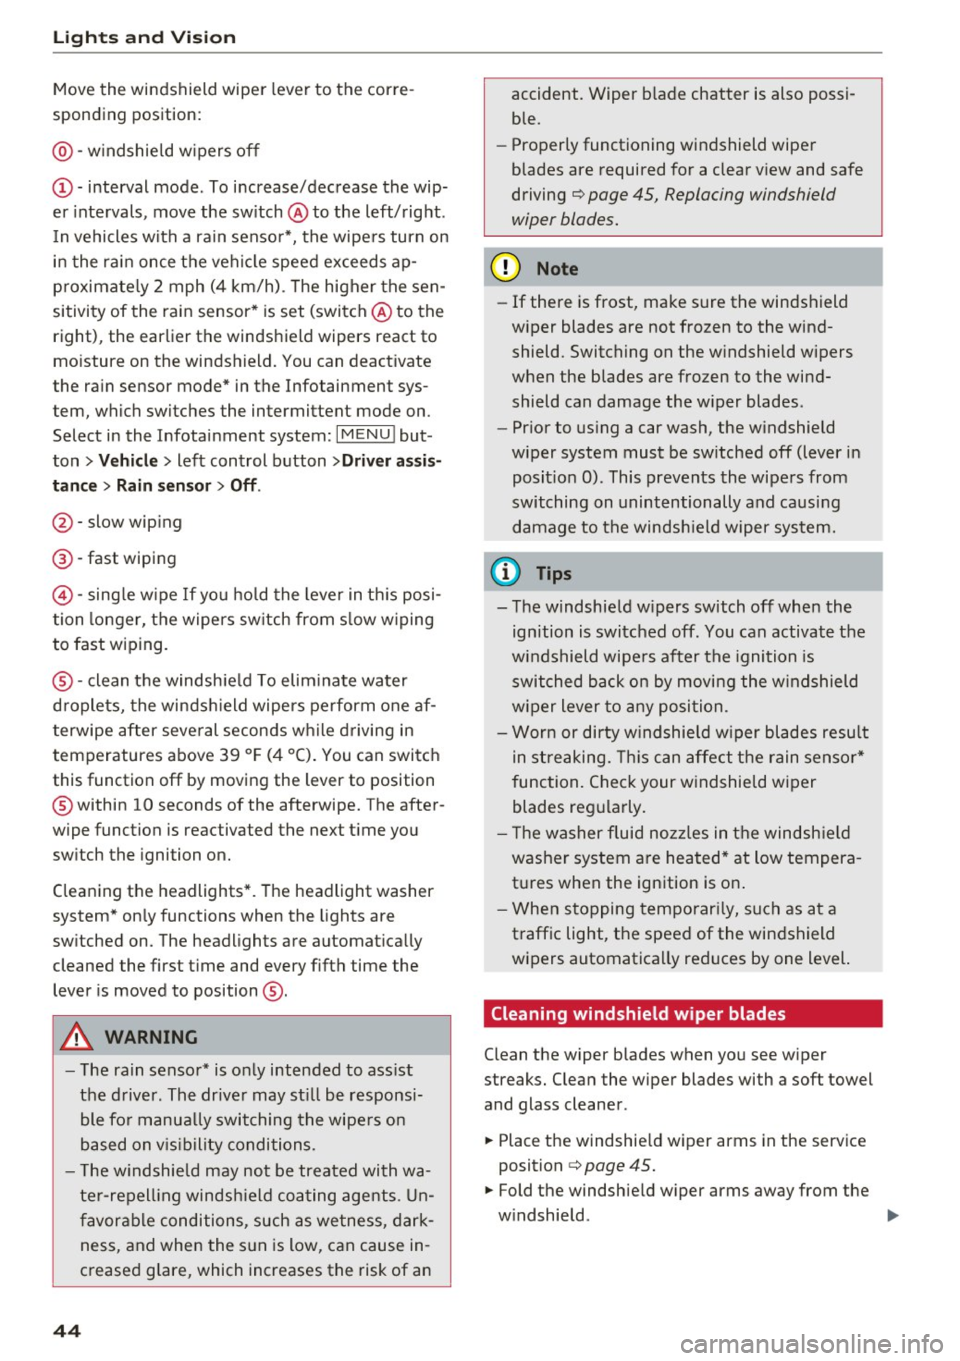
Move the windshield wiper lever to the corre
sponding position:
@ -windshield w ipers off
(D -interval mode. To increase/decrease the wip
er intervals , move the sw itch @ to the left/right .
I n vehicles with a rain sensor*, the wipe rs turn on
i n the rai n once the vehicle speed exceeds ap
p roximate ly 2 mph (4 km/h) . T he higher the sen
sitivity of the rain sensor * is set (switch @ to the
right), the earlier the windshield wipers react to
mo isture on the windshield. You can deact ivate
the rain sensor mode* in the Infotainment sys
tem, which switches the intermittent mode on .
Select in the Infotainment system:
I MENU I but
ton>
V ehicle > left control button >Dri ver a ssis
tan ce > Rain sensor> Off.
@-slow wip ing
@ -fast wiping
©-sing le w ipe If yo u ho ld the leve r in th is posi
tion longer, the wipers sw itch from s low w iping
to fast wiping .
®-clean the windsh ie ld To elim inate water
droplets, the winds hield wipers pe rform one af
terwipe after several seconds w hile driving in
temperatures above 39 °F (4 °C) . You can switch
this function off by moving the lever to position
@ within 10 seconds of the afterwipe. The after
wipe function is reactivated the next t ime you
sw itch the ignition on.
C leaning the headlights *. T he headlight washer
system* on ly functions when the lights are
sw itched on. The headlights are automat ica lly
cleaned the first t ime and every f ifth time the
lever is moved to position
® ·
A WARNING
- The rain senso r* is o nly intended to ass ist
the d river . The drive r may st ill be responsi
ble fo r manua lly switching t he wipe rs on
based on v is ibility conditions.
- T he w indshield may not be treated with wa
te r-repell ing windsh ield coa ting age nts . U n
favor able conditions, such as wetness, dark
ness, and when the s un is low, can cause in
creased g lare, which increases the risk of an
44
-
accident. Wiper b lade chatter is also possi
ble.
- Properly functioning windshield wiper
blades are required for a clear v iew and safe
driving
¢ page 45, Replacing windshield
wiper blades.
(D Note
- If there is frost, make sure the windshield
wiper blades are not frozen to the wind
shield. Switching on the w indshield w ipers
when the blades are frozen to the wind shield can damage the w iper blades .
- Pr ior to us ing a car wash, the w indshield
wiper system must be sw itched off (lever in
posit ion 0) . This prevents the wipers from
switching on unintentionally and causing
damage to the windsh ield wiper system.
('O Tips
- The windshield w ipers sw itch off when the
ignition is switched off . You can activate the
windshield wipe rs after the ignition is
switched back on by moving the windshield
wiper lever to any posi tion.
- Wor n or dirty w indshie ld w iper blades resu lt
in streaking. This can affect the rain senso r*
function. Check your w indshield wiper
blades regularly.
'
- T he washer fluid noz zles in t he windsh ie ld
washer system are heated* at low tempera
tures when the ignition is on .
- When s topping temporar ily, such as at a
traffic light, the speed of the windshield
wipers automatica lly reduces by one level.
Cleaning windshield wiper blades
Clean the wiper blades when you see w iper
streaks. Clean the wiper blades with a soft towel
and glass cleaner.
.,. Place the windshie ld wiper arms in the serv ice
position
¢ page 45.
.,. Fold the windshie ld w iper arms away from the
w indshield. ..,.
Page 269 of 314
co
co
.... N
" N .... 0
" "' c:o
wash operator to reduce the risk of accidents.
- To reduce the risk of cuts, protect yourself
from sharp metal components when wash
ing the underbody or the inside of the wheel
housings .
- After washing the vehicle, the brak ing effect
may be delayed due to mo isture on the
brake rotors or ice in the w inter . This in
creases the risk of an acc ident. The brakes
must be d ried fi rst w ith a few careful b rake
applications.
(D Note
- If you wash t he vehicle in an automatic car
wash, yo u m ust retract the extendable rear
spo iler* if necessary, and fold the exter ior
mir rors in to red uce the risk of damage.
Power folding e xte rior m irrors * mus t onl y
be fo lded in and ou t using the power folding
f u nct ion .
- To reduce the risk of pai nt d amage, do no t
wash the vehicle in di rect sunlig ht.
Ca re and cleaning
- To re duce the risk of damage, do not wash
the power top with a pressure washer .
- T o red uce the risk of damage to the surface,
do not use insect removing sponges, kitche n
sponges o r similar items .
- Matte finish painted veh icle components:
- To reduce the risk of damage to the sur-
face, do not use polishing agents or hard
wax.
- Never use protective wax. It can destroy
the matte finish effect .
- Do not place any stickers or magnetic
signs on vehicle parts painted with matte
finish paint . The paint could be damaged
when the stickers or magnets are re
moved.
@ For the sake of the environment
Only wash t he veh icle in facili ties s pec ially de
s igned for that pu rpose . This will reduce the
r isk of dirty wate r contamina ted with o il from
ente ring the sewe r sys tem.
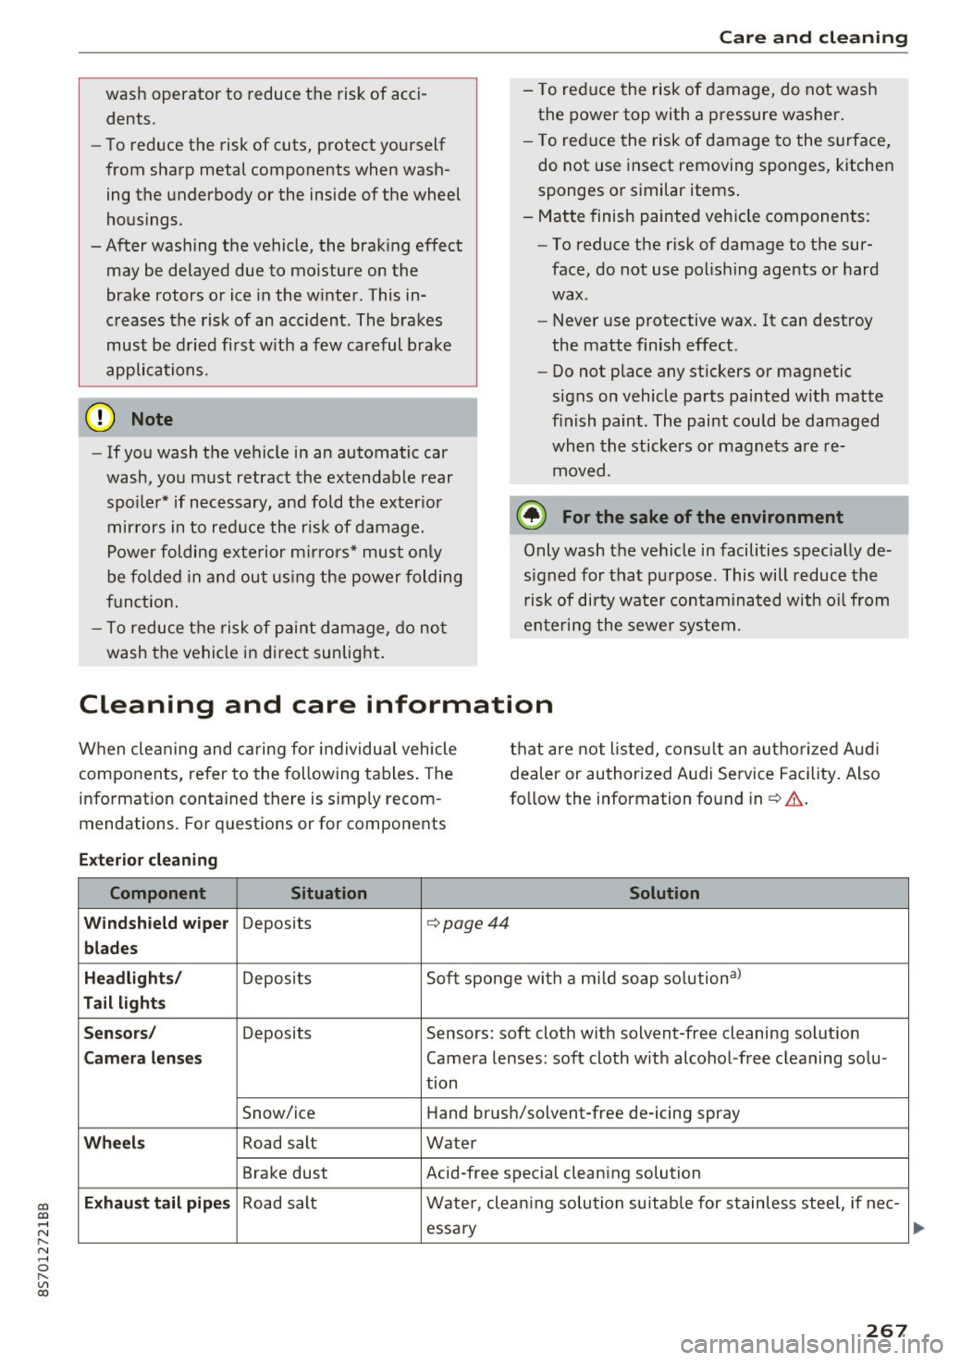
Cleaning and care information
W hen cle aning and ca ring for individua l vehicle
components, refer to the following tables . The
info rmation contained there is simply recom
mendations. Fo r questions or for components t
h at are not l isted, cons ult an autho riz e d Aud i
dealer or au thorized A udi Service Fac ility . Also
fo llow the information found in¢& .
Exterior cleaning
Component Situation Solution
Windshield wiper
Deposits c::- page44
blades
Headlights /
Deposit s So
ft sponge wi th a m il d soap solutiona )
Tail light s
Sensors /
Deposits Sensors: soft cloth with solvent-free cleaning solut ion
Camera lenses Camera lenses: soft cloth w ith alcohol -free cleaning solu -
tion
Snow/ice H
and brus h/solvent-free de-icing spray
Wheels Road salt Water
Brake dust Acid-free special clean ing solution
Exhaust tail pipes Road salt Water, clea ning solution su itab le for stainless stee l, if nee-
essa ry
267
Page 271 of 314
co
co
.... N
" N .... 0
" "' c:o
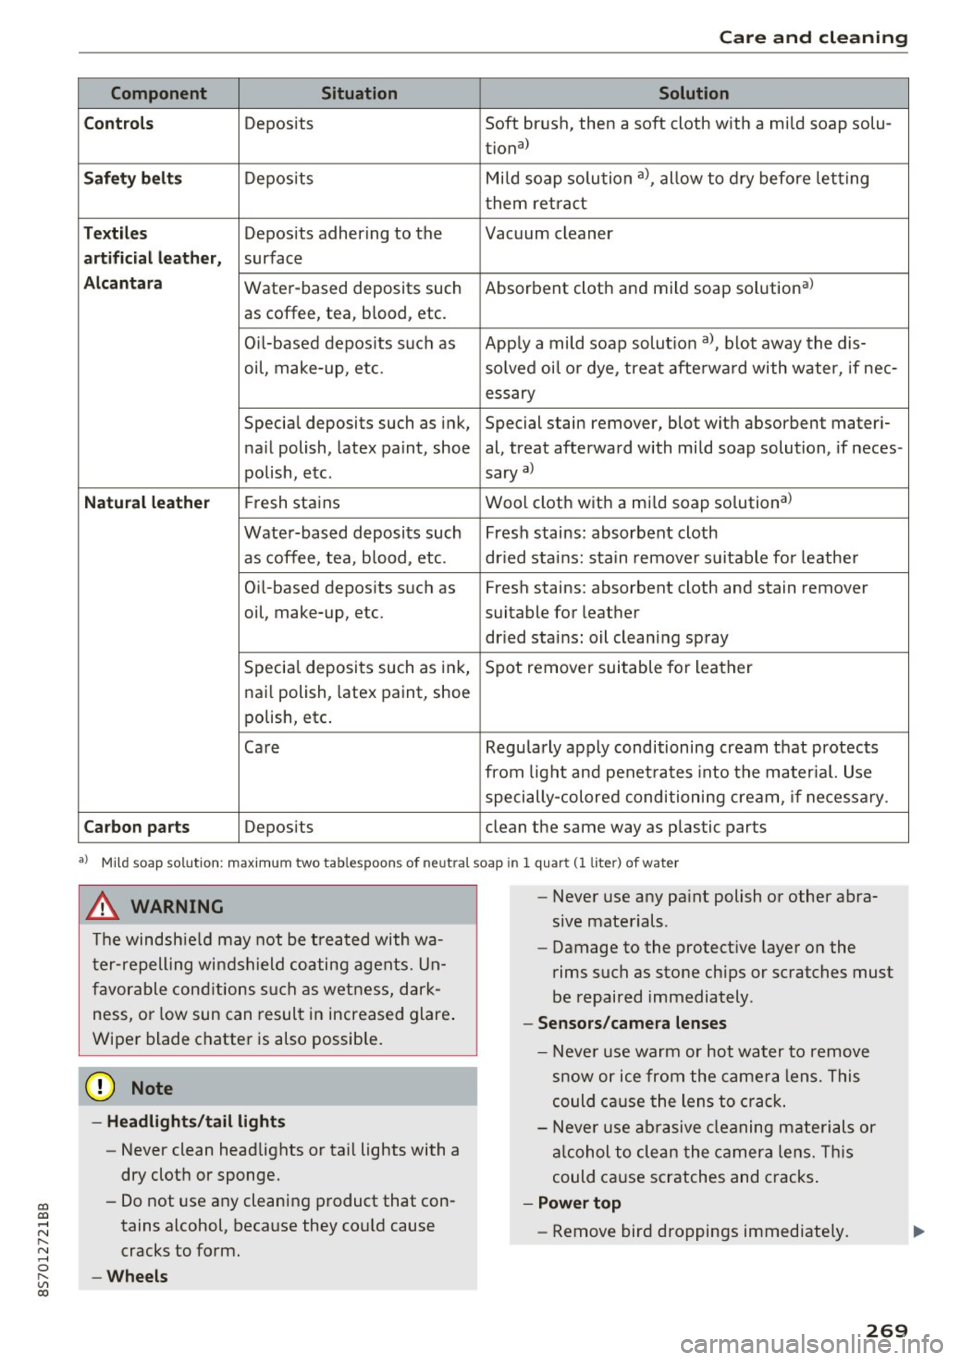
Care and cleaning
Component Situation Solution
C ont rols
Deposits Soft brush, then a soft cloth with a mild soap solu-
tiona)
Saf ety be lts Deposits Mi
ld soap solution a), allow to dry before letting
them retra ct
T ex til es Deposits adhering to the Vacuum cleaner
artificial l eather, surface
Alcantar a Water-based deposits such Absorbent cloth and mild soap solutiona)
as coffee, tea, blood, etc.
O il-based depos its s uch as App ly a mild soap solut ion a), blot away the dis-
oil, make-up, etc. solved oi l o r dye, treat afterwa rd with water, if nee-
essary
Special deposits such as ink, Special stain remover, blot with absorbent materi-
na il polish, latex paint, shoe al, treat afterward with mild soap solution, if neces-
polish, etc. sary
a)
Natu ral lea the r Fresh stains Wool cloth with a mi
ld soap solutiona >
Water-based deposits such Fresh stains: absorbent cloth
as coffee, tea, b lood, etc. dr ied stains: sta in remove r su itable for leathe r
Oi l-based deposits such as Fresh stains: absorbent cloth and stain remover
oil, make-up, etc. suitable for leather
dr ied stains: oil cleaning spray
Specia l deposits such as ink, Spot remover suitable for leather
nai l polish, latex paint, shoe
polish, etc.
Care Regularly apply conditioning cream that protects
from light and penet ra tes into the mater ial. Use
specially-colored conditioning cream, if necessa ry.
Carbon parts Deposits clean the same way as plastic parts
•> Mild soap solution: maximum two tablespoons of neutral soap in 1 quart (1 liter ) of water
A WARNING
The windshie ld may not be treated with wa
t er-repelling windshield coating agents. Un
favorable cond itions such as wetness, dark
ness, or low sun can result in increased glare .
Wiper blade chatter is also possib le.
{U) Note
- Headligh ts /t ail li ghts
- Never clean headlights or tai l lights with a
dry cloth or sponge.
- Do not use any cleaning product that con
tains alcohol, because they cou ld cause
cracks to form.
-Whe els
-
- Never use any pa int polish or other abra
sive materials.
- Damage to the protect ive layer on the
rims such as stone chips or scratches must
be repaired immediately.
- Sensors /cam era lenses
- Neve r use warm or hot water to remove
s n ow or ice from the came ra lens. This
could ca use the lens to crack.
- Neve r use ab rasive cleaning materials or
a lcohol to clean the camera lens. Th is
could cause scratches and cracks .
-Power top
- Remove bird droppings immediately.
269
Page 285 of 314
CD
CD
.... N
" N .... 0 r--. V, co
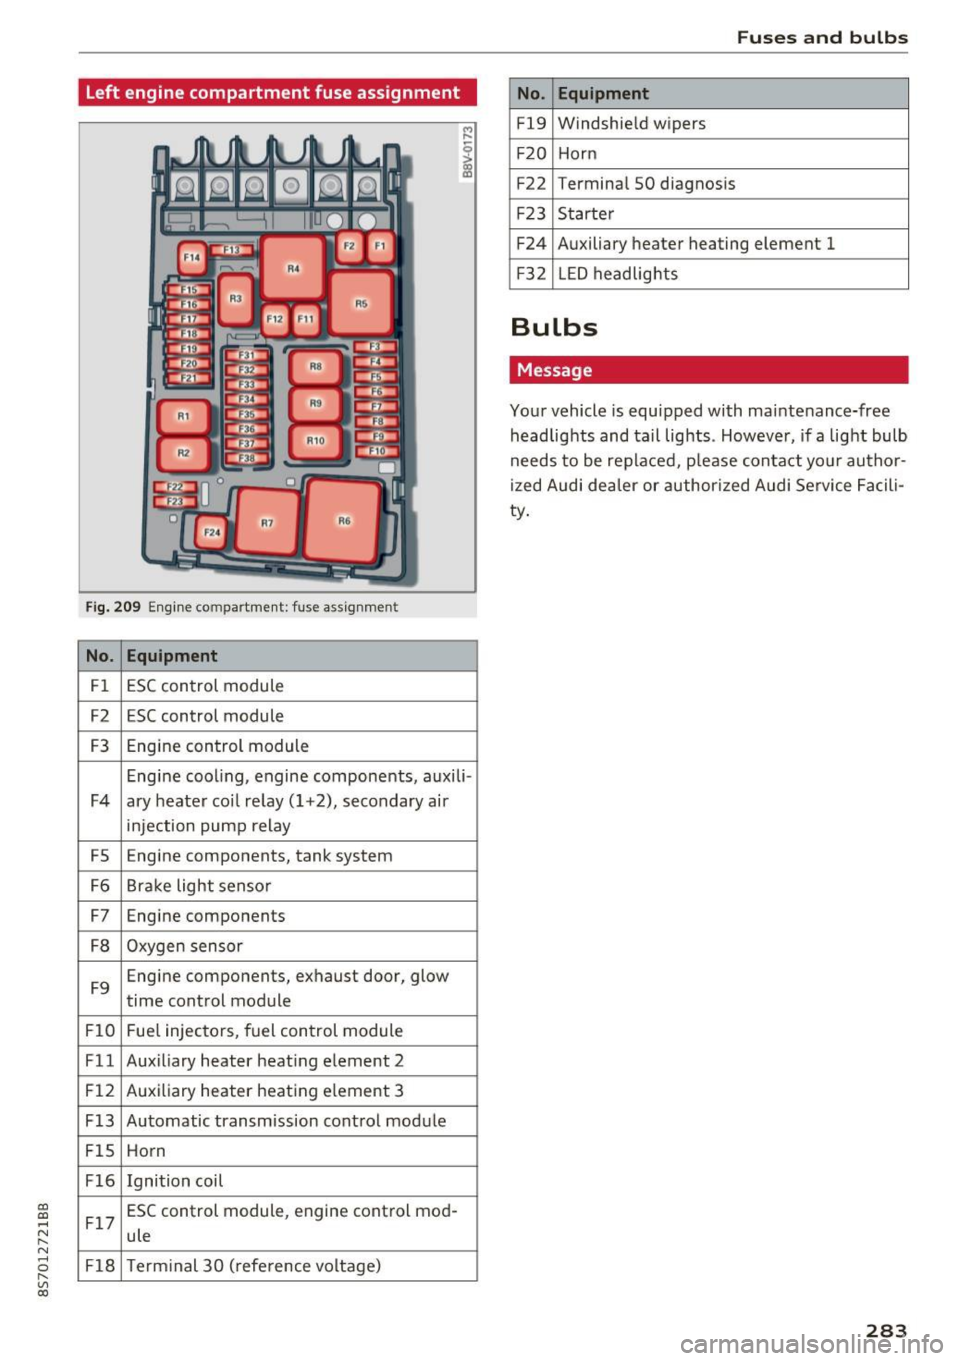
Left engine compartment fuse assignment
Fig. 209 Engine compartment: fuse ass ignment
No. Equipment
Fl ESC control module
F2 ESC control module
F3 Engine control module
Engine cooling, engine components, auxili -
F4 ary heater coil re lay ( 1+2), secondary air
injection pump relay
FS E
ngine components, tank system
F6 Brake light sensor
F7 Engine components
F8 Oxygen sensor
F9 Engine components, exhaust door, glow
time control module
FlO Fuel injectors, fuel control module
Fll Auxiliary heater heating element 2
F 12 Auxiliary heater heating e
lement 3
F13 Automatic transmission cont rol module
FlS Horn
F16 Ignition coil
F17 ESC control module
, engine control mod-
ule
F18 Term inal 30 (reference voltage)
Fuses and bulbs
No . Equipment
Fl9 Windshield wipers
F20 Horn
F22 Terminal SO diagnos
is
F23 Starter
F24 Auxiliary heater heating element 1
F3 2 LED headlights
Bulbs
Message
Your vehicle is equ ipped with maintenance-free
headlights and tail lights . However, if a light bulb
needs to be replaced, p lease contact yo ur author
ized Audi dea ler or authorized Audi Service Facili
ty.
283