sensor AUDI TT ROADSTER 2018 Owners Manual
[x] Cancel search | Manufacturer: AUDI, Model Year: 2018, Model line: TT ROADSTER, Model: AUDI TT ROADSTER 2018Pages: 310, PDF Size: 46.95 MB
Page 12 of 310
Instruments and indicator lights
10
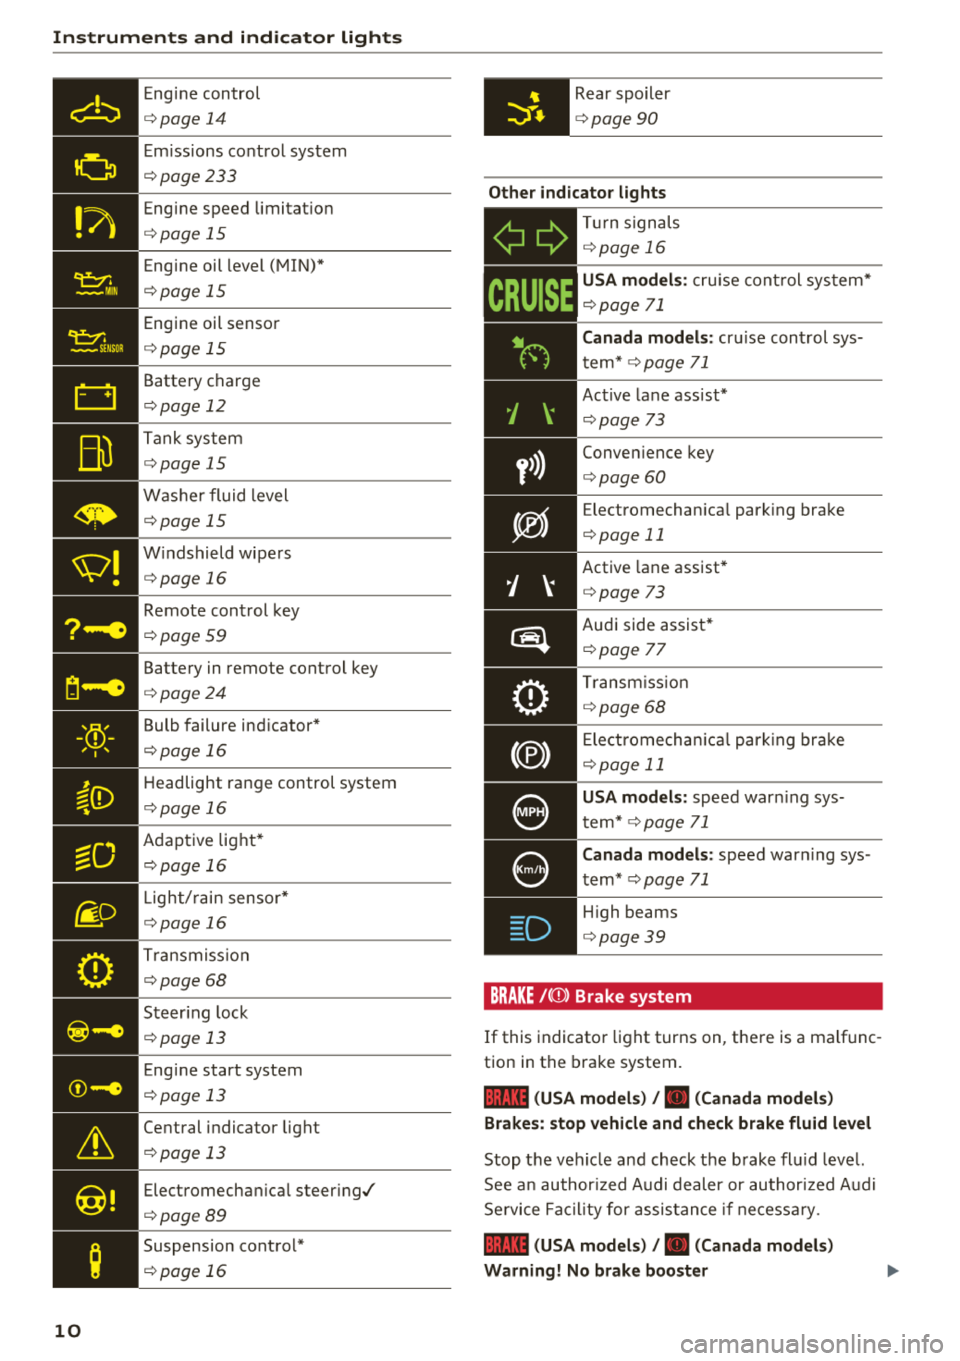
Eng ine con trol
¢ page 14
Em iss ions co ntrol system
¢ page233
Eng ine speed limitat io n
¢ page 15
Eng ine oil level ( MIN) *
¢page 15
Engi ne oil senso r
¢page 15
Batte ry charge
¢ page 12
Tank sys tem
¢page 15
W ash er fluid level
¢page 15
W indshield wipe rs
¢ page 16
Remote con trol key
¢ page 59
Batte ry in remote control key
¢ page 24
Bulb failure ind icator*
¢page 1 6
H eadlight range control system
¢ pag e 16
Adaptive lig ht*
¢ page 16
Light/ rain sensor *
¢page 16
Trans miss io n
¢page 68
S teer ing lock
¢ page 13
Eng ine start system
¢ page 13
Ce ntral indicator light
¢ page 13
Elect romecha nica l steer ing/
¢ page8 9
Suspension cont rol*
¢ page 16
Rear spoiler
¢page 90
Other indicator lights
-Ii
ii T
ur n sign als
¢ page 16
CRUISE
USA models : cru ise co ntrol system*
¢ page 71
Canada models: cr uise con trol sys
t em*
¢ page 71
- Ac
tive lane ass ist*
¢ page 73
Conve nience key
¢ page 60
Electromechan ica l park ing bra ke
¢page 11
Active lane assist *
¢page 73
Audi side assist *
r=;, page 7 7
Tra nsm iss io n
c:::> page 68
Ele ct romecha nical par king brak e
¢page 11
USA models: speed war ning sys
t em *
¢page 71
Canada models: speed war ning sys
t em *
¢page 71
- H
igh beams
. ¢ page 39
BRAKE/{©) Brake system
If this indicato r light turns on, t here is a malf unc
tion in the brake system.
1111 (USA models) / . (Canada models)
Brakes : stop vehicle and check brake fluid level
Stop t he veh icle and check t he b rake fl uid leve l.
See a n au thor ized Audi de aler or au thor ized A udi
Se rvi ce Faci lity for assis tan ce if n ecess ary.
1111 (USA models) / . (Canada models)
Warning! No brake booster
Page 17 of 310
Cl 00
!?) Engine speed limitation
Applies to: vehicles with engine speed limitation
(II Maximum engine speed : XXXX rpm
The engine speed is automatically lim ited to the
speed d isplayed in the driver information system .
This protects the engine from overheating .
The engine speed limitation deactivates once the
engine is no longer in the critical temperature range and you have released the accelerator ped
a l once.
If the engine speed limitation was activated by
an engine control malfunction, the
rl indicator
light also turns on. Make sure the engine speed
does not go
above the speed d isplayed, for exam
ple when downsh ift ing. Drive to an autho rized
Aud i dealer o r authorized Aud i Service Facility im
mediately to have the malfunction corrected.
~. Engine oil level (MIN)
Applies to: vehicles with oil level warning
Ill Please check oil level
You may continue driving for the time being.
Check the engine oil leve l as soon as possible
r=> page236.
-If the engine oil level is too low, add engine oil
r=>page 237.
-If the engine oil level is correct and the ind ica
tor light still turns on, drive at low eng ine
speed to an authori zed A udi dealer or autho r
ized Audi Serv ice Facility.
'IY ;.., Engine oil sensor
II Oil level system: malfunction! Please con
tact Service
The sensor to check the engine oil level has
failed. Drive to an authorized Audi dealer or au
thorized Audi Service Facility immediate ly to have
the malfunction corrected .
II Oil level sensor: oil change necessary. Please
contact Service
~ The engine oil leve l is too high.
N ...... 0 r--Vl 00
Instruments and indicator lights
Drive to an authorized Audi dealer or authorized
Audi Service Facility immediate ly to have the
malfunction corrected.
@ Note
Refer to the description in the Owner's Man
ual
r=> page 2 3 7, Checking the engine oil lev
el .
Bu Tank system
ml Please refuel
If the indicator light turns on for the first time
and the message appears, there are about 1.9
gal (7 L) of fuel left in the tank.
ID Please refuel immediately
If the indicator light turns on the message ap
pears, the fuel tank is almost empty. Refue l the
vehicle immediately.
ml Tank system: malfunction! Please contact
Service
If the indicator light turns on and this message
appears, there is a malfunction in the tank sys
tem .
Drive to an authorized Audi dealer or authorized
Audi Service Facility immed iately to have the
malfunction corrected .
@) For the sake of the environment
Fuel should never enter the sewer system or
come into contact with the ground.
(D Tips
For more information on fueling, see
r=> page 230.
,. Washer fluid level
m Please add washer fluid
Fill the washer fluid for th e windshie ld washer
system and the headlight washer system* when
the ignition is switched off
r=> page 243.
15
Page 18 of 310
Instruments and indicator lights
<;v! Windshield wipers
i,ij Windshield wipers: malfunction! Pl ease
c ontact Servic e
There is a malfunc tion with t he w indshie ld w ip
ers .
D rive to an authori zed Aud i dea ler or aut hori zed
Aud i Serv ice Facility immediately to have the
malfunc tion corrected .
-:
fa iled. The message in dicat es t he loca tion of the
b ul b.
Re place the bulb immedia tely .
Vehicle lights: malfunction! Please contact
Service
There is a malfunction in the head lights or t he
light switch . D rive to an autho rized A udi dealer or
author ized Audi Se rvice Facility immed iate ly to
have the ma lf u nct ion co rrected.
A WARNING
- L igh t bu lbs are under pressu re and can ex
plode when bulbs are replaced, which in
cr eases t he ris k of injury.
- W it h gas-discharge lam ps* (xenon head
l igh ts), th e high-voltage component must
be handle d ap propriate ly. Otherwise, t here
is a risk of fa tal in jury.
~[) Headlight range control system
II Headlight range control : malfunction! See
owner 's manual
T here is a malfunc tion in the hea dlight range
con trol sys tem, w hich m ay cau se g lare fo r othe r
d rivers.
D rive to an a utho rized Aud i dea le r or a uth orized
Au di S ervice Fac ility immedia tely to have t he
malfunc tion co rrecte d.
16
-
~O Audi adaptive light
Applies to: vehicles with Audi adaptive light
JII Audi adaptive light : malfunction! See own
er's manual
There is a ma lf u nction in the adap tive ligh ts. T he
headlig hts still funct ion .
D rive to an author ized A udi dealer or autho rized
Audi Se rvice Fac ility immed iate ly to have the
malfunction correc ted .
~D Light/rain sensor
Applies to: vehicles with light/rain sensor
El Automatic headlights : malfunction! See
owner's manual
m Automatic wipers: malfunction ! See owner's
manual
The light/ rain sensor is malfunctioning.
The low beams remain sw itche d on at all times
fo r safety reasons whe n the light switch is in t he
AUTO position. Yo u can cont in u e to turn t he
li ghts on and
off using the lig ht switch . You can
still contro l all w iper fu nctions t hat are inde
pende nt of t he rain senso r.
D rive to an authorized A udi dealer or autho rized
Audi Se rvice Facility immed iate ly to have the
malfunction cor rected .
g Suspension control
Applies to: vehicles with Audi drive select
B Suspension: malfunction! You may continue
driving
There is a suspension contro l ma lf u nction.
D rive to an authorized A udi dealer or autho rized
Audi Se rvice Fac ility immed iate ly to have the
malfunction cor rected .
¢¢ Turn signals
If the. or B in dicator lig ht blinks, a tur n sig
nal is tu rned on .
If both indica to r lights are bl ink
i ng, t he emergency flashers are on .
Page 24 of 310
Opening and clo sin g
Opening and closing
Central locking
Description
You can lock and u nlock the veh icle centrally. You
have the following options:
- Remote control key
i:> page 24,
- Sensors in the door handles* c> page 25,
-Lock cylinder on the driver 's door c> page 27,
or
- Interior central locking switch
c> page 26.
Auto Lock
The Auto Lock funct ion locks all doors and the
luggage compartment lid once the speed has ex
ceeded approx imately 9 mph (lS km/h).
The vehicle can be unlocked if the opening func
tion in the centra l locking system sw itch is used
or one of the door handles is pulled. The Auto L ock function can be switched on and off in the
Infotainment system
c> page 26.
I n t he event of a crash with a irbag deployment ,
the doors will a lso automat icall y unlock to allow
access to the vehicle .
Selective unlocking
The doors and luggage compartment lid w ill lock
when they close. You can set in the Infotainment
system whether
only the driver's doo r or the en
tire veh icle should be unlocked when unlocking
c>page26.
Turn signals
The turn s ignals flash tw ice when you un lock the
veh icle and flash once when you lock the veh icle .
I f the blin king con tinues, one of the doors or the
luggage compartment lid is not closed or the ig
nition is still switched on .
Unintentionally locking yourself out
Only lock your vehicle when all of the doo rs and
the luggage compa rtment l id a re closed and the
remo te control key is no t in the vehicle. This
he lps to prevent yo u from locking yourself out
accidentally.
22
The following conditions prevent yo u from lock
ing your remote control key in the vehicle:
- If the driver's door is open, the vehicle can not
be locked by press ing
the ~ button on the re
mote contro l key or by touching the locking
sensor* on a door .
- If the mos t recently used conven ien ce key* is
detected in the luggage compartment, the lug
gage compartment lid automatica lly unlocks
again after closing it.
- If the convenience key* that was last used is de
tected inside the vehicle, then the vehicle can
not be locked from the outside.
(D Tips
- Do not leave va luables unattended in the ve
hicle. A locked vehicle is not a safe!
- The LED i n the driver's door rail b links when
you lock the vehicle. If the LED lights up for
approximate ly 30 seconds after locking,
there is a malfunction in the central locking
system. Have the problem corrected by an
authorized A udi dealer or autho rized Aud i
Service Facility .
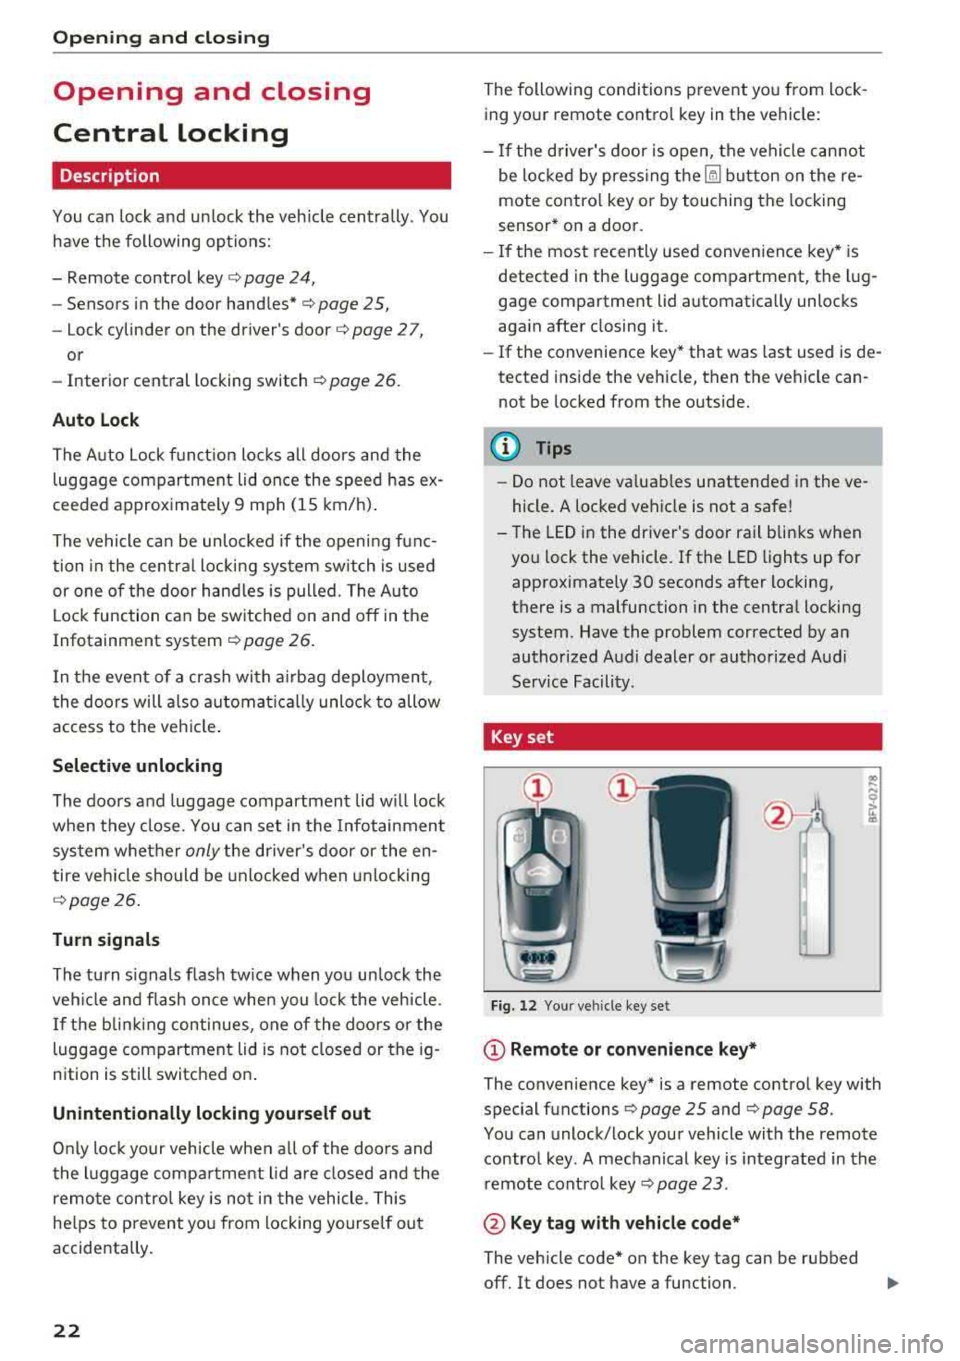
Key set
Fig. 12 Your ve hicle key set
(D Remote or con venience key*
.. .... N 0
ti
The convenience key* is a remote control key with
special functions
c> page 25 and c> page 58.
You can unlock/lock your vehicle with the remote control key . A mechanical key is integrated in the
remote control key
c> page 23 .
@ Key ta g w ith vehicle code*
The vehicle code* on the key tag can be rubbed
off. It does not have a function .
Page 27 of 310
Cl 00 .-< N r-N .-< 0 r-Vl 00
is unlocked when unlocking the vehicle
<=> page 26.
A WARNING
No one, especially children, should stay in the
vehicle when it is locked from the outside, be
cause the windows can no longer be opened
from the inside <=> page
2 7. Locked doors
make it more difficult for emergency workers
to get into the vehicle, which puts lives at
risk.
(D Tips
- Only use the remote control key when you
are within view of the vehicle .
- Do not use the remote control when you are
inside the vehicle. Otherwise, you could un
intentionally lock the vehicle. If you then
tried to start the engine or open a door, the
alarm would be triggered. If this happens,
press the unlock
button @.
-The selector lever must be in the P position
on vehicles with a convenience key*; other
wise the vehicle will not lock.
- Only use the panic function in an emergen
cy.
Unlocking/locking with the convenience
key
Applies to: vehicles with convenience key
The doors and luggage compartment lid can be
unlocked/locked without using the remote con
trol key.
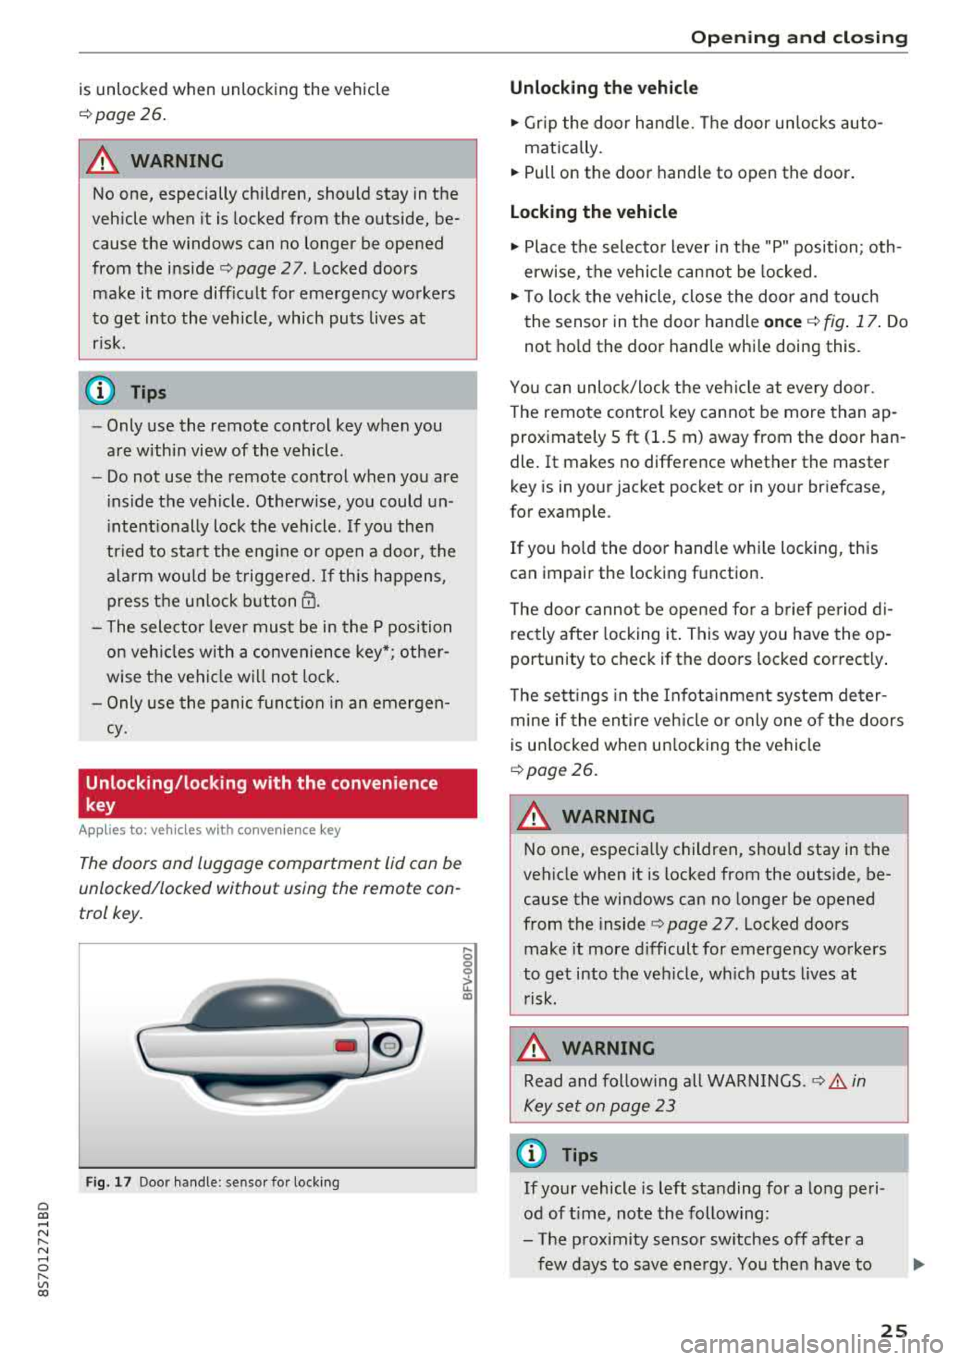
Fig. 17 Door handle : senso r for locking
,... 0
0
~ a:,
Opening and closing
Unlocking the vehicle
.,. Grip the door handle. The door unlocks auto-
matically.
.,. Pull on the door handle to open the door.
Locking the vehicle
.,. Place the selector lever in the "P" position; oth
erwise, the vehicle cannot be locked.
.,. To lock the vehicle, close the door and touch
the sensor in the door handle
once <=> fig. 17. Do
not hold the door handle while doing this.
You can unlock/lock the vehicle at every door.
Th e remote control key cannot be more than ap
proximately S ft
(1.5 m) away from the door han
dle. It makes no difference whether the master
key is in your jacket pocket or in your briefcase,
for example .
If you hold the door handle while locking, this
can impair the locking func tion .
The door cannot be opened for a brief period di
r ectly after locking i t. This way you have the op
portunity to check if the doors locked correctly.
The settings in the Infotainment system deter
mine if the entire vehicle or only one of the doors
is unlocked when unlocking the vehicle
¢page 26.
A WARNING ,..___ -
No one, especially children, should stay in the
vehicle when it is locked from the outside, be
cause the windows can no longer be opened
from the inside
¢page 27 . Locked doors
make it more difficult for emergency workers
to get into the vehicle, which puts lives at risk.
A WARNING
Read and following all WARNINGS .<=>.& in
Key set on page 23
(D Tips
If your vehicle is left standing for a long peri
od of time, note the following:
- The proximity sensor switches off after a
few days to save energy. You then have to
-
25
Page 28 of 310
Opening and clo sin g
pull once on the door handle to unlock the
vehicle and a second time to open it .
- The energy management system gradually
turns off unnecessary convenience functions
to prevent the vehicle battery from draining
and to maintain the vehicle's ability to start
for as long as possible. You may not be able
to unlock your vehicle using the convenience
key.
- For an explanation on conformity with the
FCC regulations in the United States and the
Industry Canada regulations, see
¢page 293.
(0 Tips
Unlocking with the convenience key (keyless
access) can be deactivated temporarily .
- Place the selector lever in the "P" pos ition;
otherwise, the vehicle cannot be locked.
- Close the door and press the button
(D III
¢ page 24, fig.16.
- Press the sensor on the door handle on ce
within five seconds ¢ fig. 17, ¢ & . Do not
ho ld the door handle wh ile doing this .
- The next time the vehicle is unlocked, it can
on ly be done with the remote control key or
mechanically us ing the door lock cylinder.
The convenience key will be active again af
ter the next loc king/un locking.
Central locking switch
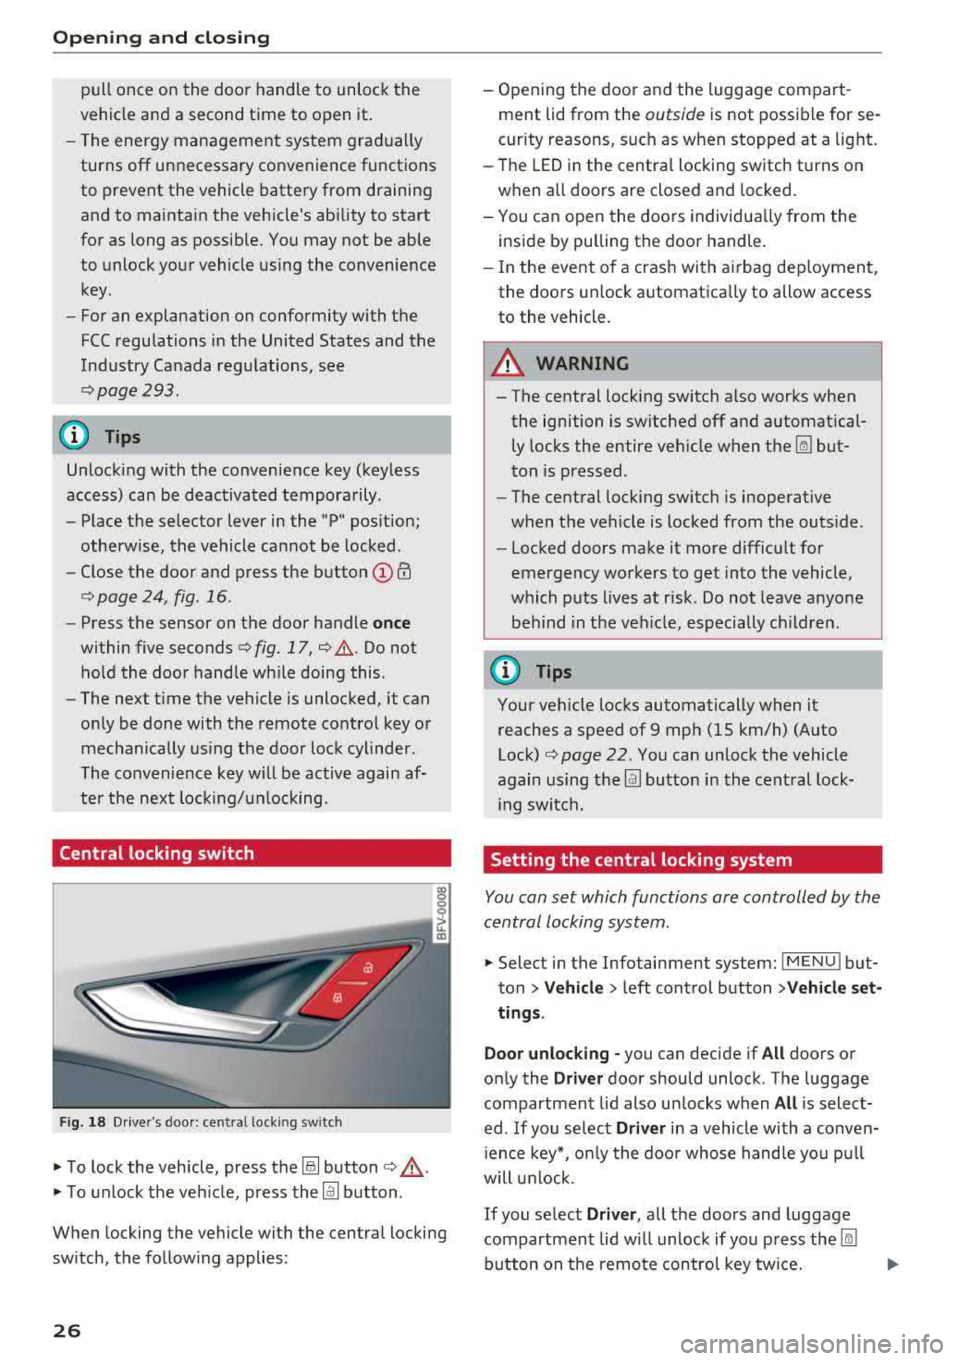
F ig . 18 Dr ive r's doo r: central locki ng switch
• To lock the vehicle, press the@! button ¢,& .
• To unlock the veh icle, press the @J button .
When locking the vehicle with the central locking
sw itch, the follow ing applies:
26
- Opening the door a nd the luggage compart
ment lid from the
outside is not possible for se
curity reasons, such as when stopped at a light.
- The LED in the centra l locking switch t urns on
when all doors are closed and locked.
- You ca n open the doors individua lly from the
inside by pulling the door handle.
- In the eve nt of a cras h with a irbag dep loyment,
the doo rs unlock automatica lly to allow access
to the vehicle.
8_ WARNING
-The central locking switch a lso works when
the ignition is switched off and automatical
ly locks the entire vehicle when
the~ but
ton is pressed.
- The central locking switch is inoperative
when the vehicle is locked from the outs ide .
-Locked doors make it more difficult for
emergency workers to get into the vehicle,
which p uts lives at risk . Do not leave anyone
behind in the ve hicle, especially ch ildren.
(D Tips
Your vehicle locks automatically when it
reaches a speed of 9 mph (15 km/h) (Auto
Lock)
¢ page 22. Yo u can unlock the vehicle
again using the
@J button i n the cent ral lock-
i ng switch.
Setting the central locking system
You con set which functions ore controlled by the
central locking system .
• Select in the Infotainment system: IMENUJ but
ton
>Ve hicle > left control button >V ehicle set
ting s.
Door unloc king -
you can decide if All doors or
on ly the
Driv er door should unlock . The luggage
compartmen t lid also un locks when
All is select
ed . If you se lect
Driver in a vehicle with a conven
i ence key*, o nly the doo r whose hand le yo u pu ll
will u nlock.
If you se lect Driver , all the doors and luggage
compartment lid w ill unloc k if yo u press
the ~
button on the remo te con trol key tw ice.
Page 29 of 310
Cl co ..... N ,....
N ...... 0
Fold mirrors* -if yo u se lec t On , the exterior rear
view mirrors fold in automatically when you press
the
[ml button on the remote cont rol key o r touch
the sensor* in the hand le.
Lo ck when driving1> -if you select On , the vehicle
l oc ks automatically when driving . A ll of the doors
and the luggage compa rtment lid lock.
Mechanically unlocking and locking the
doors
If the central locking fails , you mus t unlock/lock
t he doors separa tely.
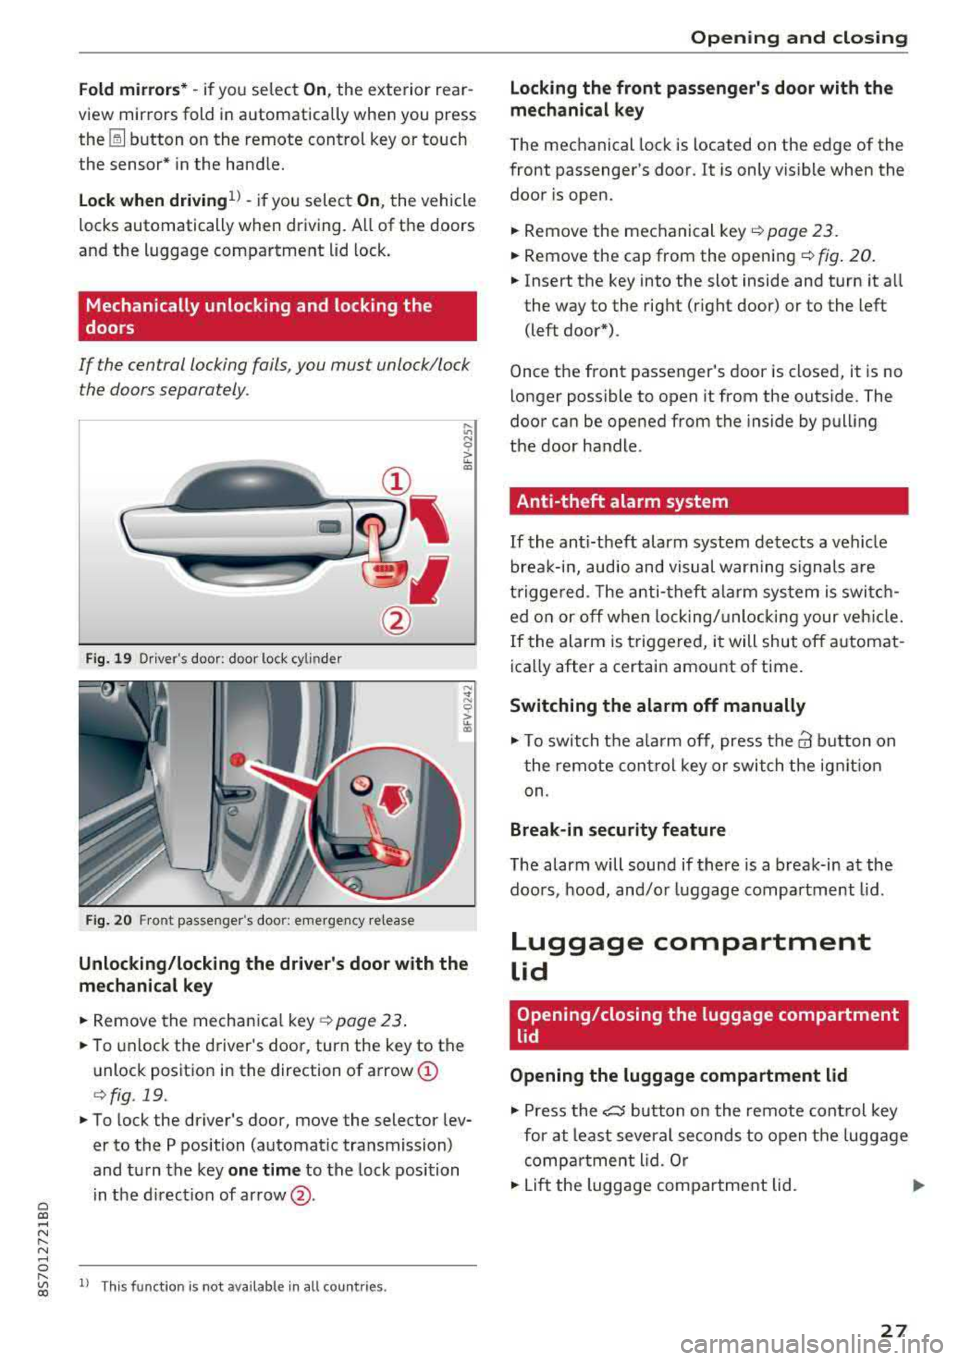
F ig. 19 Dr iver 's door: doo r loc k cy lin der
F ig. 20 Fro nt passenger 's doo r: e merge ncy re lease
Unlocking/locking the driver's door with the
mechanical key
.. Remove the mechan ica l key o:!> page 23 .
.. To unlock the driver's doo r, turn the key to the
unlock positio n in the direction of arrow
(I)
r=> fig . 19.
.. To lock the driver's door, move the selector lev
er to the P position (automat ic tra nsmission)
and tu rn the key
one t ime to the lock position
in the d irect ion of ar row @.
,....
"' l) Thi s fun ctio n is not avail able in al l coun tries. co
Opening and closing
Locking the front passenger's door with the
mechanical key
The mechanical lock is located on the edge of the
front passenger's door . It is only vis ible when the
door is open.
.. Remove the mechanical key .:!> page 23.
.. Remove the cap from the openi ng ¢ fig . 20 .
.. Insert the key into the slot inside and turn it a ll
the way to the right (r ight door) or to the left
(left door*).
Once the front passenger 's door is closed, it is no
longer possible to open it from the outs ide . The
door can be opened from the inside by pull ing
t h e door handle.
Anti-theft alarm system
If the anti-theft alarm system detects a vehicle
brea k-in, audio and visual warn ing signals are
t rigge red. The anti -theft a la rm sys tem is swi tc h
ed o n or off when lock ing/ unlo cki ng your ve hicle.
If the alarm is triggered, i t will shut off a utomat
ica lly after a certain amount of time.
Switching the alarm off manually
.,. To swit ch t he a la rm off, press t he@ b utton on
t he remote cont rol key o r switch the ig nit io n
on.
Break-in security feature
T he alarm will sound if there is a break-in at the
doo rs , hood, and/o r luggage compa rtment lid.
Luggage compartment
lid
Opening/closing the luggage compartment
lid
Opening the luggage compartment lid
.,. Press the e5 button on the remote con trol key
for at least severa l seconds to open the luggage
comp artment lid. Or
.. Lift the luggage compa rtment lid . ..,_.
27
Page 31 of 310
Cl 00 ... N r-N ... 0 r-Vl 00
Power window
Controls
The driver can control all power windows.
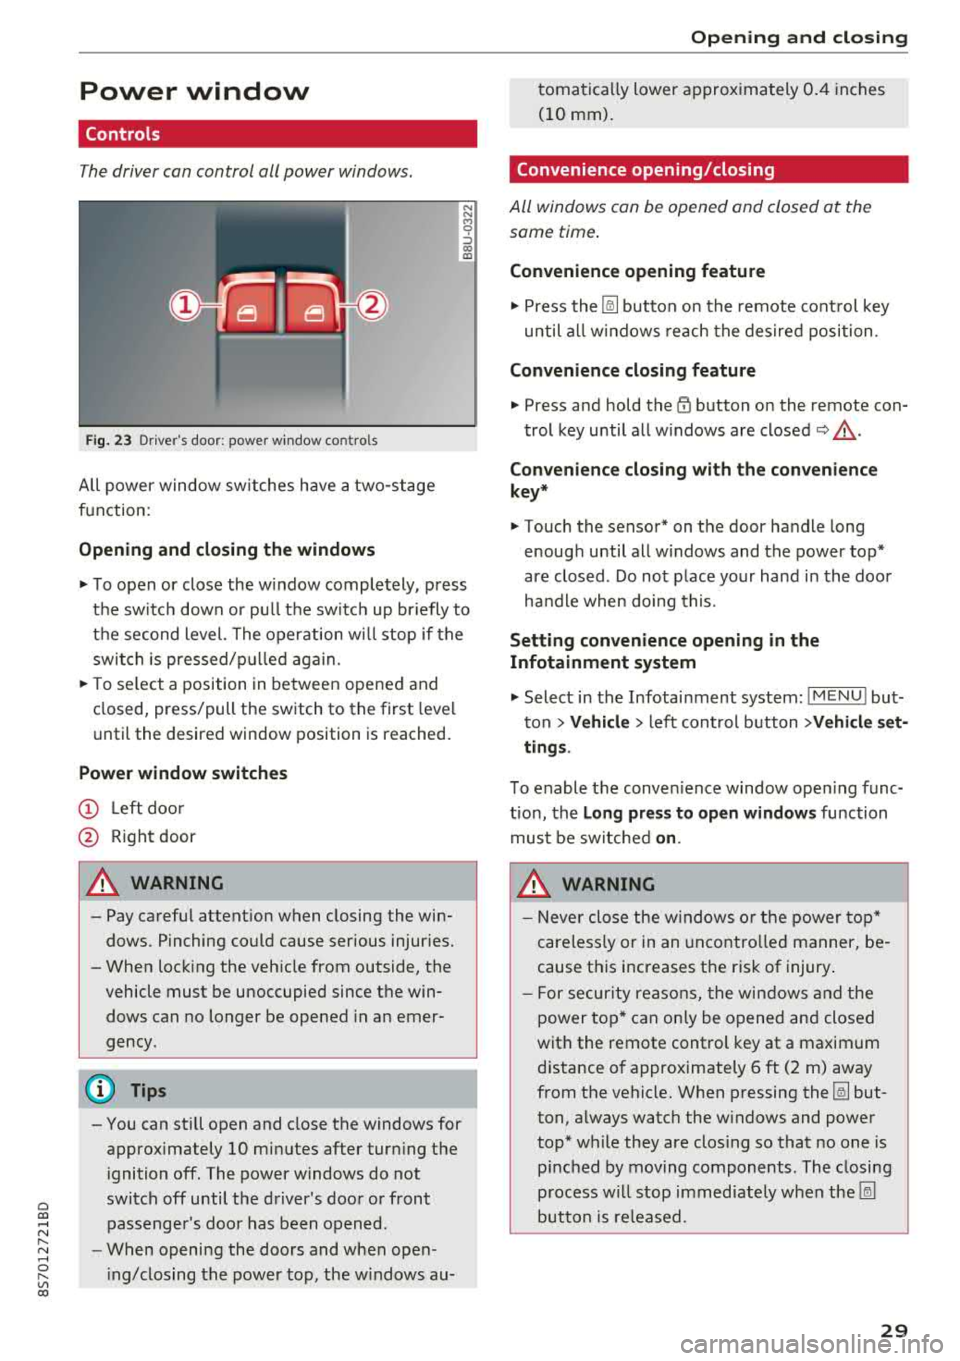
Fig. 23 Dr iver's door: power w indow co ntro ls
All power window sw itches have a two -stage
function:
Opening and clo sing the windows
N N M 0 ::':,
"' ID
.,. T o open or close the w indow completely, press
the sw itch down or pu ll the sw itch up br iefly to
the second level. The operation wi ll stop if the
switch is pressed/p ulled aga in.
.,. T o se lect a position in between opened and
closed, press/pull the switch to the first level
unti l the desired window position is reached.
Power window switch es
(D Left doo r
@ Right door
A WARNING
- Pay careful attent ion when closing the win
dows . Pinching could cause serious injur ies.
- When locking the veh icle from outside, the
vehicle must be unoccupied since the win dows can no longer be opened in an emer
gency .
(D Tips
-You can still open and close the windows for
approximately
10 minutes after turning the
i gnition off. The power windows do not
switch off until the driver's door or front passenger's doo r has been opened .
- When opening the doors and when open
i ng/closing the power top, the w indows au-
Open ing and cl osing
tomatically lower approx imately 0.4 inches
(10 mm).
Convenience opening/closing
All windows can be opened and closed at the
same time.
Convenience opening feature
.,. Press the [@] button on the remote cont rol key
until all w indows reach the desired position .
Convenience closing feature
.,. Press and hold the~ button on the remote con-
trol key until all w indows are
closed ~,&. .
Con venience closing with the con venience
key *
.,. Touch the sensor* on the door handle long
enough until all w indows and the power top*
are closed . Do not place your hand in the door
ha ndle when doing this.
Settin g convenience opening in the
Infotainment sy stem
.,. Select in the Infotainment system: I M ENU ! but
ton
> Vehicl e> left cont rol button > Vehicle set
ting s.
To enable the conven ience window open ing func
tion, the
L o ng pres s to open windows function
must be switched
o n.
A WARNING
- Never close the w indows o r the power top*
careless ly or in an uncontro lled manner, be
cause this increases the risk of injury.
- For secur ity reasons, the win dows and the
power top* can only be opened and closed
with the remote control key at a maximum
d istance of approximately 6 ft (2 m) away
from the vehicle. When p ressing the [@] but
ton, always watch the w indows and power
top* while they are closing so that no one is
p inched by moving components . The closing
p rocess w ill stop immediately when the [@]
button is re leased.
29
Page 40 of 310
Lights and Vision
Lights and Vision
Exterior lighting
Switching lights on and off
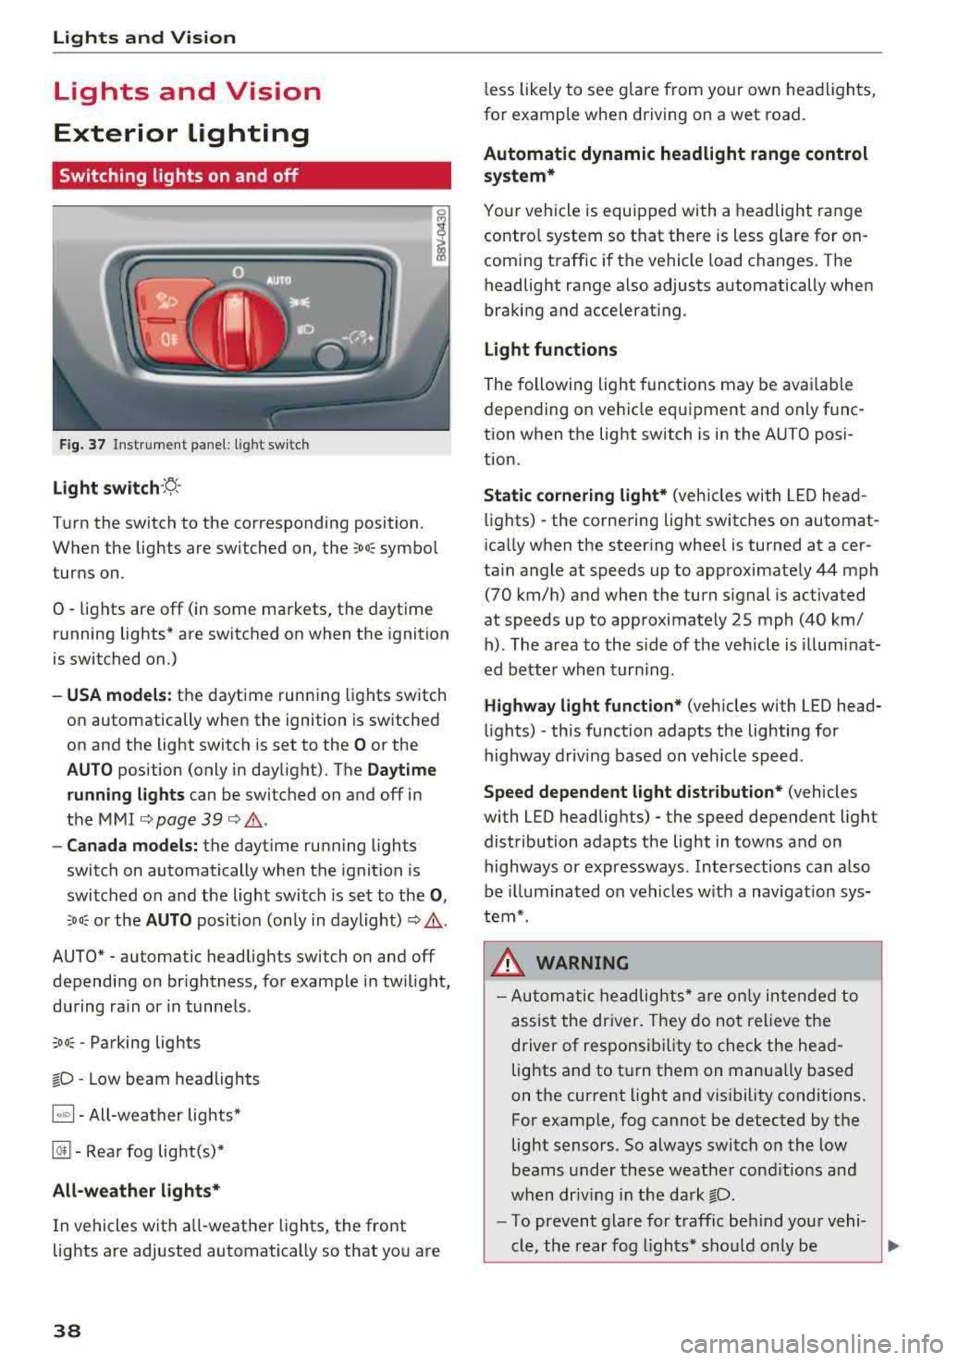
F ig. 37 Instrument panel: l ight sw itch
Light s witch ·~ ·
I
Turn the switch to the corresponding position.
When the lights are switched on, the
;Do: symbo l
turns on.
0
• lights are off (in some markets, the daytime
running lights* are switched on when the ignition
is switched on.)
-USA models : the daytime running lights switch
on automatically when the ignition is sw itched
on and the light switch is set to the
O or the
AUTO position (only in daylight). The Daytime
runn ing lights
can be switched on and off in
the
MMI c::;, page 39 c::;, ,&. .
-Canad a models: the dayt ime running lights
switch on automatically when the ignition is
switched on and the light switch is set to the
0 ,
:'.Do: or the AUTO position (only in daylight) c::;, ,&. .
AUTO* - automatic headlig hts switch on and off
depending on br ightness, for example in tw ilight,
during ra in or in tunne ls .
;Do: -Parking lights
tD -Low beam headlights
1~"' 1-All-weather lights*
@!I -Rear fog light(s)*
All-weather light s*
In vehicles with a ll-weathe r lights, the front
lights are adjusted automatically so that yo u are
38
less likely to see g lare from your own head lights,
fo r example when driving on a wet road.
Automatic dynamic headlight range control
system*
Your vehicle is equipped with a headlight range
contro l system so that there is less g la re for on
coming t raffic if the vehicle load changes. The
headlight range also adjusts automatically when
braking and accelerat ing.
Light function s
The following light funct ions may be ava ilable
depending on ve hicle equipment and only f unc
tion when the light switch is in the AUTO posi
t ion.
Static cornering light* (vehicles with LED head
li ghts) - the corne ring light switches on automat
i ca lly when the steer ing whee l is turned at acer
ta in angle at speeds up to approximately 44 mph
(70 km/h) and when the turn signal is activated
at speeds up to approximately 25 mph (40 km/ h) . The area to the side of the veh icle is illum ina t
ed bette r whe n turn ing .
Highway l ight function * (vehicles with LED head
li ghts)
-this function adapts the lighting for
highway driv ing based on veh icle speed .
Speed dependent light dist ribution* (vehicles
with LED headlig hts) - the speed dependent light
distribution adapts the light in towns and on
highways or expressways . Intersections can a lso
be illuminated on veh icles w ith a navigat ion sys
tem*.
& WARNING
- Autom atic headlig hts * are o nly in tended to
assis t the driver. They do not relieve the
driver of responsi bility to check the head
lights and to t urn them on manually based
on the current light and v is ibility conditions.
For examp le, fog cannot be detected by the
light sensors . So always switch on the low
beams under these weather cond it io ns an d
when dr iv ing in the da rk
tD.
-To prevent gla re for traffic be hind you r vehi-
cle, the rear fog lights* sho uld only be
..,.
Page 41 of 310
Cl co .... N ,..._
N .... 0 ,..._
Vl co
turned on in accordance with traffic
reg ulations.
- If the battery has been discharging for a
while, the parking light may sw itch off auto
matically. A lways make sure your vehicle is
parked and adequately lit according to the
laws . Avo id using the parking lights for sev
era l hours.
- Always observe legal reg ulat ions when us
ing the light ing systems described.
(!') Tips
- The light sensor for the automatic head
lights* is in the rearview mirror mount. Do
not place any stickers in this area on the
windsh ield.
- Some exterior lighting fu nctions can be ad
j usted
c::> page 39.
- If you turn off the ignition wh ile the exterio r
lights are on and open the door, a warning
tone so unds.
- In some markets, the ta il lights will sw itch
on when the dayt ime runn ing lights sw itch
on.
- In cool o r damp weather, the inside of the
headlig hts, tu rn s ignals and tai l lights can
fog over d ue to the tem perature d ifference
betwee n the inside and ou ts ide. They will
clea r shor tly after sw itch ing them o n. This
d oes not aff ect t he serv ice life o f the lig ht
i ng.
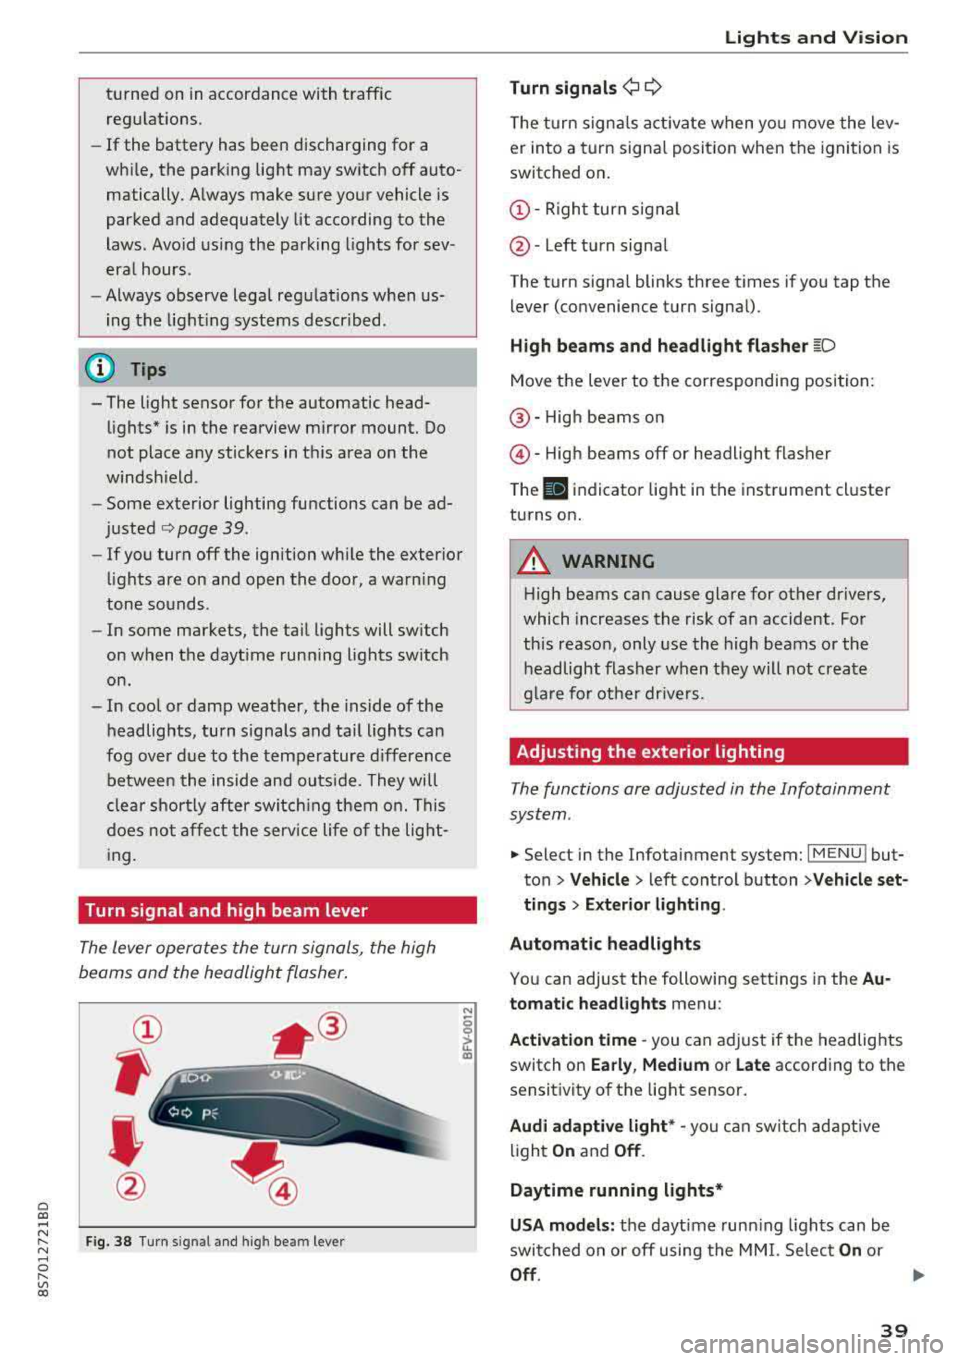
Turn signal and high beam lever
The lever opera tes the turn sign als, the high
beams and the headlight flasher .
Fig . 38 Tu rn signal an d high beam lever
N
0
~
"'
Lights and V ision
Turn signals ¢ 9
The turn signa ls act ivate w hen yo u move the lev
er into a turn signa l posit io n when the igni tion is
switched on .
©-Righ t turn signal
@ -Left tur n signal
The turn signa l blinks three t imes i f you tap t he
lever (convenience t urn signa l).
High beams and headlight flasher
~D
Move t he lever to the corresponding position:
@ -High beams o n
@-High beams off or headlight flasher
T he
II indicato r light in t he inst rument cl uster
turns on .
A WARNING
-High beams can cause glare for other drivers,
which increases the risk of an accident. Fo r
this reaso n, only use the high beams or the
headlight flasher when they wil l not create
g la re fo r ot her dr ivers.
Adjusting the exterior lighting
The functions are adjusted in the Infotainment
system .
.,. Select in the Infotainment system: I MENU ! but
ton> Vehicle > left control button >Vehicle set
tings > Exterior lighting .
Automatic headlights
You can adjust the following sett ings in the Au
tomatic headlights menu:
Activation time
-you can a djust if the headlights
switch on Early, Medium or Late according to the
sensit ivity of the light sensor.
Audi adaptive light * -you can sw itch ad ap tive
li gh t
On and Off .
Daytime running lights*
USA models: the daytime runn ing ligh ts can be
switched on or off using the MM I. Se lec t
On or
Off .
39