window AUDI TT ROADSTER 2018 Owners Manual
[x] Cancel search | Manufacturer: AUDI, Model Year: 2018, Model line: TT ROADSTER, Model: AUDI TT ROADSTER 2018Pages: 310, PDF Size: 46.95 MB
Page 9 of 310
Cl 00 .-< N r-N .-< 0 r-Vl 00
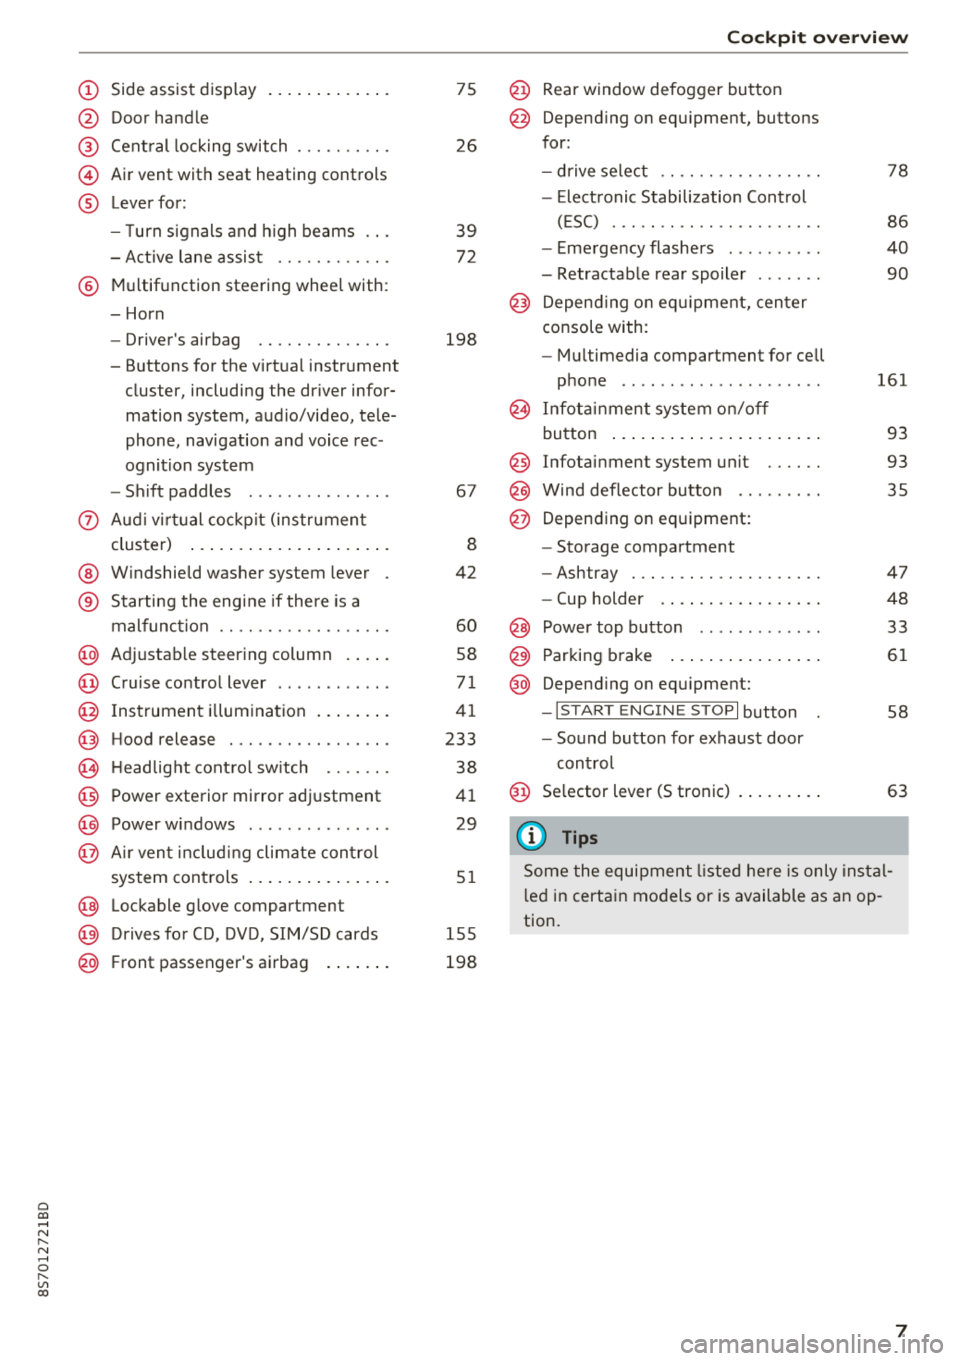
(D Side assist disp lay ..... ... .. .. .
@ Door handle
@ Cent ral locking swit ch ..... .. .. .
@ Air vent with seat heating controls
® Lever for:
- T urn s ignals and high beams
- Act ive lane assist ....... .. .. .
® M ultifunction steering whee l with :
- Horn
- Driver's airbag ........... .. .
- Buttons for the virtua l instr ument
cluster, including the dr iver infor
mation system, audio/video, tele
phone, navigation and voice rec
ognit ion system
- Shift paddles ............. . .
(J) A ud i v irtu al coc kp it (instrument
cluster) ... ... .. ..... ... .. .. .
@ W indshield washer system lever
® Starting the eng ine if the re is a
malfunc tion ............... .. .
@ Ad justable steer ing column . ... .
@ Cruise contro l lever .......... . .
@ Ins trumen t il lum ination ... .. .. .
@ Hood release .............. .. .
€3) H eadlight cont ro l sw itch .... .. .
@ Power exterio r mirror adj ustment
@) Power windows .............. .
@ A ir ven t incl uding climate con trol
system controls .. ..... ... .. .. .
@ Lockable g love compartment
@) D rives fo r CD, DV D, SIM/SD cards
@ Front passenger's ai rbag . ... .. .
75
26
39
7 2
198
67
8
42
60
58
71
41
233
38
4 1
29
5 1
1 55
198
Coc kpit o ver view
@ Rear window defogger button
@ Depend ing on equ ipment, buttons
for:
- drive select .. .............. .
- Elect ronic Stabili zation Cont rol
( E SC) . .. .. .. .............. .
- E me rge ncy flashers ......... .
- Retractable rear spoiler ...... .
@ Depending o n eq uipment, cen ter
console with:
- Mu ltimedia compartment for cell
p hone .. .. .. .. ............ .
@ In fota inment system o n/off
bu tton ... .... .. ... .. ..... .. .
@ Infotai nment system unit ..... .
@ Wind deflector butto n ........ .
@ Depending on eq uipment:
- Storage compartment
- Ashtray . .. .. .............. .
- Cup holder .... ... .. ..... .. .
@ Power top b utton ............ .
@ Parking b rake ... ... .. ..... .. .
@ Depend ing on eq uipment:
-I S TAR T ENGI NE STOP I button
- So und button for exhaust door
cont rol
@ Se lector lever (S tronic)
(D Tips
78
86
40
90
161
93
93 35
47
48
33
61
58
63
Some the equi pment listed he re is only ins tal
l e d in certa in models or is available as an op
tion.
7
Page 25 of 310
Replacing a key
If a key is lost, see an authorized Audi dealer or
authorized Audi Service Facility. Have
this key de
activated.
It is important to bring all keys with
you. If a key is lost, you should report it to your
insurance company.
Number of keys
You can check the number of keys ass igned to
your vehicle in the Infotainment system . To do
this, select the
I MENU I button > Vehicle > left
control button
> Service & checks > Vehicle in ·
formation .
This way, you can make sure that you
have all the keys when purchasing a used vehicle .
Electronic immobilizer
The immobilizer prevents unautho rized use of
the vehicle .
Unde r certain circumstances, the vehicle may not
be able to start if there is a remote contro l key
from a different vehicle manufacturer on the key
chain .
Data in the master key
When driving , service and maintenance- relevant
data is continuously stored in your remote con
trol key . Your Audi service adviso r can read out
this data and te ll you about the work your vehicle
needs. This applies also to veh icles with a con
venience key *.
Personal convenience settings
If two people use one vehicle, it is recommended
that each person always uses "their own" master
key. When the ignition is turned
off or when the
ve hicle is locked, persona l convenience settings
for the following systems are stored and as
signed to the remote master key .
- Climate control system
- Parking aid*
- Active lane assist*
- Side ass ist*
- Drive select
a The stored settings are automatically recalled co
;:::: when you unlock the vehicle, open the doors or ,....
~ turn on the ignition. 0 ,....
Vl co
Opening and closing
A WARNING
If you leave the vehicle, switch the ignition off
and take the vehicle key w ith you. This applies
particularly when children remain in the vehi
cle . Otherwise the child ren cou ld start the en
g ine or operate electrical equ ipment such as
power windows.
(D Note
Protect the remote control key against high
temperatures and direct sunl ight.
(D Tips
- The operation of the remote control key can
be temporarily disrupted by interference
from transmitters near the vehicle working
in the same frequency range (such as a cell
phone or radio equipment). Always check if
yo ur vehicle is locked!
- For an explanat ion on conformity with the
FCC regulatio ns in the United States and the
Industry Canada regulations, see
¢page 293.
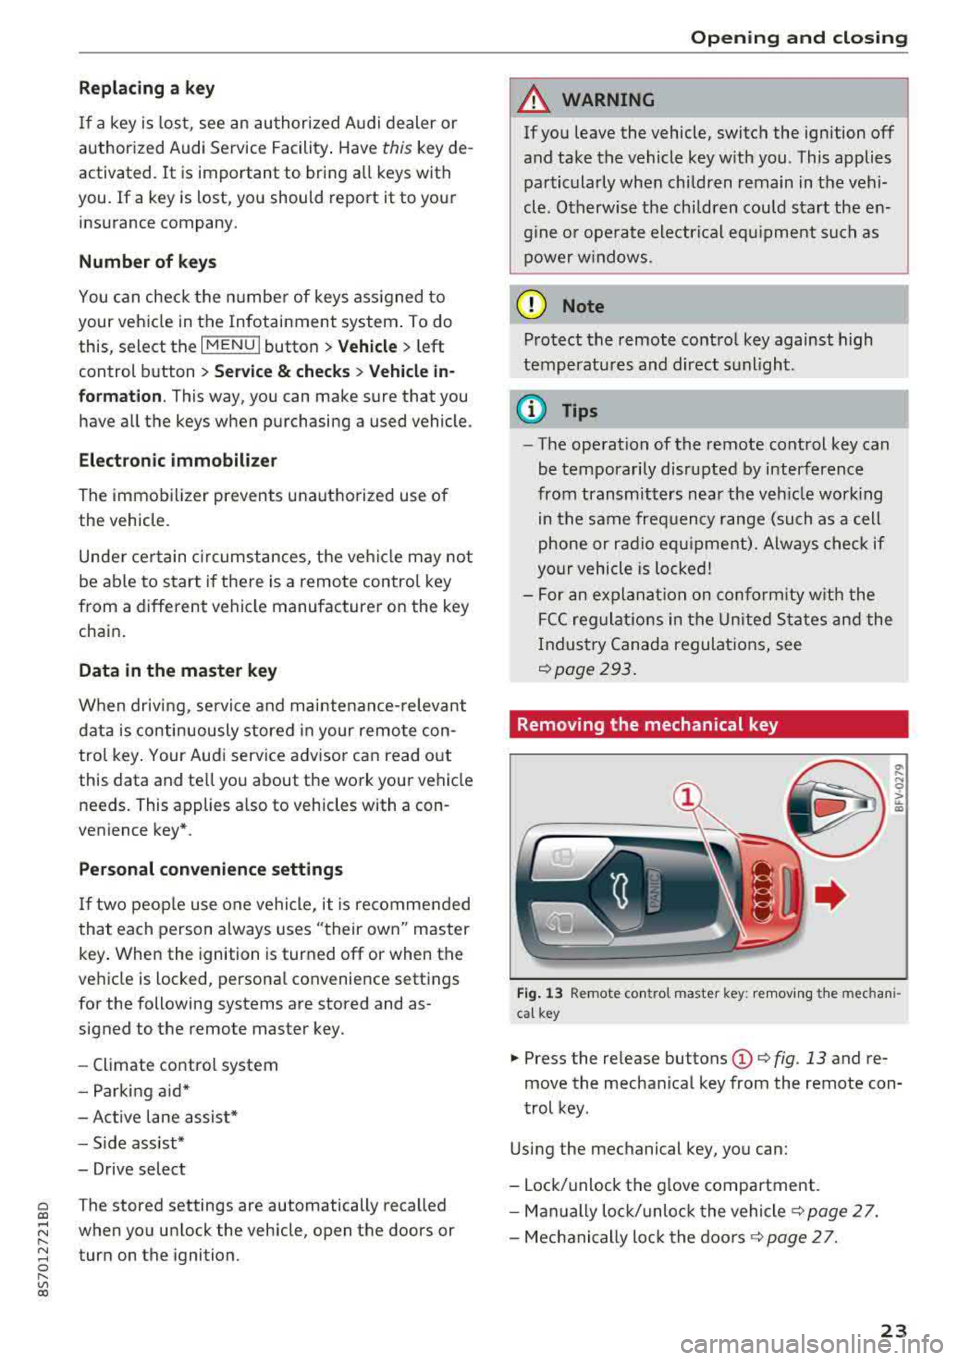
Removing the mechanical key
Fig. 13 Remote co ntro l master key : removing the mechan i
cal key
.,. Press the re lease buttons (D ¢ fig . 13 and re
move the mechanical key from the remote con
trol key.
Using the mechanical key, you can:
- Lock/unlock the glove compartment.
- Manually lock/unloc k the vehicle s>
page 2 7.
- Mechanically loc k the doors s>
page 2 7.
23
Page 27 of 310
Cl 00 .-< N r-N .-< 0 r-Vl 00
is unlocked when unlocking the vehicle
<=> page 26.
A WARNING
No one, especially children, should stay in the
vehicle when it is locked from the outside, be
cause the windows can no longer be opened
from the inside <=> page
2 7. Locked doors
make it more difficult for emergency workers
to get into the vehicle, which puts lives at
risk.
(D Tips
- Only use the remote control key when you
are within view of the vehicle .
- Do not use the remote control when you are
inside the vehicle. Otherwise, you could un
intentionally lock the vehicle. If you then
tried to start the engine or open a door, the
alarm would be triggered. If this happens,
press the unlock
button @.
-The selector lever must be in the P position
on vehicles with a convenience key*; other
wise the vehicle will not lock.
- Only use the panic function in an emergen
cy.
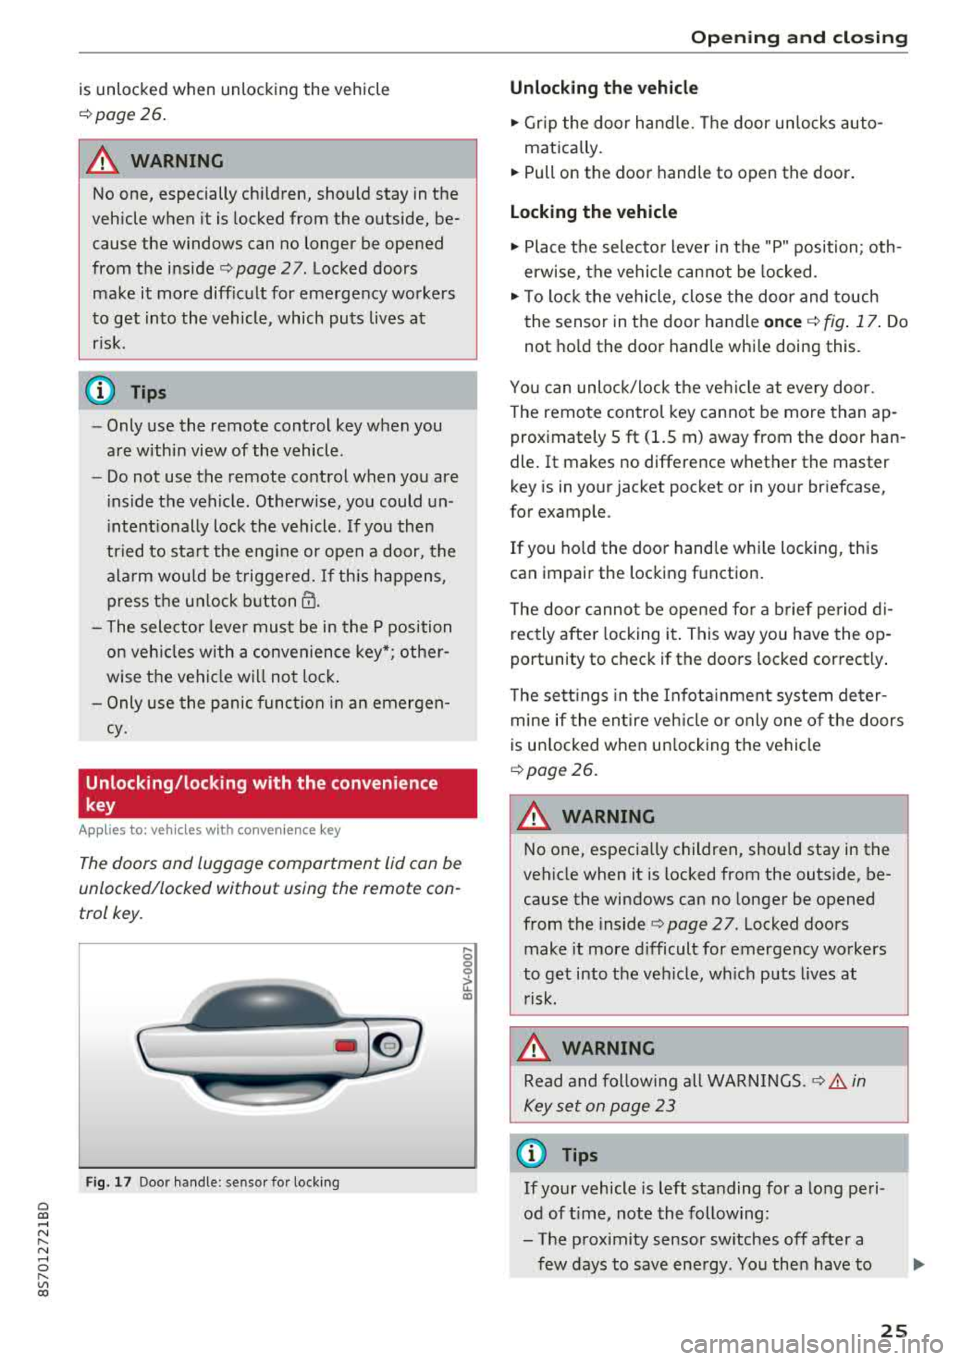
Unlocking/locking with the convenience
key
Applies to: vehicles with convenience key
The doors and luggage compartment lid can be
unlocked/locked without using the remote con
trol key.
Fig. 17 Door handle : senso r for locking
,... 0
0
~ a:,
Opening and closing
Unlocking the vehicle
.,. Grip the door handle. The door unlocks auto-
matically.
.,. Pull on the door handle to open the door.
Locking the vehicle
.,. Place the selector lever in the "P" position; oth
erwise, the vehicle cannot be locked.
.,. To lock the vehicle, close the door and touch
the sensor in the door handle
once <=> fig. 17. Do
not hold the door handle while doing this.
You can unlock/lock the vehicle at every door.
Th e remote control key cannot be more than ap
proximately S ft
(1.5 m) away from the door han
dle. It makes no difference whether the master
key is in your jacket pocket or in your briefcase,
for example .
If you hold the door handle while locking, this
can impair the locking func tion .
The door cannot be opened for a brief period di
r ectly after locking i t. This way you have the op
portunity to check if the doors locked correctly.
The settings in the Infotainment system deter
mine if the entire vehicle or only one of the doors
is unlocked when unlocking the vehicle
¢page 26.
A WARNING ,..___ -
No one, especially children, should stay in the
vehicle when it is locked from the outside, be
cause the windows can no longer be opened
from the inside
¢page 27 . Locked doors
make it more difficult for emergency workers
to get into the vehicle, which puts lives at risk.
A WARNING
Read and following all WARNINGS .<=>.& in
Key set on page 23
(D Tips
If your vehicle is left standing for a long peri
od of time, note the following:
- The proximity sensor switches off after a
few days to save energy. You then have to
-
25
Page 31 of 310
Cl 00 ... N r-N ... 0 r-Vl 00
Power window
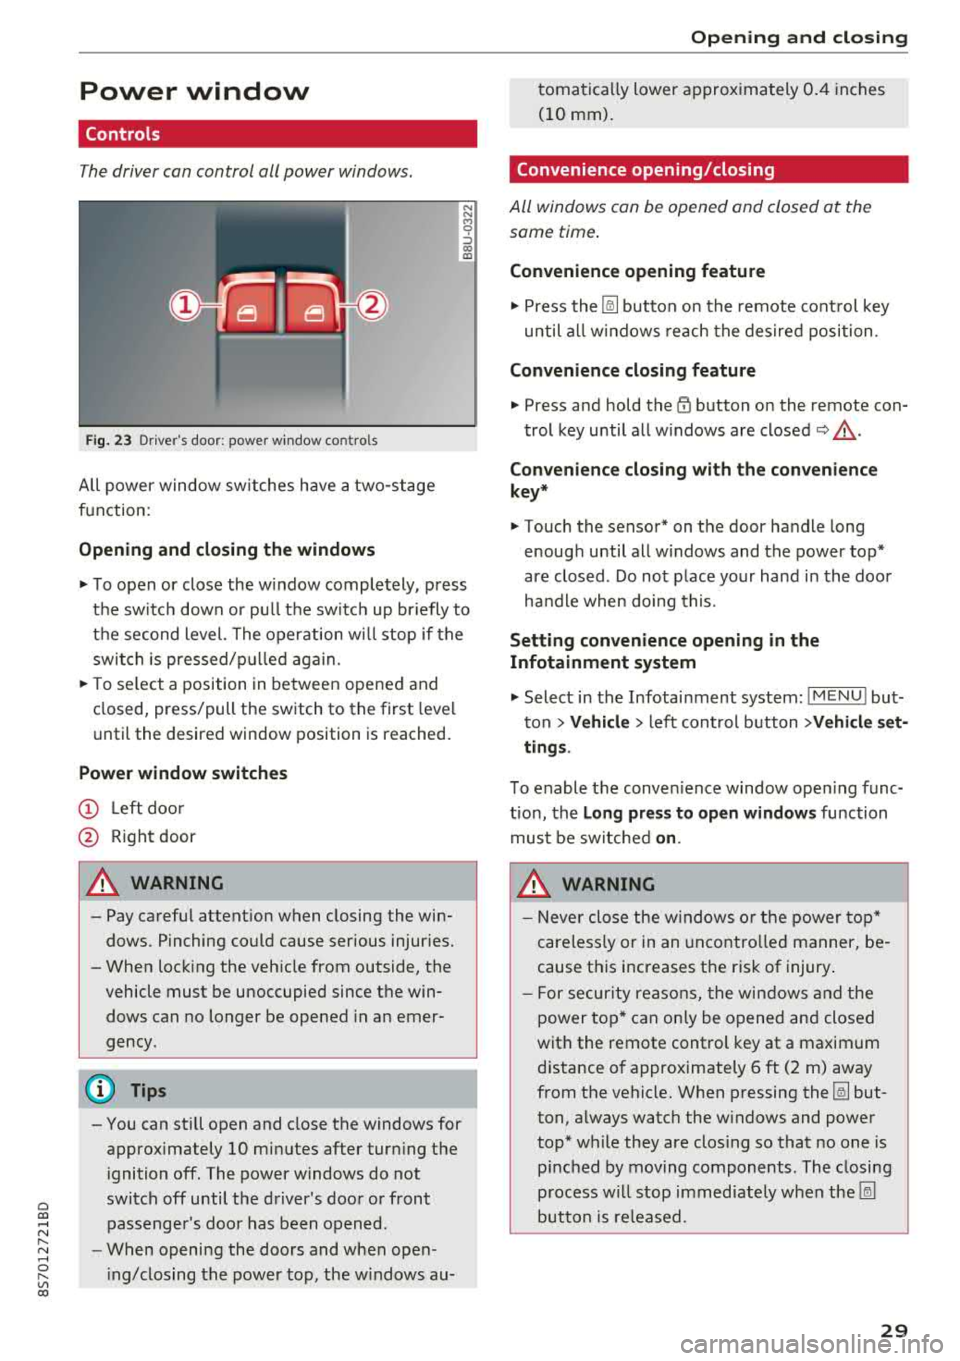
Controls
The driver can control all power windows.
Fig. 23 Dr iver's door: power w indow co ntro ls
All power window sw itches have a two -stage
function:
Opening and clo sing the windows
N N M 0 ::':,
"' ID
.,. T o open or close the w indow completely, press
the sw itch down or pu ll the sw itch up br iefly to
the second level. The operation wi ll stop if the
switch is pressed/p ulled aga in.
.,. T o se lect a position in between opened and
closed, press/pull the switch to the first level
unti l the desired window position is reached.
Power window switch es
(D Left doo r
@ Right door
A WARNING
- Pay careful attent ion when closing the win
dows . Pinching could cause serious injur ies.
- When locking the veh icle from outside, the
vehicle must be unoccupied since the win dows can no longer be opened in an emer
gency .
(D Tips
-You can still open and close the windows for
approximately
10 minutes after turning the
i gnition off. The power windows do not
switch off until the driver's door or front passenger's doo r has been opened .
- When opening the doors and when open
i ng/closing the power top, the w indows au-
Open ing and cl osing
tomatically lower approx imately 0.4 inches
(10 mm).
Convenience opening/closing
All windows can be opened and closed at the
same time.
Convenience opening feature
.,. Press the [@] button on the remote cont rol key
until all w indows reach the desired position .
Convenience closing feature
.,. Press and hold the~ button on the remote con-
trol key until all w indows are
closed ~,&. .
Con venience closing with the con venience
key *
.,. Touch the sensor* on the door handle long
enough until all w indows and the power top*
are closed . Do not place your hand in the door
ha ndle when doing this.
Settin g convenience opening in the
Infotainment sy stem
.,. Select in the Infotainment system: I M ENU ! but
ton
> Vehicl e> left cont rol button > Vehicle set
ting s.
To enable the conven ience window open ing func
tion, the
L o ng pres s to open windows function
must be switched
o n.
A WARNING
- Never close the w indows o r the power top*
careless ly or in an uncontro lled manner, be
cause this increases the risk of injury.
- For secur ity reasons, the win dows and the
power top* can only be opened and closed
with the remote control key at a maximum
d istance of approximately 6 ft (2 m) away
from the vehicle. When p ressing the [@] but
ton, always watch the w indows and power
top* while they are closing so that no one is
p inched by moving components . The closing
p rocess w ill stop immediately when the [@]
button is re leased.
29
Page 32 of 310
Opening and clo sin g
Correcting power w indow malfunctions
You can reactivate the one-touch up/down func
tion if it malfunctions .
.. Pull the power window sw itch up unt il the win
dow is completely raised.
.. Release the sw itch and pull it up again for at
least one second .
Garage door opener
(Homelink)
Description
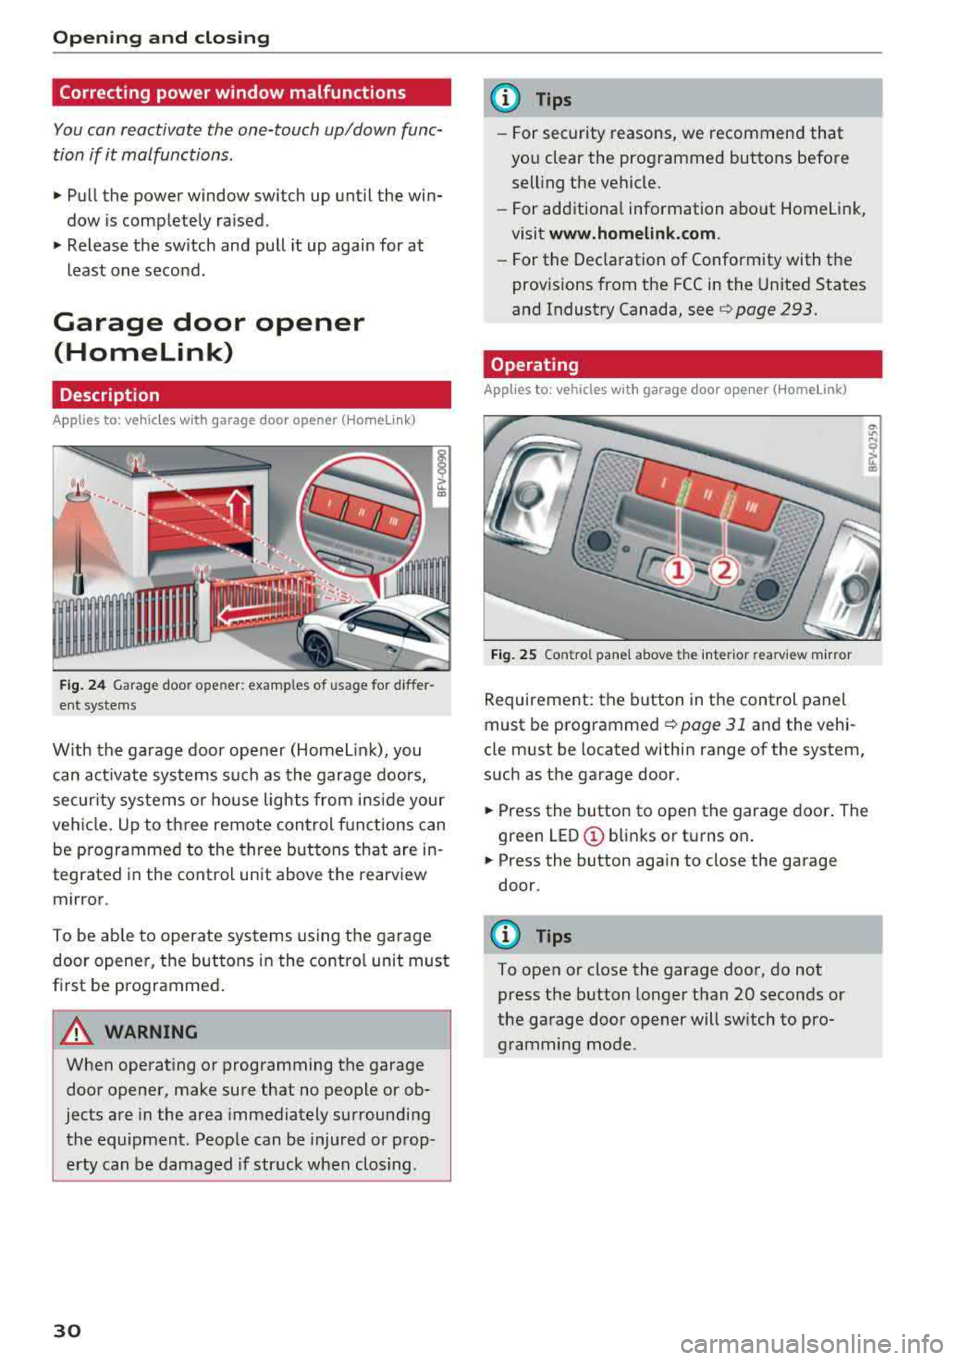
Applies to: vehicles with garage door opener (Homelink)
Fig . 24 Garage door ope ner: exa mples o f usage fo r differ
ent systems
W ith the garage door opener (Homelin k), you
can activate systems such as the garage doors,
secur ity systems o r house lights from inside your
veh icle. Up to three remote control f unctions can
be programmed to the three buttons that are in
tegrated in the control unit above the rearview
mirror .
To be ab le to operate systems using the garage
door opener, the buttons in the contro l unit must
first be programmed .
A WARNING
When operating or programming the garage
door opener, make sure that no people or ob
jects are in the area immediately surrounding
the equipment . Peop le can be injured or prop
erty can be damaged if str uck when closing .
30
@ Tips
-For security rea.sons, we recommend that
you clear the programmed buttons before
selling the vehicle .
- For additiona l information about Homelink,
visit
www.homeli nk.com .
-For the Dec laration of Conformity with the
prov isions from the FCC in the United States
and Industry Canada, see
c;, page 293.
Operating
App lies to : vehicles with garage door opener (Homelink)
F ig . 25 Co ntro l pane l above t he inter ior rea rv iew mirror
Requirement: the button in the control panel
must be
programmed ¢ page 31 and the vehi
cle must be located within range of the system,
such as the garage door.
.. Press the button to open the garage door . The
green
LED © blinks or turns on .
.. Press the button aga in to close the garage
door.
(D Tips
To open or close the garage door, do not
press the button longer than 20 seconds or
the garage door opener will switch to pro gramming mode.
Page 35 of 310
Cl co .... N ,....
N .... 0 ,....
Vl co
Power top
Power top
General information
The power top opens and closes automat ica lly .
When open , the power top is stored completely
in the power top compartment . The power top
can be opened or closed at speeds up to 30 mph (SO km/h).
Under normal conditions , the power top is wind
and waterproof. In rare cases, small droplets of
water may form under ext reme weather condi
tions such as torrential or prolonged rain. That is normal and no cause for conc ern .
F ollow the care instruct ions to keep the power
top free of leaks and to maintain its appearance
9 page 266, Care and cleaning . Also observe the
following:
- Open and stow the power top only when it is
clean and dry . Stowing the power top when it is
damp can create imprints in it, and if it is left
that way for long periods of time, mi ldew and
other damage can fo rm . T o prevent scratch ing
or damaging the power top, do not use any
sharp-edged objects to remove ice and snow .
The rear window may be cleared w ith a stand
ard ice scraper .
- Do not leave the power top open for several
weeks or the creases in it may become discol ored .
- Do not open the power top when the tempera
ture is below 32 °F (0 °C) . The fabric in the
power top loses elast icity in s ub-zero tempe ra
tu res .
Powe r top
Opening and closing the power top
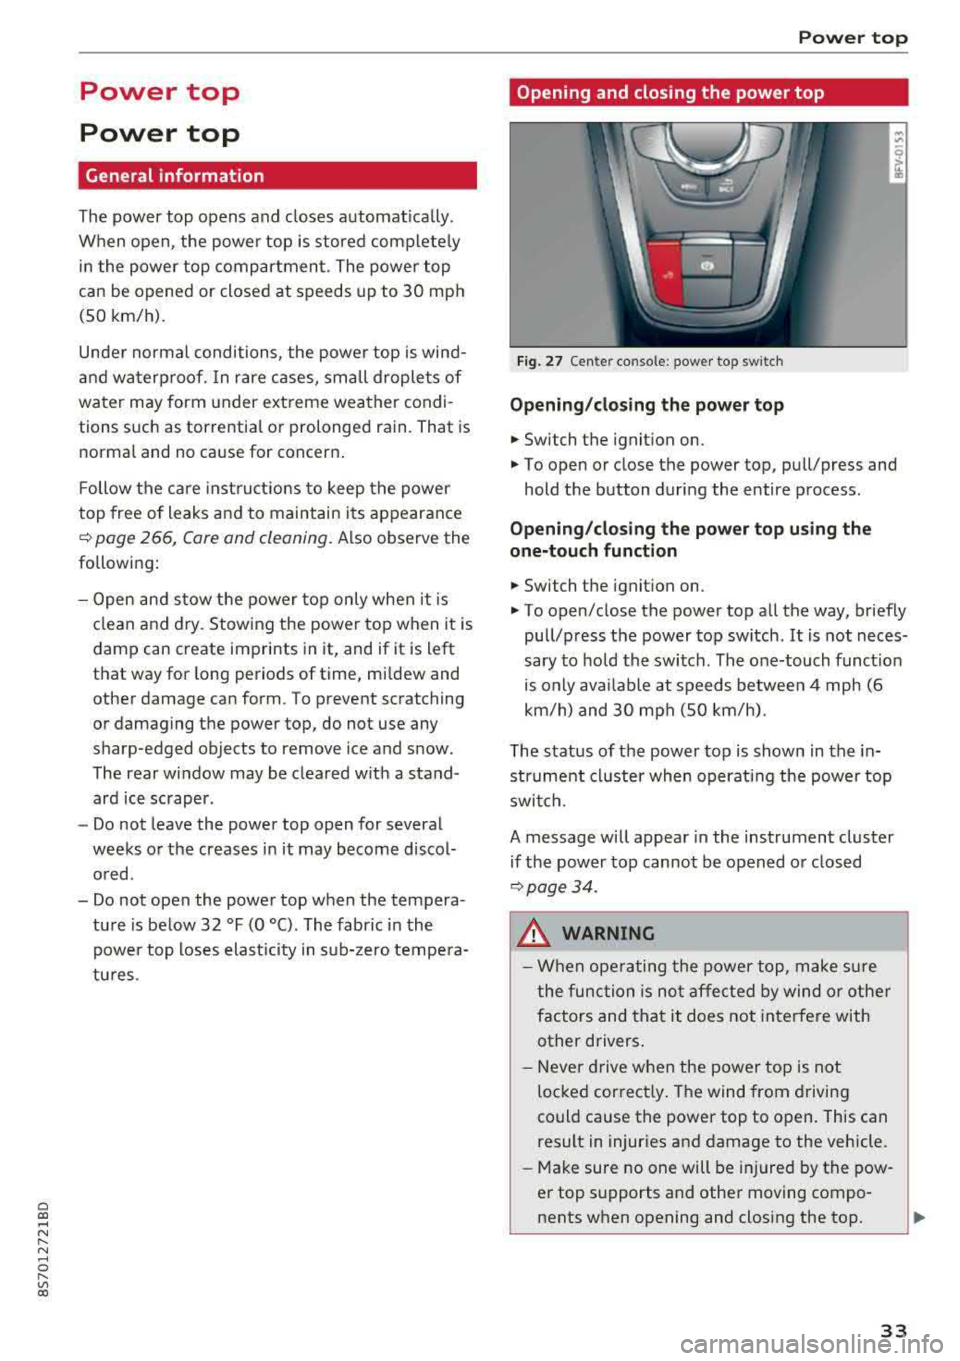
Fig. 27 Cen te r conso le : p ow er t op swi tch
Opening /closing the power top
.. Switch the ignition on.
.. To open or close the power top , pu ll/press and
hold the button during the entire process .
Opening/cl osi ng the power top u sing the
one-touch function
.. Switch the ignit ion on .
.. To open/close the power top all the way, briefly
pull/press the power top switch . It is not neces
sary to ho ld the switch . The one-touch funct io n
is only avai lab le at speeds between 4 mph (6
km/h) and 30 mph (SO km/h).
The status of the power top is shown in the in strument cluster when operating the powe r top
switch .
A message will appear in the instrument cluster
if the power top cannot be opened or closed
9 page34.
A WARNING
-When operating the power top, make s ure
the func tion is not affected by wind or other
factors and that it does not interfere with
other drivers .
- Neve r drive when the power top is not
locked cor rect ly . The wind from driving
could cause the power top to open . This can
result in injuries and damage to the vehicle .
-Make sure no one will be injured by the pow
er top supports and othe r moving compo
nents when opening and closing the top.
3 3
Page 36 of 310
Power top
-Visibility to the rear is limited when operat
ing the power top. Avoid operat ing the top
wh ile driving in reverse.
(D Note
- To prevent damage to the power top:
- do not store any objects in the power top
storage compartment.
- make sure there is enough space above
the vehicle when opening or clos ing the
powe r top.
(D Tips
- To prevent the vehicle battery from dra ining
unnecessari ly, do not open or close the pow
er top repeatedly when the engine is switch
ed off.
- A message will appear in the instrument
cluster if there is a malfunction in the powe r
top
~ page 34.
- The powe r top can also be operated manual
l y temporari ly if there is a malfunction
~ page 36, Power top emergency opera
tion.
An authorized A udi dealer or author
ized Audi Service Facility should diagnose
and correct the cause of the ma lfunction as
soon as possib le .
- If the vehicle is parked with the power top open, the vehicle interior is not protected
from damaging weather or unauthor ized ac
cess. Lock any items you leave behind in the
luggage compartment. C lose the power top
before leaving the vehicle .
- The side windows automat ically lower
slightly when opening or closing the power
top.
34 Power top convenience opening and closing
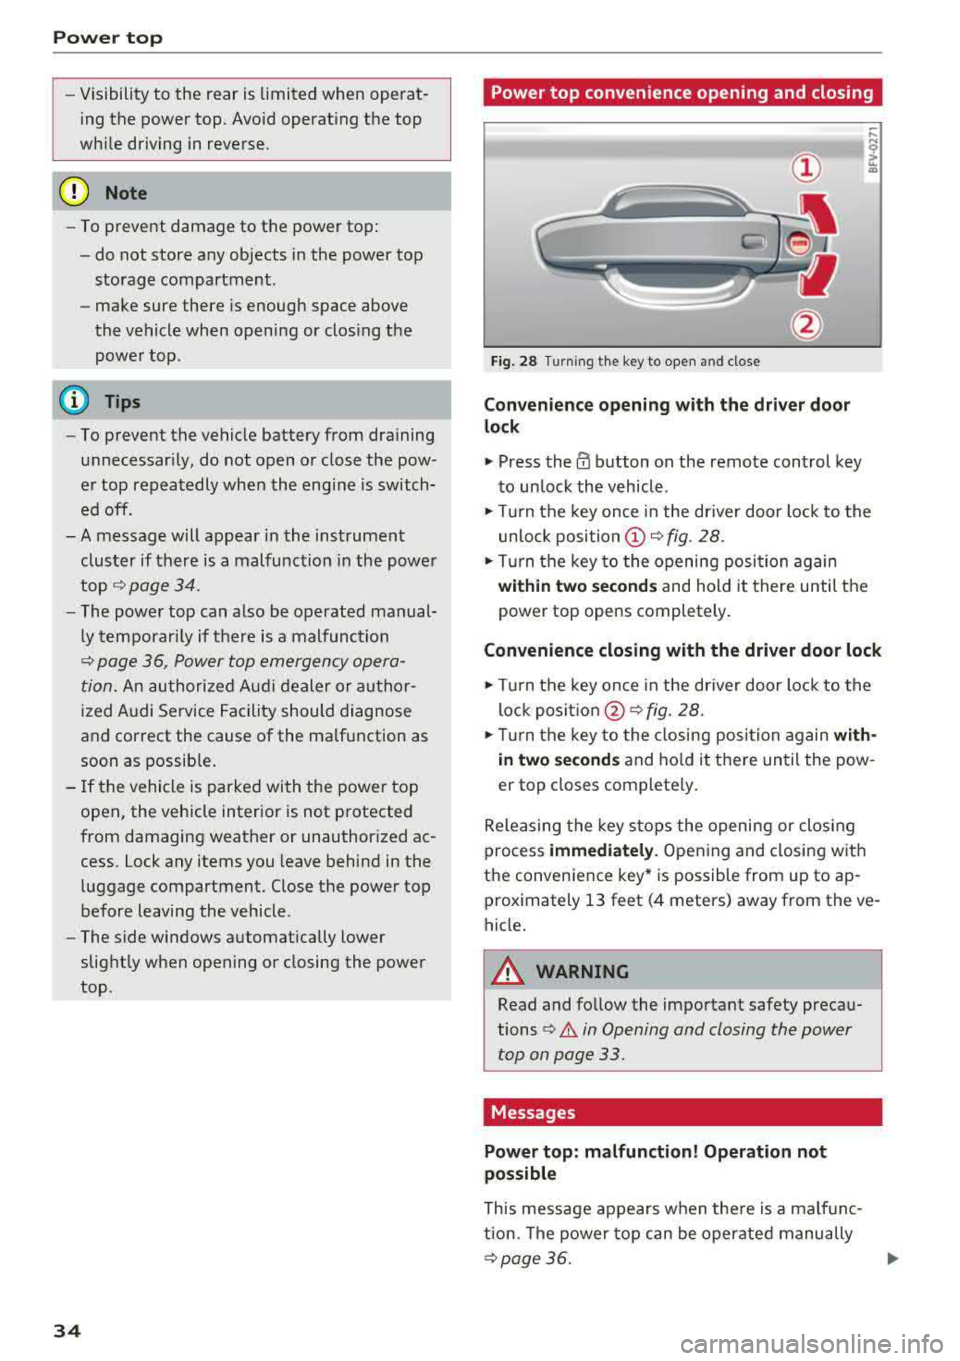
Fig. 28 Turn
ing the key to open and close
Convenience opening with t he dri ver door
lock
.,. Press the 0 button on the remote control key
to un lock the vehicle .
.,. Turn the key once in the driver door lock to the
unlo ck
position @~ fig. 28 .
.. Turn the key to the opening posi tion again
within two se cond s and hold it there until the
power top opens completely .
Convenience closing with the driver door lock
.,. Turn the key once in the driver door lock to the
lock
posit ion @ ~ fig. 28.
.. T urn the key to the closing posi tion again w ith
i n two second s
and ho ld it there until the pow
er top closes complete ly .
Releasing the key stops the opening or clos ing
process
immedi ately . Opening and closing with
the convenience key* is possible from up to ap
prox imately 13 feet (4 meters) away from the ve
hicle.
A WARNING
Read and follow the important safety precau
tions
¢ .&. in Opening and closing the power
top on page 33.
Messages
Power top: m alfunction! Oper ation not
possible
This message appears when the re is a malfunc
tion. The power top can be operated manually
~ page 36. .,.
Page 38 of 310
Power top
Power top emergency
operation
General information
The power top con be closed manually if there is
a malfunction .
• Set the parking brake .
• Open all windows.
• Switch the ignition off .
Only close the power top manual ly in an emer
gency. Have a second person assist. Drive to an
author ized Audi dealer or author ized Audi Se rvice
F aci lity immediately to have the malfunction cor
rected .
A WARNING
-There is a risk of pinching the hands or other
people during all of the power top emergen
cy operation steps.
- Make sure all windows a re lowered during
emergency ope ration.
- Do not reach into the power top supports
or other moving components.
- Never drive when the power top is not locked co rrectly. The wind from driving
cou ld cause the power top to open. This can
result in inj uries and damage to the vehicle.
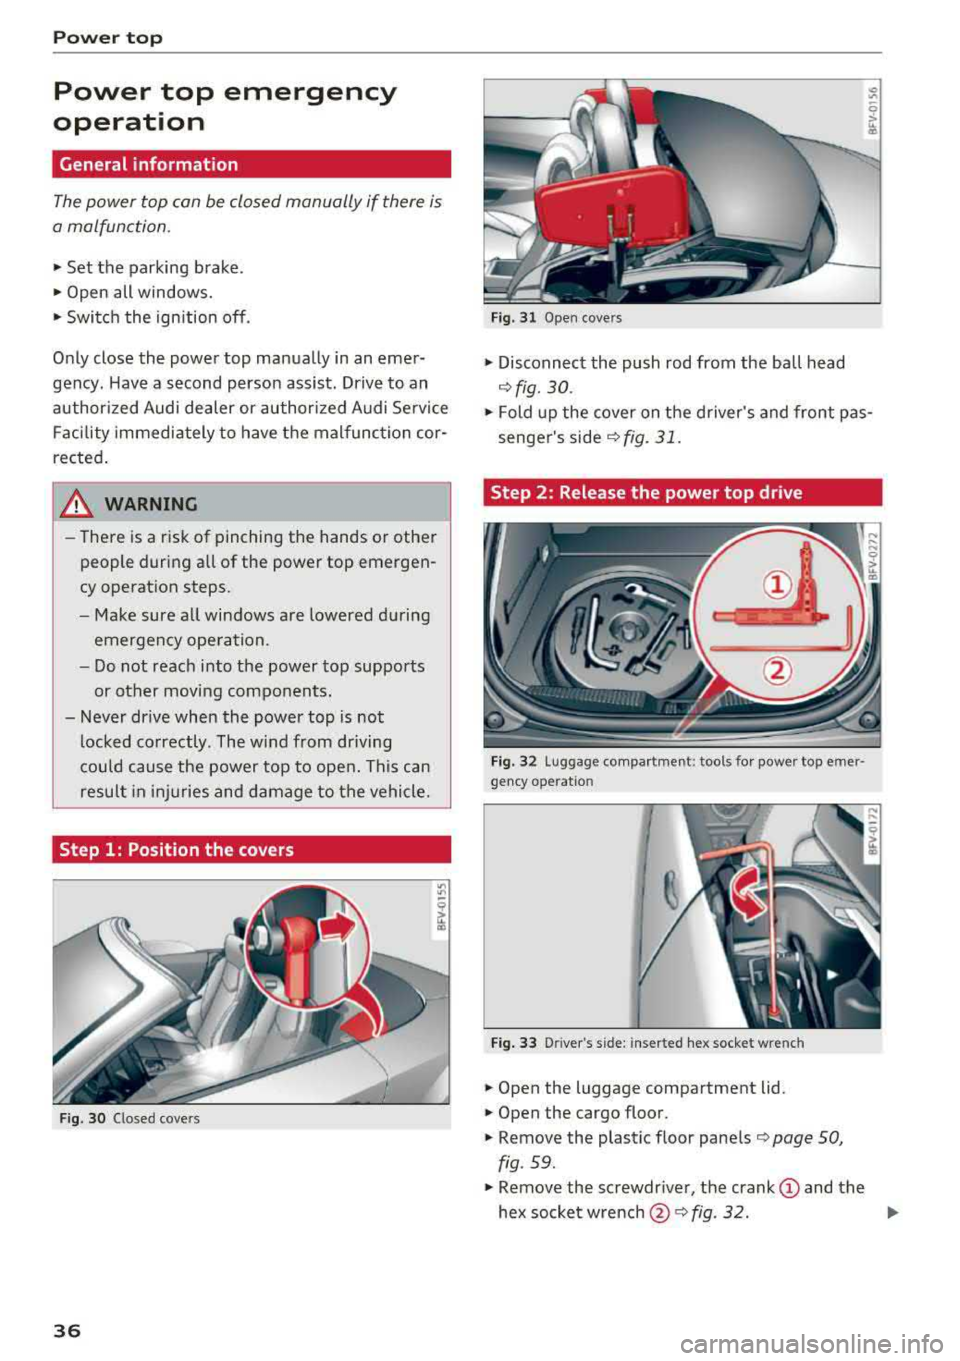
Step 1: Position the covers
Fig. 30 C losed covers
36
Fig. 31 Open cove rs
• Disconnect the push rod from the ball head
~ fig. 30 .
• Fold up the cover on the driver's and front pas
senger's
side ~ fig. 31.
Step 2 : Release the power top drive
Fig. 32 Luggage compar tment: tools for power top e mer ·
gency ope ratio n
Fig. 33 D river 's s ide: inserted hex socket w re nch
• Open the luggage compartment lid.
• Open the cargo floor.
• Remove the plastic floor panels ¢ page 50,
fig . 59.
• Remove the screwdr iver, the crank (D and the
hex socket
w rench @~ fig. 32. IJI>
Page 44 of 310
Lights and Vision
Dimming the mirrors
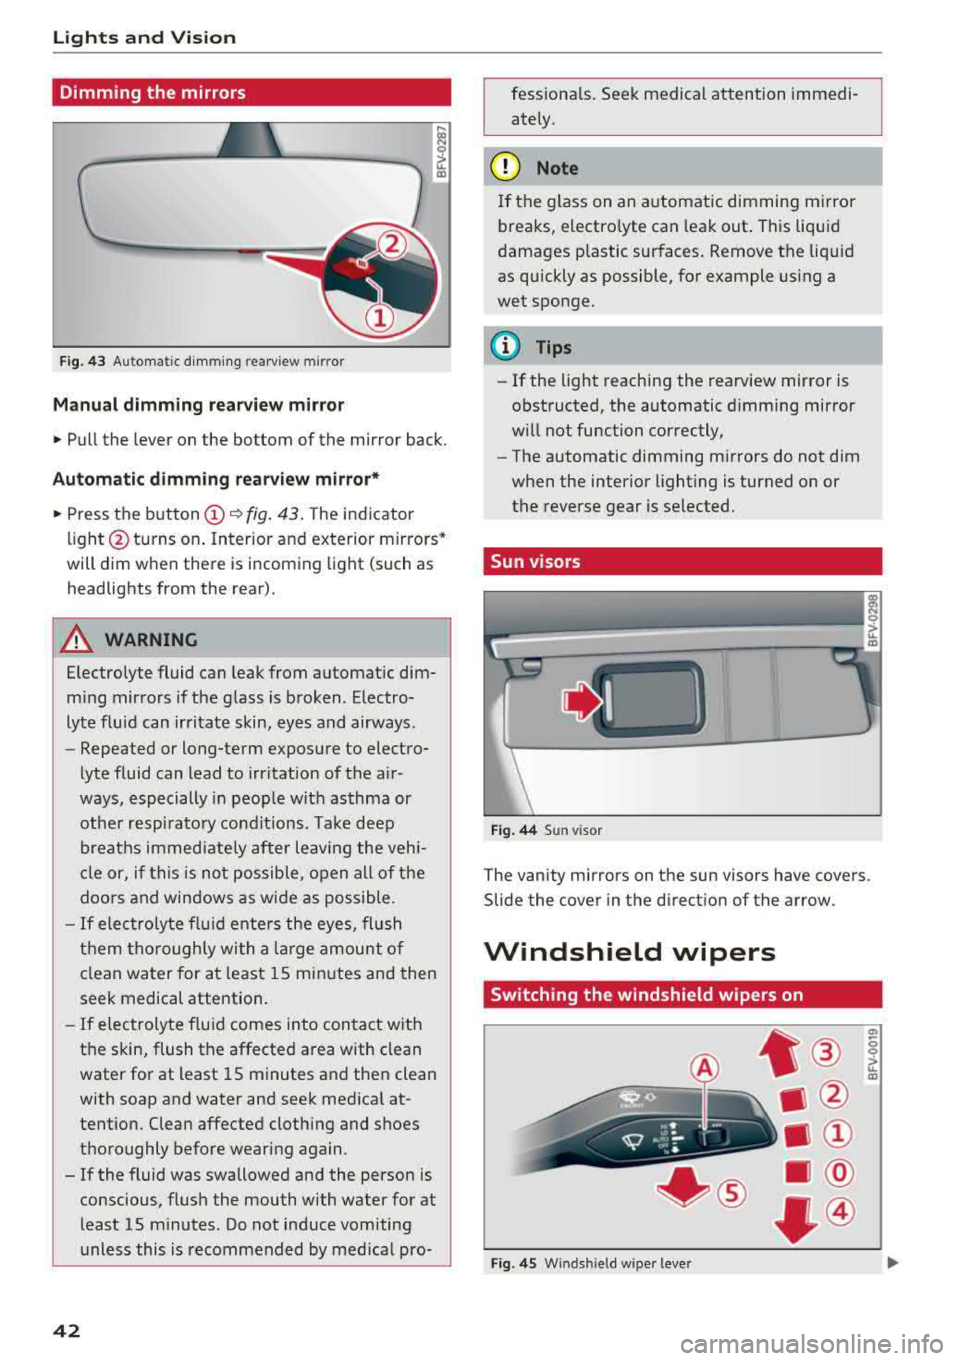
Fig. 43 Automatic dimming rearview mirror
Manual dimming rea rview mirror
• Pull the lever on the bottom of the mirror back.
Automatic dimming rearview mirror*
• Press the button (D ~ fig. 43. The indicator
light @turns on . Interior and exterior mirrors*
will dim when there is incoming light (such as
headlights from the rear) .
A WARNING
Electrolyte fluid can leak from automatic dim
m ing mirrors if the glass is broken. Electro
lyte fluid can irritate skin, eyes and airways.
- Repeated or long-term exposure to electro-
lyte fluid can lead to irritation of the a ir
ways, especially in people with asthma or
other resp irato ry conditions. Take deep
breaths immed iate ly after leaving the vehi
cle or, if this is not possible, open all of the
doors and windows as wide as possible .
-If electrolyte f lu id ente rs the eyes, flush
them thoroughly with a large amount of
clean water for at least 15 minutes and then
seek medical attention.
- If electrolyte f luid comes into contact with
the skin, flush the affected area with clean
water for at least 15 minutes and then clean
with soap and water and seek medical at
tention. Clean affected clothing and shoes
thoroughly before wearing again .
- If the fluid was swallowed and the person is conscious, flush the mouth with water for at
least 15 minutes. Do not induce vomiting
unless this is recommended by med ical pro-
42
fessionals . Seek medical attention immedi
ately .
(D Note
If the glass on an automatic dimming mirror
breaks, electro lyte can leak out . This liquid
damages plastic surfaces. Remove the liquid
as quickly as possible, for example us ing a
wet sponge.
(D Tips
- If the light reaching the rearview mirror is
obstructed, the automatic dimming mirror
will not function correctly,
- The automatic dimming mirrors do not dim
when the interior lighting is turned on or
the reverse gear is selected.
Sun visors
Fig. 44 Sun visor
T he vanity mirrors on the sun visors have covers .
Slide the cover in the direction of the arrow.
Windshield wipers
Switching the windshield wipers on
Fig . 45 W inds hield w iper leve r
(7>
0 0 > u. m
Page 53 of 310
Cl 00 .-< N r-N .-< 0 r-Vl 00
Warm and cold Climate control system
Description
The climate control system warms , cools and re
moves humidity from the air in the vehicle inte ri
or. It functions most effective ly w hen the w in
dows are closed. If there is a build -up of heat in
side the vehicle, venti lation can help to speed up
the cooling process .
Pollutant filter
The pollutant filte r removes pollutants such as
d ust and pollen from the a ir.
Key recognition
Certain settings are automat ically stored and as
signed to the remote contro l key being used .
A WARNING
Poor vis ibili ty ca n lead to ac cidents .
- For safer d riving, keep all windows free of
ice, snow a nd fog.
- Become fam ilia r as qu ickly as possible with
the correct use and function of the cl imate
c o ntro l system, espe cially with the defrost
ing and defogg ing func tion.
- Whe n the tempe ratu re is below free zing,
o nly use the win dshi eld washer sys tem after
the wi nds hield ha s been war med by t he cli
mate co ntro l sys tem. The washer fluid co ul d
freeze on the w indshield and impair visibili
ty .
{LlJ) Note
-If yo u suspect t hat the clim ate con trol sys
tem is d amaged, sw itch the system off to
Warm and c old
preven t furt her damage and have it chec ked
by an autho rized Audi dea ler o r auth orized
Audi Service Facility .
- Repairs to t he Audi climate control system
require special technical know ledge and
special tools. Have it inspected by an a u
thorized Aud i dealership or a qualified elec
tronics store.
@) For the sake of the environment
Reducing the amount of fue l used a lso re
duces the amount of pollutants that enter the
a ir.
{!) Tips
- To prevent interference with the heat ing
and cooling output and to prevent the win
dows from fogging over , th e a ir intake in
fro nt of t he w indshie ld m ust be free of ice,
snow o r leaves .
- Condensation from the cooli ng system can
dr ip and form a pudd le of water unde r the
veh icle . T h is is no rma l and does not mean
there is a le ak .
- Th e ene rgy managemen t system may tem
pora rily switch off certa in fu nctions, s uch as
the seat heati ng* o r rear window defogger.
Th ese sys tems are availab le aga in as soon
as t he ene rgy supply has been res tored .
- Th e flows throug h the vents under the re ar
w indow. Make s ure the openings are no t
cove red when plac ing clothing on t he lug
gage compa rtment cover .
51