air flow sensor BMW 3 SERIES 1985 E30 User Guide
[x] Cancel search | Manufacturer: BMW, Model Year: 1985, Model line: 3 SERIES, Model: BMW 3 SERIES 1985 E30Pages: 228, PDF Size: 7.04 MB
Page 131 of 228

and cause the system to malfunction. If
the ABS wiring harness is damaged in any
way, it must be renewed.
Caution: Make sure the ignition is
turned off before unplugging or
re-making any electrical
connections.
Diagnosis and repair
If the dashboard warning light comes on
and stays on while the vehicle is in operation,
the ABS system requires attention. Although
special electronic ABS diagnostic testing
tools are necessary to properly diagnose the
system, you can perform a few preliminary
checks before taking the vehicle to a dealer
service department.
a) Check the brake fluid level in the
reservoir.
b) Verify that the electronic control unit
connectors are securely connected.
c) Check the electrical connectors at the
hydraulic control unit.
d) Check the fuses.
e) Follow the wiring harness to each front
and rear wheel, and verify that all
connections are secure and that the
wiring is undamaged.
If the above preliminary checks do not
rectify the problem, the vehicle should bediagnosed by a dealer service department.
Due to the complex nature of this system, all
actual repair work must be done by a dealer
service department.
3 Disc brake pads- renewal
2
Warning: Disc brake pads must
be renewed on both front wheels
or both rear wheels at the same
time - NEVER renew the pads on
only one wheel. Also, the dust created by
the brake system may contain asbestos,
which is harmful to your health. Never
blow it out with compressed air, and don’t
inhale any of it. An approved filtering mask
should be worn when working on the
brakes. Do not, under any circumstances,
use petroleum-based solvents to clean
brake parts. Use brake system cleaner
only! When servicing the disc brakes, use
only original-equipment or high-quality
brand-name pads.
Warning: Brake fluid is
poisonous. It is also an effective
paint stripper. Refer to the
warning at the start of Section 16.
Note:This procedure applies to both the front
and rear disc brakes.
1Remove the cap(s) from the brake fluid
reservoir, and syphon off about two-thirds of
the fluid from the reservoir. Failing to do thiscould result in the reservoir overflowing when
the caliper pistons are pressed back into their
bores.
2Loosen the wheel bolts, raise the front or
rear of the vehicle and support it securely on
axle stands.
3Remove the front or rear wheels, as
applicable. Work on one brake assembly at a
time, using the assembled brake for reference
if necessary.
4Inspect the brake disc carefully as outlined
in Section 5. If machining is necessary, follow
the information in that Section to remove the
disc, at which time the pads can be removed
from the calipers as well.
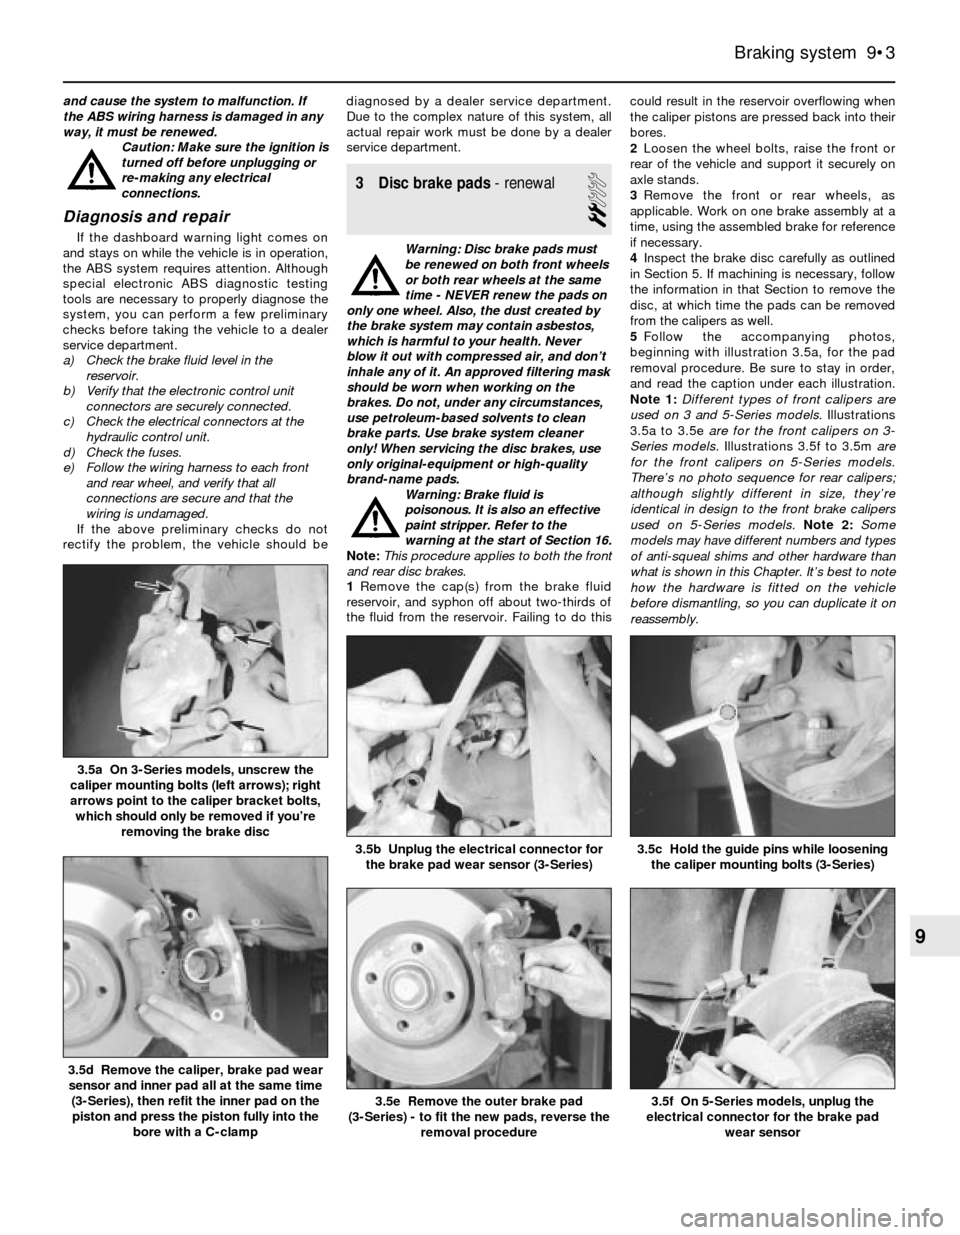
5Follow the accompanying photos,
beginning with illustration 3.5a, for the pad
removal procedure. Be sure to stay in order,
and read the caption under each illustration.
Note 1:Different types of front calipers are
used on 3 and 5-Series models. Illustrations
3.5a to 3.5e are for the front calipers on 3-
Series models.Illustrations 3.5f to 3.5m are
for the front calipers on 5-Series models.
There’s no photo sequence for rear calipers;
although slightly different in size, they’re
identical in design to the front brake calipers
used on 5-Series models.Note 2: Some
models may have different numbers and types
of anti-squeal shims and other hardware than
what is shown in this Chapter. It’s best to note
how the hardware is fitted on the vehicle
before dismantling, so you can duplicate it on
reassembly.
Braking system 9•3
3.5c Hold the guide pins while loosening
the caliper mounting bolts (3-Series)3.5b Unplug the electrical connector for
the brake pad wear sensor (3-Series)
3.5a On 3-Series models, unscrew the
caliper mounting bolts (left arrows); right
arrows point to the caliper bracket bolts,
which should only be removed if you’re
removing the brake disc
3.5f On 5-Series models, unplug the
electrical connector for the brake pad
wear sensor3.5e Remove the outer brake pad
(3-Series) - to fit the new pads, reverse the
removal procedure
3.5d Remove the caliper, brake pad wear
sensor and inner pad all at the same time
(3-Series), then refit the inner pad on the
piston and press the piston fully into the
bore with a C-clamp
9
Page 214 of 228

REF•13
REF
Fault Finding
Automatic transmission
Note:Due to the complexity of the automatic transmission, it is
difficult for the home mechanic to properly diagnose and service this
unit. For problems other than the following, the vehicle should be
taken to a dealer or transmission specialist.
Fluid leakage
m mAutomatic transmission fluid is a deep red colour. Fluid leaks
should not be confused with engine oil, which can easily be blown
by airflow onto the transmission.
m mTo pinpoint a leak, first remove all built-up dirt and grime from the
transmission housing with degreasing agents and/or by steam-
cleaning. Then drive the vehicle at low speed, so airflow will not
blow the leak far from its source. Raise the vehicle and determine
where the leak is coming from. Common areas of leakage are:
a) Transmission sump (Chapters 1 and 7B)
b) Filler pipe (Chapter 7B)
c) Transmission fluid cooler lines (Chapter 7B)
d) Speedometer sensor (Chapter 7B)
Transmission fluid brown, or has a burned smell
m mTransmission fluid burned; fluid should be changed. May indicate
transmission internal fault (Chapters 1 and 7B).
Transmission will not kickdown with accelerator
pedal pressed to the floor
m mKickdown cable out of adjustment (Chapter 7B).
General shift mechanism problems
m
mChapter 7B deals with checking and adjusting the shift linkage on
automatic transmissions. Common problems which may be
attributed to poorly-adjusted linkage are:
a) Engine starting in gears other than Park or Neutral.
b) Indicator on selector lever pointing to a gear other than the one
actually being used.
c) Vehicle moves when in Park.
m mRefer to Chapter 7B for the shift linkage adjustment procedure.
Engine will start in gears other than Park or Neutral
m
mInhibitor switch malfunctioning (Chapter 7B).
Transmission slips, shifts roughly, is noisy, or has
no drive in forward or reverse gears
m mThere are many probable causes for the above problems, but the
home mechanic should be concerned with only one possibility -
fluid level. Before taking the vehicle to an automatic transmission
specialist, check the level and condition of the fluid as described in
Chapter 1. Correct the fluid level as necessary, or change the fluid
if needed. If the problem persists, have a professional diagnose the
probable cause.
Manual transmission
Vibration
m mDamaged propeller shaft (Chapter 8).
m mOut-of-round tyres (Chapter 1).
m mTyre out-of-balance (Chapters 1 and 10).
m mWorn propeller shaft universal joint (Chapter 8).
Noisy in neutral with engine running
m
mWorn clutch release bearing (Chapter 8).
m mWorn transmission input shaft bearing (Chapter 7A).
Noisy in one particular gear
m
mDamaged or worn constant-mesh gears.
m mDamaged or worn synchronisers.
Noisy in all gears
m
mInsufficient lubricant (Chapter 1).
m mDamaged or worn bearings.
m mWorn or damaged input gear shaft and/or output gear shaft.
Slips out of gear
m
mWorn or incorrectly-adjusted linkage (Chapter 7A).
m mTransmission-to-engine mounting bolts loose (Chapter 7A).
m mShift linkage binding (Chapter 7A).
m mWorn shift fork (Chapter 7A).
Leaks lubricant
m
mExcessive amount of lubricant in transmission (Chapters 1 and 7A).
m mLoose or broken input shaft bearing retainer (Chapter 7A).
m mInput shaft bearing retainer O-ring and/or lip seal damaged
(Chapter 7A).
Page 225 of 228

REF•25
REF
Index
Note: References throughout this index relate to Chapter•page number
A
ABS - 9•2
Accelerator cable - 4•9
Acknowledgements - 0•4
Aerial - 12•4
Air bags - 0•5
Air cleaner - 4•8
Air conditioning system - 3•2, 3•7, 3•8,
3•9, 3•10
Air filter - 1•20
Air gap - 5•7
Air intake system - 4•2, 4•14
Airflow meter - 4•15, 6•4
Alternator - 5•10
Anti-lock Braking system (ABS) - 9•2
Anti-roll bar - 10•4, 10•9
Anti-theft audio system - 0•7
Antifreeze - 1•3, 1-8, 3•2
Asbestos - 0•5
ATF - 1•3, 1•13, 1•23
Automatic choke - 4•13
Automatic transmission- 7B•1et seq
Automatic transmission fault finding -
7B•4, REF•13
Automatic transmission fluid - 1•3, 1•13,
1•23
B
Backfire - REF•11
Balljoints - 10•7
Battery - 0•5, 1•16, 5•2
Battery fault - REF•11
Big-end bearings - 2B•17, 2B•21
Bleeding brakes - 9•14
Bleeding clutch - 8•4
Bleeding power steering - 10•16Block - 2B•14, 2B•15
Blower motor - 3•7
Body corrosion - REF•4
Body electrical systems- 12•1et seq
Bodywork and fittings- 11•1et seq
Bonnet - 11•4
Boot lid - 11•6
Boots - 8•9, 10•13
Brake fluid - 1•3, 1•9
Brake lines and hoses - 1•22, 9•13
Braking system- 1•22, 9•1et seq,REF•1,
REF•2, REF•3
Braking system fault finding - REF•14
Bulbs - 12•6
Bumpers - 11•6
Burning - 0•5
C
Cables - 4•9, 5•2, 7B•3, 9•12
Calipers - 9•4
Cam followers - 2B•11
Camshaft - 2A•12, 2B•11
Carburettor - 4•10, 4•11
Carpets - 11•2
Catalytic converter - 4•20, 6•6
Central locking - 12•8
Charging - 1•17, 5•9
Chemicals - REF•18
Choke - 4•13
Clutch and driveline- 8•1et seq
Clutch fault finding - REF•12
Clutch fluid - 1•3, 1•9
CO level adjustment - 1•15, REF•4
Coil - 5•5
Coil springs - 10•7, 10•9
Cold start injectors - 4•17, 4•18
Compression check - 2B•4Compressor - 3•8
Condenser - 3•9
Connecting rods -2B•12, 2B•16, 2B•21
Constant velocity (CV) joint - 8•2, 8•8, 8•9
Continuity check - 12•2
Control arm - 10•4, 10•5
Conversion factors - REF•17
Coolant - 1•3, 1•8
Coolant pump - 3•5
Coolant temperature sender unit - 3•6
Coolant temperature sensor - 6•2
Cooling fan - 3•4
Cooling, heating and air conditioning
systems- 1•21, 1•24, 3•1et seq
Cooling system fault finding - REF•12
Crankshaft - 2A•12, 2A•13, 2A•19, 2B•13,
2B•17, 2B•19, 2B•20
Cruise control - 12•3, 12•8
Crushing - 0•5
Cushion - 11•9
CV joints - 8•2, 8•8, 8•9
Cylinder head - 2A•13, 2B•7, 2B•10, 2B•12
Cylinder honing - 2B•15
D
Dents in bodywork - 11•2
Differential (final drive) - 8•2, 8•10, 8•11
Differential oil -1•3, 1•19, 1•26
Direction indicators - 12•2, 12•3
Discs - 1•22, 9•5
Distributor - 1•18, 5•4
Door - 11•6, 11•8, REF•2
Drivebelts - 1•14
Driveplate - 2A•18
Driveshafts - 1•22, 8•2, 8•9
Drums - 1•23