brush BMW 3 SERIES 1988 E30 Workshop Manual
[x] Cancel search | Manufacturer: BMW, Model Year: 1988, Model line: 3 SERIES, Model: BMW 3 SERIES 1988 E30Pages: 228, PDF Size: 7.04 MB
Page 26 of 228
13 Battery check, maintenance
and charging
2
Check and maintenance
Warning: Certain precautions
must be followed when checking
and servicing the battery.
Hydrogen gas, which is highly
flammable, is always present in the battery
cells, so keep lighted tobacco and all other
flames and sparks away from it. The
electrolyte inside the battery is actually
dilute sulphuric acid, which will cause
injury if splashed on your skin or in youreyes. It will also ruin clothes and painted
surfaces. When disconnecting the battery
cables, always detach the negative cable
first, and connect it last!
1Battery maintenance is an important
procedure, which will help ensure that you are
not stranded because of a dead battery.
Several tools are required for this procedure
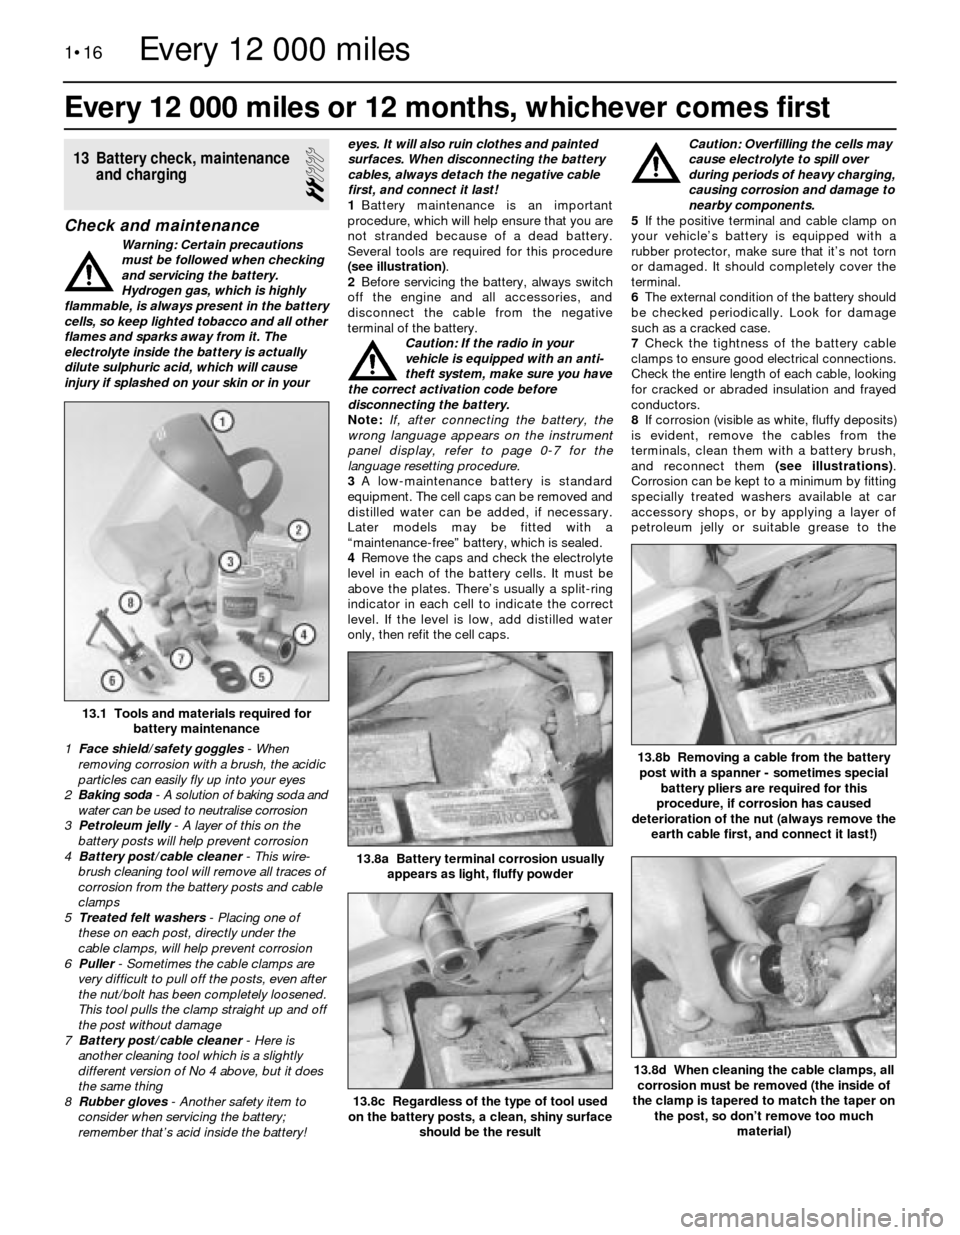
(see illustration).
2Before servicing the battery, always switch
off the engine and all accessories, and
disconnect the cable from the negative
terminal of the battery.
Caution: If the radio in your
vehicle is equipped with an anti-
theft system, make sure you have
the correct activation code before
disconnecting the battery.
Note: If, after connecting the battery, the
wrong language appears on the instrument
panel display, refer to page 0-7 for the
language resetting procedure.
3A low-maintenance battery is standard
equipment. The cell caps can be removed and
distilled water can be added, if necessary.
Later models may be fitted with a
“maintenance-free” battery, which is sealed.
4Remove the caps and check the electrolyte
level in each of the battery cells. It must be
above the plates. There’s usually a split-ring
indicator in each cell to indicate the correct
level. If the level is low, add distilled water
only, then refit the cell caps.Caution: Overfilling the cells may
cause electrolyte to spill over
during periods of heavy charging,
causing corrosion and damage to
nearby components.
5If the positive terminal and cable clamp on
your vehicle’s battery is equipped with a
rubber protector, make sure that it’s not torn
or damaged. It should completely cover the
terminal.
6The external condition of the battery should
be checked periodically. Look for damage
such as a cracked case.
7Check the tightness of the battery cable
clamps to ensure good electrical connections.
Check the entire length of each cable, looking
for cracked or abraded insulation and frayed
conductors.
8If corrosion (visible as white, fluffy deposits)
is evident, remove the cables from the
terminals, clean them with a battery brush,
and reconnect them (see illustrations).
Corrosion can be kept to a minimum by fitting
specially treated washers available at car
accessory shops, or by applying a layer of
petroleum jelly or suitable grease to the
Every 12 000 miles or 12 months, whichever comes first
1•16
13.8d When cleaning the cable clamps, all
corrosion must be removed (the inside of
the clamp is tapered to match the taper on
the post, so don’t remove too much
material)
13.8c Regardless of the type of tool used
on the battery posts, a clean, shiny surface
should be the result
13.1 Tools and materials required for
battery maintenance
1 Face shield/safety goggles- When
removing corrosion with a brush, the acidic
particles can easily fly up into your eyes
2 Baking soda - A solution of baking soda and
water can be used to neutralise corrosion
3 Petroleum jelly- A layer of this on the
battery posts will help prevent corrosion
4 Battery post/cable cleaner- This wire-
brush cleaning tool will remove all traces of
corrosion from the battery posts and cable
clamps
5 Treated felt washers- Placing one of
these on each post, directly under the
cable clamps, will help prevent corrosion
6 Puller- Sometimes the cable clamps are
very difficult to pull off the posts, even after
the nut/bolt has been completely loosened.
This tool pulls the clamp straight up and off
the post without damage
7 Battery post/cable cleaner - Here is
another cleaning tool which is a slightly
different version of No 4 above, but it does
the same thing
8 Rubber gloves- Another safety item to
consider when servicing the battery;
remember that’s acid inside the battery!
13.8b Removing a cable from the battery
post with a spanner - sometimes special
battery pliers are required for this
procedure, if corrosion has caused
deterioration of the nut (always remove the
earth cable first, and connect it last!)
13.8a Battery terminal corrosion usually
appears as light, fluffy powder
Every 12 000 miles
Page 27 of 228
terminals and cable clamps after they are
assembled.
9Make sure that the battery carrier is in good
condition, and that the hold-down clamp bolt
is tight. If the battery is removed (see Chap-
ter 5 for the removal and refitting procedure),
make sure that no parts remain in the bottom
of the carrier when it’s refitted. When refitting
the hold-down clamp, don’t overtighten the
bolt.
10Corrosion on the carrier, battery case and
surrounding areas can be removed with a
solution of water and baking soda. Apply the
mixture with a small brush, let it work, then
rinse it off with plenty of clean water.
11Any metal parts of the vehicle damaged
by corrosion should be coated with a zinc-
based primer, then painted.
12Additional information on the battery and
jump starting can be found in Chapter 5 and
the front of this manual.
Charging
Note: The manufacturer recommends the
battery be removed from the vehicle for
charging, because the gas which escapes
during this procedure can damage the paint or
interior, depending on the location of the
battery. Fast charging with the battery cables
connected can result in damage to the
electrical system.
13Remove all of the cell caps (if applicable),
and cover the holes with a clean cloth to
prevent spattering electrolyte. Disconnect thebattery negative cable, and connect the
battery charger leads to the battery posts
(positive to positive, negative to negative),
then plug in the charger. Make sure it is set at
12 volts if it has a selector switch.
Caution: If the radio in your
vehicle is equipped with an anti-
theft system, make sure you have
the correct activation code
before disconnecting the battery. Note: If,
after connecting the battery, the wrong
language appears on the instrument panel
display, refer to page 0-7 for the language
resetting procedure.
14If you’re using a charger with a rate higher
than two amps, check the battery regularly
during charging to make sure it doesn’t
overheat. If you’re using a trickle charger, you
can safely let the battery charge overnight
after you’ve checked it regularly for the first
couple of hours. Where a maintenance-free
battery is fitted, special precautions may be
necessary when charging it (for example, the
charge rate is normally very low). There may
be a warning label on the battery, but if not,
consult a BMW dealer or auto-electrician.
15If the battery has removable cell caps,
measure the specific gravity with a
hydrometer every hour during the last few
hours of the charging cycle. Hydrometers are
available inexpensively from car accessory
shops - follow the instructions that come with
the hydrometer. Consider the battery charged
when there’s no change in the specific gravity
reading for two hours, and the electrolyte in
the cells is gassing (bubbling) freely. The
specific gravity reading from each cell should
be very close to the others. If not, the battery
probably has a bad cell(s), and a new one
should be fitted.
16Some maintenance-free (sealed) batteries
have built-in hydrometers on the top,
indicating the state of charge by the colour
displayed in the hydrometer window.
Normally, a bright-coloured hydrometer
indicates a full charge, and a dark hydrometer
indicates the battery still needs charging.
Check the battery manufacturer’s instructions
to be sure you know what the colours mean.17If the battery is sealed and has no built-in
hydrometer, you can connect a digital
voltmeter across the battery terminals to
check the charge. A fully-charged battery
should read 12.6 volts or higher.
18Further information on the battery and
jump starting can be found in Chapter 5 and
at the front of this manual.
14 Spark plug check and
renewal
1
1Before beginning, obtain the necessary
tools, which will include a spark plug socket
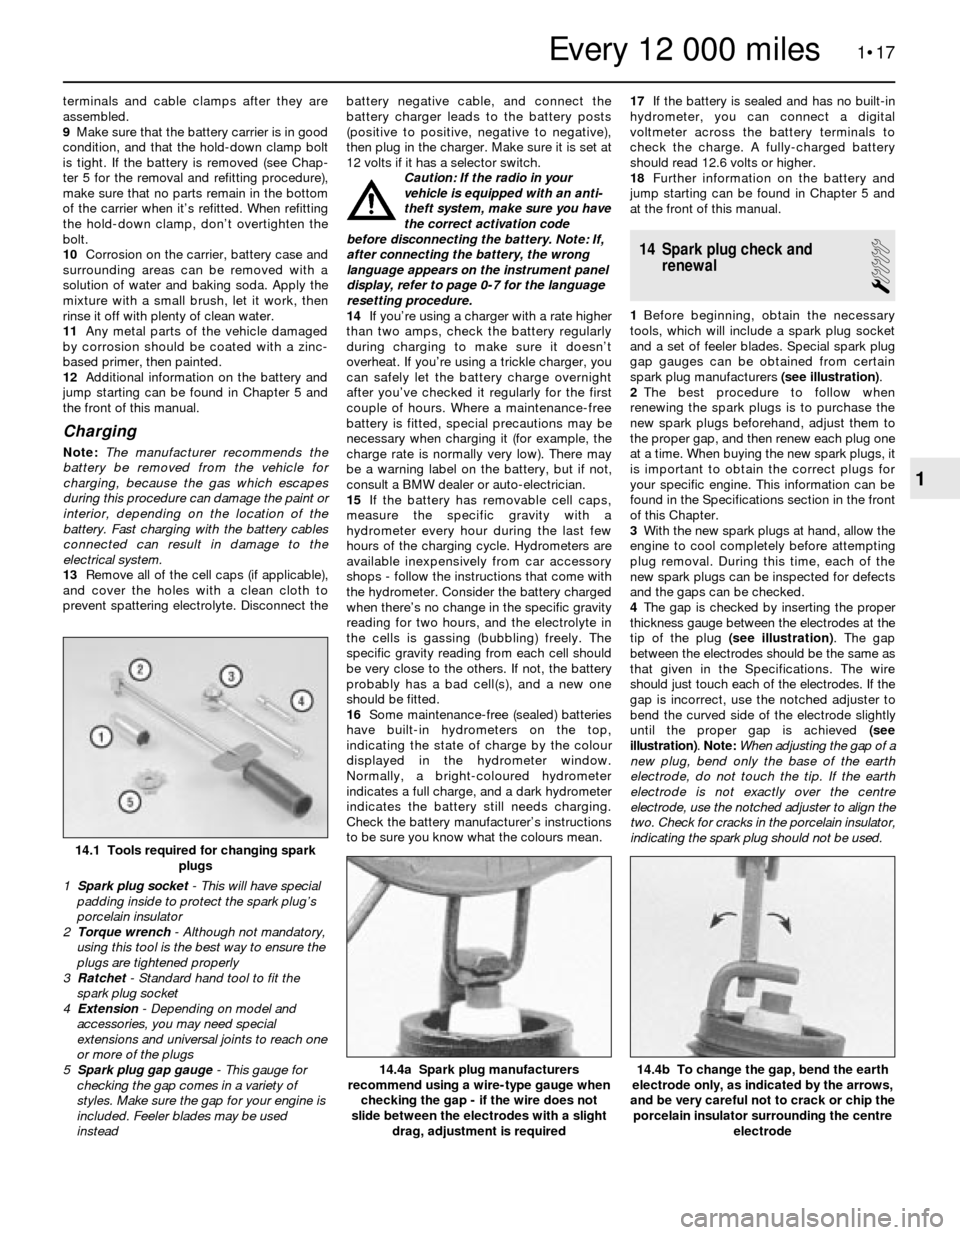
and a set of feeler blades. Special spark plug
gap gauges can be obtained from certain
spark plug manufacturers (see illustration).
2The best procedure to follow when
renewing the spark plugs is to purchase the
new spark plugs beforehand, adjust them to
the proper gap, and then renew each plug one
at a time. When buying the new spark plugs, it
is important to obtain the correct plugs for
your specific engine. This information can be
found in the Specifications section in the front
of this Chapter.
3With the new spark plugs at hand, allow the
engine to cool completely before attempting
plug removal. During this time, each of the
new spark plugs can be inspected for defects
and the gaps can be checked.
4The gap is checked by inserting the proper
thickness gauge between the electrodes at the
tip of the plug (see illustration). The gap
between the electrodes should be the same as
that given in the Specifications. The wire
should just touch each of the electrodes. If the
gap is incorrect, use the notched adjuster to
bend the curved side of the electrode slightly
until the proper gap is achieved (see
illustration). Note: When adjusting the gap of a
new plug, bend only the base of the earth
electrode, do not touch the tip. If the earth
electrode is not exactly over the centre
electrode, use the notched adjuster to align the
two. Check for cracks in the porcelain insulator,
indicating the spark plug should not be used.
1•17
14.4b To change the gap, bend the earth
electrode only, as indicated by the arrows,
and be very careful not to crack or chip the
porcelain insulator surrounding the centre
electrode14.4a Spark plug manufacturers
recommend using a wire-type gauge when
checking the gap - if the wire does not
slide between the electrodes with a slight
drag, adjustment is required
14.1 Tools required for changing spark
plugs
1 Spark plug socket- This will have special
padding inside to protect the spark plug’s
porcelain insulator
2 Torque wrench - Although not mandatory,
using this tool is the best way to ensure the
plugs are tightened properly
3 Ratchet - Standard hand tool to fit the
spark plug socket
4 Extension - Depending on model and
accessories, you may need special
extensions and universal joints to reach one
or more of the plugs
5 Spark plug gap gauge- This gauge for
checking the gap comes in a variety of
styles. Make sure the gap for your engine is
included. Feeler blades may be used
instead
1
Every 12 000 miles
Page 31 of 228
4Since some components of the fuel system
- the fuel tank and some of the fuel feed and
return lines, for example - are underneath the
vehicle, they can be inspected more easily
with the vehicle raised on a hoist. If that’s not
possible, raise the vehicle and support it on
axle stands or ramps.
5With the vehicle raised and safely
supported, inspect the fuel tank and filler neck
for punctures, cracks or other damage. The
connection between the filler neck and the
tank is particularly critical. Sometimes a
rubber filler neck will leak because of loose
clamps or deteriorated rubber. Inspect all fuel
tank mounting brackets and straps, to be sure
the tank is securely attached to the vehicle.
Warning: Do not, under any
circumstances, try to repair a fuel
tank (except rubber
components). A welding torch or
any naked flame can easily cause fuel
vapours inside the tank to explode.
6Carefully check all flexible hoses and metal
lines leading away from the fuel tank. Check
for loose connections, deteriorated hoses,
crimped lines, and other damage. Repair or
renew damaged sections as necessary (see
Chapter 4).
22 Cooling system check
1
1Many major engine failures can be
attributed to cooling system problems. If the
vehicle has automatic transmission, the
engine cooling system also plays an importantrole in prolonging transmission life, because it
cools the transmission fluid.
2The engine should be cold for the cooling
system check, so perform the following
procedure before the vehicle is driven for the
day, or after it has been switched off for at
leastthree hours.
3Remove the radiator cap, doing so slowly
and taking adequate precautions against
scalding if the engine is at all warm. Clean the
cap thoroughly, inside and out, with clean
water. Also clean the filler neck on the
radiator. The presence of rust or corrosion in
the filler neck means the coolant should be
changed (see Section 29). The coolant inside
the radiator should be relatively clean and
clear. If it’s rust-coloured, drain the system
and refill with new coolant.
4Carefully check the radiator hoses and the
smaller-diameter heater hoses. Inspect each
coolant hose along its entire length, renewing
any hose which is cracked, swollen or
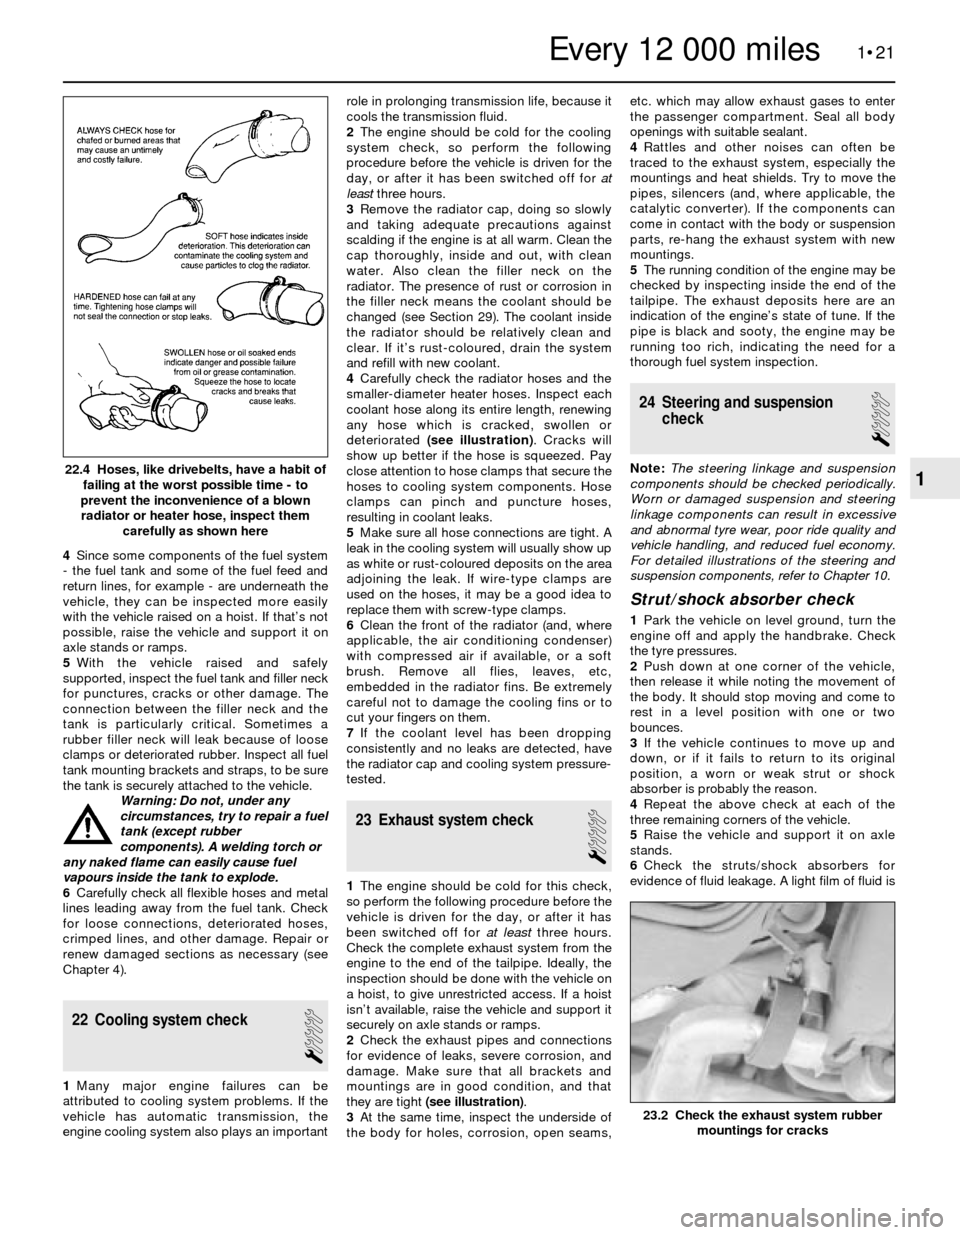
deteriorated (see illustration). Cracks will
show up better if the hose is squeezed. Pay
close attention to hose clamps that secure the
hoses to cooling system components. Hose
clamps can pinch and puncture hoses,
resulting in coolant leaks.
5Make sure all hose connections are tight. A
leak in the cooling system will usually show up
as white or rust-coloured deposits on the area
adjoining the leak. If wire-type clamps are
used on the hoses, it may be a good idea to
replace them with screw-type clamps.
6Clean the front of the radiator (and, where
applicable, the air conditioning condenser)
with compressed air if available, or a soft
brush. Remove all flies, leaves, etc,
embedded in the radiator fins. Be extremely
careful not to damage the cooling fins or to
cut your fingers on them.
7If the coolant level has been dropping
consistently and no leaks are detected, have
the radiator cap and cooling system pressure-
tested.
23 Exhaust system check
1
1The engine should be cold for this check,
so perform the following procedure before the
vehicle is driven for the day, or after it has
been switched off for at leastthree hours.
Check the complete exhaust system from the
engine to the end of the tailpipe. Ideally, the
inspection should be done with the vehicle on
a hoist, to give unrestricted access. If a hoist
isn’t available, raise the vehicle and support it
securely on axle stands or ramps.
2Check the exhaust pipes and connections
for evidence of leaks, severe corrosion, and
damage. Make sure that all brackets and
mountings are in good condition, and that
they are tight (see illustration).
3At the same time, inspect the underside of
the body for holes, corrosion, open seams,etc. which may allow exhaust gases to enter
the passenger compartment. Seal all body
openings with suitable sealant.
4Rattles and other noises can often be
traced to the exhaust system, especially the
mountings and heat shields. Try to move the
pipes, silencers (and, where applicable, the
catalytic converter). If the components can
come in contact with the body or suspension
parts, re-hang the exhaust system with new
mountings.
5The running condition of the engine may be
checked by inspecting inside the end of the
tailpipe. The exhaust deposits here are an
indication of the engine’s state of tune. If the
pipe is black and sooty, the engine may be
running too rich, indicating the need for a
thorough fuel system inspection.
24 Steering and suspension
check
1
Note: The steering linkage and suspension
components should be checked periodically.
Worn or damaged suspension and steering
linkage components can result in excessive
and abnormal tyre wear, poor ride quality and
vehicle handling, and reduced fuel economy.
For detailed illustrations of the steering and
suspension components, refer to Chapter 10.
Strut/shock absorber check
1Park the vehicle on level ground, turn the
engine off and apply the handbrake. Check
the tyre pressures.
2Push down at one corner of the vehicle,
then release it while noting the movement of
the body. It should stop moving and come to
rest in a level position with one or two
bounces.
3If the vehicle continues to move up and
down, or if it fails to return to its original
position, a worn or weak strut or shock
absorber is probably the reason.
4Repeat the above check at each of the
three remaining corners of the vehicle.
5Raise the vehicle and support it on axle
stands.
6Check the struts/shock absorbers for
evidence of fluid leakage. A light film of fluid is
1•21
22.4 Hoses, like drivebelts, have a habit of
failing at the worst possible time - to
prevent the inconvenience of a blown
radiator or heater hose, inspect them
carefully as shown here
23.2 Check the exhaust system rubber
mountings for cracks
1
Every 12 000 miles
Page 61 of 228
otherwise a small brush or even a bicycle tyre
pump will work). The idea is to prevent dirt
from getting into the cylinders as the
compression check is being done.
3Remove all the spark plugs from the engine
(see Chapter 1).
4Block the throttle wide open, or have an
assistant hold the throttle pedal down.
5On carburettor models, disconnect the LT
lead from the coil. On fuel injection models,
disable the fuel pump and ignition circuit by
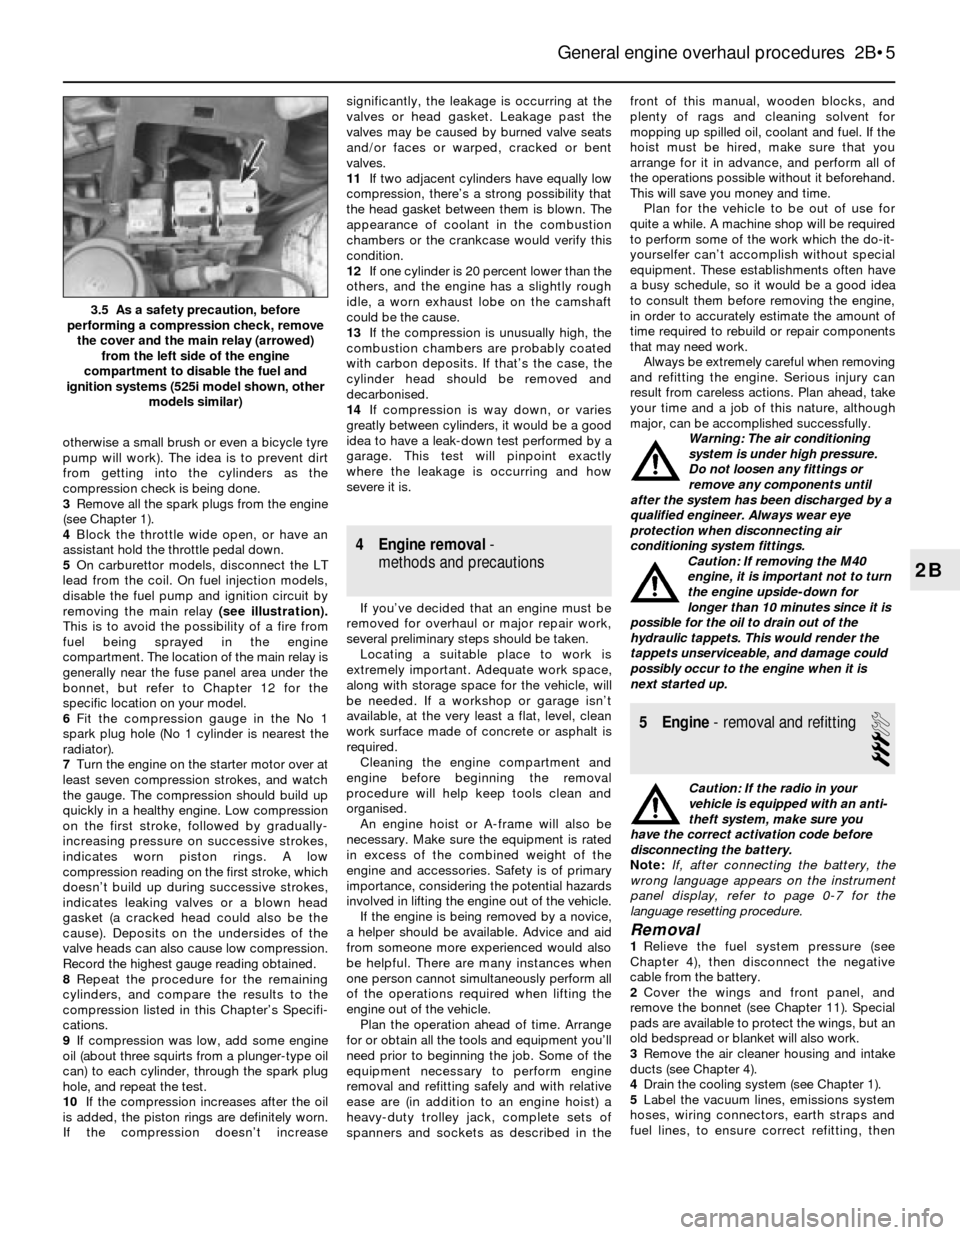
removing the main relay(see illustration).
This is to avoid the possibility of a fire from
fuel being sprayed in the engine
compartment. The location of the main relay is
generally near the fuse panel area under the
bonnet, but refer to Chapter 12 for the
specific location on your model.
6Fit the compression gauge in the No 1
spark plug hole (No 1 cylinder is nearest the
radiator).
7Turn the engine on the starter motor over at
least seven compression strokes, and watch
the gauge. The compression should build up
quickly in a healthy engine. Low compression
on the first stroke, followed by gradually-
increasing pressure on successive strokes,
indicates worn piston rings. A low
compression reading on the first stroke, which
doesn’t build up during successive strokes,
indicates leaking valves or a blown head
gasket (a cracked head could also be the
cause). Deposits on the undersides of the
valve heads can also cause low compression.
Record the highest gauge reading obtained.
8Repeat the procedure for the remaining
cylinders, and compare the results to the
compression listed in this Chapter’s Specifi-
cations.
9If compression was low, add some engine
oil (about three squirts from a plunger-type oil
can) to each cylinder, through the spark plug
hole, and repeat the test.
10If the compression increases after the oil
is added, the piston rings are definitely worn.
If the compression doesn’t increasesignificantly, the leakage is occurring at the
valves or head gasket. Leakage past the
valves may be caused by burned valve seats
and/or faces or warped, cracked or bent
valves.
11If two adjacent cylinders have equally low
compression, there’s a strong possibility that
the head gasket between them is blown. The
appearance of coolant in the combustion
chambers or the crankcase would verify this
condition.
12If one cylinder is 20 percent lower than the
others, and the engine has a slightly rough
idle, a worn exhaust lobe on the camshaft
could be the cause.
13If the compression is unusually high, the
combustion chambers are probably coated
with carbon deposits. If that’s the case, the
cylinder head should be removed and
decarbonised.
14If compression is way down, or varies
greatly between cylinders, it would be a good
idea to have a leak-down test performed by a
garage. This test will pinpoint exactly
where the leakage is occurring and how
severe it is.
4 Engine removal-
methods and precautions
If you’ve decided that an engine must be
removed for overhaul or major repair work,
several preliminary steps should be taken.
Locating a suitable place to work is
extremely important. Adequate work space,
along with storage space for the vehicle, will
be needed. If a workshop or garage isn’t
available, at the very least a flat, level, clean
work surface made of concrete or asphalt is
required.
Cleaning the engine compartment and
engine before beginning the removal
procedure will help keep tools clean and
organised.
An engine hoist or A-frame will also be
necessary. Make sure the equipment is rated
in excess of the combined weight of the
engine and accessories. Safety is of primary
importance, considering the potential hazards
involved in lifting the engine out of the vehicle.
If the engine is being removed by a novice,
a helper should be available. Advice and aid
from someone more experienced would also
be helpful. There are many instances when
one person cannot simultaneously perform all
of the operations required when lifting the
engine out of the vehicle.
Plan the operation ahead of time. Arrange
for or obtain all the tools and equipment you’ll
need prior to beginning the job. Some of the
equipment necessary to perform engine
removal and refitting safely and with relative
ease are (in addition to an engine hoist) a
heavy-duty trolley jack, complete sets of
spanners and sockets as described in thefront of this manual, wooden blocks, and
plenty of rags and cleaning solvent for
mopping up spilled oil, coolant and fuel. If the
hoist must be hired, make sure that you
arrange for it in advance, and perform all of
the operations possible without it beforehand.
This will save you money and time.
Plan for the vehicle to be out of use for
quite a while. A machine shop will be required
to perform some of the work which the do-it-
yourselfer can’t accomplish without special
equipment. These establishments often have
a busy schedule, so it would be a good idea
to consult them before removing the engine,
in order to accurately estimate the amount of
time required to rebuild or repair components
that may need work.
Always be extremely careful when removing
and refitting the engine. Serious injury can
result from careless actions. Plan ahead, take
your time and a job of this nature, although
major, can be accomplished successfully.
Warning: The air conditioning
system is under high pressure.
Do not loosen any fittings or
remove any components until
after the system has been discharged by a
qualified engineer. Always wear eye
protection when disconnecting air
conditioning system fittings.
Caution: If removing the M40
engine, it is important not to turn
the engine upside-down for
longer than 10 minutes since it is
possible for the oil to drain out of the
hydraulic tappets. This would render the
tappets unserviceable, and damage could
possibly occur to the engine when it is
next started up.
5 Engine- removal and refitting
3
Caution: If the radio in your
vehicle is equipped with an anti-
theft system, make sure you
have the correct activation code before
disconnecting the battery.
Note: If, after connecting the battery, the
wrong language appears on the instrument
panel display, refer to page 0-7 for the
language resetting procedure.
Removal1Relieve the fuel system pressure (see
Chapter 4), then disconnect the negative
cable from the battery.
2Cover the wings and front panel, and
remove the bonnet (see Chapter 11). Special
pads are available to protect the wings, but an
old bedspread or blanket will also work.
3Remove the air cleaner housing and intake
ducts (see Chapter 4).
4Drain the cooling system (see Chapter 1).
5Label the vacuum lines, emissions system
hoses, wiring connectors, earth straps and
fuel lines, to ensure correct refitting, then
General engine overhaul procedures 2B•5
3.5 As a safety precaution, before
performing a compression check, remove
the cover and the main relay (arrowed)
from the left side of the engine
compartment to disable the fuel and
ignition systems (525i model shown, other
models similar)
2B
Page 63 of 228
36Run the engine and check for leaks and
proper operation of all accessories, then refit
the bonnet and test drive the vehicle.
37Where necessary, have the air
conditioning system recharged and leak-
tested.
6 Engine overhaul- alternatives
The do-it-yourselfer is faced with a number
of options when performing an engine
overhaul. The decision to renew the engine
block, piston/connecting rod assemblies and
crankshaft depends on a number of factors,
with the number one consideration being the
condition of the block. Other considerations
are cost, access to machine shop facilities,
parts availability, time required to complete
the project, and the extent of prior mechanical
experience on the part of the do-it-yourselfer.
Some of the alternatives include:
Individual parts - If the inspection
procedures reveal that the engine block and
most engine components are in re-usable
condition, purchasing individual parts may be
the most economical alternative. The block,
crankshaft and piston/connecting rod
assemblies should all be inspected carefully.
Even if the block shows little wear, the
cylinder bores should be surface-honed.
Crankshaft kit- A crankshaft kit (where
available) consists of a reground crankshaft
with matched undersize new main and
connecting big-end bearings. Sometimes,
reconditioned connecting rods and new
pistons and rings are included with the kit
(such a kit is sometimes called an “engine
kit”). If the block is in good condition, but the
crankshaft journals are scored or worn, a
crankshaft kit and other individual parts may
be the most economical alternative.
Short block- A short block consists of an
engine block with a crankshaft and
piston/connecting rod assemblies already
fitted. New bearings are fitted, and all
clearances will be correct. The existing
camshaft, valve train components, cylinder
head and external parts can be bolted to the
short block with little or no machine shop
work necessary.
Full block - A “full” or “complete” block
consists of a short block plus an oil pump,
sump, cylinder head, valve cover, camshaft
and valve train components, timing sprockets
and chain (or belt) and timing cover. All
components are fitted with new bearings,
seals and gaskets used throughout. The
refitting of manifolds and external parts is all
that’s necessary.
Give careful thought to which alternative is
best for you, and discuss the situation with
local machine shops, parts dealers and
experienced rebuilders before ordering or
purchasing new parts.
7 Engine overhaul-
dismantling sequence
1It’s much easier to dismantle and work on
the engine if it’s mounted on a portable
engine stand. A stand can often be hired quite
cheaply from a tool hire shop. Before the
engine is mounted on a stand, the
flywheel/driveplate should be removed from
the engine.
2If a stand isn’t available, it’s possible to
dismantle the engine with it blocked up on the
floor. Be extra-careful not to tip or drop the
engine when working without a stand.
3If you’re going to obtain a rebuilt engine, all
the external components listed below must
come off first, to be transferred to the new
engine if applicable. This is also the case if
you’re doing a complete engine overhaul
yourself. Note:When removing the external
components from the engine, pay close
attention to details that may be helpful or
important during refitting. Note the fitted
position of gaskets, seals, spacers, pins,
brackets, washers, bolts and other small items.
Alternator and brackets
Emissions control components
Distributor, HT leads and spark plugs
Thermostat and housing cover
Water pump
Fuel injection/carburettor and fuel system
components
Intake and exhaust manifolds
Oil filter and oil pressure sending unit
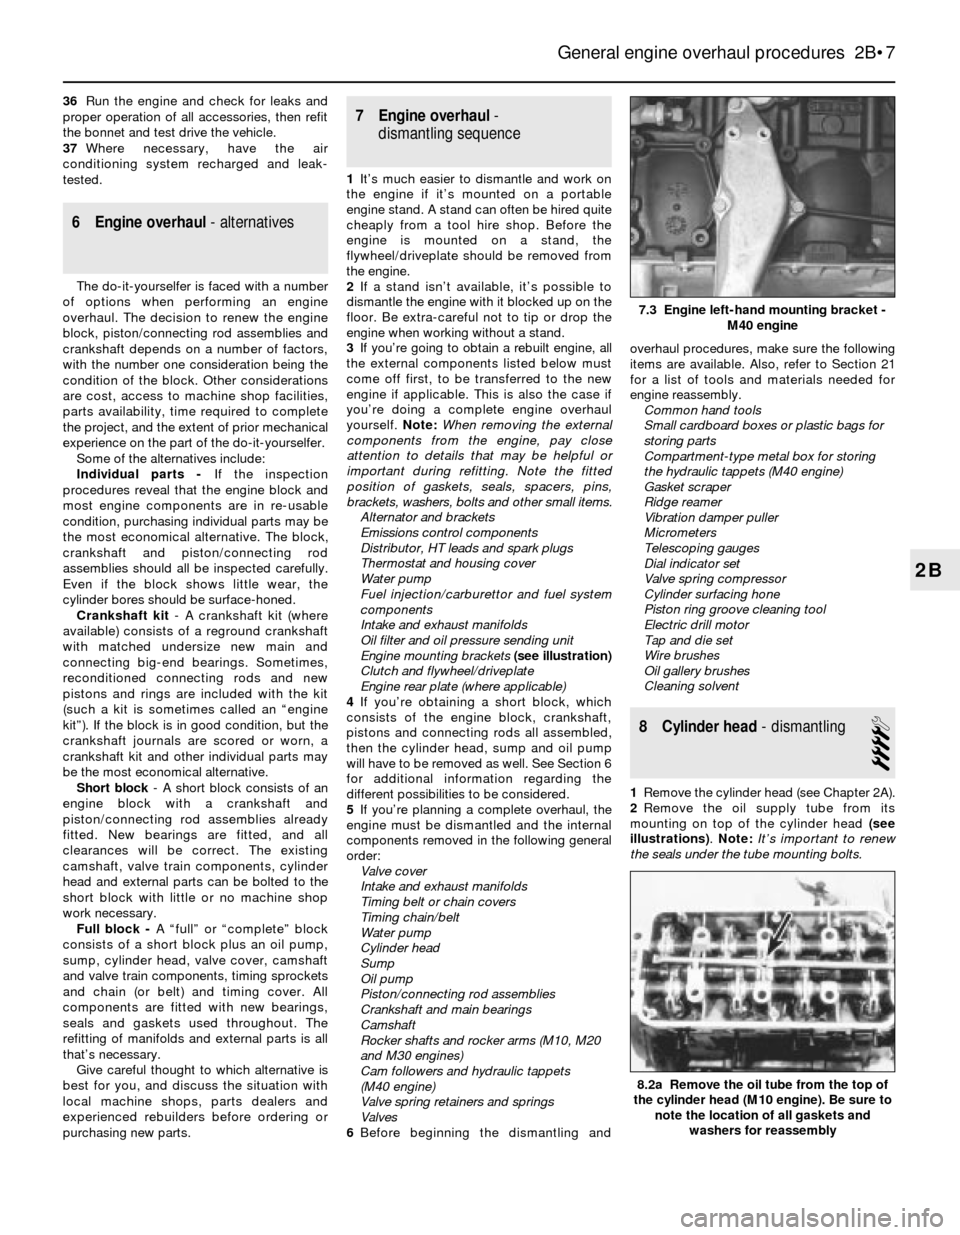
Engine mounting brackets (see illustration)
Clutch and flywheel/driveplate
Engine rear plate (where applicable)
4If you’re obtaining a short block, which
consists of the engine block, crankshaft,
pistons and connecting rods all assembled,
then the cylinder head, sump and oil pump
will have to be removed as well. See Section 6
for additional information regarding the
different possibilities to be considered.
5If you’re planning a complete overhaul, the
engine must be dismantled and the internal
components removed in the following general
order:
Valve cover
Intake and exhaust manifolds
Timing belt or chain covers
Timing chain/belt
Water pump
Cylinder head
Sump
Oil pump
Piston/connecting rod assemblies
Crankshaft and main bearings
Camshaft
Rocker shafts and rocker arms (M10, M20
and M30 engines)
Cam followers and hydraulic tappets
(M40 engine)
Valve spring retainers and springs
Valves
6Before beginning the dismantling andoverhaul procedures, make sure the following
items are available. Also, refer to Section 21
for a list of tools and materials needed for
engine reassembly.
Common hand tools
Small cardboard boxes or plastic bags for
storing parts
Compartment-type metal box for storing
the hydraulic tappets (M40 engine)
Gasket scraper
Ridge reamer
Vibration damper puller
Micrometers
Telescoping gauges
Dial indicator set
Valve spring compressor
Cylinder surfacing hone
Piston ring groove cleaning tool
Electric drill motor
Tap and die set
Wire brushes
Oil gallery brushes
Cleaning solvent
8 Cylinder head- dismantling
4
1Remove the cylinder head (see Chapter 2A).
2Remove the oil supply tube from its
mounting on top of the cylinder head (see
illustrations). Note:It’s important to renew
the seals under the tube mounting bolts.
General engine overhaul procedures 2B•7
7.3 Engine left-hand mounting bracket -
M40 engine
8.2a Remove the oil tube from the top of
the cylinder head (M10 engine). Be sure to
note the location of all gaskets and
washers for reassembly
2B
Page 66 of 228
24Repeat the procedure for the remaining
valves. Remember to keep all the parts for
each valve together, so they can be refitted in
the same locations.
25Once the valves and related components
have been removed and stored in an
organised manner, the head should be
thoroughly cleaned and inspected. If a
complete engine overhaul is being done,
finish the engine dismantling procedures
before beginning the cylinder head cleaning
and inspection process.
9 Cylinder head and
components-
cleaning and inspection
4
1Thorough cleaning of the cylinder head(s)
and related valve train components, followed
by a detailed inspection, will enable you to
decide how much valve service work must be
done during the engine overhaul. Note: If the
engine was severely overheated, the cylinder
head is probably warped (see paragraph 10).
Cleaning
2Scrape all traces of old gasket material and
sealing compound off the cylinder head,
intake manifold and exhaust manifold sealing
surfaces. Be very careful not to gouge the
cylinder head. Special gasket removal
solvents are available at motor factors.
3Remove all built-up scale from the coolant
passages.
4Run a stiff brush through the various holes
to remove deposits that may have formed in
them.
5Run an appropriate-size tap into each of the
threaded holes, to remove corrosion and
thread sealant that may be present. If
compressed air is available, use it to clear the
holes of debris produced by this operation.
Warning: Wear eye protection
when using compressed air!
6Clean the cylinder head with solvent, and
dry it thoroughly. Compressed air will speed
the drying process, and ensure that all holesand recessed areas are clean. Note:
Decarbonising chemicals are available, and
may prove very useful when cleaning cylinder
heads and valve train components. They are
very caustic, however, and should be used
with caution. Be sure to follow the instructions
on the container.
7Clean all the rocker shafts/arms/followers,
springs, valve springs, spring seats, keepers
and retainers with solvent, and dry them
thoroughly. Clean the components from one
valve at a time, to avoid mixing up the parts.
Caution: DO NOT clean the
hydraulic tappets of the M40
engine; leave them completely
immersed in oil.
8Scrape off any heavy deposits that may
have formed on the valves, then use a
motorised wire brush to remove deposits from
the valve heads and stems. Again, make sure
the valves don’t get mixed up.
Inspection
Note: Be sure to perform all of the following
inspection procedures before concluding that
machine shop work is required. Make a list of
the items that need attention.
Cylinder head
9Inspect the head very carefully for cracks,
evidence of coolant leakage, and other
damage. If cracks are found, check with an
machine shop concerning repair. If repair isn’t
possible, a new cylinder head should be
obtained.
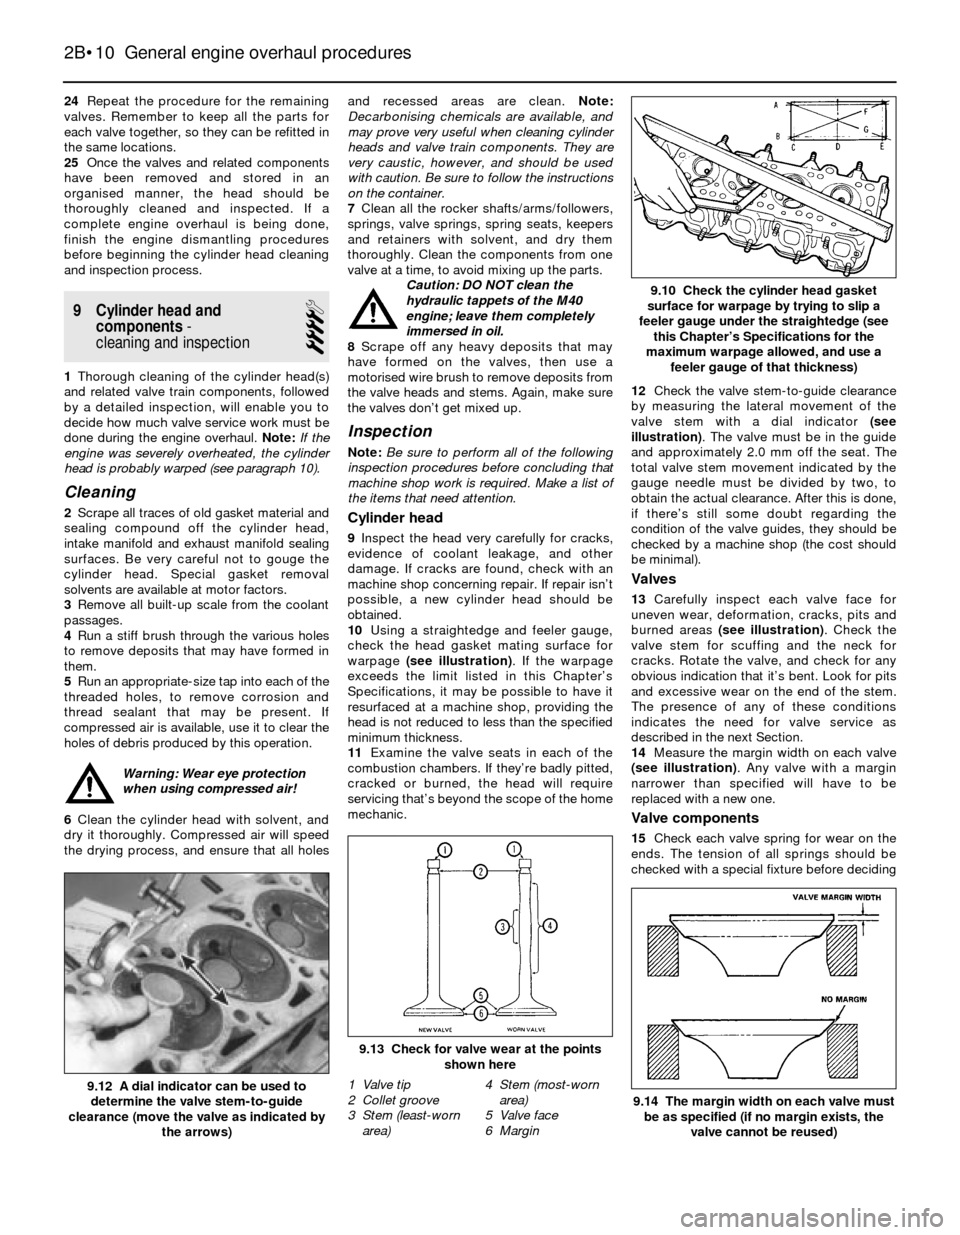
10Using a straightedge and feeler gauge,
check the head gasket mating surface for
warpage (see illustration). If the warpage
exceeds the limit listed in this Chapter’s
Specifications, it may be possible to have it
resurfaced at a machine shop, providing the
head is not reduced to less than the specified
minimum thickness.
11Examine the valve seats in each of the
combustion chambers. If they’re badly pitted,
cracked or burned, the head will require
servicing that’s beyond the scope of the home
mechanic.12Check the valve stem-to-guide clearance
by measuring the lateral movement of the
valve stem with a dial indicator (see
illustration). The valve must be in the guide
and approximately 2.0 mm off the seat. The
total valve stem movement indicated by the
gauge needle must be divided by two, to
obtain the actual clearance. After this is done,
if there’s still some doubt regarding the
condition of the valve guides, they should be
checked by a machine shop (the cost should
be minimal).
Valves
13Carefully inspect each valve face for
uneven wear, deformation, cracks, pits and
burned areas (see illustration). Check the
valve stem for scuffing and the neck for
cracks. Rotate the valve, and check for any
obvious indication that it’s bent. Look for pits
and excessive wear on the end of the stem.
The presence of any of these conditions
indicates the need for valve service as
described in the next Section.
14Measure the margin width on each valve
(see illustration). Any valve with a margin
narrower than specified will have to be
replaced with a new one.
Valve components
15Check each valve spring for wear on the
ends. The tension of all springs should be
checked with a special fixture before deciding
2B•10 General engine overhaul procedures
9.14 The margin width on each valve must
be as specified (if no margin exists, the
valve cannot be reused)
9.13 Check for valve wear at the points
shown here
9.12 A dial indicator can be used to
determine the valve stem-to-guide
clearance (move the valve as indicated by
the arrows)
9.10 Check the cylinder head gasket
surface for warpage by trying to slip a
feeler gauge under the straightedge (see
this Chapter’s Specifications for the
maximum warpage allowed, and use a
feeler gauge of that thickness)
1 Valve tip
2 Collet groove
3 Stem (least-worn
area)4 Stem (most-worn
area)
5 Valve face
6 Margin
Page 70 of 228
5Gently tap the caps with a soft-faced
hammer, then separate them from the engine
block. If necessary, use the bolts as levers to
remove the caps. Try not to drop the bearing
shells if they come out with the caps.
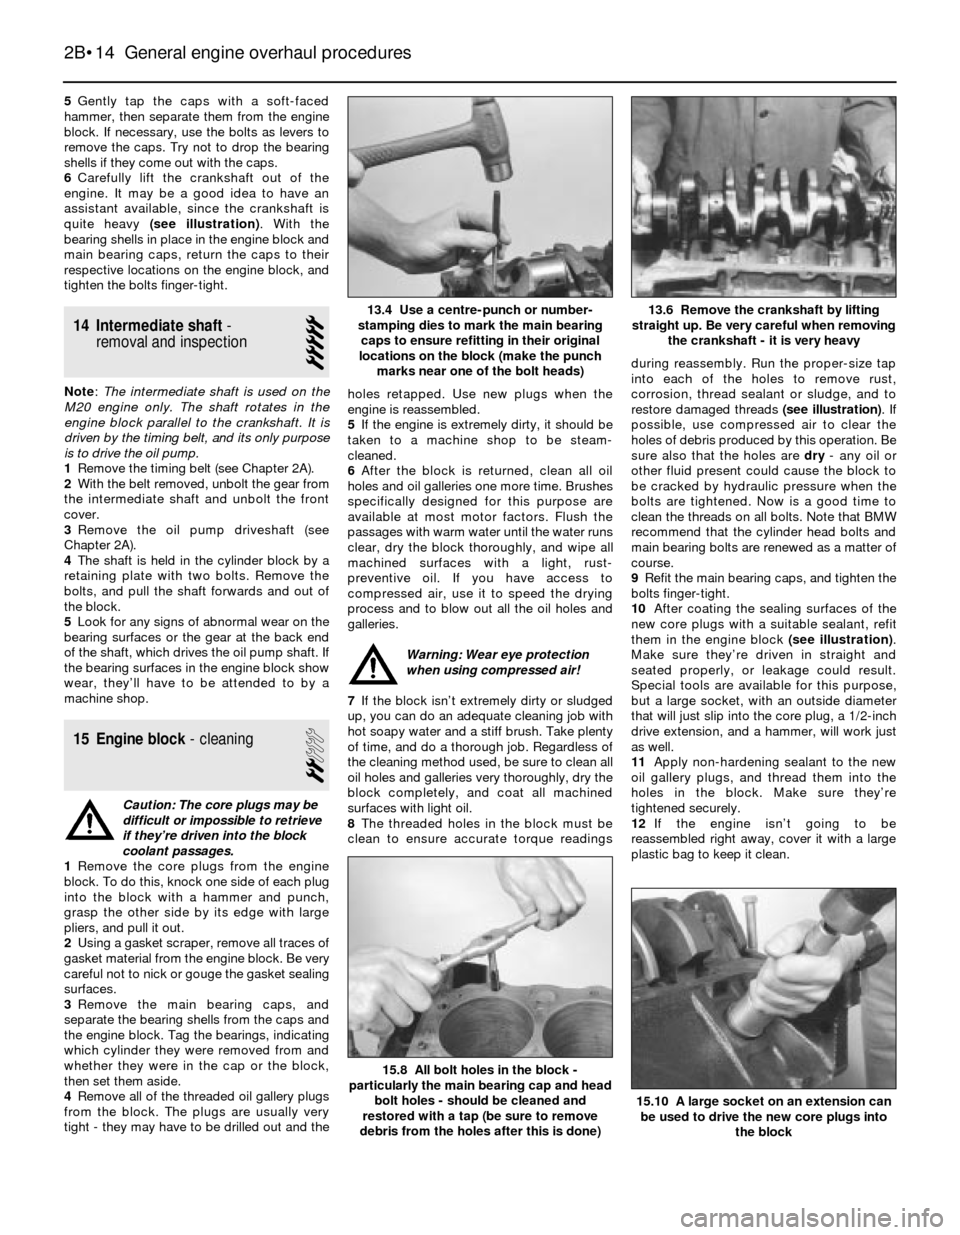
6Carefully lift the crankshaft out of the
engine. It may be a good idea to have an
assistant available, since the crankshaft is
quite heavy (see illustration). With the
bearing shells in place in the engine block and
main bearing caps, return the caps to their
respective locations on the engine block, and
tighten the bolts finger-tight.
14 Intermediate shaft-
removal and inspection
5
Note:The intermediate shaft is used on the
M20 engine only. The shaft rotates in the
engine block parallel to the crankshaft. It is
driven by the timing belt, and its only purpose
is to drive the oil pump.
1Remove the timing belt (see Chapter 2A).
2With the belt removed, unbolt the gear from
the intermediate shaft and unbolt the front
cover.
3Remove the oil pump driveshaft (see
Chapter 2A).
4The shaft is held in the cylinder block by a
retaining plate with two bolts. Remove the
bolts, and pull the shaft forwards and out of
the block.
5Look for any signs of abnormal wear on the
bearing surfaces or the gear at the back end
of the shaft, which drives the oil pump shaft. If
the bearing surfaces in the engine block show
wear, they’ll have to be attended to by a
machine shop.
15 Engine block- cleaning
2
Caution: The core plugs may be
difficult or impossible to retrieve
if they’re driven into the block
coolant passages.
1Remove the core plugs from the engine
block. To do this, knock one side of each plug
into the block with a hammer and punch,
grasp the other side by its edge with large
pliers, and pull it out.
2Using a gasket scraper, remove all traces of
gasket material from the engine block. Be very
careful not to nick or gouge the gasket sealing
surfaces.
3Remove the main bearing caps, and
separate the bearing shells from the caps and
the engine block. Tag the bearings, indicating
which cylinder they were removed from and
whether they were in the cap or the block,
then set them aside.
4Remove all of the threaded oil gallery plugs
from the block. The plugs are usually very
tight - they may have to be drilled out and theholes retapped. Use new plugs when the
engine is reassembled.
5If the engine is extremely dirty, it should be
taken to a machine shop to be steam-
cleaned.
6After the block is returned, clean all oil
holes and oil galleries one more time. Brushes
specifically designed for this purpose are
available at most motor factors. Flush the
passages with warm water until the water runs
clear, dry the block thoroughly, and wipe all
machined surfaces with a light, rust-
preventive oil. If you have access to
compressed air, use it to speed the drying
process and to blow out all the oil holes and
galleries.
Warning: Wear eye protection
when using compressed air!
7If the block isn’t extremely dirty or sludged
up, you can do an adequate cleaning job with
hot soapy water and a stiff brush. Take plenty
of time, and do a thorough job. Regardless of
the cleaning method used, be sure to clean all
oil holes and galleries very thoroughly, dry the
block completely, and coat all machined
surfaces with light oil.
8The threaded holes in the block must be
clean to ensure accurate torque readingsduring reassembly. Run the proper-size tap
into each of the holes to remove rust,
corrosion, thread sealant or sludge, and to
restore damaged threads (see illustration). If
possible, use compressed air to clear the
holes of debris produced by this operation. Be
sure also that the holes are dry- any oil or
other fluid present could cause the block to
be cracked by hydraulic pressure when the
bolts are tightened. Now is a good time to
clean the threads on all bolts. Note that BMW
recommend that the cylinder head bolts and
main bearing bolts are renewed as a matter of
course.
9Refit the main bearing caps, and tighten the
bolts finger-tight.
10After coating the sealing surfaces of the
new core plugs with a suitable sealant, refit
them in the engine block (see illustration).
Make sure they’re driven in straight and
seated properly, or leakage could result.
Special tools are available for this purpose,
but a large socket, with an outside diameter
that will just slip into the core plug, a 1/2-inch
drive extension, and a hammer, will work just
as well.
11Apply non-hardening sealant to the new
oil gallery plugs, and thread them into the
holes in the block. Make sure they’re
tightened securely.
12If the engine isn’t going to be
reassembled right away, cover it with a large
plastic bag to keep it clean.
2B•14 General engine overhaul procedures
15.10 A large socket on an extension can
be used to drive the new core plugs into
the block
15.8 All bolt holes in the block -
particularly the main bearing cap and head
bolt holes - should be cleaned and
restored with a tap (be sure to remove
debris from the holes after this is done)
13.6 Remove the crankshaft by lifting
straight up. Be very careful when removing
the crankshaft - it is very heavy13.4 Use a centre-punch or number-
stamping dies to mark the main bearing
caps to ensure refitting in their original
locations on the block (make the punch
marks near one of the bolt heads)
Page 71 of 228
16 Engine block- inspection
3
1Before the block is inspected, it should be
cleaned (see Section 15).
2Visually check the block for cracks, rust
and corrosion. Look for stripped threads in
the threaded holes. It’s also a good idea to
have the block checked for hidden cracks by
a machine shop that has the special
equipment to do this type of work. If defects
are found, have the block repaired, if possible;
otherwise, a new block will be required.
3Check the cylinder bores for scuffing and
scoring.
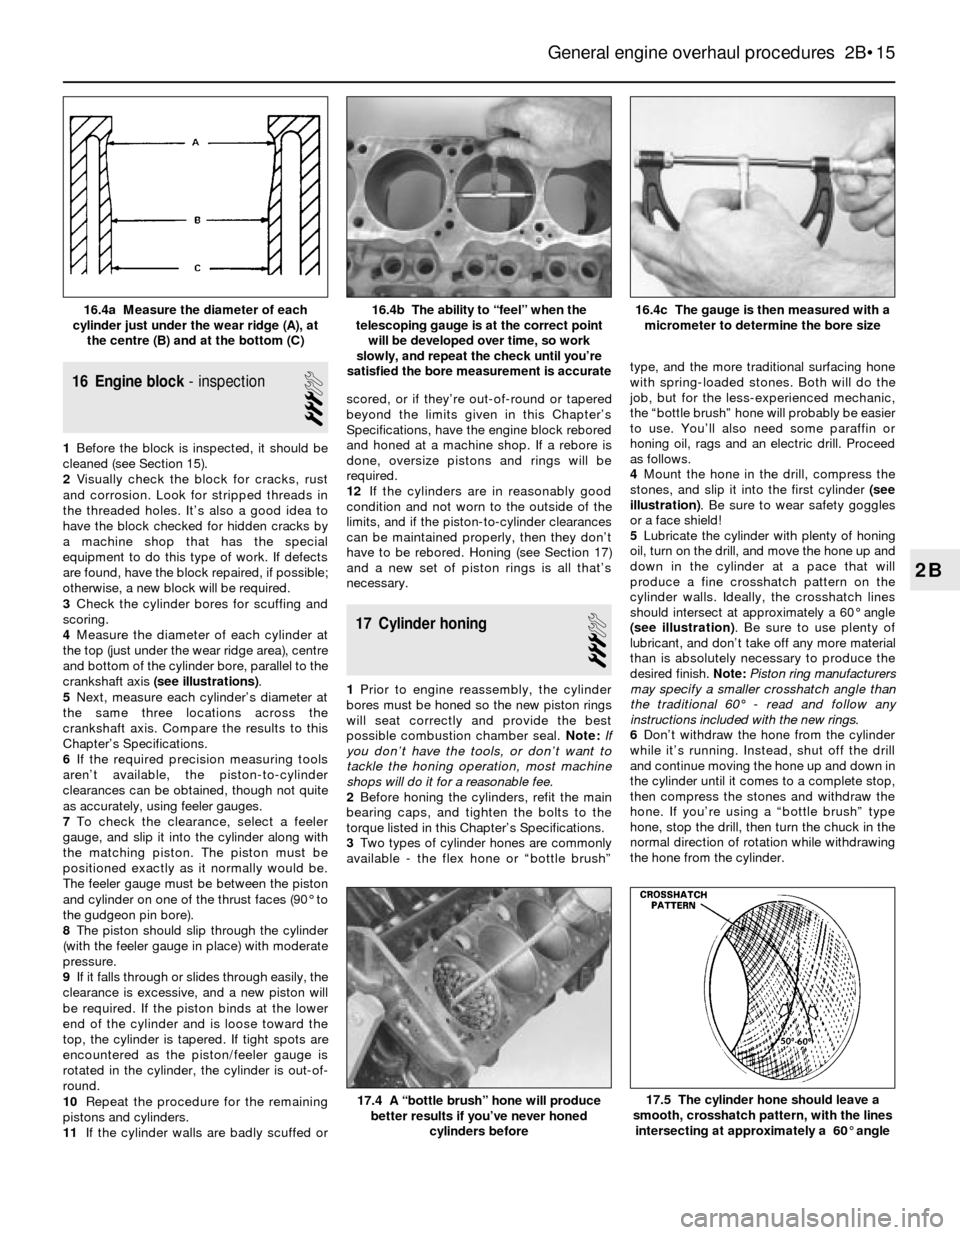
4Measure the diameter of each cylinder at
the top (just under the wear ridge area), centre
and bottom of the cylinder bore, parallel to the
crankshaft axis (see illustrations).
5Next, measure each cylinder’s diameter at
the same three locations across the
crankshaft axis. Compare the results to this
Chapter’s Specifications.
6If the required precision measuring tools
aren’t available, the piston-to-cylinder
clearances can be obtained, though not quite
as accurately, using feeler gauges.
7To check the clearance, select a feeler
gauge, and slip it into the cylinder along with
the matching piston. The piston must be
positioned exactly as it normally would be.
The feeler gauge must be between the piston
and cylinder on one of the thrust faces (90° to
the gudgeon pin bore).
8The piston should slip through the cylinder
(with the feeler gauge in place) with moderate
pressure.
9If it falls through or slides through easily, the
clearance is excessive, and a new piston will
be required. If the piston binds at the lower
end of the cylinder and is loose toward the
top, the cylinder is tapered. If tight spots are
encountered as the piston/feeler gauge is
rotated in the cylinder, the cylinder is out-of-
round.
10Repeat the procedure for the remaining
pistons and cylinders.
11If the cylinder walls are badly scuffed orscored, or if they’re out-of-round or tapered
beyond the limits given in this Chapter’s
Specifications, have the engine block rebored
and honed at a machine shop. If a rebore is
done, oversize pistons and rings will be
required.
12If the cylinders are in reasonably good
condition and not worn to the outside of the
limits, and if the piston-to-cylinder clearances
can be maintained properly, then they don’t
have to be rebored. Honing (see Section 17)
and a new set of piston rings is all that’s
necessary.
17 Cylinder honing
3
1Prior to engine reassembly, the cylinder
bores must be honed so the new piston rings
will seat correctly and provide the best
possible combustion chamber seal. Note:If
you don’t have the tools, or don’t want to
tackle the honing operation, most machine
shops will do it for a reasonable fee.
2Before honing the cylinders, refit the main
bearing caps, and tighten the bolts to the
torque listed in this Chapter’s Specifications.
3Two types of cylinder hones are commonly
available - the flex hone or “bottle brush”type, and the more traditional surfacing hone
with spring-loaded stones. Both will do the
job, but for the less-experienced mechanic,
the “bottle brush” hone will probably be easier
to use. You’ll also need some paraffin or
honing oil, rags and an electric drill. Proceed
as follows.
4Mount the hone in the drill, compress the
stones, and slip it into the first cylinder (see
illustration). Be sure to wear safety goggles
or a face shield!
5Lubricate the cylinder with plenty of honing
oil, turn on the drill, and move the hone up and
down in the cylinder at a pace that will
produce a fine crosshatch pattern on the
cylinder walls. Ideally, the crosshatch lines
should intersect at approximately a 60° angle
(see illustration). Be sure to use plenty of
lubricant, and don’t take off any more material
than is absolutely necessary to produce the
desired finish. Note:Piston ring manufacturers
may specify a smaller crosshatch angle than
the traditional 60°- read and follow any
instructions included with the new rings.
6Don’t withdraw the hone from the cylinder
while it’s running. Instead, shut off the drill
and continue moving the hone up and down in
the cylinder until it comes to a complete stop,
then compress the stones and withdraw the
hone. If you’re using a “bottle brush” type
hone, stop the drill, then turn the chuck in the
normal direction of rotation while withdrawing
the hone from the cylinder.
General engine overhaul procedures 2B•15
16.4c The gauge is then measured with a
micrometer to determine the bore size16.4b The ability to “feel” when the
telescoping gauge is at the correct point
will be developed over time, so work
slowly, and repeat the check until you’re
satisfied the bore measurement is accurate16.4a Measure the diameter of each
cylinder just under the wear ridge (A), at
the centre (B) and at the bottom (C)
17.5 The cylinder hone should leave a
smooth, crosshatch pattern, with the lines
intersecting at approximately a 60° angle17.4 A “bottle brush” hone will produce
better results if you’ve never honed
cylinders before
2B
Page 72 of 228
7Wipe the oil out of the cylinder, and repeat
the procedure for the remaining cylinders.
8After the honing job is complete, chamfer
the top edges of the cylinder bores with a
small file, so the rings won’t catch when the
pistons are refitted. Be very careful not to nick
the cylinder walls with the end of the file.
9The entire engine block must be washed
again very thoroughly with warm, soapy
water, to remove all traces of the abrasive grit
produced during the honing operation. Note:
The bores can be considered clean when a
lint-free white cloth - dampened with clean
engine oil - used to wipe them out doesn’t
pick up any more honing residue, which will
show up as grey areas on the cloth.Be sure to
run a brush through all oil holes and galleries,
and flush them with running water.
10After rinsing, dry the block, and apply a
coat of light rust-preventive oil to all machined
surfaces. Wrap the block in a plastic bag to
keep it clean, and set it aside until
reassembly.
18 Pistons/connecting rods-
inspection
3
1Before the inspection process can be
carried out, the piston/connecting rod
assemblies must be cleaned and the original
piston rings removed from the pistons.Note:
Always use new piston rings when the engine
is reassembled.
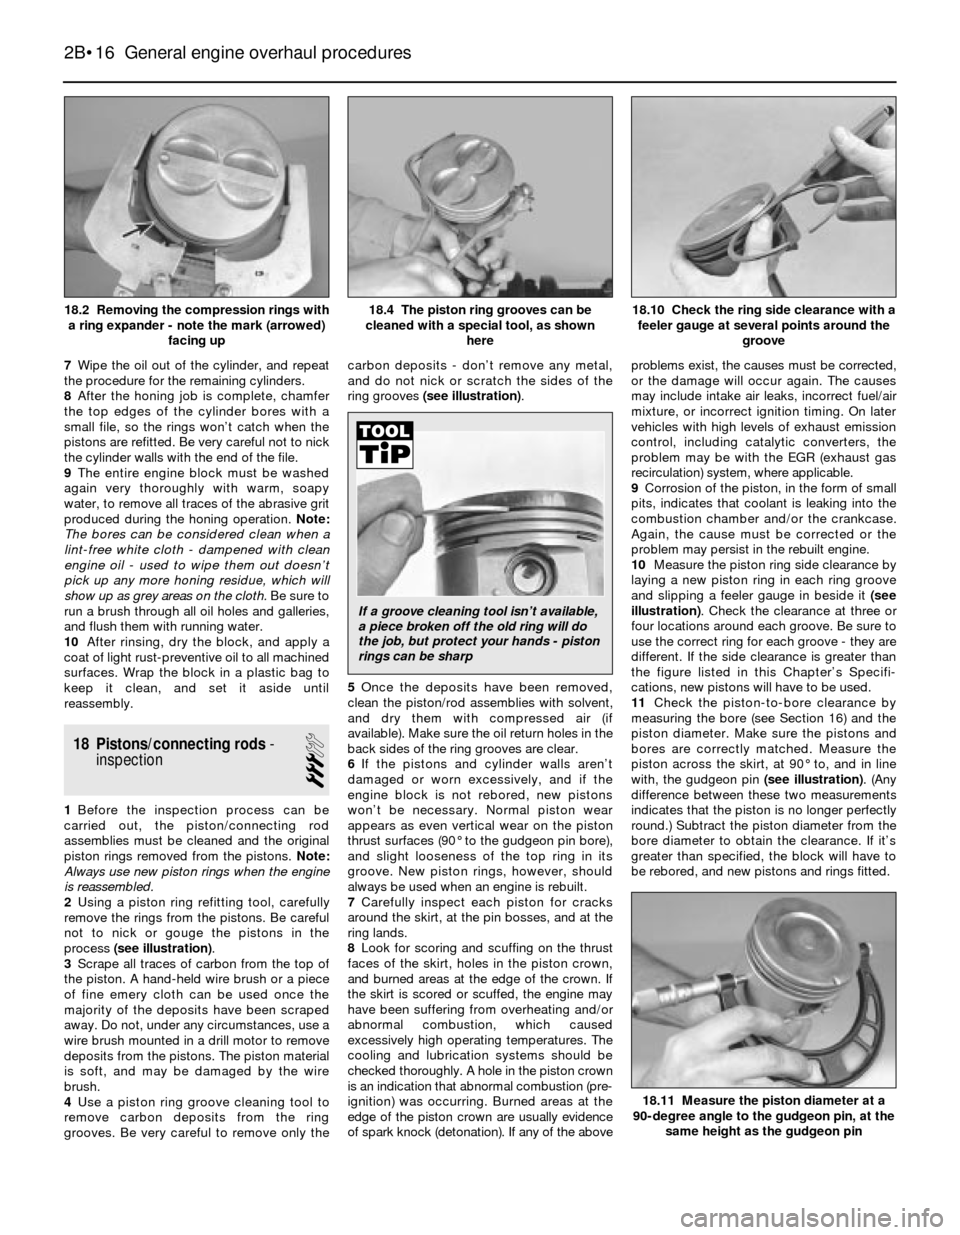
2Using a piston ring refitting tool, carefully
remove the rings from the pistons. Be careful
not to nick or gouge the pistons in the
process (see illustration).
3Scrape all traces of carbon from the top of
the piston. A hand-held wire brush or a piece
of fine emery cloth can be used once the
majority of the deposits have been scraped
away. Do not, under any circumstances, use a
wire brush mounted in a drill motor to remove
deposits from the pistons. The piston material
is soft, and may be damaged by the wire
brush.
4Use a piston ring groove cleaning tool to
remove carbon deposits from the ring
grooves. Be very careful to remove only thecarbon deposits - don’t remove any metal,
and do not nick or scratch the sides of the
ring grooves (see illustration).
5Once the deposits have been removed,
clean the piston/rod assemblies with solvent,
and dry them with compressed air (if
available). Make sure the oil return holes in the
back sides of the ring grooves are clear.
6If the pistons and cylinder walls aren’t
damaged or worn excessively, and if the
engine block is not rebored, new pistons
won’t be necessary. Normal piston wear
appears as even vertical wear on the piston
thrust surfaces (90° to the gudgeon pin bore),
and slight looseness of the top ring in its
groove. New piston rings, however, should
always be used when an engine is rebuilt.
7Carefully inspect each piston for cracks
around the skirt, at the pin bosses, and at the
ring lands.
8Look for scoring and scuffing on the thrust
faces of the skirt, holes in the piston crown,
and burned areas at the edge of the crown. If
the skirt is scored or scuffed, the engine may
have been suffering from overheating and/or
abnormal combustion, which caused
excessively high operating temperatures. The
cooling and lubrication systems should be
checked thoroughly. A hole in the piston crown
is an indication that abnormal combustion (pre-
ignition) was occurring. Burned areas at the
edge of the piston crown are usually evidence
of spark knock (detonation). If any of the aboveproblems exist, the causes must be corrected,
or the damage will occur again. The causes
may include intake air leaks, incorrect fuel/air
mixture, or incorrect ignition timing. On later
vehicles with high levels of exhaust emission
control, including catalytic converters, the
problem may be with the EGR (exhaust gas
recirculation) system, where applicable.
9Corrosion of the piston, in the form of small
pits, indicates that coolant is leaking into the
combustion chamber and/or the crankcase.
Again, the cause must be corrected or the
problem may persist in the rebuilt engine.
10Measure the piston ring side clearance by
laying a new piston ring in each ring groove
and slipping a feeler gauge in beside it(see
illustration). Check the clearance at three or
four locations around each groove. Be sure to
use the correct ring for each groove - they are
different. If the side clearance is greater than
the figure listed in this Chapter’s Specifi-
cations, new pistons will have to be used.
11Check the piston-to-bore clearance by
measuring the bore (see Section 16) and the
piston diameter. Make sure the pistons and
bores are correctly matched. Measure the
piston across the skirt, at 90° to, and in line
with, the gudgeon pin (see illustration). (Any
difference between these two measurements
indicates that the piston is no longer perfectly
round.) Subtract the piston diameter from the
bore diameter to obtain the clearance. If it’s
greater than specified, the block will have to
be rebored, and new pistons and rings fitted.
2B•16 General engine overhaul procedures
18.11 Measure the piston diameter at a
90-degree angle to the gudgeon pin, at the
same height as the gudgeon pin
18.10 Check the ring side clearance with a
feeler gauge at several points around the
groove18.4 The piston ring grooves can be
cleaned with a special tool, as shown
here18.2 Removing the compression rings with
a ring expander - note the mark (arrowed)
facing up
If a groove cleaning tool isn’t available,
a piece broken off the old ring will do
the job, but protect your hands - piston
rings can be sharp
Page 73 of 228
12Check the piston-to-rod clearance by
twisting the piston and rod in opposite
directions. Any noticeable play indicates
excessive wear, which must be corrected. The
piston/connecting rod assemblies should be
taken to a machine shop for attention.
13If the pistons must be removed from the
connecting rods for any reason, they should
be taken to a machine shop. When this is
done, have the connecting rods checked for
bend and twist, since most machine shops
have special equipment for this purpose.
Note:Unless new pistons and/or connecting
rods must be fitted, do not dismantle the
pistons and connecting rods.
14Check the connecting rods for cracks and
other damage. Temporarily remove the rod
caps, lift out the old bearing shells, wipe the rod
and cap bearing surfaces clean, and inspect
them for nicks, gouges and scratches. After
checking the rods, fit new bearing shells, slip the
caps into place, and tighten the nuts finger-tight.
19 Crankshaft- inspection
3
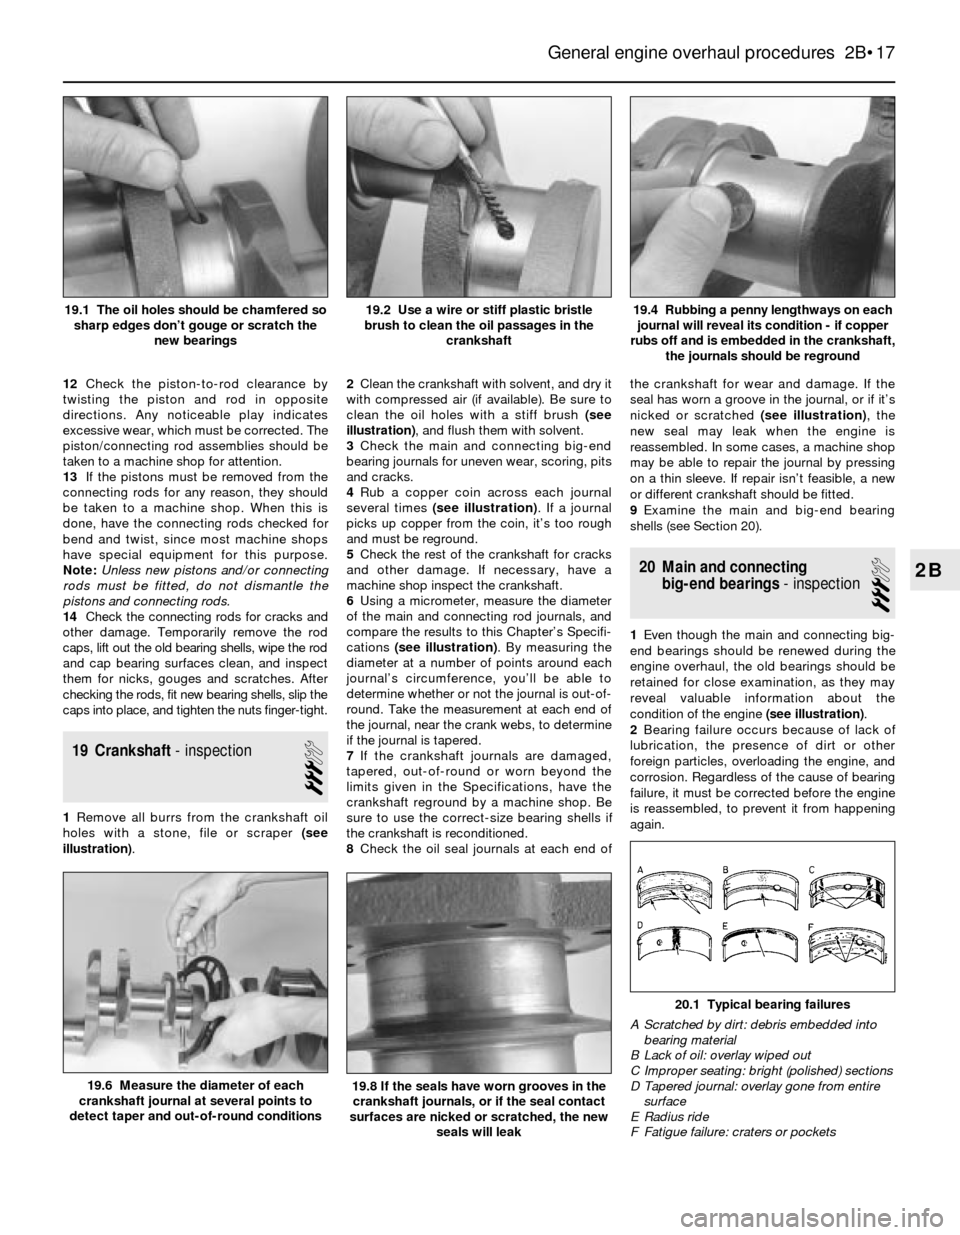
1Remove all burrs from the crankshaft oil
holes with a stone, file or scraper (see
illustration).2Clean the crankshaft with solvent, and dry it
with compressed air (if available). Be sure to
clean the oil holes with a stiff brush (see
illustration), and flush them with solvent.
3Check the main and connecting big-end
bearing journals for uneven wear, scoring, pits
and cracks.
4Rub a copper coin across each journal
several times (see illustration). If a journal
picks up copper from the coin, it’s too rough
and must be reground.
5Check the rest of the crankshaft for cracks
and other damage. If necessary, have a
machine shop inspect the crankshaft.
6Using a micrometer, measure the diameter
of the main and connecting rod journals, and
compare the results to this Chapter’s Specifi-
cations (see illustration). By measuring the
diameter at a number of points around each
journal’s circumference, you’ll be able to
determine whether or not the journal is out-of-
round. Take the measurement at each end of
the journal, near the crank webs, to determine
if the journal is tapered.
7If the crankshaft journals are damaged,
tapered, out-of-round or worn beyond the
limits given in the Specifications, have the
crankshaft reground by a machine shop. Be
sure to use the correct-size bearing shells if
the crankshaft is reconditioned.
8Check the oil seal journals at each end ofthe crankshaft for wear and damage. If the
seal has worn a groove in the journal, or if it’s
nicked or scratched (see illustration), the
new seal may leak when the engine is
reassembled. In some cases, a machine shop
may be able to repair the journal by pressing
on a thin sleeve. If repair isn’t feasible, a new
or different crankshaft should be fitted.
9Examine the main and big-end bearing
shells (see Section 20).
20 Main and connecting
big-end bearings- inspection
3
1Even though the main and connecting big-
end bearings should be renewed during the
engine overhaul, the old bearings should be
retained for close examination, as they may
reveal valuable information about the
condition of the engine (see illustration).
2Bearing failure occurs because of lack of
lubrication, the presence of dirt or other
foreign particles, overloading the engine, and
corrosion. Regardless of the cause of bearing
failure, it must be corrected before the engine
is reassembled, to prevent it from happening
again.
General engine overhaul procedures 2B•17
19.4 Rubbing a penny lengthways on each
journal will reveal its condition - if copper
rubs off and is embedded in the crankshaft,
the journals should be reground19.2 Use a wire or stiff plastic bristle
brush to clean the oil passages in the
crankshaft19.1 The oil holes should be chamfered so
sharp edges don’t gouge or scratch the
new bearings
20.1 Typical bearing failures
A Scratched by dirt: debris embedded into
bearing material
B Lack of oil: overlay wiped out
C Improper seating: bright (polished) sections
D Tapered journal: overlay gone from entire
surface
E Radius ride
F Fatigue failure: craters or pockets
19.8 If the seals have worn grooves in the
crankshaft journals, or if the seal contact
surfaces are nicked or scratched, the new
seals will leak19.6 Measure the diameter of each
crankshaft journal at several points to
detect taper and out-of-round conditions
2B