Button BMW 3 SERIES CONVERTIBLE 2013 E93 Owner's Manual
[x] Cancel search | Manufacturer: BMW, Model Year: 2013, Model line: 3 SERIES CONVERTIBLE, Model: BMW 3 SERIES CONVERTIBLE 2013 E93Pages: 311, PDF Size: 7.05 MB
Page 16 of 311
This overview of buttons, switches and displays
is intended to familiarize you with your vehicle's
operating environment. The section will also
assist you in becoming acquainted with the control concepts and options available for operating the various systems.
At a glance
00320051004F004C00510048000300280047004C0057004C005200510003
Page 18 of 311
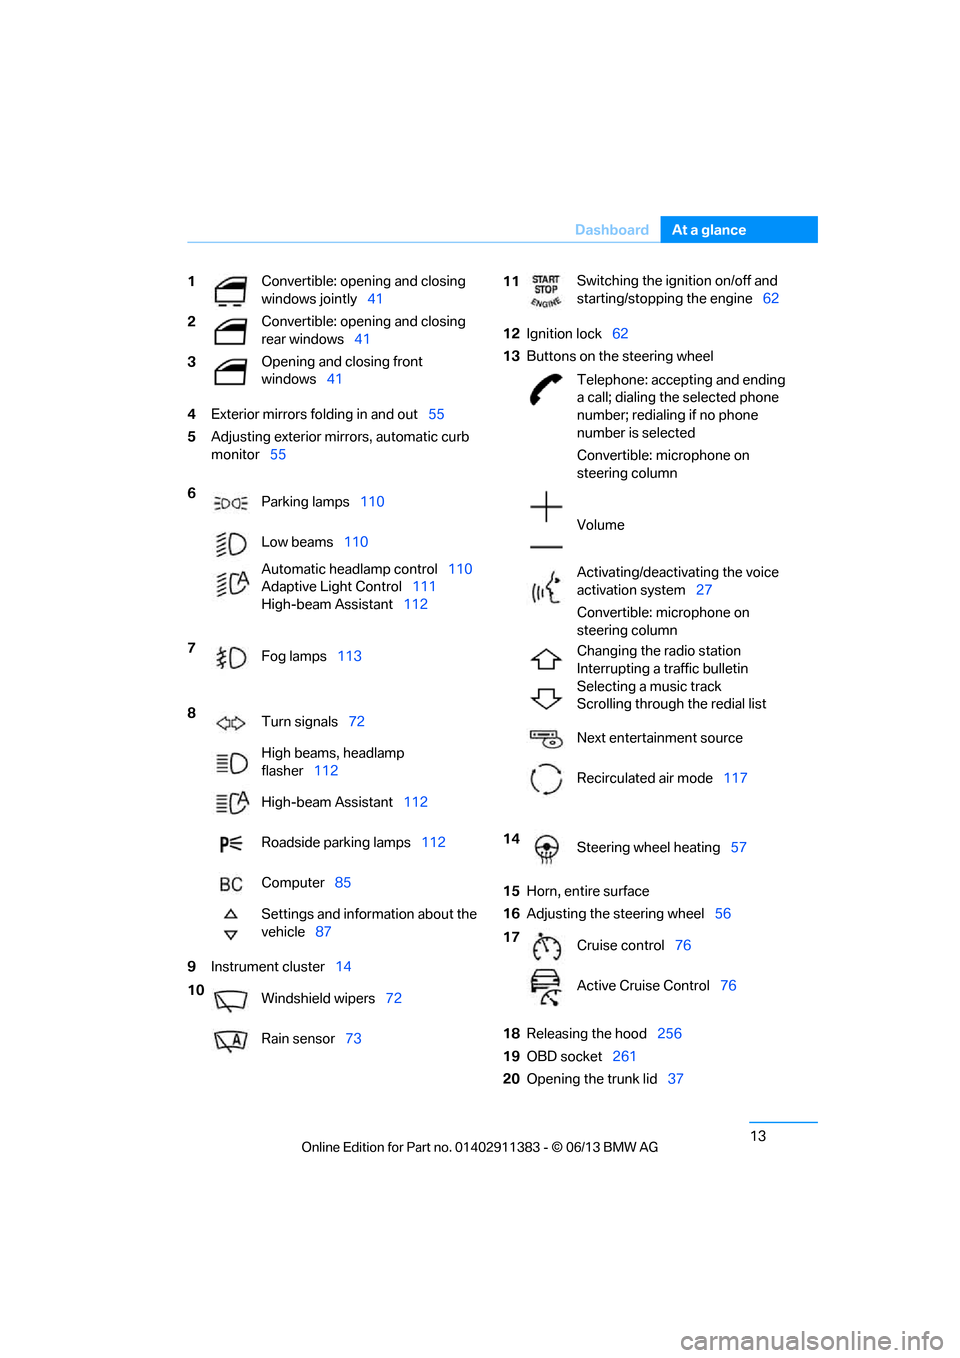
13
Dashboard
At a glance
4
Exterior mirrors fo lding in and out55
5 Adjusting exterior mirrors, automatic curb
monitor 55
9 Instrument cluster 14 12
Ignition lock 62
13 Buttons on the steering wheel
15 Horn, entire surface
16 Adjusting the steering wheel 56
18 Releasing the hood 256
19 OBD socket 261
20 Opening the trunk lid 37
1
Convertible: opening and closing
windows jointly
41
2 Convertible: opening and closing
rear windows
41
3 Opening and closing front
windows
41
6 Parking lamps 110
Low beams 110
Automatic head lamp control110
Adaptive Light Control 111
High-beam Assistant 112
7 Fog lamps 113
8 Turn signals 72
High beams, headlamp
flasher 112
High-beam Assistant 112
Roadside parking lamps 112
Computer 85
Settings and information about the
vehicle 87
10 Windshield wipers 72
Rain sensor 73
11Switching the ignition on/off and
starting/stopping the engine
62
Telephone: accepting and ending
a call; dialing the selected phone
number; redialing if no phone
number is selected
Convertible: microphone on
steering column
Volume
Activating/deactivating the voice
activation system 27
Convertible: microphone on
steering column
Changing the radio station
Interrupting a traffic bulletin
Selecting a music track
Scrolling through the redial list
Next entertainment source
Recirculated air mode 117
14 Steering wheel heating 57
17 Cruise control 76
Active Cruise Control 76
00320051004F004C00510048000300280047004C0057004C005200510003
Page 22 of 311
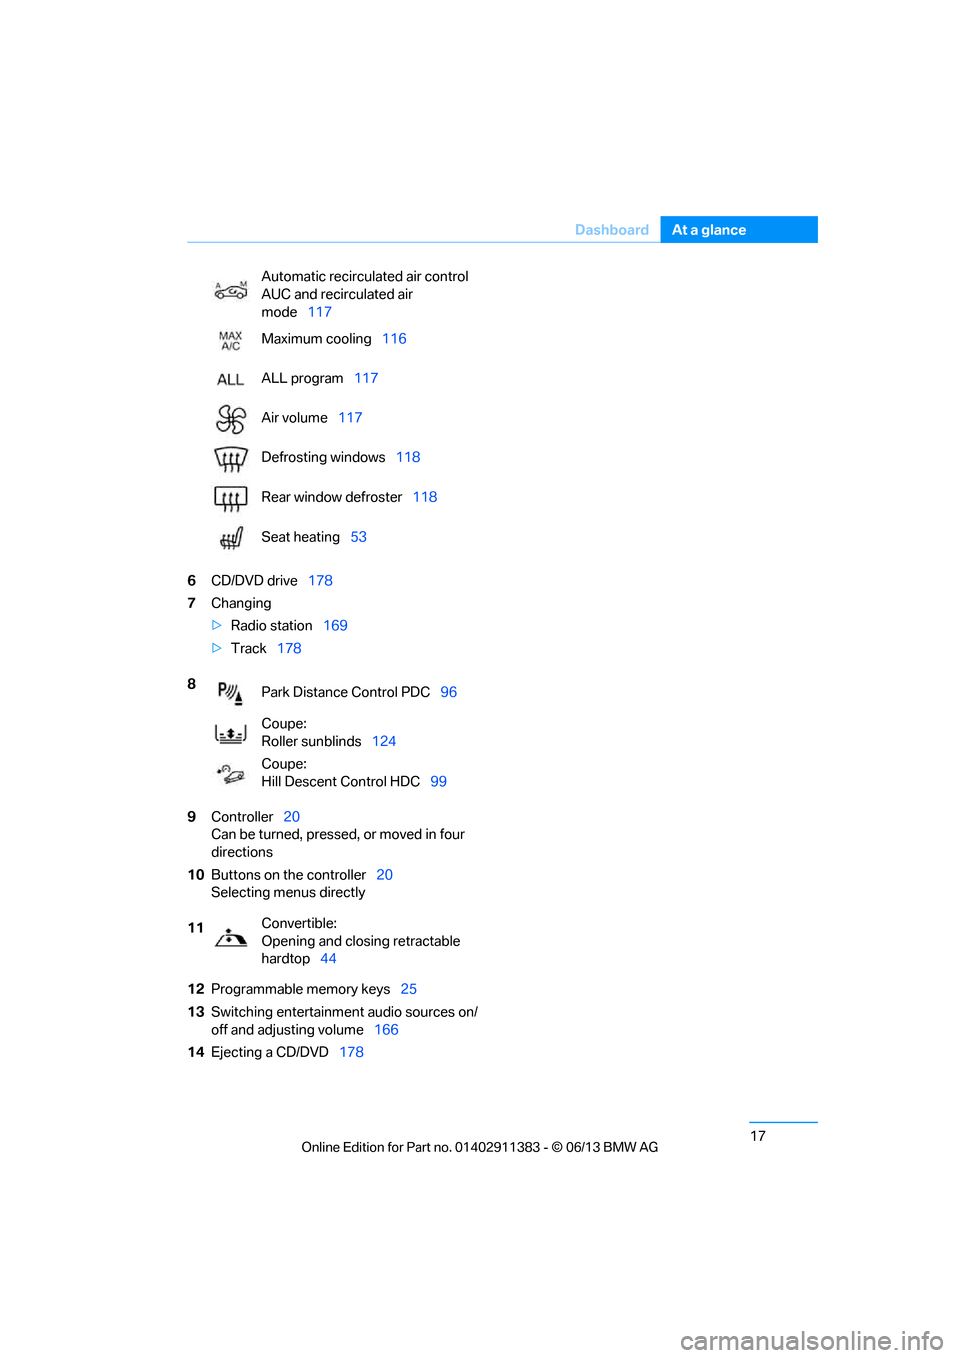
17
Dashboard
At a glance
6
CD/DVD drive 178
7 Changing
>Radio station 169
> Track 178
9 Controller 20
Can be turned, pressed, or moved in four
directions
10 Buttons on the controller 20
Selecting menus directly
12 Programmable memory keys 25
13 Switching entertainment audio sources on/
off and adjusting volume 166
14 Ejecting a CD/DVD 178
Automatic recirculated air control
AUC and recirculated air
mode
117
Maximum cooling 116
ALL program 117
Air volume 117
Defrosting windows 118
Rear window defroster 118
Seat heating 53
8 Park Distance Control PDC 96
Coupe:
Roller sunblinds 124
Coupe:
Hill Descent Control HDC 99
11 Convertible:
Opening and closing retractable
hardtop
44
00320051004F004C00510048000300280047004C0057004C005200510003
Page 25 of 311
20
At a glanceiDrive
iDrive
Vehicle equipment
In this chapter, all pr oduction, country, and
optional equipment that is offered in the model
range is described. For this reason, descrip-
tions will be given of some equipment that may
not be available in a vehi cle, for example due to
the special options or national-market version
selected. This also app lies to safety related
functions and systems.
The concept
iDrive integrates the fu nctions of a large num-
ber of switches. This allows these functions to
be operated from a single central position.
Make entries only when traffic and road
conditions permit; otherwise, you may
endanger vehicle occupants and other road
users by being distracted. <
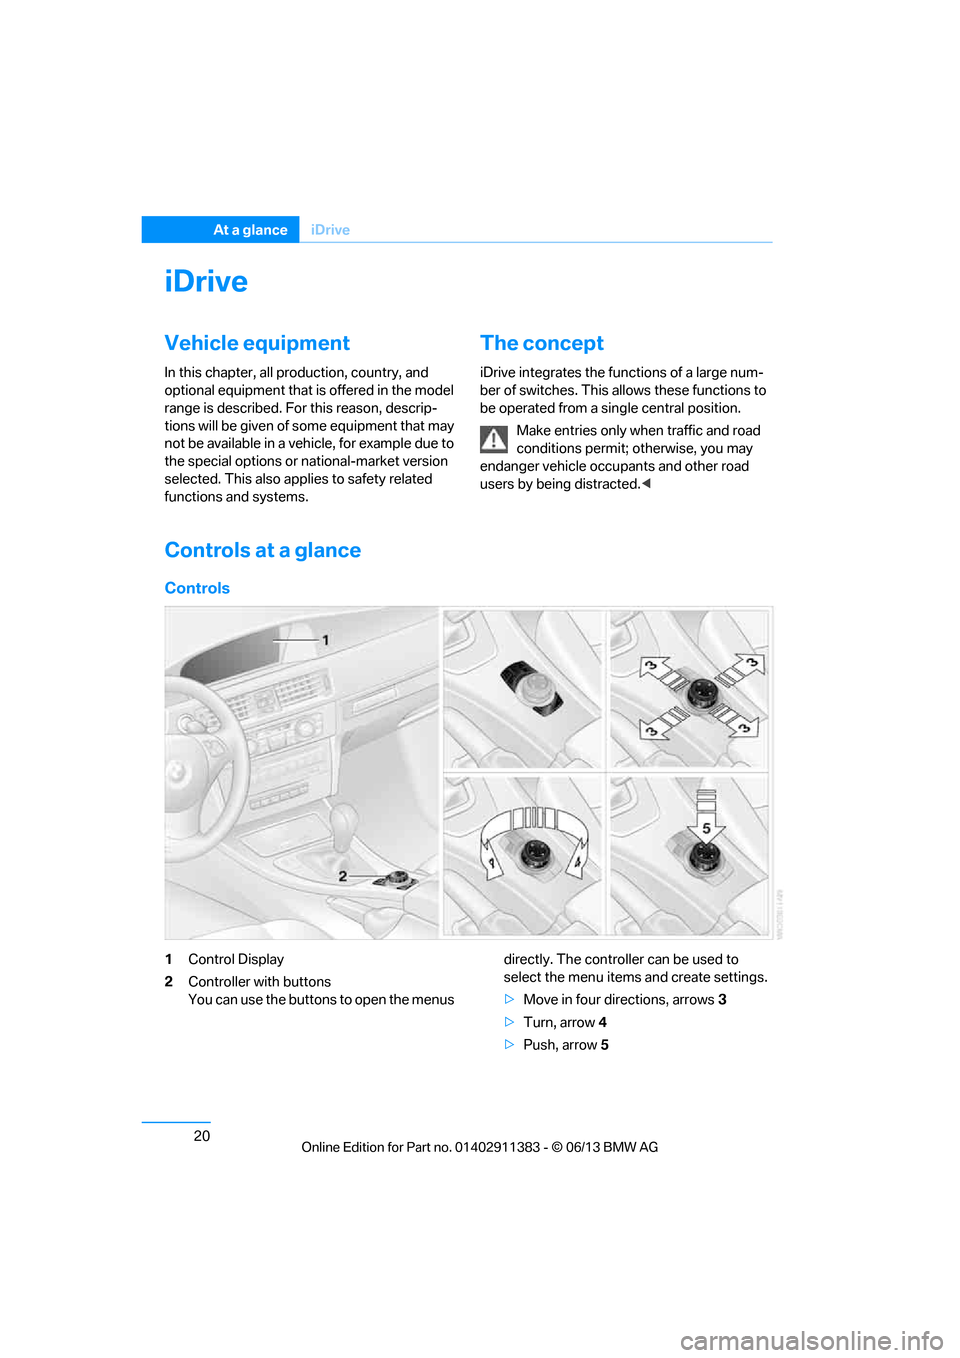
Controls at a glance
Controls
1Control Display
2 Controller with buttons
You can use the buttons to open the menus directly. The controller can be used to
select the menu item
s and create settings.
> Move in four directions, arrows 3
> Turn, arrow 4
> Push, arrow 5
00320051004F004C00510048000300280047004C0057004C005200510003
Page 26 of 311
21
iDrive
At a glance
Control Display
Notes
>
Follow care instructions when cleaning the
Control Display.
> Do not store items in the region in front of
the Control Display; doing so may damage
the Control Display.
Switching off
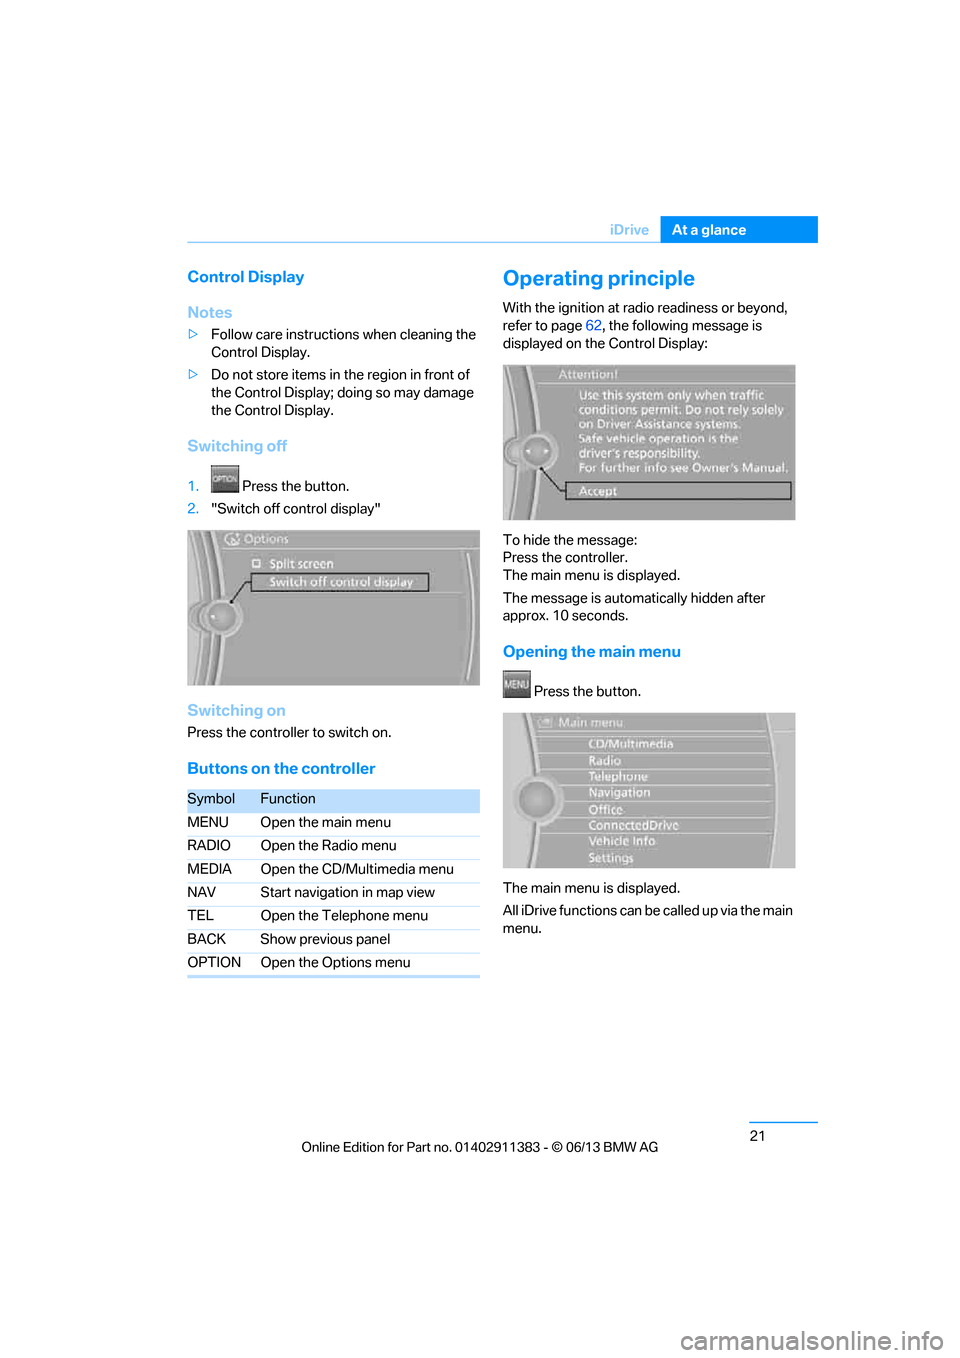
1. Press the button.
2. "Switch off control display"
Switching on
Press the controller to switch on.
Buttons on the controller
Operating principle
With the ignition at radio readiness or beyond,
refer to page 62, the following message is
displayed on the Control Display:
To hide the message:
Press the controller.
The main menu is displayed.
The message is automatically hidden after
approx. 10 seconds.
Opening the main menu
Press the button.
The main menu is displayed.
All iDrive functions can be called up via the main
menu.
SymbolFunction
MENU Open the main menu
RADIO Open the Radio menu
MEDIA Open the CD/Multimedia menu
NAV Start navigation in map view
TEL Open the Telephone menu
BACK Show previous panel
OPTION Open the Options menu
00320051004F004C00510048000300280047004C0057004C005200510003
Page 27 of 311
22
At a glanceiDrive
Selecting a menu item
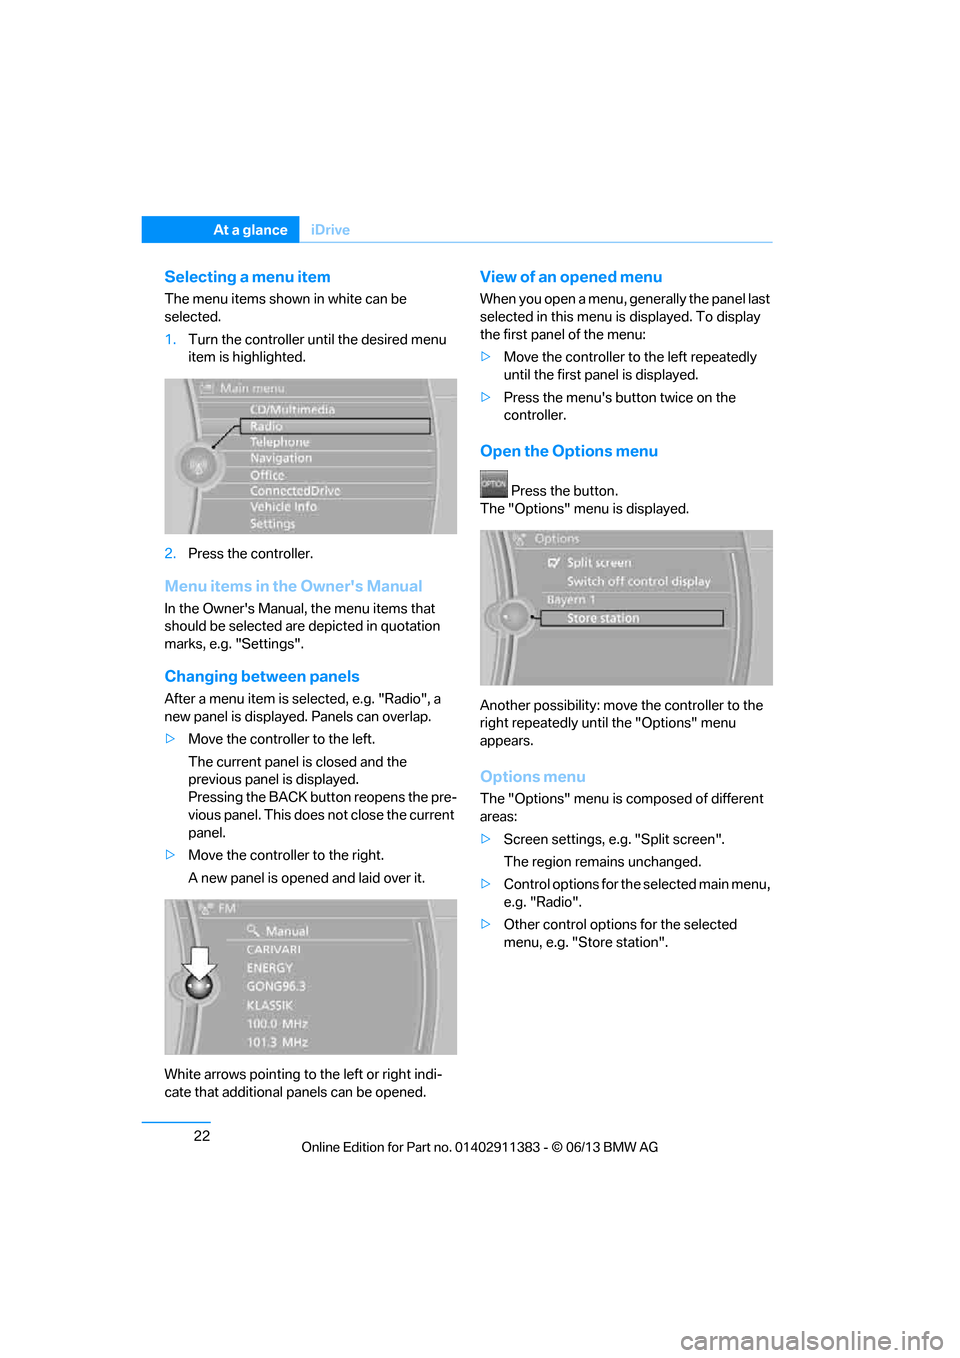
The menu items shown in white can be
selected.
1.Turn the controller until the desired menu
item is highlighted.
2. Press the controller.
Menu items in the Owner's Manual
In the Owner's Manual, the menu items that
should be selected are depicted in quotation
marks, e.g. "Settings".
Changing between panels
After a menu item is selected, e.g. "Radio", a
new panel is displayed. Panels can overlap.
> Move the controller to the left.
The current panel is closed and the
previous panel is displayed.
Pressing the BACK button reopens the pre-
vious panel. This does not close the current
panel.
> Move the controller to the right.
A new panel is opened and laid over it.
White arrows pointing to the left or right indi-
cate that additional panels can be opened.
View of an opened menu
When you open a menu, ge nerally the panel last
selected in this menu is displayed. To display
the first panel of the menu:
> Move the controller to the left repeatedly
until the first pa nel is displayed.
> Press the menu's button twice on the
controller.
Open the Options menu
Press the button.
The "Options" menu is displayed.
Another possibility: move the controller to the
right repeatedly until the "Options" menu
appears.
Options menu
The "Options" menu is composed of different
areas:
> Screen settings, e.g. "Split screen".
The region remains unchanged.
> Control options for the selected main menu,
e.g. "Radio".
> Other control options for the selected
menu, e.g. "Store station".
00320051004F004C00510048000300280047004C0057004C005200510003
Page 28 of 311
23
iDrive
At a glance
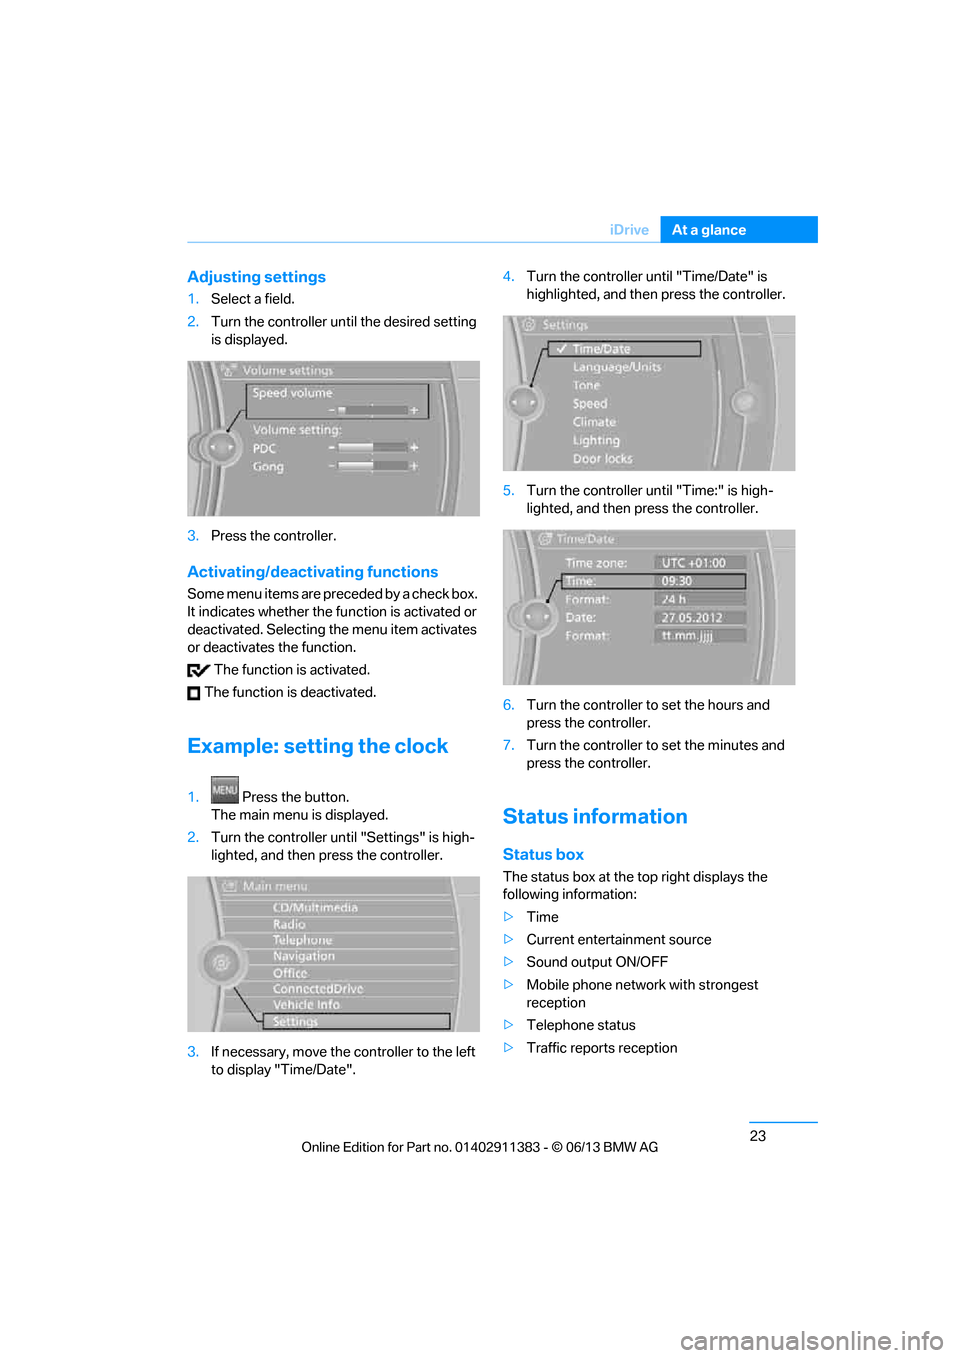
Adjusting settings
1.
Select a field.
2. Turn the controller until the desired setting
is displayed.
3. Press the controller.
Activating/deactivating functions
Some menu items are preceded by a check box.
It indicates whether the fu nction is activated or
deactivated. Selecting the menu item activates
or deactivates the function.
The function is activated.
The function is deactivated.
Example: setting the clock
1. Press the button.
The main menu is displayed.
2. Turn the controller until "Settings" is high-
lighted, and then press the controller.
3. If necessary, move the controller to the left
to display "Time/Date". 4.
Turn the controller until "Time/Date" is
highlighted, and then press the controller.
5. Turn the controller until "Time:" is high-
lighted, and then press the controller.
6. Turn the controller to set the hours and
press the controller.
7. Turn the controller to set the minutes and
press the controller.
Status information
Status box
The status box at the top right displays the
following information:
> Time
> Current entertainment source
> Sound output ON/OFF
> Mobile phone network with strongest
reception
> Telephone status
> Traffic reports reception
00320051004F004C00510048000300280047004C0057004C005200510003
Page 29 of 311
24
At a glanceiDrive
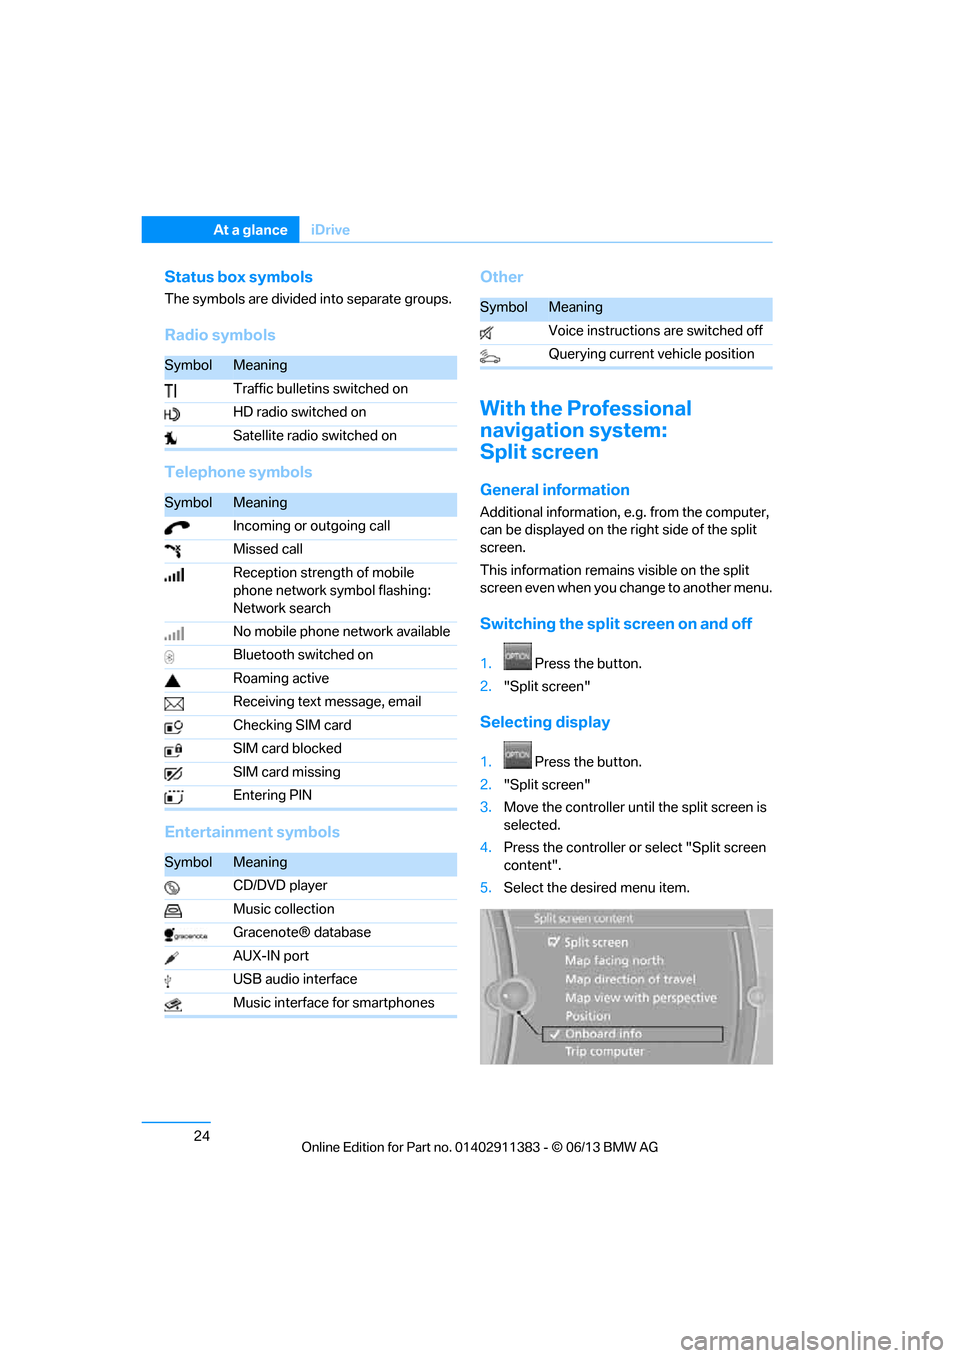
Status box symbols
The symbols are divided into separate groups.
Radio symbols
Telephone symbols
Entertainment symbols Other
With the Professional
navigation system:
Split screen
General information
Additional information, e.g. from the computer,
can be displayed on the right side of the split
screen.
This information remains visible on the split
screen even when you change to another menu.
Switching the split
screen on and off
1.Press the button.
2. "Split screen"
Selecting display
1. Press the button.
2. "Split screen"
3. Move the controller until the split screen is
selected.
4. Press the controller or select "Split screen
content".
5. Select the desired menu item.
SymbolMeaning
Traffic bulletins switched on
HD radio switched on
Satellite radio switched on
SymbolMeaning
Incoming or outgoing call
Missed call
Reception strength of mobile
phone network symbol flashing:
Network search
No mobile phone network available
Bluetooth switched on
Roaming active
Receiving text message, email
Checking SIM card
SIM card blocked
SIM card missing
Entering PIN
SymbolMeaning
CD/DVD player
Music collection
Gracenote® database
AUX-IN port
USB audio interface
Music interface for smartphones
SymbolMeaning
Voice instructions are switched off
Querying current vehicle position
00320051004F004C00510048000300280047004C0057004C005200510003
Page 30 of 311
25
iDrive
At a glance
Programmable memory keys
General information
iDrive functions can be stored on the program-
mable memory keys and called up directly, e.g.
radio stations, navigation destinations, phone
numbers and entry points into the menu.
The settings are stored
for the remote control
currently in use.
Storing functions
1. Highlight the function via the iDrive.
2. Press the desired button
... for longer than
two seconds.
Executing a function
... Press the button.
The function is executed immediately. This
means, for example, that the number is dialed
when a phone number is selected.
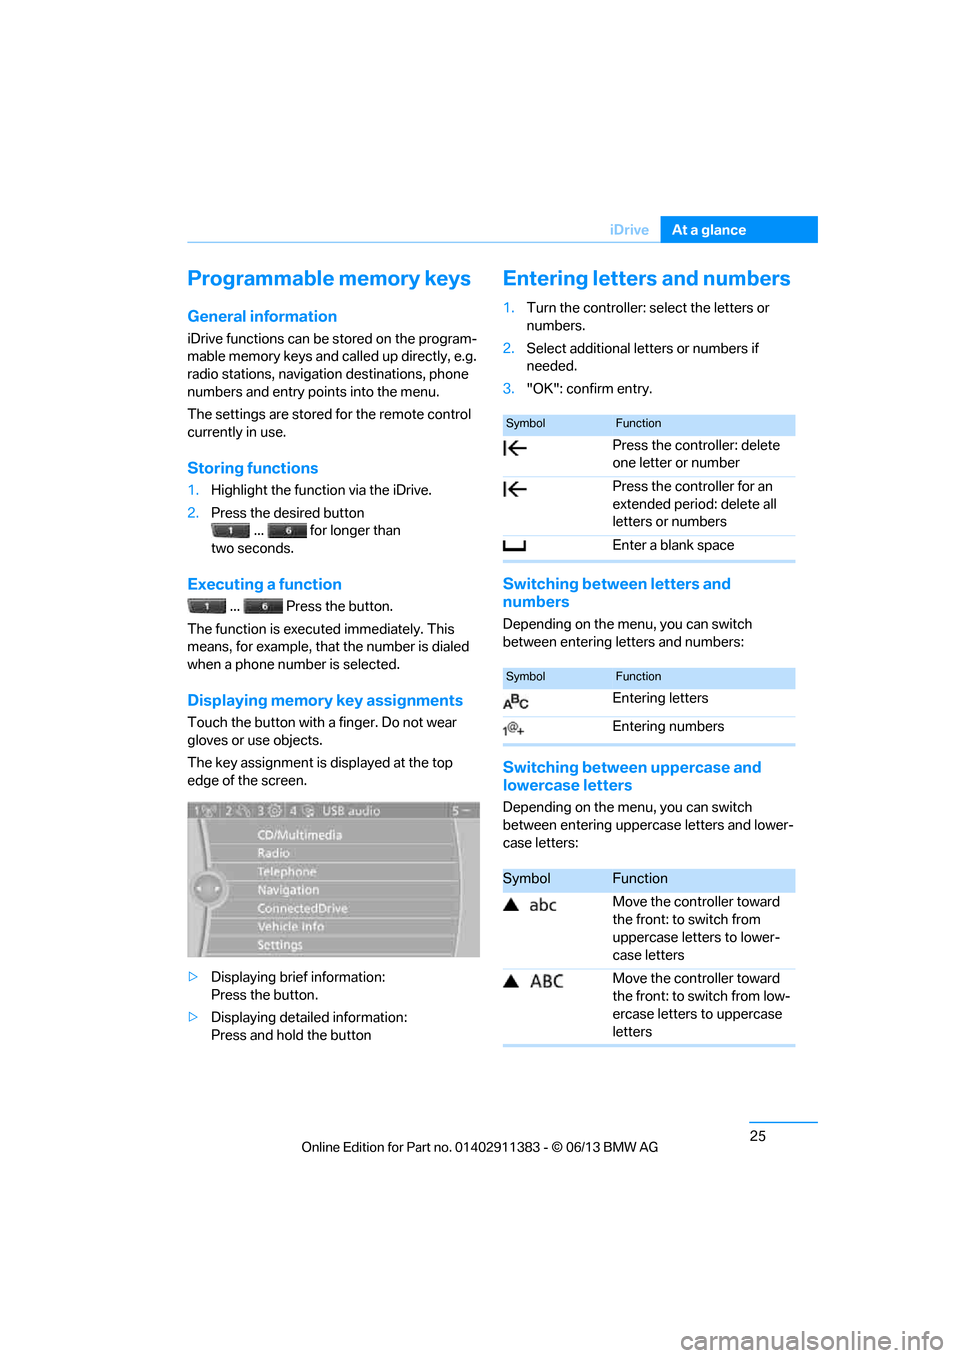
Displaying memory key assignments
Touch the button with a finger. Do not wear
gloves or use objects.
The key assignment is displayed at the top
edge of the screen.
> Displaying brief information:
Press the button.
> Displaying detailed information:
Press and hold the button
Entering letters and numbers
1.Turn the controller: se lect the letters or
numbers.
2. Select additional letters or numbers if
needed.
3. "OK": confirm entry.
Switching between letters and
numbers
Depending on the menu, you can switch
between entering letters and numbers:
Switching between uppercase and
lowercase letters
Depending on the menu, you can switch
between entering upperc ase letters and lower-
case letters:
SymbolFunction
Press the controller: delete
one letter or number
Press the controller for an
extended period: delete all
letters or numbers
Enter a blank space
SymbolFunction
Entering letters
Entering numbers
SymbolFunction
Move the controller toward
the front: to switch from
uppercase letters to lower-
case letters
Move the controller toward
the front: to switch from low-
ercase letters to uppercase
letters
00320051004F004C00510048000300280047004C0057004C005200510003
Page 32 of 311
27
Voice activation system
At a glance
Voice activation system
Vehicle equipment
In this chapter, all production, country, and
optional equipment that is offered in the model
range is described. For this reason, descrip-
tions will be given of some equipment that may
not be available in a vehi
cle, for example due to
the special options or national-market version
selected. This also app lies to safety related
functions and systems.
The concept
> The voice activation system can be used
to control most functions by spoken
commands.
> Functions that can only used when the vehi-
cle is stopped cannot be operated using the
voice activation system.
> The system includes a special microphone
on the driver's side.
> In the Owner's Manual, {...} indicates com-
mands for the voice activation system.
> In the Owner's Manual, {{...}} indicates the
answers from the voice activation system.
Prerequisite
On the Control Display, set a language that is
also supported by the vo ice activation system
to permit identification of the commands to be
spoken.
Setting the langua ge, refer to page95.
Saying commands
Activating voice activation system
1.Press the button on the steering wheel.
2. Wait for the acoustic signal.
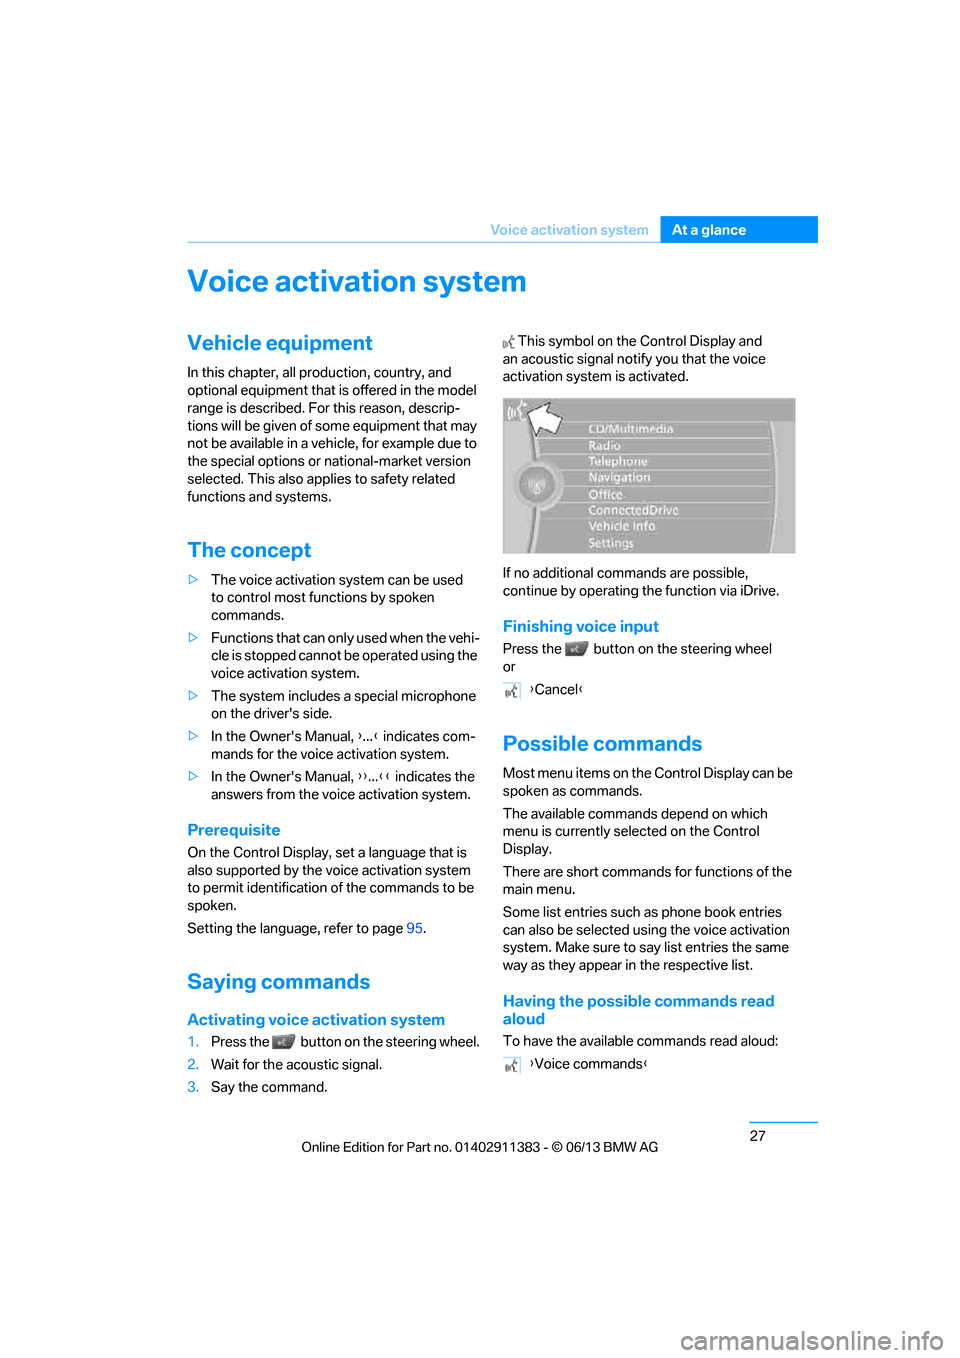
3. Say the command. This symbol on th
e Control Display and
an acoustic signal notify you that the voice
activation system is activated.
If no additional commands are possible,
continue by operating the function via iDrive.
Finishing voice input
Press the button on the steering wheel
or
Possible commands
Most menu items on the Control Display can be
spoken as commands.
The available commands depend on which
menu is currently selected on the Control
Display.
There are short commands for functions of the
main menu.
Some list entries such as phone book entries
can also be selected using the voice activation
system. Make sure to say list entries the same
way as they appear in the respective list.
Having the possible commands read
aloud
To have the available commands read aloud:
{ Cancel }
{ Voice commands }
00320051004F004C00510048000300280047004C0057004C005200510003