tow BMW 328i 1998 E36 User Guide
[x] Cancel search | Manufacturer: BMW, Model Year: 1998, Model line: 328i, Model: BMW 328i 1998 E36Pages: 759
Page 86 of 759
116-2
CYLINDER
HEADAND
VALVETRAIN
3
.
Remove
timing
chain
sprockets
and
timing
chains
from
7
.
Slowly
release
pressure
oncamshaft
bearing
capsby
camshafts
.
Remove
upper
timing
chain
guidefrom
cyl-
turningeccentric
shaft
.
Remove
bearing
caps
and
inder
head
.
See117
Camshaft
Timing
Chain
.
camshaft
.
Repeat
procedureon
remaining
camshaft
.
NOTE-
It
is
not
necessary
lo
remove
the
lower
timing
chain
cover
.
4
.
Remove
spark
plugs
and
instaf
BMW
special
tool
11
3
260
to
cylinder
head
.
Tighten
tool
retaining
bolts
in
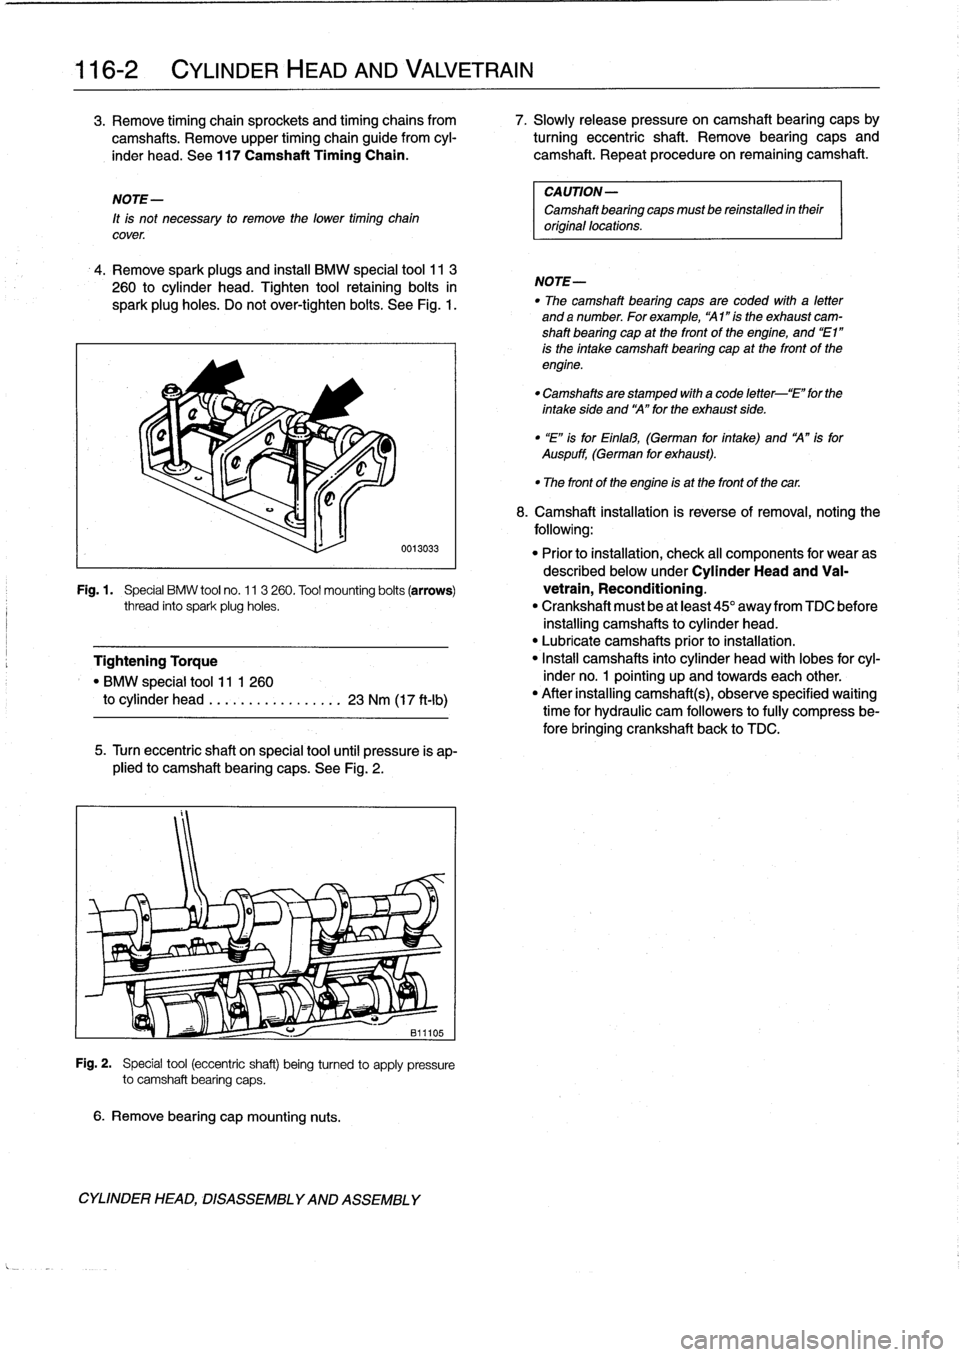
spark
plug
holes
.
Do
not
over-tighten
bolts
.
See
Fig
.
1
.
6
.
Remove
bearing
cap
mounting
nuts
.
0013033
5
.
Turn
eccentric
shaft
on
special
tool
until
pressure
is
ap-
plied
to
camshaft
bearing
caps
.
See
Fig
.
2
.
Fig
.
2
.
Special
tool
(eccentric
shaft)
being
turned
to
apply
pressure
to
camshaft
bearing
caps
.
CYLINDER
HEAD,
DISASSEMBLYAND
ASSEMBLY
CAUTION-
Camshaft
bearing
caps
mustbe
reinstalled
intheir
original
locations
.
NOTE-
"
The
camshaft
bearing
caps
are
coded
wíth
a
letter
anda
number
.
Forexample,
"Al
"ís
the
exhaust
cam-
shaft
bearing
cap
at
the
front
of
the
engíne,
and
"El"
is
the
intake
camshaft
bearing
cap
at
the
front
of
the
engine
.
"
Camshafts
are
stamped
with
a
code
letter-`E"
for
the
intakeside
and
`A"forthe
exhaust
side
.
"
"E"
isforEinlal3,
(German
for
íntake)
and
A"
isfor
Auspuff,
(German
for
exhaust)
.
"
The
front
of
the
engine
is
at
the
front
of
thecar
.
8
.
Camshaft
installation
is
reverse
of
removal,noting
the
following
:
"
Prior
to
installation,
check
al¡
components
for
wear
as
described
below
underCylinder
Head
and
Va¡-
Fig
.1
.
Special
BMW
tool
no
.
11
3
260
.
Tool
mounting
bolts
(arrows)
vetrain,
Reconditioning
.
thread
into
spark
plug
holes
.
"
Crankshaft
must
be
at
least
45°
away
from
TDC
before
installing
camshafts
to
cylinder
head
.
"
Lubricate
camshafts
prior
to
installation
.
Tightening
Torque
"
Install
camshafts
into
cylinder
head
with
lobes
for
cyl-
"
BMW
special
tool
11
1
260
inder
no
.
1
pointing
up
and
towards
each
other
.
to
cylinder
head
.
...
.
.
...........
23
Nm
(17
ft-Ib)
"
After
installing
camshafts),observe
specified
waiting
time
for
hydraulic
cam
followers
to
fully
compress
be-
fore
bringing
crankshaft
back
to
TDC
.
Page 90 of 759
116-
6
CYLINDER
HEAD
AND
VALVETRAIN
9
.
Camshaft
installation
is
reverse
of
removal,noting
the
following
:
"
Prior
to
installation,
check
al¡
components
for
wear
as
described
below
under
Cylinder
Head
and
Val-
vetrain
Reconditioning
.
"
Crankshaft
must
be
at
least
45°
away
from
MC
before
installing
camshafts
to
cylinder
head
.
"
Lubricate
camshafts
prior
to
installation
.
"
Insta¡¡
camshafts
into
cylinder
head
with
lobes
for
cyl-
inder
no
.
1
pointing
up
and
towards
each
other
.
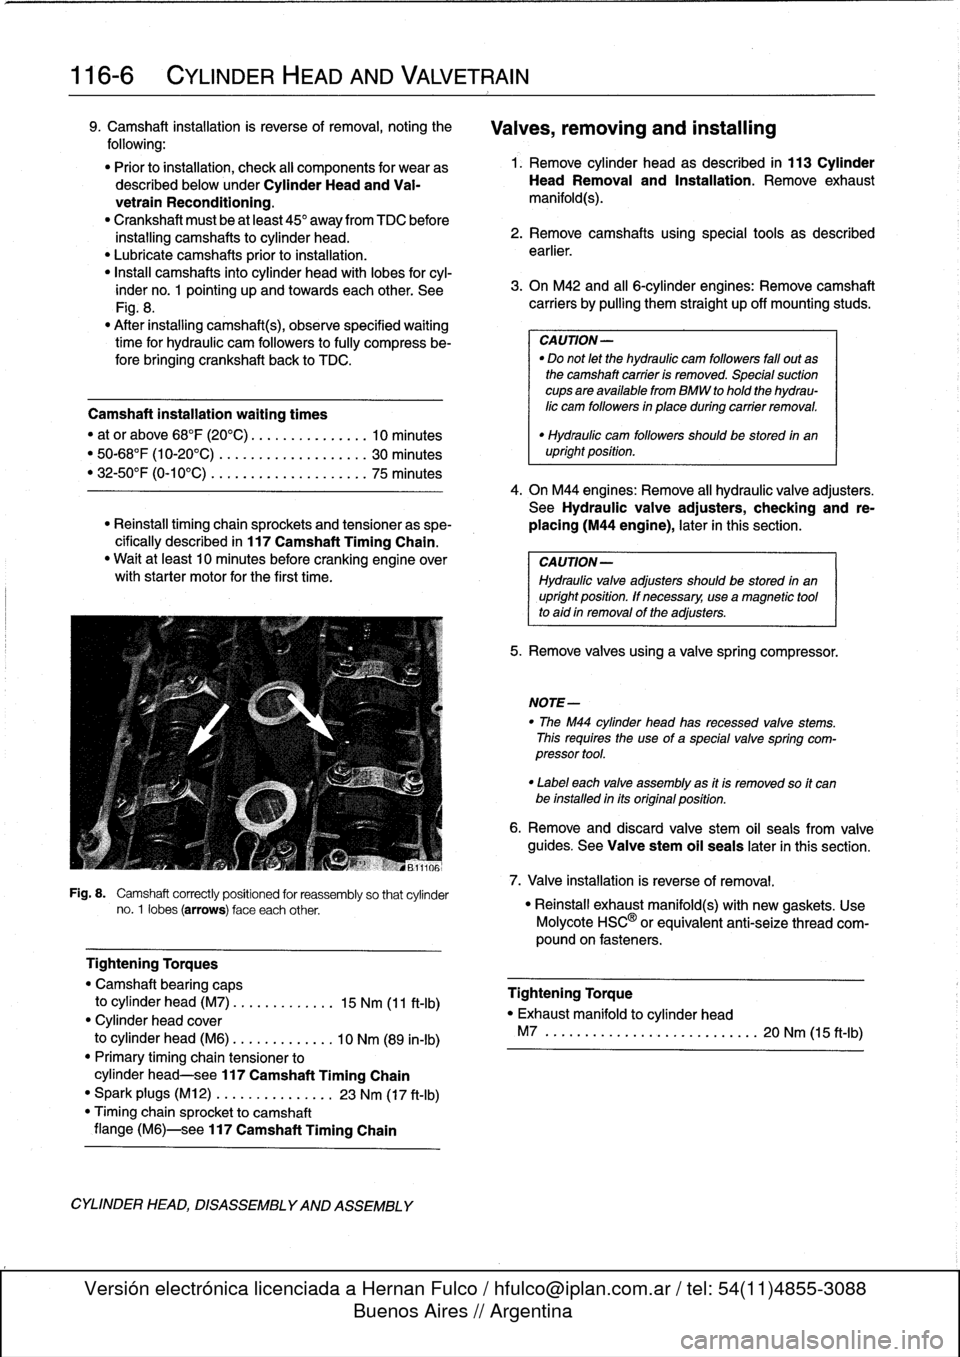
See
Fig
.
8
.
"
After
installing
camshaft(s),
observe
specified
waiting
time
for
hydraulic
cam
followers
to
fully
compress
be-
fore
bringing
crankshaft
back
to
TDC
.
Fig
.
8
.
Camshaft
correctly
positioned
for
reassembly
so
thatcylinder
no
.
1
lobes
(arrows)
face
each
other
.
Tightening
Torques
"
Camshaft
bearing
caps
to
cylinder
head
(M7)
.
..
...
..
.
....
15
Nm
(11
ft-Ib)
"
Cylinder
head
cover
to
cylinder
head
(M6)
..
.
..........
10
Nm
(89
in-lb)
"
Primary
timing
chaintensioner
to
cylinder
head-see
117
Camshaft
Timing
Chain
"
Spark
plugs
(M12)
.............
.
.
23
Nm
(17
ft-Ib)
"
Timing
chain
sprocket
to
camshaft
flange
(M6)-see
117
Camshaft
Timing
Chain
CYLINDER
HEAD,
DISASSEMBLYAND
ASSEMBLY
Valves,
removing
and
installing
1
.
Remove
cylinder
head
as
described
in
113
Cylinder
HeadRemoval
and
Installation
.
Remove
exhaust
manifold(s)
.
2
.
Remove
camshafts
using
special
tools
as
descríbed
earlier
.
3
.
On
M42
and
al¡
6-cylinder
engines
:
Remove
camshaft
carriers
by
pulling
them
straight
up
off
mounting
studs
.
CAUTION-
"
Do
not
let
the
hydraulic
cam
followers
fa¡¡
out
as
the
camshaft
carrier
is
removed
.
Special
suction
cupsare
available
from
BMW
to
hold
the
hydrau-
lic
cam
followers
in
place
during
carrier
removal
.
Camshaft
installation
waiting
times
"
at
or
above
68°F
(20
0
C)
....
..
.
..
......
10
minutes
"
50-68°F
(10-20°C)
...
.
..
....
.
..
......
30
minutes
"
32-50°F
(0-10°C)
....
.
..
....
.
..
......
75
minutes
4
.
On
M44
engines
:
Remove
all
hydraulic
valve
adjusters
.
See
Hydraulicvalve
adjusters,
checking
and
re-
"
Reinstall
timing
chainsprockets
and
tensioner
as
spe-
placing
(M44
engine),
later
in
this
section
.
cifically
described
in
117
Camshaft
Timing
Chain
.
"
Waít
at
least
10
minutes
before
cranking
engine
over
CAUTION-
withstarter
motor
for
the
first
time
.
Hydraulic
valve
adjusters
should
be
stored
in
an
upright
position
.
lf
necessary,
use
amagnetic
tool
to
aid
in
removal
of
the
adjusters
.
"
Hydraulic
cam
followers
shouldbe
stored
in
an
upright
position
.
5
.
Remove
valves
using
a
valve
spring
compressor
.
NOTE-
"
The
M44
cylinder
head
has
recessed
valve
stems
.
This
requires
the
use
of
a
special
valve
spring
com-
pressor
tool
.
"
Label
each
valve
assembly
as
it
is
removed
so
it
can
be
installed
in
its
original
position
.
6
.
Remove
and
discard
valve
stem
oil
seals
from
valve
guides
.
See
Valve
stem
oil
seals
later
in
this
section
.
7
.
Valve
installation
is
reverse
of
removal
.
"
Reinstall
exhaust
manifold(s)
with
new
gaskets
.
Use
Molycote
HSC'
5
or
equivalent
anti-seize
thread
com-
pound
on
fasteners
.
Tightening
Torque
"
Exhaust
manifold
to
cylinder
head
M7
............
..
...
....
.
...
..
20
Nm
(15
ft-Ib)
Page 98 of 759
117-2
CAMSHAFT
TIMING
CHAIN
CAMSHAFT
TIMING
CHAIN,
4-CYLINDER
Special
BMW
service
tools
are
needed
for
timing
chain
re-
moval
and
installation
procedures
.
The
special
tools
assure
proper
timing
of
the
valvetrain
.
Precíse
marks
to
setthe
timing
on
the
camshafts
are
not
provided
for
reassembly
.
Read
the
procedures
through
before
beginning
the
job
.
CAUTION-
lf
the
camshaftsare
not
properly
timed,
the
pis-
tons
can
contact
thevalves
.
Camshaft
timing
chain,
removing
(4-cylinder
engines)
U0119-
Fig
.
3
.
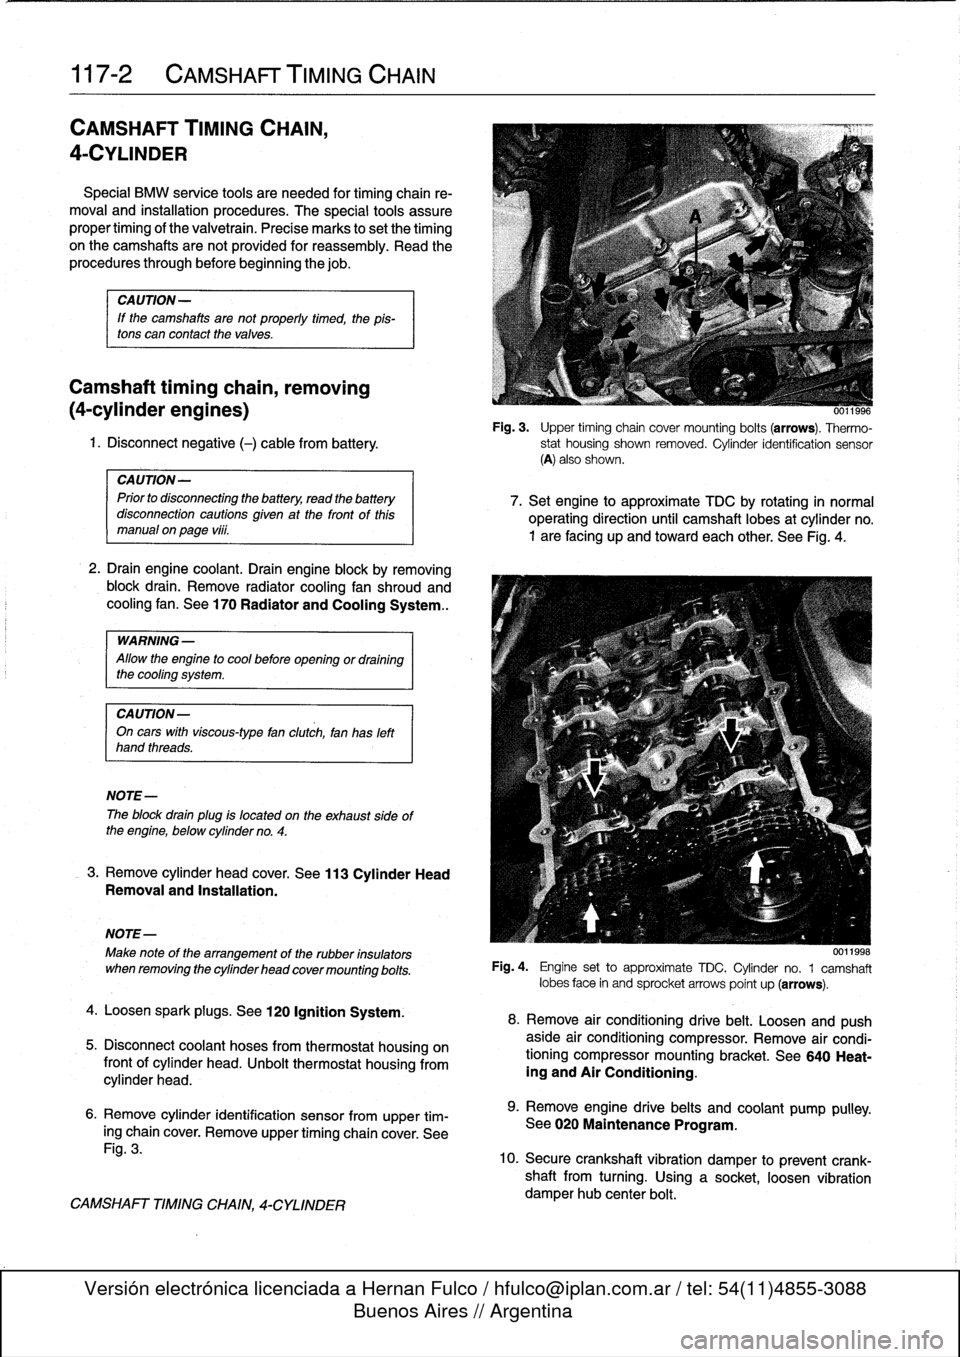
Upper
timing
chain
covermounting
bolts(arrows)
.
Thermo-
1
.
Disconnect
negative
(-)cablefrom
battery
.
stat
housing
shown
removed
.
Cylinder
ídentification
sensor
(A)
also
shown
.
CAUTION-
Prior
to
disconnecting
the
battery,
read
the
battery
disconnection
cautions
given
at
the
front
of
this
manual
on
page
viii
.
2
.
Drain
engine
coolant
.
Drain
engine
block
byremoving
block
drain
.
Remove
radiator
cooling
fan
shroud
and
cooling
fan
.
See
170
Radiator
and
Cooling
System
..
WARNING
-
Allow
the
engine
to
cool
before
openingor
draining
the
cooling
system
.
CA
UTION-
On
cars
with
viscous-type
fan
clutch,
fan
has
left
hand
threads
.
NOTE-
The
block
drain
plug
is
located
on
the
exhaust
sideof
the
engine,
below
cylinder
no
.
4
.
3
.
Remove
cylinder
head
cover
.
See
113
Cylinder
HeadRemoval
and
Installation
.
NOTE-
Make
note
of
the
arrangement
of
the
rubber
insulators
when
removing
the
cylinder
head
cover
mounting
belts
.
4
.
Loosen
sparkplugs
.
See
120
Ignition
System
.
5
.
Disconnect
coolant
hoses
from
thermostat
housingon
front
of
cylinder
head
.
Unbolt
thermostat
housing
from
cylinder
head
.
6
.
Remove
cylinder
identification
sensor
from
upper
tim-
ing
chain
cover
.
Remove
upper
timing
chain
cover
.
See
Fig
.
3
.
CAMSHAFT
TIMING
CHAIN,
4-CYLINDER
7
.
Set
engine
to
approximate
TDC
by
rotating
in
normal
operating
direction
until
camshaft
lobes
at
cylinder
no
.
1
are
facing
up
and
toward
each
other
.
See
Fig
.
4
.
0011998
Fig
.
4
.
Engine
set
to
approximate
TDC
.
Cylinder
no
.
1
camshaft
lobes
face
in
and
sprocket
arrows
point
up
(arrows)
.
8
.
Remove
air
conditioning
drive
belt
.
Loosenand
push
aside
air
conditioning
compressor
.
Remove
air
condi-
tioning
compressor
mounting
bracket
.
See
640
Heat-
ing
and
Air
Conditioning
.
9
.
Remove
engine
drive
belts
and
coolant
pump
pulley
.
See
020
Maintenance
Program
.
10
.
Secure
crankshaft
vibration
damper
to
prevent
crank-
shaft
from
turning
.
Using
a
socket,
loosen
vibration
damper
hub
center
bolt
.
Page 106 of 759
117-
1
0
CAMSHAFT
TIMING
CHAIN
21
.
On
1993
and
lates
engines
:
Remove
access
plugs
from
24
.
On
1993
and
later
engines
:
VANOS
control
unit
in
front
of
exhaust
camshaft
"
Remove
VANOS
control
unit
as
described
laterinthis
sprocket
.
Remove
4
bolts
from
exhaust
camshaft
repair
group
.
sprocket
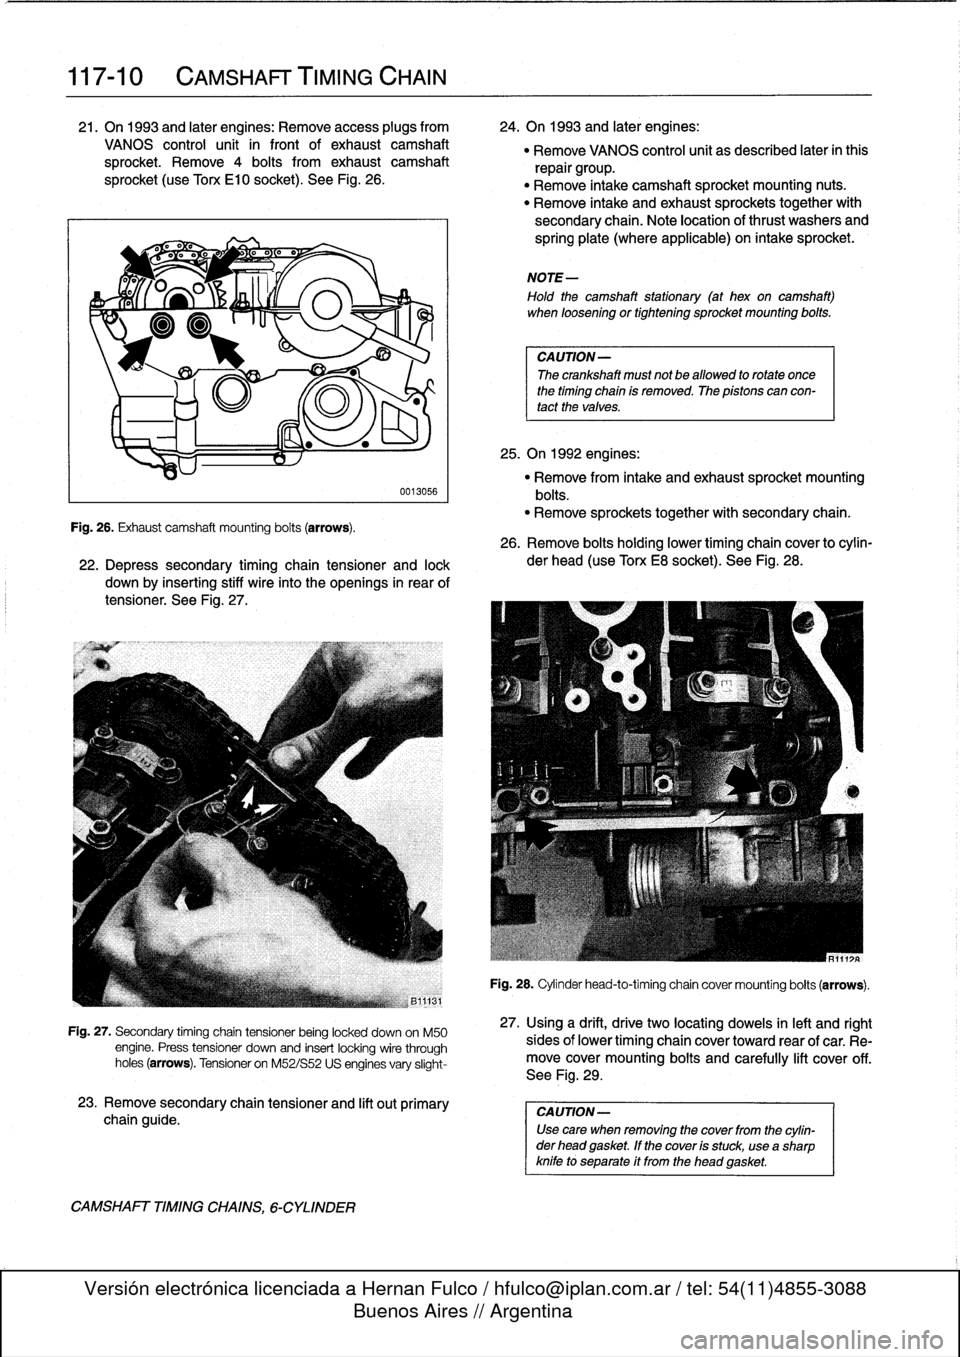
(useTono
El0
socket)
.
See
Fig
.
26
.
"
Remove
intake
camshaft
sprocket
mounting
nuts
.
"
Remove
intake
and
exhaust
sprockets
together
with
secondary
chain
.
Note
location
of
thrust
washers
and
spring
plate
(where
applicable)
on
intake
sprocket
.
Fig
.
26
.
Exhaust
camshaftmounting
bolts
(arrows)
.
CAMSHAFT
TIMING
CHAINS,
6-CYLINDER
0013056
22
.
Depress
secondary
timing
chain
tensiones
and
lock
down
by
inserting
stiff
wire
into
the
openings
in
rear
of
tensioner
.
See
Fig
.
27
.
Fig
.
27
.
Secondary
timing
chaintensioner
being
locked
down
on
M50
engine
.
Press
tensioner
downand
insert
locking
wire
through
holes(arrows)
.
Tensioner
on
M52/S52
US
engines
vary
slight-
23
.
Remove
secondary
chain
tensioner
and
lift
out
primary
chain
guide
.
NOTE-
Hold
the
camshaft
stationary
(at
hex
on
camshaft)
when
loosening
ortightening
sprocket
mounting
boits
.
CAUTION-
The
crankshaft
must
not
be
allowed
to
rotate
once
the
timing
chain
is
removed
.
The
pistons
can
con-
tact
the
valves
.
25
.
On
1992
engines
:
"
Remove
from
intake
and
exhaust
sprocket
mounting
bolts
.
"
Remove
sprockets
together
with
secondary
chain
.
26
.
Remove
bolts
holding
lower
timing
chain
cover
to
cylin-
der
head
(use
Torx
E8
socket)
.
See
Fig
.
28
.
MR111:
R
Fig
.
28
.
Cylinderhead-to-timingchain
covermounting
bolts
(arrows)
.
27
.
Using
a
drift,
drive
two
locatiog
dowels
in
left
and
right
sides
of
lower
timing
chaincover
toward
rear
of
car
.
Re-
move
covermounting
boits
and
carefully
lift
cover
off
.
See
Fig
.
29
.
CA
UTION-
Use
care
when
removing
the
cover
from
the
cylin-
der
head
gasket
.
If
the
cover
is
stuck,
useasharp
knife
to
separate
it
from
the
head
gasket
.
Page 114 of 759
117-
1
8
CAMSHAFT
TIMING
CHAIN
CAUTION-
It
is
crítical
that
the
exhaustcamshaft
sprocket
be
turned
only
the
mínimum
amount
necessary
to
engage
the
gear
cup
.
If
this
procedure
is
done
ín-
correctly,
the
VANOS
system
may
not
function
throughout
íts
full
range
.
NOTE-
As
the
control
unit
isinstalled,
the
secondary
sprockets
will
rotate
in
the
counterclockwise
direction
.
It
may
be
necessary
to
guide
sprockets
counterclockwise
as
the
control
unit
is
installed
.
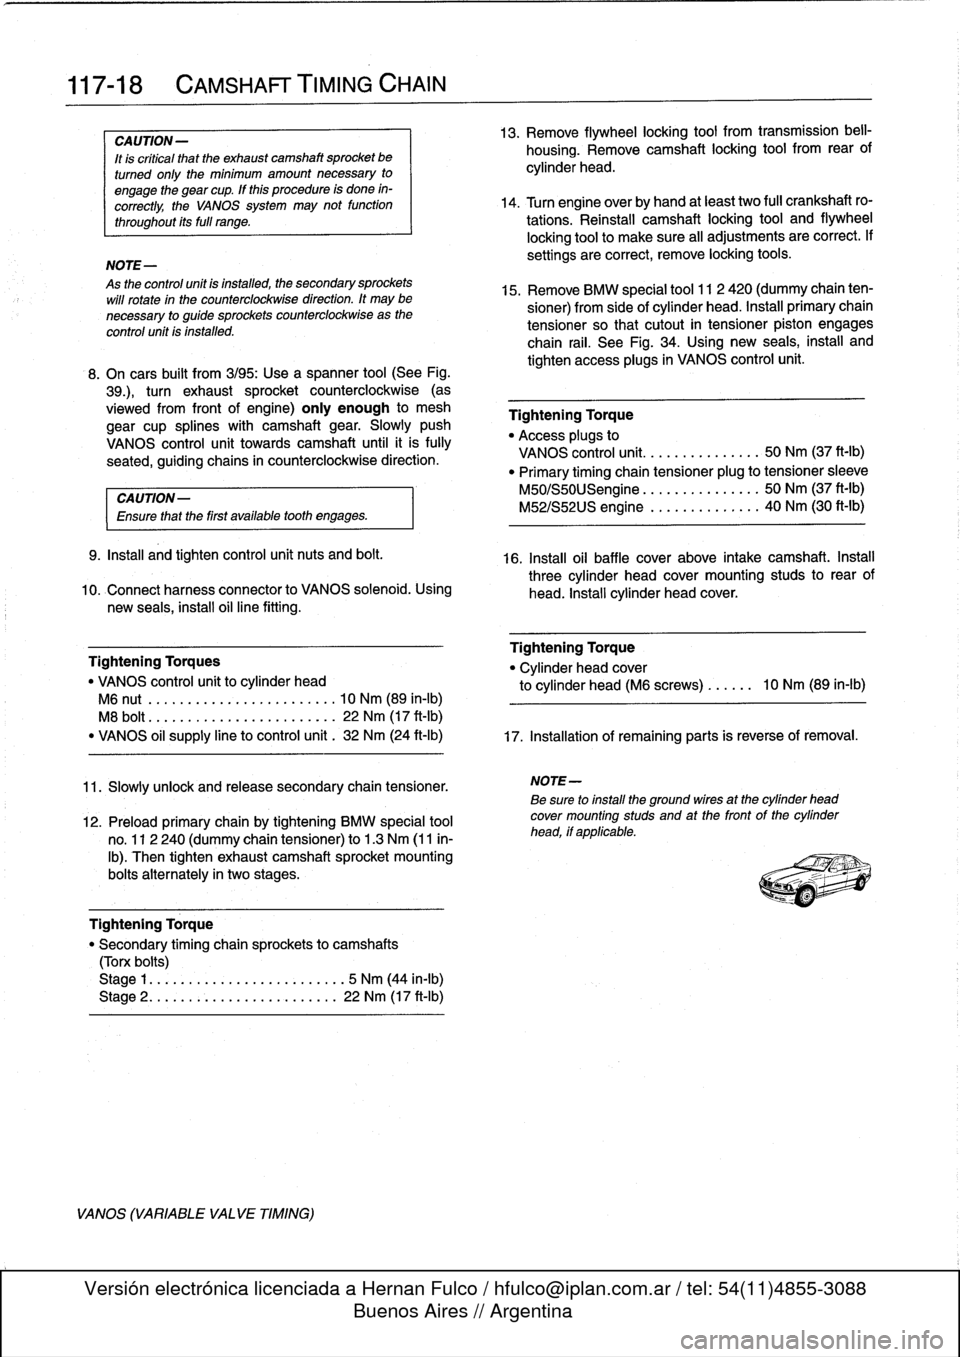
8
.
On
cars
built
from3/95
:
Use
a
spanner
tool
(See
Fig
.
39
.),
turn
exhaust
sprocket
counterclockwise
(as
víewed
from
front
of
engine)
only
enough
to
mesh
gear
cup
splines
with
camshaftgear
.
Slowly
push
VANOS
control
unit
towards
camshaft
until
it
is
fully
seated,guiding
chains
in
counterclockwise
direction
.
CA
UTION-
Ensure
that
the
first
available
tooth
engages
.
9
.
Install
and
tightencontrol
unit
nuts
and
bolt
.
10
.
Connect
harness
connector
to
VANOS
solenoid
.
Using
new
seals,
insta¡¡
oil
line
fitting
.
Tightening
Torques
"
VANOS
control
unitto
cylinder
head
M6
nut
.....
..
..
.
.
.............
10
Nm
(89
in-lb)
M8
bolt
.....
.
.
.
.
..
.............
22
Nm
(17
ft-Ib)
"
VANOS
oil
supply
line
to
control
unit
.
32
Nm
(24
ft-Ib)
11
.
Slowlyunlock
and
release
secondary
chain
tensioner
.
12
.
Preloadprimary
chain
by
tightening
BMW
special
tool
no
.
112
240
(dummy
chain
tensioner)
to
1
.3
Nm
(11
in-
lb)
.
Then
tighten
exhaust
camshaft
sprocket
mounting
bolts
alternately
in
two
stages
.
Tightening
Torque
"
Secondarytiming
chain
sprockets
to
camshafts
(Tora
boits)
Stage
1
..
...............
...
.
.
...
5
Nm
(44
in-lb)
Stage
2
..
...............
...
.
.
..
22
Nm
(17
ft-Ib)
VANOS
(VARIABLE
VALVE
TIMING)
13
.
Remove
flywheel
locking
tool
from
transmission
bell-
housing
.
Remove
camshaft
locking
tool
from
rear
of
cylinder
head
.
14
.
Turn
engine
over
by
hand
at
least
two
fui¡
crankshaft
ro-
tations
.
Reinstall
camshaft
locking
tool
and
flywheel
locking
toolto
make
sure
all
adjustments
are
correct
.
If
settings
are
correct,
remove
locking
tools
.
15
.
Remove
BMW
special
tool
112
420
(dummy
chain
ten-
sioner)
from
side
of
cylinder
head
.
Install
primary
chain
tensioner
so
that
cutout
in
tensioner
piston
engages
chain
rail
.
See
Fig
.
34
.
Using
new
seals,
install
and
tighten
access
plugs
in
VANOS
control
unit
.
Tightening
Torque
"
Access
plugs
to
VANOS
control
unit
.
..
.
.....
.
..
...
50
Nm
(37
ft-lb)
"
Primary
timing
chain
tensioner
plug
to
tensioner
sleeve
M50/S50USengine
.
.
..
.
.
...
.
...
..
50
Nm
(37
ft-Ib)
M52/S52US
engine
...
..
...
...
...
40
Nm
(30
ft-Ib)
16
.
Install
oil
baffle
cover
above
intake
camshaft
.
Install
three
cylinder
head
covermounting
studs
to
rear
of
head
.
Instali
cylinder
head
cover
.
Tightening
Torque
"
Cylinder
head
cover
to
cylinder
head
(M6
screws)
......
10
Nm
(89
in-Ib)
17
.
Installationof
remaining
parts
is
reverse
of
removal
.
NOTE-
Be
sure
to
install
the
ground
wíres
at
the
cylinder
head
cover
mounting
studs
and
at
the
front
of
the
cylinder
head,
if
applicable
.
Page 120 of 759
119-
6
LUBRICATION
SYSTEM
17
.
Raise
engine
as
much
as
possible
.
Check
carefully
for
22
.
Installation
is
reverse
of
removal
.
obstructions,
wiring
harness
clearance
and
pinched
hoses
or
lines
as
engine
is
raised
.
"
When
installing
oil
pan,
apply
a
b
d
of
non-hardening
sealing
compound
(3-Bond
1209
0
or
equivalent)
to
18
.
Remove
oil
pan
mounting
bolts
and
lower
oil
pan
to
front
and
rear
end
cover
seam
areas
on
block
.
subframe
crossmember
.
"
Position
oil
pump
pickup
tube
and
oil
pan
onto
block
and
install
pickup
tube
using
a
new
gasket
.
"
Be
sure
tab
on
gasket
faces
down
towards
intake
of
NOTE-
pickup
tube
.
If
the
oil
pan
does
not
separate
easily
from
the
engine
"
Tightenforward
oil
pan
screws
first,
then
tighten
rear
.
cylinder
block,
afew
taps
with
arubber
mallet
should
"
Fill
engine
with
oil
as
described
in
020
Maintenance
break
it
free
.
Do
not
pry
the
oil
pan
loose
.
Program
.
"
After
adding
engine
oil,
start
and
run
engine
.
Raise
en-
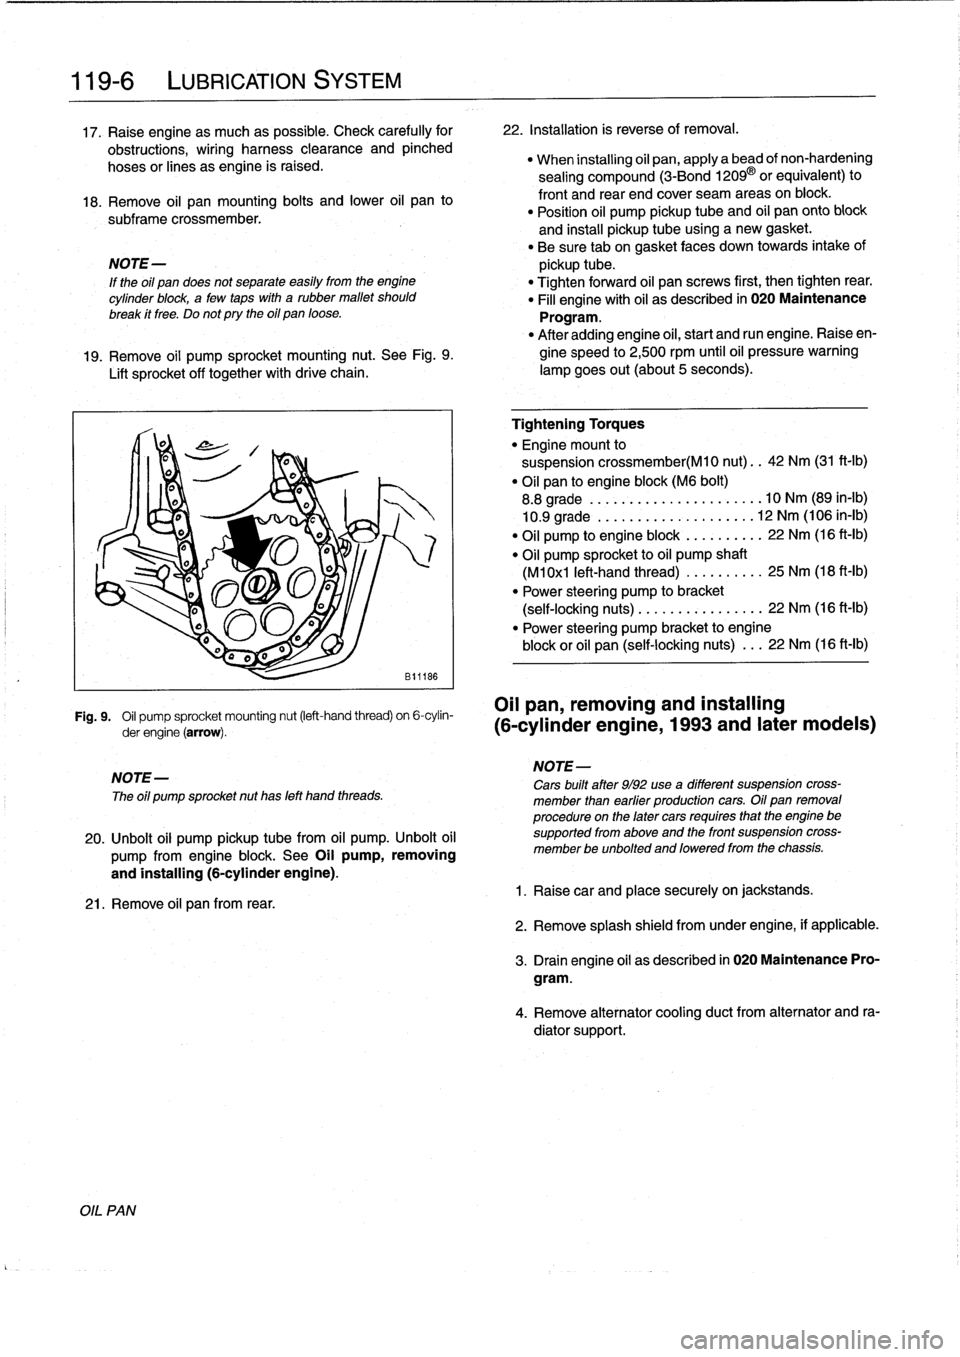
19
.
Remove
oil
pump
sprocket
mounting
nut
.
See
Fig
.
9
.
gine
speed
to
2,500
rpm
until
oil
pressure
warning
Lift
sprocket
off
together
with
drive
chain
.
lampgoes
out(about
5seconds)
.
Fig
.
9
.
Oil
pump
sprocket
mounting
nut
(left-hand
thread)
on
6-cylin-
OII
pan,
removing
and
installing
derengine(arrow)
.
(6-cylinder
engine,
1993
and
later
modeis)
NOTE-
The
oíl
pump
sprocket
nut
has
left
hand
threads
.
20
.
Unbolt
oil
pump
pickup
tubefrom
oil
pump
.
Unbolt
oil
pump
from
engine
block
.
See
Oil
pump,
removing
and
installing
(6-cylinder
engine)
.
21
.
Remove
oil
pan
from
rear
.
Tightening
Torques
"
Engine
mount
to
suspension
crossmember(M10
nut)
..
42
Nm
(31
ft-Ib)
"
Oil
pan
to
engine
block
(M6
bolt)
8
.8
grade
....
..
.
...
...
.
........
10
Nm
(89
in-lb)
10
.9
grade
.
.
..
.
..
...
.
.
.
.
.
.....
12
Nm
(106
in-lb)
"
Oil
pump
to
engine
block
.
...
...
.
..
22
Nm
(16
ft-Ib)
"
Oil
pump
sprocket
to
oil
pump
shaft
(M1
0x1
left-hand
thread)
...
..
.
.
..
.
25
Nm
(18
ft-Ib)
"
Power
steering
pump
to
bracket
(self-locking
nuts)
.....
.
....
..
.
...
22
Nm
(16
ft-lb)
"
Power
steering
pump
bracket
to
engine
block
or
oil
pan
(self-locking
nuts)
.
..
22
Nm
(16
ft-Ib)
NOTE-
Cars
built
after
9/92
use
a
different
suspension
cross-
member
¡han
earfier
productíon
cars
.
Oil
pan
removal
procedure
on
the
later
cars
requíres
that
the
engine
be
supported
from
aboye
and
the
front
suspension
cross-
member
be
unbolted
and
loweredfrom
the
chassis
.
1
.
Raisecar
and
place
securely
on
jackstands
.
2
.
Remove
splash
shield
fromunder
engine,
if
applicable
.
3
.
Drain
engine
oil
as
descríbed
in
020
Maintenance
Pro-
gram
.
4
.
Remove
alternator
cooling
duct
from
alternator
and
ra-
diator
support
.
Page 127 of 759
IGNITION
SYSTEM
DIAGNOSTICS
IGNITION
SYSTEM
SERVICE
Poor
driveability
may
have
a
variety
of
causes
.
The
fault
On
4-cylinder
engines,
an
ignition
coil
pack
is
mounted
to
may
lie
with
the
ignition
system,
the
fuel
system,
parts
of
the
the
passenger
side
strut
tower
in
the
engine
compartment
.
emission
control
system,
or
a
combination
of
the
three
.
Be-
The
coil
pack
integrates
4
individual
coils
.
cause
of
these
interrelated
functions
and
their
effects
oneach
other,
it
is
often
difficult
to
know
where
to
begin
looking
for
On
6-cylinder
engines,
an
ignition
coil
is
located
directly
problems
.
above
each
spark
plug
.
For
this
reason,
effective
troubleshooting
should
alwaysbe-
gin
with
an
interrogation
of
the
On-Board
Diagnostic
(OBD)
system
.
The
OBD
system
detects
certain
emissions-related
engine
management
malfunctions
.
When
faults
are
detected,
the
OBD
system
stores
a
Diagnostic
Trouble
Code
(DTC)
in
the
system
ECM
.
In
addition,
the
Check
Enginewarning
light
will
come
on
if
an
emissions-related
fault
is
detected
.
Two
generations
of
OBD
areusedon
the
cars
coveredby
this
manual
.
See
100
Engine-General
for
OBD
information
.
On-Board
Diagnostics
"
1992-1995
models
............
...
.
..
...
OBD
I
"
1996
and
later
models
.........
.......
..
OBD
II
NOTE-
"
On
carswith
OBD
ti,
specialized
OBD
11
scan
tool
equipment
mustbeused
to
access
DTCs,
either
using
the
BMW
special
tool
or
a
`generic"
OBD
11
scan
tool
.
"
The
OBD
11
fault
memory
(including
an
illuminated
Check
Engine
light)
can
only
be
reset
using
the
spe-
cial
scan
tool
.
Removing
the
connector
from
the
ECM
or
dísconnecting
the
battery
will
not
erase
the
fault
memory
.
Basic
Troubleshooting
Principies
An
engine
that
starts
and
runs
indicates
the
ignition
system
is
fundamentally
working-delivering
voltage
toat
least
some
of
the
sparkplugs
.
A
hard-starting
or
poor-running
engine,
however,
may
indicate
ignition
coil
problems,
cracked
or
dete-
riorated
spark
plug
wires
(4-cylinder
engines
only),
and
worn
or
fouled
spark
plugs
.
WARNING
-
Inefficient
combustion
(richair/fuel
mixture)
can
cause
the
catalytic
converter
to
overheat
and
plug
.
An
overheated
catalytic
converter
can
also
bea
tire
hazard
.
Checking
for
Spark
IGNITION
SYSTEM
120-
3
WARNING
-
If
a
spark
test
is
done
incorrectly,
damage
to
theen-
gine
control
module
(ECM)
or
the
ignitioncoil(s)
may
result
.
Checking
for
spark
is
difficult
onengines
with
distributorless
ignition
systems
.
Try
Rmovng
the
plugs
and
inspecting
for
differences
be-
tween
them
.
A
poor-firing
plug
may
be
wet
with
fuel
and/or
black
and
sooty,
butnot
always
.
If
a
coil
is
not
operating,
the
engine
management
system
will
electrically
disable
the
fuel
injectorto
that
cylinder
.
The
key
is
to
look
for
differences
be-
tween
cylinders
.
Ignition
coil,
testing
and
replacing
(4-cylinder
engine)
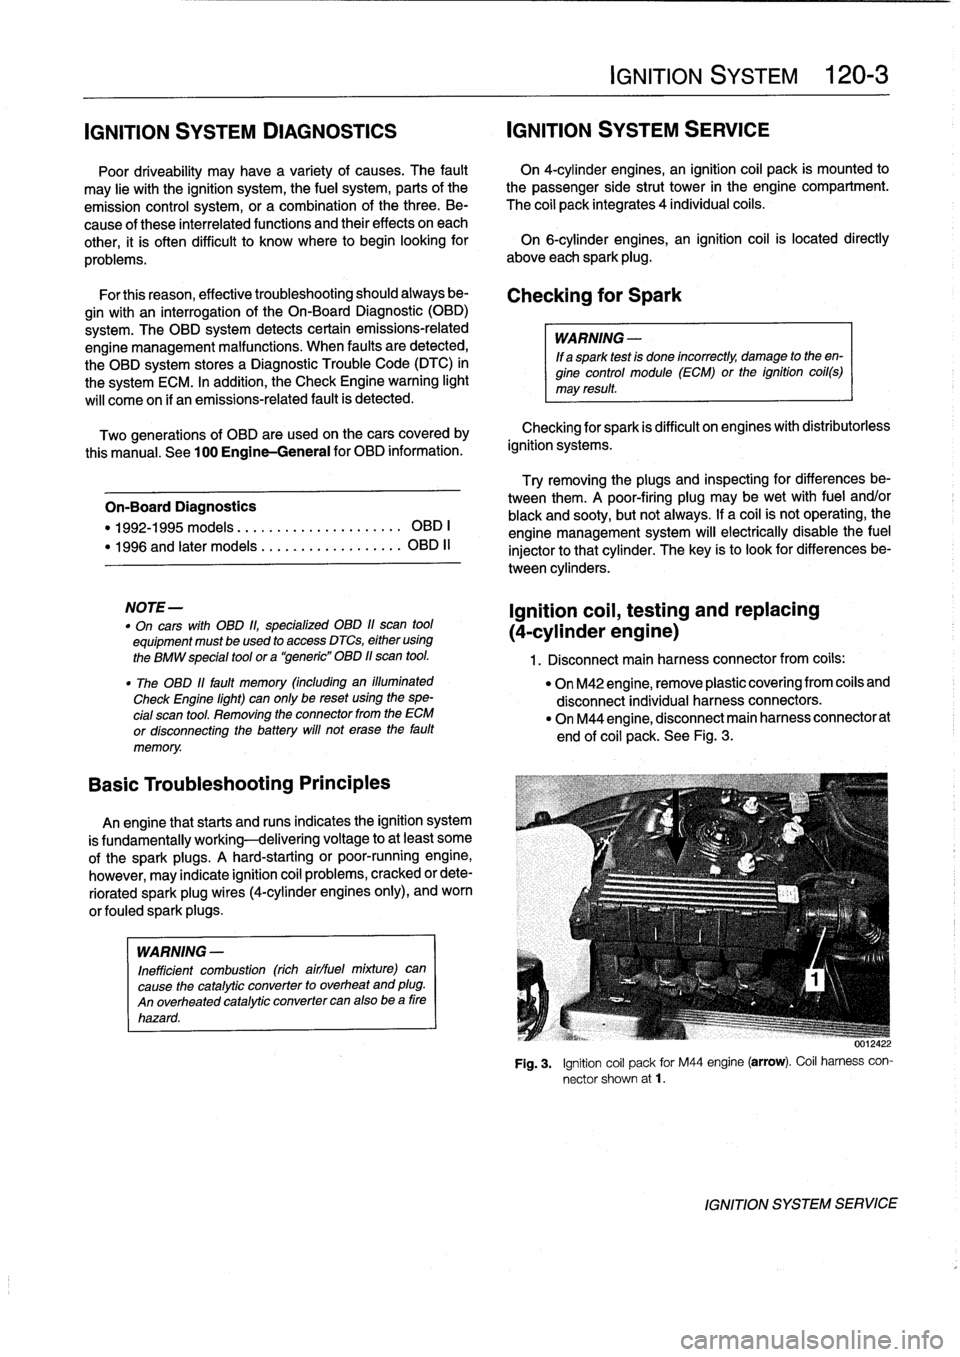
1.
Disconnect
mainharness
connector
from
coils
:
"
On
M42
engine,
remove
plastic
covering
from
coils
and
disconnect
individual
harness
connectors
.
"
On
M44
engine,
disconnect
main
harness
connectorat
end
of
coil
pack
.
See
Fig
.
3
.
Fig
.
3
.
Ignition
coil
pack
for
M44
engine
(arrow)
.
Coil
harness
con-
nector
shown
at1
.
IGNITION
SYSTEM
SERVICE
Page 132 of 759
120-8
IGNITION
SYSTEM
1
1
.0
GN
1
.0
Gl
.0
GN
I
Ign
coil
1
.0
GN
.
Tti
%ti
r,
_%ti
_
_
ice_
I
25
52
5524
51
54
56
I
Power
input
power
input
t
U
Engine
Control
Module
(Bosch
DME
Ml
.7)
II
Powerinput
Mainrelaycontrol
I
15
42
43
16442868
67
34
6
26
27
1
-----
__
V
_
--
_
~
8K
.35
BK
.35
13,1
1
.35
YE
1
.35
BK35
VE
.35
3
cyl
.1
1
11
E
S
2
1
.0
BR
2
.5
BR
Ign
.
coil
cyl
.
3
II
Ign
.
coil
Ign
.
coil
3
cyI
.
2
1
Y
_
Y
2
k
3
cyl
.
4
IGNITION
SYSTEM
SCHEMATICS
Battery
voltage
in
run
or
start
(
vía
ignition
switchterminal
15)
WIRING
COLOR
CODE
4
.0
GN
1
.0
BR'V
.
Camshaft
Knock
Sensor
Knock
Sensor
Position
(cyl
.1-2)
(cyl
.3-4)
Sensor
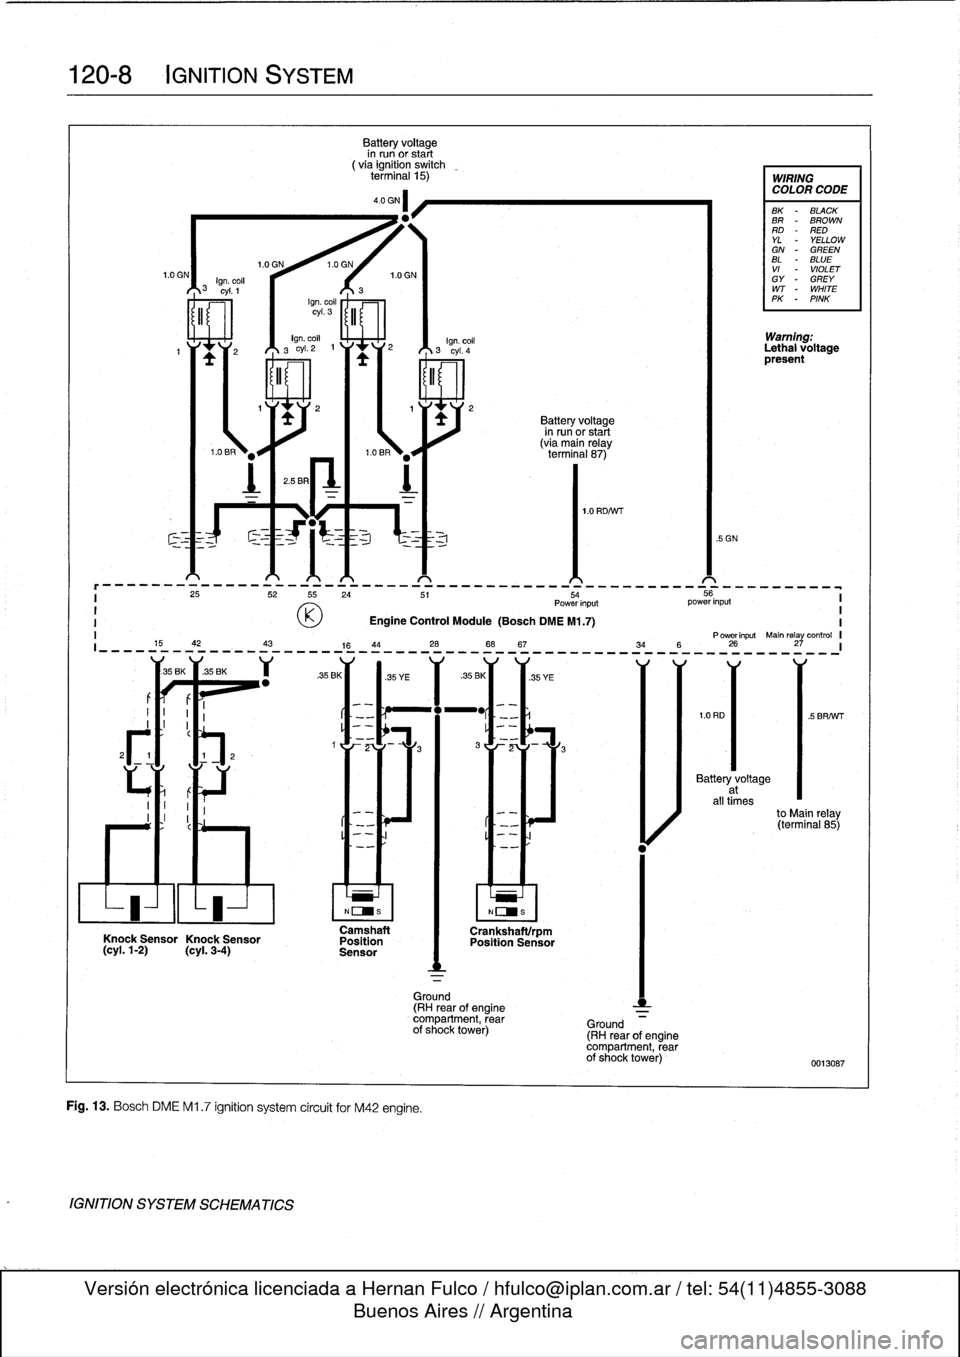
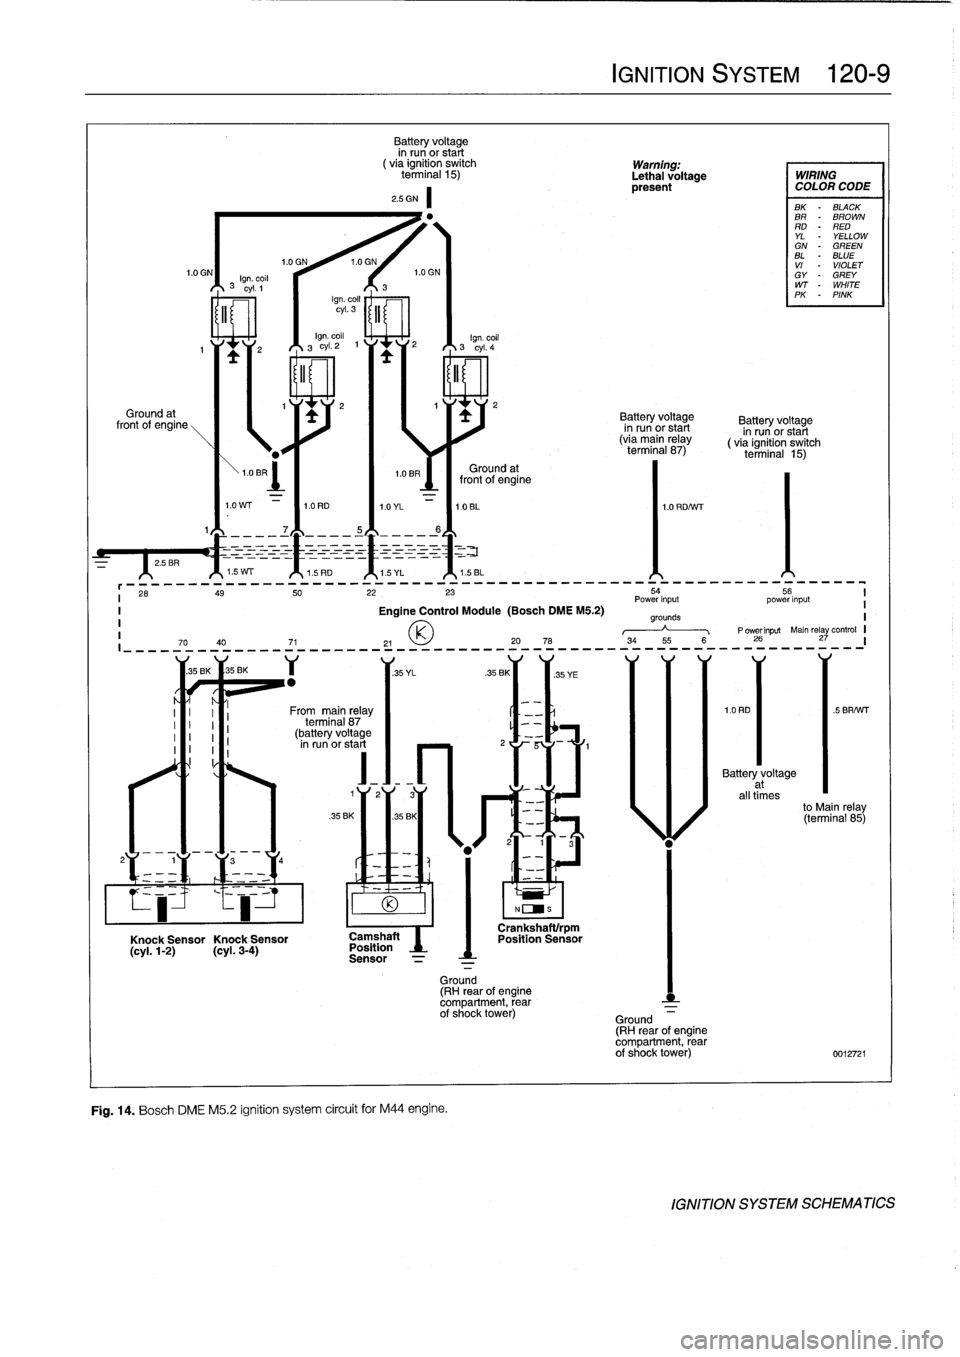
Fig
.
13
.
Bosch
DME
M1
.7
ignition
system
circuit
for
M42
engine
.
Ground
(RH
rearof
engine
compartment,
rear
of
shock
tower)
N[INS
Crankshaftlrpm
Position
Sensor
Battery
voltage
in
run
or
start
(vía
main
relay
terminal
87)
Ground
(RH
rearof
engine
compartment,
rearof
shock
tower)
5GN
BK
-
BLACK
BR
"
BROWN
RD
-
RED
YL-
YELLOW
GN
-
GREEN
BL
-
BLUE
VI
-
VIOLET
GY
-
GREY
WT
-
WHITE
PK
-
PINK
Warning
:
Lethal
voltagepresent
Battery
voltage
at
all
times
to
Main
relay
(terminal
85)
'Y
Y
---------------------
0013087
Page 133 of 759
^1
.5WT
^1
.5RD
^1
.5YL
^1
.5BL
r
--__
____-
__-_
___-_
-___-_____--__--
-____-___
____-
i
26
g
5022
23
54
5
I
Power
input
power
input
I
Engine
Control
Module
(Bosch
DME
M5
.2)
I
I
grounds
I
P
owerinput
Main
relay
control
I
70
40
71
21
2078
34
55
626
27
----------------------
-
---------
-
--
-
------------
-
-----------
.,
v
1
1
.1
v
`
1
35BK
35BK
2
(
1Y
¡3
194
Knock
Sensor
Knock
Sensor
(cyl
.1-2)
(cyl
.3-4)
Frommain
relay
terminal
87
(battery
voltage
in
run
or
start
Battery
voltage
in
run
or
start
(
via
ignition
switch
Warnin
terminal
15)
Lethal
óltage
WIRING
present
COLOR
CODE
2
.5
GN
'
1
.0
YL
/
1
.0
BL
/
1
.0
RDNJT
.35
BK
/
/
.35
BK
Camshaft
Position
Sensor
-_
Fig
.
14
.
Bosch
DME
M5
.2
ignition
system
circuit
for
M44
engine
.
Ground
(RH
rear
of
engine
compartment,
rearof
shock
tower)
Crankshaftirpm
Position
Sensor
IGNITION
SYSTEM
120-9
Batteryvoltage
Battery
voltage
in
run
or
start
in
run
or
start
(via
main
relay
(
via
ignition
switch
terminal
87)
terminal
15)
BK
-
BLACX
BR
-
BROWN
RD
-
RED
YL
-
YELLOW
GN
-
GREEN
BL
-
BLUE
VI
-
VIOLET
GY
-
GREY
WT
-
WHITE
PK
-
PINK
Battery
voltage
at
all
times
to
Main
relay
(terminal
85)
Ground
(RH
rear
of
engine
compartment,
rearof
shock
tower)
0012721
lGNITION
SYSTEM
SCHEMATlCS
Page 134 of 759
120-10
IGNITION
SYSTEM
Ground
(rear
of
engine
compartment,
rear
of
passenger
side
shock
tower)
.!
BK
Camshaft
Position
Sensor
IGNITION
SYSTEM
SCHEMATICS
Batteryvoltage
in
run
or
start
(
via
ignition
switch
terminal
15)
---------------------------------------------------------
55
S5154
i
power
input
Power
input
1
DME
Control
Module(Bosch
DME
M3
.1)
Ground
-
(RHrear
of
enginecompartment,
rearof
passenger
side
shock
tower)
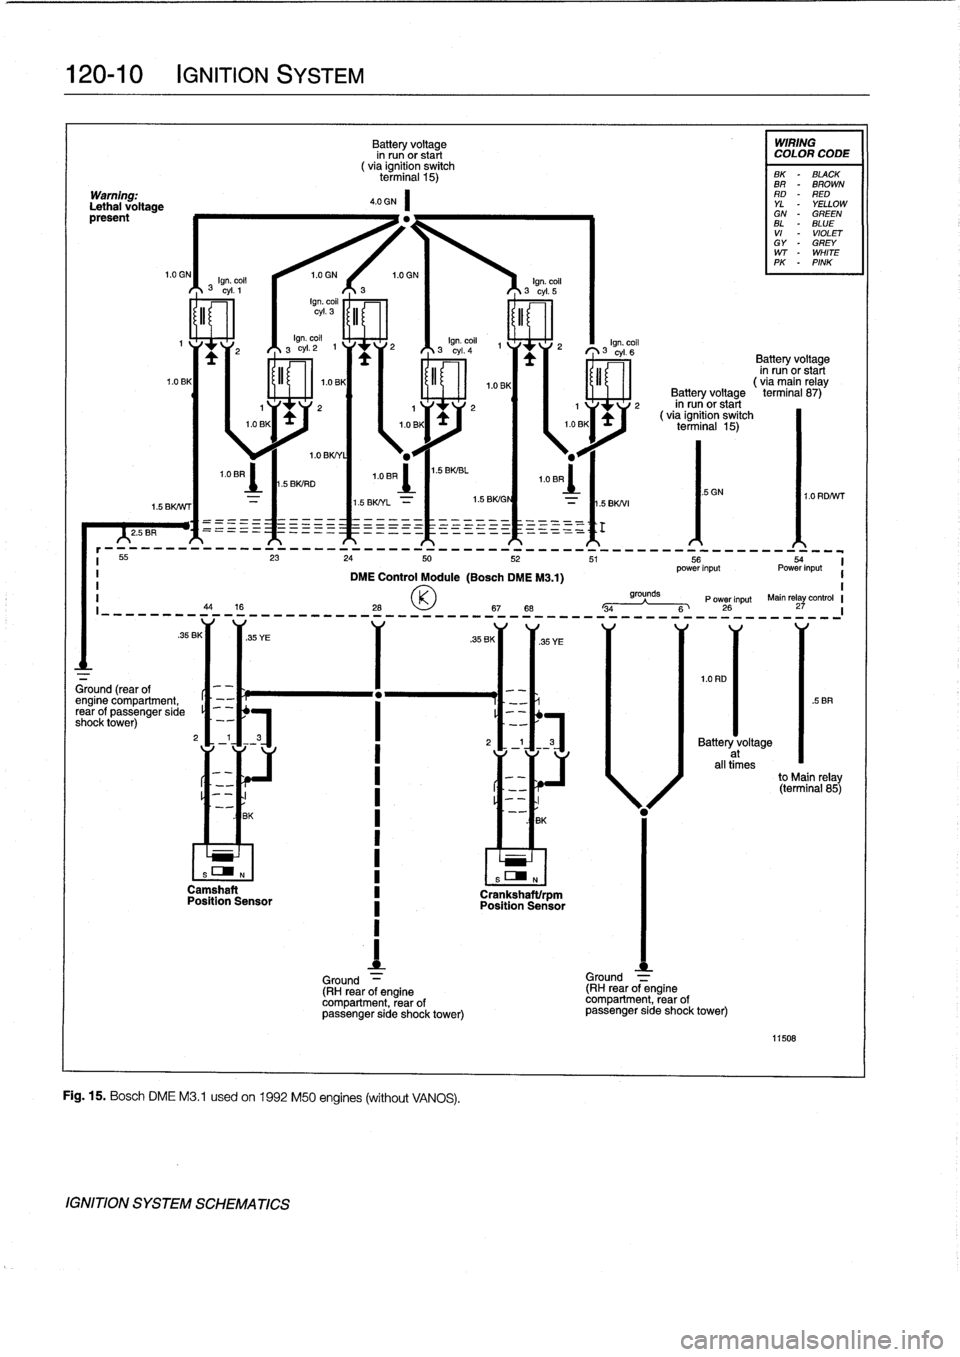
Fig
.
15
.
Bosch
DME
M3
.1
usedon1992
M50
engines(without
VANOS)
.
.EBK
Crankshaftlrpm
Position
Sensor
5GN
1.0
RD
Ground
(RH
rearof
enginecompartment,
rear
of
passenger
side
shock
tower)
WIRING
COLOR
CODE
BK
-
BLACK
BR
-
BROWN
RD
-
RED
YL
-
YELLOWGN
-
GREEN
BL
-
BLUE
VI-
VIOLET
GY
"
GREY
WT
"
WHITE
PK
-
PINK
Batteryvoltage
in
run
or
start
(
via
main
relay
Battery
voltage
terminal
87)
in
run
or
start
(via
ignition
switch
terminal
15)
11508
1
grounds
Main
rela
control
P
ower
Input
Y
I
-
34
---"--
6
26
27
1
Battery
voltage
at
all
times
to
Main
relay
(terminal
85)