seat BMW 5 SERIES GRAN TURISMO 2013 F07 Owner's Manual
[x] Cancel search | Manufacturer: BMW, Model Year: 2013, Model line: 5 SERIES GRAN TURISMO, Model: BMW 5 SERIES GRAN TURISMO 2013 F07Pages: 255, PDF Size: 7.25 MB
Page 6 of 255
Addendum
recommends having this work
performed by a service center as it
is important that this safety feature
functions properly.”
6.At page 55, under the heading:
“Active head restraint,” the
paragraph beginning, “Only attach
accessories . . .” should be
disregarded and the following text
should be read in lieu thereof:
“BMW recommends that you attach
accessories approved by BMW to
the seat or head restraint.”
7.At page 160, under the heading:
“Special windshield,” the paragraph
beginning, “Therefore, have the
special windshield . . .” should be
disregarded and the following text
should be read in lieu thereof:
“BMW recommends that you have
the special windshield replaced by
the service center.”
8.At page 186 under the heading:
“Objects in the area around the
pedals” and at page 233 under the
heading: “Carpets and floor mats,”
the paragraph that begins: “Only
use floor mats . . .” should be
disregarded and the following
language should be read in lieu
thereof: “The manufacturer of your
vehicle recommends that you use
floor mats that have been identified
by it as appropriate for use in your
vehicle and that can be properly
fixed in place.”
9.At page 191, under the heading:
“Have maintenance carried out,” the
sentence beginning, “Have the
maintenance carried out . . .” should
be disregarded and the following
text should be read in lieu thereof:
“BMW recommends that you have
the maintenance carried out by your
service center.”
10.At page 207, under the heading:
“Mounting,” the paragraph
beginning, “Have mounting and
balancing . . .” should be
disregarded and the following text
should be read in lieu thereof:
“BMW recommends that you have
mounting and balancing performed
by your service center or a tire
mounting specialist.”
11.At page 207, under the heading:
“Approved wheels and tires,” the
term “Approved” should be
disregarded and in lieu thereof, the
term “Recommended” should be
read in its place. In addition, the
text of that section should be
disregarded and the following text
should be read in lieu thereof:
The manufacturer of your vehicle
strongly suggests that you use
wheels and tires that have been
recommended by the vehicle
manufacturer for your vehicle type;
otherwise, for example, despite
having the same official size ratings,
variations can lead to body contact
and with it, the risk of severe
accidents.
The manufacturer of your vehicle
does not evaluate non-
recommended wheels and tires to
determine if they are suitable for
use on your vehicle.
Page 16 of 255
CockpitVehicle equipment
All standard, country-specific and optional
equipment that is offered in the model series is
described in this chapter. Therefore, equip‐ment is also described that is not available in a
vehicle, e. g., because of the selected optional
equipment or country variant. This also applies
for safety-related functions and systems.
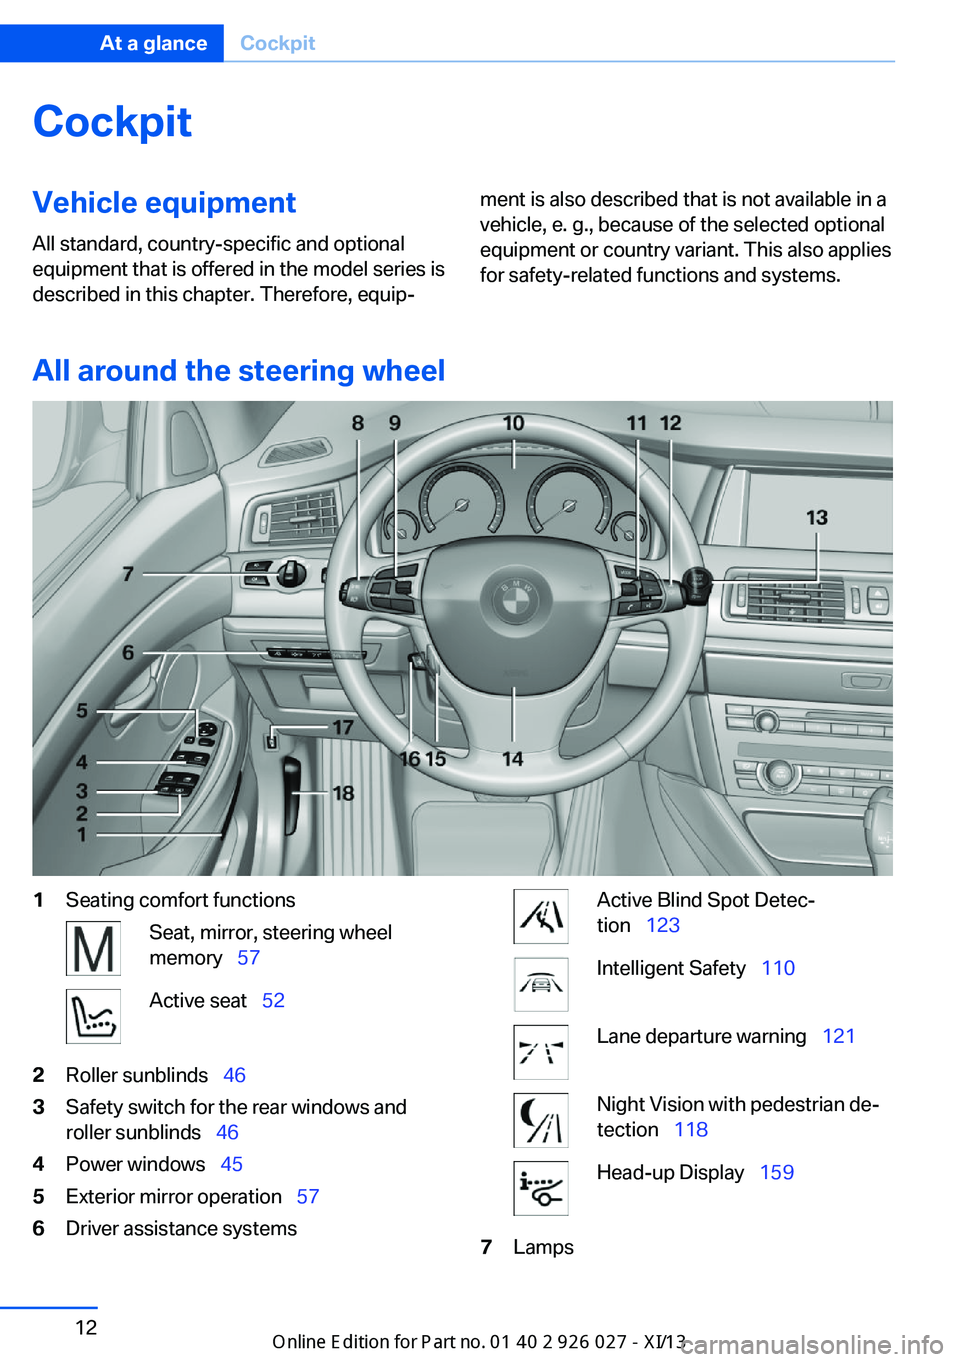
All around the steering wheel
1Seating comfort functionsSeat, mirror, steering wheel
memory 57Active seat 522Roller sunblinds 463Safety switch for the rear windows and
roller sunblinds 464Power windows 455Exterior mirror operation 576Driver assistance systemsActive Blind Spot Detec‐
tion 123Intelligent Safety 110Lane departure warning 121Night Vision with pedestrian de‐
tection 118Head-up Display 1597LampsSeite 12At a glanceCockpit12
Online Edition for Part no. 01 40 2 909 928 - VI/13
Page 37 of 255
Display profile list during start
The profile list can be displayed during each
start for selecting the desired profile.1."Settings"2."Profiles"3.Open "Options".4."Display user list at startup"
Personal Profile settings
The following functions and settings can be
stored in a profile.
▷Collision warning: warning time.▷Exterior mirror position.▷CD/Multimedia: audio source listened to
last.▷Unlocking/locking of the vehicle: settings.▷Driving Dynamics Control: sport program.▷Driver's seat position: automatic retrieval
after unlocking.▷Programmable memory buttons: assign‐
ment.▷Head-up Display: selection, brightness,
position and rotation of the display.▷Headlamp courtesy delay feature: time set‐
ting.▷Tone: tone settings.▷Automatic climate control: settings.▷Steering wheel position.▷Navigation: map views, route criteria, voice
output on/off.▷Night Vision with pedestrian detection.▷Intelligent Safety: individual settings.▷Park Distance Control PDC: adjusting the
signal tone volume.▷Radio: stored stations, station listened to
last, special settings.▷Rearview camera: selection of functions
and type of display.▷Side View: selection of the display type.▷Language on the Control Display.▷Lane departure warning: last setting, on/
off.▷Active Blind Spot Detection: last setting,
on/off.▷Daytime running lights: current setting.▷Triple turn signal activation.▷Locking the vehicle: after a brief period or
after starting to drive.
Central locking system
The concept The central locking system becomes active
when the driver's door is closed.
The system simultaneously engages and re‐
leases the locks on the following:
▷Doors.▷Tailgate.▷Fuel filler flap.
Operating from the outside
▷Via the remote control.▷Via the driver's door lock.▷Via the door handles.▷Via the button on the tailgate.
The following takes place simultaneously
when locking/unlocking the vehicle via the re‐
mote control:
▷Depending on how the vehicle is equipped,
the theft protection is activated/deacti‐
vated. Theft protection prevents the doors
from being unlocked using the lock but‐
tons or the door opener.▷The welcome lamps, interior lamps and
courtesy lamps are switched on and off.▷The alarm system, refer to page 43, is
armed or disarmed.Seite 33Opening and closingControls33
Online Edition for Part no. 01 40 2 909 928 - VI/13
Page 47 of 255
2."Doors/key"3.Select the desired function:▷"Lock if no door opened"
The vehicle locks automatically after a
short period of time if a door is not
opened.▷"Lock after start driving"
The vehicle locks automatically after
you drive away.
Retrieving the seat, mirror, and
steering wheel settings
The driver's seat, exterior mirror, and steering
wheel positions selected last are stored for the
currently used remote control.
When the vehicle is unlocked, these positions
are automatically retrieved if this function was
activated.
Pinch hazard when moving back the seat
If this function is used, first make sure
that the footwell behind the driver's seat is
empty. Otherwise, people can be injured or ob‐
jects damaged when the seat is moved back.◀
The adjustment procedure is interrupted:
▷When a seat position switch is pressed.▷When a button of the seat, mirror, and
steering wheel memory is pressed briefly.
Activating the setting
1."Settings"2."Doors/key"3."Last seat position autom."
Alarm system
The conceptThe vehicle alarm system responds to:
▷Opening of a door, the hood or the tailgate.▷Movements in the vehicle.▷Changes in the vehicle tilt, e.g., during at‐
tempts to steal a wheel or when towing the
car.▷Interruptions in battery voltage.
The alarm system briefly indicates tampering:
▷By sounding an acoustic alarm.▷By switching on the hazard warning sys‐
tem.▷By flashing the high beams.
Arming and disarming the alarm
system
General information
When you lock or unlock the vehicle, either
with the remote control, Comfort Access or at
the door lock the alarm system is armed or dis‐
armed at the same time.
Door lock and armed alarm systemUnlocking via the door lock will trigger the
alarm on some country-specific versions.
In order to terminate this alarm, unlock vehicle
with the remote control or switch on the igni‐
tion, if necessary, by emergency detection of
the remote control.
Tailgate and armed alarm system
The tailgate can be opened even when the alarm system is armed.
▷Press the button on the remote
control for approx. 1 second.
The large tailgate opens slightly.
This button can also be used to unlock the
doors. The button assignment on the remote
control can be set variously depending on how
the vehicle is equipped and according to the
country-specific variant.
With Comfort Access, the tailgate opens with
no-touch activation, refer to page 41.
Seite 43Opening and closingControls43
Online Edition for Part no. 01 40 2 909 928 - VI/13
Page 50 of 255
For example, if there is an external danger or if
ice on the windows prevents a window from
closing normally, proceed as follows:1.Pull the switch past the resistance point
and hold it there.
The pinch protection is limited and the
window reopens slightly if the closing force
exceeds a certain value.2.Pull the switch past the resistance point
again within approx. 4 seconds and hold it
there.
The window closes without pinch protec‐
tion.
Safety switch
The following functions can be locked simulta‐
neously, using the switch:
▷Opening and closing of the rear windows
using the switches in the rear.▷Operation of the roller sunblinds using the
switches in the rear.▷Adjustment of the power rear seats.▷Adjustment of the power head restraints in
the rear.
Switching on and off
Press the button.
The LED lights up if the safety func‐
tion is switched on.
Safety switch for rear operation
Press the safety switch when transport‐
ing children in the rear; otherwise, injury may
result if the windows are closed without super‐
vision.◀
Roller sunblinds
General information
The safety switch in the driver's door can be
used to prevent children, for example, from op‐
erating the roller blinds using the switches in
the rear.
Press the safety switch in the driver's door.
The LED lights up if the safety function is
switched on.
If you are no longer able to move the roller
blinds after having activated them consecu‐
tively a number of times, the system is blocked
for a limited time to prevent overheating. Let
the system cool.
The roller sunblinds cannot be moved at low
interior temperatures.
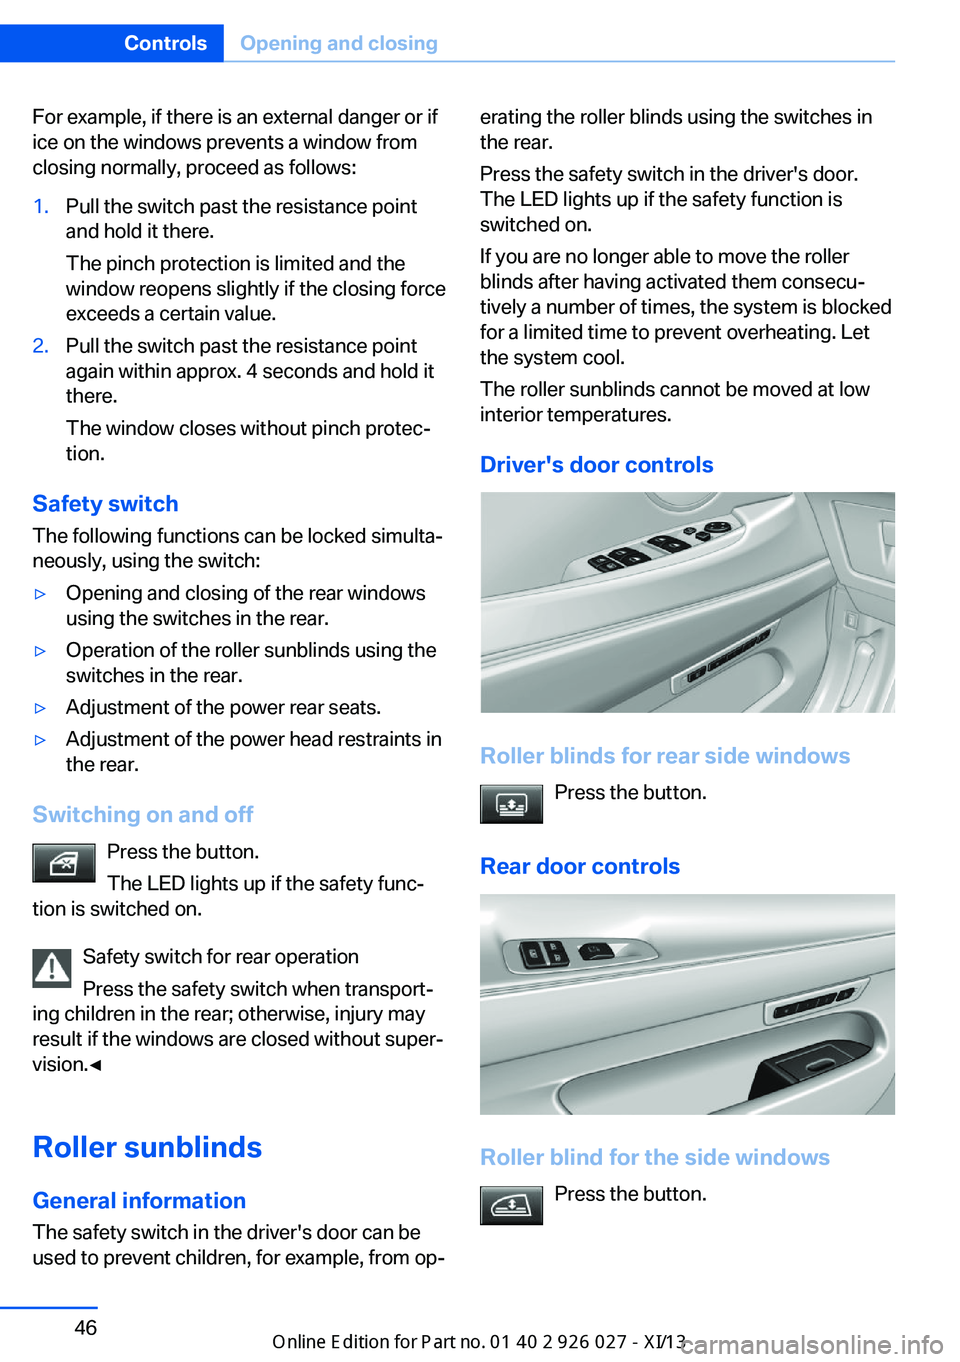
Driver's door controls
Roller blinds for rear side windows Press the button.
Rear door controls
Roller blind for the side windows Press the button.
Seite 46ControlsOpening and closing46
Online Edition for Part no. 01 40 2 909 928 - VI/13
Page 53 of 255
AdjustingVehicle equipment
All standard, country-specific and optional
equipment that is offered in the model series is
described in this chapter. Therefore, equip‐
ment is also described that is not available in a
vehicle, e. g., because of the selected optional
equipment or country variant. This also applies
for safety-related functions and systems.
Sitting safely The ideal seating position can make a vital
contribution to relaxed, fatigue-free driving.
The seating position plays an important role in
an accident in combination with:▷Safety belts, refer to page 54.▷Head restraints, refer to page 55.▷Airbags, refer to page 102.
Front seats
General information Do not adjust the seat while driving
Do not adjust the driver's seat while driv‐
ing, or the seat could respond with unexpected
movement and the ensuing loss of vehicle
control could lead to an accident.◀
Do not incline the backrest too far to the
rear
Also on the front passenger side, do not incline
the backrest on the front passenger side too far to the rear during driving, or there is a risk of
slipping under the safety belt in the event of an
accident. This would eliminate the protection
normally provided by the belt.◀
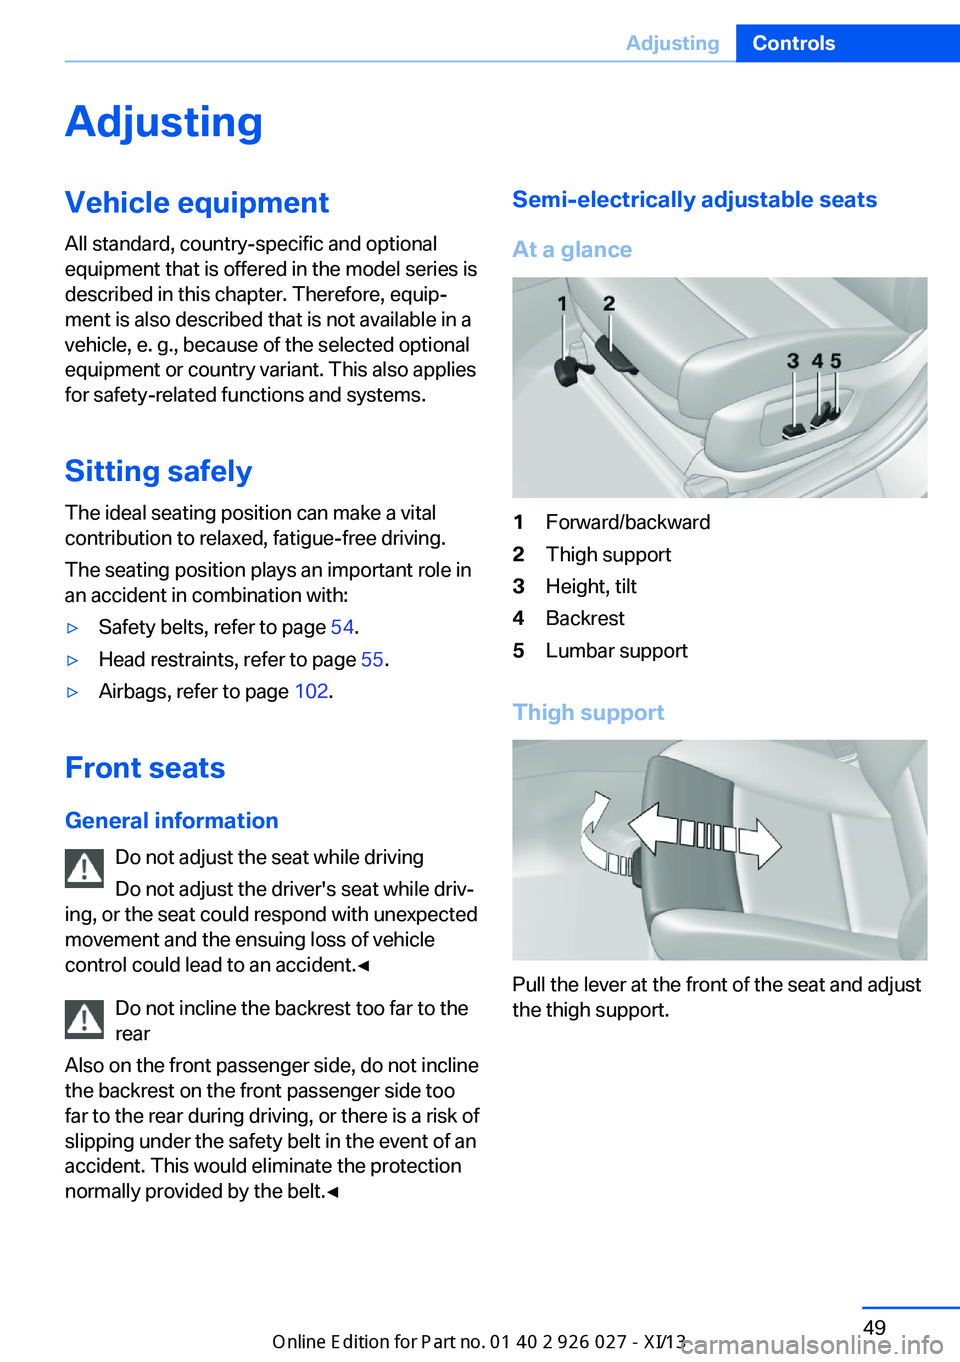
Semi-electrically adjustable seats
At a glance1Forward/backward2Thigh support3Height, tilt4Backrest5Lumbar support
Thigh support
Pull the lever at the front of the seat and adjust
the thigh support.
Seite 49AdjustingControls49
Online Edition for Part no. 01 40 2 909 928 - VI/13
Page 54 of 255
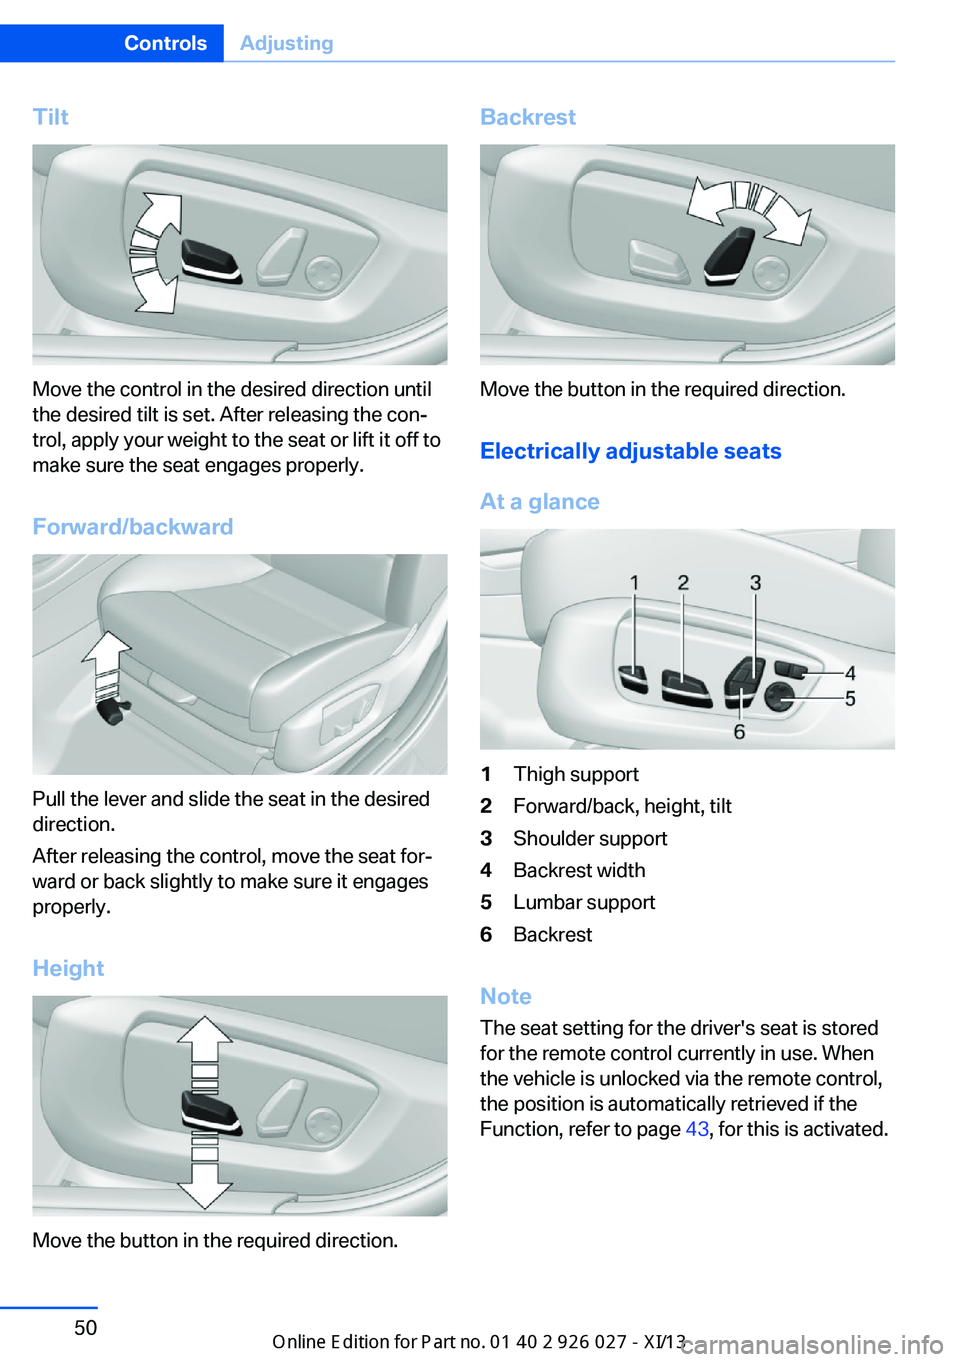
Tilt
Move the control in the desired direction until
the desired tilt is set. After releasing the con‐
trol, apply your weight to the seat or lift it off to
make sure the seat engages properly.
Forward/backward
Pull the lever and slide the seat in the desired
direction.
After releasing the control, move the seat for‐
ward or back slightly to make sure it engages
properly.
Height
Move the button in the required direction.
Backrest
Move the button in the required direction. Electrically adjustable seats
At a glance
1Thigh support2Forward/back, height, tilt3Shoulder support4Backrest width5Lumbar support6Backrest
Note The seat setting for the driver's seat is stored
for the remote control currently in use. When
the vehicle is unlocked via the remote control,
the position is automatically retrieved if the
Function, refer to page 43, for this is activated.
Seite 50ControlsAdjusting50
Online Edition for Part no. 01 40 2 909 928 - VI/13
Page 55 of 255
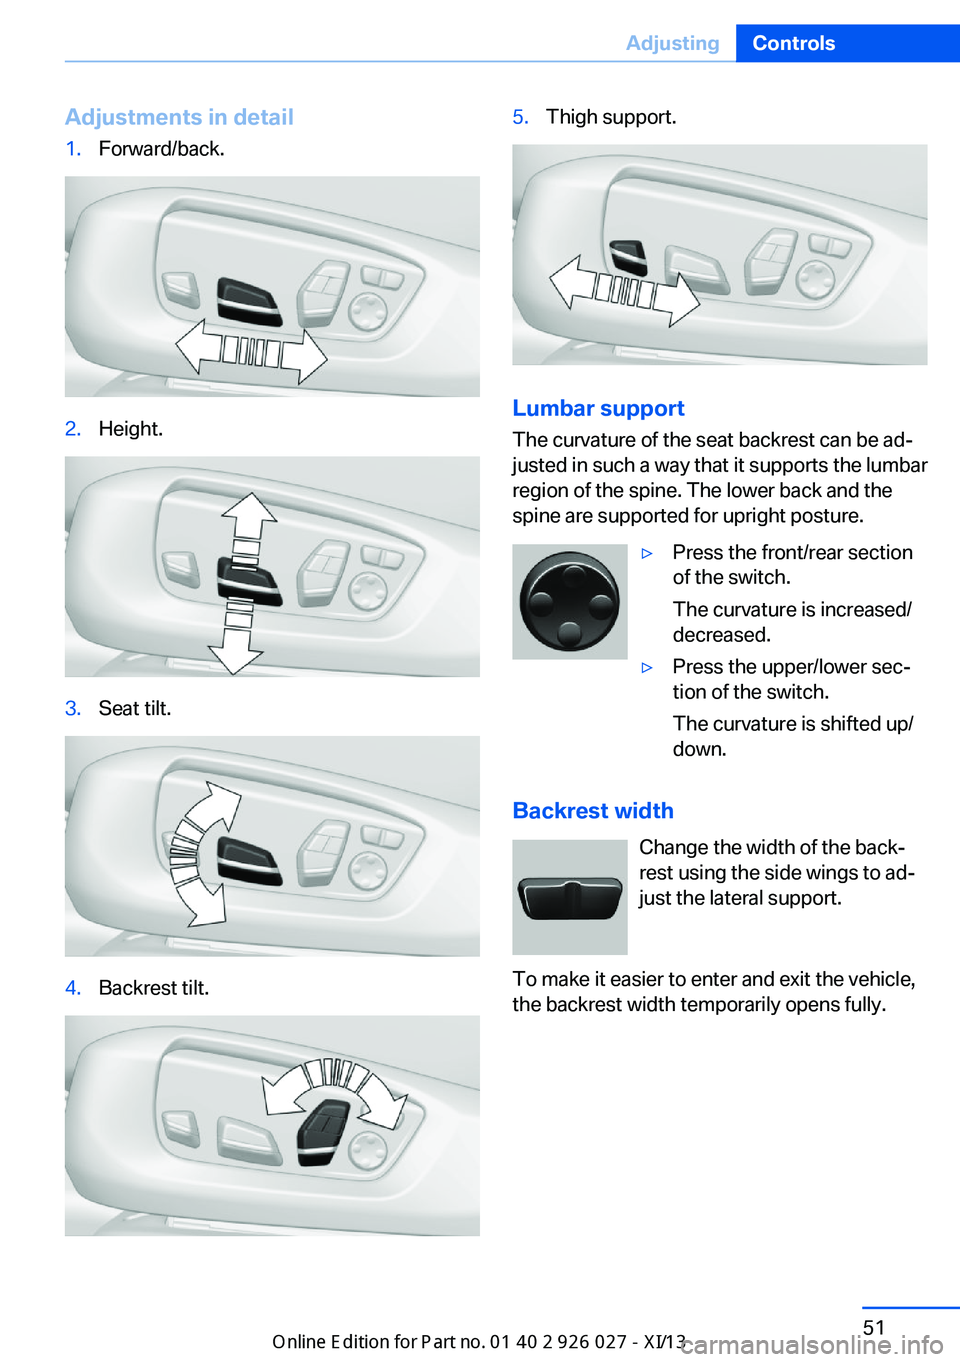
Adjustments in detail1.Forward/back.2.Height.3.Seat tilt.4.Backrest tilt.5.Thigh support.
Lumbar support
The curvature of the seat backrest can be ad‐
justed in such a way that it supports the lumbar
region of the spine. The lower back and the
spine are supported for upright posture.
▷Press the front/rear section
of the switch.
The curvature is increased/
decreased.▷Press the upper/lower sec‐
tion of the switch.
The curvature is shifted up/
down.
Backrest width
Change the width of the back‐
rest using the side wings to ad‐
just the lateral support.
To make it easier to enter and exit the vehicle,
the backrest width temporarily opens fully.
Seite 51AdjustingControls51
Online Edition for Part no. 01 40 2 909 928 - VI/13
Page 56 of 255
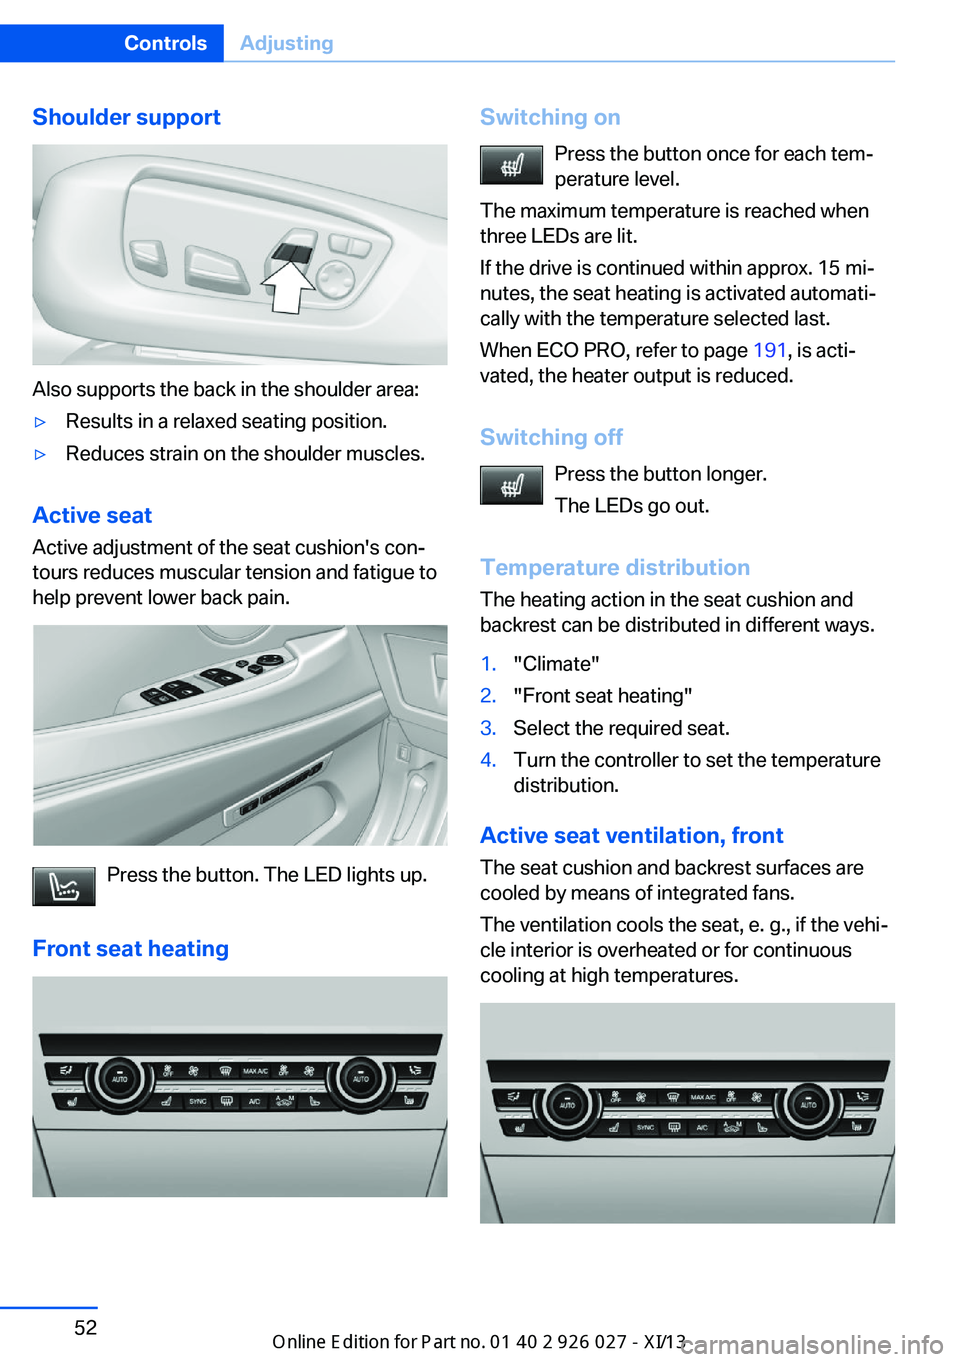
Shoulder support
Also supports the back in the shoulder area:
▷Results in a relaxed seating position.▷Reduces strain on the shoulder muscles.
Active seatActive adjustment of the seat cushion's con‐
tours reduces muscular tension and fatigue to
help prevent lower back pain.
Press the button. The LED lights up.
Front seat heating
Switching on Press the button once for each tem‐
perature level.
The maximum temperature is reached when
three LEDs are lit.
If the drive is continued within approx. 15 mi‐
nutes, the seat heating is activated automati‐
cally with the temperature selected last.
When ECO PRO, refer to page 191, is acti‐
vated, the heater output is reduced.
Switching off Press the button longer.
The LEDs go out.
Temperature distribution
The heating action in the seat cushion and
backrest can be distributed in different ways.1."Climate"2."Front seat heating"3.Select the required seat.4.Turn the controller to set the temperature
distribution.
Active seat ventilation, front
The seat cushion and backrest surfaces are
cooled by means of integrated fans.
The ventilation cools the seat, e. g., if the vehi‐
cle interior is overheated or for continuous
cooling at high temperatures.
Seite 52ControlsAdjusting52
Online Edition for Part no. 01 40 2 909 928 - VI/13
Page 57 of 255
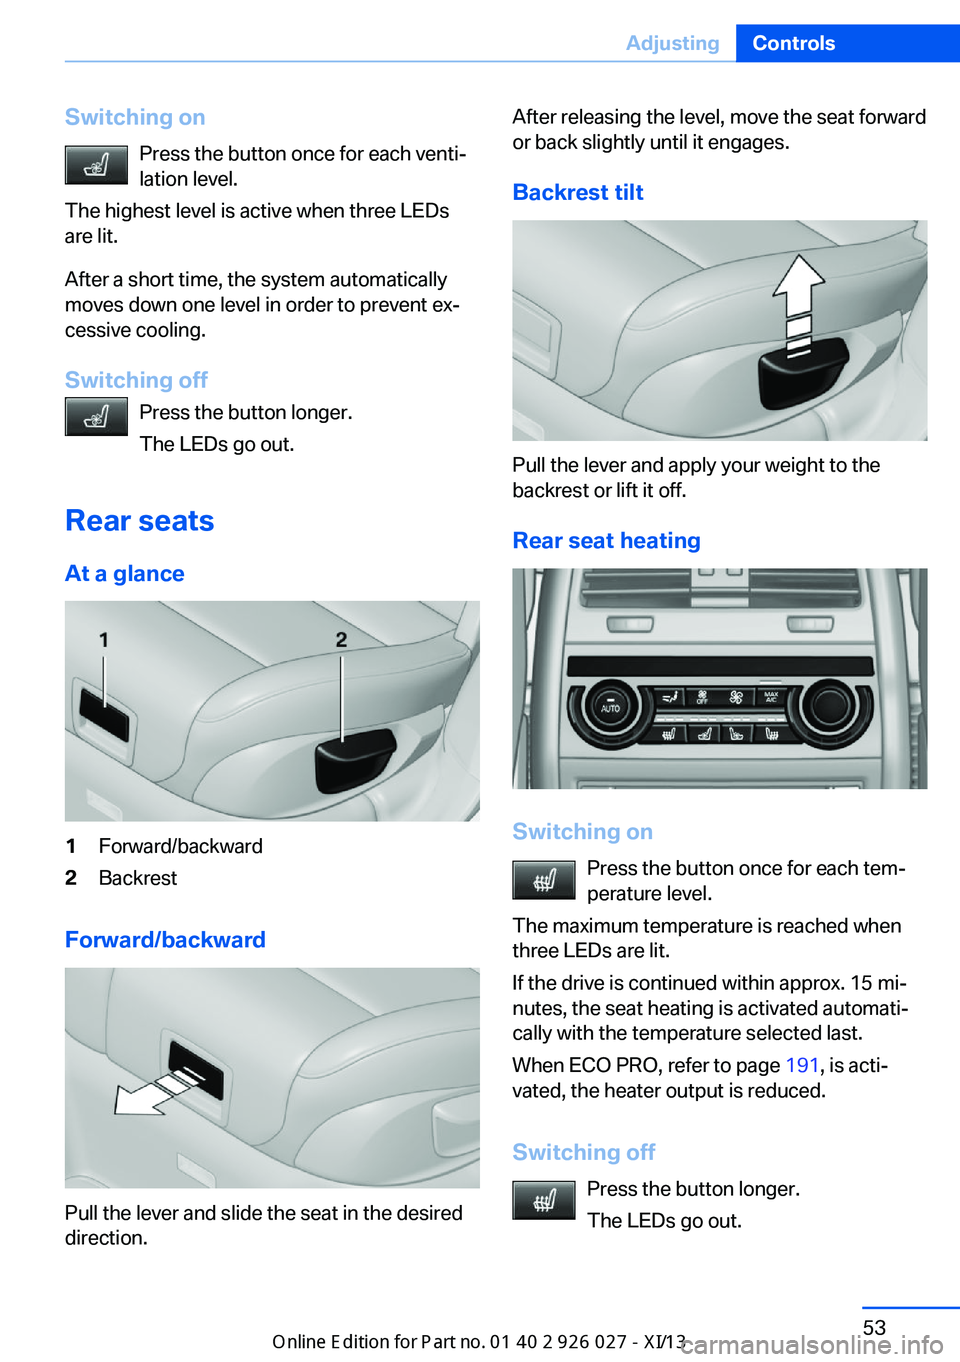
Switching onPress the button once for each venti‐
lation level.
The highest level is active when three LEDs
are lit.
After a short time, the system automatically
moves down one level in order to prevent ex‐
cessive cooling.
Switching off Press the button longer.
The LEDs go out.
Rear seats
At a glance1Forward/backward2Backrest
Forward/backward
Pull the lever and slide the seat in the desired
direction.
After releasing the level, move the seat forward
or back slightly until it engages.
Backrest tilt
Pull the lever and apply your weight to the
backrest or lift it off.
Rear seat heating
Switching on Press the button once for each tem‐
perature level.
The maximum temperature is reached when
three LEDs are lit.
If the drive is continued within approx. 15 mi‐
nutes, the seat heating is activated automati‐
cally with the temperature selected last.
When ECO PRO, refer to page 191, is acti‐
vated, the heater output is reduced.
Switching off Press the button longer.
The LEDs go out.
Seite 53AdjustingControls53
Online Edition for Part no. 01 40 2 909 928 - VI/13