engine BMW 525i 1998 E39 Workshop Manual
[x] Cancel search | Manufacturer: BMW, Model Year: 1998, Model line: 525i, Model: BMW 525i 1998 E39Pages: 1002
Page 741 of 1002
Downloaded from www.Manualslib.com manuals search engine
-- I
I: ... . -. Rear Suspension! -- .- -
Air compressor pump relay, removing and
installing
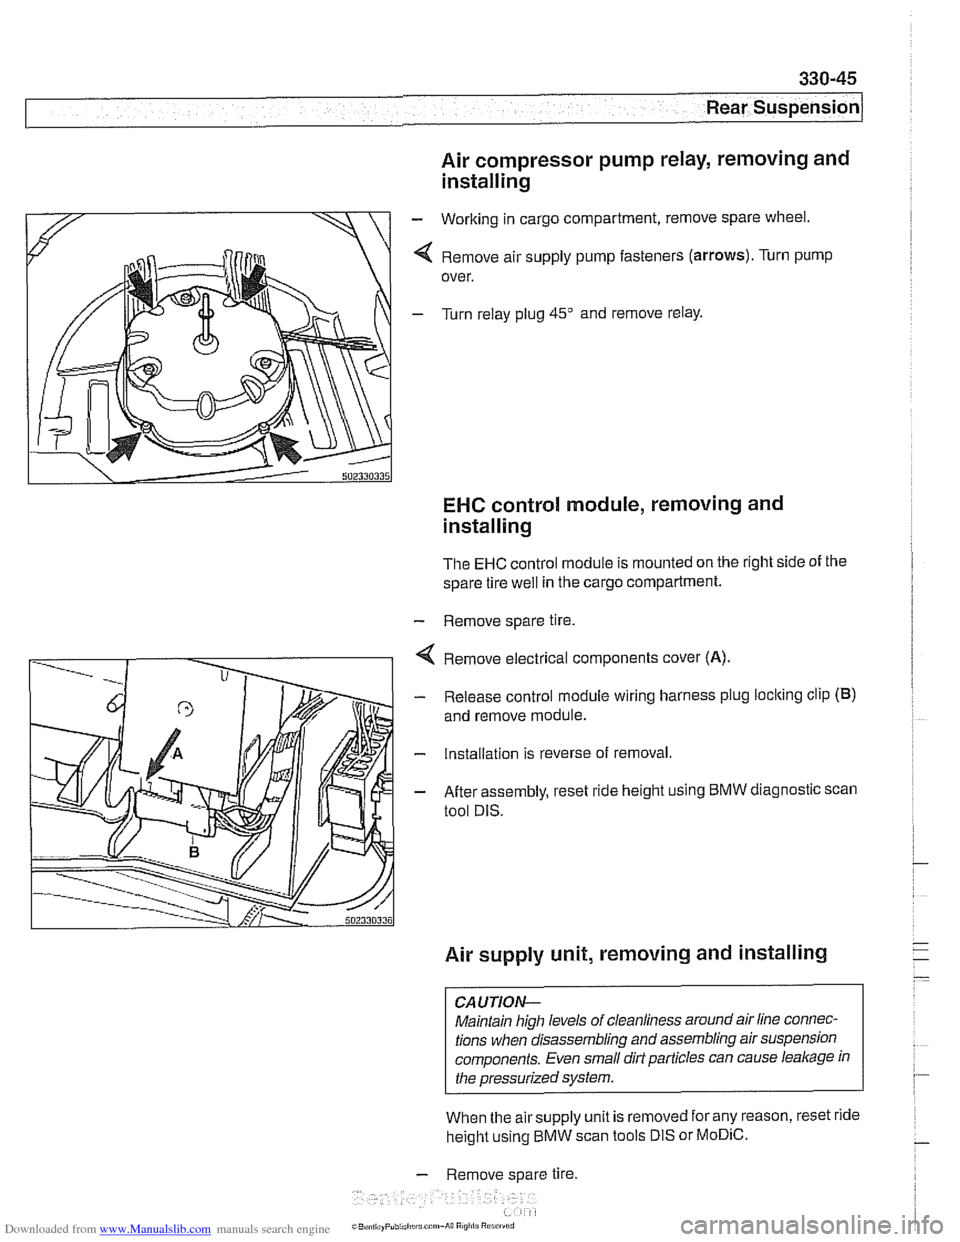
- Working in cargo compartment, remove spare wheel.
4 Remove air supply pump fasteners (arrows). Turn pump
over.
- Turn relay plug 45" and remove relay.
EHC control module, removing and
installing
The EHC control module is mounted on the right side of the
spare tire
well in the cargo compartment.
- Remove spare tire.
4 Remove electrical components cover (A).
- Release control module wiring harness plug loclting clip (B)
and remove module.
- Installation is reverse of removal.
- After assembly, reset ride height using BMW diagnostic scan
tool DIS.
Air supply unit, removing and installing
CAUTION-
Maintain high levels of cleanliness around air line connec-
tions when disassembling and assembling air suspension
components. Even small dirt particles can cause
leakage in
the pressurized system.
When the airsupply unit is removed for any reason, reset ride
height using BMW scan tools DIS or
MoDiC.
- Remove spare tire.
i~B,!n,,ayPubi.l,c~u.c~"~-A~~ R
Page 742 of 1002
Downloaded from www.Manualslib.com manuals search engine
Rear Suspension
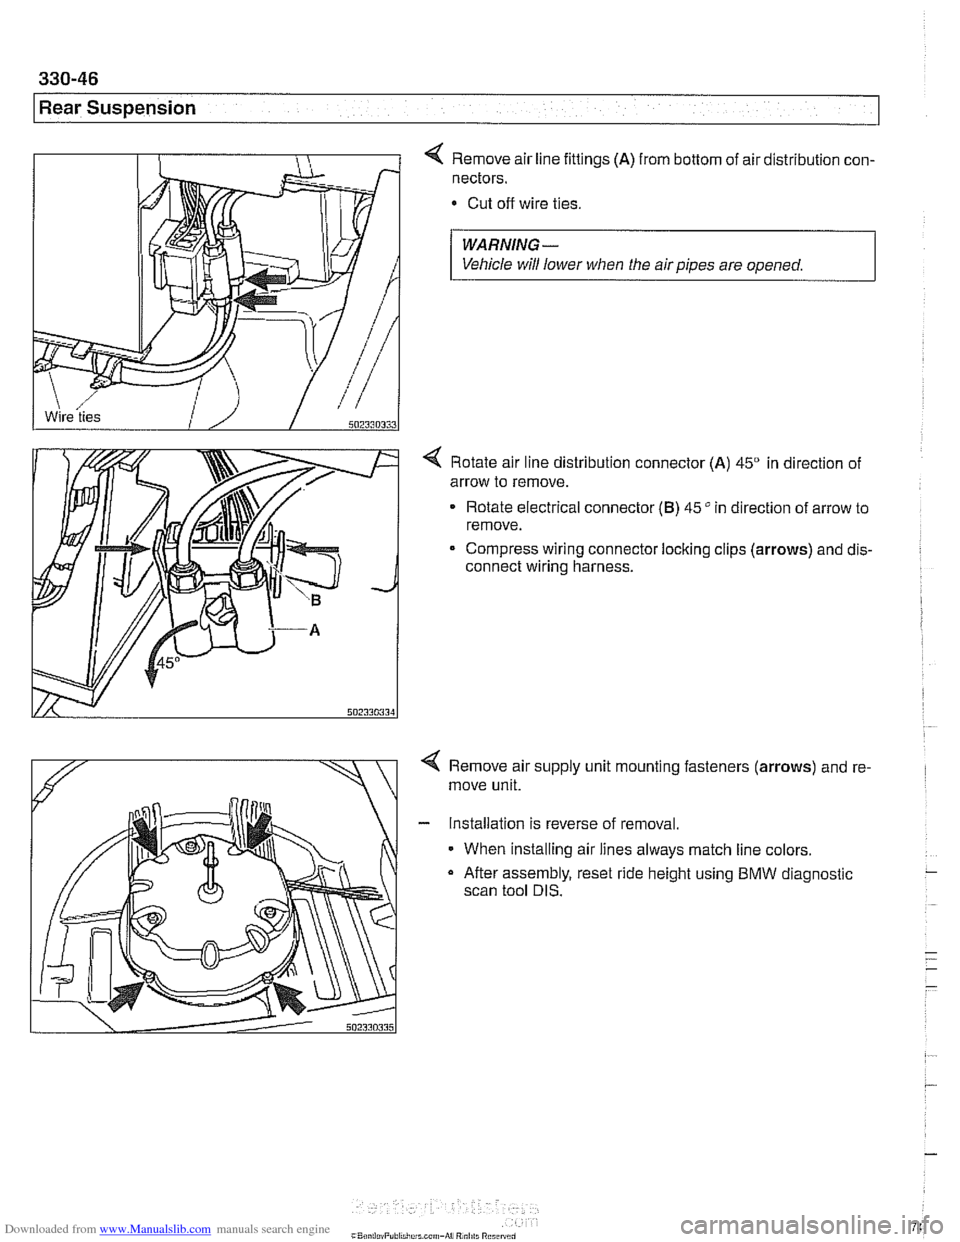
4 Remove air line fittings (A) from bottom of air distribution con-
nectors.
Cut off wire ties.
WARNING-
Vehicle will lower when the air pipes are opened.
4 Rotate air line distribution connector (A) 45" in direction of
arrow to remove.
Rotate electrical connector
(B) 45" in direction of arrow to
remove.
Compress wiring connector locking clips
(arrows) and dis-
connect wiring harness.
< Remove air supply unit mounting fasteners (arrows) and re-
move unit.
- Installation is reverse of removal.
When installing air lines always match line colors.
a After assembly, reset ride height using BMW diagnostic
scan tool DIS.
Page 743 of 1002
Downloaded from www.Manualslib.com manuals search engine
330-47
Rear suspension/
Ride height sensor, removing and installing
Hall effect sensors for vehicle height detection are mounted
on the
left and right sides of the rear suspension. A coupling
rod mounted between the rear suspension arm and the sen-
sor arm is used to send a varying voltage signal to the
EHC
control module.
Raise car and support safely.
WARNING-
Male sure the car is firmly supported on jaclc stands de-
signed
for the purpose. Place jaclc stands underneath struc-
tural chassis points. Do not place jaclc stands under
sus~ension Darts.
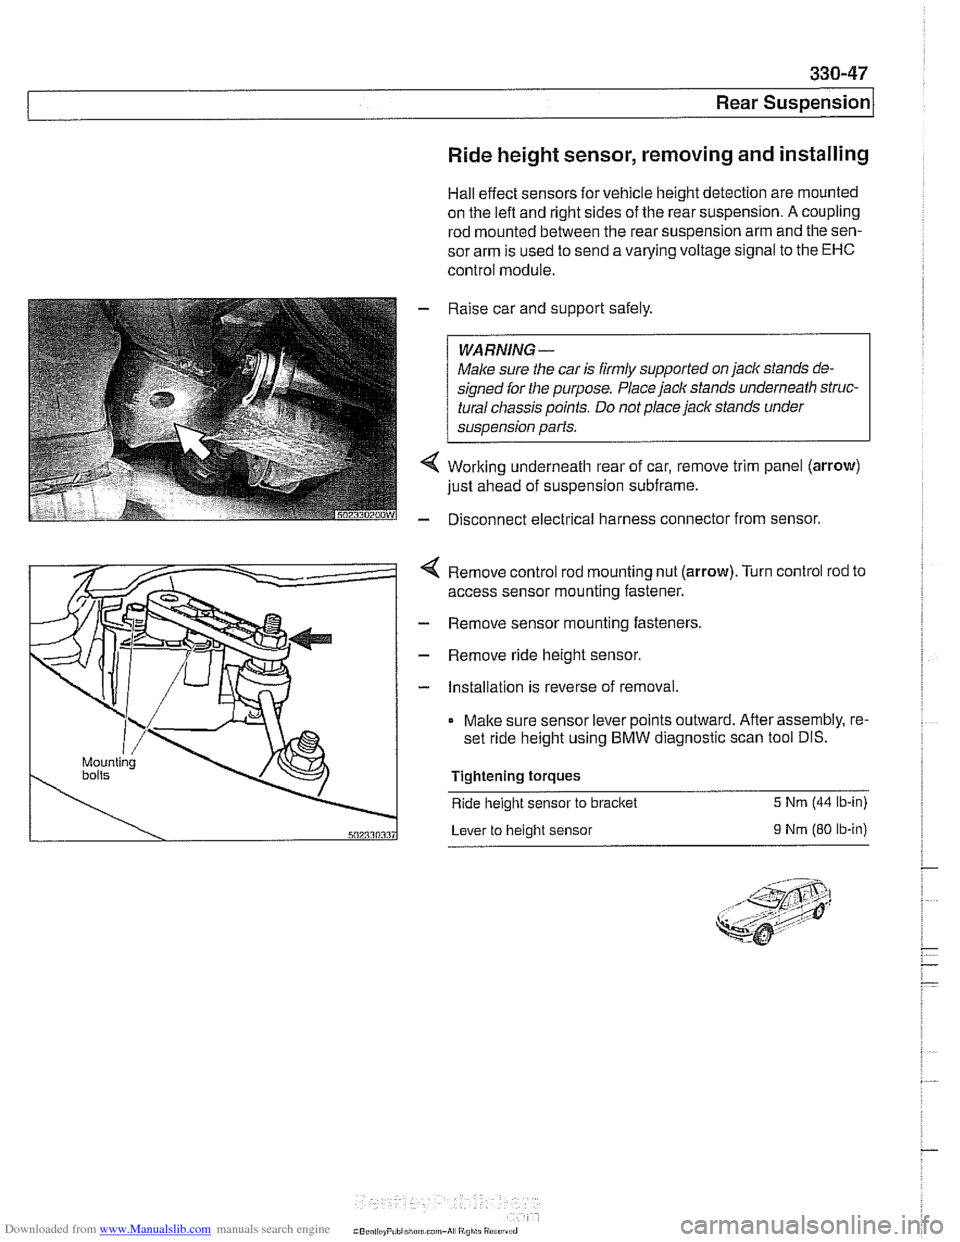
Working underneath rear of car, remove trim panel (arrow)
just ahead of suspension subframe.
Disconnect electrical harness connector from sensor.
4 Remove control rod mounting nut (arrow).Turn control rod to
access sensor mounting fastener.
- Remove sensor mounting fasteners.
- Remove ride height sensor.
- Installation is reverse of removal.
Make sure sensor lever points outward. After assembly, re-
set ride height using BMW diagnostic scan tool DIS.
Tightening torques
Ride
height sensor to bracket 5 Nrn (44 lb-in)
Lever to height sensor
9 Nrn (80 ib-in)
Page 744 of 1002
Downloaded from www.Manualslib.com manuals search engine
Page 745 of 1002
Downloaded from www.Manualslib.com manuals search engine
33UFinal Drive
General ........................... ,331 -2 Drive Axles ....................... 331 -1 4
Special tools
........................ ,331 -2 Drive axle assembly ................. 331-14
Aluminum suspension components
...... ,331-4 Drive axle, removing and
installing (sedan)
.................... 331-14 ........................ Final Drive ,331 -5
Drive axle, removing
........... ...... Final drive, removing and installing ,331-5 and (Sport Wagon) 331-15
...................... Differential oil level, checking ........... ,331-6 CV joint boots 331-17 Final drive in~ut shaft seal, replacing ..... ,331-7 .
Final drive oitput shaft seals, replacing . . ,331-10
Final drive cover, removing and installing ,331-12
Final drive mounts, replacing .......... ,331-12
Page 746 of 1002
Downloaded from www.Manualslib.com manuals search engine
331-2
Final Drive
This repair group covers removal and repair informat~on for
the final drive (differential), axle shafts.
CV joints, CV joint
boots, and final drive seal replacement.
Internal repairs of the differential assembly are not covered in
this manual.
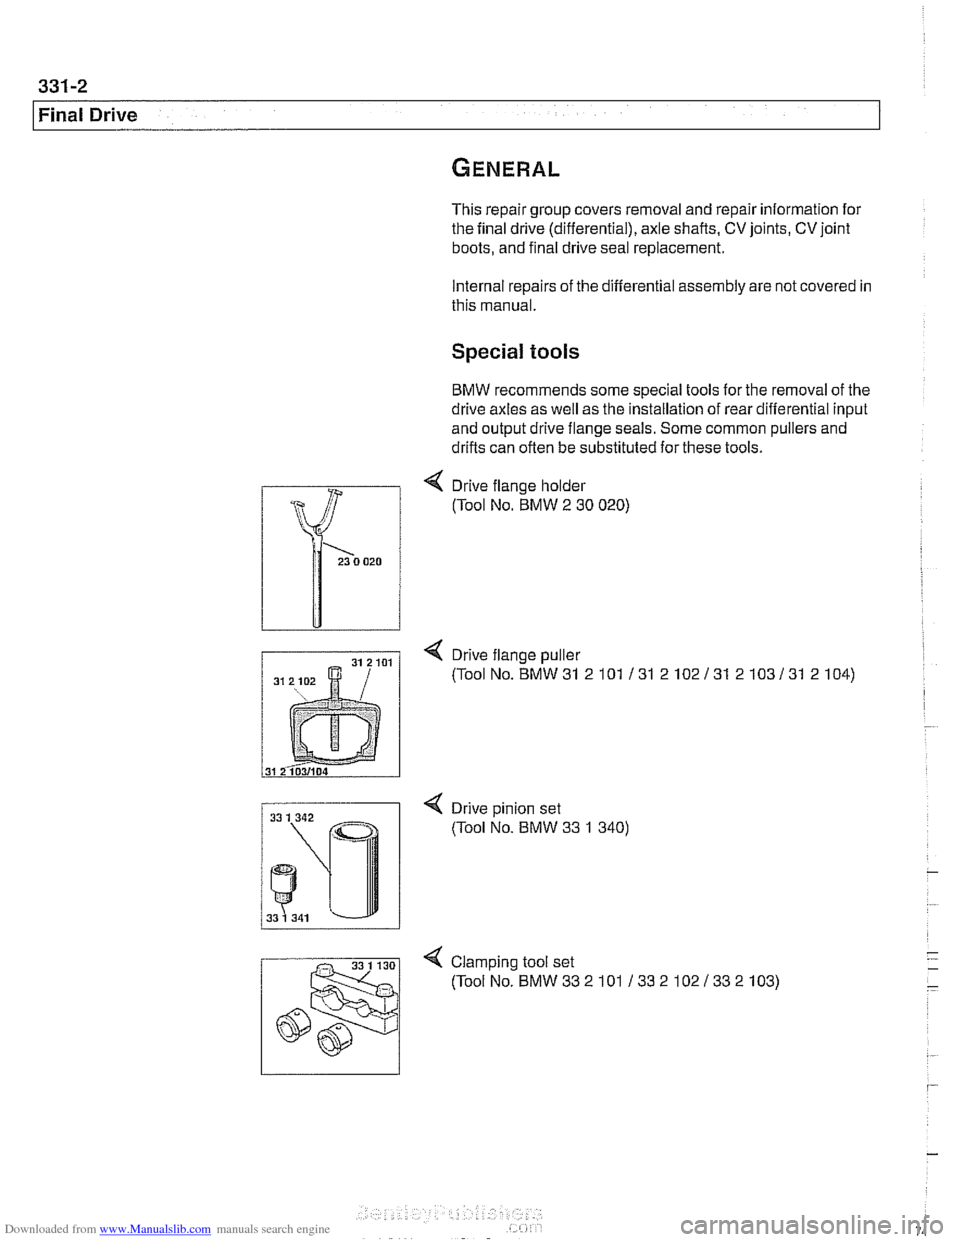
Special tools
BMW recommends some special tools for the removal of the
drive axles as well as the installation of rear differential input
and output drive flange seals. Some common pullers and
drifts can often be substituted for these tools.
4 Drive flange holder
(Tool No. BMW
2 30 020)
< Drive flange puller
(ToolNo.BMW31 2101 131 2102131 2103131 2104)
< Drive pinion set
(Tool No. BMW 33 1 340)
4 Clamp~ng tool set
(ToolNo.BMW332101 13321021332103)
Page 747 of 1002
Downloaded from www.Manualslib.com manuals search engine
Final Drive
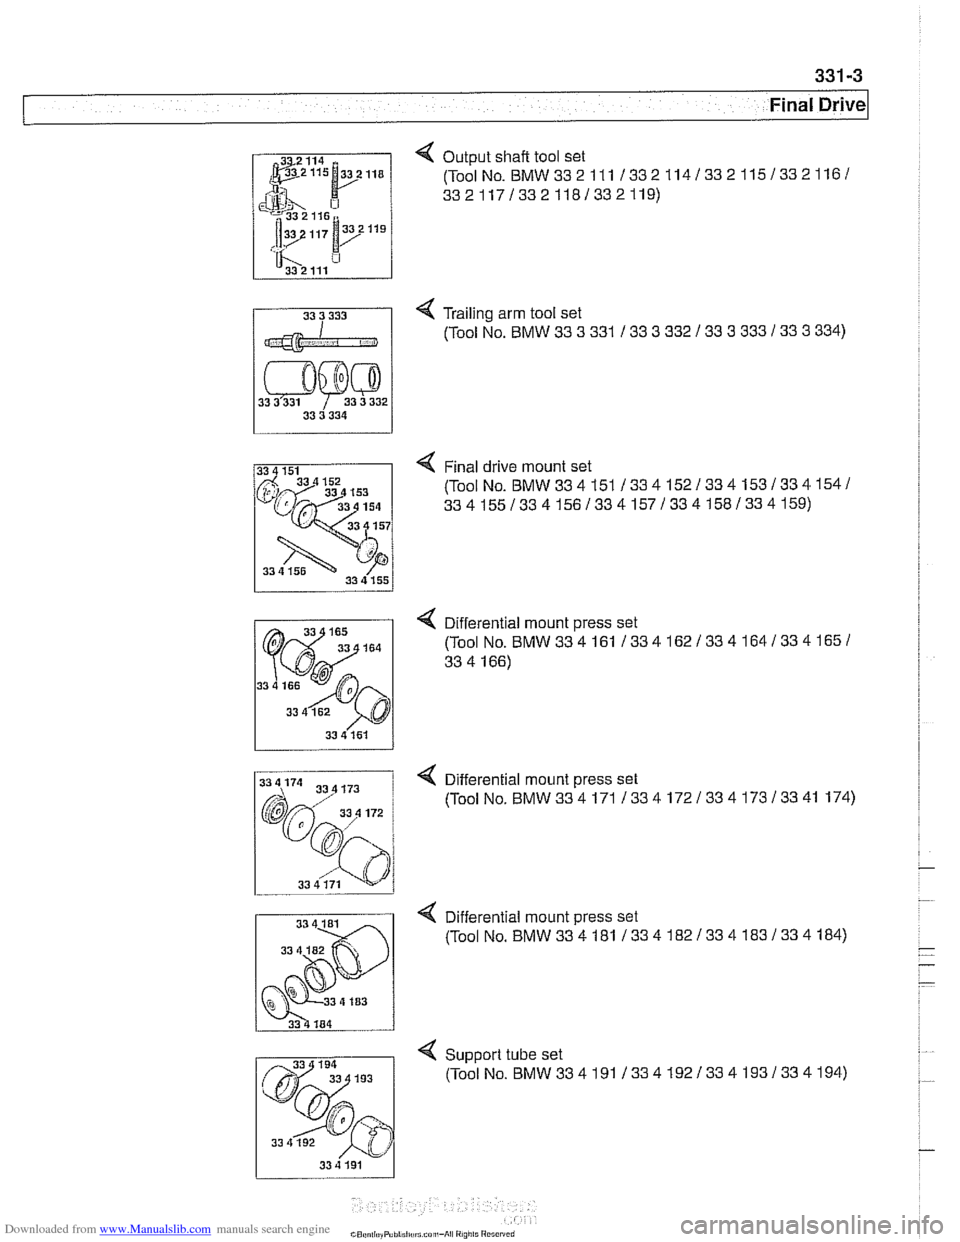
4 Output shaft tool set
(ToolNo.
BMW332111 1332114/332115/3321161
33211713321181332119)
4 Trailing arm tool set
11 (Tool NO BMW 33 3 331 I 33 3 332 1 33 3 333 133 3 334)
4 Final drive mount set
(ToolNo.
BMW334151 /334152/334153/334154/
3341551334156133415713341581334159)
< Differential mount press set
(Tool
No.BMW334161 1334162133416413341651
33 4 166)
33 4 161
Q Differential mount press set
(ToolNo.
BMW334171 /334172/334173/3341 174)
. .
33 4 181 4 Differential mount press set
33 (Tool No. BMW334181 133418213341831334184)
Support tube set
(ToolNo.BMW334191133419213341931334194)
33 4 192
33 4 191
Page 748 of 1002
Downloaded from www.Manualslib.com manuals search engine
331-4
Final Drive
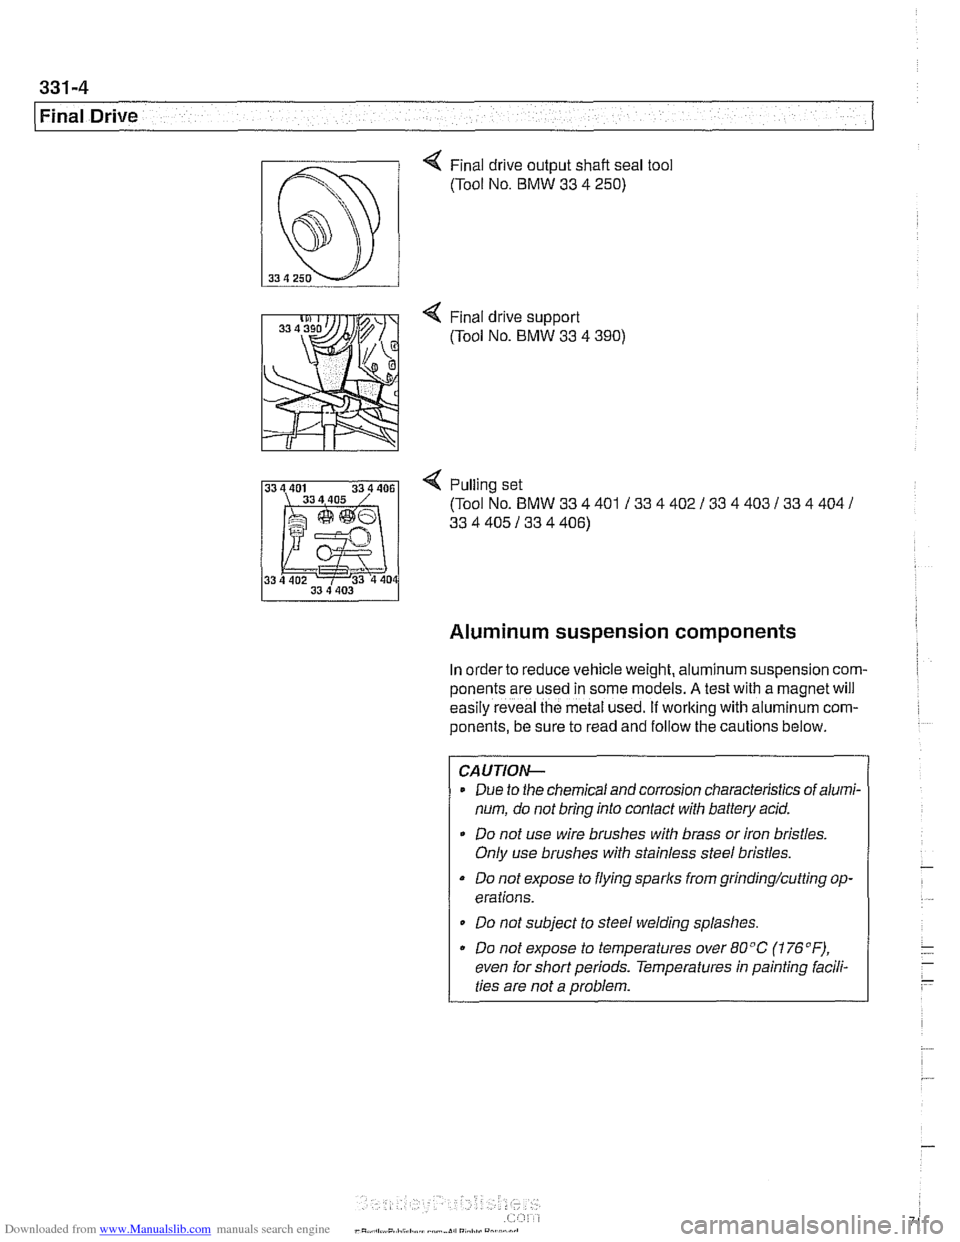
4 Final drive output shaft seal tool
(Tool No.
BMW 33 4 250)
4 Pulling set
(Tool No.
BMW 33 4 401 / 33 4 402 / 33 4 403 133 4 404 /
33 4 405 / 33 4 406)
Aluminum suspension components
In order to reduce vehicle weight, aluminum suspension com-
ponents are
~sed in some models. A tesl wlh a magnet wi.1
eas'ly reveal lhe metal Lseo. If working with a umin~m com-
ponents, be sure to read and follow the cautions below.
CAUTIOI\C
Due to the chemical and corrosion characteristics of alumi-
num, do not bring into contact with battery acid.
Do not use wire brushes with brass or iron bristles.
Only use brushes with stainless steel bristles.
Do not expose to flying sparks from grinding/cutting op-
erations.
Do not subject to steel welding splashes.
Do not expose to temperatures over
80°C (176"F),
even for short periods. Temperatures in painting facili-
ties are not a problem.
Page 749 of 1002
Downloaded from www.Manualslib.com manuals search engine
Final Drive
Final drive, removing and installing
- Raise rear of car.
WARNING-
Make sure that the car is firmly supported on jack stands de-
signed for the purpose. Place the jaclc stands beneath struc-
tural chassis
~oints. Do not i lace iaclc stands under
( suspension barfs.
Remove exhaust system. See 180 Exhaust System.
Disconnect drive shaft from final drive. See
260 Driveshaft.
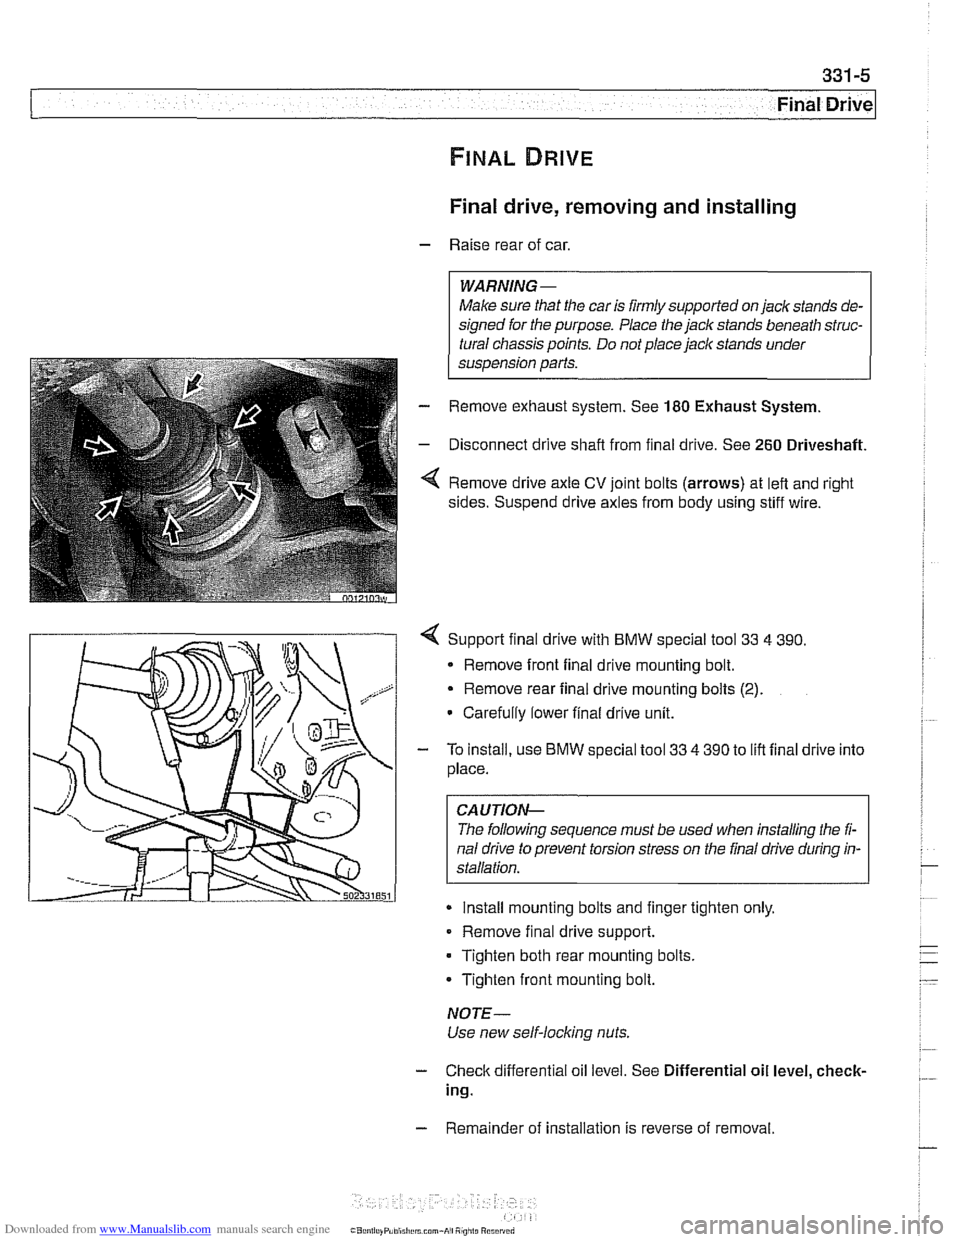
Remove drive axle CV joint bolts (arrows) at left and right
sides. Suspend drive axles from body using stiff wire.
4 Support final drive with BMW special tool 33 4 390.
* Remove front final drive mounting bolt.
Remove rear final drive mounting bolts
(2).
Carefully lower final drive unit.
- To install, use BMW special tool 33 4 390 to lift final drive into
place.
CA UTIOP&
The following sequence must be used when installing the fi-
nal drive to prevent torsion stress on the final drive during in-
Install mounting bolts and finger tighten only.
Remove final drive support.
Tighten both rear mounting bolts.
Tighten front mounting bolt.
NOTE-
Use new self-locking nuts.
- Check differential oil level. See Differential oil level, check-
ing.
- Remainder of installation is reverse of removal.
Page 750 of 1002
Downloaded from www.Manualslib.com manuals search engine
Final Drive
Tightening torques
F~nal drive to rear axle carrier 105 Nm (77 it-lb)
Driveshaft CV joint to final drive flange
- MlO (Torx bolt) 70
Nm (51 ft-lb)
- M8 (compression nut) 32 Nm (24
ft-lb)
Drive axle to final drive
ilange
Torx bolts (M10) 83 Nm (61 ft-lb)
Torx bolt with
rlbbed teeth (M10) 64 Nm (47 ft-lb)
Torx bolt
wlth ribbed teeth (MI0 sliver) 80 Nm (59 ft-lb)
Torx
bolt with ribbed teeth (M10 black) 100 Nm (74 ft-lb)
* Torx bolt with ribbed teeth (M12) 135 Nm (100 ft-lb)
Differential oil level, checking
The E39 differential is filled with lifetime oil that ordinarily
does not need to be changed. BMW recommends using only
a specially formulated synthetic gear oil
(SAF-XO) that is
available through an authorized BMW dealer parts depart-
ment. For additional information on this lubricant and any oth-
er lubricants that may be compatible, contact an authorized
BMW dealer service department.
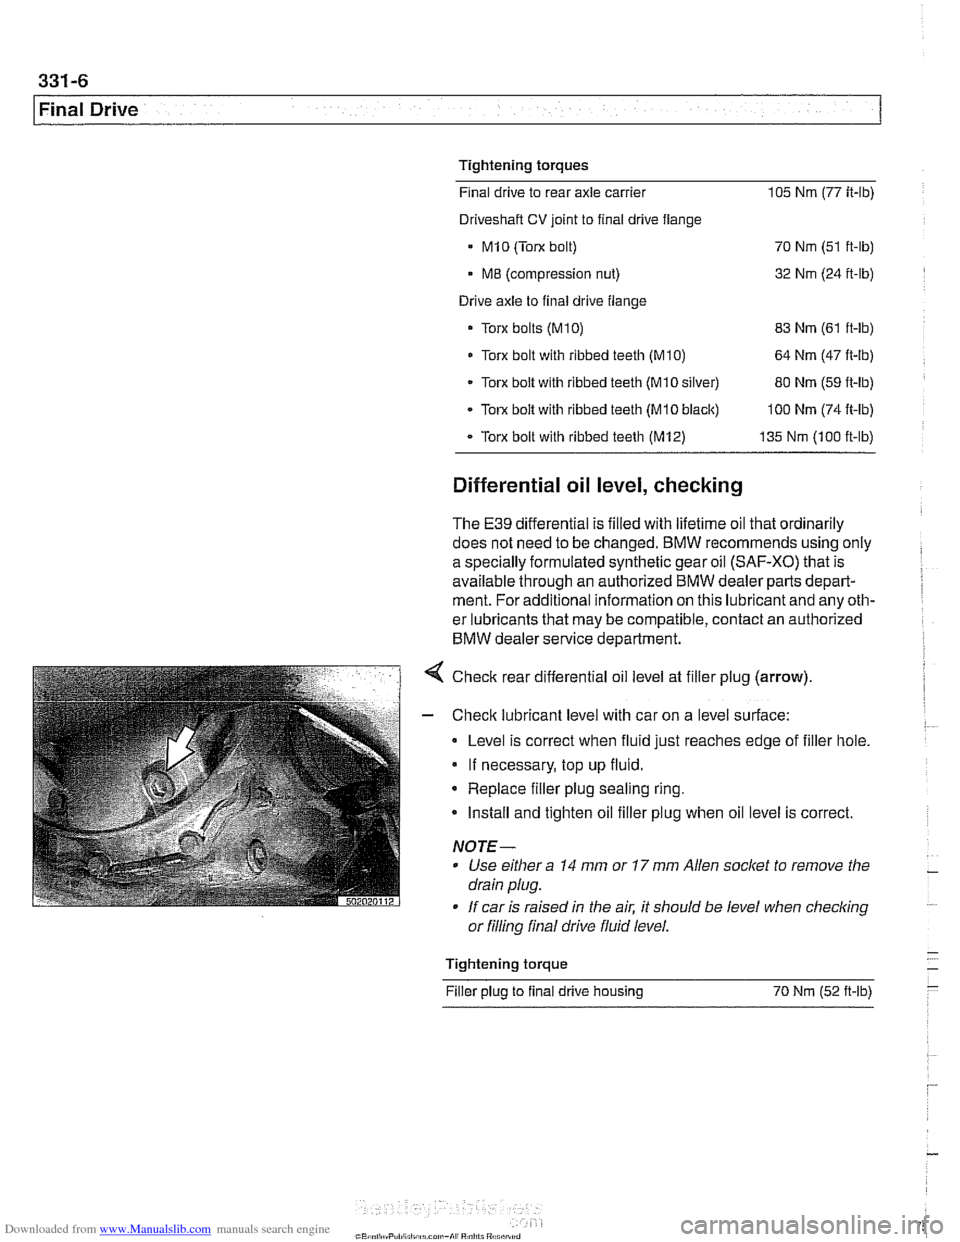
< Check rear differential oil level at filler plug (arrow).
- Check lubricant level with car on a level surface:
Level is correct when fluid just reaches edge of filler hole.
If necessary, top up fluid.
* Replace filler plug sealing ring.
Install and tighten oil filler plug when oil level is correct.
NOTE-
Use either a 14 mm or 17 mm Allen socket to remove the
drain plug.
If car is raised in the air. it should be level when
checkino " or filling final drive fluid level.
- Tightening torque -
Filler plug to final drive housing 70 Nm (52
ft-lb) -