replace timing chain BMW 525i 1999 E39 User Guide
[x] Cancel search | Manufacturer: BMW, Model Year: 1999, Model line: 525i, Model: BMW 525i 1999 E39Pages: 1002
Page 214 of 1002
Downloaded from www.Manualslib.com manuals search engine
I Cylinder Head and Valvetrain
- Remove adjustable primary timing chain tensioner tool and
reinstall primary chain tensioner cylinder to cylinder head.
Tightening torque
Primary chain tensioner cylinder
to 70 Nm (52 ft-lb)
cylinder head
- Remove flywheel locking tool from crankcase. Replace spe-
cial tool bore sealing plug.
- Remove camshaft locking tools from cylinder head
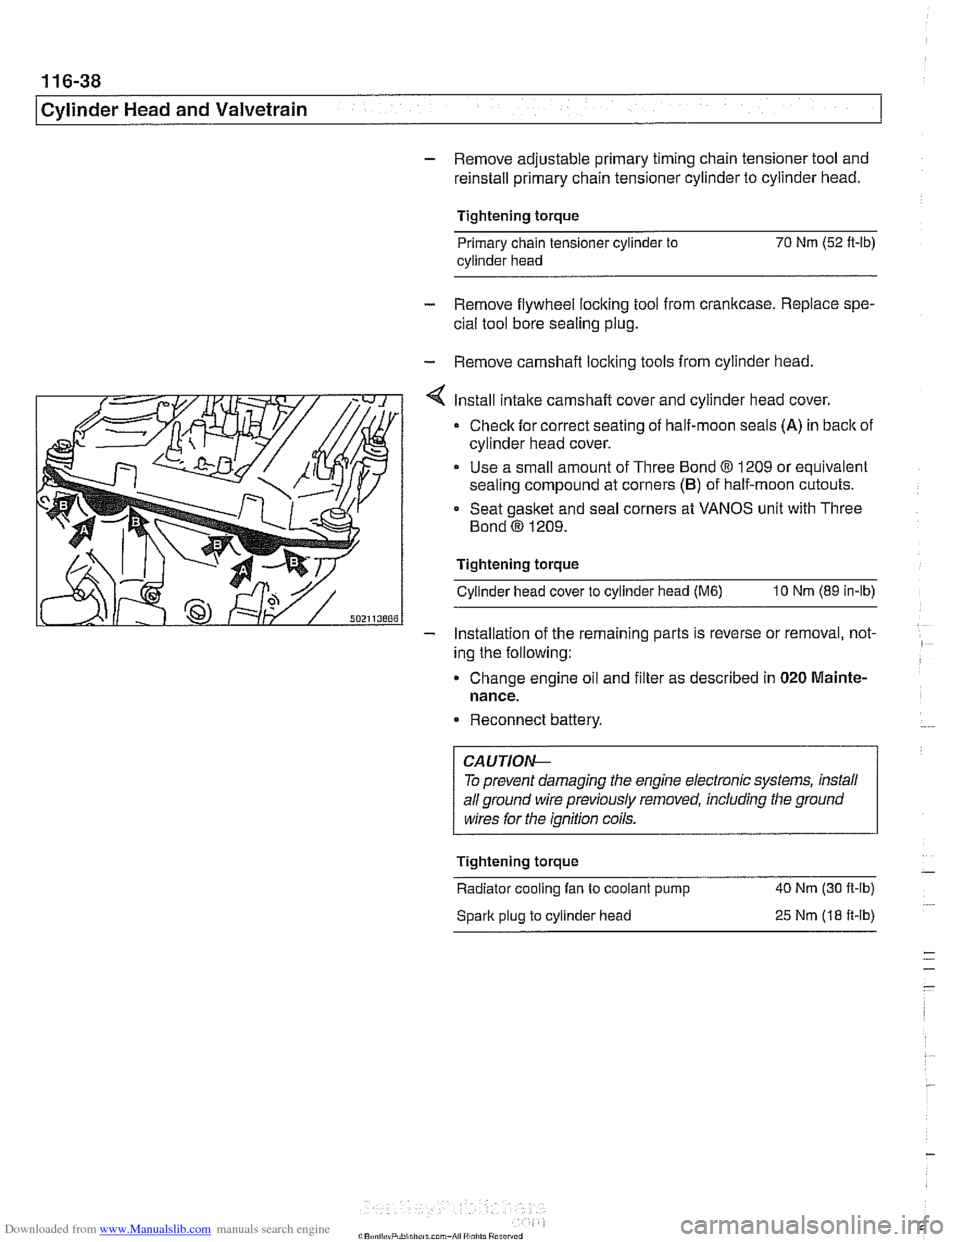
Install intake camshaft cover and cylinder head cover.
Check for correct seating of half-moon seals (A) in back of
cylinder head cover.
Use a small amount of Three Bond
8 1209 or equivalent
sealing compound at corners
(B) of half-moon cutouts.
Seat gasket and seal corners at VANOS unit with Three
Bond
@ 1209.
Tightening torque Cylinder head cover to cylinder head
(M6) 10 Nm (89 in-lb)
- Installation of the remaininq parts is reverse or removal, not- -
ing the following:
Change engine
011 and f~lter as descr~bed in 020 Mainte-
nance.
Reconnect battery.
To prevent damaging the engine electronic systems, install
all ground wire previously removed, including the ground
wires for the ignition coils.
Tightening torque
-
Radiator cooling fan to coolant pump 40 Nm
(30 ft-ib)
Spark plug to cylinder head
25 Nm (18 ft-ib)
Page 230 of 1002
Downloaded from www.Manualslib.com manuals search engine
11 6-54
Cylinder Head and Valvetrain
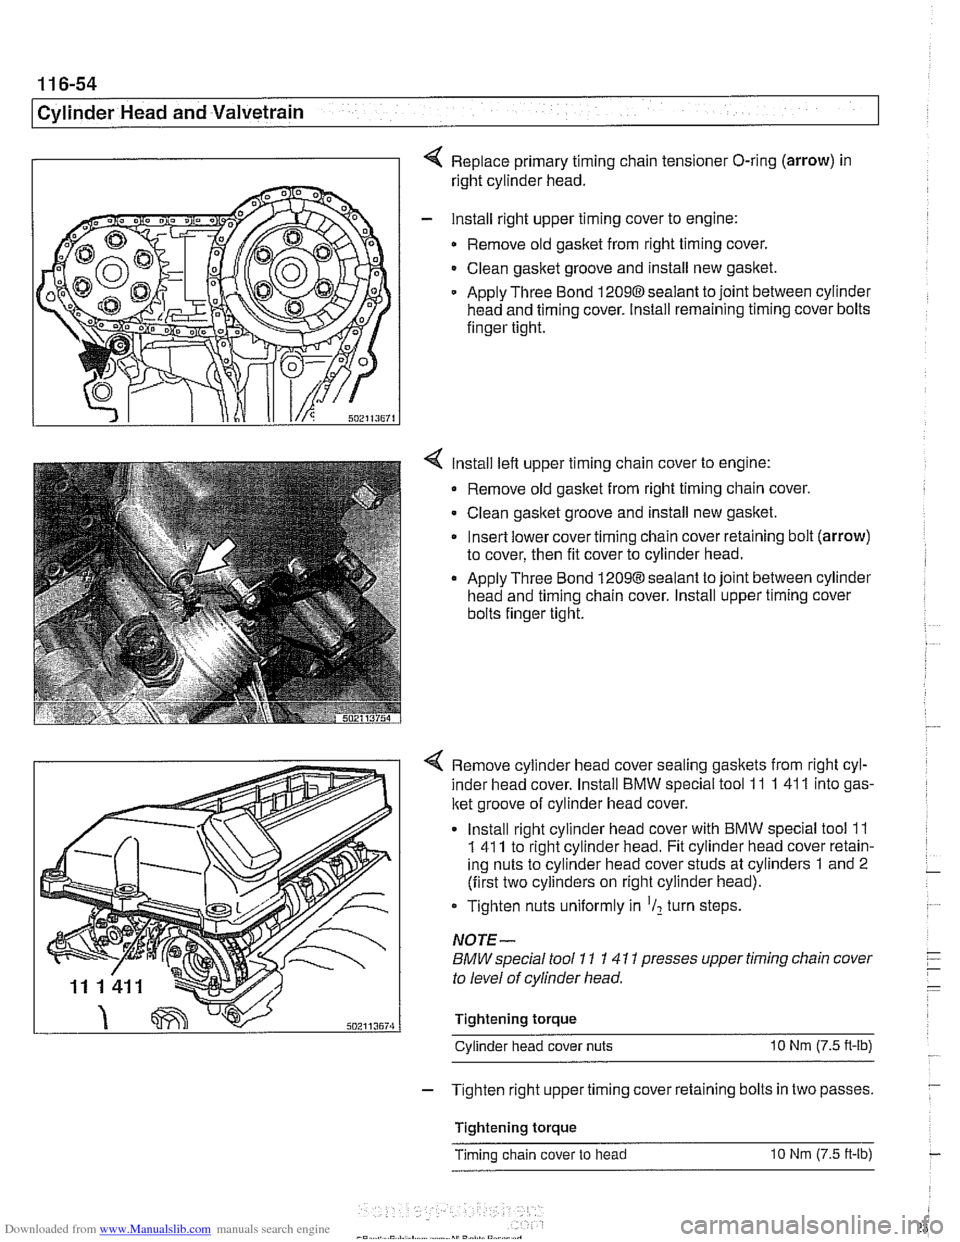
Replace primary timing chain tensioner O-ring (arrow) in
right cylinder head.
- lnstall right upper timing cover to engine:
Remove old gasket from right timing cover.
Clean gasket groove and install new gasket.
Apply Three Bond
12098sealant to joint between cylinder
head and timing cover. Install remaining timing cover bolts
finger tight.
lnstall left upper timing chain cover to engine:
Remove old gasket from right timing chain cover.
Clean gasket groove and install new gasket.
Insert lower cover timing chain cover retaining bolt (arrow)
to cover, then fit cover to cylinder head.
Apply Three Bond 12098 sealant to joint between cylinder
head and timing chain cover. lnstall upper timing cover
bolts finger tight.
4 Remove cylinder head cover sealing gaskets from right cyl-
inder head cover. lnstall BMW special tool 11
1 41 1 into gas-
ket groove of cylinder head cover.
lnstall right cylinder head cover with BMW special tool
11
1 41 1 to right cylinder head. Fit cylinder head cover retain-
ing nuts to cylinder head cover studs at cylinders
1 and 2
(first two cylinders on right cylinder head).
Tighten nuts uniformly in
'I2 turn steps.
NOTE-
BMW special tool 11 1 41 1 presses upper timing chain cover
to level of cylinder head.
Tightening torque Cylinder head cover nuts
10 Nm (7.5 n-lb)
- Tighten right upper timing cover retaining bolts in two passes.
Tightening torque
Timing chain cover to head
10 Nm (7.5 ft-lb)
Page 246 of 1002
Downloaded from www.Manualslib.com manuals search engine
117-10
/Camshaft Timing Chain
NOTE-
The crankshaft hub center bolt is torqued to 410 Nm
(300 ft-lb).
- Install crankshaft damper puller (BMW special tool 11 8 21 0)
to
11 8 200. Use bolt to remove damper from crankshaft.
- Oil seal replacement:
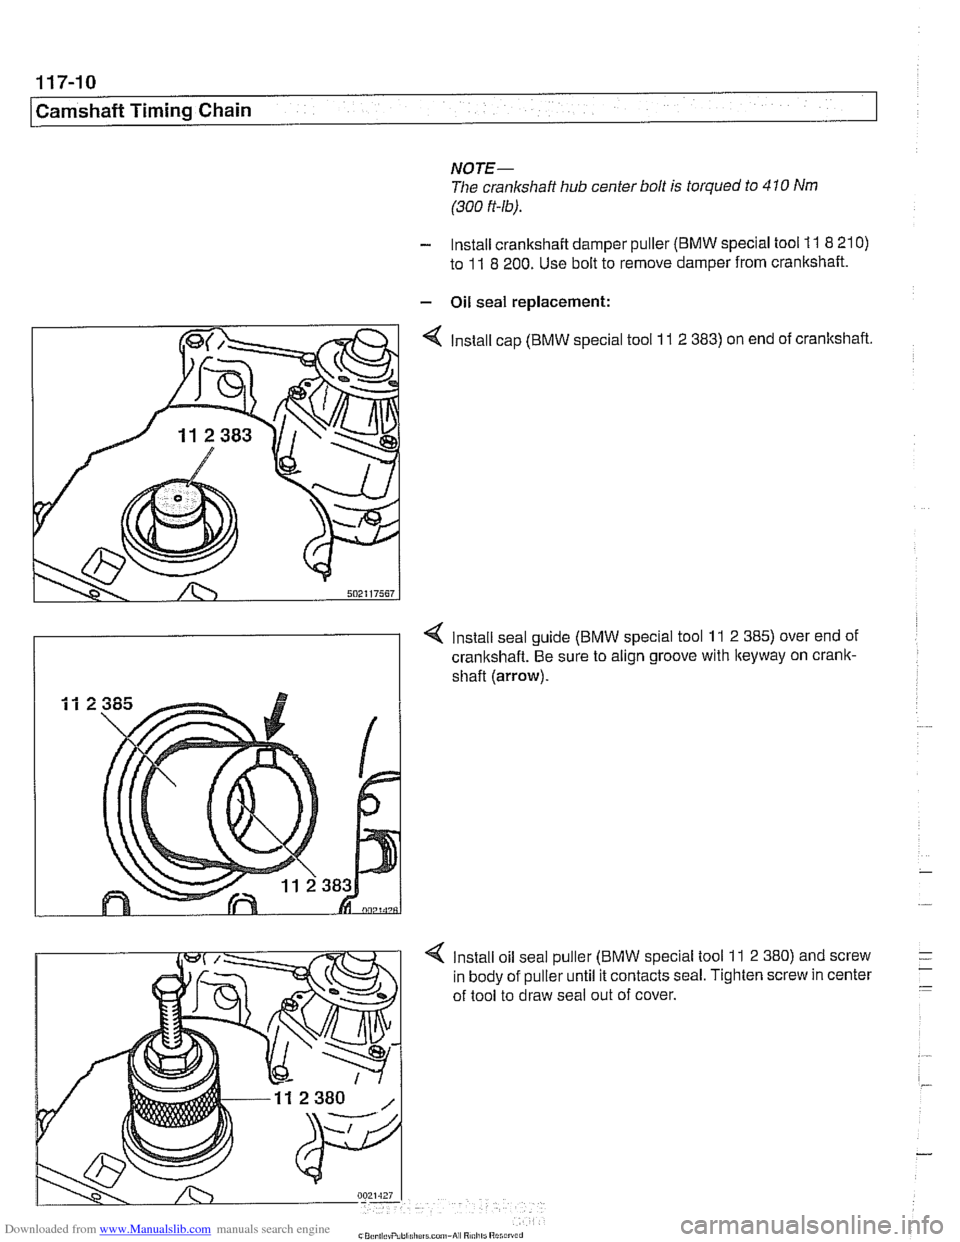
4 Install cap (BMW special tool 11 2 383) on end of crankshaft.
Install seal guide (BMW special tool
11 2 385) over end of
crankshaft. Be sure to align groove with
lteyway on crank-
shaft (arrow).
4 Install oil seal puller (BMW special tool 11 2 380) and screw
in body of puller until it contacts seal. Tighten screw in center
of tool to draw seal out of cover.
Page 250 of 1002
Downloaded from www.Manualslib.com manuals search engine
I Camshaft Timing Chain
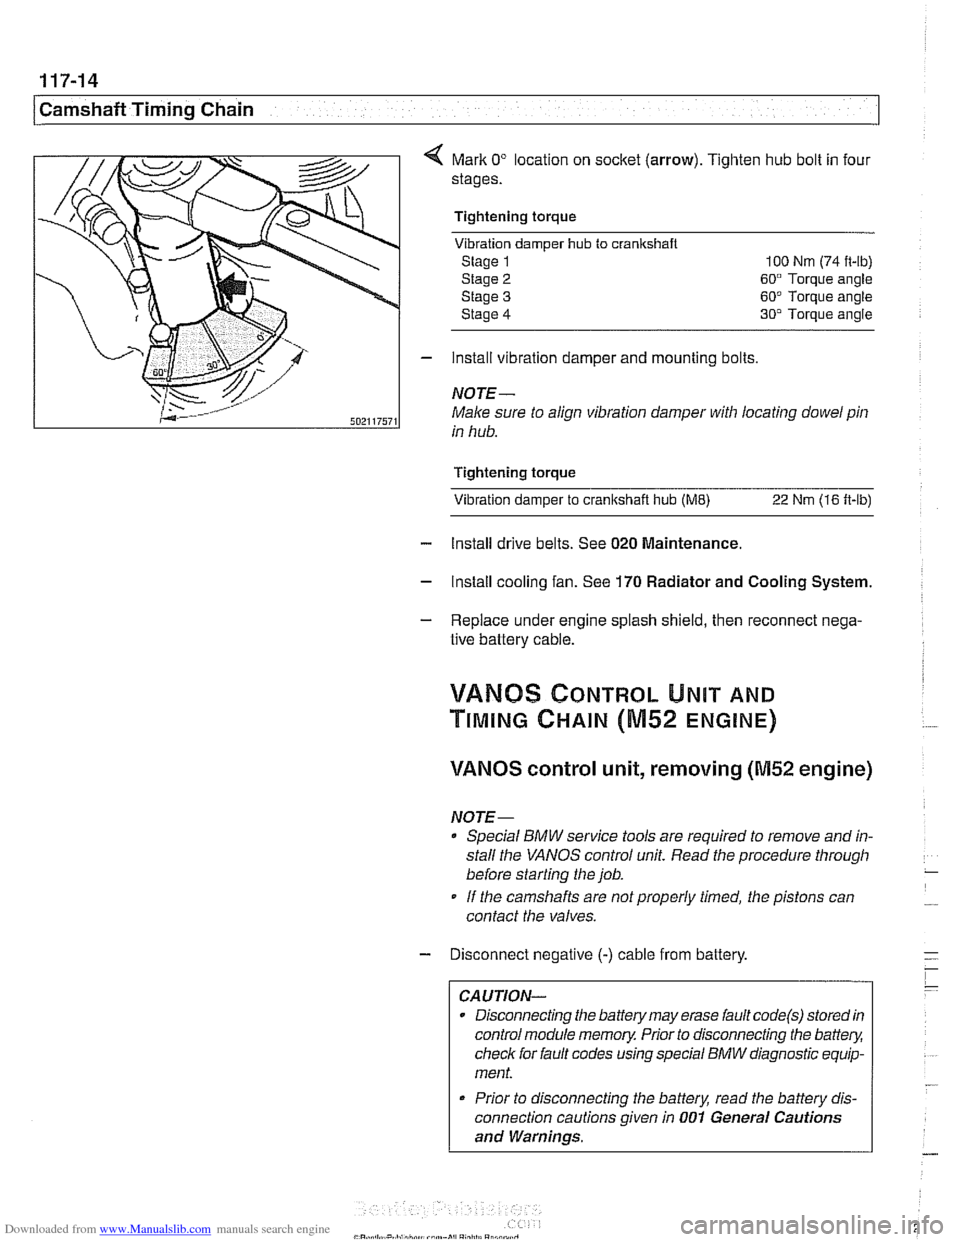
Mark 0" location on socket (arrow). Tighten hub bolt in four
stages.
Tightening torque Vibration damper
hub to cranlrshaft
Stage 1 100 Nm (74 it-lb)
Stage
2 60" Torque angle
Stage
3 60" Torque angle
Stage
4 30" Torque angle
- install vibration damper and mounting bolts
NOTE-
Male sure to align vibration damper with locating dowel pin
in hub.
Tightening torque Vibration damper to
cranltshait hub (ME) 22 Nm (16 ft-lb)
- Install drive belts. See 020 Maintenance.
- Install cooling fan. See 170 Radiator and Cooling System.
- Replace under engine splash shield, then reconnect nega-
tive battery cable.
!/ANBS CONTROL UNIT AND
TIMING CHAIN (M52 ENGINE)
VANOS control unit, removing (M52 engine)
NOTE-
Special BMW service tools are required to remove and in-
stall the
VANOS control unit. Read the procedure through
before starting the job.
If the camshafts are notproperly timed, the pistons can
contact the valves.
- Disconnect negative (-) cable from battery.
CAUTION-
Disconnecting the battery may erase fault code(s) stored in
control module memory. Prior to disconnecting the
battev,
check for fault codes using special BMW diagnostic equip-
ment.
* Prior to disconnecting the battery, read the battery dis-
connection cautions given in
001 General Cautions
and Warnings.
Page 265 of 1002
Downloaded from www.Manualslib.com manuals search engine
Camshaft Timing chain1
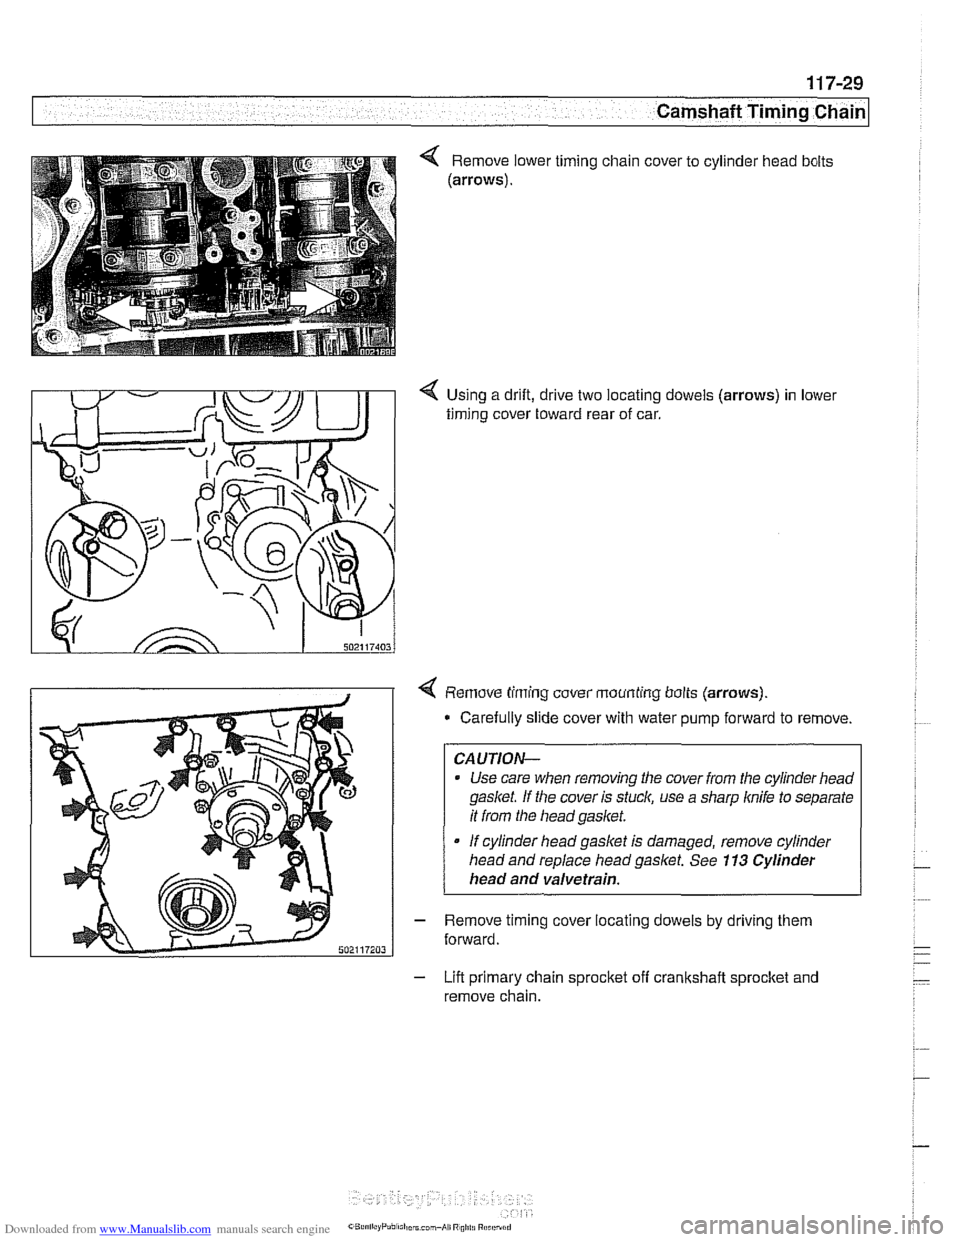
Using a drift, drive two locating dowels (arrows) in lower
timing cover toward rear of car.
4 Remove timing cover mounting bolts (arrows).
* Carefully slide cover with water pump forward to remove
CAUTION-
Use care when removing the cover from the cylinder head
gasket If the cover is stuck, use a sharp knife to separate
it from the head gasket.
If cylinder head gasket is damaged, remove cylinder
head and replace head
gaslet. See 113 Cylinder
head and valvetrain.
- Remove timing cover locating dowels by driving them
forward.
- Lift primary chain sprocket off crankshaft sprocket and
remove chain.
Page 266 of 1002
Downloaded from www.Manualslib.com manuals search engine
1 17-30
I Camshaft Timing Chain
Timing chain, installing
(M52 engine)
CAUTION-
The procedure outlined below assumes that the camshafts
and the crankshaft are
lockedin the TDCposition with BMW
special tools.
- Inspect timing chain and sprocltets and guide rails for wear.
Replace worn parts.
NOTE-
If any of the sprockets are being replaced due to wear, the
chain should also be replaced.
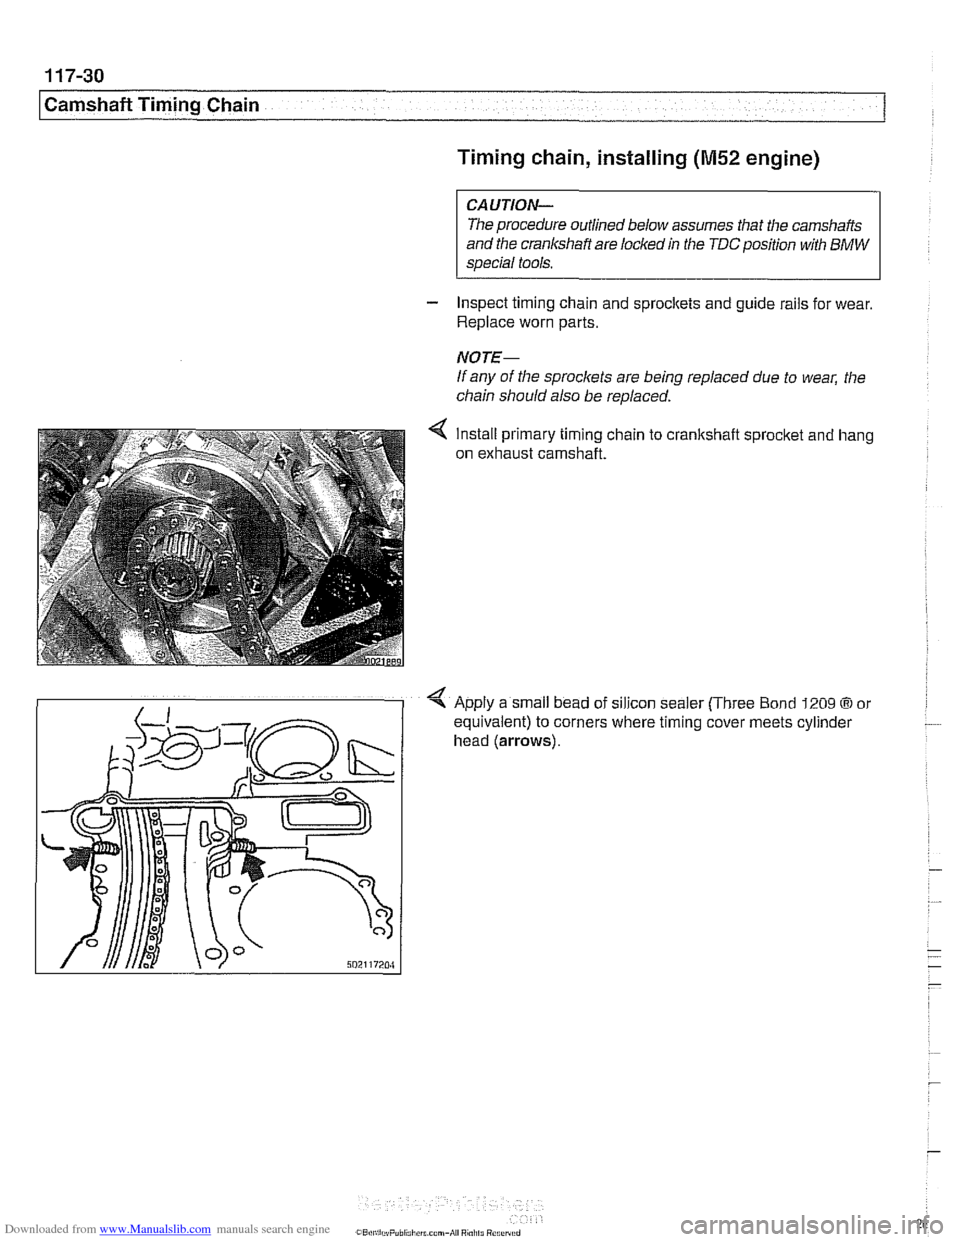
Install primary timing chain
on exhaust camshaft. to crankshait
sprocket and hang
4 Apply a small bead oi silicon sealer (Three Bond 1209 @or
equivalent) to corners where tim~ng cover meets cylinder
head
(arrows).
Page 267 of 1002

Downloaded from www.Manualslib.com manuals search engine
Camshaft Timing chain1
Tap locating dowels into cover until they protrude 2 to 3 mm
from sealing surface.
- Using new gaskets, install lower timing chain cover:
Tap cover into position to engage dowels.
Install timing chain cover fasteners and tighten to
5 Nm (44
in-lb).
Drive dowels in flush to front of cover.
. Tighten cover mounting bolts alternately and in stages.
Install cylinder head to timing chain cover fasteners and
tighten.
Tightening torques Lower timing chain cover to block
M7 15 Nm (1 1 ft-lb)
ME 20 Nm (15 it-lb)
- Replace front crankshaft radial seal. See Crankshaft oil
seal, front, replacing
(M52 engine).
Install engine oil pan using
a new gasket. See 119 Lubrica-
tion System.
Mount primary timing chain sprocket to primary
cha~n so that
arrow on sprocket faces up. Mount sprocket to camshafl so
that tapped holes in camshaft are on left side of elongated
holes in sprocket.
4 Install adjustable timing chain tensioner (BMW special tool
11 4 220). Thread tool in finger tight until slack is removed
from chain.
NOTE-
BMW special tool 11 4 220 is an adjustable timing chain ten-
sioner that simulates the function of the hydraulic tensioner.
- Check that elongated holes in primary sprocket are centered
to bolt holes in camshafl and chain is free of slack.
- Install secondary timing chain guide and secondary chain
tensioner. Tighten mounting bolts (tensioner remains
locited
down).
F81.,,l,ryT-iib.l>nii,:oni-Aii Ri"ilti R
Page 273 of 1002
Downloaded from www.Manualslib.com manuals search engine
Camshaft Timing Chain
VANOS control unit, removing
(M52 TU and M54 engines)
This procedure includes removal of the Double VANOS con-
trol unit.
NOTE-
If the Double VANOS control unit is being replaced, camshaft
timing must be checked. This procedure requires multiple
special tools. Be sure to read the procedures through before
beginning the repair.
- Working inside luggage compartment, disconnect negative
(-) battery cable.
Prior to disconnecting the
batteg read the battery discon-
nection cautions given in
001 General Cautions and
Remove engine cooling fan assembly. See 170 Radiator
and Cooling System.
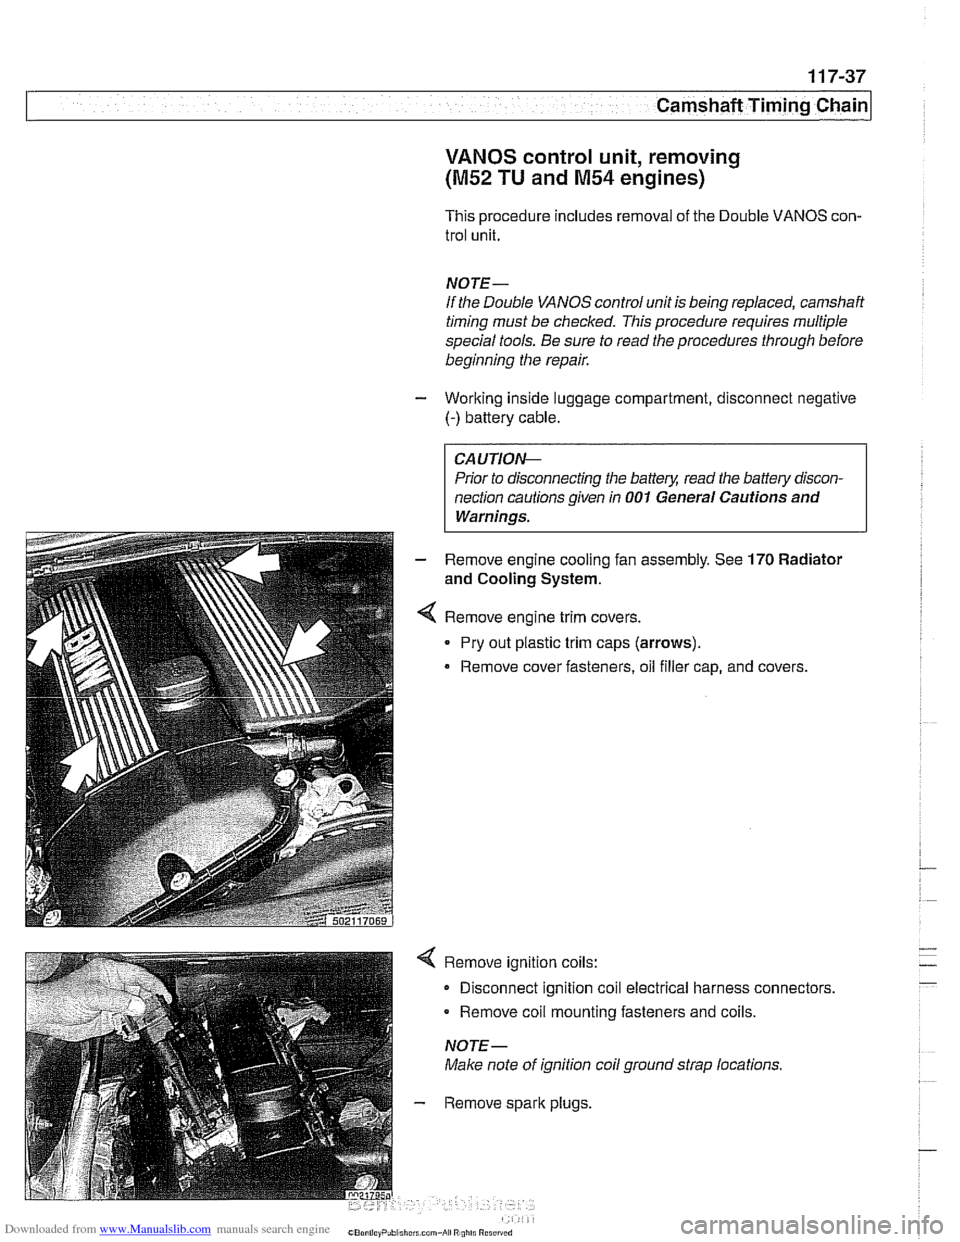
Remove engine trim covers.
Pry out plastic trim caps (arrows).
Remove cover fasteners, oil filler cap, and covers.
Remove ignition coils:
Disconnect ignition coil electrical harness connectors.
Remove coil mounting fasteners and coils.
NOTE-
Make note of ignition coil ground strap locations.
Remove spark plugs,
Page 277 of 1002
Downloaded from www.Manualslib.com manuals search engine
Camshaft Timing Chain
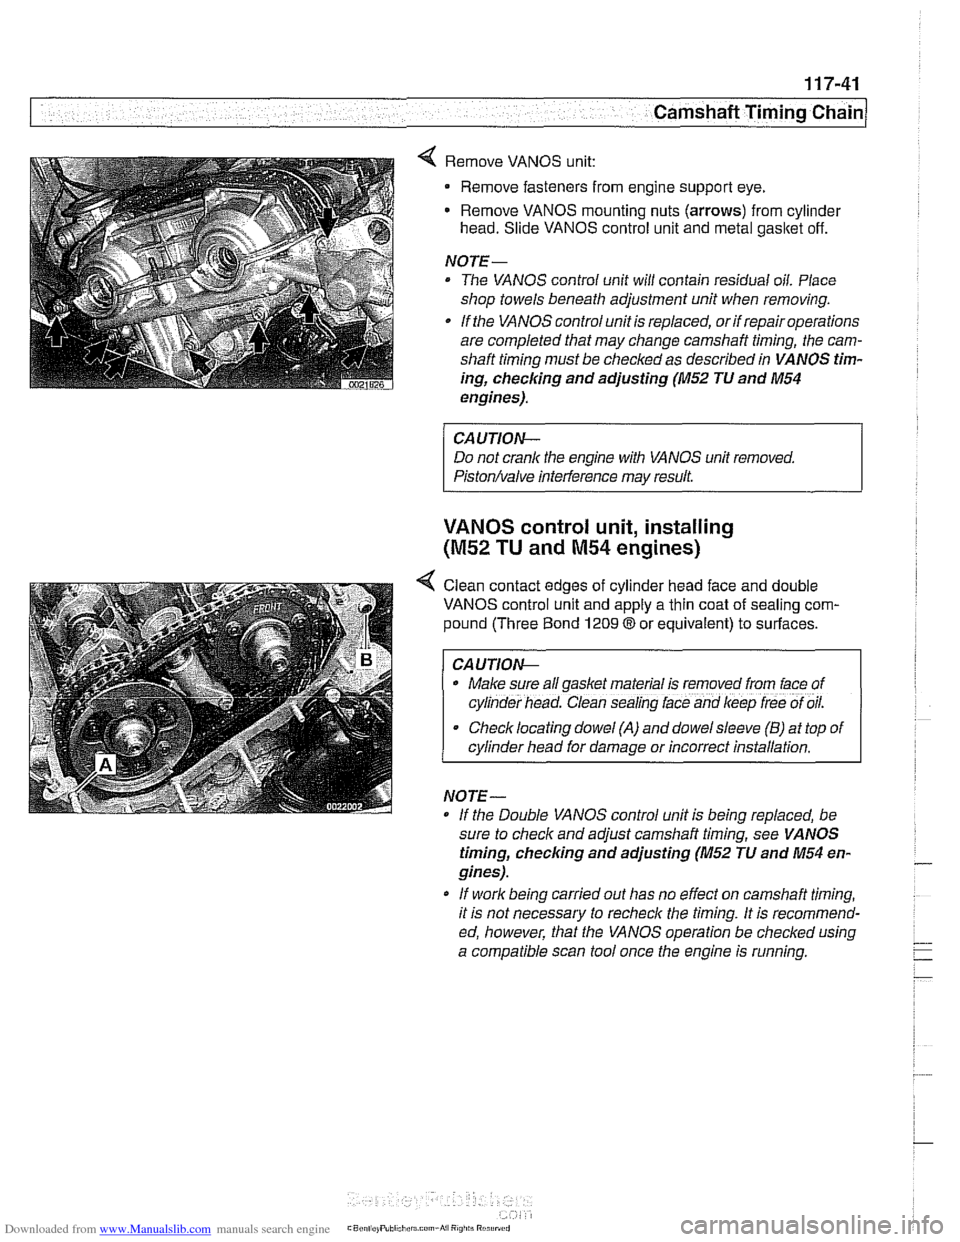
4 Remove VANOS unit:
Remove fasteners from engine support eye.
Remove VANOS mounting nuts (arrows) from cylinder
head. Slide VANOS control unit and metal gasltet off.
NOJE-
The VANOS control unit will contain residual oil. Place
shop towels beneath adjustment unit when removing.
If the VANOS control unit is replaced, or if repair operations
are completed that may change camshaft timing, the cam-
shaft timing must be checked as described in VANOS tim-
ing,
checlcing and adjusting (M52 JU and M54
engines).
CAUJION-
Do not crank the engine with VANOS unit removed.
Piston/valve interference may result.
VANOS control unit, installing
(M52 TU and M54 engines)
< Clean contact edges of cylinder head face and double
VANOS control unit and apply a thin coat of sealing com-
pound (Three Bond
1209 8 or equivalent) to surfaces.
I CAUJION-
. Make sure all gaskel material is removed from lace of
cyl~nder head. Clean sealing lace and keep lree of oil.
Checklocating dowel (A) and dowelsleeve (B) at top of
cylinder head for damage or incorrect installation.
NO
JE -
If the Double VANOS control unit is beino reolaced. be -.
sure to check and adjust camshaft timing, see VA NOS
timing, checking and adjusting (M52 JU and M54 en-
gines).
* If work being carried out has no effect on camshaft timing,
it is not necessary to recheck the timing. It is recommend-
ed, however, that the VANOS operation be checked using
a compatible scan tool once the engine is running.
Page 278 of 1002
Downloaded from www.Manualslib.com manuals search engine
I Camshaft Timing Chain
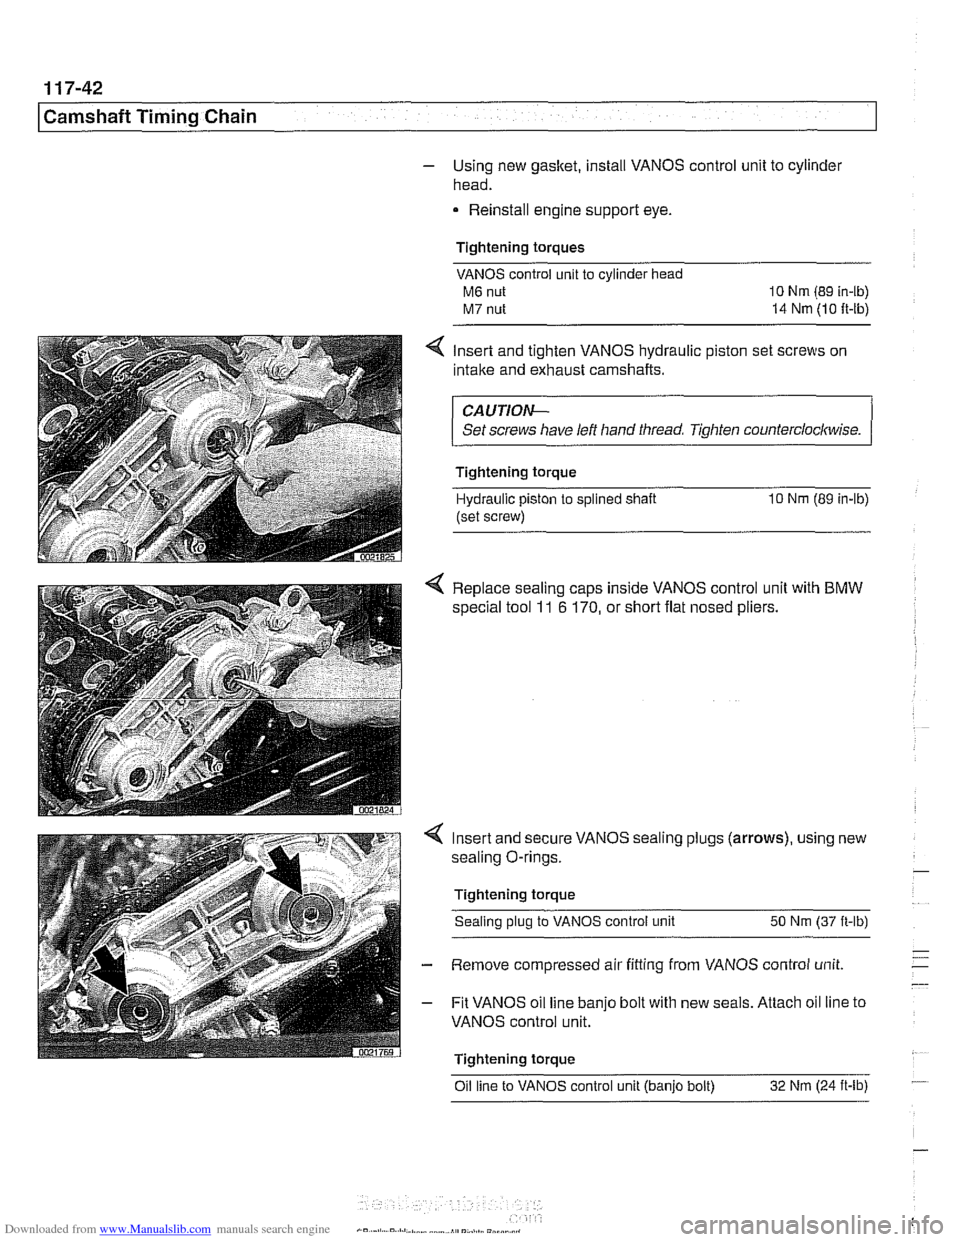
- Using new gasket, install VANOS control unit to cylinde~
head.
Reinstall engine support eye.
Tightening torques VANOS control unit to cylinder head
M6 nut 10 Nm (89 in-lb)
M7 nut 14 Nm (10 ft-ib)
4 Insert and tighten VANOS hydraulic piston set screws on
intake and exhaust camshafts.
CAUTIOI\C
Set screws have left hand thread Tighten counterclocltwise.
Tightening torque
Hydraulic piston
to splined shaft 10 Nm (89 in-lb)
(set screw)
4 Replace sealing caps inside VANOS control unit with BMW
special tool 11 6 170, or short flat nosed pliers.
Insert and secure VANOS sealing plugs (arrows), using new
sealing O-rings.
Tightening torque Sealing plug to VANOS control unit 50 Nm (37
it-lb)
Remove compressed air fitting from VANOS control unit
Fit VANOS oil line banjo bolt with new seals. Attach oil line to
VANOS control unit.
Tightening torque Oil line to VANOS control unit (banjo bolt) 32
Nm (24
it-lb) -