instrument cluster BMW 525I SPORT WAGON 2002 Owners Manual
[x] Cancel search | Manufacturer: BMW, Model Year: 2002, Model line: 525I SPORT WAGON, Model: BMW 525I SPORT WAGON 2002Pages: 186, PDF Size: 2.77 MB
Page 4 of 186

Contents
© 2001 Bayerische Motoren Werke
Aktiengesellschaft
Munich, Germany
Reprinting, including excerpts, only with the
written consent of BMW AG, Munich.
Order No. 01 41 0 156 213
US English VIII/2001
Printed in Germany
Printed on environmentally friendly paper
(bleached without chlorine, suitable for recycling).
Overview
Controls and features
Cockpit14
Instrument cluster15
Indicator and warning lamps19
Steering wheel with multifunction
buttons22
Warning triangle23
First-aid kit23
Refueling24
Fuel specifications25
Tire inflation pressure26
Locks and security systems:
Keys32
Central locking system32
Opening and closing Ð via the
door lock33
Opening and closing Ð via the
remote control34
Opening and closing Ð from the
inside37
Luggage compartment lid/
Tailgate38
Rear window40
Luggage compartment42
Alarm system42
Electric power windows44
Sliding/tilt sunroof46
Adjustments:
Correct sitting posture48
Seats48
Manually-adjusted seat49
Electric power seats50
Head restraints52
BMW actice seat52
Safety belts53
Seat, mirror and steering wheel
memory54
Seat heating55
Adjusting steering wheel56
Heated steering wheel56
Mirrors57
Passenger safety systems:
Airbags58
Transporting children safely61
Vehicle Memory, Key
Memory64
Driving:
Steering/Ignition lock66
Starting the engine66
Switching off the engine68
Parking brake68
Manual transmission69
Automatic transmission70
Automatic transmission with
Steptronic73
Indicator/Headlamp flasher76
Washer/Wiper system/Rain
sensor76
Cruise control78
Everything under control:
Odometer, outside temperature
display80
Tachometer81
Energy control81
Fuel gauge81
Coolant temperature gauge82
Service Interval Display82
Check Control83
Computer86
Multi-Information Display
(MID)87
Digital clock in the MID89
Computer in the MID91
Contents
Page 15 of 186
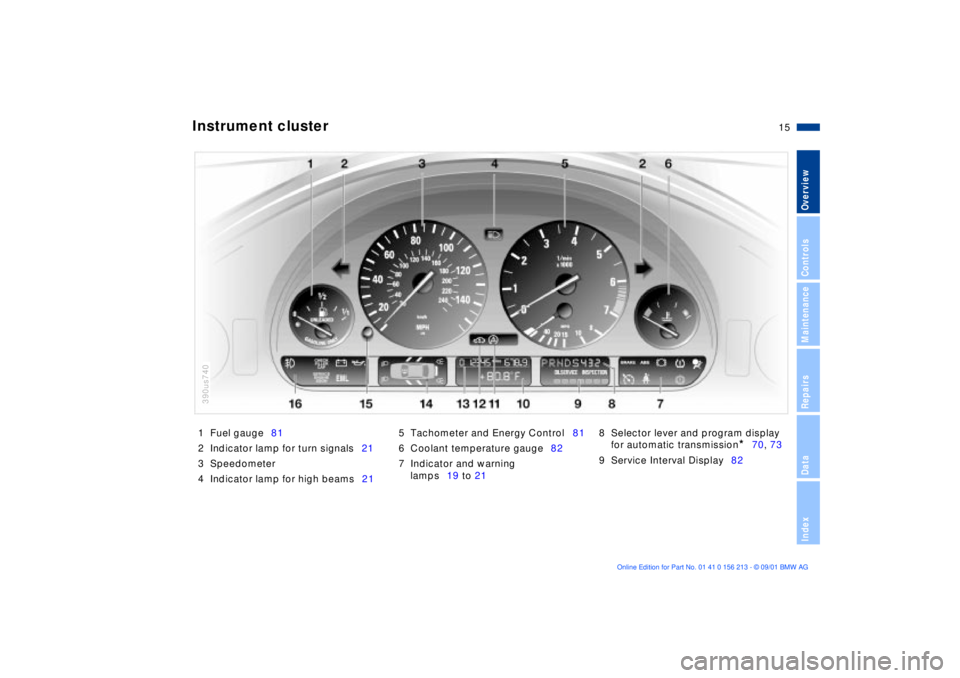
15n
OverviewControlsMaintenanceRepairsDataIndex
1 Fuel gauge81
2 Indicator lamp for turn signals21
3 Speedometer
4 Indicator lamp for high beams215 Tachometer and Energy Control81
6 Coolant temperature gauge82
7 Indicator and warning
lamps19 to 218 Selector lever and program display
for automatic transmission
*
70, 73
9 Service Interval Display82
Instrument cluster
390us740
Page 16 of 186
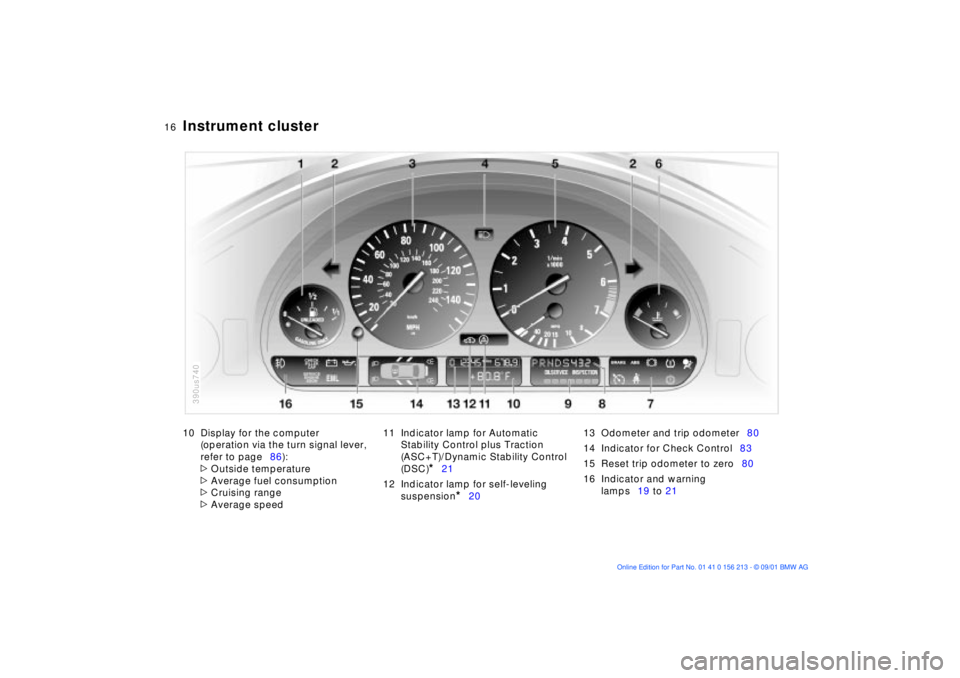
16n
Instrument cluster
10 Display for the computer
(operation via the turn signal lever,
refer to page86):
>
Outside temperature
>
Average fuel consumption
>
Cruising range
>
Average speed11 Indicator lamp for Automatic
Stability Control plus Traction
(ASC+T)/Dynamic Stability Control
(DSC)
*
21
12 Indicator lamp for self-leveling
suspension
*
2013 Odometer and trip odometer80
14 Indicator for Check Control83
15 Reset trip odometer to zero80
16 Indicator and warning
lamps19 to 21
390us740
Page 17 of 186
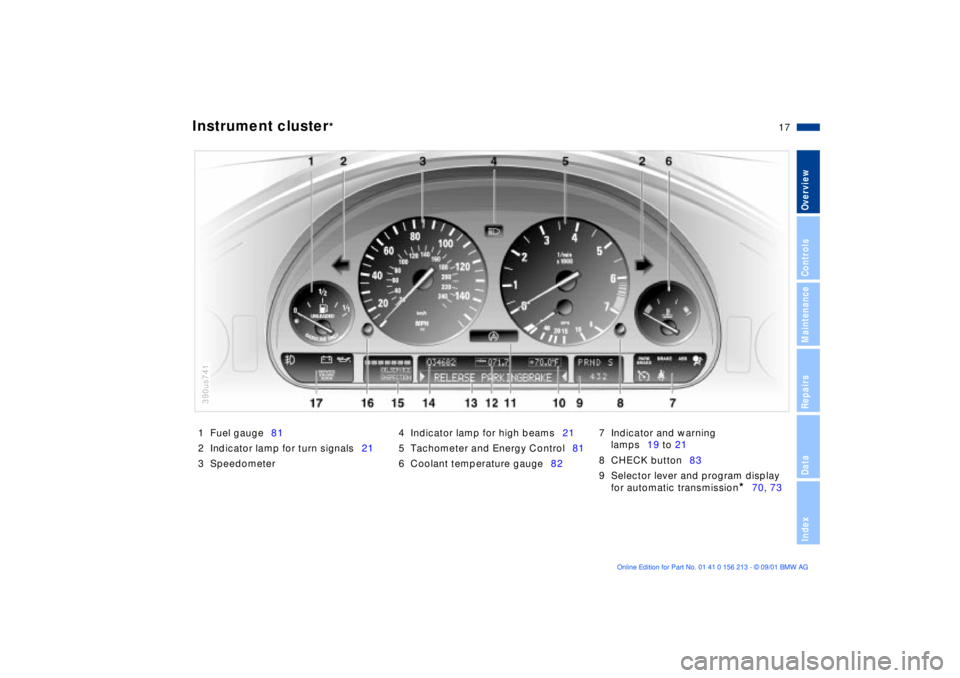
17n
OverviewControlsMaintenanceRepairsDataIndex
Instrument cluster
*
1 Fuel gauge81
2 Indicator lamp for turn signals21
3 Speedometer4 Indicator lamp for high beams21
5 Tachometer and Energy Control81
6 Coolant temperature gauge827 Indicator and warning
lamps19 to 21
8 CHECK button83
9 Selector lever and program display
for automatic transmission
*
70, 73
390us741
Page 18 of 186
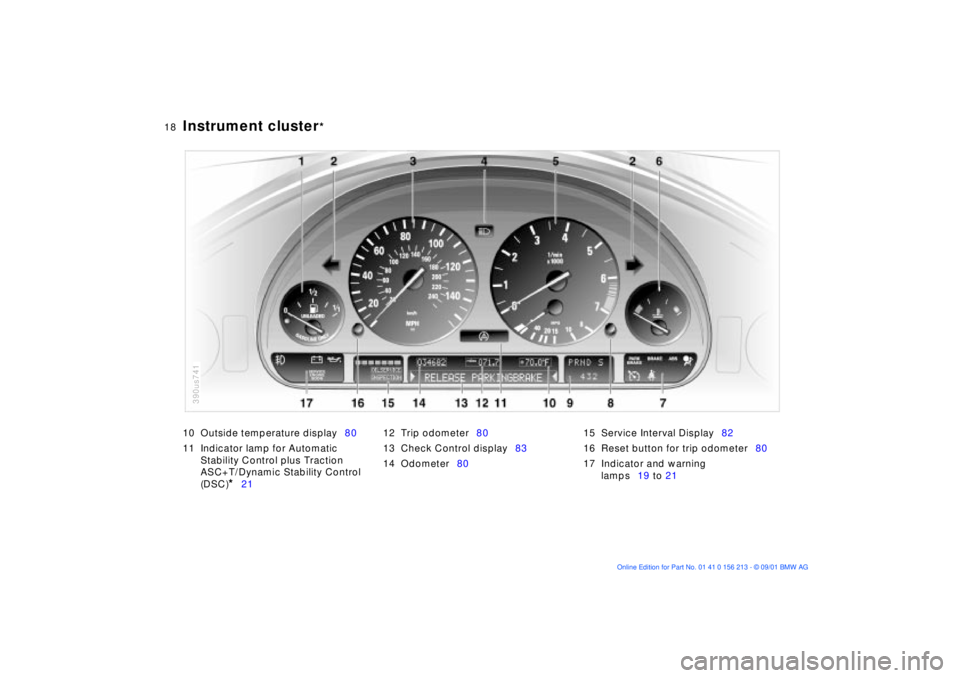
18n
Instrument cluster
*
10 Outside temperature display80
11 Indicator lamp for Automatic
Stability Control plus Traction
ASC+T/Dynamic Stability Control
(DSC)
*
2112 Trip odometer80
13 Check Control display83
14 Odometer8015 Service Interval Display82
16 Reset button for trip odometer80
17 Indicator and warning
lamps19 to 21
390us741
Page 68 of 186
68n
Switching off the engine Parking brakeTurn the ignition key to position 1 or 0.
Do not remove the ignition key
while the vehicle is rolling. The
steering locks, making it impossible to
steer the vehicle.
Always remove the ignition key and
engage the steering lock before leaving
the vehicle.
Vehicles with manual transmission:
Always engage the parking brake
when parking on hills and inclined
surfaces, as first gear or reverse may
not provide adequate resistance to
rolling.
Vehicles with automatic transmission:
Place the selector lever in "Park."<
Vehicles with automatic transmission:
The vehicle must be stationary and the
selector lever in "Park" before you can
remove the ignition key.
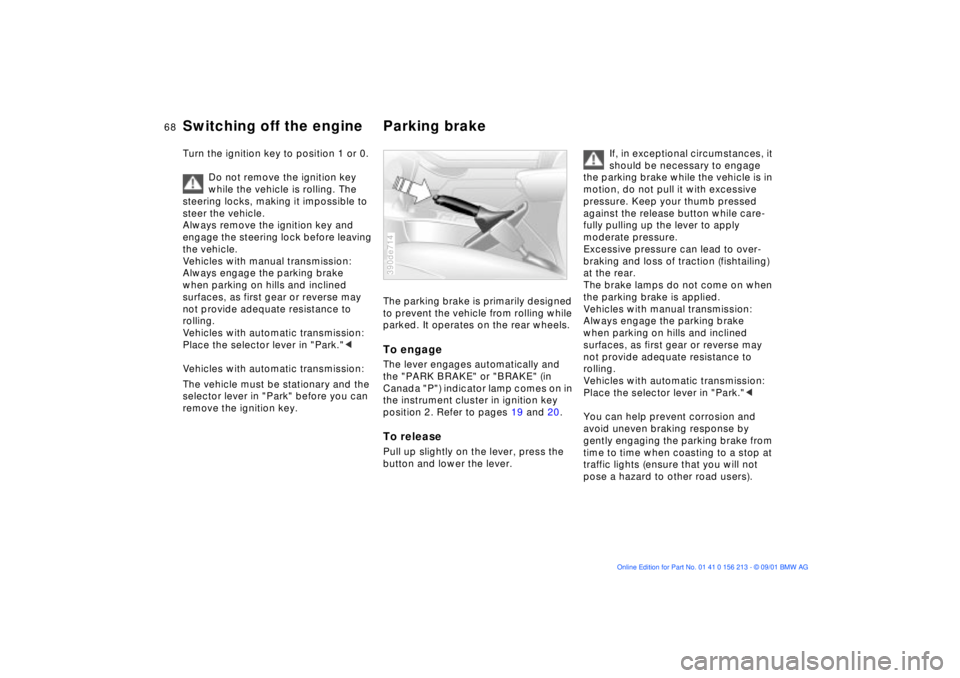
The parking brake is primarily designed
to prevent the vehicle from rolling while
parked. It operates on the rear wheels.To engageThe lever engages automatically and
the "PARK BRAKE" or "BRAKE" (in
Canada "P") indicator lamp comes on in
the instrument cluster in ignition key
position 2. Refer to pages 19 and 20.To releasePull up slightly on the lever, press the
button and lower the lever.390de714
If, in exceptional circumstances, it
should be necessary to engage
the parking brake while the vehicle is in
motion, do not pull it with excessive
pressure. Keep your thumb pressed
against the release button while care-
fully pulling up the lever to apply
moderate pressure.
Excessive pressure can lead to over-
braking and loss of traction (fishtailing)
at the rear.
The brake lamps do not come on when
the parking brake is applied.
Vehicles with manual transmission:
Always engage the parking brake
when parking on hills and inclined
surfaces, as first gear or reverse may
not provide adequate resistance to
rolling.
Vehicles with automatic transmission:
Place the selector lever in "Park."<
You can help prevent corrosion and
avoid uneven braking response by
gently engaging the parking brake from
time to time when coasting to a stop at
traffic lights (ensure that you will not
pose a hazard to other road users).
Page 75 of 186
75n
OverviewControlsMaintenanceRepairsDataIndex
Automatic transmission with Steptronic
*
ATC executes upshifts and downshifts
only when the new gear will provide a
suitable combination of vehicle and
engine speed, i.e., ATC will not execute
downshifts that would cause the engine
to overrev. The gear selected will
appear briefly in the instrument cluster
followed by the current gear.
If you are driving in the manual
mode and wish to accelerate
rapidly from low road speeds (when
passing, for instance), you must shift
down manually or with the "kickdown"
function.<
You can only change from "S/M" to
selector lever positions "P," "R," and
"N" via the "D" position.
Electronic transmission control
module
If the indicator lamp comes on
or the message "TRANS. FAIL-
SAFE PROG" appears in the
Check Control
*, there is a fault in the
transmission system.
Bring the vehicle to a stop. Move the
transmission selector lever to "P."
Engage the parking brake and turn the
engine off (ignition key to position 0).
Wait a few seconds, then start the
engine.
If the indicator lamp goes out after a
few seconds, normal transmission
performance has been restored. You
may continue to drive as usual. If the
indicator lamp does not go out, you can
place the selector lever in all positions.
However, the vehicle will now only drive
forward with limited gear selection.
If this happens, avoid extreme engine
loads and refer the problem to the
nearest BMW center.
Never perform work in the engine
compartment without first
ensuring that the transmission is in
"Park" or "Neutral" as the vehicle could
otherwise start to move off on its own.<
For jump-starting, towing and tow-
starting, refer to pages 162 and 163.
Page 78 of 186

78n
Washer/Wiper system Cruise controlThe programmed interval is deleted
>approx. 10 seconds after the lever is
placed in position 0 or
>after the engine is switched off.
When the rear window is opened, the
rear window wiper is switched off. It
must be switched on again after the
window has been closed.
For changing the wiper blade, refer to
page 150.You can store and automatically main-
tain any desired vehicle speed above
approx. 20 mph (30 km/h).
The cruise control is available whenever
the engine is running and the system
has been activated.
To activate the system From ignition key position 2:
Press the button and the indicator lamp
on the instrument cluster (refer to
page 21) will come on. You can now
use the cruise control.
Do not use cruise control on
twisting roads, when high traffic
density prevents driving at a constant
speed, or when the road surface is slick
(snow, rain, ice) or loose (rocks or
gravel, sand).< To deactivate the systemPress button as often as needed until
the indicator lamp in the instrument
cluster goes out.
Cruise control is also deactivated when
the ignition key is in position 0.
The speed stored in memory is deleted.
Page 80 of 186
80n
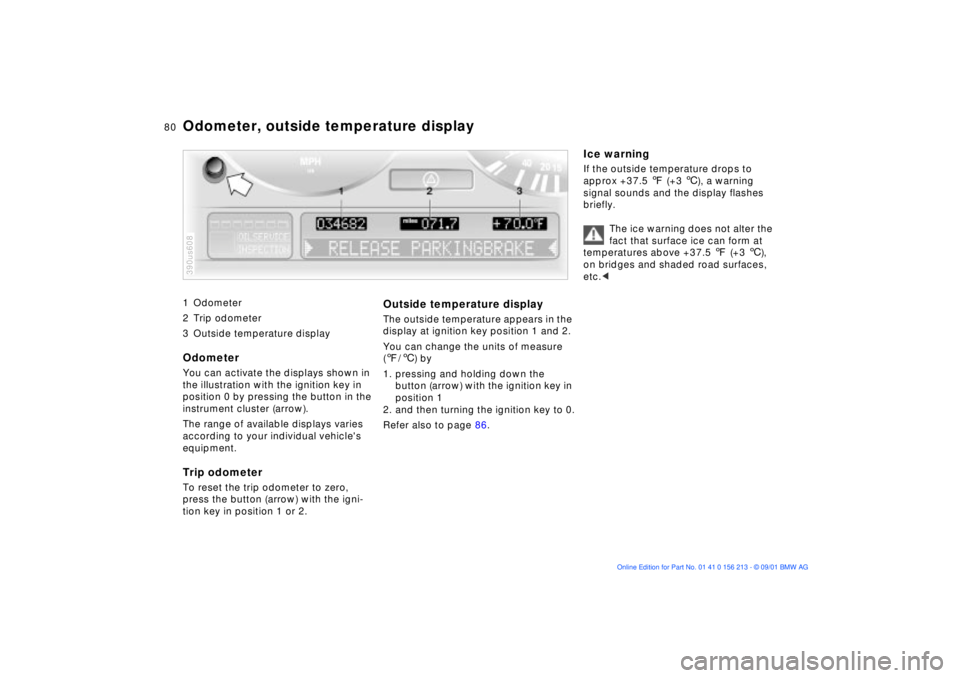
1 Odometer
2 Trip odometer
3 Outside temperature display
Odometer You can activate the displays shown in
the illustration with the ignition key in
position 0 by pressing the button in the
instrument cluster (arrow).
The range of available displays varies
according to your individual vehicle's
equipment.Trip odometerTo reset the trip odometer to zero,
press the button (arrow) with the igni-
tion key in position 1 or 2.390us608
Outside temperature displayThe outside temperature appears in the
display at ignition key position 1 and 2.
You can change the units of measure
(7/6) by
1. pressing and holding down the
button (arrow) with the ignition key in
position 1
2. and then turning the ignition key to 0.
Refer also to page 86.
Ice warningIf the outside temperature drops to
approx +37.5 7 (+3 6), a warning
signal sounds and the display flashes
briefly.
The ice warning does not alter the
fact that surface ice can form at
temperatures above +37.5 7 (+3 6),
on bridges and shaded road surfaces,
etc.<
Odometer, outside temperature display
Page 91 of 186
91n
OverviewControlsMaintenanceRepairsDataIndex
Computer in the MID
*
Only make entries when the
vehicle is standing still to avoid
endangering yourself or other road
users.<
Computer calculations begin at the
start of the journey.
Information can also be accessed for
display by remote control, refer to
page 95.
Speed limitSpeed limit entry:
You can enter the road speed at which
you wish to hear and see a reminder
signal: a signal will sound, the word
LIMIT will flash, and for a moment, the
speed limit warning stored in the
memory will appear on the instrument
cluster as an alphanumeric display
*,
along with the Check Control.
The speed limit reminder is only
repeated if the vehicle has in the
meantime been driven at least 3 mph
(approx. 5 km/h) slower.
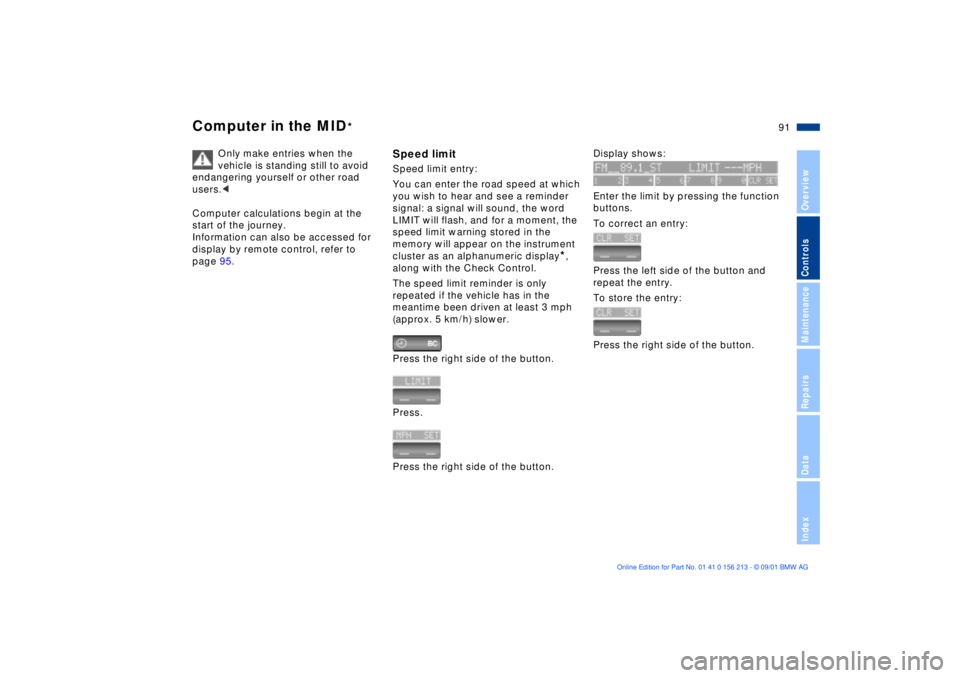
Press the right side of the button.
Press.
Press the right side of the button.
Display shows:
Enter the limit by pressing the function
buttons.
To correct an entry:
Press the left side of the button and
repeat the entry.
To store the entry:
Press the right side of the button.