Temperature sensor BMW 528i 1997 E39 Owner's Manual
[x] Cancel search | Manufacturer: BMW, Model Year: 1997, Model line: 528i, Model: BMW 528i 1997 E39Pages: 1002
Page 420 of 1002
Downloaded from www.Manualslib.com manuals search engine
Fuel Injection
Engine coolant temperature
(ECT) sensor,
testing and replacing
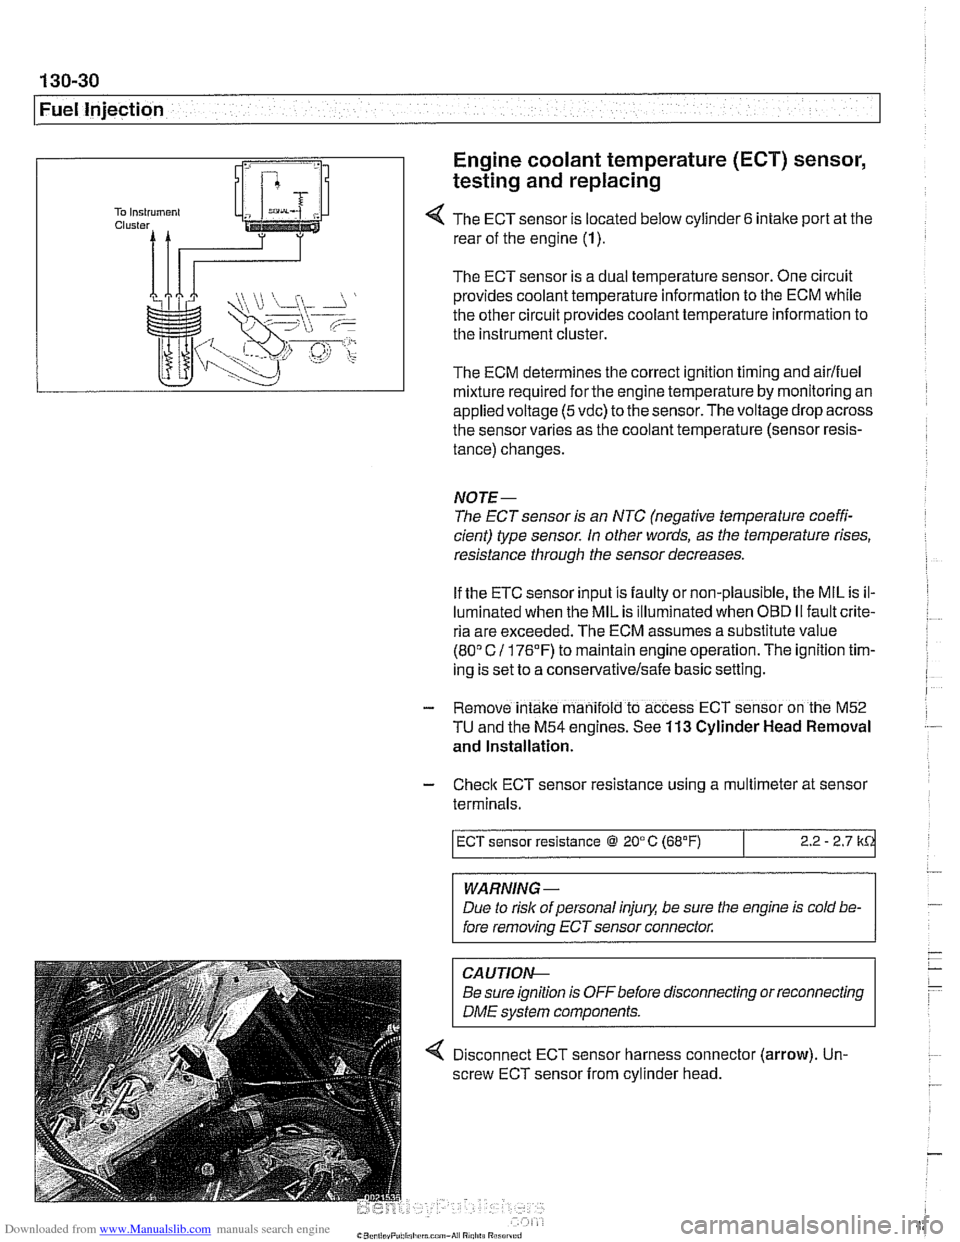
4 The ECT sensor is located below cylinder 6 intake port at the
rear of the engine (1).
The ECT sensor is a dual temperature sensor. One circuit
provides coolant temperature information to the ECM while
the other circuit provides coolant temperature information to
the instrument cluster.
The ECM determines the correct ignition timing and airlfuel
mixture required
forthe engine temperature by monitoring an
appliedvoltage
(5vdc) to the sensor.Thevoltage drop across
the sensor varies as the coolant temperature (sensor resis-
tance) changes.
NOTE-
The ECT sensor is an NTC (negative temperature coeffi-
cient) type sensor. In other words, as the temperature rises,
resistance through the sensor decreases.
If the ETC sensor input is faulty or non-plausible, the MIL is il-
luminated when the MIL is illuminated when
OED II fault crite-
ria are exceeded. The ECM assumes a substitute value
(80" C 11 76'F) to maintain engine operation. The ignition tim-
ing is set to a
conservativelsafe basic setting.
- Remove intake manifold to access ECT sensor on the M52
TU and the M54 engines. See 113 Cylinder Head Removal
and Installation.
- Check ECT sensor resistance using a multimeter at sensor
terminals.
WARNING -
Due to rislc of personal injury, be sure the engine is cold be-
fore removing ECT sensor connector.
ECT sensor resistance @ 20°C (68°F)
CAUTIOI\C
Be sure ignition is OFFbefore disconnecting or reconnecting
DME svstem components.
2.2 - 2.7 k
4 Disconnect ECT sensor harness connector (arrow). Un-
screw ECT sensor from cylinder head.
Page 421 of 1002

Downloaded from www.Manualslib.com manuals search engine
Fuel Injection
- Installation is reverse of removal:
Use new copper sealing washers when installing sensor.
Replace any lost coolant.
Tightening torque
Temperature sensor to cylinder head
13 Nm (10 ft-lb)
Intake air temperature (IAT) sensor,
testing and replacing
4 The intake airtemperature (IAT) sensor, located at the top of
I the intake manifold, adapts (fine tunes) the fuel mixture and i
T engine timing based on varying intake air temperatures.
i If the intaite air temperature signal is implausible, a fault code
! is set and the MIL is illuminated when OBD I1 fault criteria are
I exceeded. The ECM then operates the engine using the ECT
i sensor sional inout as a back uo.
type sensor. In other words,
a> the temperature rises, resis-
tance through the sensor decreases.
lid I The IATsensor can be tested using a multimeter:
/IAT sensor resistance at 20'C (68°F) 2.2 - 2.7 kd
Remove engine cover by prying off plastic trim caps (arrows)
and removing nuts below caps.
Page 422 of 1002
Downloaded from www.Manualslib.com manuals search engine
Fuel Injection
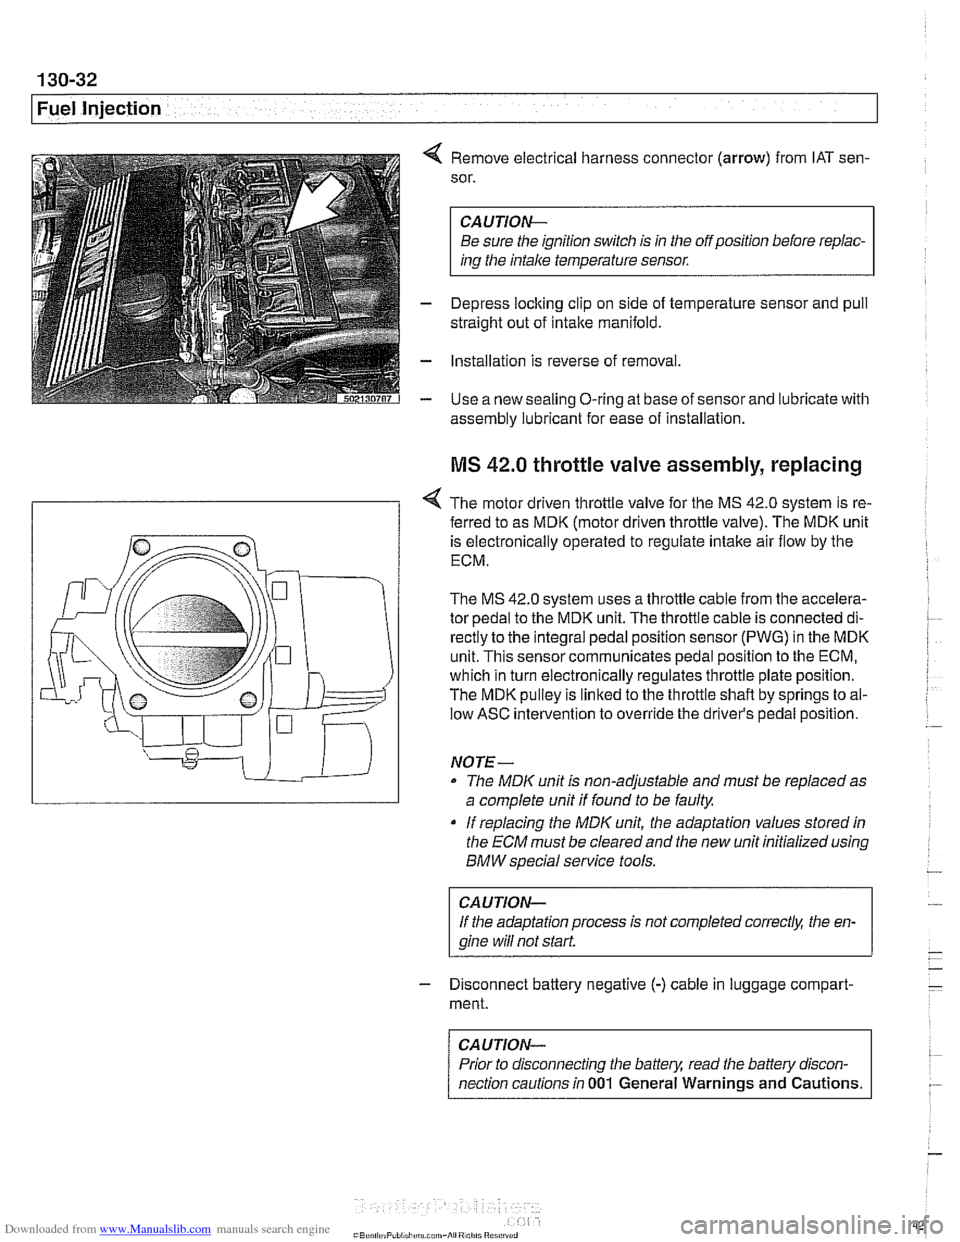
4 Remove electrical harness connector (arrow) from IAT sen-
sor.
CAUTION-
Be sure the ignition switch is in the off position before repiac-
ins the intake temperature sensor.
- Depress loclting clip on side of temperature sensor and pull
straight out of intake manifold.
- Installation is reverse of removal
- Use a new sealing O-ring at base of sensor and lubricate with
assembly lubricant for
ease of installation
MS 42.0 throttle valve assembly, replacing
< The motor driven throttle valve for the MS 42.0 system is re-
- ferred to as MDK (motor driven throttle valve). The MDK unit
is electronically operated to regulate intake air flow by the
ECM.
The
MS 42.0 system uses a throttle cable from the accelera-
tor pedal to the MDK unit. The throttle cable is connected di-
rectly to the integral pedal position sensor
(PWG) in the MDK
unit. This sensor communicates pedal position to the ECM,
which in turn electronically regulates throttle plate position.
The MDK pulley is linked to the throttle shaft by springs to al-
low ASC intervention to override the driver's pedal position.
NO TE -
The MDIC unit is non-adjustable and must be replaced as
a complete unit if found to be faulty.
if replacing the
MDK unit, the adaptation values stored in
the ECM must be clearedand the new unit initialized using
BMW special service tools.
CAUTION-
If the adaptation process is not completed correct& the en-
gine wiii
not start.
- Disconnect battery negative (-) cable in luggage compart-
ment.
CAUTION-
Prior to disconnecting the battern read the battely discon-
nection cautions in
001 General Warnings and Cautions.
Page 423 of 1002
Downloaded from www.Manualslib.com manuals search engine
Fuel lniection I
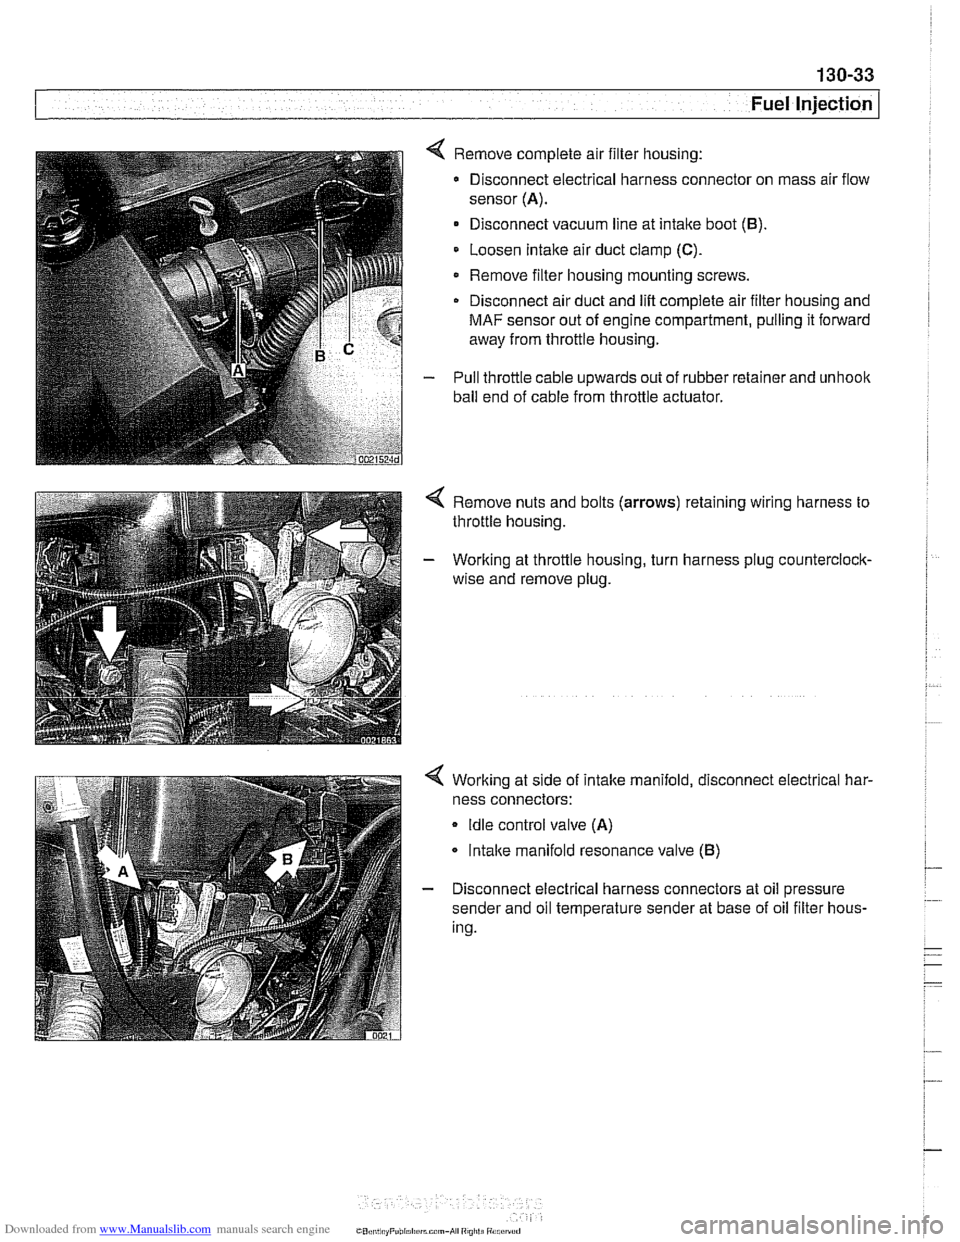
4 Remove complete air filter housing:
Disconnect electrical harness connector on mass air flow
sensor
(A).
Disconnect vacuum line at intake boot (B).
Loosen Intake air duct clamp (C).
Remove filter housing mounting screws
Disconnect air duct and
lift complete air filter housing and
MAF sensor out of engine compartment, pulling it forward
away from throttle housing.
- Pull throttle cable upwards out of rubber retainer and unhoolc
ball end of cable from throttle actuator.
4 Remove nuts and bolts (arrows) retaining wiring harness to
throttle housing.
- Working at throttle housing, turn harness plug counterclock-
wise and remove plug.
4 Working at side of intake manifold, disconnect electrical har-
ness connectors:
Idle control valve (A)
lntalce manifold resonance valve (B)
- Disconnect electrical harness connectors at oil pressure
sender and oil temperature sender at base of oil filter hous-
ing.
CO,l,> ti,, "F"bl,rl,irrm.,-AI ",",>ti
Page 433 of 1002
![BMW 528i 1997 E39 Owners Manual Downloaded from www.Manualslib.com manuals search engine
130-43
Fuel Injection ]
I I I
12 llnput IFeedback signal, engine start /Starter
Table c. Siemens MS 42.0 and MS 43.0 ECM pin assignments BMW 528i 1997 E39 Owners Manual Downloaded from www.Manualslib.com manuals search engine
130-43
Fuel Injection ]
I I I
12 llnput IFeedback signal, engine start /Starter
Table c. Siemens MS 42.0 and MS 43.0 ECM pin assignments](/img/1/2822/w960_2822-432.png)
Downloaded from www.Manualslib.com manuals search engine
130-43
Fuel Injection ]
I I I
12 llnput IFeedback signal, engine start /Starter
Table c. Siemens MS 42.0 and MS 43.0 ECM pin assignments (continued)
I I - I
13 Input /I Alternator (generator) Notes
Throttle
valve
Crankshaft position sensor
Throttle valve (MS
42.0)
Throttle valve
Pin
6
7
8
9
10
11
14
15
16
17
18
19
20
I 1- I
23 l~round I~round, intaite air temperature sensor /Intake air temperature sensor
Signal
Output
Input
Input
Input
I I I
Component/function
Not used
Throttle valve supply potentiometer
2
Signal, crankshaft position sensor
Signal,
pedal position sensor 2 (MS 42.0)
Signal, throttle position sensor 1
Not used
Ground
Ground
Input
Ground
Ground
Input
Ground Cranltshaft position sensor
21
24
25
26
27
28
29
30
I 1- I
33 1 input ISignal, cylinder 1 fuel injector /cylinder 1 fuel injector
Ground, throttle position sensor (MS
42.0)
Ground, exhaust camshaftsensor I
Signal, pedal position sensor 1 (MS 42.0)
Ground, mass air flow sensor
Ground, intake camshaft sensor
1
Signal, throttle potentiometer 1
Ground, throttle position sensor
22 loutput I~ignal, intake air temperature Ilntake air temperature sensor
I I - I
Throttle
valve (MS 42.0)
Camshaft position sensor I
Throttle valve (MS
42.0)
Hot film mass air flow sensor
Camshaft position sensor i
Throttle valve
Throttle valve
Ground
Output
Ground Input
Output
Ground
Output
Out~ut
Ground, crankshaft position sensor
Knoclt sensor
31
34
35
36
37
38
39
Signal, coolant temperature sensor
Ground, coolant temperature sensor
Signal,
oil pressure
Signal, engine
oil temperature sensor
Ground, engine oil temperature sensor
Signal, knock sensor
Signal, knock sensor
32 loutput ISignal, ltnock sensor l~nock sensor
40
41
Coolant temperature sensor
Coolant temperature sensor
Oil pressure switch
Oil temperature sensor
Oil temperature sensor
Knoclt sensor
I
Input
input
Input
Input
Input
Inout
Signal, knock sensor
Input
Input Signal, cylinder
2 fuel injector
Signal, cylinder
3 fuel injector
Signal, cylinder
4 fuel injector
Signal, cylinder
5 fuel injector
Signal, cylinder
6 fuel injector
Sianai, oil level sensor Cylinder
2 fuel
injector
Cylinder
3 fuel injector
Cylinder
4 fuel injector
Cylinder
5 fuel injector
Cylinder
6 fuel injector
Oil level sensor
-
Signal. VANOS inlet valve
Signal. VANOS outlet valve VANOS
inlet valve
VANOS outlet valve
Page 443 of 1002
Downloaded from www.Manualslib.com manuals search engine
Fuel Injection I
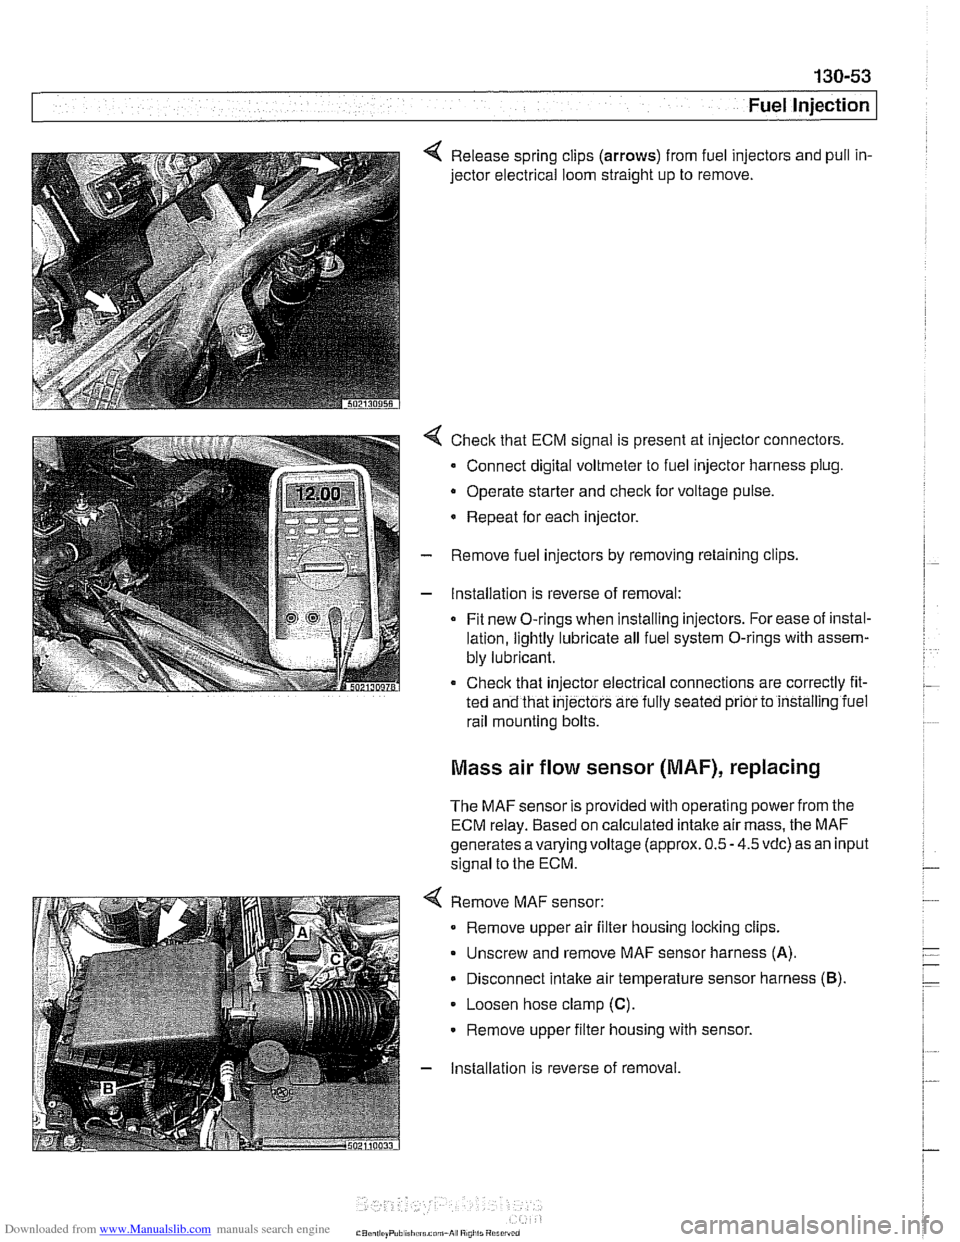
4 Release spring clips (arrows) from fuel injectors and pull in-
jector electrical loom straight up to remove.
4 Check that ECM signal is present at injector connectors.
- Connect digital voltmeter to fuel injector harness plug.
Operate starter and
check for voltage pulse.
* Repeat for each injector.
- Remove fuel injectors by removing retaining clips
- Installation is reverse of removal:
Fit new O-rings when installing injectors. For ease of instal-
lation, lightly lubricate all fuel system O-rings with assem-
bly lubricant.
Check that injector electrical connections are correctly fit-
ted and that
injectors are fully seated prior to installing iuel
rail mounting bolts.
Mass air flow sensor (MAF), replacing
The MAF sensor is provided with operating power from the
ECM relay. Based on calculated intake air mass, the MAF
generates
avarying voltage (approx. 0.5 - 4.5 vdc) as an input
signal to the ECM.
4 Remove MAF sensor:
Remove upper air filter housing locking clips.
Unscrew and remove MAF sensor harness
(A).
Disconnect intake air temperature sensor harness (B).
Loosen hose clamp (C).
Remove upper filter housing with sensor.
- Installation is reverse of removal
Page 445 of 1002
Downloaded from www.Manualslib.com manuals search engine
Fuel Injection
- If voltage is present as described above, check wiring be-
tween ECM and valve. If no wiring faults are found, check
ECM signal to valve.
- When replacing idle speed control valve, clean and inspect
all sealing areas.
. Inspect sealing ring in throttle body and replace if neces-
sary.
Throttle position sensor (TPS),
testing and replacing
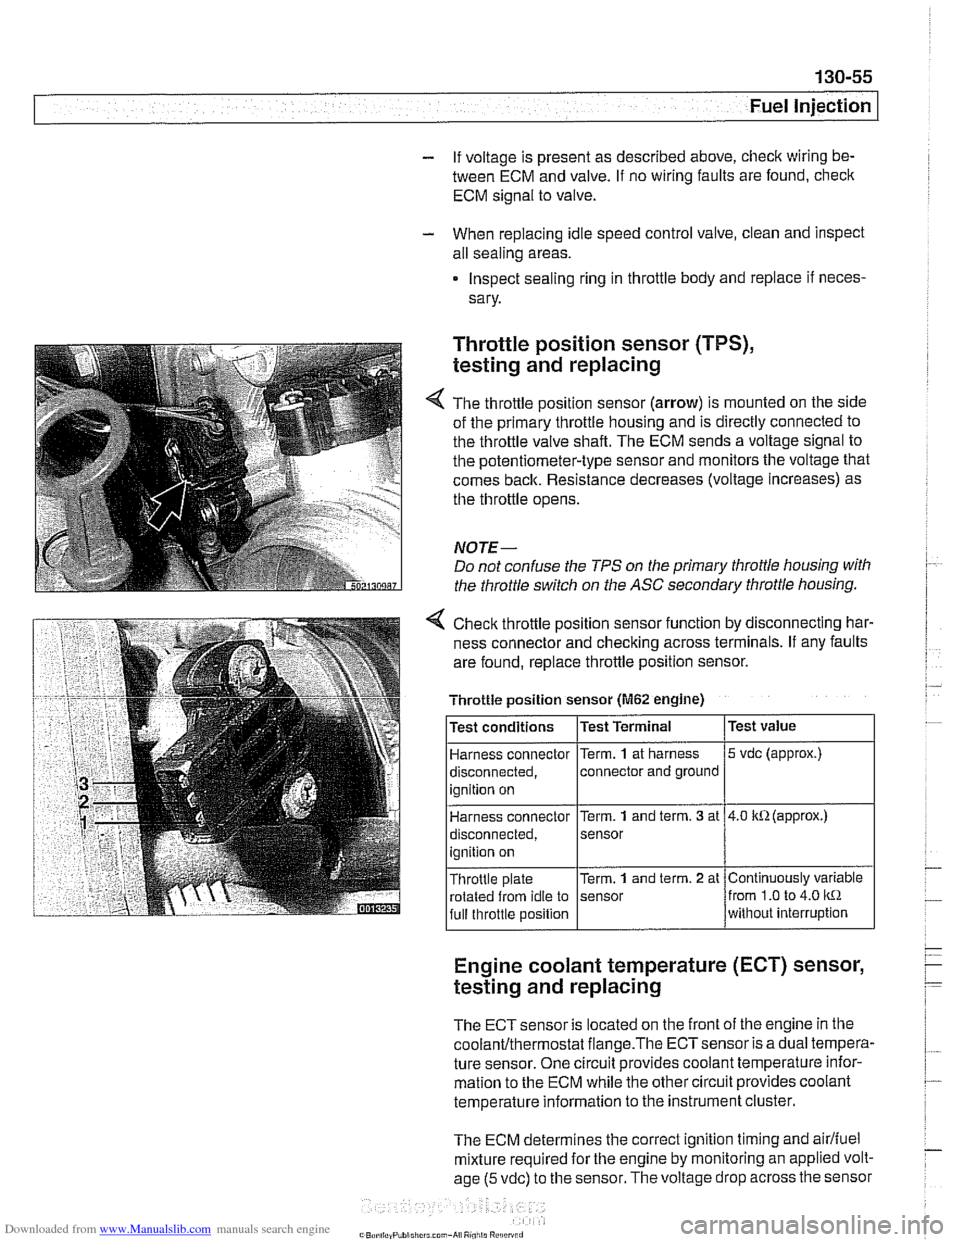
The throttle position sensor (arrow) is mounted on the side
of the primary throttle housing and is directly connected to
the throttle valve shaft. The ECM sends a voltage signal to
the potentiometer-type sensor and monitors the voltage that
comes back. Resistance decreases (voltage increases) as
the throttle opens.
NOTE-
Do not confuse the TPS on the primary throttle housing with
the throttle switch on the
ASC secondary throttle housing.
4 Check throttle position sensor function by disconnecting har-
ness connector and checking across terminals. If any faults
are found, replace throttle position sensor.
Engine coolant temperature (ECT) sensor,
testing and replacing
Throttle position sensor (M62 engine)
The ECT sensor is located on the front of the engine in the
coolanVthermostat flange.The ECTsensor is a dual tempera-
ture sensor. One circuit provides coolant temperature infor-
mation to the ECM while the other circuit provides coolant
temperature information to the instrument cluster.
The ECM determines the correct ignition timing and
airlfuel
mixture required for the engine by monitoring an applied volt-
age
(5 vdc) to the sensor. The voltage drop across the sensor
Test
value
5 vdc (approx.)
4.0 kR(approx.)
Continuously variable
from
1.0 to 4.0 kR
without interruption
Test
conditions
Harness connector
disconnected, ignition on
Harness connector
disconnected,
ignition on
Throttle plate rotated from idle to
full throttle position Test Terminal
Term.
1 at
harness
connector and ground
Term.
1 and term. 3 at
sensor
Term.
1 and term. 2 at
sensor
Page 446 of 1002
Downloaded from www.Manualslib.com manuals search engine
I Fuel lniection
varies as the coolant temperature (sensor resistance) chang-
es.
NOTE-
The ECT sensor is an NTC (negative temperature coeff-
cient) type sensor. In other words, as the temperature rises,
resistance through the sensor decreases.
If the ETC sensor input is faulty or non-plausible, the MILis il-
luminated when OBD
II fault criteria are exceeded. The ECM
assumes a substitute value
(8OoC/176"F) to maintain engine
operation. The ignition timing is set to a
conservativelsafe ba-
sic setting.
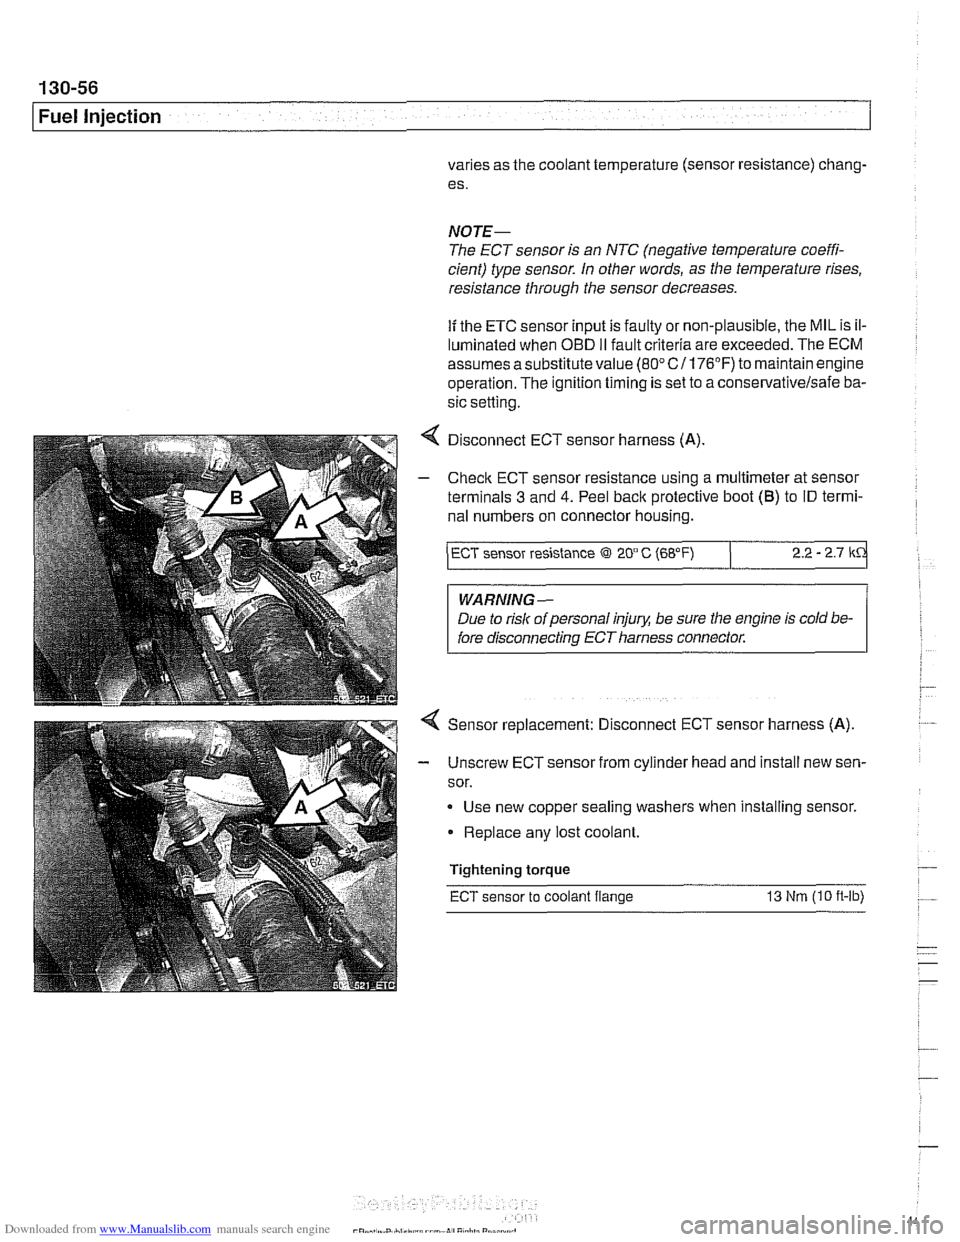
4 Disconnect ECT sensor harness (A)
- Checlc ECT sensor resistance using a multimeter at sensor
terminals
3 and 4. Peel back protective boot (B) to ID termi-
nal numbers on connector housing.
/ ECT sensor resistance @l 2O" C (68°F) 2.2 - 2.7 kd
WARNING -
Due to risk of personal injug be sure the engine is cold be-
fore disconnecting ECT harness connector.
Sensor replacement: Disconnect ECT sensor harness (A).
- Unscrew ECT sensor from cylinder head and install new sen-
sor.
Use new copper sealing washers
when installing sensor.
Replace any lost coolant.
Tightening torque
ECT sensor to coolant flange 13 Nm (I0 it-lb)
Page 447 of 1002
Downloaded from www.Manualslib.com manuals search engine
Fuel Injection
Intake air temperature
([AT) sensor,
testing and replacing
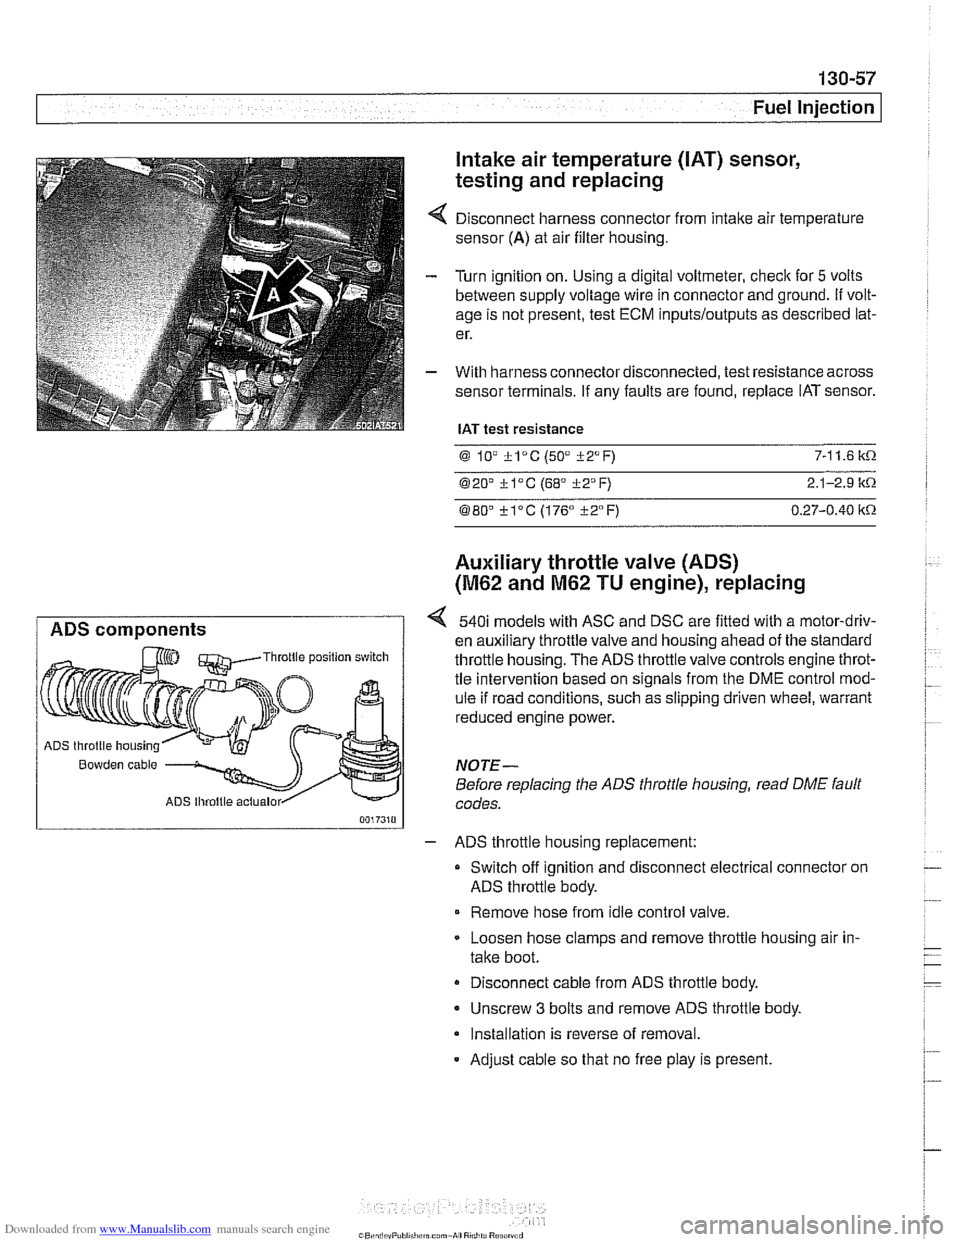
Disconnect harness connector from intake air temperature
sensor
(A) at air filter housing.
Turn ignition on. Using a digital voltmeter, check for
5 volts
between supply voltage wire in connector and ground.
If volt-
age is not present, test ECM
inputs/outputs as described lat-
er.
With harness connector disconnected, test resistance across
sensor terminals. If any faults are found, replace IAT sensor.
IAT test resistance
0 lV *lac (50" i-2°F) 7-1 1.6 k.0.
020' kl°C (68' 322°F) 2.1-2.9 it.0.
080" ?lac (176" i-2°F) 0.27-0.40 itn
Auxiliary throttle valve (ADS)
(M62 and M62 TU engine), replacing
ADS components 540i models with ASC and DSC are fitted with a motor-driv-
en auxiliary throttle valve and housing ahead of the standard Throttle position switch throttle housing. The ADS throttle valve controls engine throt-
tle intervention based on signals from the DME control mod-
ule if road conditions, such as slipping driven wheel, warrant
reduced engine power.
ADS throttle housing
Bowden cable NOTE-
Before replacing the ADS throttle housing, read DME fault
ADS lhroltle actualor codes.
- ADS throttle housing replacement:
Switch off ignition and disconnect electrical connector on
ADS throttle body.
Remove hose from idle control valve.
Loosen hose clamps and remove throttle housing air in-
take boot.
Disconnect cable from ADS throttle body.
- Unscrew 3 bolts and remove ADS throttle body.
Installation is reverse of removal.
- Adjust cable so that no free play is present.
Page 449 of 1002
Downloaded from www.Manualslib.com manuals search engine
130-59
Fuel Injection
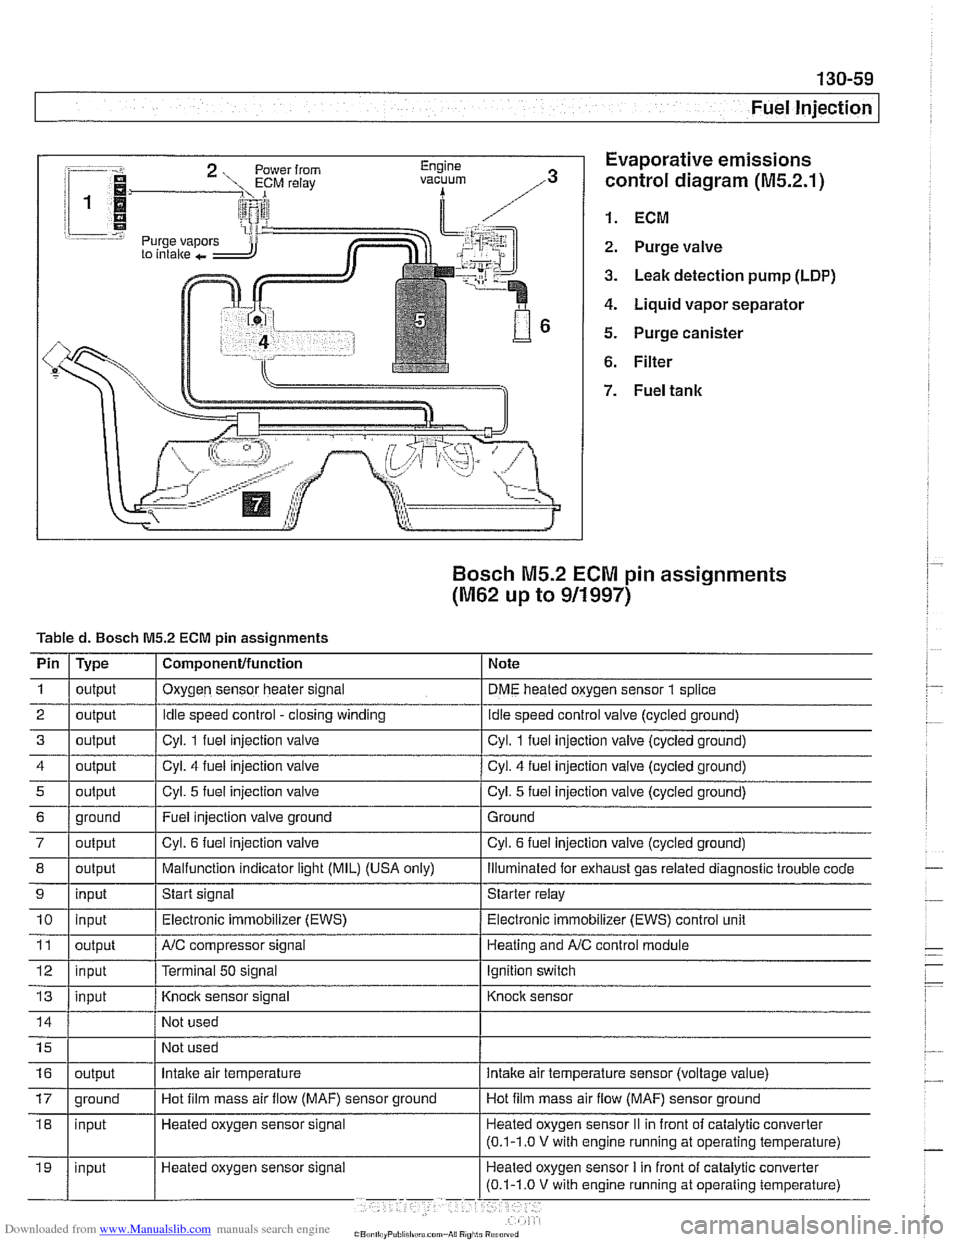
:-- -i. Evaporative emissions
1.
control diagram (M5.2.1)
i 1
i I @ 1. ECM r.=.:-:, 2. Purge valve
3. Leak detection pump (LDP)
4. Liquid vapor separator
5. Purge canister
6. Filter
Bosch M5.2 ECM pin assignments
(M62 up to 911997)
Tabled. Bosch M5.2 ECM pin assignments
I' 1- 1. . . -
4 1 output / Cyl. 4 fuel injection valve I Cyl. 4 fuel injection valve (cycled ground)
Pin
1
2
3
i I
I
7 / output I Cyl. 6 fuel injection valve I Cyl. 6 fuel injection valve (cycled ground)
Type
output
output
output
I I ,
8 1 output I Malfunction indicator light (MIL) (USA only) I lliumlnated for exhaust gas related diagnostic trouble code
5
Component/function
Oxygen sensor heater signal
Idle speed control -closing winding
Cvl. 1 fuel iniection valve Note
DME heated oxygen sensor
1 splice
idle speed control valve (cycled ground)
Cvl. 1 fuel iniection valve lcvcled around)
6 1 ground I Fuel injection valve ground 1 Ground
output
9
Not
used
Not used
11
12
13
Cyl. 5 fuel injection valve
10 1 input I Electronic immobilizer (EWS) / Electronic immobilizer (EWS) control unit
input
Heated oxygen sensor signal Cyl.
5 fuel injection
valve (cycled ground)
output
input
input
16
Start signal Starter relay
NC compressor signal
Terminal
50 signal
Knock sensor signal
17 1 ground I Hot film mass air flow (MAF) sensor ground I Hot film mass air flow (MAF) sensor ground
output Heating and
A/C control module
Ignition switch
Knock sensor
Intake air temperature intake air temperature sensor (voltage value)