ECT BMW 528i 1998 E39 Workshop Manual
[x] Cancel search | Manufacturer: BMW, Model Year: 1998, Model line: 528i, Model: BMW 528i 1998 E39Pages: 1002
Page 186 of 1002
Downloaded from www.Manualslib.com manuals search engine
Cylinder Head and Valvetrain
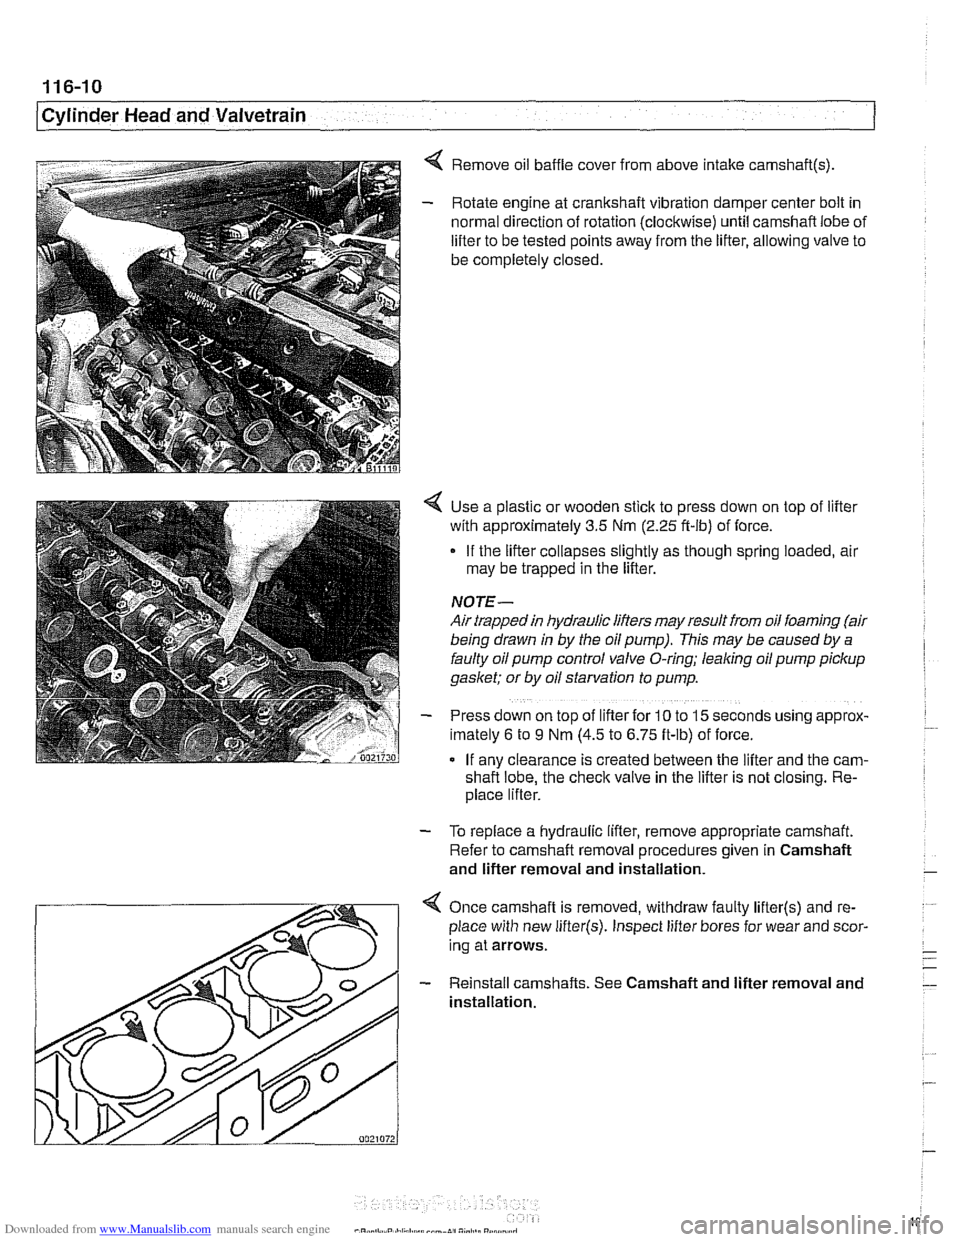
< Remove oil baffle cover from above intake camshaft(s)
- Rotate engine at crankshaft vibration damper center bolt in
normal direction of rotation (clockwise) until camshaft lobe of
lifter to be tested points away from the lifter, allowing valve to
be completely closed.
Use a plastic or wooden stick to press down on top of lifter
with approximately 3.5 Nm
(2.25 ft-ib) of force.
If the lifter collapses slightly as though spring loaded, air
may be trapped in the lifter.
NOTE-
Air trapped in hydraulic lifters may result from oil foaming (air
being drawn
in by the oil pump). This may be caused by a
faulty oil pump control valve O-ring; leaking oil pump pickup
gaslcet; or by oil starvation to pump.
Press down on top of lifter for
10 to 15 seconds uslng approx-
lmately 6 to 9 Nm (4.5 to 6.75 ft-lb) of force.
If anv clearance is created between the lifter and the
cam-
shafi lobe, the check valve in the lifter is not closing. Re-
place lifter.
- To replace a hydraulic lifter, remove appropriate camshaft.
Refer to camshaft removal procedures given in Camshaft
and lifter removal and installation.
Once camshaft is removed, withdraw faulty
lifter(s) and re-
place with new
lifter(s). Inspect lifter bores for wear and scor-
ing at arrows.
- Reinstall camshafts. See Camshaft and lifter removal and
installation.
Page 187 of 1002
Downloaded from www.Manualslib.com manuals search engine
Cylinder Head and Valvetrain
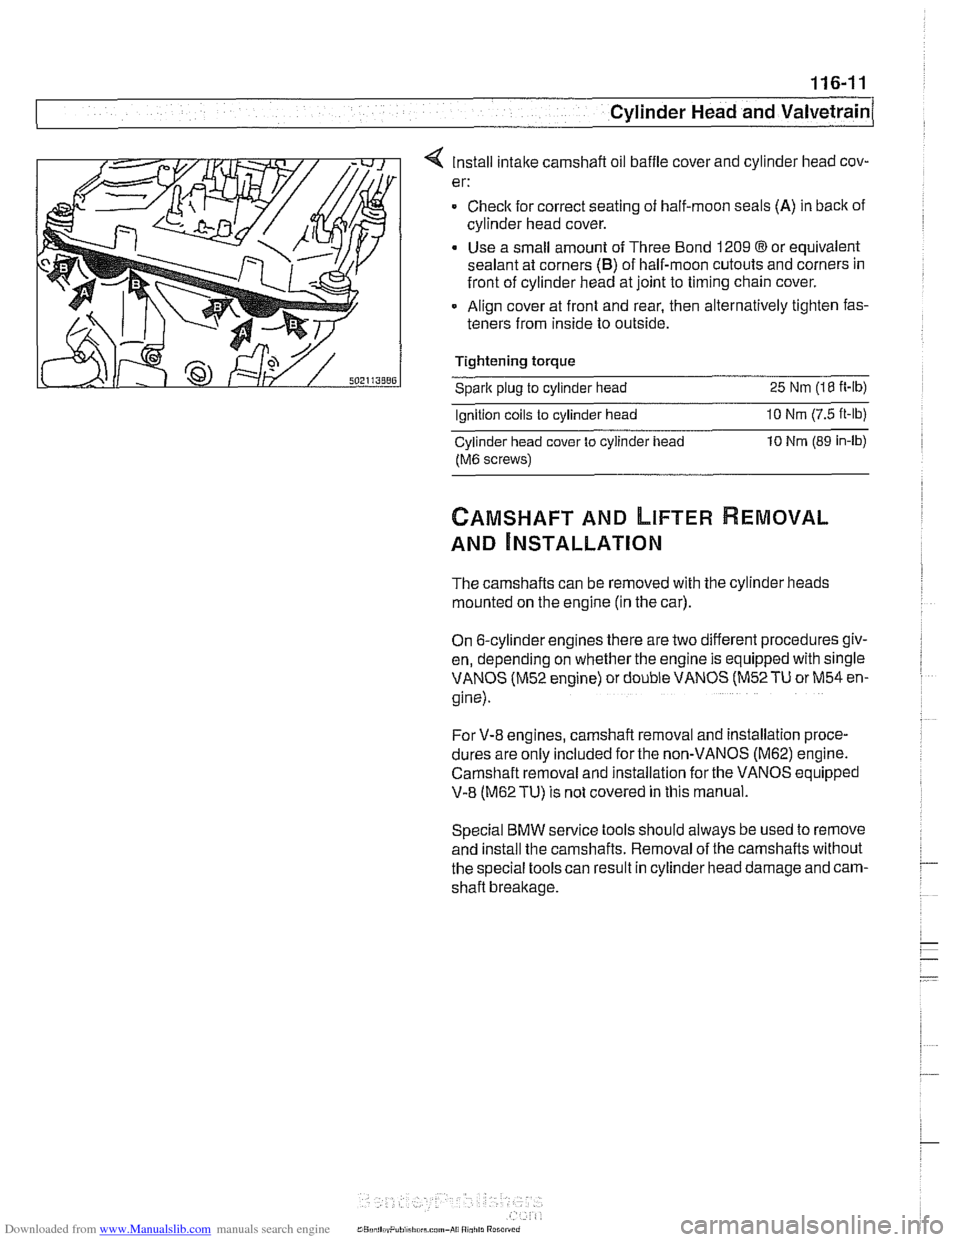
4 Install intake camshaft oil baffle cover and cylinder head cov-
er:
= Checlc for correct seating of half-moon seals (A) in back of
cylinder head cover.
Use a small amount of Three Bond 1209
@or equivalent
sealant at corners
(B) of half-moon cutouts and corners in
front of cylinder head at joint to timing chain cover.
Align cover at front and rear, then alternatively tighten fas-
teners from inside to outside.
Tightening torque
Sparic plug to cylinder head 25 Nm (18 it-lb)
Ignition coils to cylinder head 10 Nrn (7.5 ft-lb)
Cylinder head cover to cylinder iiead 10 Nrn (89 in-lb)
fM6 screws)
CAMSHAFT AND LIFTER REMOVAL
AND ~NSTALLATION
The camshafts can be removed with the cylinder heads
mounted on the engine (in the car).
On 6-cylinder engines there are two different procedures giv-
en, depending on whether the engine is equipped with single
VANOS (M52 engine) or double VANOS
(M52TU or M54 en-
gine).
For V-8 engines, camshaft removal and installation proce-
dures are
only included for the non-VANOS (M62) engine.
Camshaft removal and installation for the
VANOS eq;ipped
V-8 (M62TU) is not covered in this manual.
Special BMW service tools should always be used to remove
and install the camshafts. Removal of the camshafts without
the special tools can result in cylinder head damage and cam-
shaft breakage.
Page 188 of 1002
Downloaded from www.Manualslib.com manuals search engine
116-12
I Cylinder Head and Valvetrain
Camshaft and lifter removal and installation
(M52 engine)
Camshafts and lifters, removing (M52 engine)
WARNING
-
The process of evenly loosening the camshaft bearing cap
nuts is NOT an acceptable method of removing the cam-
shafts. Special tools should always be used to remove the
camshafts. Be sure to read the procedure
tlirough before
starting a job.
I Allow engine to cool before beginning this procedure. /
- Disconnect negative (-) cable from battery.
CAUTION-
Prior to disconnecting the batfew read the battery discon-
nection cautions given in
001 General Cautions and
Warnings.
- Remove VANOS control unit from cylinder head. See 117
Camshaft Timing Chain.
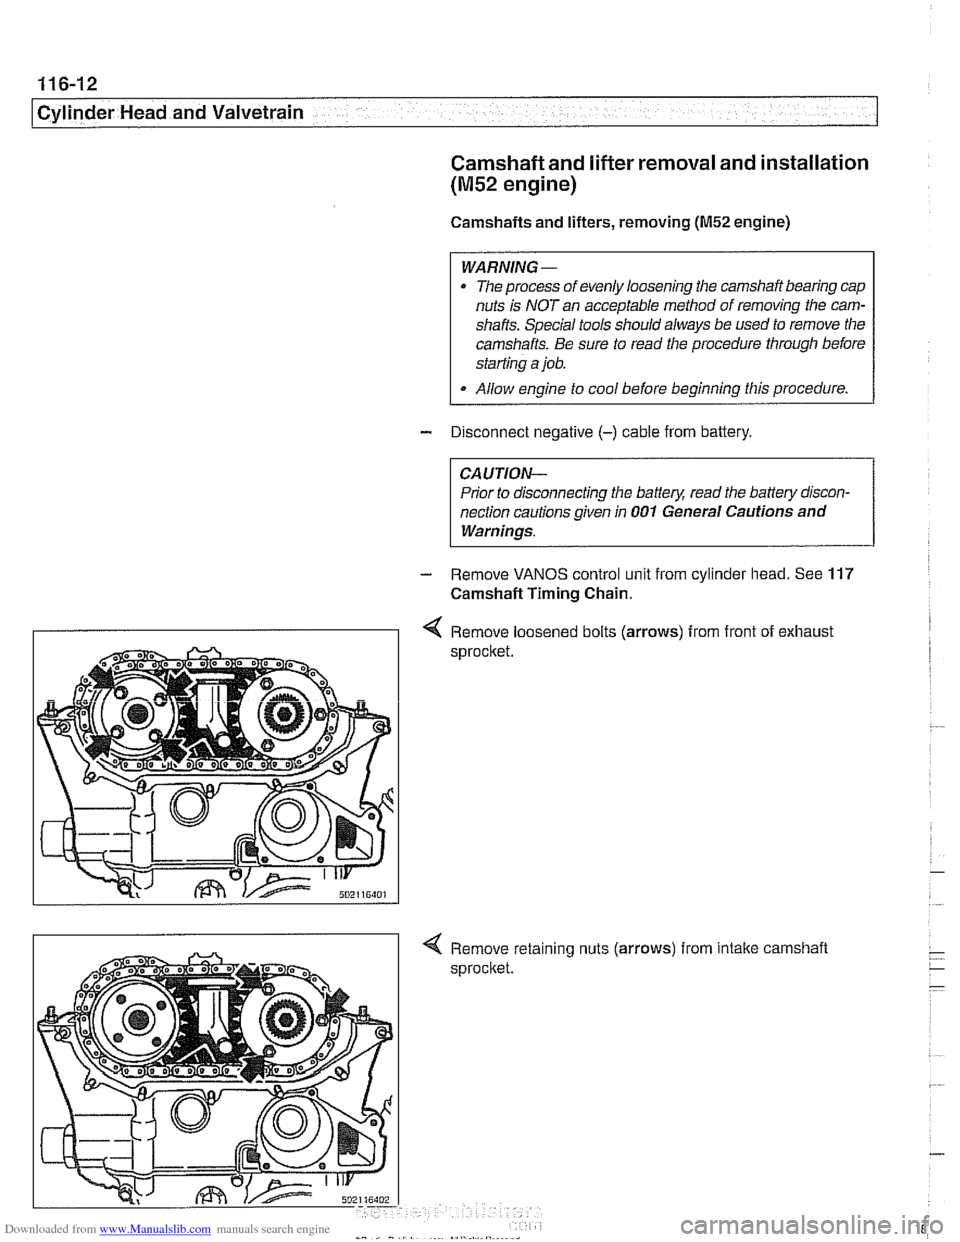
I I 4 Remove loosened bolts (arrows) from front of exhaust
sprocket
nuts
(arrows) from intake camshaft
Page 193 of 1002

Downloaded from www.Manualslib.com manuals search engine
Cylinder Head and Valvetrain
4 Secure hydraulic lifters in lifter bores using BMW special tool
11 3 250, or remove lifters using a magnetic pick-up tool.
4 Remove camshaft bearing carrier from cylinder head.
CA UTION-
Camshaftbearing carriers must be reinstalledin their original
/ locations (E for ir;fal
Do not let hydraulic lifters fall out as the camshaft carrier is
removed.
Hydraulic lifters should be stored in an upright position.
Used hydraulic lifters
must be replaced into original lifter
bores.
Camshafts and lifters, installing
(M52 Engine)
Lubricate camshafts, camshaft carriers, bearing caps, hy-
draulic liflers, friction washers, splined shafts and spline hubs
with assembly lubricant before installation.
Make sure
the cranltshaft, which had been rotated approxi-
mately
30" opposite the direction of engine rotation from
TDC, is still in thatposition before lowering the
camshaffs into
position. All pistons must be out of TDC position to prevent
valve/piston interference when the camshalts are installed.
Before installing camshaft carriers, examine bearing bores
(arrows) on hydraulic lifter bores for signs of wear.
Page 195 of 1002
Downloaded from www.Manualslib.com manuals search engine
Cylinder Head and valvetrain1
- Remainder of installation is reverse of removal, noting the
following:
See
117 Camshaft Timing Chain for VANOS control unit
installation.
Tightening torques
Camshaft bearing caps
to cylinder head (M7) 15 Nm (1 1 ft-lb)
Cylinder head cover to cylinder head (M6) 10 Nm (89 in-lb)
Sparic plugs (M12) 23 Nm (17 ft-lb)
Camshaft and lifter, removal and
installation
(M52 TU and M54 engine)
Camshafts and lifters, removing
(M52 TU and M54 engine)
WARNING-
Allow engine fo cool before beginning this procedure.
- Disconnect negative (-) cable from battery.
CAUTION--
Prior to disconnecting the battea read the battery discon-
nection cautions in
001 General Cautions and Warnings.
Remove VANOS control unit. See 117 Camshaii Timing
Chain.
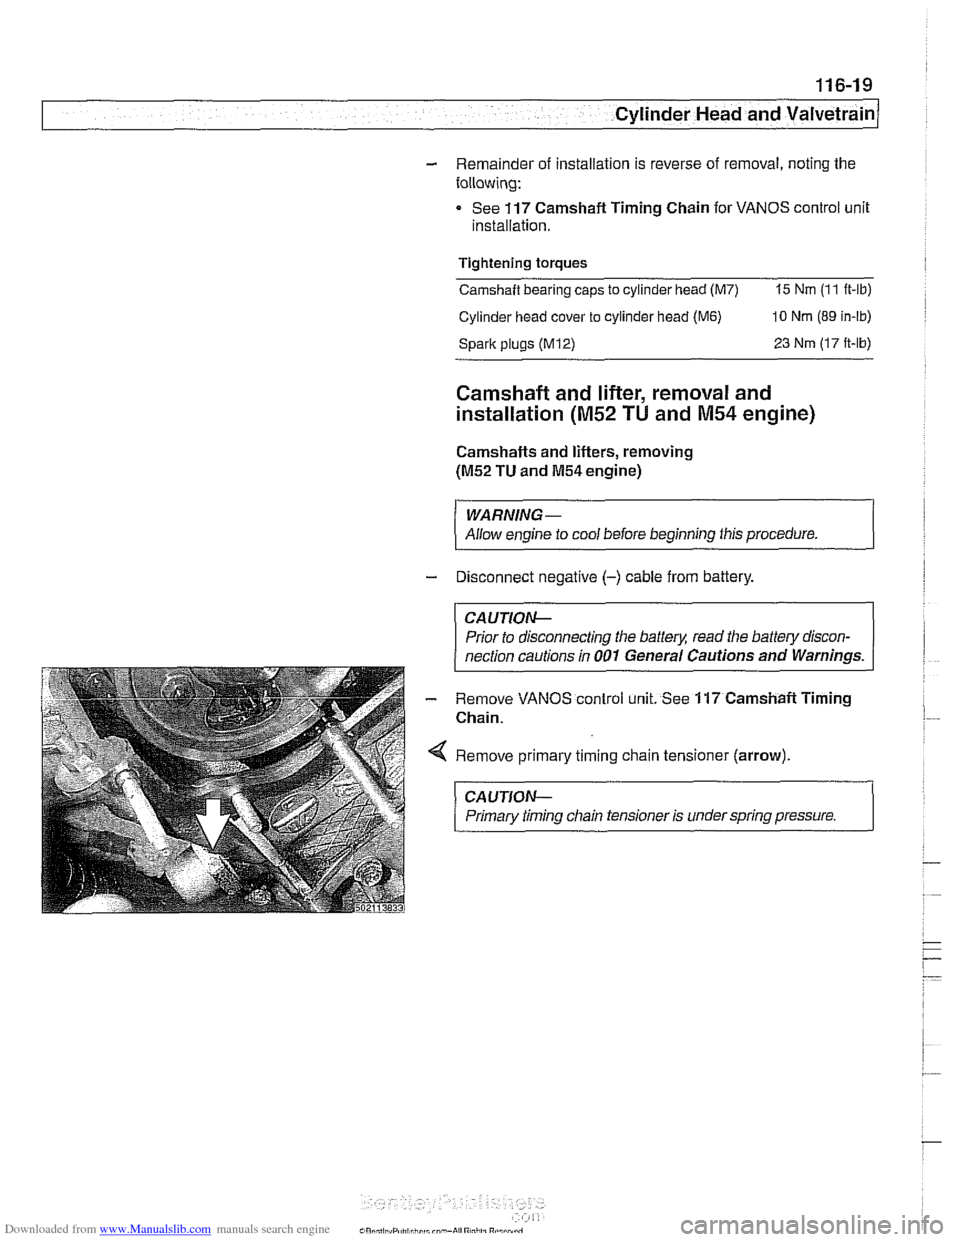
Remove primary timing chain tensioner (arrow).
CAUTION-
Primary timing chain tensioner is under spring pressure. 1
Page 200 of 1002
Downloaded from www.Manualslib.com manuals search engine
..--.
I Cylinder Head and Valvetrain - I
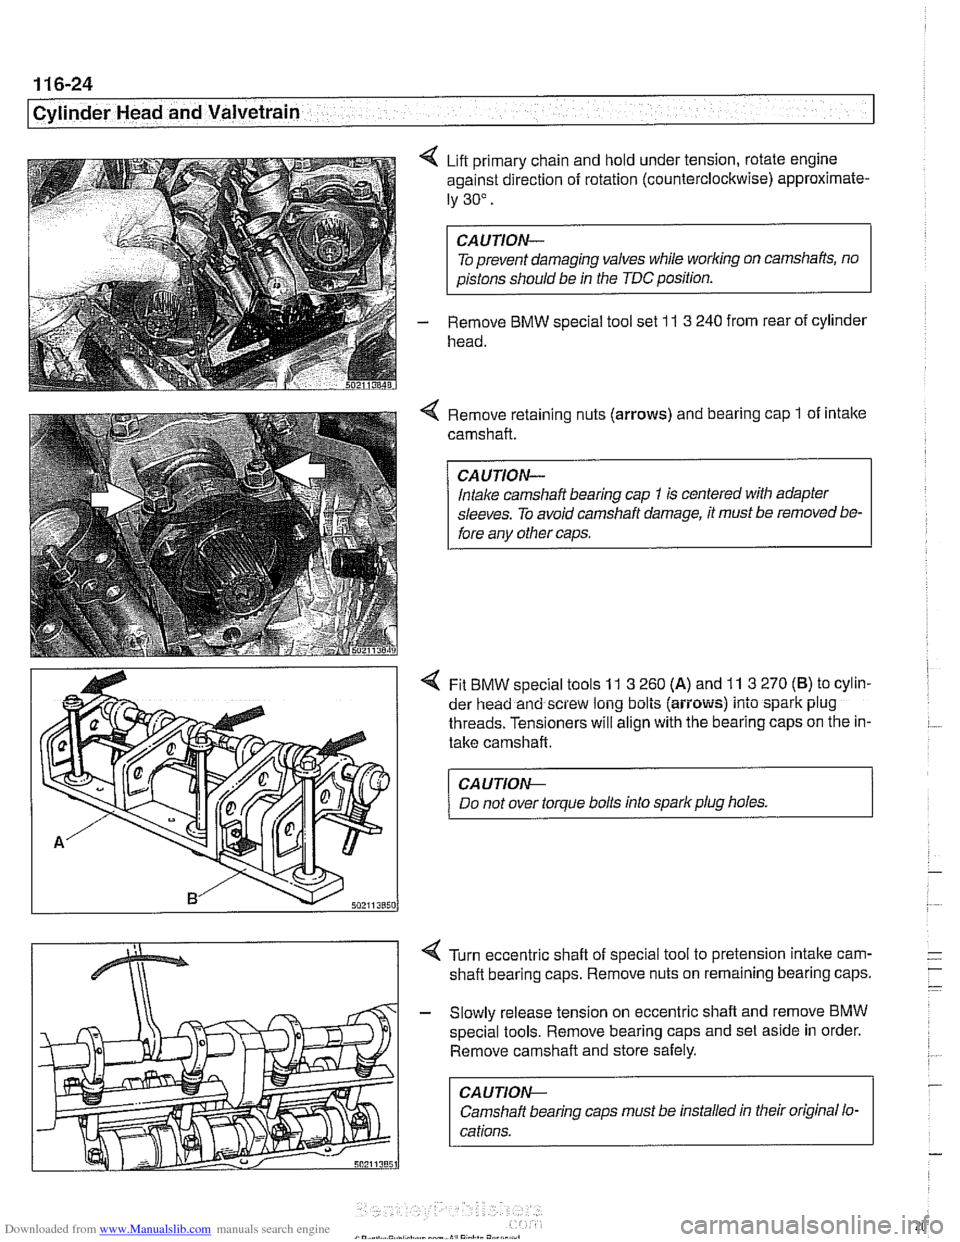
4 Lift primary chain and hold under tension, rotate engine
against direction of rotation (counterclockwise) approximate-
ly 30".
To prevent damaging valves while
worlcing on camshafts, no
aistons should be in the TDC position.
- Remove BMW special tool set 1 I 3 240 from rear of cylinder
head.
Remove retaining nuts (arrows) and bearing cap
1 of intake
camshaft.
Intake camshaft bearing cap
1 is centered with adapter
sleeves. To avoid camshaft damage, it must be removed be-
fore anv other caos.
4 Fit BMW special tools 11 3 260 (A) and 11 3 270 (B) to cylin-
der head and screw long bolts (aiiows) into spark plug
threads. Tensioners will align with the bearing caps on the in-
take camshaft.
CA UTION--
Do not over torque bolts into spark plug holes. 1
4 Turn eccentric shaft of special tool to pretension intake carn-
shaft bearing caps. Remove nuts on remaining bearing caps.
- Slowly release tension on eccentric shaft and remove BMW
special tools. Remove bearing caps and set aside in order.
Remove camshaft and store safely.
CA U TIOW-
Camshaft bearing caps must be installed in their original lo-
cations.
Page 201 of 1002
Downloaded from www.Manualslib.com manuals search engine
Cylinder Head and Valvetrain
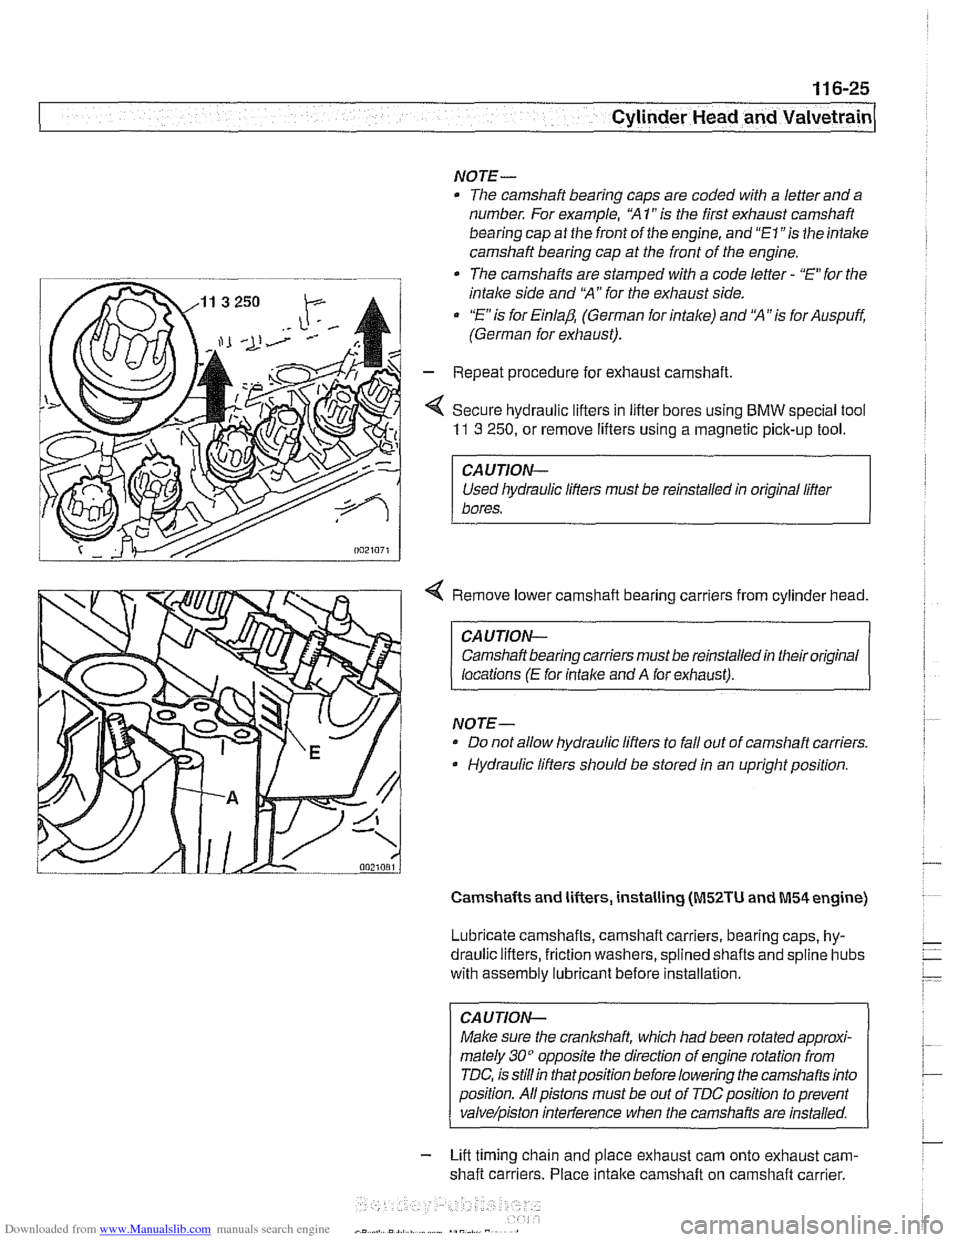
NOTE-
The camshaft bearing caps are coded with a letter and a
number. For example, "A
1" is the first exhaust camshaft
bearing cap
at the front of the engine, and "El "is the intake
camshaft bearing cap at the front of the engine.
-. -
The camshafts are stamped with a code letter - "E for the
intake side and
'X" for the exhaust side.
"E is for Einlap. (German for intake) and 'XA7s for Auspuff.
(German for exhaust).
- Repeat procedure for exhaust camshaft
< Secure hydraulic lifters in lifter bores using BMW special tool
11 3 250, or remove lifters using a magnetic pick-up tool.
I CAUTION-
Used liydraulic lifters must be reinstalled in original lifter
1 bores.
4 Remove lower camshaft bearing carriers from cylinder head.
CAUTION- Camshaft bearing carriers must be reinstalled in their original
locations
(E for intalce and A for exhaust).
NOTE- Do not allow hydraulic lifters to fall out of camshaft carriers.
Hydraulic lifters should be stored in an upright position.
Camshafts and lifters, installing (M52TU and M54 engine)
Lubricate camshafts, camshaft carriers, bearing caps, hy-
draulic lifters, friction washers, splined shafts and
spline hubs
with assembly
lubricant before installation.
CAUTION-
Make sure the crankshaft, which had been rotated approxi-
mately
30" opposite the direction of engine rotation from
TDC, is
stillin thatposition before lowering the camshafts into
position. Allpistons must be out of
TDCposition to prevent
valve/piston inteiference when the carnshafis are installed.
- Lift timing chain and place exhaust cam onto exhaust cam-
shaft carriers. Place
intake camshaft on camshaft carrier.
Page 206 of 1002
Downloaded from www.Manualslib.com manuals search engine
~ ~. --
Cylinder Head and Valvetrain .-
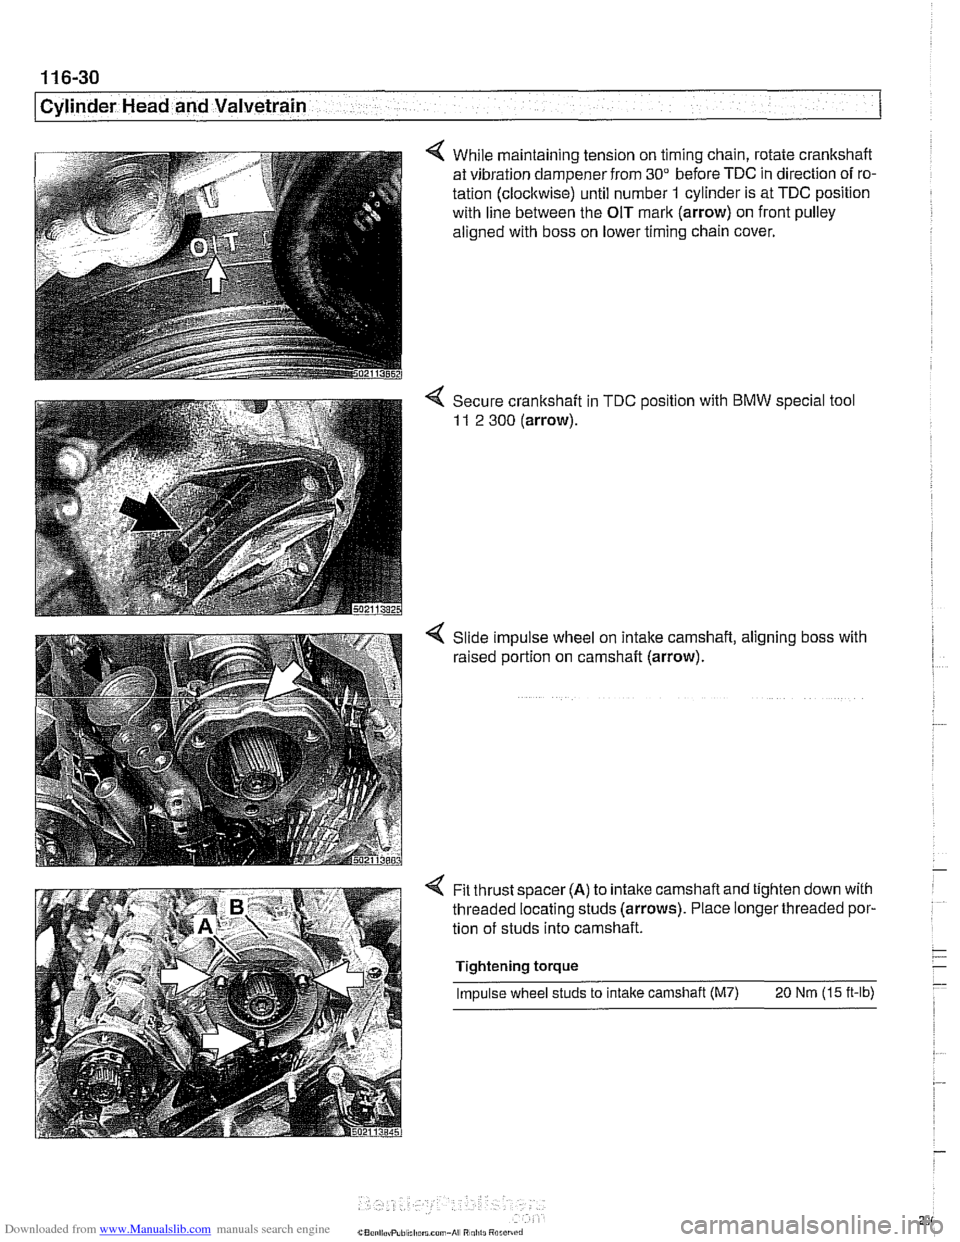
4 While maintaining tension on timing chain, rotate crankshaft
at vibration dampener from
30" before TDC in direction of ro-
tation (clockwise) until number
1 cylinder is at TDC position
with line between the OIT mark (arrow) on front pulley
aligned with boss on lower timing chain cover.
4 Secure crankshaft in TDC position with BMW special tool
11 2 300 (arrow).
Slide impulse wheel on intake camshaft, aligning boss with
raised portion on camshaft (arrow).
Fit thrust spacer
(A) to intalte camshaft and tighten down with
threaded locating studs (arrows). Place longer threaded por-
tion of studs into camshaft.
Tightening torque
Impulse wheel studs to intake camshaft (M7)
20 Nm (15 ft-lb)
Page 209 of 1002
Downloaded from www.Manualslib.com manuals search engine
Cylinder Head and valvetrain1
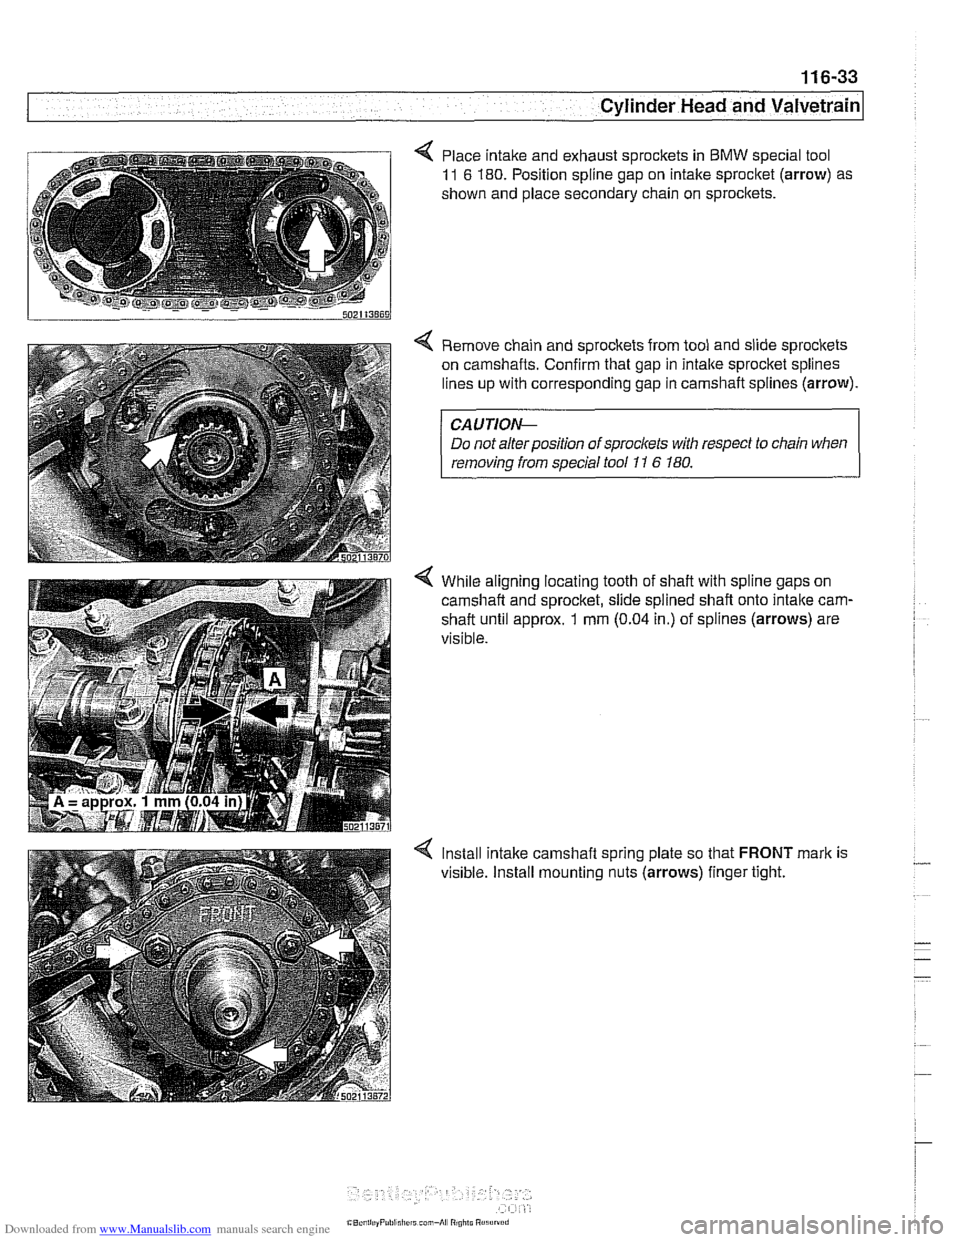
< Place intake and exhaust sprockets in BMW special tool
11 6 180. Position spline gap on intake sprocket (arrow) as
shown and place secondary chain on
sprocitets.
< Remove chain and sprockets from tool and slide sprockets
on camshafts. Confirm that gap in intalte sprocket splines
lines up with corresponding gap in camshaft splines (arrow).
CAUTIOI\C
Do not alter position of sprockets with respect to chain when
removinq from saecial tool 11 6 180.
4 While aligning locating tooth of shaft with spline gaps on
camshaft and sprocket, slide spiined
shaft onto intalte carn-
shaft until approx. 1 mm (0.04 in.) of splines (arrows) are
visible.
4 lnstall intake camshaft spring plate so that FRONT mark is
visible. install mounting nuts (arrows) finger tight.
Page 213 of 1002
![BMW 528i 1998 E39 Workshop Manual Downloaded from www.Manualslib.com manuals search engine
-
. - - -- Cylinder Head and valvetrain]
Turn engine over twice in direction of rotation until cylinder 1
intake and exhaust camshaft BMW 528i 1998 E39 Workshop Manual Downloaded from www.Manualslib.com manuals search engine
-
. - - -- Cylinder Head and valvetrain]
Turn engine over twice in direction of rotation until cylinder 1
intake and exhaust camshaft](/img/1/2822/w960_2822-212.png)
Downloaded from www.Manualslib.com manuals search engine
-
. - - -- Cylinder Head and valvetrain]
Turn engine over twice in direction of rotation until cylinder 1
intake and exhaust camshaft lobes (arrows) face each other.
- Lock crankshaft in TDC position with BMW special tool
11 2 300.
4 Place BMW special tool set 11 3 240 over camshafts and
measure clearances.
NOTE-
@ If the exhaust side of the tool (A) is not flush with the head,
camshaft timing is incorrect. Reset camshaft timing as de-
scribed in 11
7 Camshaft Timing Chain.
Due to flexible sprocket design, VANOS unit tolerances
and play in the VANOS splines, when the camshaft timing
is set correctly, the intake side of special tool set
11 3 240
(B) may be up to 1 mm (0.04 in.) above the suiface of the
cylinder head. This is normal. Reassemble engine. Other-
wise, reset camshaft timing as describedin 1
l?Camshaft
Timing Chain.
- Remove BMW special tool 11 6 150 from front of cylinder
head.
4 Clean contact edges of cylinder head face and VANOS unit
and apply a thin coat of Three Bond
12090 or equivalent
sealing compound to surfaces.
CAUTION-
Male sure all gasket material is removed from face of cyl-
inder head. Clean sealing face and keep free of oil.
Check locating dowel
(A) and dowel sleeve (B) at top
of cylinder head for damage or incorrect installation.
- Using a new steel gasket, install VANOS unit to front of cyi-
inder head. See 117 Camshaft Timing Chain.
NOTE-
If VANOS control unit is being replaced, be sure to check and
adjust camshaft timing as described in 117 Camshaft Tim-
ing Chain.
- Reinstall engine lifting eye.
- Reconnect electrical harness connectors to camshaft posi-
tion sensors and
VANOS solenoid valves.