ECT BMW 528i 1998 E39 Workshop Manual
[x] Cancel search | Manufacturer: BMW, Model Year: 1998, Model line: 528i, Model: BMW 528i 1998 E39Pages: 1002
Page 258 of 1002
Downloaded from www.Manualslib.com manuals search engine
Camshaft Timing Chain
VANOS timing, checking and adjusting
(M52 engine)
NOTE-
* Special BMW service tools are required to remove and in-
stall the VANOS control unit. Read the procedure through
before starting the job.
If the camshafts are not properly timed, the pistons can
contact the valves.
- Disconnect negative (-) cable from battery.
CAUTIOG Disconnecting the battery may erase
faultcode(s) storedin
control module memory. Prior to disconnecting the battery,
checlc for fault codes using special BMW diagnostic equip-
ment.
Prior to disconnecting the battery, read the battery dis-
connection cautions given in
001 General Cautions
and Warnings.
- Remove viscous clutch cooling fan. See 170 Radiator and
Cooling
System.
CAUTIOG The radiator cooling fan nut
(32 mm wrench) has left-hand
threads.
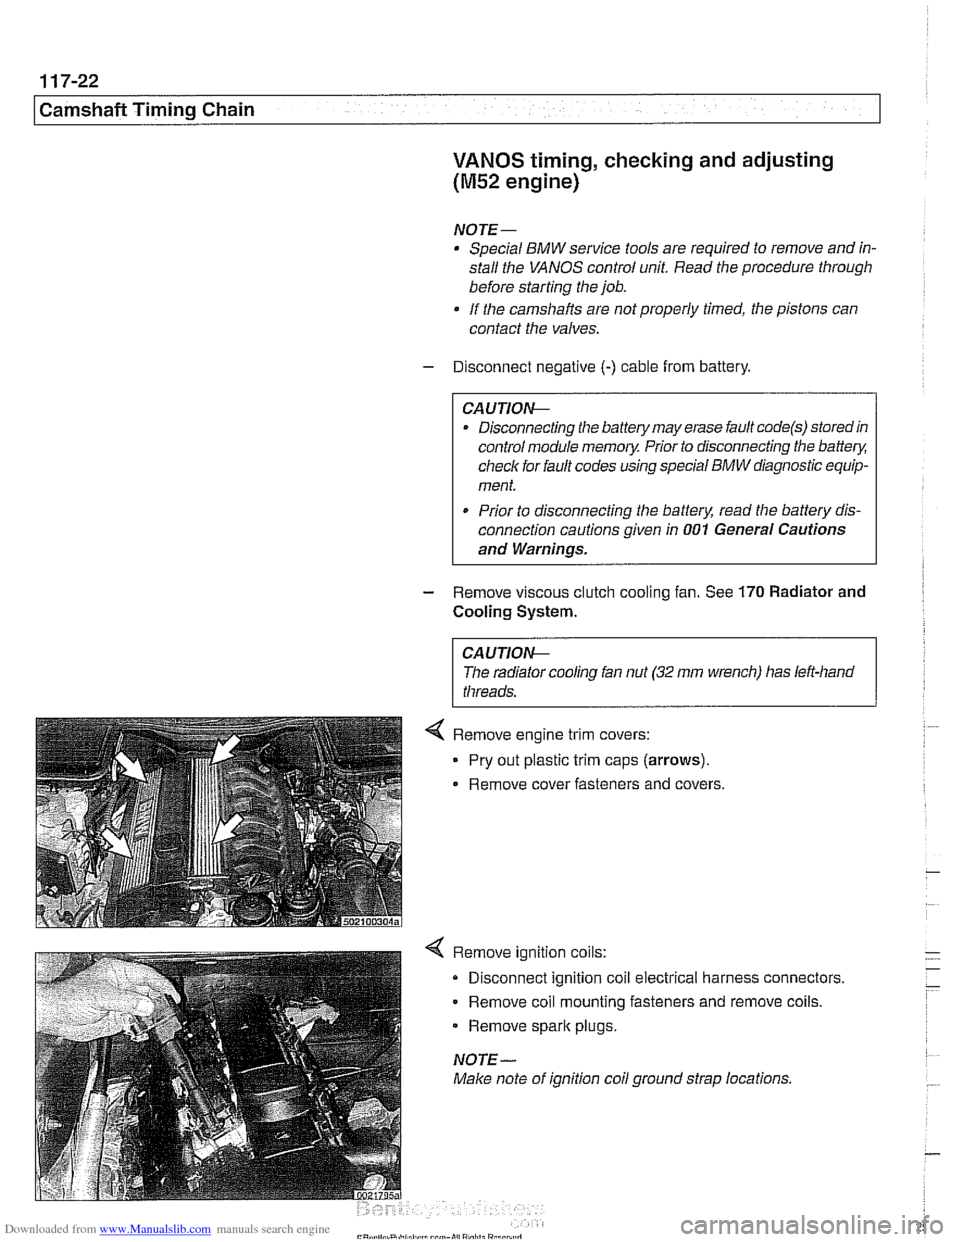
4 Remove ignition coils:
Disconnect ignition coil electrical harness connectors.
Remove coil mounting fasteners and remove coils.
Remove
spark plugs.
NOTE-
Make note of ignition coil ground strap locations.
Page 259 of 1002
Downloaded from www.Manualslib.com manuals search engine
Camshaft Timing Chain
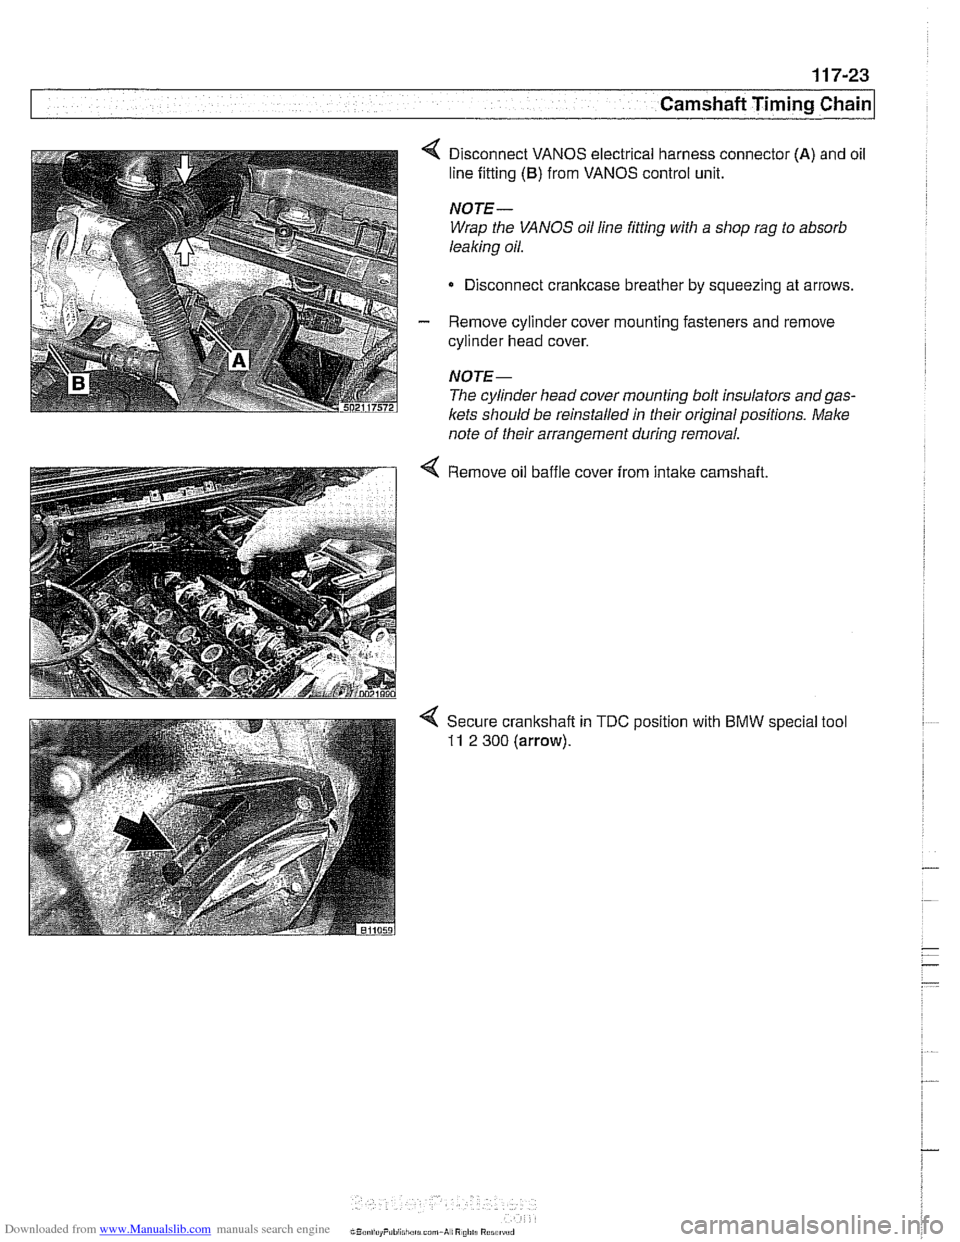
4 Disconnect VANOS electrical harness connector (A) and oil
line fitting
(B) from VANOS control unit.
NOTE-
Wrap the VANOS oil line fitting with a shop rag to absorb
leaking oil.
Disconnect cranltcase breather by squeezing at arrows.
- Remove cylinder cover mounting fasteners and remove
cylinder head cover.
NOTE-
The cylinder head cover mounting bolt insulators andgas-
lets should be reinstalled in their original positions. Make
note of their arrangement during removal.
4 Remove oil baffle cover from intake camshaft
Page 260 of 1002
Downloaded from www.Manualslib.com manuals search engine
1 17-24
I Camshaft Timing Chain
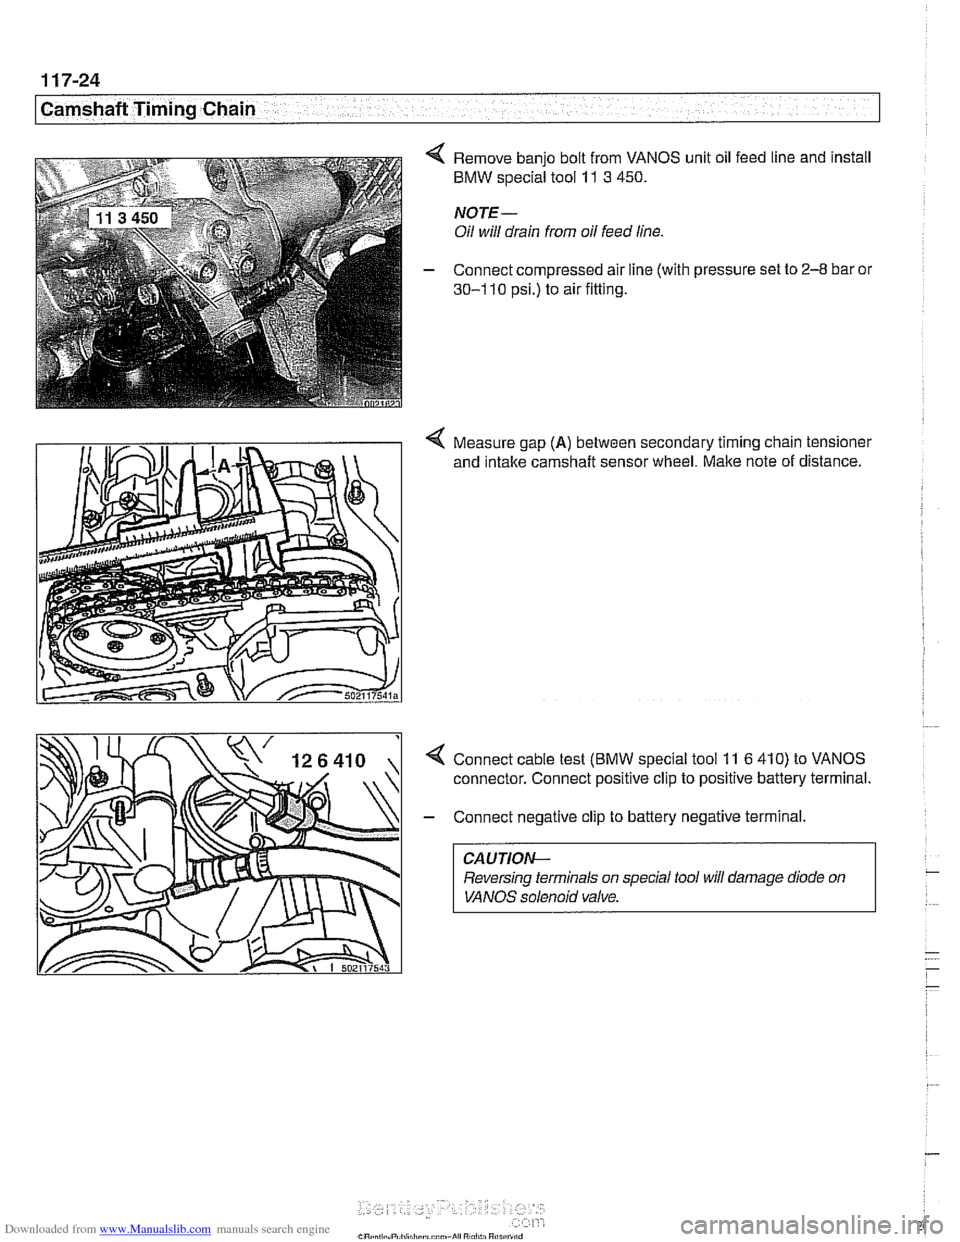
4 Remove banjo bolt from VANOS unit oil feed line and install
BMW special tool 11 3 450.
NOTE-
Oil will drain from oil feed line.
- Connect compressed air line (with pressure set to 2-8 bar or
30-1 10 psi.) to air fitting.
4 Measure gap (A) between secondary timing chain tensioner
and
intake camshaft sensor wheel. Make note of distance.
4 Connect cable test (BMW special tool 11 6 410) to VANOS
connector. Connect positive clip to positive battery terminal.
- Connect negative clip to battery negative terminal.
CAUTION-
Reversing terminals on special tool will damage diode on
VANOS solenoid valve.
Page 266 of 1002
Downloaded from www.Manualslib.com manuals search engine
1 17-30
I Camshaft Timing Chain
Timing chain, installing
(M52 engine)
CAUTION-
The procedure outlined below assumes that the camshafts
and the crankshaft are
lockedin the TDCposition with BMW
special tools.
- Inspect timing chain and sprocltets and guide rails for wear.
Replace worn parts.
NOTE-
If any of the sprockets are being replaced due to wear, the
chain should also be replaced.
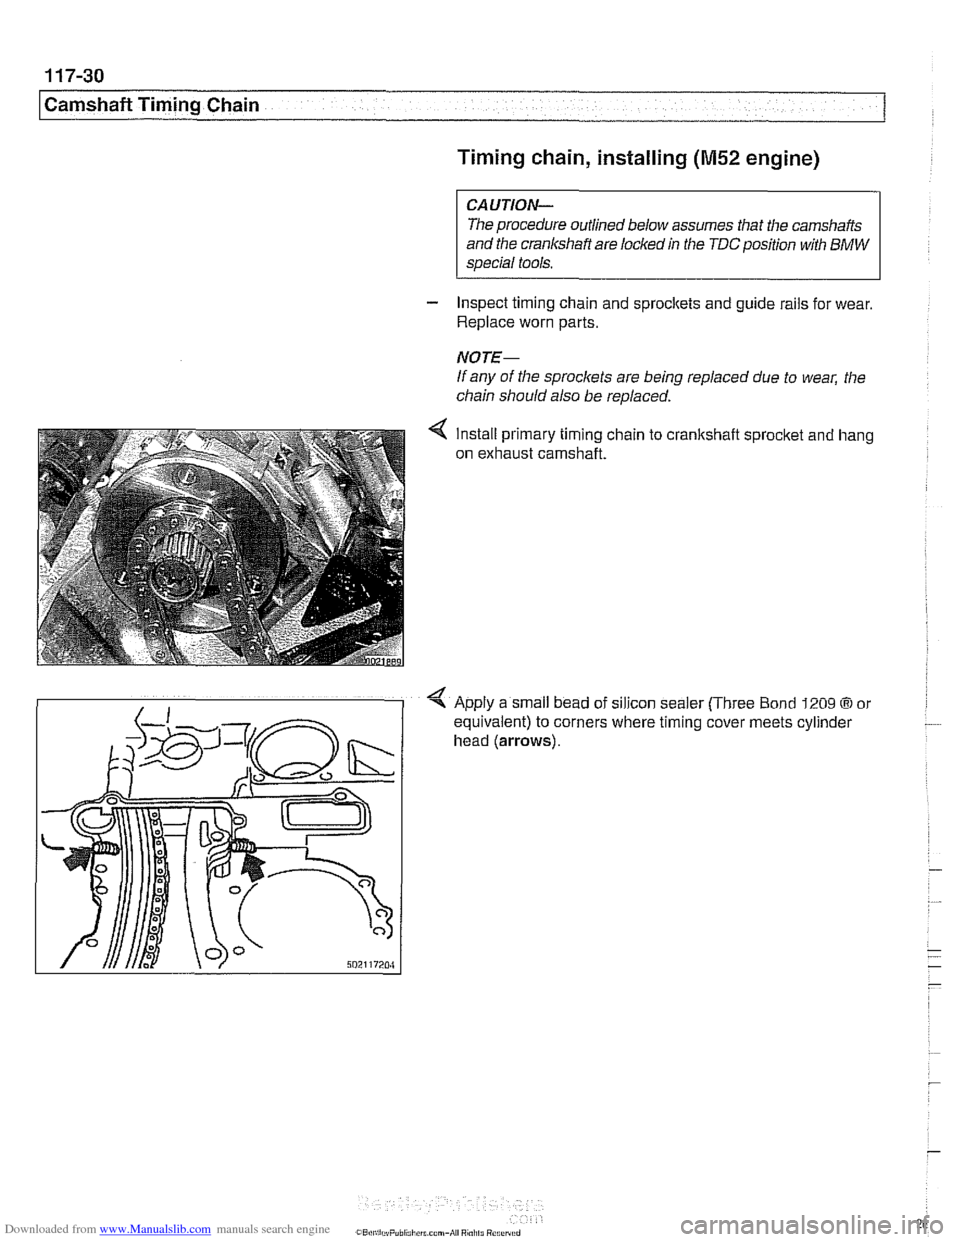
Install primary timing chain
on exhaust camshaft. to crankshait
sprocket and hang
4 Apply a small bead oi silicon sealer (Three Bond 1209 @or
equivalent) to corners where tim~ng cover meets cylinder
head
(arrows).
Page 268 of 1002
Downloaded from www.Manualslib.com manuals search engine
-- -
Chain 1
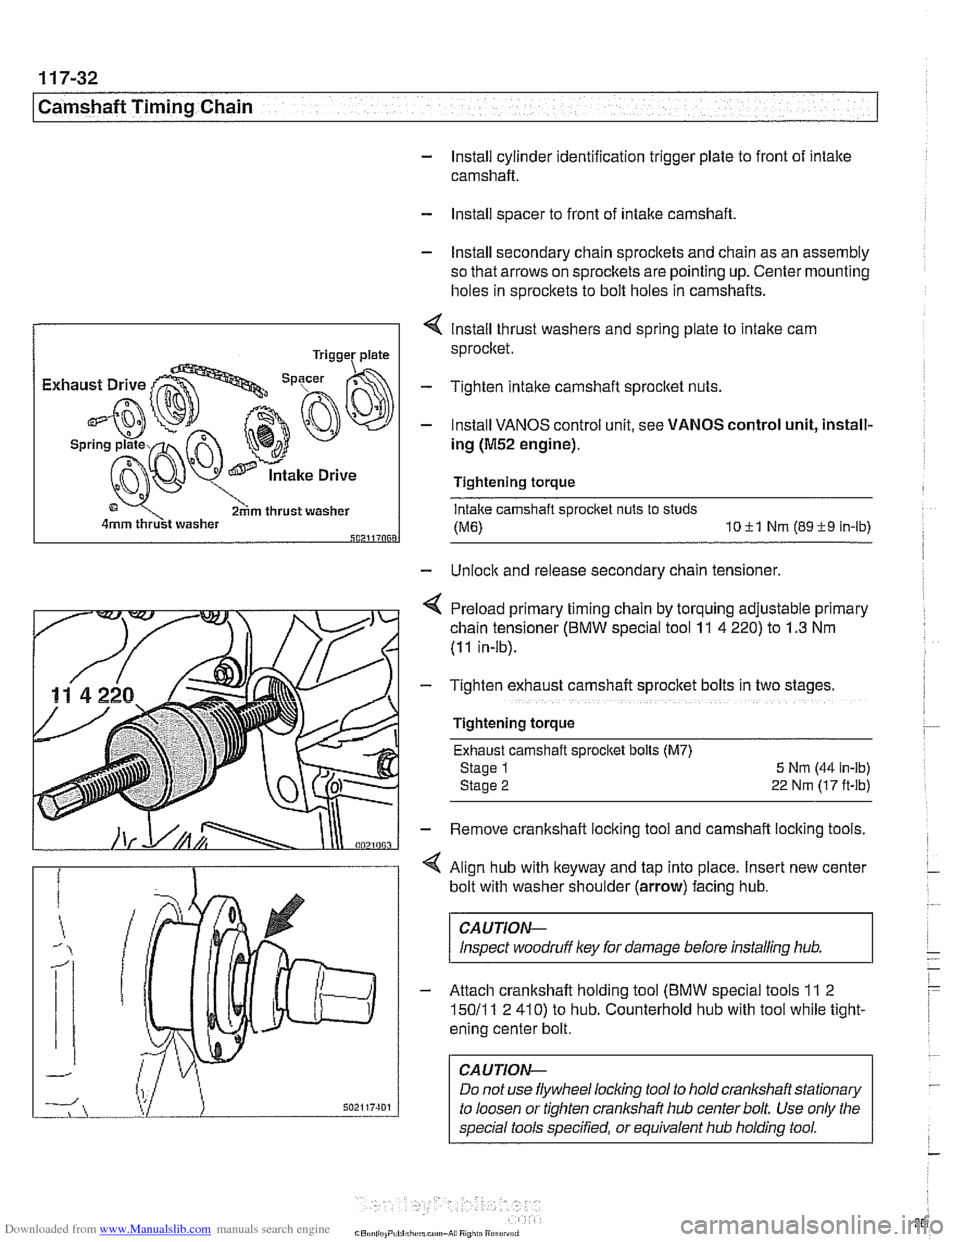
- Install cylinder identification trigger plate to front of intake
camshaft.
- Install spacer to front of intake camshaft
- Install secondary chain sprockets and chain as an assembly
so that arrows on sprockets are pointing up. Center mounting
holes in sprockets to bolt holes in camshafts.
4 lnstall thrust washers and spring plate to intake cam
sprocket.
Tighten intake camshaft sprocket nuts.
- Install VANOS control unit, see VANOS control unit, install-
ing
(M52 engine).
Tightening torque
Intake camshaft sprocket nuts to studs
(ME) 1011 Nm (8919 In-lb) 502117068
- Unlock and release secondary chain tensioner,
4 Preload primary timing chain by torquing adjustable primary
chain tensioner (BMW special tool
11 4 220) to 1.3 Nm
(11 in-lb).
- Tighten exhaust camshaft sprocket bolts in two stage
Tightening torque Exhaust camshaft sprocket bolls (M7)
Stage 1
5 Nrn (44 in-lb)
Stage
2 22 Nm (17 ft-lb)
- Remove crankshaft locking tool and camshaft locking tools.
< Align hub with keyway and tap into place. Insert new center
bolt with washer shoulder (arrow) facing hub.
CAUTION-
Inspect woodruff ley for damage before installing hub.
- Attach crankshaft holding tool (BMW special tools 11 2
15011 1 2 410) to hub. Counterhold hub with tool while tight-
ening center bolt.
CAUTION-
Do not use flywheel locling tool to hold crankshaft stationary
to loosen or tighten
cranlshaft hub center bolt. Use only the
special tools specified, or equivalent hub holding tool.
Page 269 of 1002

Downloaded from www.Manualslib.com manuals search engine
-- Camshaft Timing Chain -- -
Tightening torque
Vibration damper hub to crankshaft
410 Nm (300 ft-lb)
4 Install cranltshaft hub and vibration damper while aligning
locating hole (arrow) in damper with dowel pin in hub.
Tightening torque
Vibration damper and
pulley to
cranltshaft hub
22 Nm (17 ft-lb)
- Turn engine over by hand in direction of rotation at least two
full rotations. Reinstall camshaft and crankshaft locking
toois
to recheck engine timing. Remove locking tools if no faults
are found.
- Remove BMW special tool 11 3 390 (dummy tensioner) from
side of cyiinder head.
- Install primary chain tensionerso that cutout in tensioner pis-
ton engages chain rail.
Tightening torque
Timing chain tensioner to tensioner sleeve
70 Nm (52 ft-ib)
- Install cylinder head cover mounting studs, camshaft cover,
and cylinder head cover.
Tightening torque Cylinder head cover to cyiinder head
M6 nut 10 Nm (89 in-lb)
MB bolt 22 Nm (17 ft-lb)
- installation of remaining parts is reverse of removal, noting
the following:
When installing thermostat, make sure arrow or vent hole
faces up, if applicable.
Refill cooling system as described in
170 Radiator and
Cooling System.
Fill engine with oil and install new
oil filter as described in
020 Maintenance.
Tightening torque Upper timing chain cover to cylinder head
M6 nut 10 Nm (89 in-lb)
MB bolt 22 Nm (17 ft-lb)
VANOS oil supply pipe to VANOS control
unit banjo bolt
32 Nm (24 ft-ib)
Page 270 of 1002
Downloaded from www.Manualslib.com manuals search engine
1 17-34
1 Camshaft Timing Chain
DOUBLE VAMOS SYSTEM
(M52 TU AND M54 ENGINES)
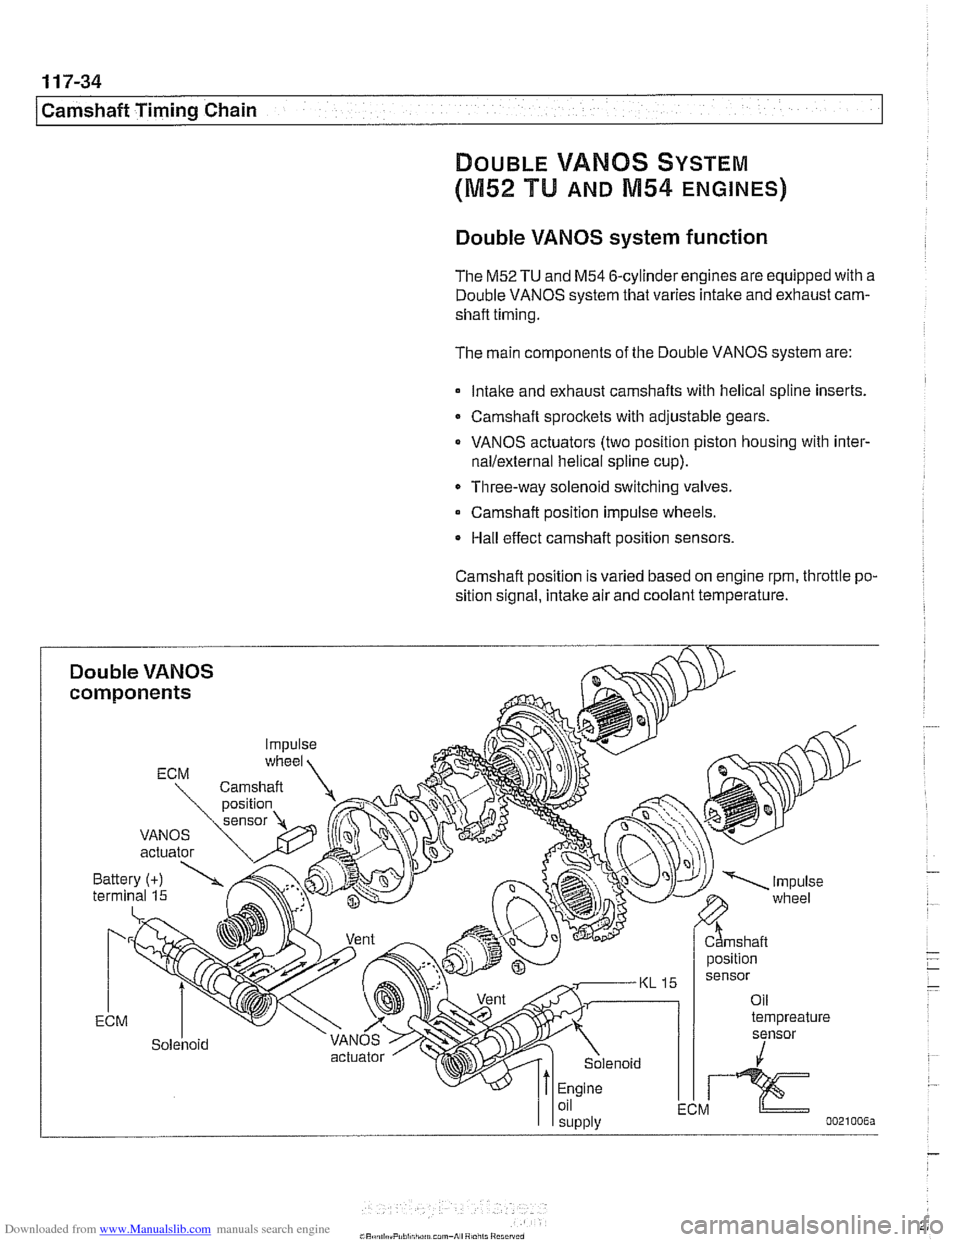
Double VANOS system function
The M52TU and M54 6-cylinder engines are equipped with a
Double VANOS system that varies intake and exhaust cam-
shaft timing.
The main components of the Double VANOS system are:
lntalte and exhaust camshafts with helical spline inserts.
Camshaft sprockets with adjustable gears.
VANOS actuators (two position piston housing with
inter-
nallexternal helical spline cup).
Three-way solenoid switching valves.
Camshaft position impulse wheels.
Hall effect camshaft position sensors.
Camshaft position
IS varied based on engine rpm, throttle po-
sition signal, intake air and coolant temperature.
Page 271 of 1002
Downloaded from www.Manualslib.com manuals search engine
Camshaft Timing Chain
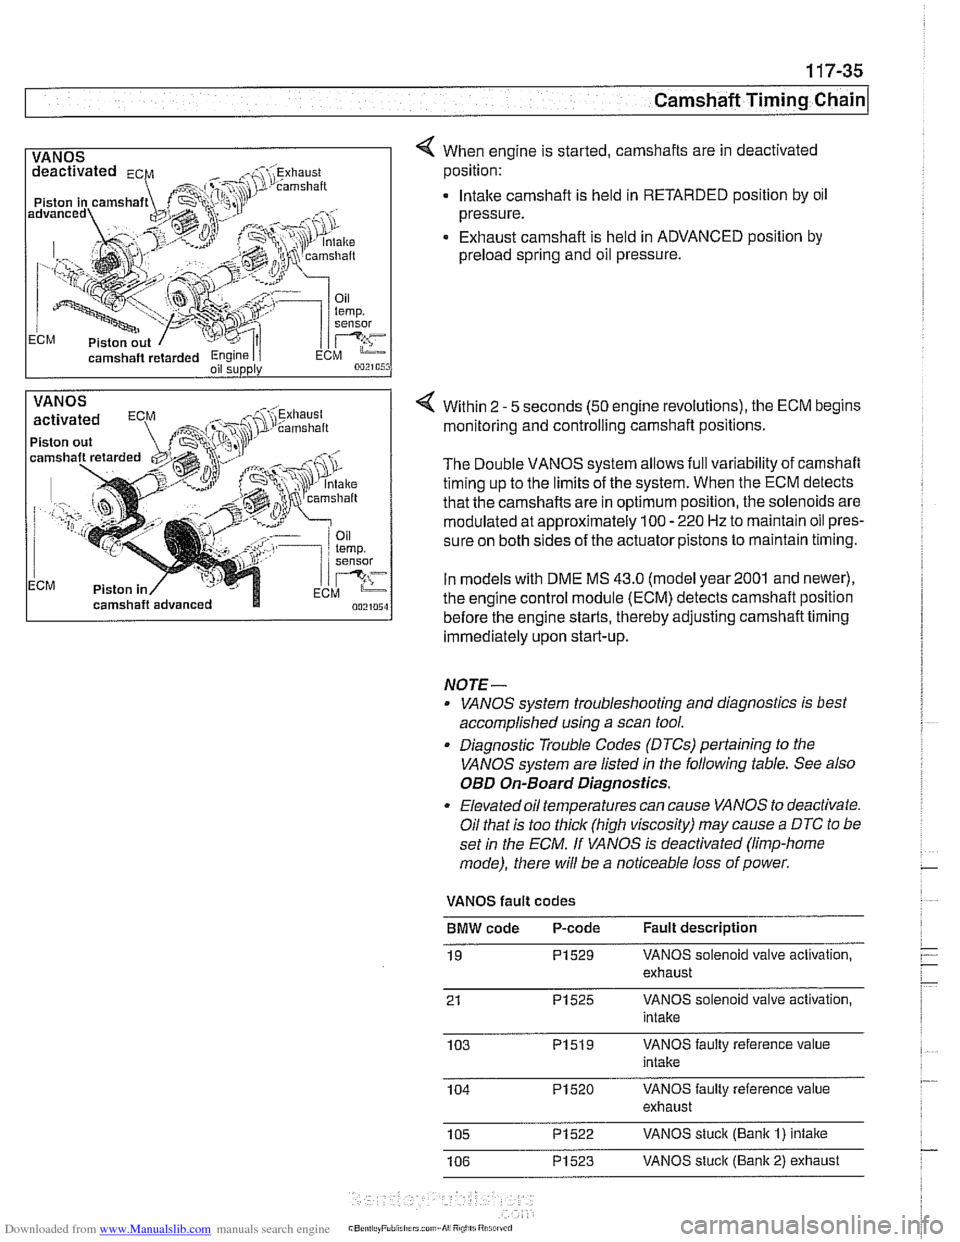
1 VANOS I 4 When engine is started, camshafts are in deactivated
camshaft
retarded Engine I i oil supply
position:
. lntalte camshaft is held in RETARDED position by oil
pressure.
Exhaust camshaft is held in ADVANCED position by
preload spring and oil pressure.
VANOS
Piston out
ECM Piston in Within 2
- 5
seconds (50 engine revolutions), the ECM begins
monitoring and controlling camshaft positions.
The Double VANOS system allows full variability of camshaft
timing up to the limits of the system. When the ECM detects
that the camshafts are in optimum position, the solenoids are
modulated at approximately 100
- 220 Hz to maintain oil pres-
sure on both sides of the actuator pistons to maintain timing.
In models with DME
MS 43.0 (model year2001 and newer),
the engine control module (ECM) detects camshaft position
before the engine starts, thereby adjusting camshaft timing
immediately upon start-up.
NOTE-
. VANOS system troubleshooting and diagnostics is best
accomplished using a scan tool.
. Diagnostic Trouble Codes (DTCs) pertaining to the
VANOS system are listed
in the following table. See also
OED On-Board Diagnostics.
Elevated oil temperatures can cause VANOS to deactivate.
Oil that is too thick (high viscosity) may cause
a DTC to be
set
in the ECM. If VANOS is deactivated (limp-home
mode), there will be a noticeable loss of power.
VANOS fault codes
BMW code P-code Fault description
19
PI529 VANOS solenoid valve activation,
exhaust
21
PI525 VANOS solenoid valve activation,
intake
103
PI519 VANOS faulty reference value
intake
104
PI520 VANOS faulty reference value
exhaust
105
PI522 VANOS stuck (Bank I) intake
106
PI523 VANOS stuck (Bank 2) exhaust
Page 273 of 1002
Downloaded from www.Manualslib.com manuals search engine
Camshaft Timing Chain
VANOS control unit, removing
(M52 TU and M54 engines)
This procedure includes removal of the Double VANOS con-
trol unit.
NOTE-
If the Double VANOS control unit is being replaced, camshaft
timing must be checked. This procedure requires multiple
special tools. Be sure to read the procedures through before
beginning the repair.
- Working inside luggage compartment, disconnect negative
(-) battery cable.
Prior to disconnecting the
batteg read the battery discon-
nection cautions given in
001 General Cautions and
Remove engine cooling fan assembly. See 170 Radiator
and Cooling System.
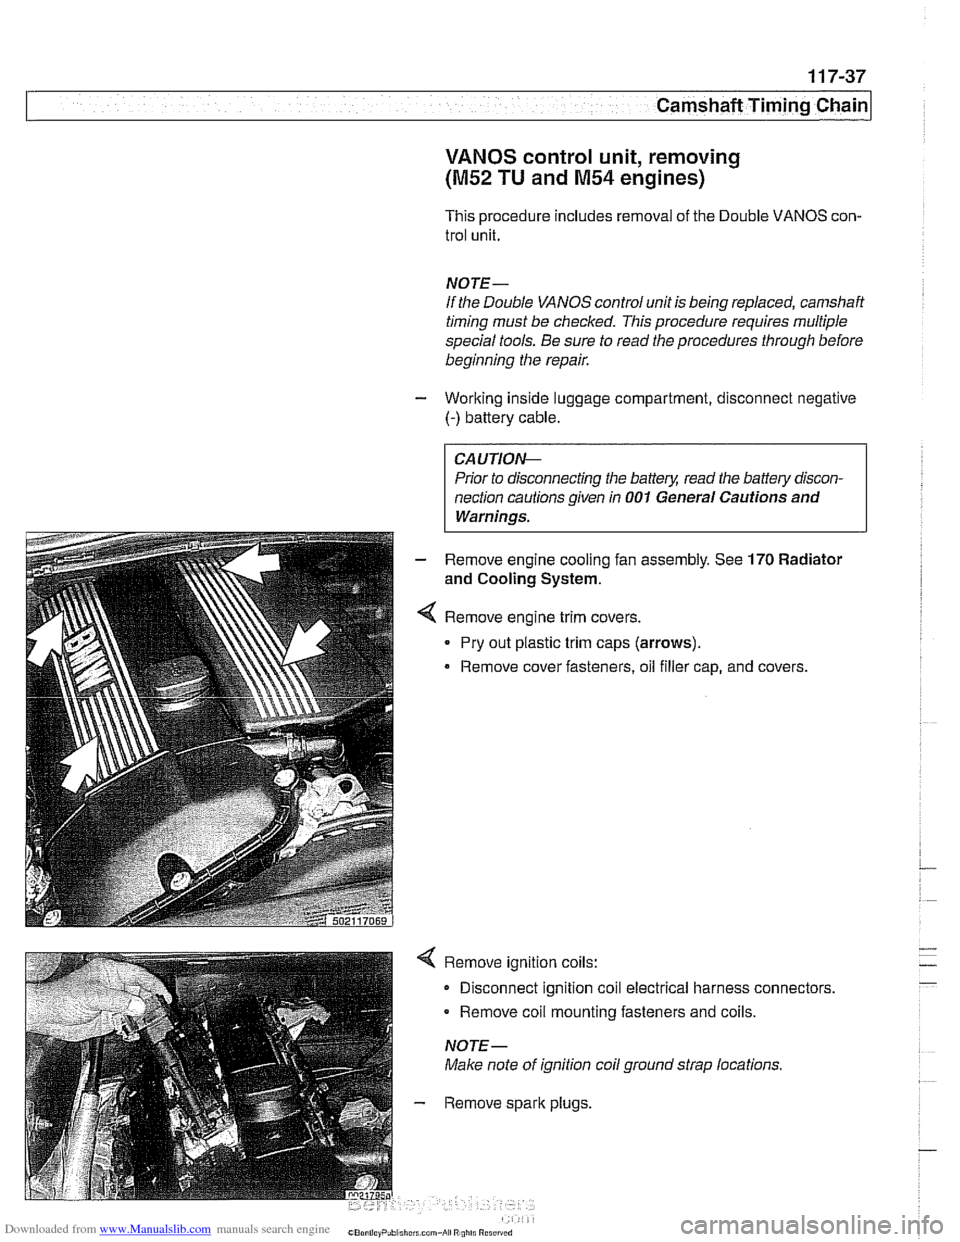
Remove engine trim covers.
Pry out plastic trim caps (arrows).
Remove cover fasteners, oil filler cap, and covers.
Remove ignition coils:
Disconnect ignition coil electrical harness connectors.
Remove coil mounting fasteners and coils.
NOTE-
Make note of ignition coil ground strap locations.
Remove spark plugs,
Page 274 of 1002
Downloaded from www.Manualslib.com manuals search engine
11 7-38
[Camshaft Timing Chain
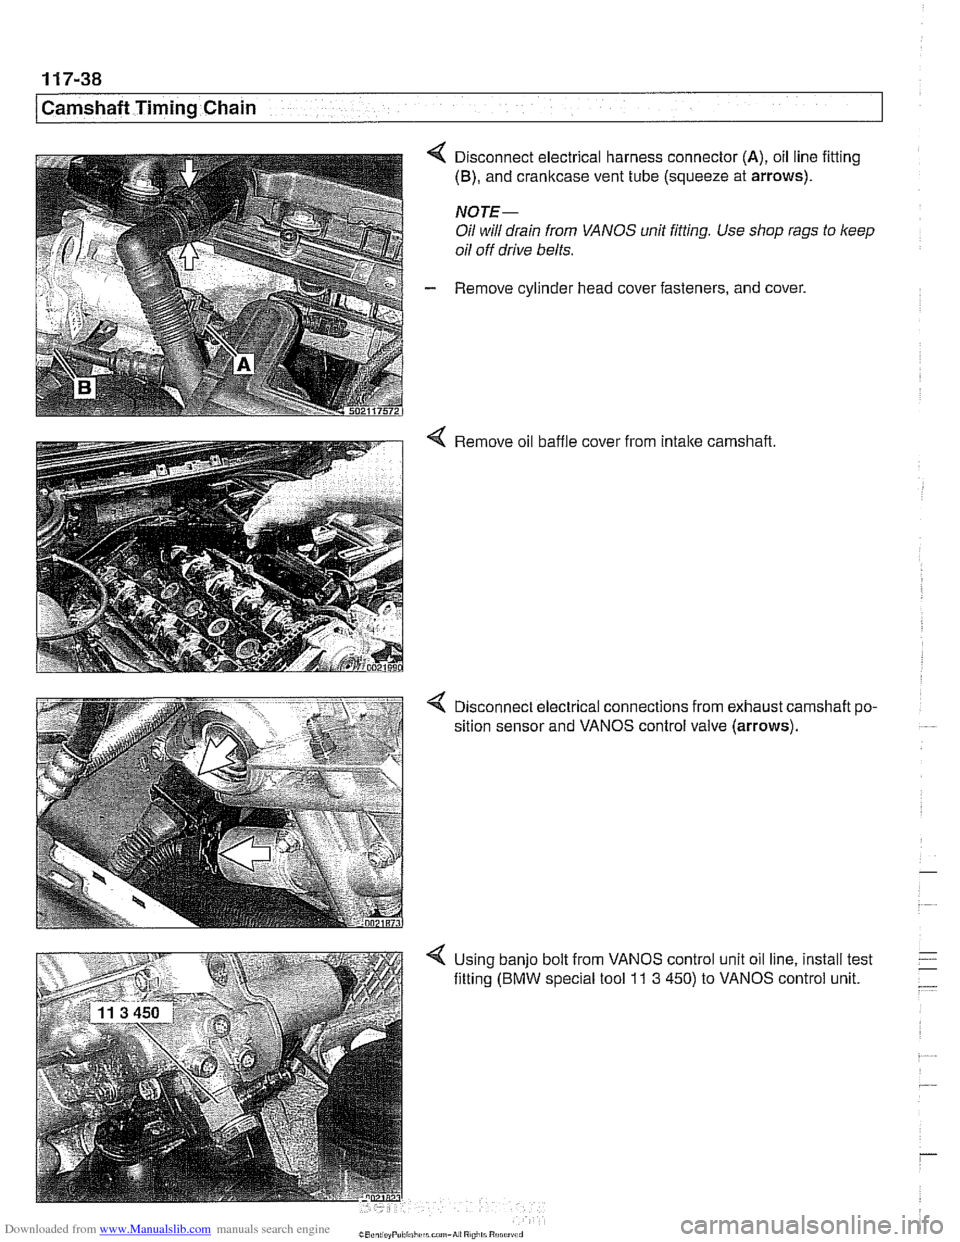
4 Disconnect electrical harness connector (A), oil line fitting
(B), and cranltcase vent tube (squeeze at arrows).
NOJE-
Oil will drain from VANOS unit fitting. Use shop rags to keep
oil off drive belts.
- Remove cylinder head cover fasteners, and cover.
4 Remove oil baffle cover from intake camshaft
4 D~sconnect electrical connections from exhaust camshaft po-
sition sensor and VANOS control valve (arrows).
4 Using banjo bolt from VANOS control unit oil line, install test
fitting
(BMW special tool 11 3 450) to VANOS control unit.