troubleshooting BMW 528i 1998 E39 Owner's Guide
[x] Cancel search | Manufacturer: BMW, Model Year: 1998, Model line: 528i, Model: BMW 528i 1998 E39Pages: 1002
Page 740 of 1002
Downloaded from www.Manualslib.com manuals search engine
---
Rear Suspension
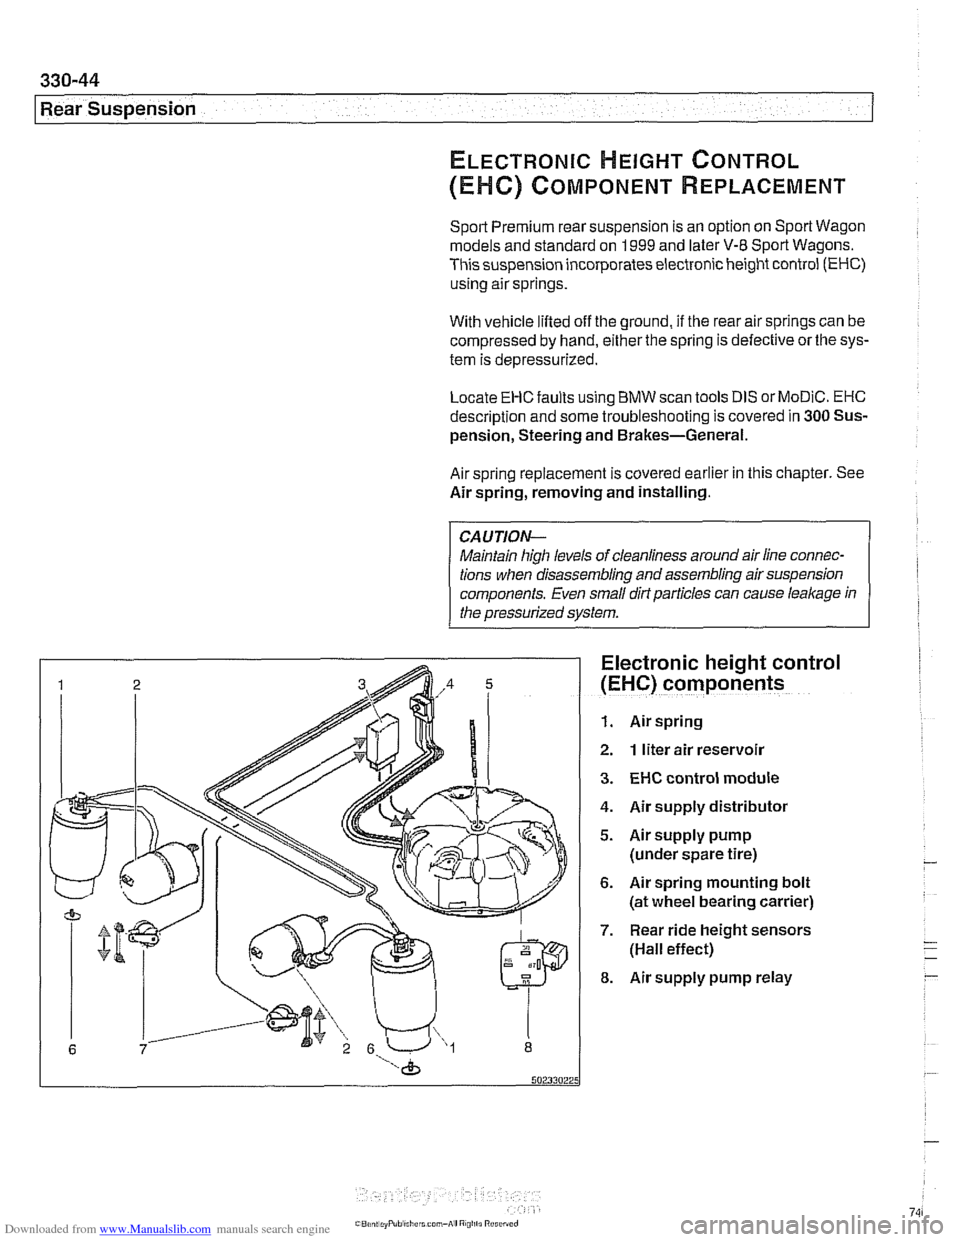
ELECTRONIC HEIGHT CONTROL
(EHC) COMPONENT REPLACEMENT
Sport Premium rear suspension is an option on Sport Wagon
models and standard on
1999 and later V-8 Sport Wagons.
This suspension incorporates electronic height control
(EHC)
using air springs.
With vehicle lifted off the ground,
if the rear air springs can be
compressed by hand, either the spring is defective or the sys-
tem is depressurized.
Locate
EHC faults using BMW scan tools DIS or MoDiC. EHC
description and some troubleshooting is covered in 300 Sus-
pension, Steering and Brakes-General.
Air spring replacement is covered earlier in this chapter. See
Air spring, removing and installing.
CAUTION-
Maintain high levels of cleanliness around air line connec-
tions when disassembling and assembling air suspension
components. Even
small dirt particles can cause leakage in
the pressurized system.
Electronic height control
(EHC) components
1. Air spring
2. 1 liter air reservoir
3. EHC control module
4. Air supply distributor
5. Airsupply pump
(under spare tire)
6. Air spring mounting bolt
(at wheel bearing carrier)
7. Rear ride height sensors
(Hall effect)
8. Air supply pump relay
Page 763 of 1002
Downloaded from www.Manualslib.com manuals search engine
General ........................... .34 0.2
Special Tools
....................... .34 0.2
E39 brake system
.................... .34 0.4
Electronic braking and stability control
.... .34 0.4
Troubleshooting
..................... .34 0.5
Warnings and cautions
................ .34 0.7
Bleeding Brakes ................... .34 0.8
Brakes, bleeding
..................... .34 0.9
Brake Pads, Calipers and Rotors ... .34 0.1 1
Braking system components .......... .34 0.11
Brake pads,
checking and replacing ..... .34 0.12
Brake rotors, removing and installing
.... .34 0.15
Master Cylinder .................. .34 0.16
Master cylinder, removing and installing
. .34 0.17
Brake Booster .................... .349 0.1
Brake booster check valve
............ .34 0.19
Brake booster, removing and installing
.. .34 0.20
Parking Brake .................... .34 0.22
Parking brake components
............ .34 0.22
Parking
brake, adjusting .............. .34 0.22
Parking bralte shoes, removing
and installing
....................... .34 0.23
Parking
brake cable, replacing ......... .34 0.24
ABS Component Replacement ..... 340-26
Wheel speed sensor. replacing
......... 340-26
ABS impulse wheel
.................. 340-27
DSC lateral acceleration or
rotational rate (yaw) sensor. replacing
... 340-27
DSC steering angle sensor.
removing and installing
............... 340-28
DSC precharge pump.
removing and installing (1998 models)
... 340-29
DSC pressure sensor
(1 999 - 2002 models) ................ 340-30
ABS /traction electronic control
module
(1 997 -1 998 models) .......... 340-31
ABS
/ DSC control module
(1 999
- 2002 models) ................ 340-31
ABS
/ traction control hydraulic unit.
removing and installing
............... 340-31
Page 767 of 1002
Downloaded from www.Manualslib.com manuals search engine
Brakes
Troubleshooting
Brake performance is mainly affected by three things:
Q Level and condition of brake fluid
Ability of bralte system to create and maintain pressure
Condition of friction components
Air in bralte fluid will
make the brake pedal feel spongy during
braking
orwill increase the bralte pedal force required to stop.
Fluid contaminated by moisture or dirt can corrode the sys-
tem. lnspect the brake fluid inside the reservoir. If it is dirty or
murky, or is more then two years old, replace fluid.
To
check the function of the master cylinder hold the bralte
pedal down hard with the engine running. If the pedal slowly
falls to the floor, either the master cylinder is leaking internal-
ly, or fluid is leaking externally.
lnspect the rotors for glazing, discoloration and scoring.
Steering wheel vibration while braking at speed is often
caused by warped rotors, but can also be caused by worn
suspension components.
When troubleshooting, keep in mind that tire inflation, wear
and temperature can all have an affect on braking. See
300
Suspension, Steering and Brakes-General for additional
suspension and brake system troubleshooting.
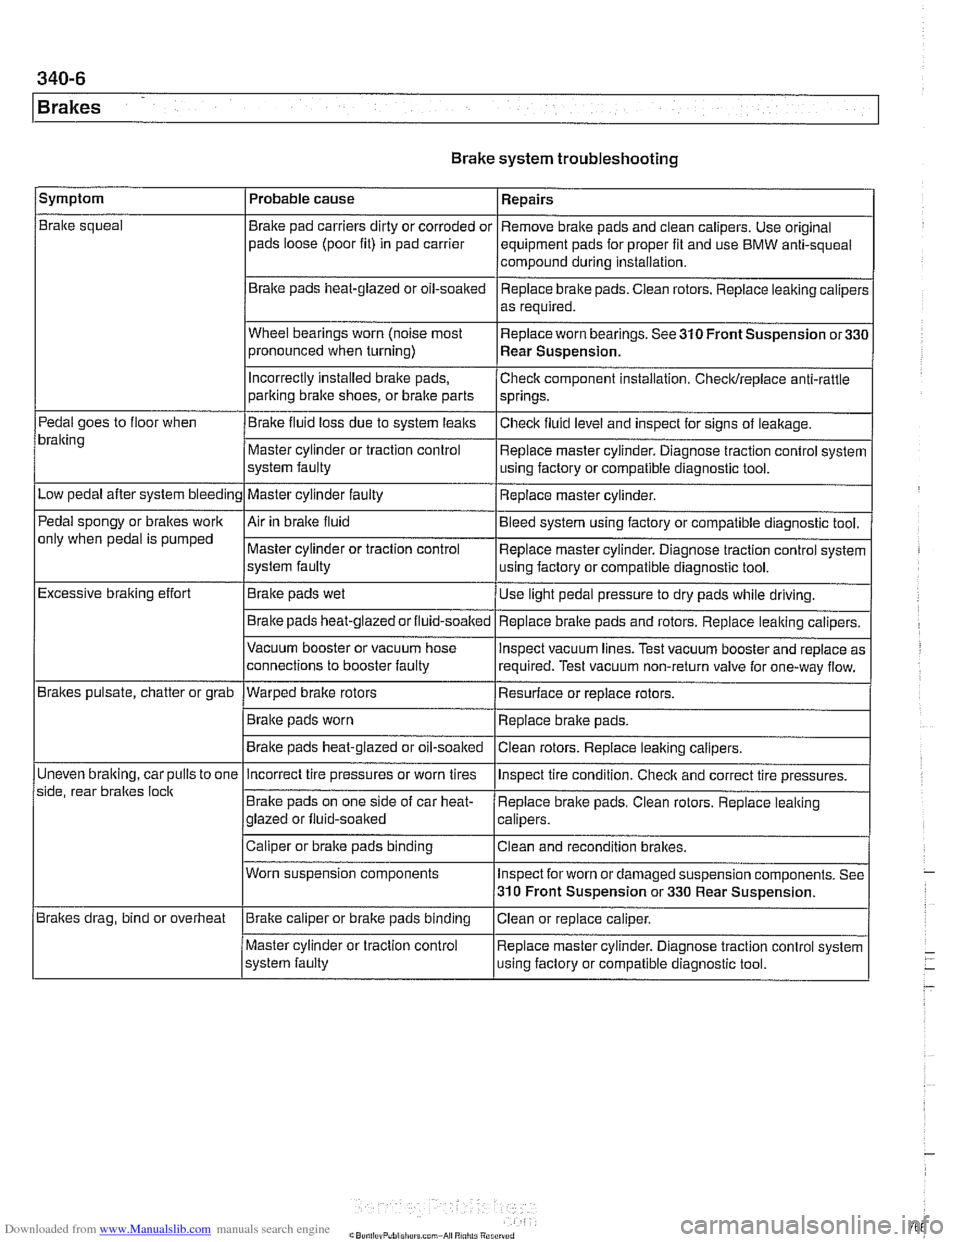
The table Brake system troubleshooting lists symptoms of
brake problems, probable causes, and suggested corrective
actions. Unless noted otherwise, relevant repairs are de-
scribed later in this repair group.
Page 768 of 1002
Downloaded from www.Manualslib.com manuals search engine
340-6
1 Brakes
Brake system troubleshooting
/symptom I Probable cause 1 Repairs
Brake squeal
Pedal goes to floor when
bralting
Low pedal after system bleeding
Pedal spongy or brakes work
only when pedal is pumped
Excessive braking effort
Brakes pulsate, chatter or grab
Uneven
bralting, car pulls to one
side, rear braltes
loclt
Brakes drag, bind or overheat Brake
pad carriers dirty or corroded or
pads loose (poor fit) in pad carrier
Braite pads heat-glazed or oil-soaked
Wheel bearings worn (noise most
pronounced when turning)
Incorrectly Installed brake pads,
parking bralte shoes, or bralte parts
Brake fluid loss due to system leaks
Master cylinder or traction control
system faulty
Master cylinder faulty
Air in braite fluid
Master cylinder or traction control
system faulty
Brake pads wet
Brake pads
heat-glazedorfluid-soalted
Vacuum booster or vacuum hose
connections to booster faulty
--- Warped brake rotors
Brake pads worn
Brake pads heat-glazed or oil-soaked Remove
brake pads and clean calipers. Use original
equipment pads for proper fit and use BMW anti-squeal
compound during installation,
Replace brake pads. Ciean rotors. Replace leaking caliper:
as required.
Replace worn bearings. See 310 Front Suspension
or33C
Rear Suspension.
Check component installation. Checldreplace anti-rattle
springs.
Checlt fluid level and inspect for signs of leakage.
Replace master cylinder. Diagnose traction control system
using factory or compatible diagnostic tool.
Replace master cylinder.
Bleed system using factory or compatible diagnostic tool.
Replace master cylinder. Diagnose traction control system
using factory or compatible diagnostic tool.
Use light pedal pressure to dry pads while driving.
Replace
bralte pads and rotors. Replace leaking calipers.
lnspect vacuum lines. Test vacuum booster and replace as
required. Test vacuum non-return valve for one-way flow.
Resurface or replace rotors.
Replace brake pads.
Clean rotors. Replace leaiting calipers.
Incorrect tire pressures or worn tires
Brake pads on one side of car heat-
glazed or fluid-soaked
Caliper or brake pads binding
Worn suspension components
Brake caliper or brake pads binding
Master cylinder or traction control
system faulty lnspect
tire condition. Checlt and correct tire pressures.
Replace brake pads. Clean rotors. Replace leaking
calipers.
Clean and recondition brakes.
Inspect for worn or damaged suspension components. See
310 Front Suspension or 330 Rear Suspension.
Ciean or replace caliper.
Replace master cylinder. Diagnose traction control system
using faclory or compatible diagnostic tool.
Page 802 of 1002
Downloaded from www.Manualslib.com manuals search engine
400-8
Body-General
Airbags
Front airbags, s~de a~rbags, pyrotechnic seat belt tensioners
and the Battery Safety Terminal (BST) are integrated into the
Supplemental Restraint System (SRS) and its variants.
NOTE-
The BMW SRS system is called Multiple Restra~nt System
(MRS). Over the years,
E39 cars were equipped with MRS,
MRS
11, MRS 111. Each version offers varied features and im-
provements over the previous system.
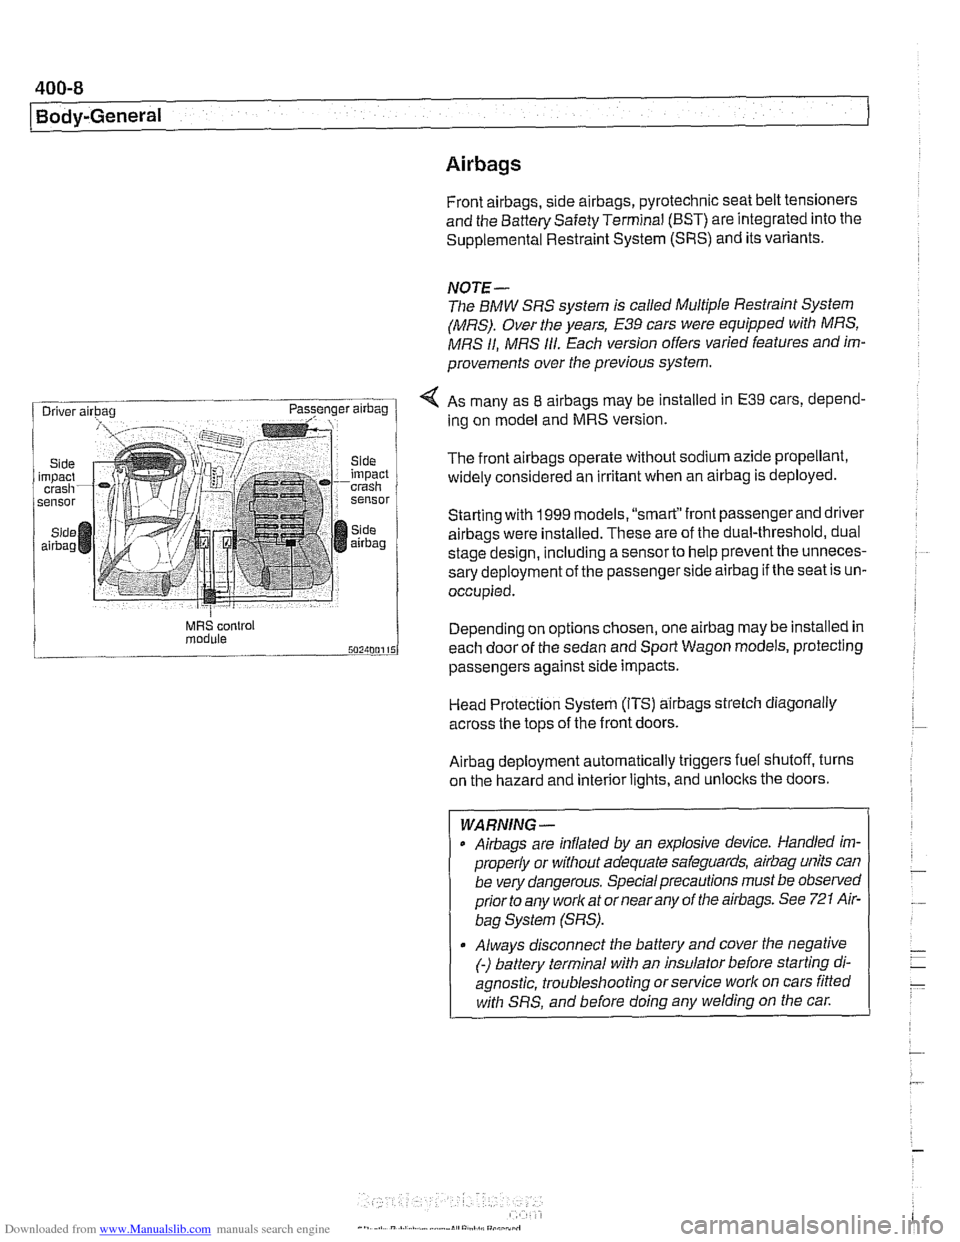
< As many as 8 airbags may be installed in E39 cars, depend-
ing on model and MRS version.
The front
airbags operate without sodium azide propellant,
widely considered an irritant when an
airbag is deployed.
Starting with
1999 models. "smart"front passenger and driver
airbags were installed. These are of the dual-threshold, dual
stage design, including a
sensorto help prevent the unneces-
sary deployment of the passenger side
airbag if the seat is un-
occupied.
MRS control Depend~ng on options chosen, one airbag may be installed in module each door of the sedan and Sport Wagon models, protecting
passengers against
s~de impacts.
Head Protection System (ITS)
airbags strelch diagonally
across the tops of the front doors.
Airbag deployment automatically triggers fuel shutoff, turns
on the hazard and interior lights, and unlocks the doors.
- -
WARNING -
Airbags are inflated by an explosive device. Handled im-
properly or without adequate safeguards,
airbag units can
be very dangerous. Special precautions must be observed
prior to any worlc at or near any of the airbags. See
721 Air-
bag System (SRS).
Always disconnect the battery and cover the negative
(-) battery terminal with an insulator before starting di-
agnostic, troubleshooting or service work on cars fitted
with SRS, and before doing any welding on the
car.
Page 939 of 1002
Downloaded from www.Manualslib.com manuals search engine
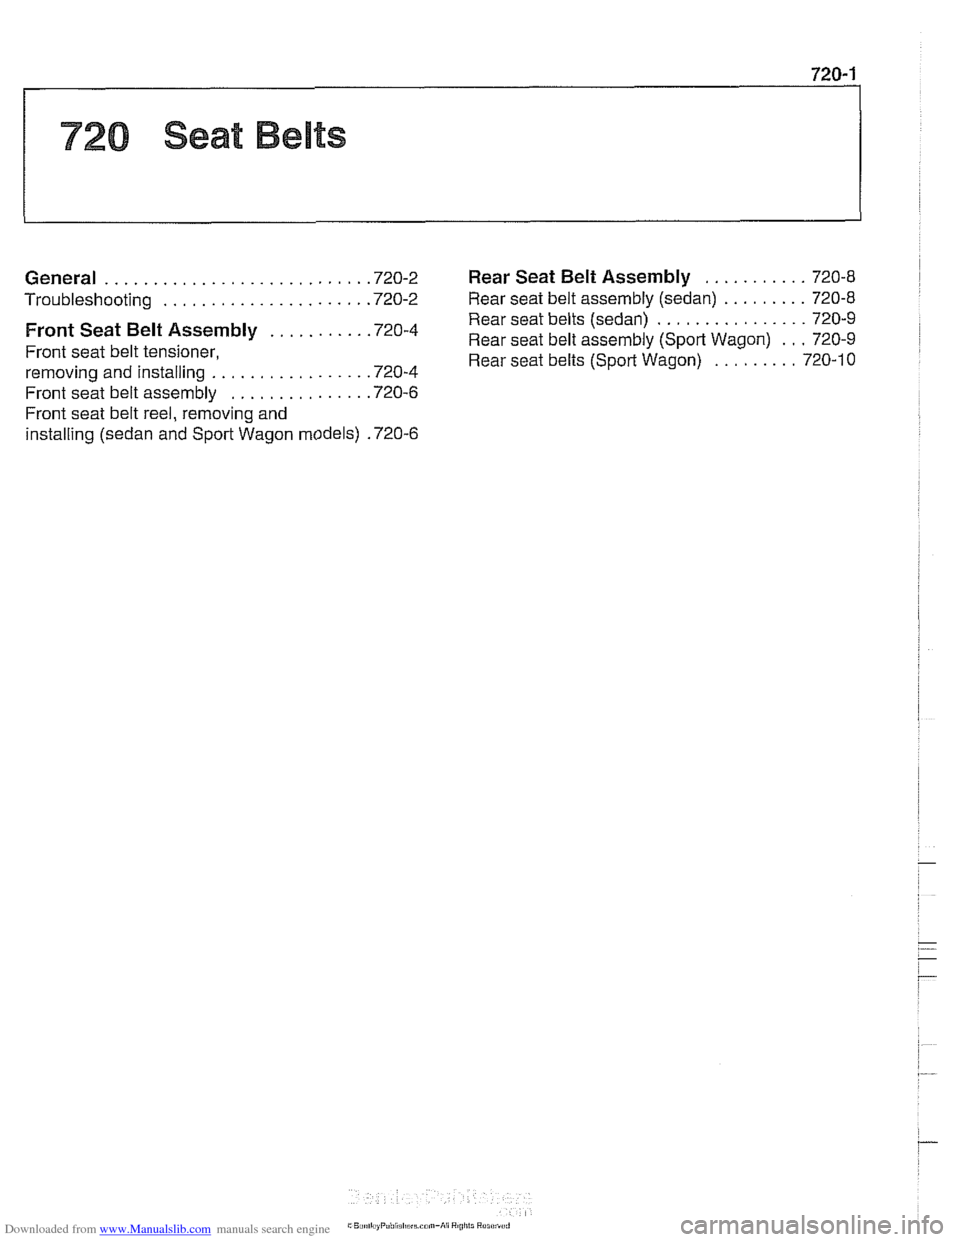
........... General ........................... .72 0.2 Rear Seat Belt Assembly 720-8
......... Troubleshooting ..................... .72 0.2 Rear seat belt assembly (sedan) 720-8
................ Rear seat belts (sedan) 720-9
... .......... Front Seat Assembly '720-4 Rear seat belt assembly (Sport Wagon) 720-9
Front seat belt tensioner,
......... Rear seat belts (Sport Wagon) 720-10
removing and installing ................ .72 0.4
Front seat belt assembly
.............. .72 0.6
Front seat belt reel. removing and
installing (sedan and Sport Wagon models)
.72 0.6
Page 940 of 1002
Downloaded from www.Manualslib.com manuals search engine
I Seat Belts
This section covers repairs to the following seat belts sys-
tems. See the table below.
IMultIple Restraint Systems I
Years
311 996 - 811 997
Multiple Restraint System electronics integrate seat belt op-
erations and
airbag deployment. Airbag repair information is
covered
in 721 Airbag System (SRS).
Troubleshooting
The seat belt reel should lock when driving quicltly through
curves,
during severe braking or in case of a collision. The au-
tomatic reel does not require any servicing and should never
be opened.
- In case of an accident, follow the seat belt troubleshooting
procedures presented
in the table below.
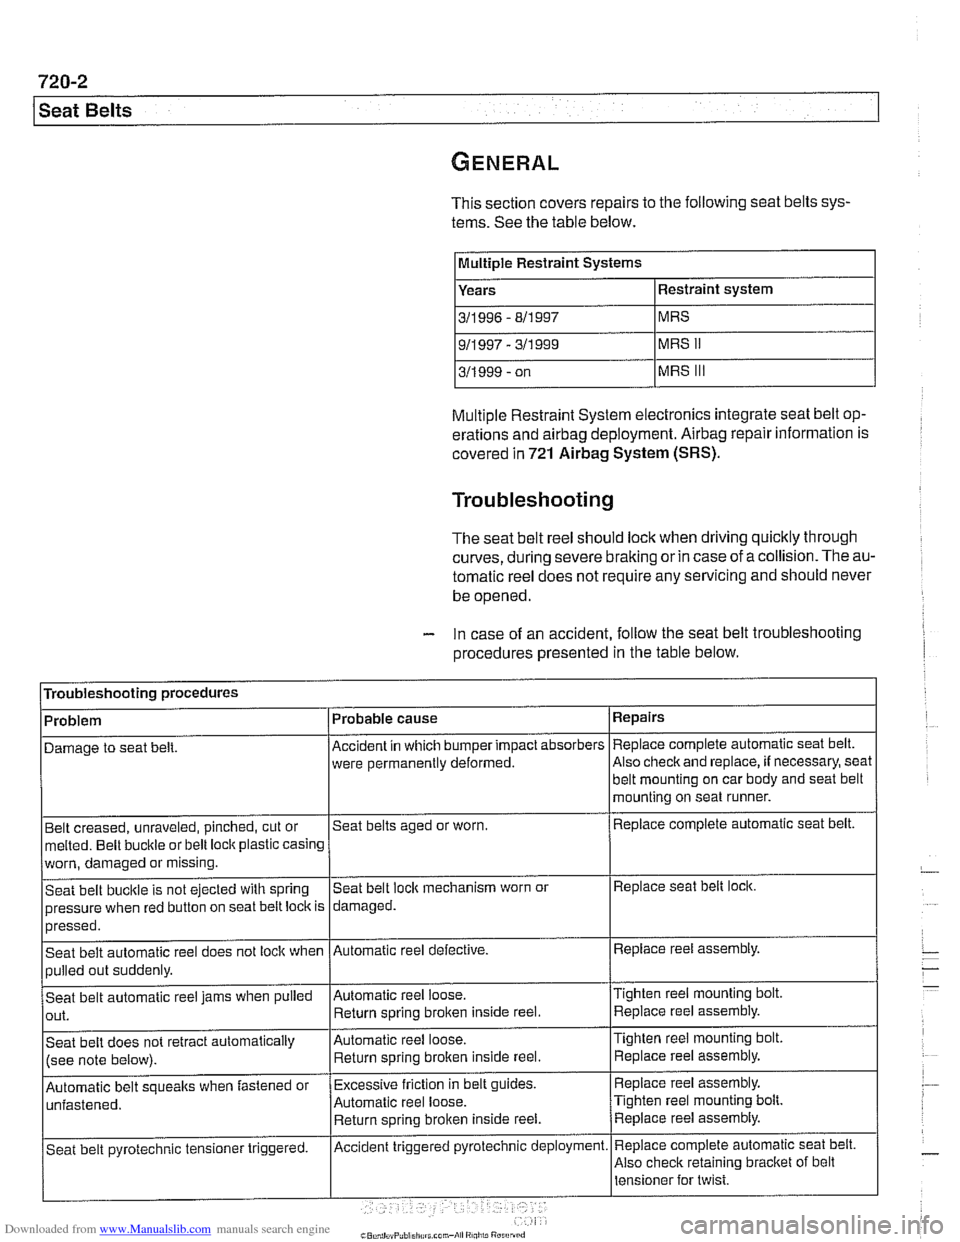
Troubleshooting procedures
Belt creased, unraveled, pinched, cut or
melted. Belt buckle or belt loclt plastic casing Repairs
Replace complete automatic
seat belt.
Also
checlt and replace, if necessary, seat
Problem
Damage to seat
belt.
worn, damaged or missing.
Seat belt bucltle is not ejected with spring
pressure when red button on seat belt loclt is
>--- I I
Automatic belt soueaks when fastened or I~xcessive friction in belt guides. I Replace reel assembly.
Probable
cause
Accident in which bumper impact absorbers
were permanently deformed.
Seat belts aged or worn.
pressed.
Seat belt automatic reel does not lock when
pulled out suddenly.
Seat belt automatic reel jams when pulled
out.
Seat belt does not retract automatically
(see note below).
Automatic reel loose. Return sorino broken inside reel. belt mounting on car body and
seat belt
mounting on seat runner.
Replace complete automatic seat belt.
Seat belt
loclt mechanism worn or
damaged.
Tighten reel mounting bolt Replace reel assembly.
Replace seat belt lock.
Automatic reel defective.
Automatic reel loose. Return spring
broken inside reel.
Automatic reel loose.
Return spring brolten inside reel. Replace reel
assembly.
Tighten reel mounting
bolt.
Replace reel assembly.
Tighten reel mounting bolt. Replace reel assembly.
~ ~-~~ , - I'
Replace complete automatic seat belt.
Also check retaining bracket of belt
Seat belt
pyrotechnic tensioner triggered. Accident triggered pyrotechnic deployment.
Page 953 of 1002
Downloaded from www.Manualslib.com manuals search engine
Airbag System (SRS)~
Warnings
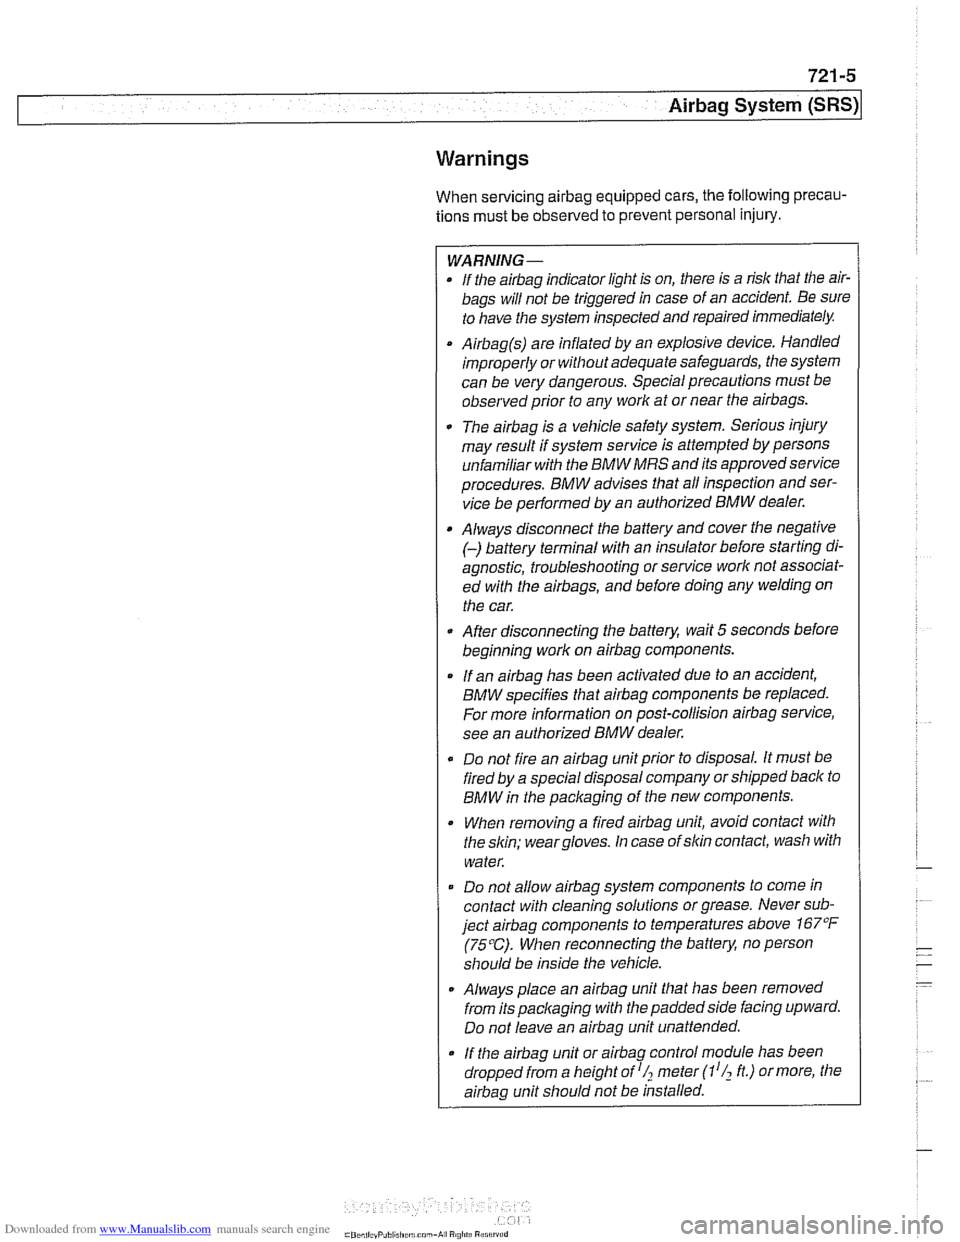
When servicing airbag equipped cars, the following precau-
tions must be
observed to prevent personal injury.
WARNING-
. If the airbag indicator light is on, there is a risk that the air-
bags will not be triggered in case of an accident Be sure
to have the system inspected and repaired immediately
Airbag(s) are inflated by an explosive device. Handled
improperly or witliout adequate safeguards, the system
can be very dangerous. Special precautions must be
observed prior to any work at or near the airbags.
0 The airbag is a vehicle safety system. Serious injury
may result if system service is attempted by persons
unfamiliar with the BMW
MRS and its approved service
procedures. BMW advises that all inspection and ser-
vice be performed by an authorized BMW dealer.
Always disconnect the battery and cover the negative
(-) battery terminal with an insulator before starting di-
agnostic, troubleshooting or service
work not associat-
ed
with the airbags, and before doing any welding on
the car.
0 After disconnecting the battery, wait 5 seconds before
beginning work on
airbag components.
* If an airbag has been activated due to an accident,
BMW specifies that
airbag components be replaced.
For more information on post-collision
airbag service,
see an authorized BMW dealer.
Do not fire an
airbag unit prior to disposal. It must be
fired by a special disposal company or shipped back to
BMW in the packaging of the new components.
When removing a fired
airbag unit, avoid contact with
the
skin; weargloves. In case ofskin contact, wash with
water.
Do not allow
airbag system components to come in
contact with cleaning solutions or grease. Never sub-
ject
airbag components to temperatures above 167°F
(75°C). When reconnecting the battery, no person
should be inside the vehicle.
Always place an
airbag unit that has been removed
from its
packaging with the paddedside facing upward.
Do not leave an
airbag unit unattended.
0 If the airbag unit or airbag control module has been
dropped from a height of
'/? meter (I//: ft.) or more, the
airbag unit should not be installed.
Page 992 of 1002
Downloaded from www.Manualslib.com manuals search engine
2 INDEX
Battery, starter, alternator
alternator (generator)
121-10
6-cylinder engine, removingi
installing 121-15
M62 engine 121-16
M62 TU engine (water cooled)
121-18
battery
121-5 charging 121-9
safety terminal 121-3
testing 121-5 charging system, troubleshooting
121-12
starter
121-1 9
6-cylinder engine, removingi instaliinq 121-20 . V-8 engine, rernovinglinsialiing
121-21
solenoid, removinglinstalling
121-23 troubleshooting 121-19
see also Maintenance
Bearing, wheel
see Front suspension
see also Rear suspension
Belts see Maintenance, drive belts
Blade, wiper
see Wipers and Washers
Blower motor see
A/C
BMW emblem
see Exterior trim
BMW special tools 010-18 see also special tools section at
beginning
of each repair group
Body dimensions 400-2
interior features
400-9 salety and security 400-7
Body side molding
see Exterior trim
Bonnet see Engine hood
Boot see Trunk
Brake fluid
020-24, 340-8
Brake fluid pressure sensor
340-30
Brakes
ABS, ASC or DSC system
300-12
component replacement 340-26
ASCIDSC switch
see Switches
bleeding
bralces 340-8
brake booster 340-1 9 bralce Dads. caiioers and rotors ,., 340-1 1
descriotion 300-10
e~ectrdnic brake & stability 300-11
light switch
see Switches
master cylinder
340-16 pariking brake 340-22
troubleshooting 340-5
Bulbs see Lights
Bumper
lront 510-6 height, adjusting 510-12
rear 510-9
Bus system
600-4
Camber
320-33
Camshaft
removingiinslaiiing
M52 engine 116-12
M52 TU
/ M54 engine 116-1 9 M62 engine 11 6-39
wear
116-6
Camshaft position sensors
see ignition system
Camshaft timing chain
adjusting M52 engine
117-22
M52 TU I M54 engine 117-43
M62 engine 117-79 removinglinstalling
M52 engine 117-26
M52TU 1 M54 engine 113-46.116-
28
M62 engine 117-66
Capacities, fluid
020.10
Car rnemorvlicev memorv . . 600-10
see also Centrai
lociking
Carbon canister, activated
see Fuel
tank
Caster
320-33
Catalytic converter and oxygen sensor 020-19
see also Exhaust system: exhaust
manilolds
Cautions
001-3
CD changer
650-4
Center bearing, driveshaft
see Driveshait
Center brake light
sedan
630-13
Center console
513-3
Centrai body electronics (ZKE 111)
600-6
Central locking
car memoryiey memory 515.12 general module iunctions 515-2
remote entry (FZV) 515-8
remote lkey initialization 515-10 single lociddouble ioclk 515-6
switch 515-4
Chain
see Camshaft liming chain
Characteristic map (electrically heated) thermostat
see Electrically heated thermostat
Charging system
see Battery, starter, alternator
Cluster see instruments
Clutch fluid see Maintenance
hydraulics
210-4
mechanical 210-9
switch
see Switches, pedal ciuster
variations
210.10
Codes, fault OED-1
Coil
see Ignition system
Coil spring
see Front suspension
see also Rear
suspe nsion
Page 993 of 1002
Downloaded from www.Manualslib.com manuals search engine
WARNING
Your common sense, good
judgement, and general alertness are
crucial lo sale and
successlul service
work. Belore attempling any work on
your BMW, be sure to read 001
General Warnings and Cautions
and lhe copyright page
a1 llle Iron1 01
the manual. Review lliese warnings
and cautions each time you prepare
lo work on your
BMW Please also
read any warnings and
caulions lhal
accompany the procedures In !he
manual.
Component locations
see Electrical system
Compression test
113-5
Compressor see
AlC
Condenser see
AlC
Constant velocity (CV) joint
see Maintenance
see also
Driveshall
see also Drive axles
Consumer cutoff
600-10
Control arm see Front suspension
see also Rear suspension,
suspension arms
Coolant (antifreeze) see Maintenance
see also Cooling system
Coolant pump
see Cooling system Cooling system
coolant bleeding
170-14 6-cylinder engine, draininglfilling
170-10
V-8 engine, draininglfilling 170-12
coolant pump 170-3
6-cyiinder engine, replacing 170-1 9
V-8 engine, replacing 170-20 cooling fan 170-4
viscous ciutch fan, removingi
installing 170-14
electric fan, removlngiinstailing 170-1 5
expansion tank, removinglinstalling
170-22
electrically heated (ciiaracterislic
map) therrnostat 170-4
radiator, removinglinstaliing 170-22
service
see Maintenance
therrnostat 170-16
transmission fluid heat exchanger
170-5 troubleshooting 170-7
combuslion leal( test 170-10
pressure test
170-9
Crankshaft oil seals
iront
117-6
rear 11 9-6
Crankshaft speed sensor
see Ignition syslem
Crash sensor
see
Airbag system (SRS), side-impact
airbag crasii sensor
Cruise control clutch switch 612-9
CV joint
see Maintenance
see also Driveshalt
see also Drive axles
CV joint boot
see Maintenance
see also Drive axles
Cylinder head removinglinslaliing
M52 engine 113-8
M52 TU / M54 engine 113-22
M62 engine 113-56
Cylinder head and valvetrain
hydraulic lifters, checking and
replacing
116-7 leak test 116-5 valves 11 6-56
see
alsocylinder head Dashboard
513-7
Deck
lid
seeTrunk lid
Diagnostic monitors
OED-4
Diagnostic trouble codes
(DTCs)
080-7
Digital multimetel
010-17
Differential see Final drive
DLC (data
link connector) 020-4, OED-4
DME (digital motor electronics)
see
130 under appropriate fuel
injection system
see also ignition system
DM-TL (detection module-tank leak)
see
Fuel lank, leak deteclion unit
Drive
belts
see Maintenance
Dome light
seeLighls, interior lights
Door
door
check, replacing 411-4
hinge adjustment 41 1-5
loci(
see Door lock see also Central locking
removinglinslaliing 41
1-2
panel, removinglinstaliing 41 1-7 window
see Door window
Door
check
see Door
Door
handle
see Door lock
Door glass
see Door window
Door
lock
handles and loci(s 515-16
see also Central locking
Door
molding
510-13
Door panel see Door