Reverse BMW 528i 1999 E39 Workshop Manual
[x] Cancel search | Manufacturer: BMW, Model Year: 1999, Model line: 528i, Model: BMW 528i 1999 E39Pages: 1002
Page 690 of 1002
Downloaded from www.Manualslib.com manuals search engine
320-32
Steering and Wheel Alignment
Center tie
rod, replacing
- Raise front of car. Remove splash shield from under engine.
WARNING-
Make sure tlie car is firmly supported on jack stands de-
signed for the purpose. Place jack stands beneath structural
cliassis points. Do not place jack stands under suspension
parts.
- Measure length of left and right (outer) tie rods. Write down
measurements.
NOTE-
Accurate measurement of the tie rod end with reference to
the center tie rod will help approximate correct wheel align-
ment when new parts are installed.
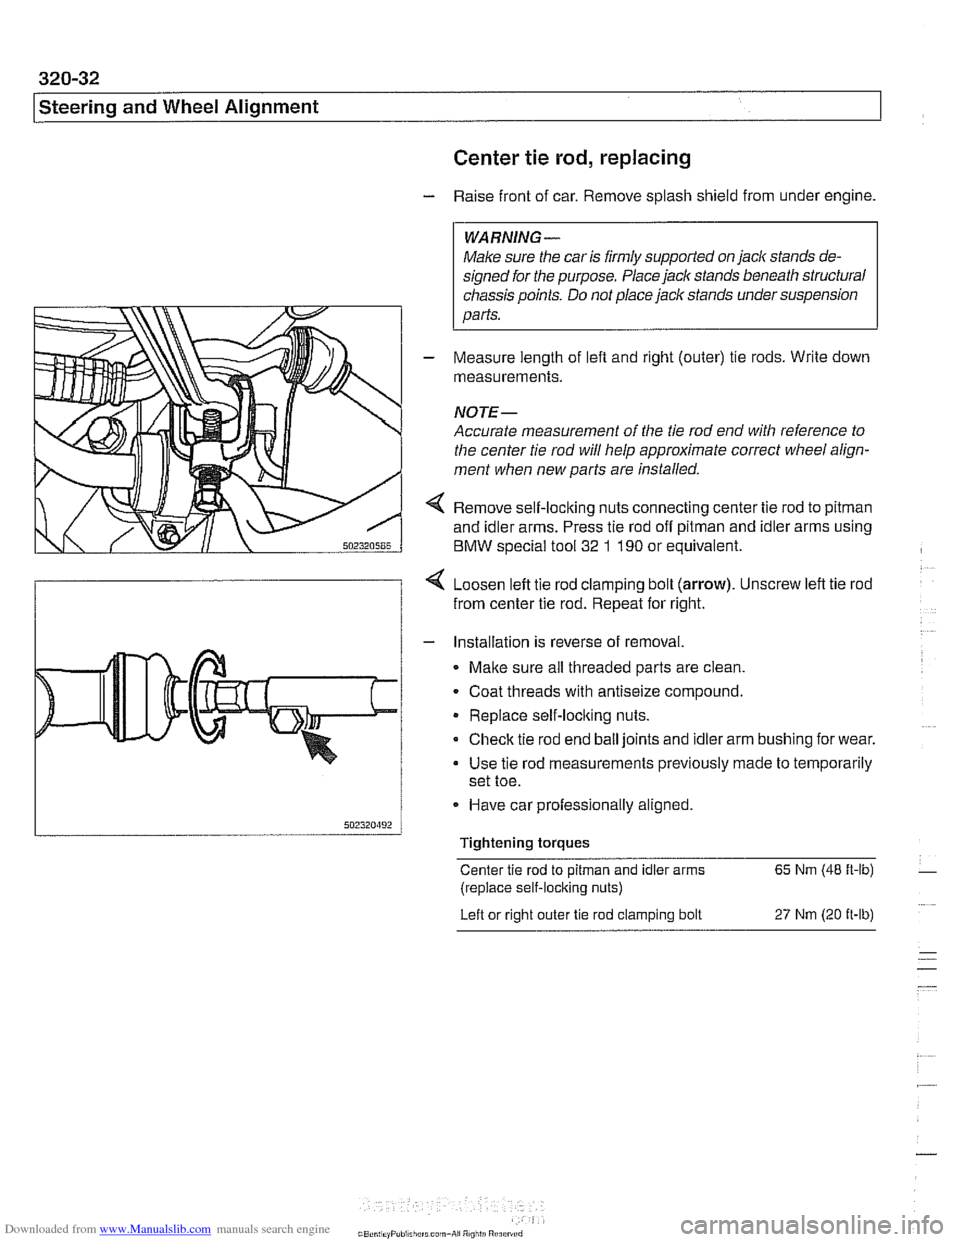
4 Remove self-loclting nuts connecting center tie rod to pitman
and idler arms. Press tie rod off pitman and idler arms using
BMW special tool
32 1 190 or equivalent.
4 Loosen left tie rod clamping bolt (arrow). Unscrew left tie rod
from center tie rod. Repeat for right.
- Installation is reverse of removal.
Malte sure all threaded parts are clean.
. Coat threads with antiseize compound.
Replace self-loclting nuts.
Check tie rod end ball joints and idler arm bushing for wear.
Use tie rod measurements previously made to temporarily
set toe.
- Have car professionally aligned.
Tightening torques
Center tie rod to
pitman and idler arms 65 Nm (48 ft-lb)
(replace self-locking nuts)
Left or right outer
tie rod clamping bolt 27 Nm (20 it-lb)
Page 702 of 1002
Downloaded from www.Manualslib.com manuals search engine
330-6
Rear Suspension
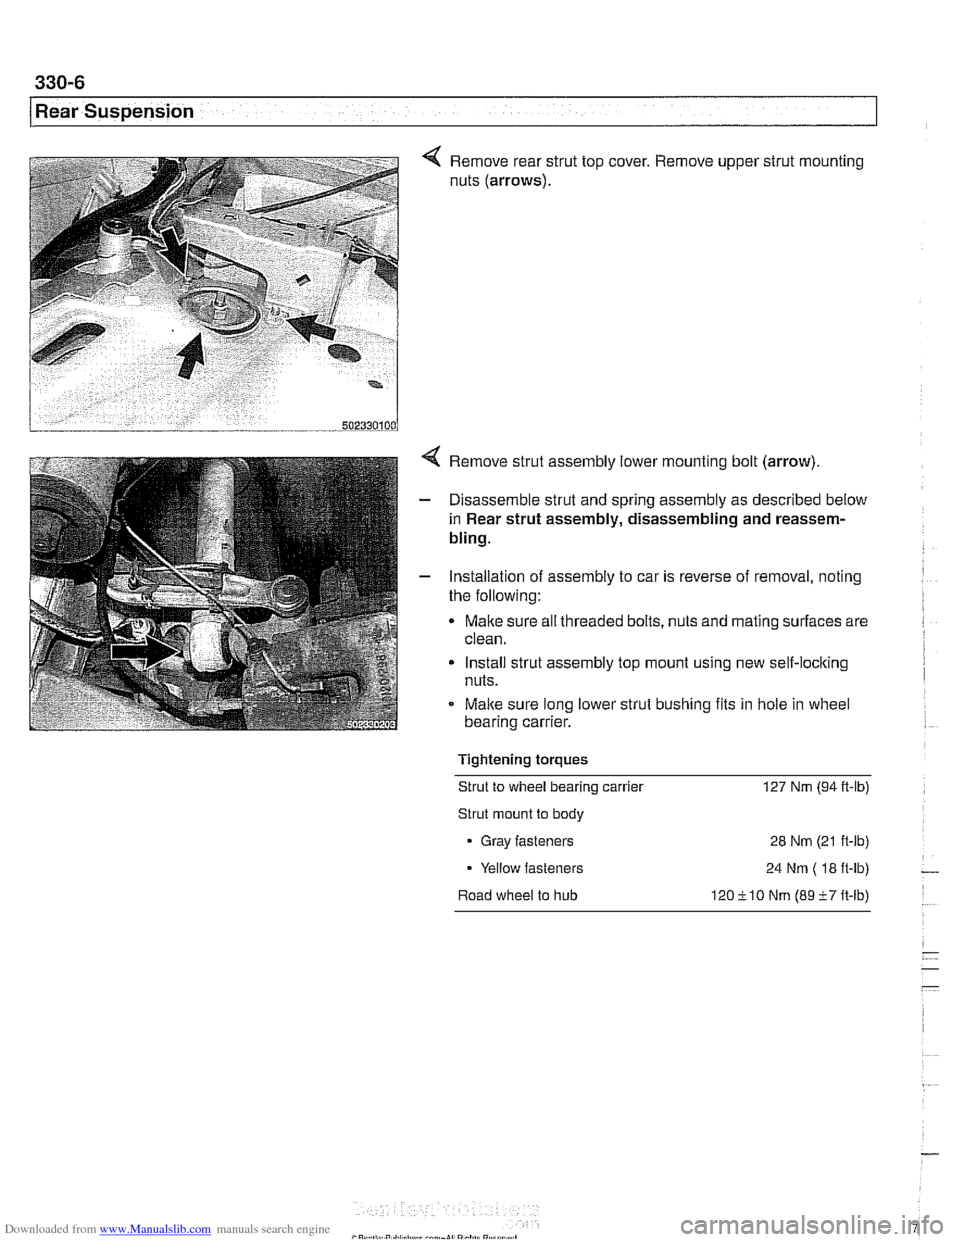
4 Remove rear strut top cover. Remove upper strut mounting
nuts (arrows).
Remove strut assembly lower mounting bolt (arrow).
Disassemble strut and spring assembly as described below
in Rear strut assembly, disassembling and reassem-
bling.
Installation of assembly to car is reverse of removal, noting
the following:
Make sure all threaded bolts, nuts and mating surfaces are
clean.
Install strut assembly top mount using new self-loclting
nuts.
Malte sure long lower strut bushing fits in
hole in wheel
bearing carrier.
Tightening torques Strut to wheel bearing carrier 127 Nm (94
it-lb)
Strut mount to body
Gray fasteners 28 Nm (21 ft-lb)
Yellow fasteners 24 Nm
( 18 it-lb) -
Road wheel to hub 120ilO Nm (89i7ft-lb)
Page 706 of 1002
Downloaded from www.Manualslib.com manuals search engine
330-1 0
/Rear Suspension
- Remove rubber protective cap from shock absorber upper
mount.
- Remove shock absorber upper mounting nuts.
- Remove shock absorber lower mounting bolt. Lower shock
absorber out of wheel housing.
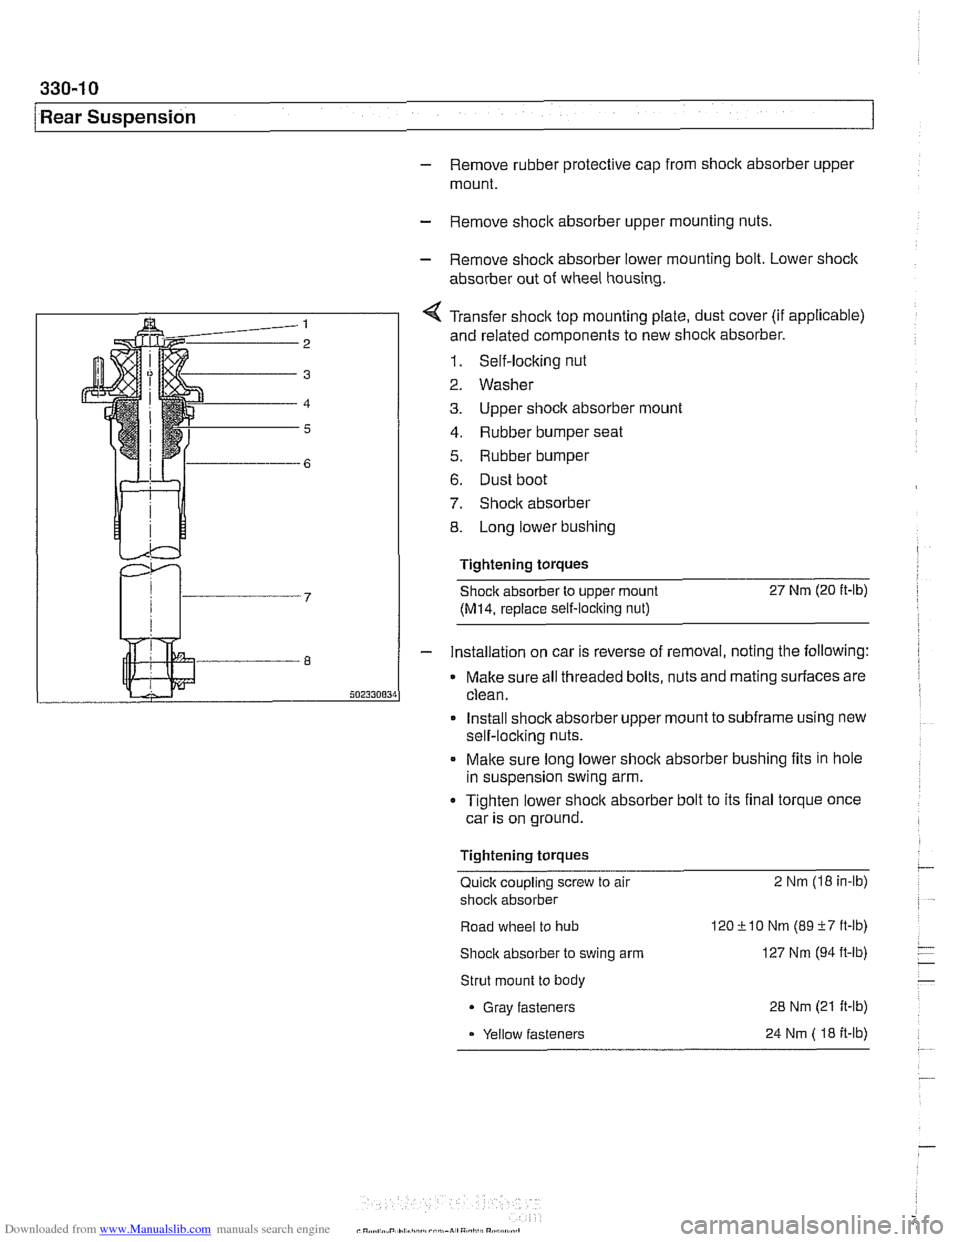
< Transfer shock top mounting plate, dust cover (if applicable)
and related components to new shoclc absorber.
1. Self-locking nut
2. Washer
3. Upper siioclc absorber mount
4. Rubber bumper seat
5. Rubber bumper
6. Dust boot
7. Shock absorber
8. Long lower bushing
Tightening torques
Shock absorber to upper mount
27 Nm (20 it-lb)
(M14, replace self-locking nut)
- Installation on car is reverse of removal, noting the following:
Make sure all threaded bolts, nuts and mating surfaces are
clean.
Install shock absorber upper mount to
subframe using new
self-locking nuts.
. Make sure long lower shock absorber bushing fits in hole
in suspension swing arm.
Tighten lower shoclc absorber bolt to its final torque once
car is on ground.
Tightening torques
Quick coupling screw to air 2 Nm (18 in-lb)
shock absorber
Road wheel to
hub 120 &I0 Nm (89 -f7 ft-lb)
Shock absorber to swing arm 127 Nm (94 ft-lb)
Strut mount to body
Gray fasteners
Yellow fasteners
24 Nm ( 18 it-lb)
Page 707 of 1002
Downloaded from www.Manualslib.com manuals search engine
330-1 1
Rear Suspension
Coil spring, removing and installing
Raise car and remove rear wheels.
WARNING-
Make sure the car is firmly supported on jack stands de-
signed for the purpose. Place jack stands underneath struc-
tural chassis points. Do not place jack stands under
suspension parts.
- Remove brake caliper and brake disc. Hang brake caliper
aside with stiff wire. Do not disconnect
bralte fluid hose. See
340 Brakes.
- Remove exhaust system. See 180 Exhaust System.
- Disconnect driveshafl from final drive. See 260 Driveshaft.
- Detach parking bralte cables from mounting bracltets on sub-
frame.
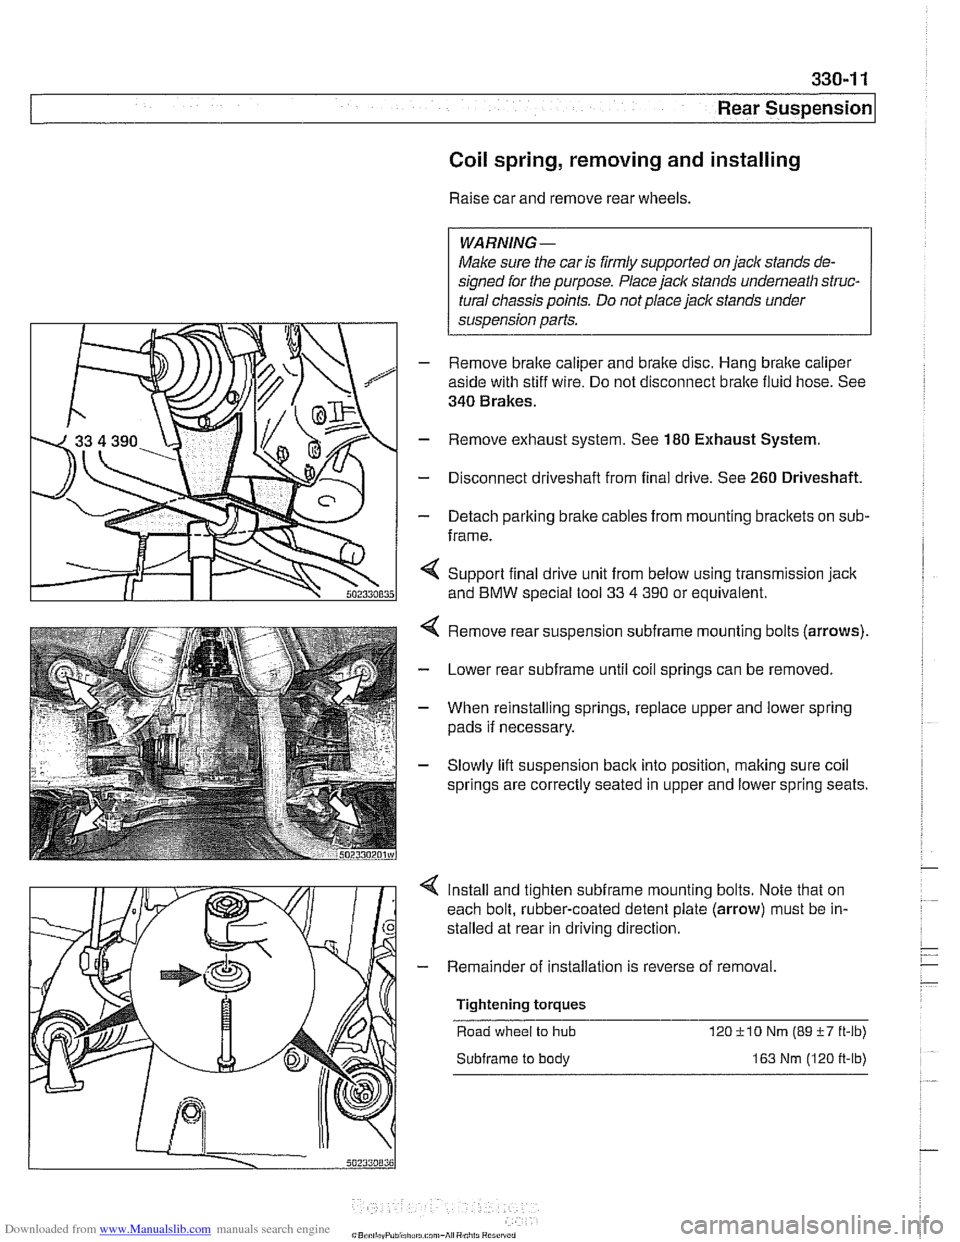
< Support final drive unit from below using transmission jack
and
BMW special tool 33 4 390 or equivalent.
Remove rear suspension
subframe mounting bolts (arrows).
Lower rear
subframe until coil springs can be removed.
When reinstalling springs, replace upper and lower spring
pads if necessary.
Slowly lift suspension
back into position, making sure coil
springs are correctly seated in upper and lower spring seats.
Install and tighten
subframe mounting bolts. Note that on
each bolt, rubber-coated detent plate (arrow) must be in-
stalled at rear in driving direction
- Remainder of installation is reverse of removal
Tightening torques Road wheel
to hub 12OilO Nm (89i-7 ft-lb)
Subframe to body 163 Nm (120 ft-lb)
Page 709 of 1002
Downloaded from www.Manualslib.com manuals search engine
330-1 3
Rear Suspension
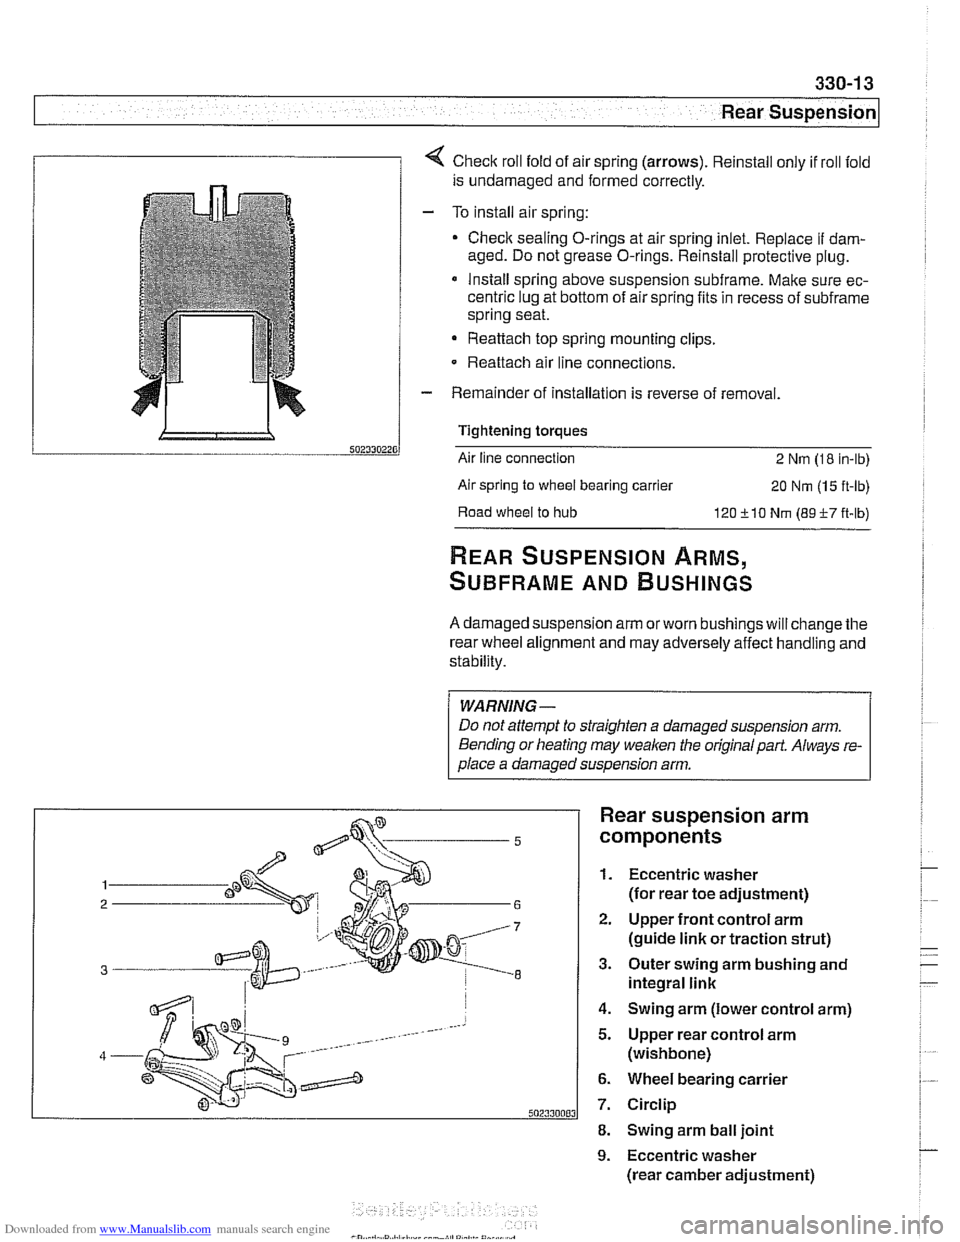
1 1 4 Check roll fold of air spring (arrows). Reinstall only if roll fold
is undamaged and formed correctly.
- To install air spring:
Check sealing O-rings at air spring inlet. Replace
if dam-
aged. Do not grease O-rings. Reinstall protective plug.
* Install spring above suspension subframe. Make sure ec-
centric lug at bottom of air spring fits in recess of
subframe
spring seat.
Reattach top spring mounting clips.
- Reattach air line connections.
- Remainder of installation is reverse of removal.
Tightening torques
Air line connection
2 Nm (1 8 in-lb)
Air spring
to wheel bearing carrier 20 Nm (1 5 ft-lb)
Road
wheel to hub 120 510 Nm (89-F-7 ft-lb)
REAR SUSPENSION ARMS,
SUBFRAME AND BUSHINGS
A damaged suspension arm orworn bushings will change the
rear wheel alignment and may adversely affect handling and
stability.
WARNING-
Do not attempt to straighten a damaged suspension arm.
Bending or heating may
weaken the original part. Always re-
olace a damaoed susoension arm.
Rear suspension arm
components
1. Eccentric washer
(for rear toe adjustment)
2. Upper front control arm
(guide link or traction strut)
3. Outer swing arm bushing and
integral link
4. Swing arm (lower control arm)
5. Upper rear control arm
(wishbone)
6. Wheel bearing carrier
7. Circlip
8. Swing arm ball joint
9. Eccentric washer
(rear camber adjustment)
Page 711 of 1002
Downloaded from www.Manualslib.com manuals search engine
--- .-
Rear ~us~ensionl
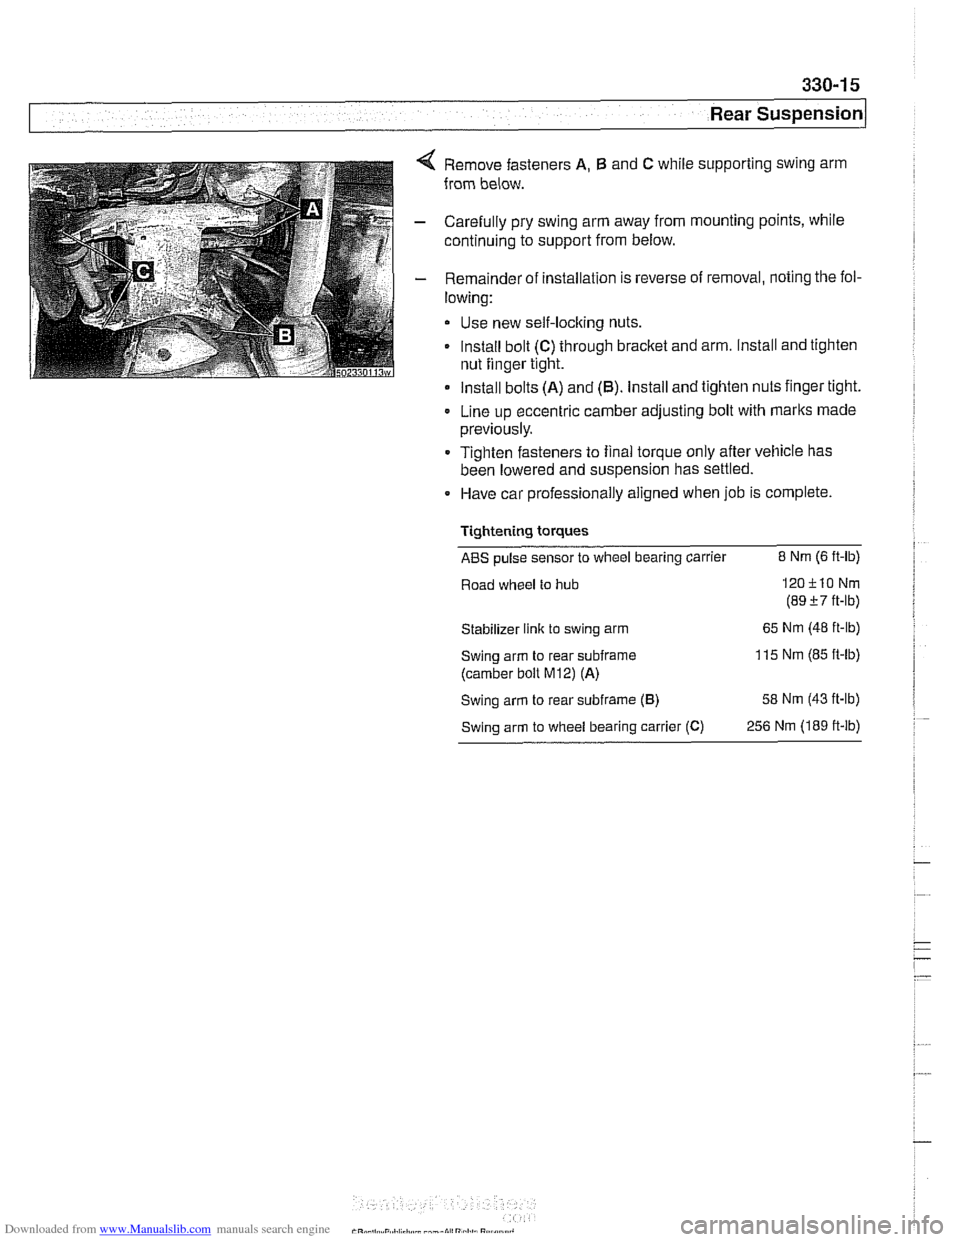
Remove fasteners A, B and C while supporting swing arm
from below.
Carefully pry swing arm away from mounting points, while
continuing to support from below.
Remainder of installation is reverse of removal, noting the fol-
lowing:
Use new self-locking nuts.
lnstall bolt
(C) through bracket and arm. Install and tighten
nut finger tight.
Install bolts
(A) and (6). Install and tighten nuts finger tight.
Line up eccentric camber adjusting bolt with marlts made
previously.
Tighten fasteners to final torque only after vehicle has
been lowered and suspension has settled.
Have car professionally aligned when job is complete.
Tightening torques
ABS pulse sensor to wheel bearing carrier 8 Nm (6 ft-lb)
Road wheel to hub
120+10 Nm
(89
i-7 ft-lb)
Stabilizer link to swing arm 65
Nm (48 ft-lb)
Swing arm to rear
subframe
(camber bolt M12) (A)
115 Nm (85 ft-lb)
Swing arm to rear
subframe (B) 58 Nm (43 ft-lb)
Swing arm
to wheel bearing carrier (C) 256 Nm (189 ft-lb)
Page 714 of 1002
Downloaded from www.Manualslib.com manuals search engine
--. -
Rear Suspension
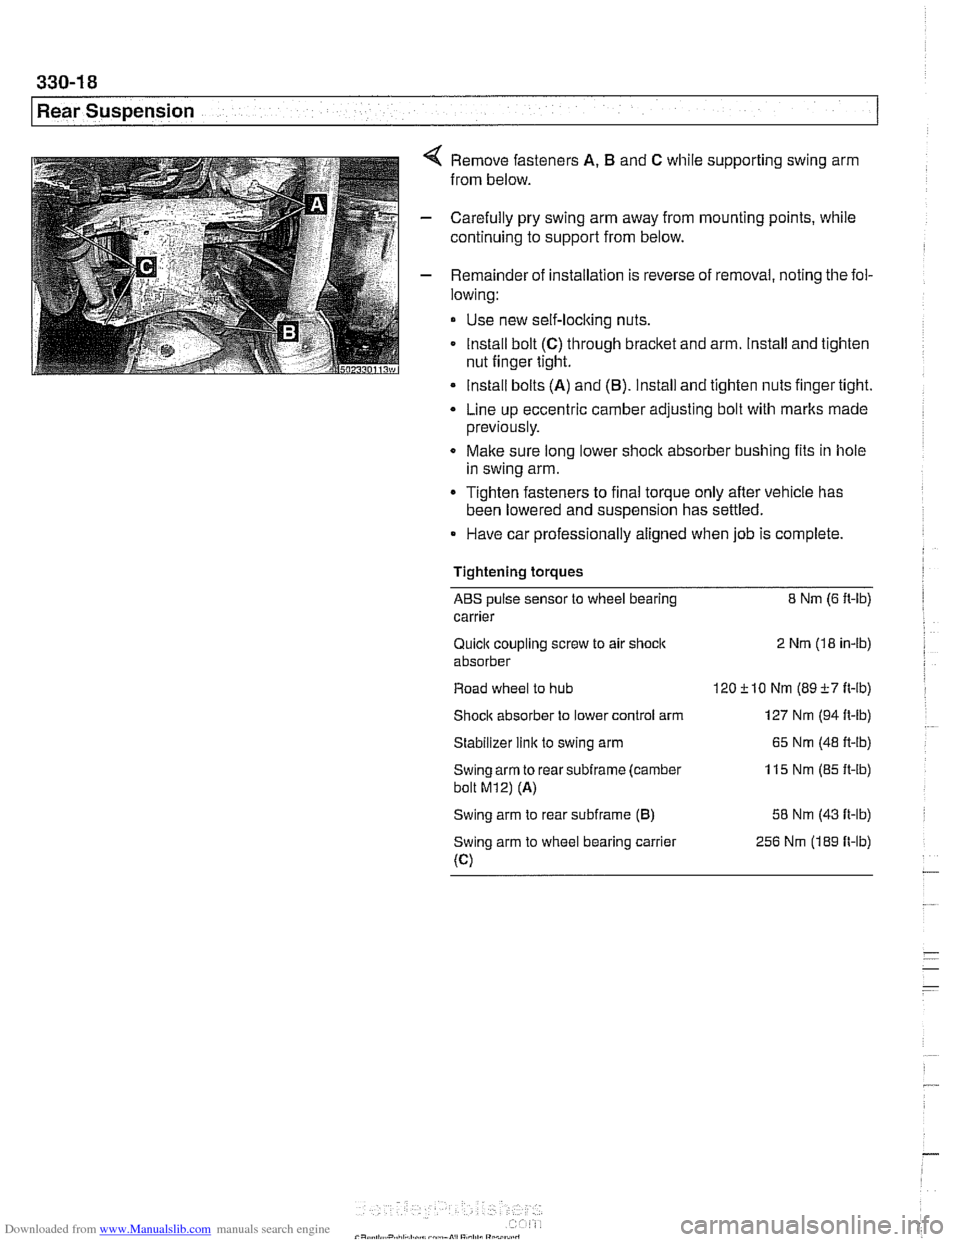
Remove fasteners A. B and C while supporting swing arm
from below.
Carefully pry swing arm away from mounting points, while
continuing to support from below.
Remainder of installation is reverse of removal, noting the fol-
lowing:
Use new self-locking nuts.
Install bolt
(C) through bracket and arm. Install and tighten
nut finger tight.
lnstall bolts (A) and
(6). Install and tighten nuts finger tight.
Line up eccentric camber adjusting bolt with rnarlts made
previously.
Make sure long lower shock absorber bushing fits in hole
in swing arm.
Tighten fasteners to final torque only afler vehicle has
been lowered and suspension has settled.
Have car professionally aligned when job is complete.
Tightening
torques
ABS pulse sensor to wheel bearing 8 Nm (6 It-lb)
carrier
Quiclc coupling screw to air shock 2 Nm (18 in-lb)
absorber
Road wheel to hub 120
210 Nm (89i-7 It-ib)
Shocic absorber
to lower control arm 127 Nm (94
ft-lb)
Stabilizer link to swing arm
65 Nm (48 ft-ib)
Swing arm to rear
subframe (camber 11 5 Nm (85 It-lb)
bolt M12) (A)
Swing arm to rear subframe (6) 58 Nm (43 It-lb)
Swing arm to wheel bearing carrier 256
Nm (189 It-lb)
(C)
Page 718 of 1002
Downloaded from www.Manualslib.com manuals search engine
330-22
I Rear Suspension
s
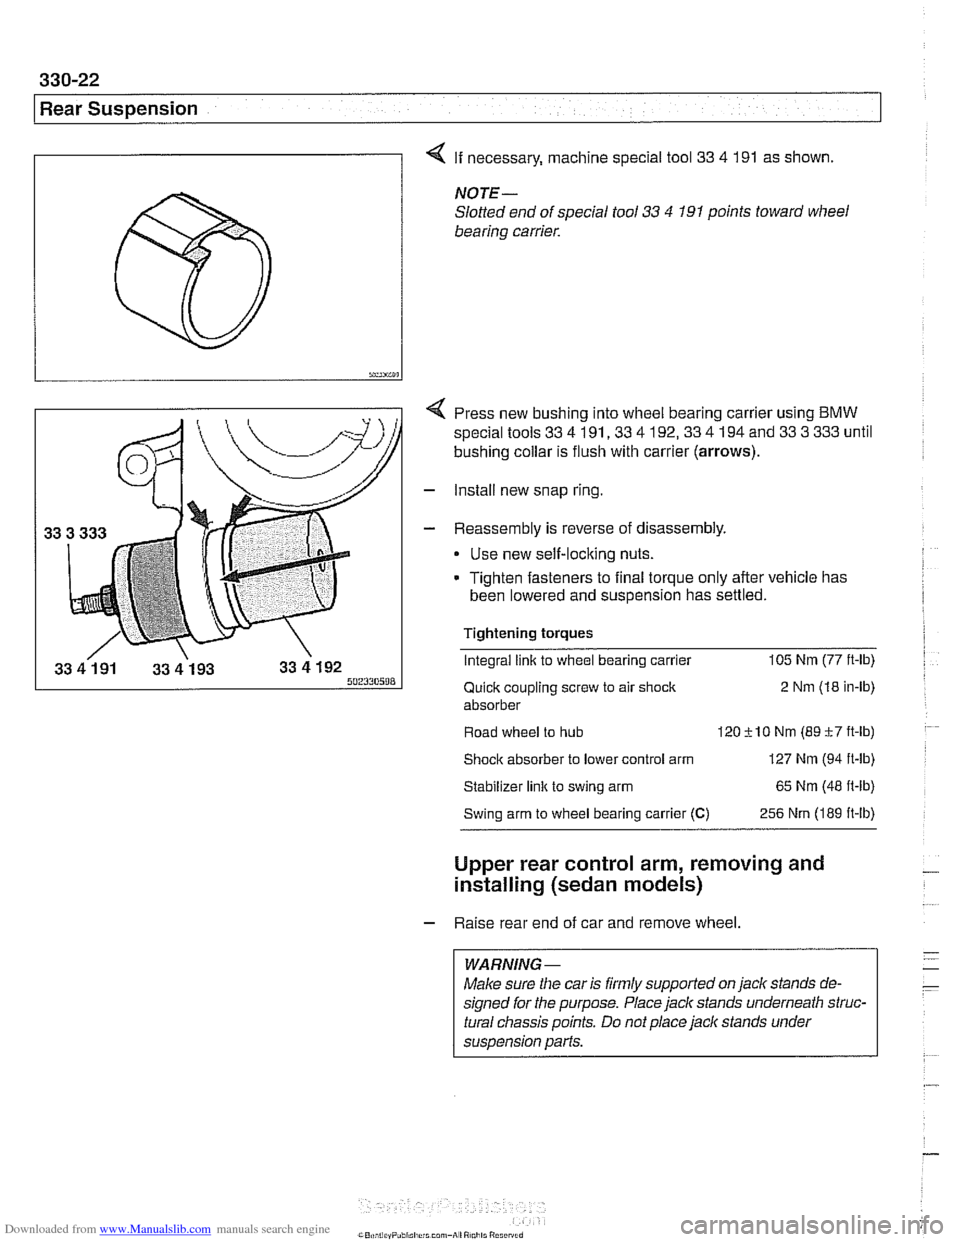
4 If necessary, machine special tool 33 4 191 as shown.
NOTE-
Slotted end of special tool 33 4 191 points toward wheel
bearing carrier.
Press new bushing into wheel bearing carrier using BMW
special tools
33 4 191,33 4 192,33 4 194 and 33 3 333 until
bushing collar is flush with carrier (arrows).
- Install new snap ring
- Reassembly is reverse of disassembly
Use new self-locking nuts.
Tighten fasteners to final torque only after vehicle has
been lowered and suspension has settled.
Tightening torques Integral link to wheel bearing carrier 105
Nm (77
ft-lb)
Quick coupling screw to air shock 2
Nm (18 in-ib)
absorber
Road wheel to hub
120+lO Nm (89c7ft-ib)
Shock absorber to lower control arm 127 Nm (94 ft-lb)
Stabilizer link to swing arm 65
Nm (48
fl-lb)
Swing arm to wheel bearing carrier (C) 256 Nrn (189 ft-lb)
Upper rear control arm, removing and
installing (sedan models)
- Raise rear end of car and remove wheel.
WARNING-
Make sure the car is firmly supported on jack stands de-
signed for the purpose. Place jack stands underneath struc-
tural chassis points. Do not place
jaclc stands under
suspension parts.
Page 719 of 1002
Downloaded from www.Manualslib.com manuals search engine
330-23
Rear Suspension
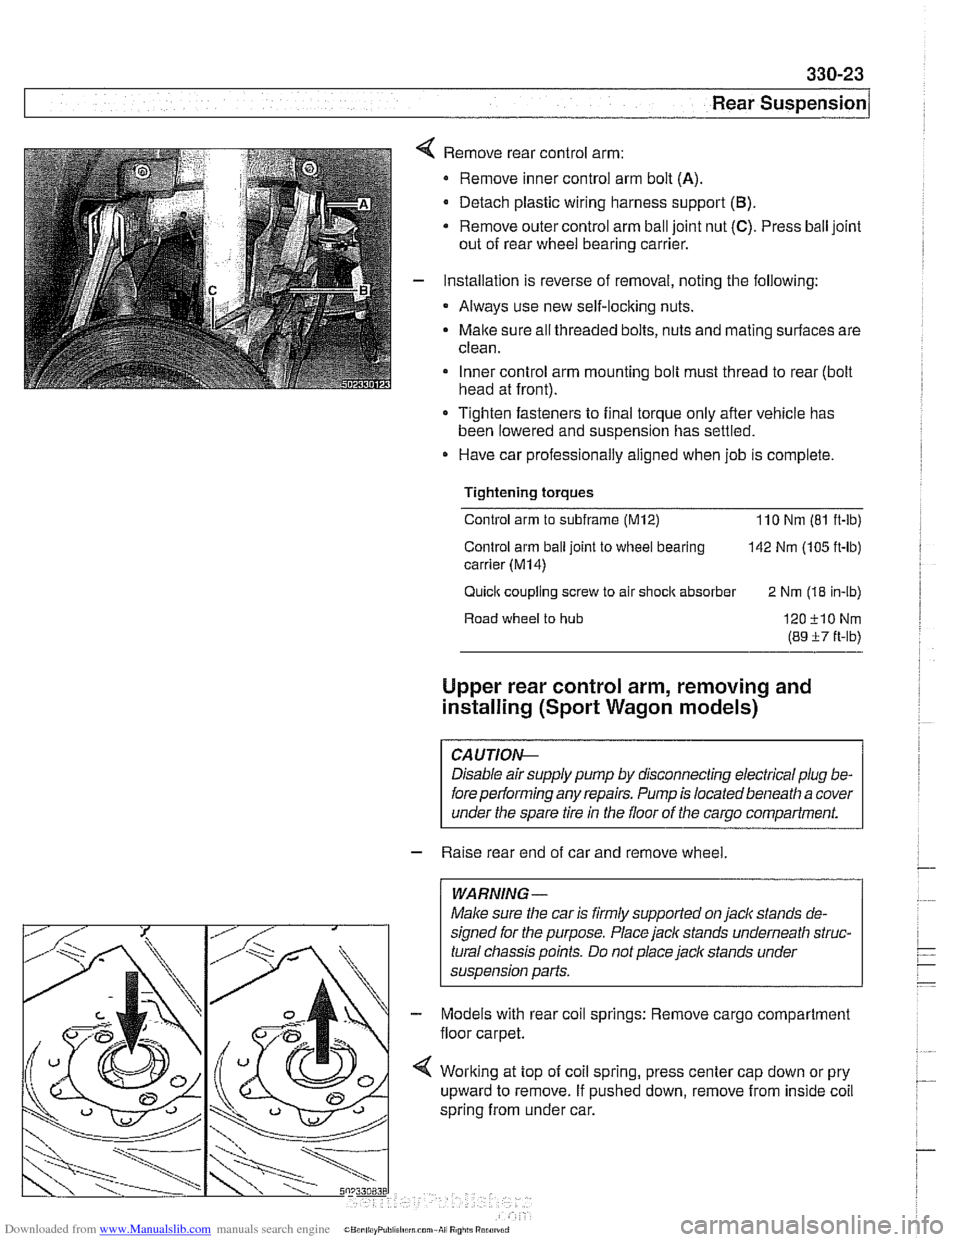
Remove rear control arm:
Remove inner control arm bolt
(A).
Detach plastic wiring harness support (B).
* Remove outer control arm ball joint nut (C). Press ball joint
out of rear wheel bearing carrier.
Installation is reverse of removal, noting the following:
Always use new self-locking nuts.
Malte sure all threaded bolts, nuts and mating surfaces are
clean.
Inner control arm mounting bolt must thread to rear (bolt
head at front).
Tighten fasteners to final torque only afler vehicle has
been lowered and suspension has settled.
Have car professionally aligned when job is complete.
Tightening
torques
Control arm to subframe (M12) 110 Nm (81 ft-ib)
Control arm
ball joint to wheel bearing 142 Nm (105 ft-lb)
carrier
(M14)
Quick coupling screw to air shock absorber
2 Nm (18 in-lb)
Road wheel
to hub 120-flONm
(89 i7 ft-lb)
Upper rear control arm, removing and
installing (Sport Wagon models)
CAUTIOG
Disable air supply pump by disconnecting electrical plug be-
fore
perlorming any repairs. Pump is located beneath a cover
under the spare tire in the floor of the
carqo compartment.
- Raise rear end of car and remove wheel.
WARNING -
Make sure the car is firmly supported on jaclc stands de-
signed for the purpose.
Place jaclc stands underneath struc-
tural chassis points. Do not place jack stands under
suspension parts.
Models with rear coil springs: Remove cargo compartment
floor carpet.
Worlting at top of coil spring, press center cap down or pry
upward to remove. If pushed down, remove from inside coil
spring from under car.
Page 721 of 1002
Downloaded from www.Manualslib.com manuals search engine
330-25
Rear Suspension
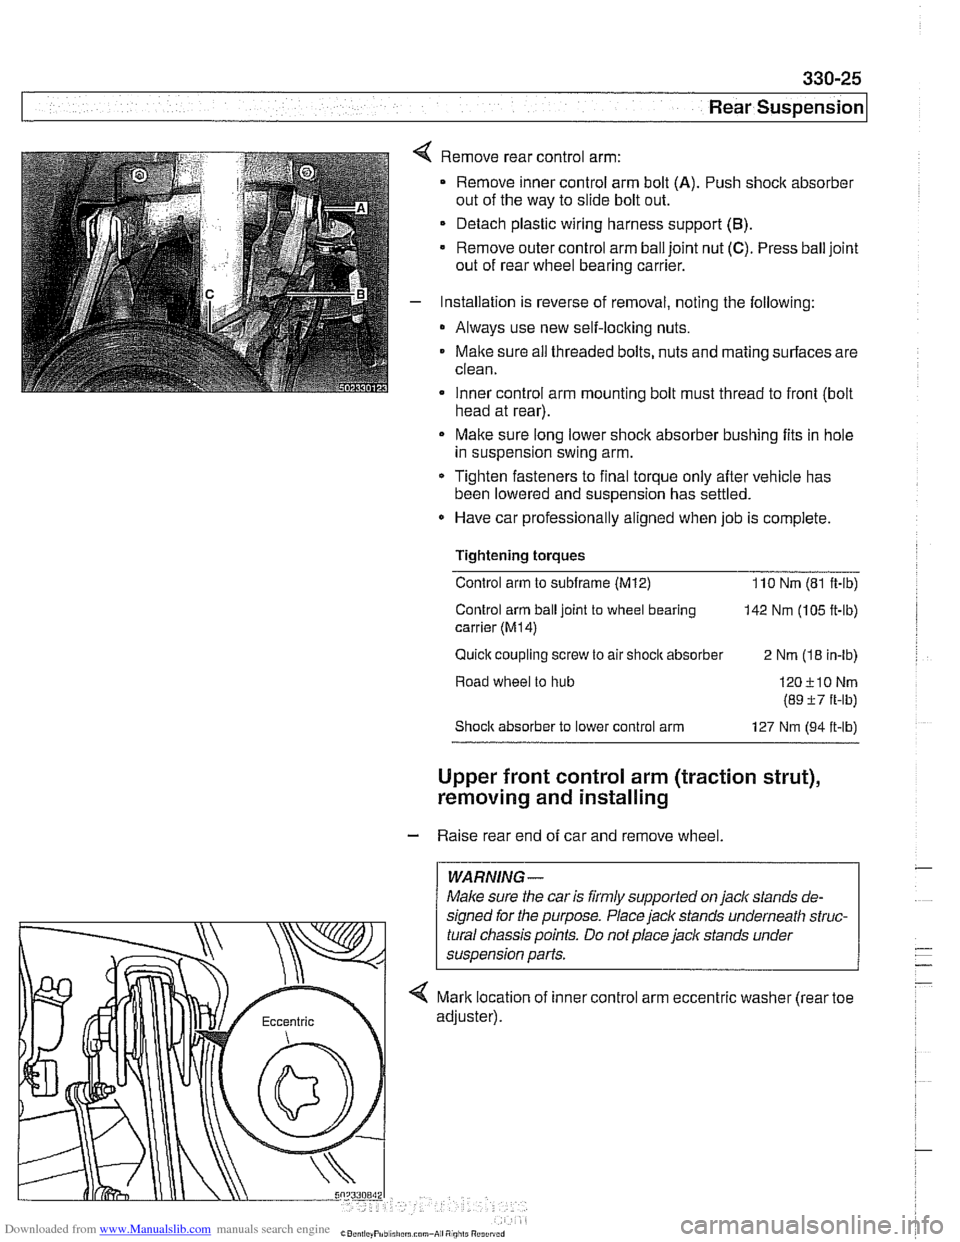
Remove rear control arm:
Remove inner control arm bolt
(A). Push shock absorber
out of the way to slide bolt out.
Detach plastic wiring harness support
(B).
Remove outer control arm ball joint nut (C). Press ball joint
out of rear wheel bearing carrier.
Installation is reverse of removal, noting the following:
* Always use new self-locking nuts.
Maite sure
ail threaded bolts, nuts and mating surfaces are
clean.
Inner control arm mounting bolt must thread to front
(bolt . head at rear).
Make sure long lower shock absorber bushing fits in hole
in suspension swing arm.
* Tighten fasteners to final torque only after vehicle has
been lowered and suspension has settled.
Have car professionally aligned when job is complete.
Tightening torques Control arm to
subframe (M12) 110 Nm (81 ft-ib)
Control arm ball joint to wheel bearing
142 Nm (105 ft-lb)
carrier
(M14)
Quick coupling screw to air shocit absorber
2 Nm (18 in-lb)
Road wheel to hub
Shoclc absorber to lower control arm 127 Nm (94 it-lb)
Upper front control arm (traction strut),
removing and installing
- Raise rear end of car and remove wheel.
WARNING-
Maice sure the car is firmly supported on jack stands de-
signed for the purpose. Place
jack stands underneath struc-
tural chassis points. Do not place jack stands under
< Mark location of inner control arm eccentric washer (rear toe