boot BMW 530i 1998 E39 Owner's Guide
[x] Cancel search | Manufacturer: BMW, Model Year: 1998, Model line: 530i, Model: BMW 530i 1998 E39Pages: 1002
Page 681 of 1002
Downloaded from www.Manualslib.com manuals search engine
Steering and Wheel Alignment
- lnstallation is reverse of removal.
Make sure all threaded parts are clean.
Use anti-seize paste on inner tie rod threads.
Use new self-locking nuts, where applicable.
Use tie rod measurement
(A) to set toe temporarily.
Have car professionally aligned.
Tightening torque
Tie rod
to steering itnuckle (replace seii-loclting nut) 65 Nm ( 46 ft-lb)
Outer tie rod end ioclt nut 51 Nm (38 ft-ib)
Tie rod (inner), replacing
- To replace inner tie rod, first remove outer tie rod end. See
Tie rod (outer), replacing.
- Cut rack boot clamps and slide bellows back
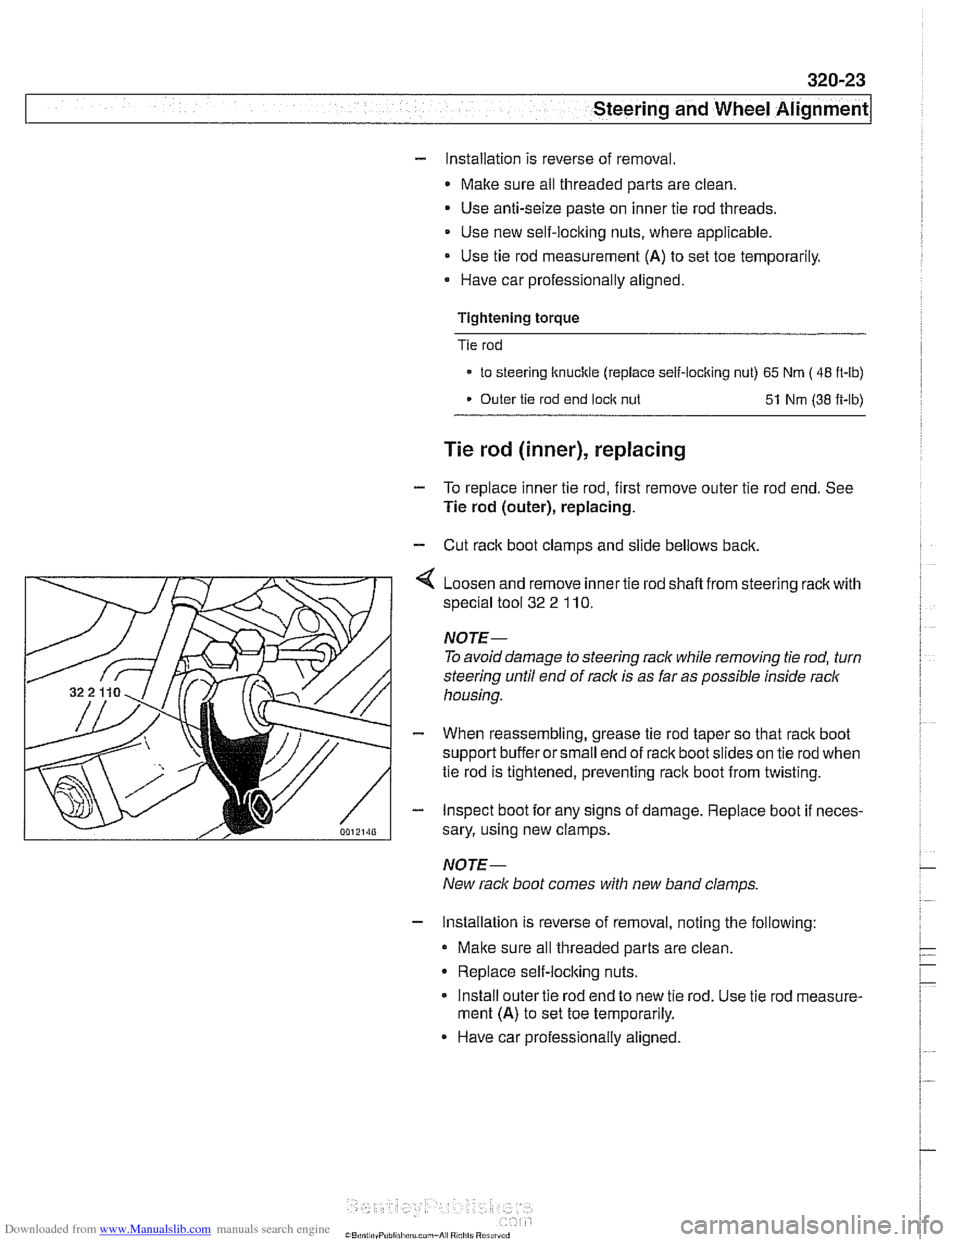
4 Loosen and remove inner tie rod shafl from steering rack with
special tool
32 2 110.
NOTE-
To avoid damage to steering rack while removing tie rod, turn
steering until end of rack is as far as possible inside rack
housing.
- When reassembling, grease tie rod taper so that rack boot
support buffer or small end of rack boot slides on tie rod when
tie rod is tightened, preventing rack boot from twisting.
- Inspect boot for any signs of damage. Replace boot if neces-
sary, using new clamps.
NOTE-
New rack boot comes with new band clamps
- Installation is reverse of removal, noting the following:
Make sure all threaded parts are clean
Replace self-locking nuts.
Install outer tie rod end to new tie rod. Use tie rod measure-
ment
(A) to set toe temporarily.
Have car professionally aligned.
Page 692 of 1002
Downloaded from www.Manualslib.com manuals search engine
320-34
I Steerins and Wheel Alignment
Front toe and toe difference angle
Toe is the difference in the distance between the front of the
front wheels and the rear of the front wheels. It is adjusted by
altering the length of the tie rods.
Toe difference angle determines the progressively different
paths taken by the front wheels as the car is turning. In
V-8
models, it is set by the pitman arm adjustment, but depends
on accurate setting of the toe.
Toe adjustments should only be made on specialized align-
ment equipment and only with the car in normal loaded posi-
tion, described below.
- Set front wheel toe at tie rod ends:
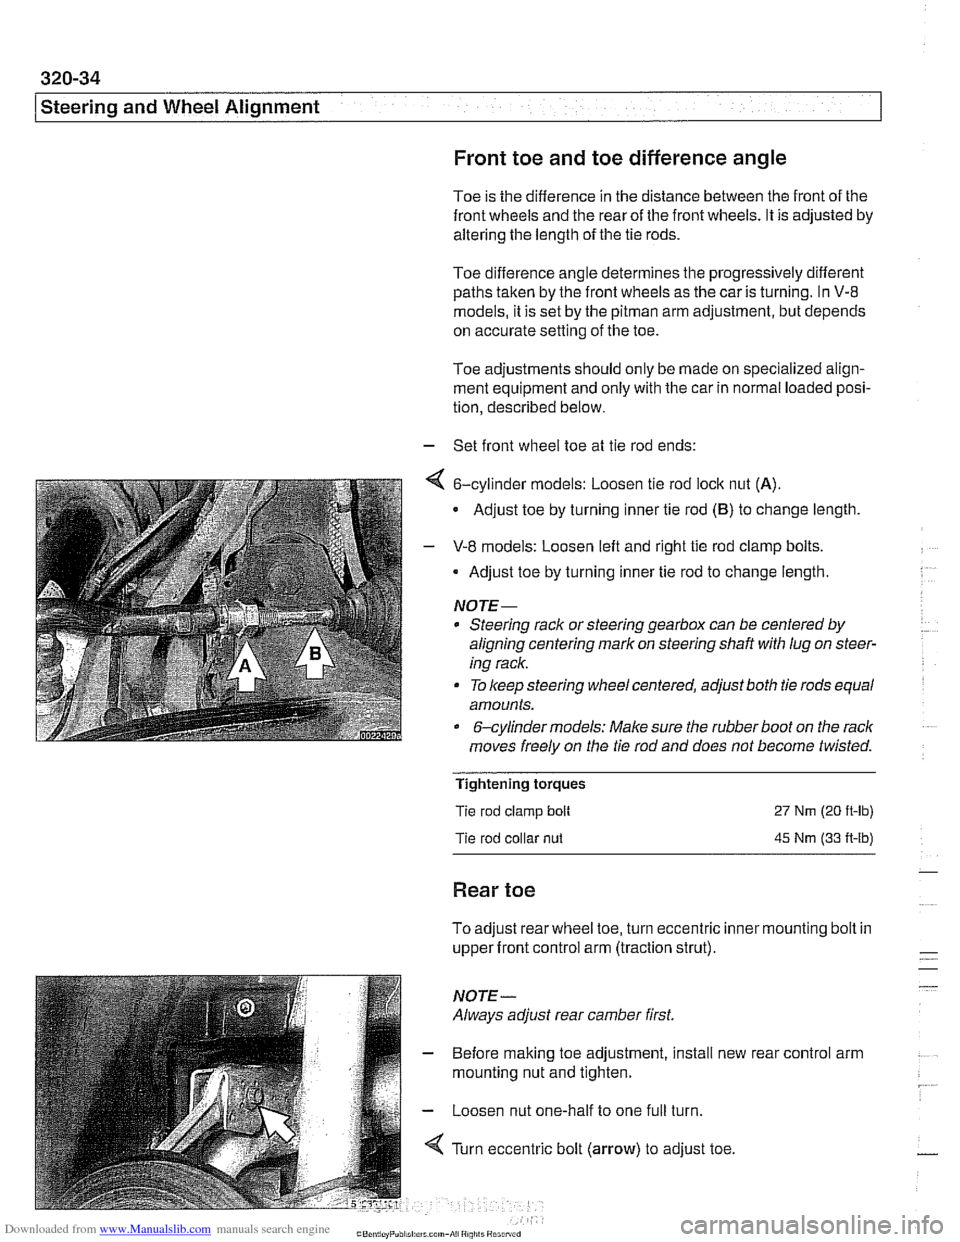
4 6-cylinder models: Loosen tie rod lock nut (A).
Adjust toe by turning inner tie rod (B) to change length
- V-8 models: Loosen left and right tie rod clamp bolts.
Adjust toe by turning inner tie rod to change length.
NOTE-
* Steering rack or steering gearbox can be centered by
aligning centering mark on steering shaft
with lug on steer-
ing rack.
To keep steering wheel centered, adjust both tie rods equal
amounts.
&cylinder models: Make sure the rubber boot on the rack
moves freely on the tie rod and does not become twisted.
Tightening torques
Tie rod clamp bolt
Tie rod collar
nut
27 Nm (20 ft-lb)
45 Nm (33 A-lb)
Rear toe
To adjust rear wheel toe, turn eccentric inner mounting bolt in
upper front control arm (traction strut).
NOTE-
Always adjust rear camber first.
- Before making toe adjustment, install new
mounting nut and tighten.
- Loosen nut one-half to one full turn.
4 Turn eccentric bolt (arrow) to adjust toe. rear
control arm
Page 704 of 1002
Downloaded from www.Manualslib.com manuals search engine
330-8
Rear Suspension
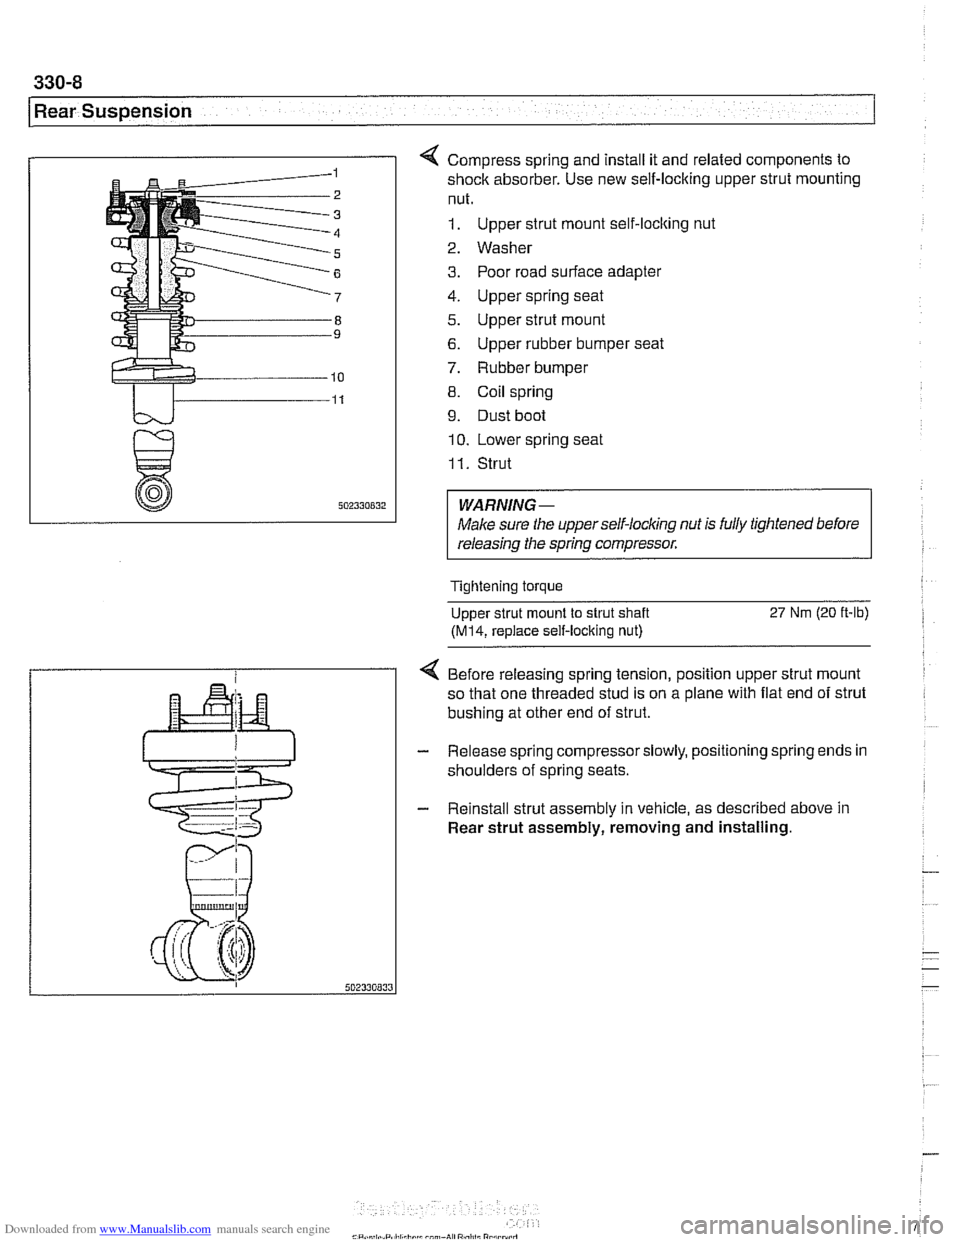
4 Compress spring and install it and related components to
shock absorber. Use new self-locking upper strut mounting
nut.
1. Upper strut mount self-locking nut
2. Washer
3. Poor road surface adapter
4. Upper spring seat
5. Upper strut mount
6. Upper rubber bumper seat
7. Rubber bumper
8. Coil spring
9. Dust boot
10. Lower spring seat
I I. Strut
WARNING-
Male sure the upperself-locking nut is fully tightened before
releasing the spring compressor.
Tightening torque
Upper strut mount to strut shaft
27 Nm (20 ft-lb)
(M14, replace self-locking nut)
4 Before releasing spring tension, position upper strut mount
so that one threaded stud is on a plane with flat end of strut
bushing at other end of strut.
- Release spring compressorslowly, positioning spring ends in
shoulders of spring seats.
- Reinstall strut assembly in vehicle, as described above in
Rear strut assembly, removing and installing.
Page 706 of 1002
Downloaded from www.Manualslib.com manuals search engine
330-1 0
/Rear Suspension
- Remove rubber protective cap from shock absorber upper
mount.
- Remove shock absorber upper mounting nuts.
- Remove shock absorber lower mounting bolt. Lower shock
absorber out of wheel housing.
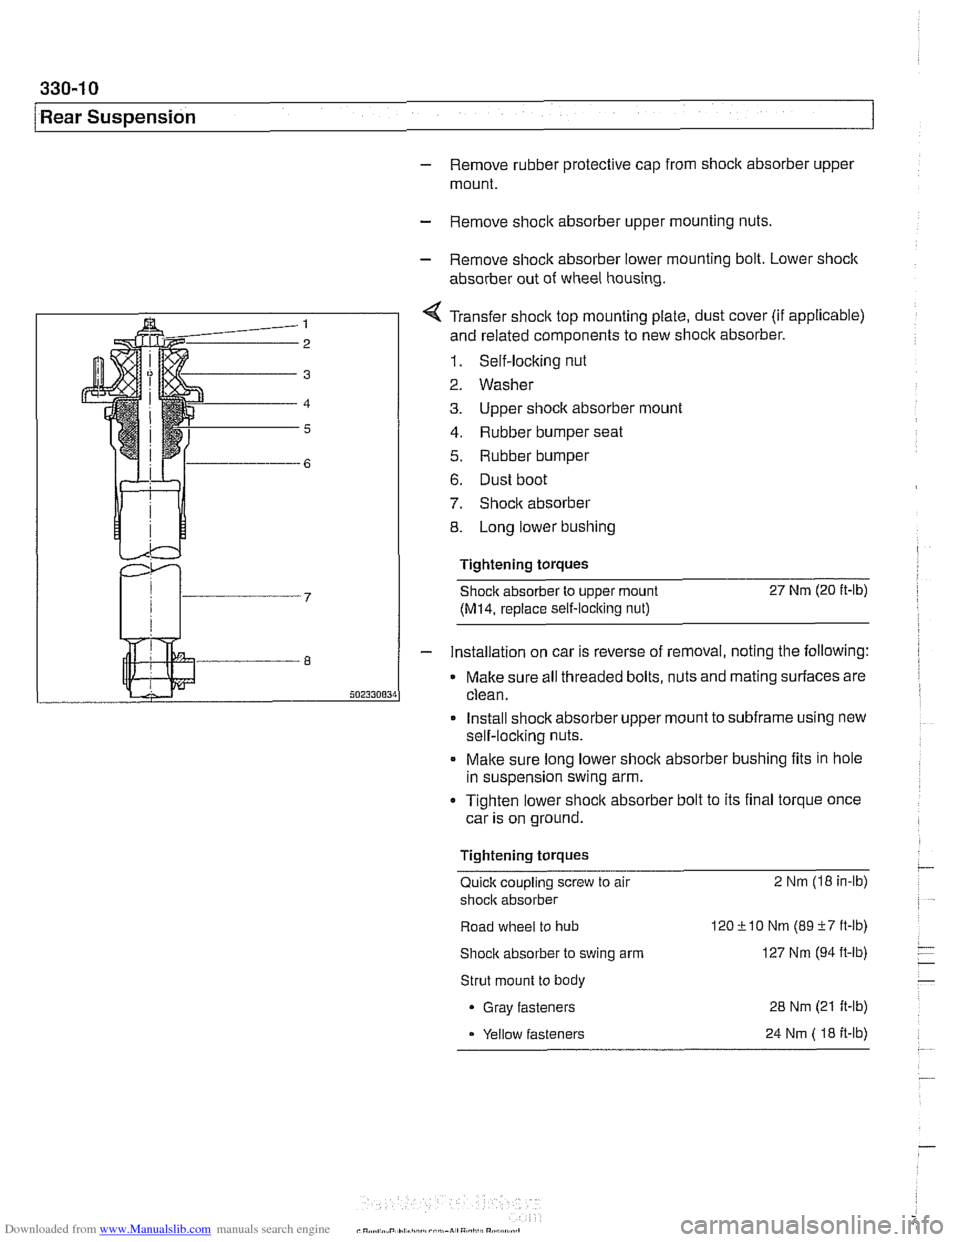
< Transfer shock top mounting plate, dust cover (if applicable)
and related components to new shoclc absorber.
1. Self-locking nut
2. Washer
3. Upper siioclc absorber mount
4. Rubber bumper seat
5. Rubber bumper
6. Dust boot
7. Shock absorber
8. Long lower bushing
Tightening torques
Shock absorber to upper mount
27 Nm (20 it-lb)
(M14, replace self-locking nut)
- Installation on car is reverse of removal, noting the following:
Make sure all threaded bolts, nuts and mating surfaces are
clean.
Install shock absorber upper mount to
subframe using new
self-locking nuts.
. Make sure long lower shock absorber bushing fits in hole
in suspension swing arm.
Tighten lower shoclc absorber bolt to its final torque once
car is on ground.
Tightening torques
Quick coupling screw to air 2 Nm (18 in-lb)
shock absorber
Road wheel to
hub 120 &I0 Nm (89 -f7 ft-lb)
Shock absorber to swing arm 127 Nm (94 ft-lb)
Strut mount to body
Gray fasteners
Yellow fasteners
24 Nm ( 18 it-lb)
Page 745 of 1002
Downloaded from www.Manualslib.com manuals search engine
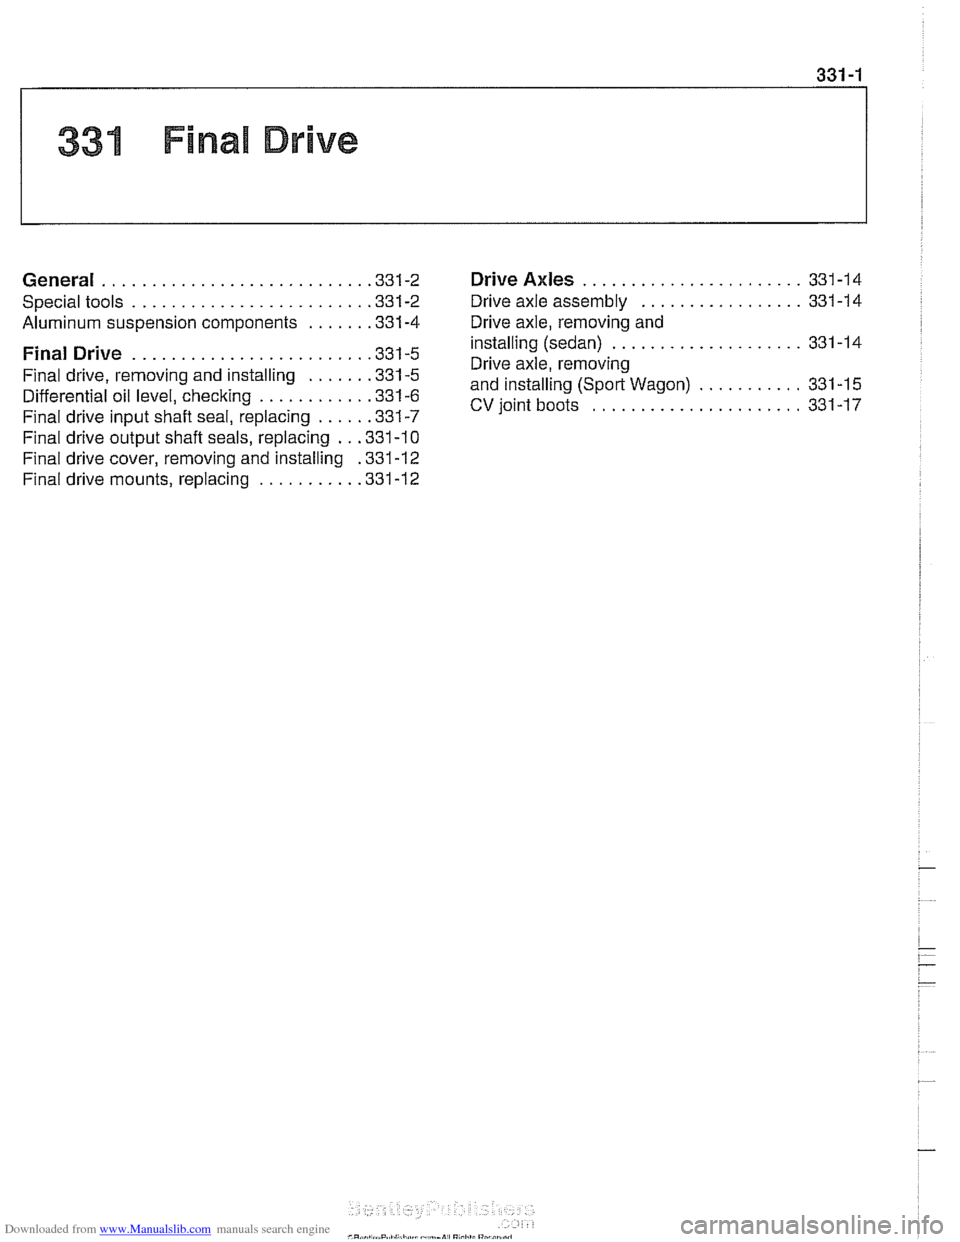
33UFinal Drive
General ........................... ,331 -2 Drive Axles ....................... 331 -1 4
Special tools
........................ ,331 -2 Drive axle assembly ................. 331-14
Aluminum suspension components
...... ,331-4 Drive axle, removing and
installing (sedan)
.................... 331-14 ........................ Final Drive ,331 -5
Drive axle, removing
........... ...... Final drive, removing and installing ,331-5 and (Sport Wagon) 331-15
...................... Differential oil level, checking ........... ,331-6 CV joint boots 331-17 Final drive in~ut shaft seal, replacing ..... ,331-7 .
Final drive oitput shaft seals, replacing . . ,331-10
Final drive cover, removing and installing ,331-12
Final drive mounts, replacing .......... ,331-12
Page 746 of 1002
Downloaded from www.Manualslib.com manuals search engine
331-2
Final Drive
This repair group covers removal and repair informat~on for
the final drive (differential), axle shafts.
CV joints, CV joint
boots, and final drive seal replacement.
Internal repairs of the differential assembly are not covered in
this manual.
Special tools
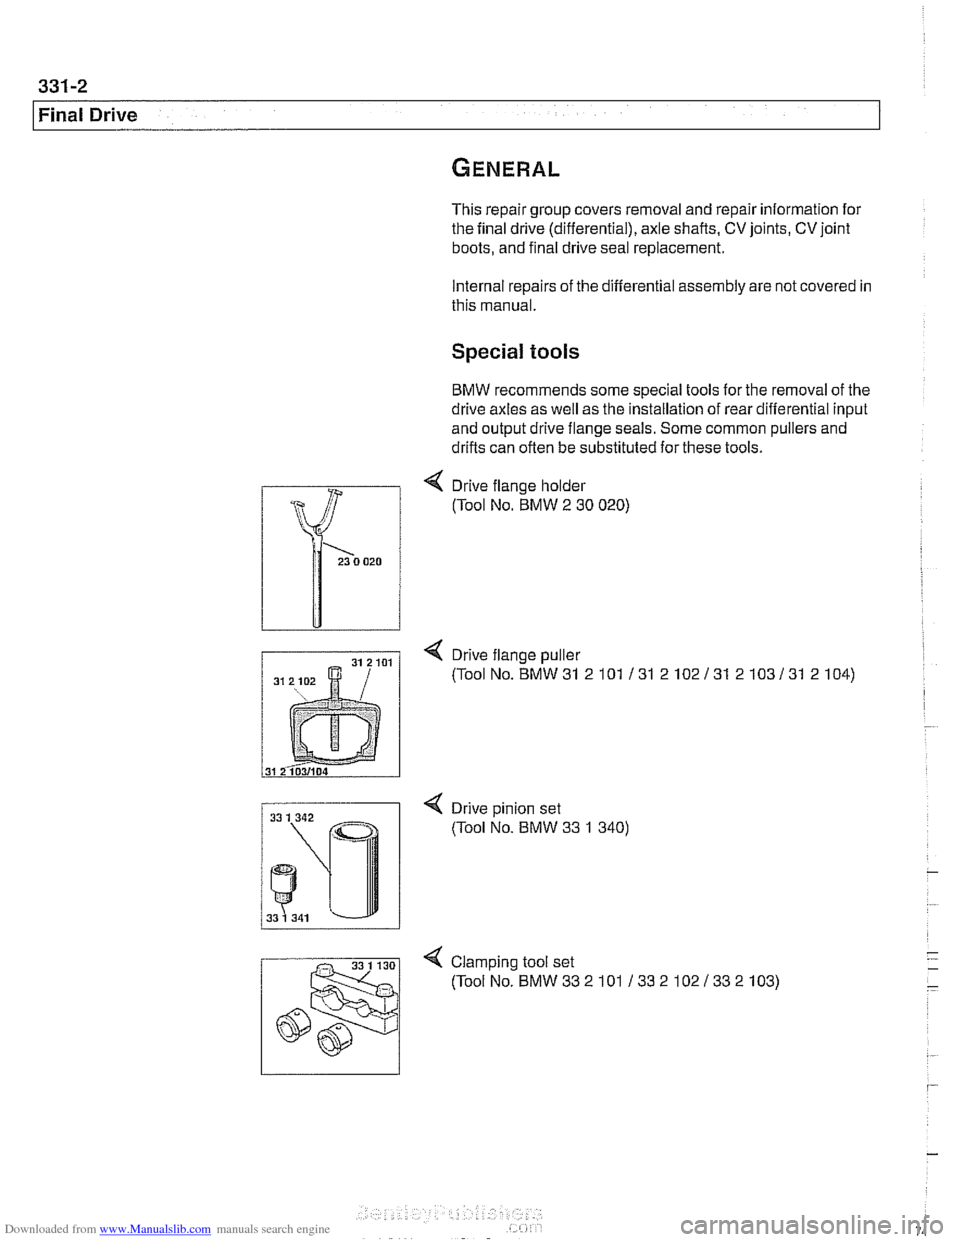
BMW recommends some special tools for the removal of the
drive axles as well as the installation of rear differential input
and output drive flange seals. Some common pullers and
drifts can often be substituted for these tools.
4 Drive flange holder
(Tool No. BMW
2 30 020)
< Drive flange puller
(ToolNo.BMW31 2101 131 2102131 2103131 2104)
< Drive pinion set
(Tool No. BMW 33 1 340)
4 Clamp~ng tool set
(ToolNo.BMW332101 13321021332103)
Page 758 of 1002
Downloaded from www.Manualslib.com manuals search engine
Final Drive
Drive axles use constant-velocity (CV) joints on both ends.
For replacement parts, only CV joint boots or complete axles
are offered by BMW. The procedure for drive axle removal
varies for sedan and sport wagon. Follow the appropriate pro-
cedure below.
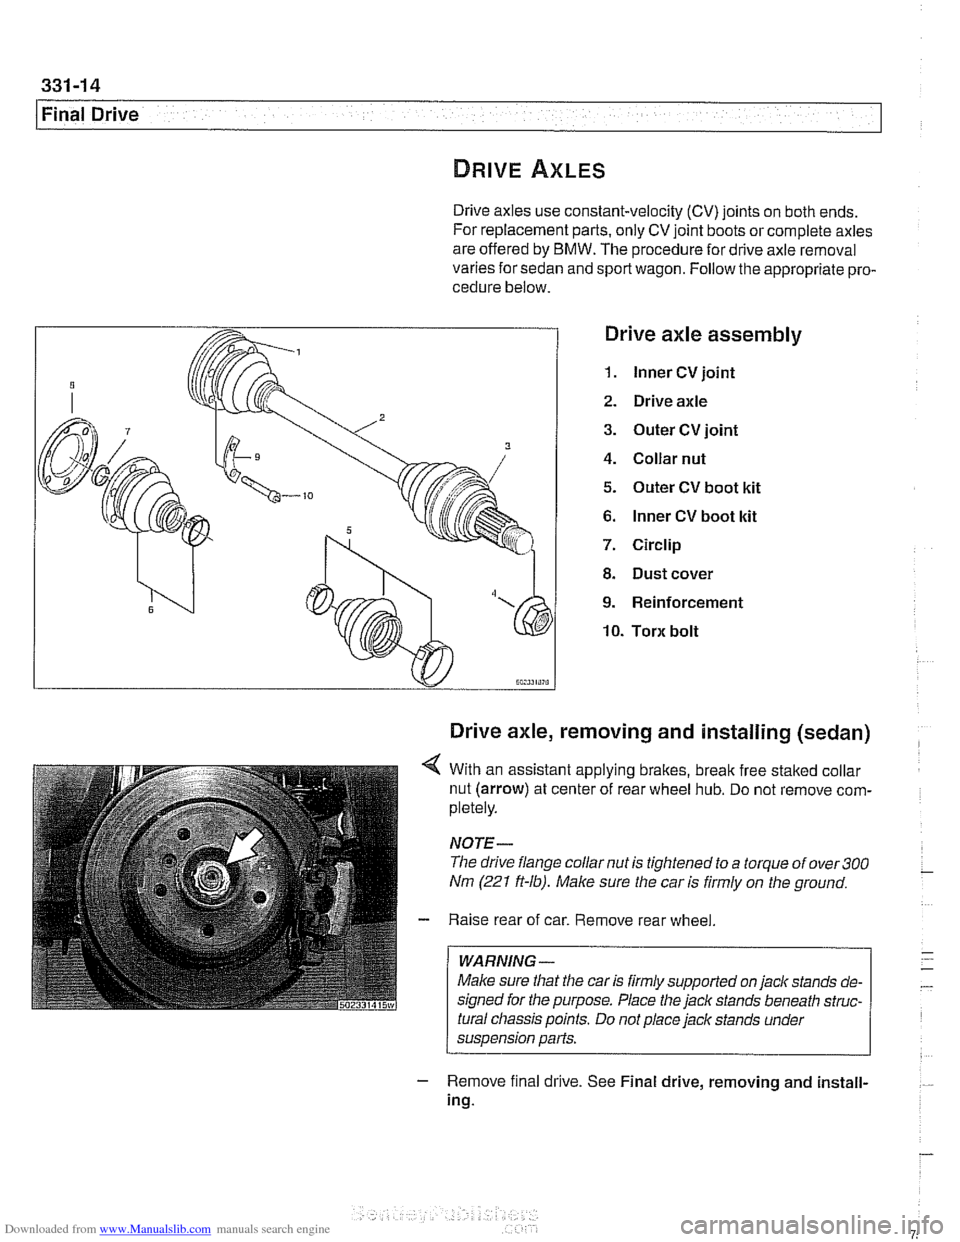
Drive axle assembly
1. lnner CV joint
2. Drive axle
3. Outer CV joint
4. Collar nut
5. Outer CV boot kit
6. lnner CV boot kit
7. Circlip
8. Dust cover
9. Reinforcement
10. Torx bolt
Drive axle, removing and installing (sedan)
4 With an assistant applying brakes, break free staked collar
nut (arrow) at center of rear wheel hub. Do not remove com-
pletely.
NOTE-
The drive flange collar nut is tightened to a torque of over 300
Nm (221 ft-lb). Male sure the car is firmly on the ground.
- Raise rear of car. Remove rear wheel
WARNING -
Make sure that the car is firmly supported on jack stands de-
signed for the purpose. Place the
jack stands beneath struc-
tural chassis points. Do not place jack stands under
suspension parts.
- Remove f~nal drrve. See Final drive, removing and install-
ing.
Page 761 of 1002
Downloaded from www.Manualslib.com manuals search engine
331-17
Final ~rivel
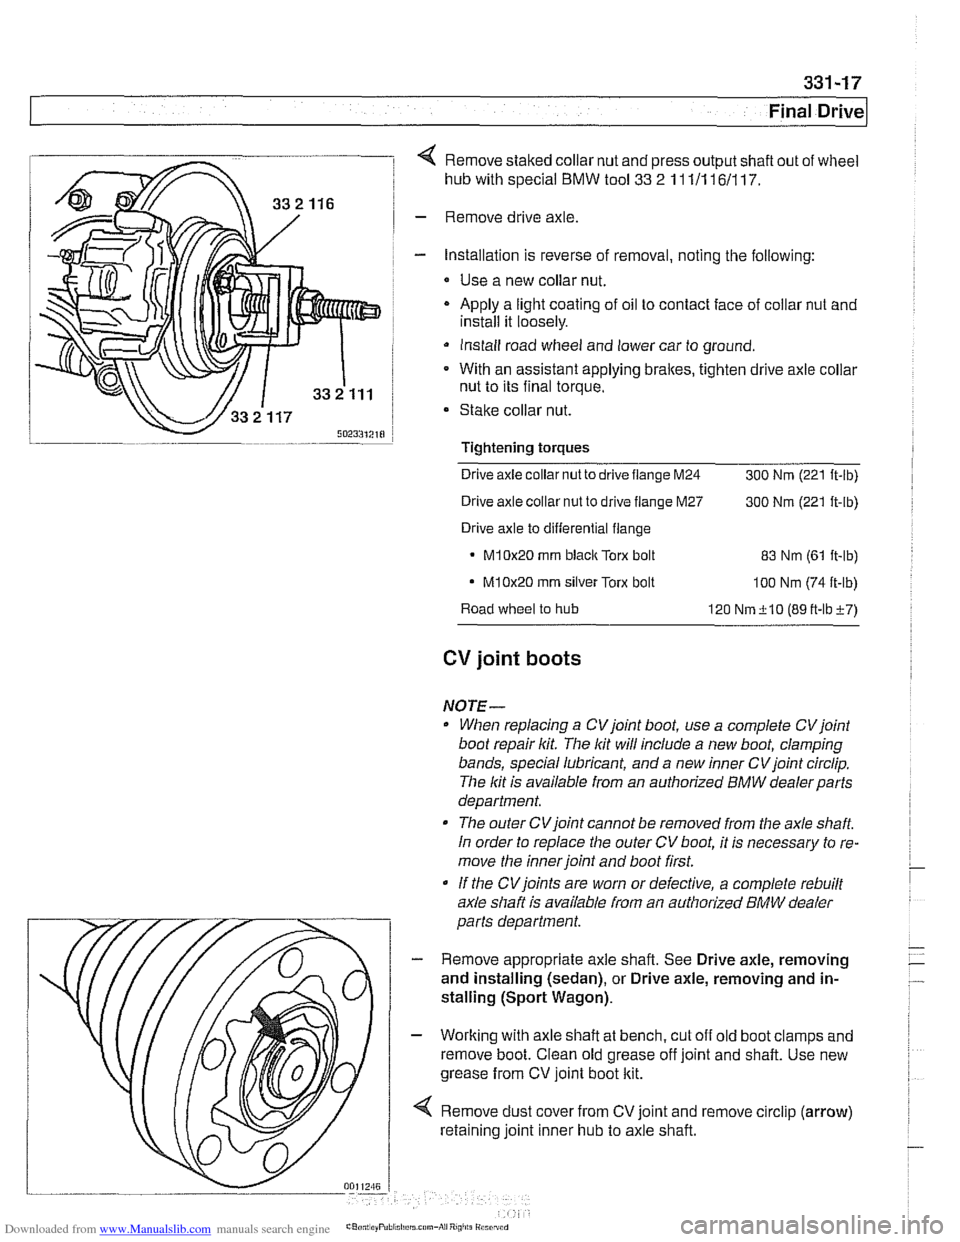
4 Remove staked collar nut and press output shaft out of wheel
hub with special
BMW tool 33 2 11 111 161117.
- Remove drive axle
- Installation is reverse of removal, noting the following:
* Use a new collar nut.
- Apply a light coating of oil to contact face of collar nut and
install it loosely.
Install road wheel and lower car to ground.
* With an assistant applying brakes, tighten drive axle collar
nut to its final torque.
Stake collar nut.
Tightening
torques
Drive axle collar nut to drive flange M24
300 Nrn (221 ft-lb)
Drive axle collar nut to drive flange M27
300 Nrn (221 ft-lb)
Drive axle to differential flange
M10x20 rnrn blaclc Torx bolt 83 Nrn (61 it-lb)
- M10x20 rnrn silver Torx bolt loo Nrn (74 ft-lb)
Road wheel to hub
120 Nrn+lO (89tt-lbi-7)
CV joint boots
NOTE-
When replacing a CVjoint boot, use a complete CVjoint
boot repair kit. The lit will include a new boot, clamping
bands, special lubricant, and a new inner CV joint circlip.
The lit is available from an authorized
BMW dealerparts
department.
The outer CVjoint cannot be removed from the axle
shaft
In order to replace the outer CV boot, it is necessary to re-
move the inner joint and boot first.
If the
CVjoints are worn or defective, a complete rebuilt
axle shaft is available from an authorized
BMW dealer
parts department.
- Remove appropriate axle shaft. See Drive axle, removing
and installing (sedan), or Drive axle, removing and in-
stalling (Sport Wagon).
- Working with axle shaft at bench, cut off old boot clamps and
remove boot. Clean old grease off joint and shaft. Use new
grease from CV joint boot kit.
4 Remove dust cover from CV joint and remove circlip (arrow)
retaining joint inner hub to axle shaft.
Page 762 of 1002
Downloaded from www.Manualslib.com manuals search engine
I Final Drive
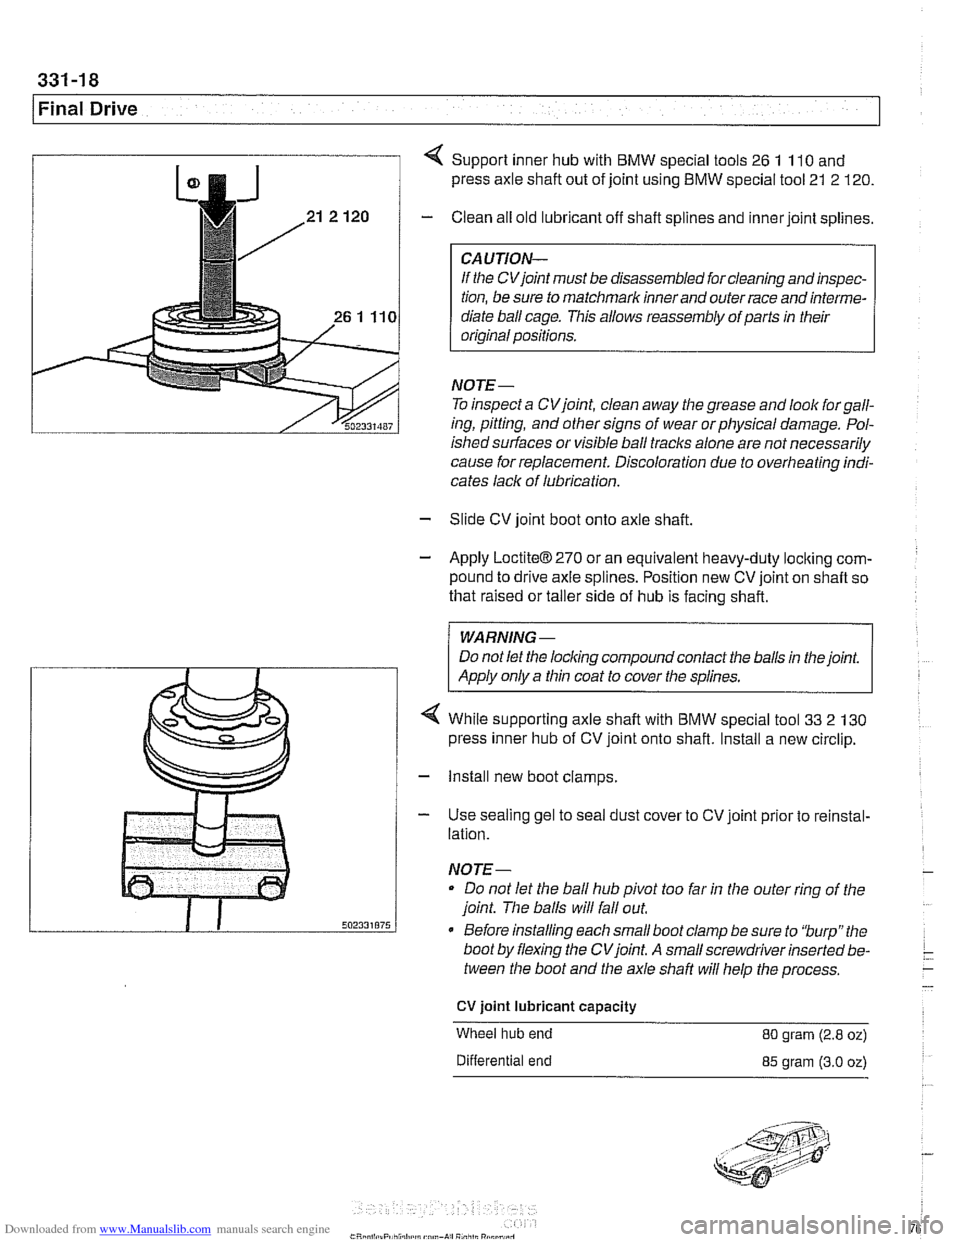
4 Support inner hub with BMW special tools 26 1 110 and
press axle shaft out of joint using BMW special tool 21 2 120.
- Clean all old lubricant off shaft splines and inner joint splines.
If the CVjoint must be disassembled for cleaning and inspec-
tion, be sure to matchmark inner and outer race and interme-
diate ball cage. This allows reassembly
ofparfs in their
original positions.
NOTE-
To inspect a CVjoint, clean away the grease and loolc forgall-
ing, pitting, and other signs of wear orphysical damage. Pol-
ishedsurfaces or visible ball traclts alone are not necessarily
cause forreplacement. Discoloration due to overheating indi-
cates
laclt of lubrication.
- Slide CV joint boot onto axle shaft
- Apply LoctiteO270 or an equivalent heavy-duty loclting corn-
pound to drive axle splines. Position new CV joint on shaft so
that raised or taller side of hub is facing shaft.
WARNING-
Do not let the locking compound contact the balls in the joint.
Apply only a thin coat to cover the splines.
While supporting axle shaft with BMW special tool
33 2 130
press inner hub of CV joint onto shaft. Install a new circlip.
- Install new boot clamps.
- Use sealing gel to seal dust cover to CV joint prior to reinstal-
lation.
NOTE-
* Do not let the ball hub pivot too far in the outer ring of the
joint.
Tlie balls will fa1 out.
Before installing each small boot clamp be sure to
'burp"the
boot by flexing the CVjoint. A small screwdriver inserted be-
tween the boot and the axle shafl will help the process.
CV joint lubricant capacity
Wheel hub end
80 gram (2.8 oz)
Differential end
85 gram (3.0 oz)
Page 769 of 1002
Downloaded from www.Manualslib.com manuals search engine
Brakes
Warnings and cautions
WARNING-
. E39 cars require special BMWsen/ice equipment toprop-
erly bleed the brake hydraulic system. See Bleeding
Brakes for additional information.
Semi-metallic and metallic brake friction materials in
brake pads or shoes may produce dangerous dust.
Brake fluid is poisonous, corrosive and dangerous to
the environment. Wear safety glasses and rubber
gloves when worliing with
bralie fluid. Do not siphon
brake fluid with your mouth. Dispose of brake fluid
properly
Do not reuse self-locking nuts, bolts or fasteners. They
are designed to be used only once and may fail if re-
used. Always replace them with new self-locliing fas-
teners.
CAUTlOI\C
Immediately clean bralie fluid spilled on painted surfaces
and wash with water, as
bralie fluid will remove paint.
Always use new brake fluid from a fresh, unopened
container.
Brake fluid will absorb moisture from the air.
This can lead to corrosion problems in the
braking sys-
tem, and will also lower the fluid boiling point.
. Plug open lines and brake fluid ports to prevent con-
tamination.
Only tighten brake hoses on front wheels
with wheels
in straight ahead position.
If carrying out electric welding
worlc, be sure to discon-
nect electrical harness connector from electronic con-
trol module.
Do not expose electronic control modules to high sus-
tained heat, such as in a paint drying booth. Maximum
heat exposure:-95°C (203
OF) for short periods of time-
85'C (185°F) for Ions periods of time (approx. 2 hours)