jack BMW 540i 1998 E39 Workshop Manual
[x] Cancel search | Manufacturer: BMW, Model Year: 1998, Model line: 540i, Model: BMW 540i 1998 E39Pages: 1002
Page 8 of 1002
Downloaded from www.Manualslib.com manuals search engine
I General Warnings and Cautions
WARNINGS (continued)
. The air conditioning system is filled with chemical refrigerant,
which is hazardous. The AIC system should be serviced only by
trained technicians using approved refrigerant recoverylrecycling
equipment, trained in related safety precautions, and familiar with
regulations governing the discharging and disposal of automotive
chemical refrigerants.
. Do not expose any part of the AIC system to high temperatures
such as open flame. Excessive heat will increase system pres-
sure and may cause the system to burst.
Some aerosol tire inflators are highly flammable. Be extremely
cautious when repairing a tire that may have been inflated using
an aerosol tire inflator. Keep sparks, open flame or other sources
of ignition away
from the tire repair area. Inflate and deflate the
tire at least four
times before breaking the bead from the rim.
Completely remove the tire from the rim before attempting any re-
pair.
Cars covered by this manual are equipped with a supplemental
restraint system (SRS), that automatically deploys
airbags and
pyrotechnic seat belt tensioners
In the event oi a frontal or side
impact. These are explosive devices. Handled improperly or with-
out adequate safeguards, they can be accidently activated and
cause serious injury.
- The ignition system produces high voltages that can be fatal.
Avoid contact with exposed terminals and use extreme care when
working on a car with the engine running or the ignition switched
on.
. Place jack stands only at locations specified by the manufacturer.
The vehicle
illtino iack su~olied with the vehicle is intended fortire -. , . changes only. A heavy duty floor jack should be used lo lift vehicle
before installing
jacl( stands. See 010 General.
- Battery acid (electrolyte) can cause severe burns. Flush contact
area
with water, seek medical attention.
Aerosol cleaners and solvents may contain hazardous or deadly
vapors and are highly flammable. Use only in a well ventilated ar-
ea. Do not use on hot surfaces (engines, brakes, etc.).
Do not remove
coolant reservoir or radiator cap with the engine
hot. Danger of burns and engine damage.
CAUTIONS-
See also WARNINGS
- if you lack the slqills, tools and equipment, or a suitable worl(shop
for any procedure described in this manual, leave such repairs to
an authorized BMW dealer or other qualified shop.
BMW is constantly improving its cars and sometimes these
changes, both in parts and specifications, are made applicable to
earlier models. Therefore, part numbers listed in this manual are
for reference only. Always check with your authorized BMW deal-
er parts department for the latest information.
Before starting a job, make certain that you have all the neces-
sary tools and parts on hand. Read ail the instructions thorough-
ly, and do not attempt shortcuts. Use tools appropriate to the
work and use only replacement parts meeting BMW specifica-
tions.
Use pneumatic and electric tools only to loosen threaded parts
and fasteners. Never use these tools to tighten fasteners, espe-
cially on light alloy parts. Always use a torque wrench to tighten
fasteners to the tightening torque specification listed.
Be mindful of the environment and ecology. Before you drain the
crankcase, find out the proper way to dispose of the
oil. Do not
pour
oil onto the ground, down a drain, or into a stream, pond or
lake. Dispose of waste in accordance with Federal, State and
Local laws.
The control module for the anti-lock brake system
(ABS) cannot
withstand temperatures from a paint-drying booth or a heat
lamp
in excess of 203" F (95°C) and should not be subjected to tem-
peratures in excess of 185°F
(8S°C) for more than two hours.
- Before doing any electrical welding on cars equipped with ABS,
disconnect the battery negative
(-) terminal (ground strap) and
the ABS control module connector.
- Always make sure ignition is off before disconnecting battery.
Label battery cables before disconnecting. On some models, bat-
tery cables are not color coded.
Disconnecting the battery may erase fault code@) stored in control
module memory. Using special BMW diagnoslic equipment, check
lor
iauit codes prior to disconnecting the battery cables. If the mal-
I.mct on ndicator Ignt (MIL) s I. ..minaled. see OBD On-Board
Diaanostics
Tl11s iant is iuenlfted as lne Check Ena~ne oht
(1997-2000 models jor~ervlce Engine Soon light (2061 andlater
models). If any other system iaults have been detected (indicated
by an illuminated warning light), see an authorized BMW dealer.
If a normal
or rapid charger is used to charge battery, the battery
must be disconnected and removed from the vehicle in order to
avoid damaging the vehicle.
- Do not quick-charge the battery (for boost starting) for longer
than one minute. Wait at least one minute before boosting the
battery a second time.
* Connect and disconnect a battery charger only with the battery
charger switched off.
- Sealed or "maintenance free" batteries should be slow-charged
only, at an amperage rate that is approximately 10% of the bat-
tery's ampere-hour (Ah)
rating.
. Do not allow battery charging voltage to exceed 16.5 volts. If the
battery begins producing gas or boiling violently, reduce the
charging rate.
Boosting a sulfated battery at a high charging rate
can cause an explosion.
Page 11 of 1002
Downloaded from www.Manualslib.com manuals search engine
01 0-1
010 General
General ........................... .01 0.2
How to Use this Manual ............ .01 0.2
Warnings. cautions and notes ........... .0l 0.3
Getting Started .................... .0i 0.5
Safety ............................. .O1 0.5
Lifting the car ........................ .O1 0.5
Raising car ......................... .O1 0.5
Working under car .................... .O1 0.6
Advice for the Beginner ............ .O1 0.7
Planning ahead ...................... .O1 0.7
Workshop practices ................... .O1 0.7
Non-reusable fasteners ................ .O1 0.7
Tightening fasteners .................. .O1 0.8
Gaskets and seals .................... .O1 0.9
Electrical testing .................... .O1 0.10
Wire repairs ........................ .O1 0.10
Buying Parts ..................... .01 0.11
Genuine BMW parts ................. .O1 0.11
Non-returnable parts ................. .O1 0.11
Information you need to know .......... .0l 0.12
Service ........................... 01 0-1 3
TOOIS ............................. 010-13
Basic tool requirements ............... 01 0-1 4
Jack stands ......................... 01 0-1 6
Oil change equipment ................. 01 0-1 6
Torque wrench ...................... 01 0-17
Digital multimeter .................... 010-17
BMW special tools ................... 01 0-1 8
Emergencies ...................... 01 0-1 8
Changing a tire ...................... 01 0-1 8
Jump starting ....................... 01 0-1 9
Indicator and warning lights ............ 01 0-1 9
Towing ............................ 010-20
Spare parts kit ...................... 010-21
Page 15 of 1002
Downloaded from www.Manualslib.com manuals search engine
General
Much of the necessary maintenance and minor repairthat an
automobile will need can be done with ordinary tools. Below
you'll find important information on how to work safely, a dis-
cussion of what tools will be needed and how to use them.
Safety
Although an automobile presents many hazards, common
sense and good equipment can help ensure safety. Many ac-
cidents happen because of carelessness. Pay attention and
stick to the safety rules in this manual.
Lifting the car
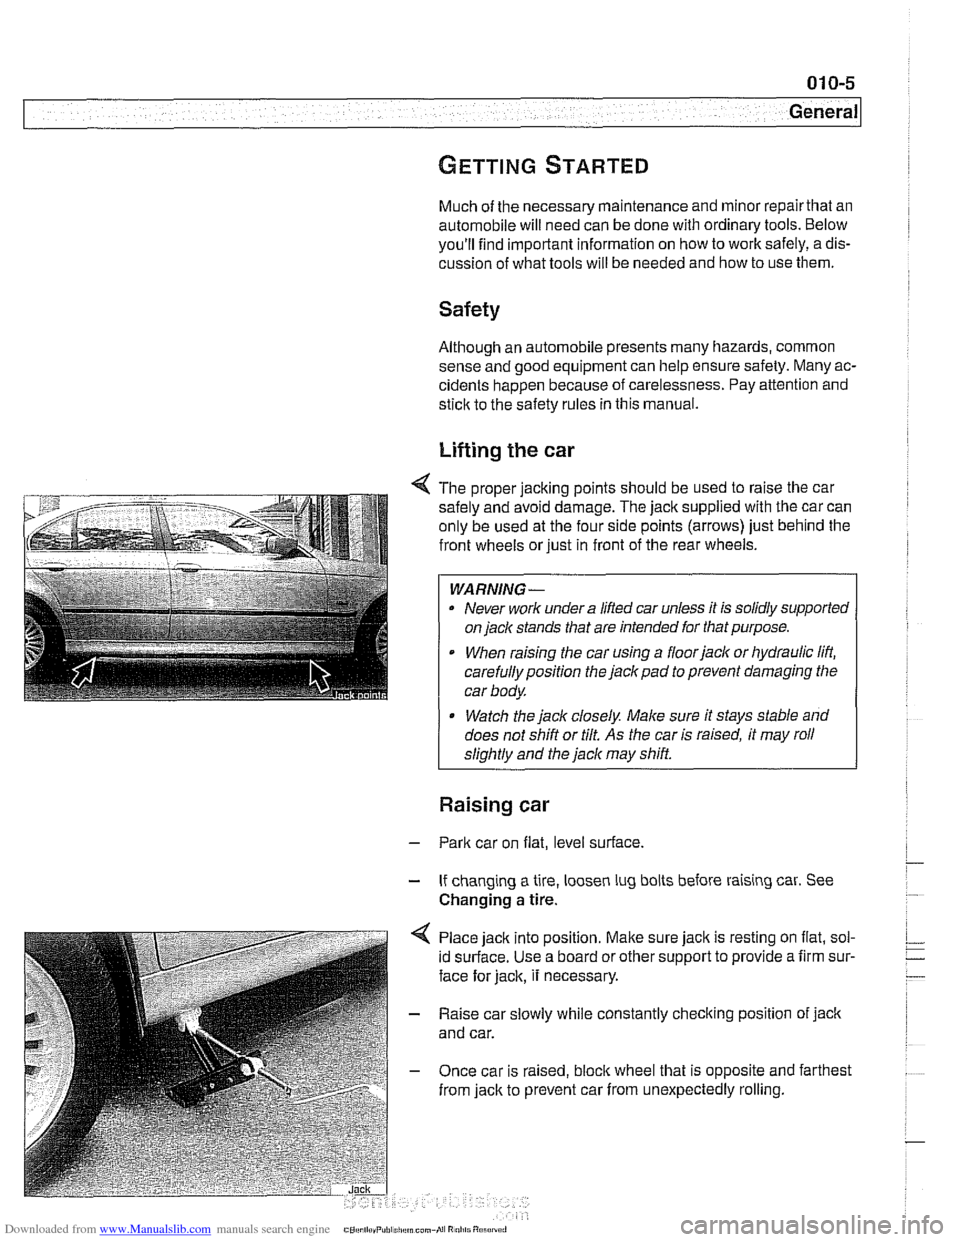
4 The proper jacking points should be used to raise the car
safely and avoid damage. The
jack supplied with the car can
only be used at the four side points (arrows) just behind the
front wheels or just in front of the rear wheels.
WARNING-
. Never work under a lifted car unless it is solidly supported
on
jack stands that are intended for that purpose.
When raising the car using a floorjack or hydraulic lift,
carefully position the jack pad to prevent damaging the
car body.
* Watch the jack closely. Male sure it stays stable and
does not shift or tilt.
As the car is raised, it may roll
sliahtlv and the
jack mav shift.
Raising car
- Park car on flat, level surface.
- If changing a tire, loosen lug bolts before raising car. See
Changing
a tire.
Place jack into position.
Malte sure jack is resting on flat, sol-
id surface. Use a board or other support to provide a firm sur-
face for jack, it necessary.
- Raise car slowly while constantly checking position of jack
and car.
- Once car is raised, bloclc wheel that is opposite and farthest
from jack to prevent car from unexpectedly rolling.
Page 16 of 1002
Downloaded from www.Manualslib.com manuals search engine
(General
WARNING-
Do not rely on the transmission or the parking brake to
keep the car from rolling. They are not
a substitute forpos-
itively bloclcing the opposite wheel.
Never
work undera car that is supported only by a jaclc.
Use jack stands designed to support the car. See
Tools.
Working under car
- Disconnect negative (-) cable from battery so that car cannot
be started. Let others know what you will be doing.
CAUTION-- Prior to disconnecting the battery, read the battery discon-
nection cautions given in
001 General Cautions and
Warnings.
- Raise car slowly as described above.
- Use at least two jack stands to support car. Use jack stands
designed for the purpose of supporting a car. See Tools.
WARNING-
* A jaclc is a temporary lifting device and should not be used
alone to support the car while you are under it.
Do not use wood, concrete
blocks, or bricks to support
a
ca,: Wood may split Blocks and bricks, while strong,
are not designed for that kind of load, and may break or
- Place jaclc stands on firm, solid surface. If necessary, use a
flat board or similar solid object to provide a firm footing.
- Lower car slowly until its weight is fully supported by jack
stands. Watch to
make sure that the jack stands do not tip or
lean as the car settles on them.
- Observe all jacking precautions again when raising car to re-
move jack stands.
Page 26 of 1002
Downloaded from www.Manualslib.com manuals search engine
.-
General
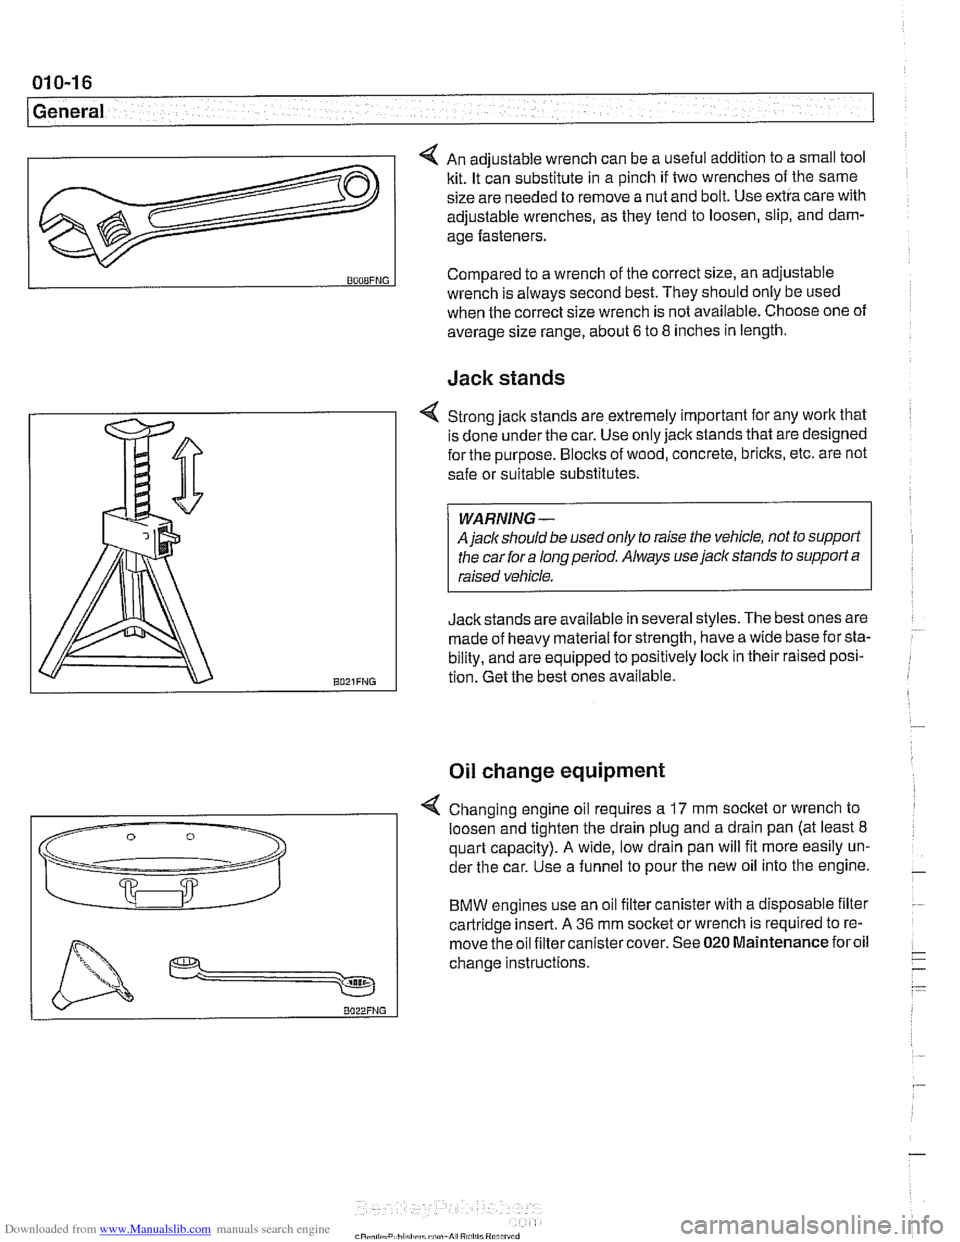
4 An adjustable wrench can be a useful addition to a small tool
kit. It can substitute in a pinch if two wrenches of the same
size are needed to remove a nut and bolt. Use extra care with
adjustable wrenches, as they tend to loosen, slip, and dam-
age fasteners.
Jack stands
v
BOOBFNG
4 Strong jack stands are extremely important for any work that
is done under the car. Use only jack stands that are designed
for the purpose.
Blocks of wood, concrete, bricks, etc. are not
safe or suitable substitutes.
A
jaclc should be used only to raise the vehicle, not to support
the car for a long period. Always use
jack stands to support a
Jackstands are available in several styles. The best ones are
:
made of heavy material for strength, have a wide base for sta-
bility, and are equipped to positively lock in their raised posi-
tion. Get the best ones available.
Compared to
a wrench of the correct size, an adjustable
Oil change equipment
wrench is always second best. They should only be used
when the correct size wrench is not available. Choose one of
average size range, about
6 to 8 inches in length.
4 Changing engine oil requires a 17 mm socket or wrench to
loosen and tighten the drain plug and a drain pan (at least
8
quart capacity). A wide, low drain pan will fit more easily un-
der the car. Use a funnel to pour the new oil into the engine.
BMW engines use an oil filter canister with a disposable filter
cartridge insert. A
36 mm socket or wrench is required to re-
move the oil filtercanistercover. See
020 Maintenance foroil
change instructions.
Page 28 of 1002
Downloaded from www.Manualslib.com manuals search engine
-
General
BMW special tools
Many repairs covered in this manual call for the use of BMW
special tools. Many of the BMW special tools mentioned in
this manual are simply the best thing to use to do the job cor-
rectly. In these cases, the tool is identified with a
BMW parl
number. See your authorized BMW dealer parts department
for information on how to order special tools.
There are some jobs for which expensive special tools are es-
sential, and not a cost-effective purchase for a one time repair
by the do-it-yourself owner. This manual includes such re-
pairs for the benefit of those with the necessary experience
and access to tools. For the do-it-yourselfer, the need for spe-
cial tools is noted in the text, and whether or not BMW dealer
service is recommended.
Changing a tire
- Stop car on as flat a surface as possible, in a place where you
can be easily seen by other drivers. Avoid stopping just over
the crest of a hill.
WARNING -
If a tire goes flat while driving, pull well off the road. Changing
a tire on a busy slreet or liigliway is very dangerous. If
nec-
essag drive a short distance on the flat tire to get to a safe
place. It is much better to ruin a tire or rim than to
risk being
hit.
-
- Turn on emergency flashers, and set out flares or emergency
markers well behind car.
Choclc wheel (wheel chock located
in trunk) diagonally opposite to the one being changed. Pas-
sengers should get out of car and stand well away from road.
- Take jaclc and tools from tool area beneath trunk mat. Re-
move spare tire from tire storage tray.
- Loosen wheel bolts while car is on ground, but leave them a
little snug.
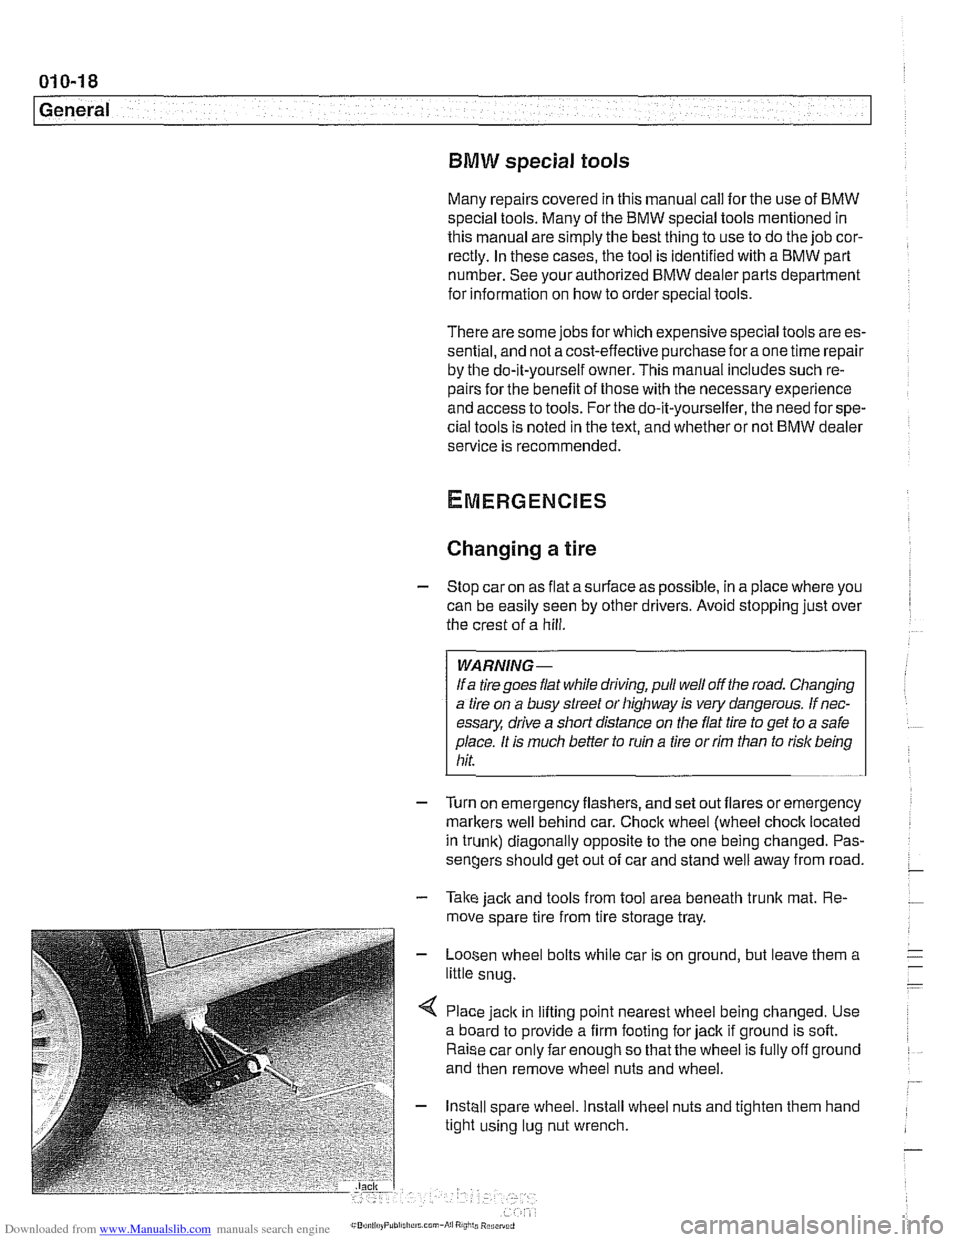
< Place jack in lifting point nearest wheel being changed. Use
a board to provide a firm footing for jack if ground is soft.
Raise car only far enough so that the wheel is fully off ground
and then remove wheel nuts and wheel.
- Install spare wheel. Install wheel nuts and tighten them hand
tight using lug nut wrench.
Page 78 of 1002
Downloaded from www.Manualslib.com manuals search engine
. .- -
I Engine Removal and Installation I
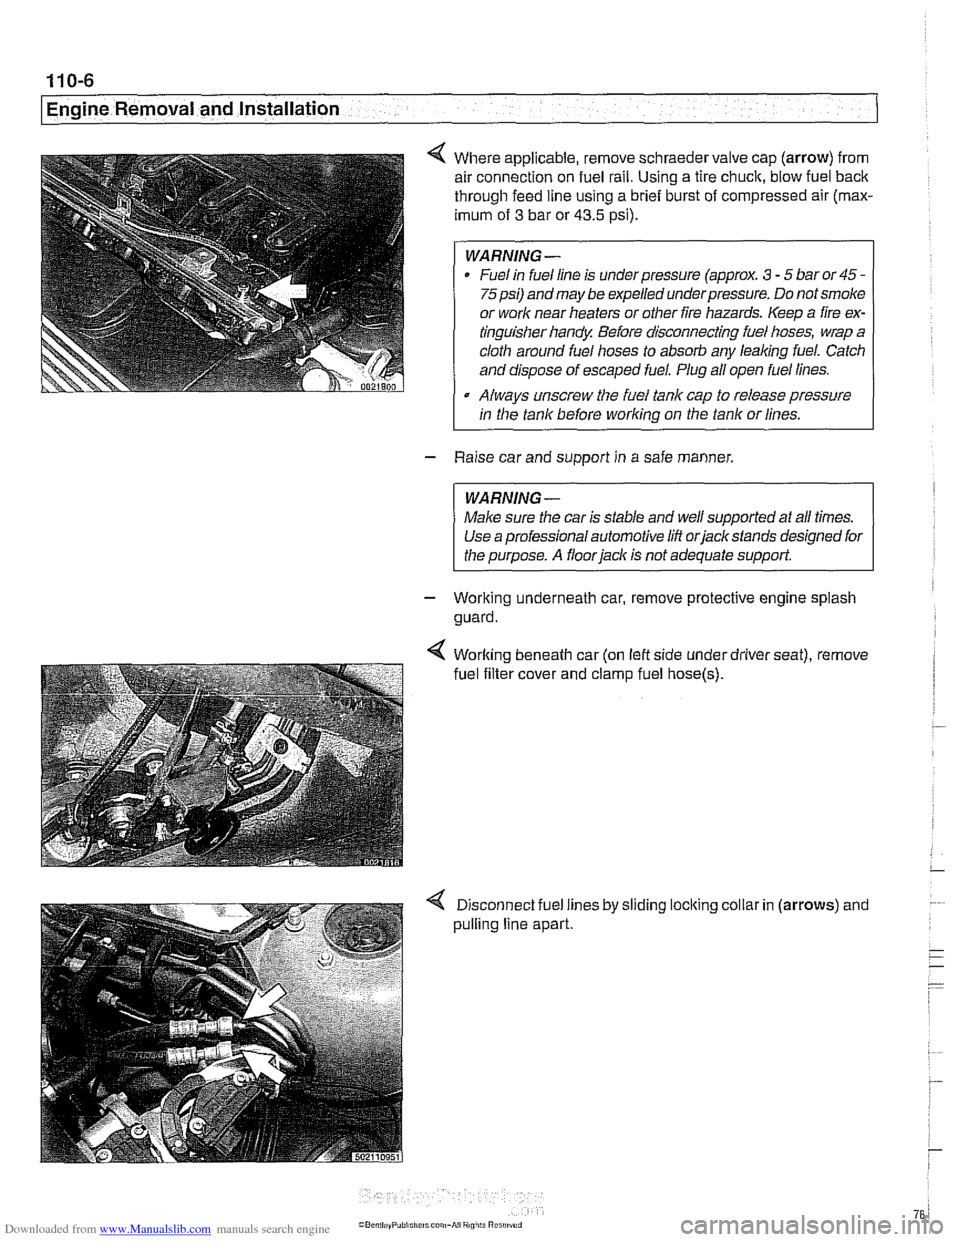
4 Where applicable, remove schraedervalve cap (arrow) from
air connection on fuel rail. Using a tire chuck, blow fuel back
through feed line using a brief burst of compressed air
(rnax-
imum of 3 bar or 43.5 psi).
WARNING -
Fuel in fuel line is under pressure (approx. 3 - 5 bar or 45 -
75psi) andmay be expelled underpressure. Do not smoke
or work near heaters or other fire hazards. Keep a fire ex-
tinguisher handy Before disconnecting fuel hoses, wrap
a
cloth around fuel hoses to absorb any leaking fuel. Catch
and dispose of escaped fuel. Plug all open fuel lines.
Alwavs unscrew the Fuel tank cao to release
oressure
I in the tank before working on the tank or lines. I
- Raise car and support in a safe manner.
WARNING-
Male sure the car is stable and we/ supported at all times.
Use a professional automotive lift orjackstands designed for
the purpose. A floor jack is not adequate support
- Working underneath car, remove protective engine splash
guard.
4 Disconnect fuel lines by sliding locking collar in (arrows) and
pulling line apart.
Page 91 of 1002
Downloaded from www.Manualslib.com manuals search engine
110-19
Engine Removal and Installation
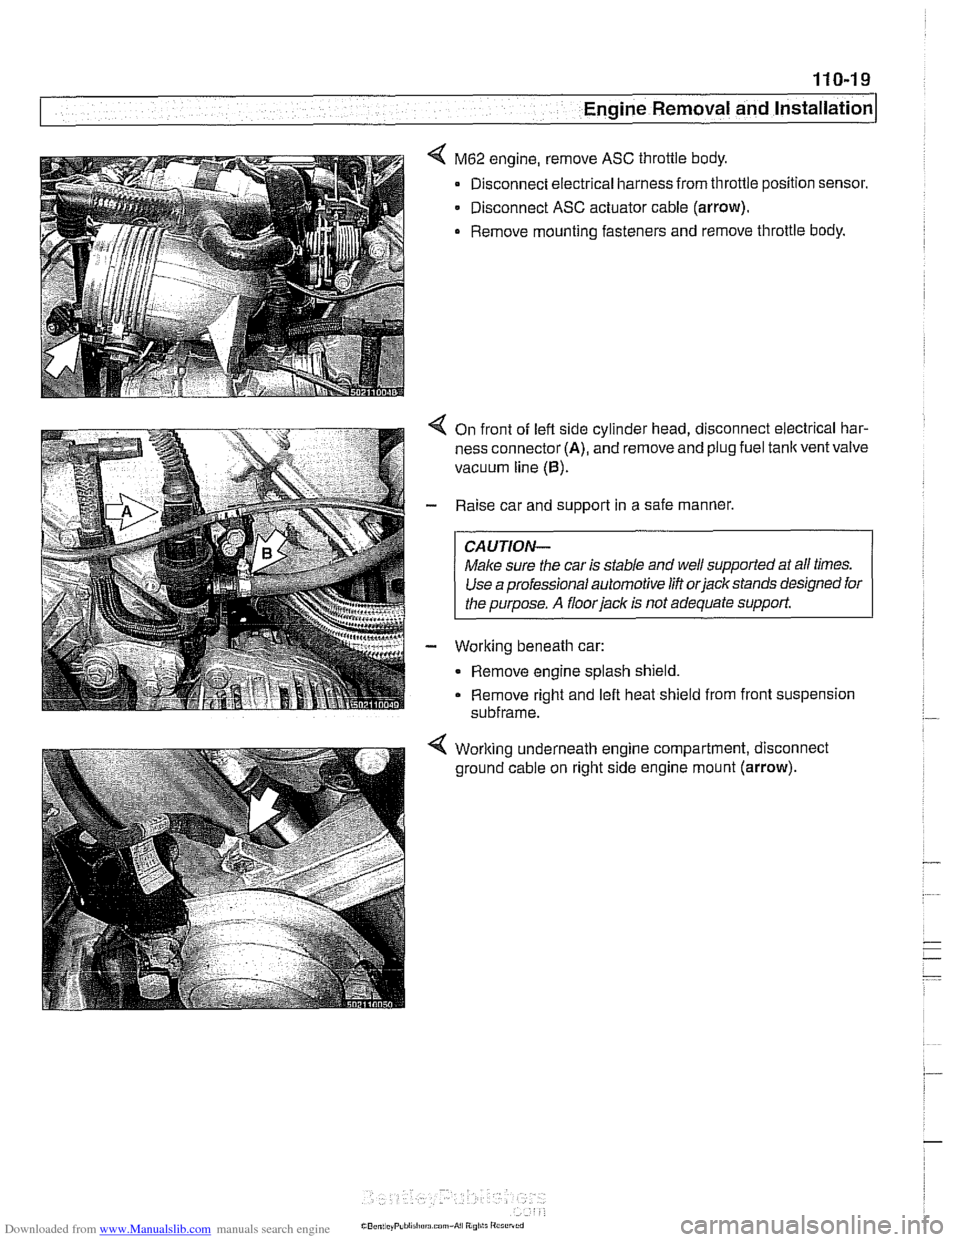
M62 engine, remove ASC throttle body.
Disconnect electrical harness from throttle position sensor.
- Disconnect ASC actuator cable (arrow).
. Remove mounting fasteners and remove throttle body.
On front of left side cylinder head, disconnect electrical har-
ness connector
(A), and remove and plug fuel tank vent valve
vacuum line
(0).
Raise car and support in a safe manner.
CAUTION-
Male sure the car is stable and well supported at aN times.
Use a professional automotive
lifi orjackstands designed for
I the ouroose. A floor jack is not adequate support.
Working beneath car:
- Remove engine splash shield.
Remove right and left heat shield from front suspension
subframe.
Working underneath engine compartment, disconnect
ground cable on right side engine mount
(arrow).
Page 118 of 1002
Downloaded from www.Manualslib.com manuals search engine
. .- -
Cylinder Head Removal and Installation
- Working at side of intake manifold near left strut tower, dis-
connect intake manifold resonance valve electrical harness
connector.
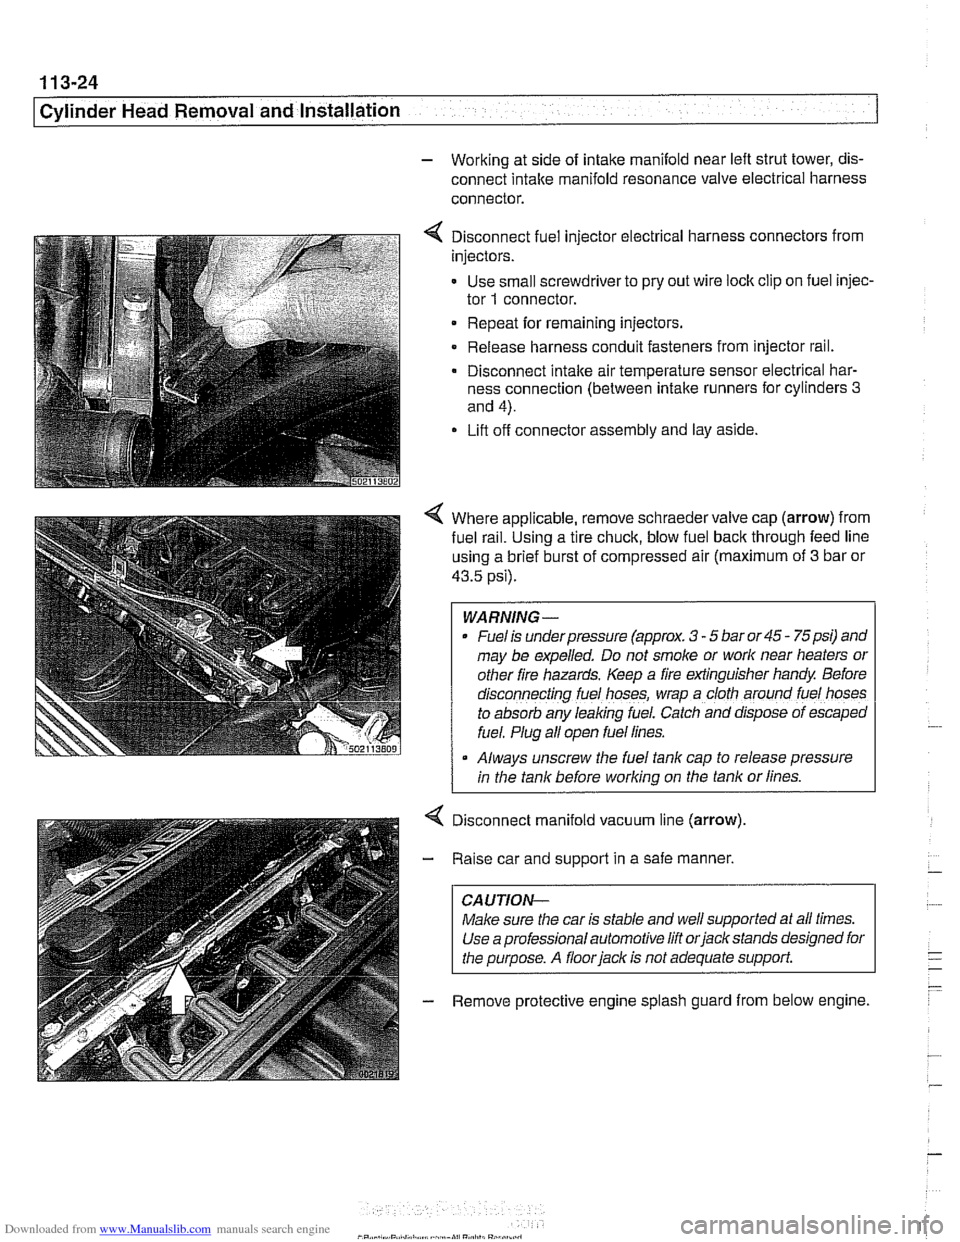
4 Disconnect fuel injector electrical harness connectors from
injectors.
- Use small screwdriver to pry out wire lock clip on fuel injec-
tor
1 connector.
Repeat for remaining injectors.
Release harness conduit fasteners from injector rail.
- Disconnect intake air temperature sensor electrical har-
ness connection (between intake runners for cylinders
3
and 4).
Lift off connector assembly and lay aside.
4 Where applicable, remove schraeder valve cap (arrow) from
fuel
ra~l. Using a tire chuck, blow fuel back through feed line
using a brief burst of compressed air (maximum of
3 bar or
43.5 psi).
WARNING-
Fuel is underpressure (approx. 3 - 5 bar or 45 - 75psi) and
may be expelled. Do not smoke or
work near heaters or
other fire hazards. Keep a fire extinguisher handy Before
d~sconnecting fuel hoses, wrap a cloth around fuel hoses
to absorb any leaking fuel. Catch and
dfspose of escaped
fuel. Plug all open fuel lines.
Always unscrew the fuel tank cap to release pressure
I in the tank before working on the tank or lines.
Disconnect manifold vacuum line (arrow)
Raise car and support in a safe manner,
CAUTION-
Make sure the car is stable and well supported at all times.
Use a professional automotive lift
orjack stands designed for
the purpose. A
floorjack is not adequate support.
Remove protective engine splash guard from below engine.
Page 330 of 1002
Downloaded from www.Manualslib.com manuals search engine
11 9-1 0
Lubrication System
Oil pan, removing and installing
(6-cylinder)
The engine oil pan removal procedure requires that the en-
gine be supported from the top and the front suspension
sub-
frame be lowered.
- Raise car and place securely on jack stands.
Make sure the car is stable and well supported at all times.
Use a professional automotive
lift orjackstands designed for
- Remove splash shield from under engine.
- Drain engine oil as described in 020 Maintenance.
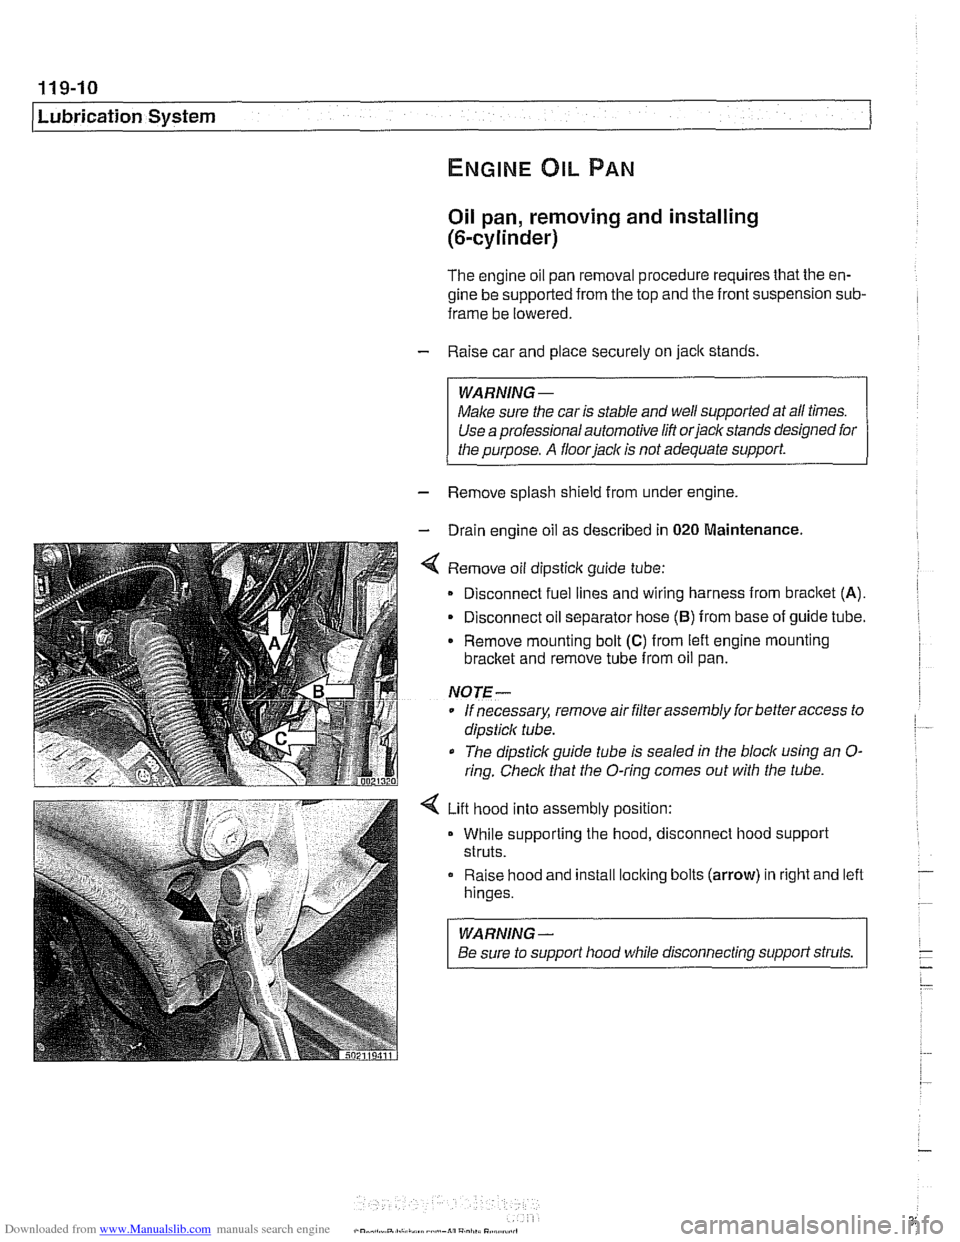
4 Remove oil dipsticlc guide tube:
Disconnect fuel lines and wiring harness from
bracket (A).
- Disconnect oil separator hose (B) from base of guide tube.
Remove mounting bolt
(C) from left engine mounting
bracket and remove tube from oil pan.
NOTE-
* If necessary, remove air filter assembly for better access to
dipsticlc tube.
The dipstick guide tube is sealed in the block using an
O-
ring. Check that the O-ring comes out with the tube.
4 Lift hood into assembly position:
While supporting the hood, disconnect hood support
struts.
Raise hood and install
loclting bolts (arrow) in right and left
hinges.
WARNING-
Be sure to support hood while disconnecting support struts.