wheel bolt torque BMW 540i 2000 E39 Workshop Manual
[x] Cancel search | Manufacturer: BMW, Model Year: 2000, Model line: 540i, Model: BMW 540i 2000 E39Pages: 1002
Page 148 of 1002
Downloaded from www.Manualslib.com manuals search engine
. ." ".
[Cylinder Head Removal and Installation - .. - -1 -
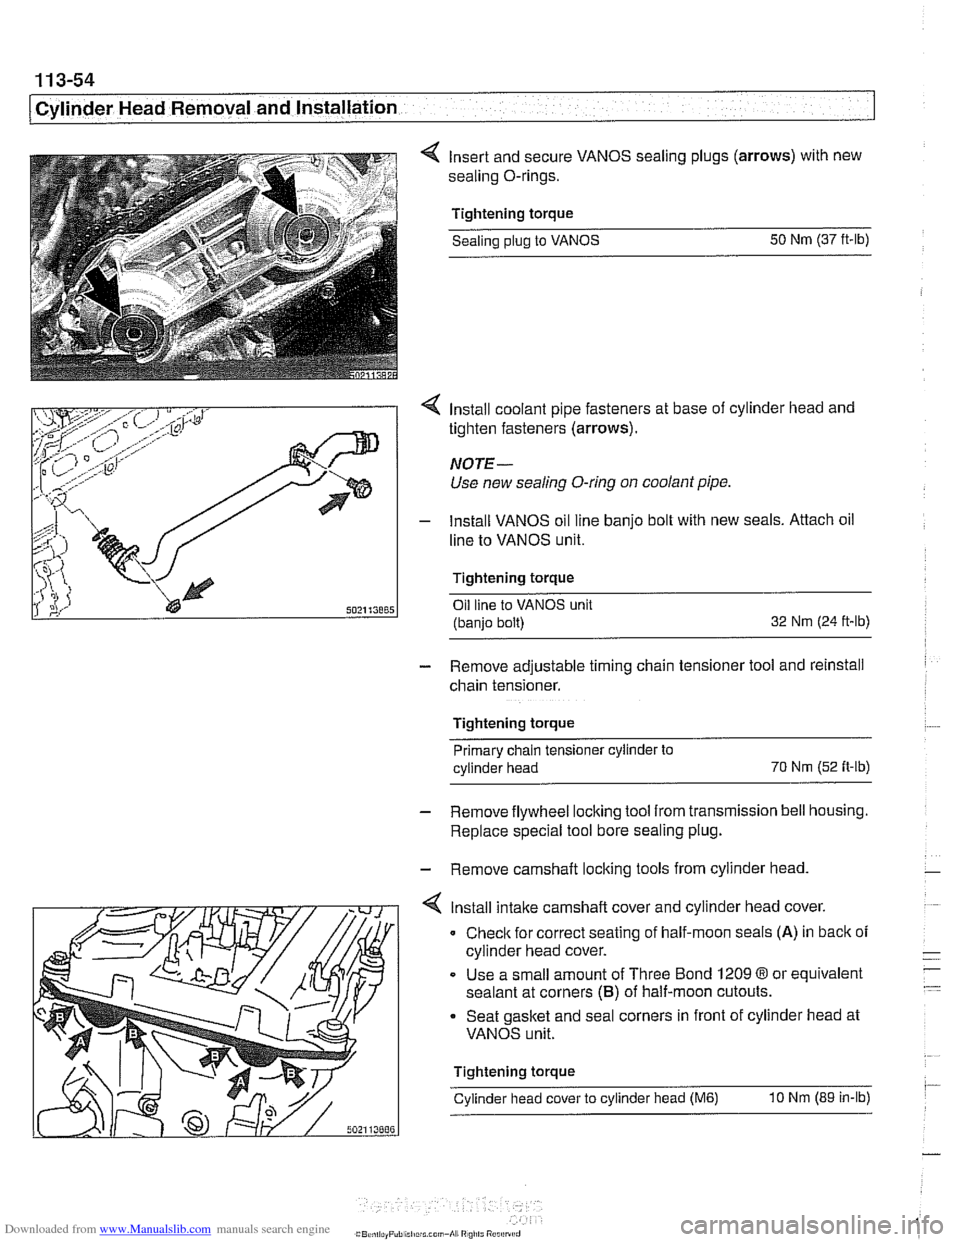
4 Insert and secure VANOS sealing plugs (arrows) with new
sealing O-rings.
Tightening torque Sealing
plug to VANOS 50
Nm (37 ft-lb)
4 Install coolant pipe fasteners at base of cylinder head and
tighten fasteners (arrows).
NOTE-
Use new sealing O-ring on coolant pipe.
- lnstall VANOS oil line banjo bolt with new seals. Attach oil
line to VANOS unit.
Tightening torque Oil line to VANOS unit
(banjo bolt) 32
Nm (24 ft-ib)
- Remove adjustable timing chain tensioner tool and reinstall
chain tensioner.
Tightening torque Primary chain tensioner cylinder to
cylinder head 70
Nm
(52 fi-ib)
- Remove flywheel locking tool from transmission bell housing.
Replace special tool bore sealing plug.
- Remove camshaft locking tools from cylinder head
4 lnstall intake camshaft cover and cylinder head cover.
0 Check for correct seating of half-moon seals (A) in back of
cylinder head cover.
Use a small amount of Three Bond
1209 8 or equivalent
sealant at corners
(B) of half-moon cutouts.
Seat gasket and seal corners in front of cylinder head at
VANOS unit.
Tightening torque
Cylinder head cover to cylinder head
(M6) 10 Nm (89 in-lb)
Page 243 of 1002
Downloaded from www.Manualslib.com manuals search engine
Camshaff Timing Chain
NOTE-
Mark direction of belt rotation if reusing belt.
- Remove vibration damper mounting bolts and remove vibra-
tion damper and pulley from hub.
NOTE- The M52
6-cylinder engine uses a 2-piece vibration damper
and hub assembly.
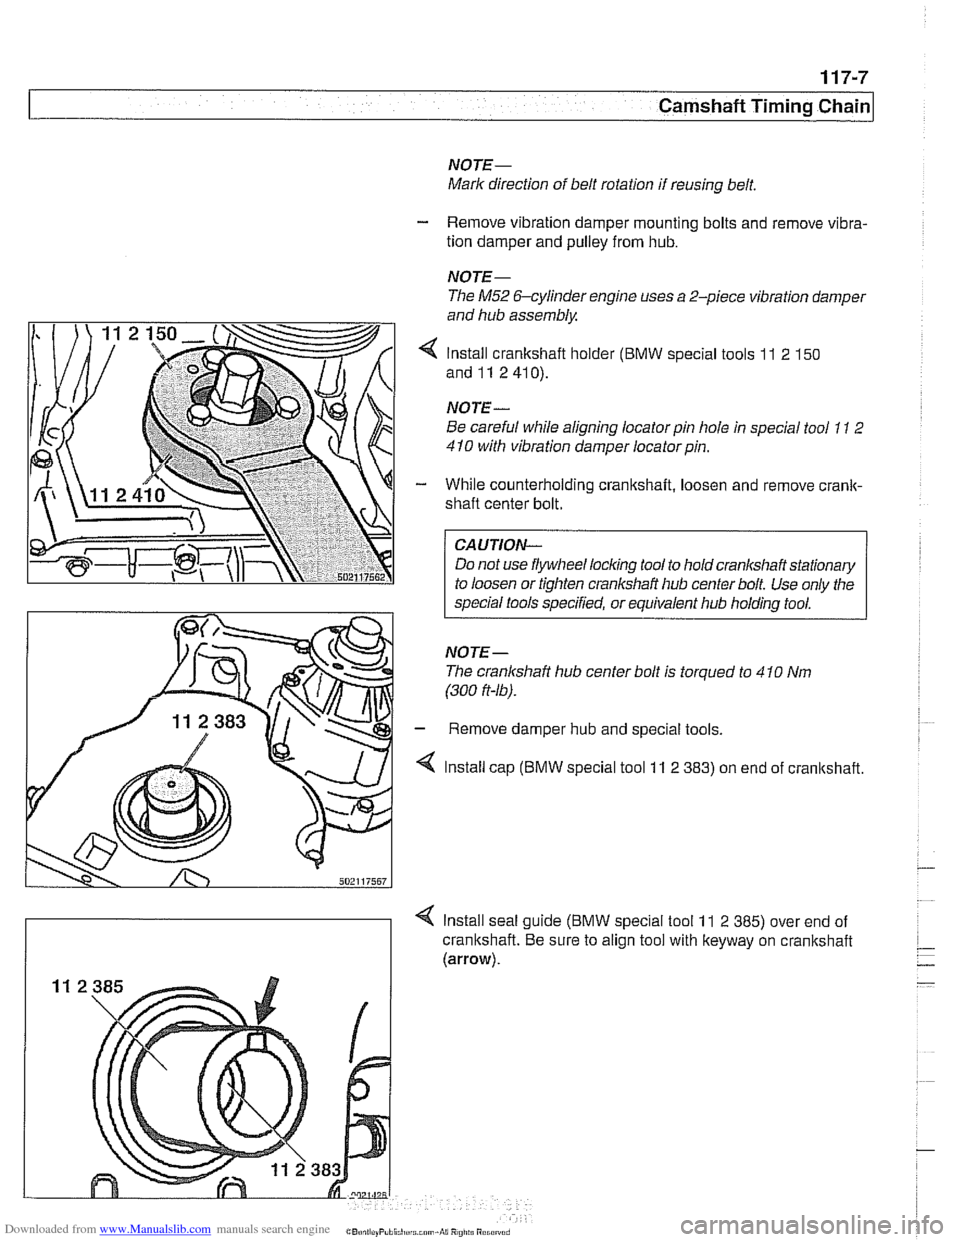
4 Install crankshaft holder (BMW special tools 11 2 150
and11 2410).
NOTE
-
Be careful while aligning locator pin hole in special tool 11 2
410 with vibration damper locatorpin.
- While counterholding crankshaft, loosen and remove crank-
shaft center bolt.
CAUTION-
Do not use flywheel locking tool to hold crankshaft stationary
to loosen or tighten crankshaft hub center bolt Use only the
special tools specified, or equivalent hub holding tool.
NOTE- The cranlshaft hub center bolt is torqued to 4
10 Nm
(300
ft-16).
- Remove damper hub and special tools.
4 Install cap (BMW special tool 11 2 383) on end of cranltshaft.
4 Install seal guide (BMW special tool 11 2 385) over end of
crankshaft. Be sure to align tool with keyway on crankshaft
(arrow).
Page 245 of 1002
Downloaded from www.Manualslib.com manuals search engine
Camshaft Timing Chain
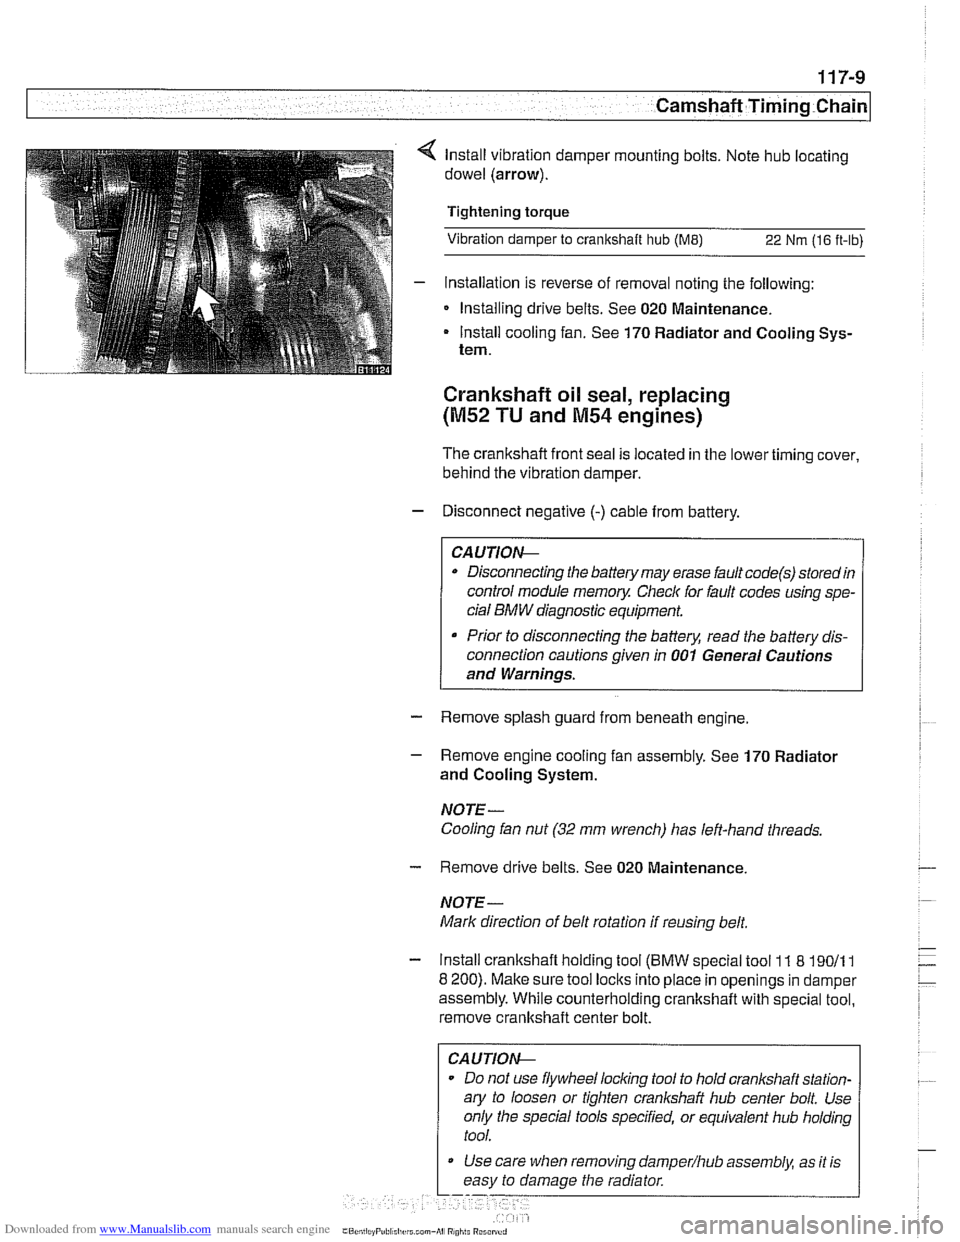
lnstall vibration damper mounting bolts. Note hub locating
dowel (arrow).
Tightening torque
Vibration damper to crankshaft hub
(ME) 22 Nm (16 ft-lb)
- Installation is reverse of removal noting the following:
Installing drive belts. See 020 Maintenance.
Install cooling fan. See 170 Radiator and Cooling Sys-
tem.
Crankshaft oil seal, replacing
(M52 TU and M54 engines)
The crankshafl front seal IS located in the lower timing cover,
behind the
vibrat~on damper.
- Disconnect negative (-) cable from battery.
Disconnecting the battery may erase fault
code(s) storedin
control module memoy Checlc for fault codes using spe-
cial
BMW diagnostic equipment.
Prior to disconnecting the battery, read the battery dis-
connection cautions given in
001 General Cautions
and Warnings.
- Remove splash guard from beneath engine
- Remove engine cooling fan assembly. See 170 Radiator
and Cooling System.
NOTE- Cooling fan nut
(32 mm wrench) has left-hand threads.
- Remove drive belts. See 020 Maintenance
NOTE-
Mark direction of belt rotation if reusing belt.
- Install crankshaft holding tool (BMW special tool 11 8 19011 1
8 200). Make sure tool locks into place in openings in damper
assembly. While counterholding crankshafl with special tool,
remove crankshaft center bolt.
CAUTIOI\C
Do not use flywheel locling tool to hold crankshaft station-
ary to loosen or tighten
cranl(shaft hub center bolt. Use
only the special tools specified, or equivalent hub holding
tool.
Use care when removing
damper/hub assembly, as ~t is
easy to damage the radiator
Page 263 of 1002
Downloaded from www.Manualslib.com manuals search engine
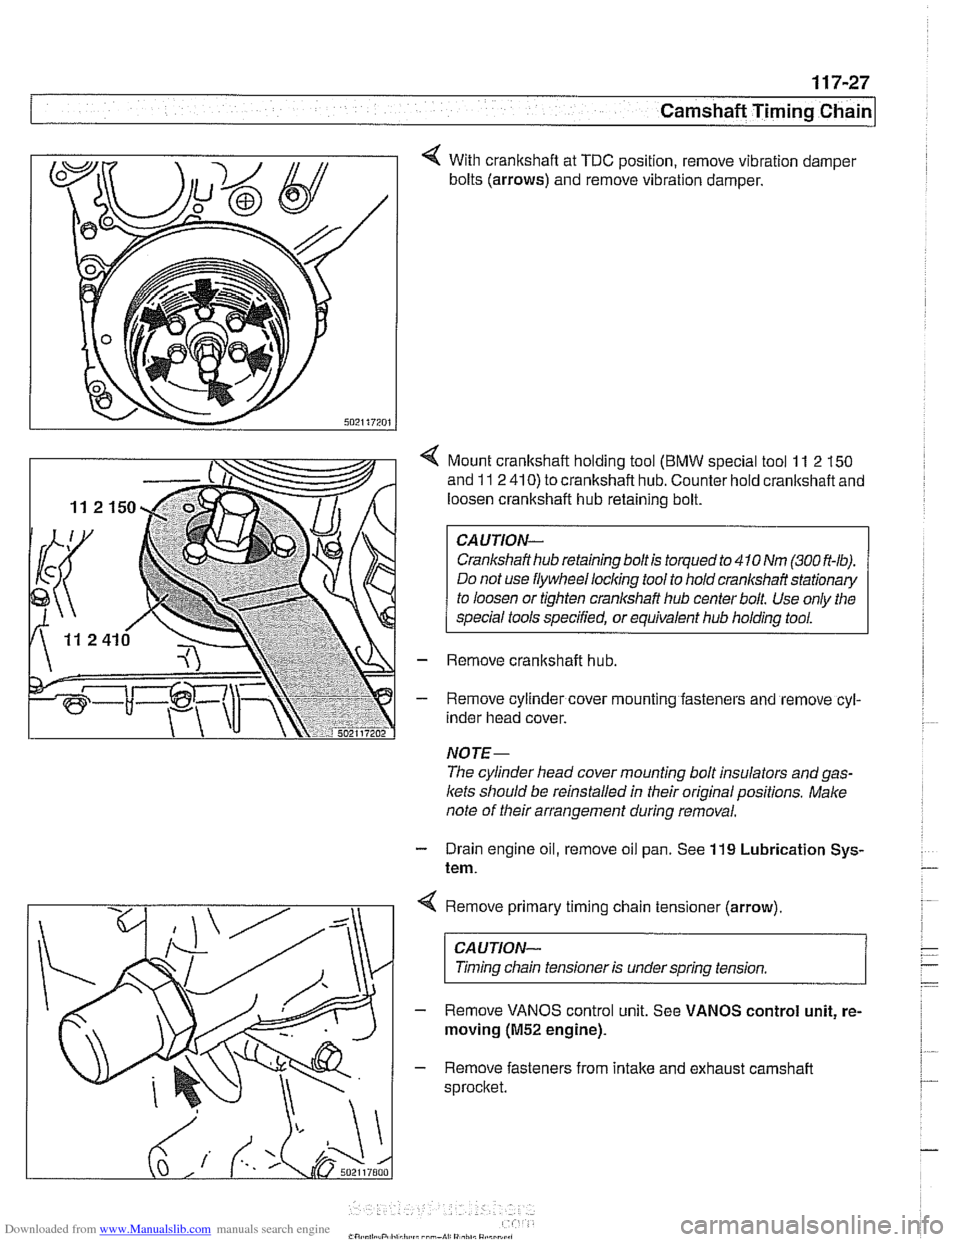
4 With crankshaft at TDC position, remove vibration damper
bolts (arrows) and remove vibration damper.
< Mount crankshaft holding tool (BMW special tool 11 2 150
and
11 2 410) to crankshaft hub. Counter hold crankshaft and
loosen crankshaft hub retaining bolt.
Crankshaft hub retaining bolt is torqued to
410 Nm (300 ft-lb).
Do not use flywheel
locliing tool to hold cranl(shait stationary
to loosen or tighten crankshaft hub center bolt. Use only the
special tools specified, or equivalent hub holding tool.
- Remove crankshaft hub.
- Remove cylinder cover mounting fasteners and remove cyl-
inder head cover.
NOTE-
The cylinder head cover mounting bolt insulators and gas-
lets should be reinstalled in their original positions. Make
note of their arrangement during removal.
- Drain engine oil, remove oil pan. See 119 Lubrication Sys-
tem.
Remove primary timing chain tensioner (arrow).
CAUTION-
Timing chain tensioner is under spring tension. I
- Remove VANOS control unit. See VANOS control unit, re-
moving
(M52 engine).
- Remove fasteners from intake and exhaust camshaft
sprocket.
Page 268 of 1002
Downloaded from www.Manualslib.com manuals search engine
-- -
Chain 1
- Install cylinder identification trigger plate to front of intake
camshaft.
- Install spacer to front of intake camshaft
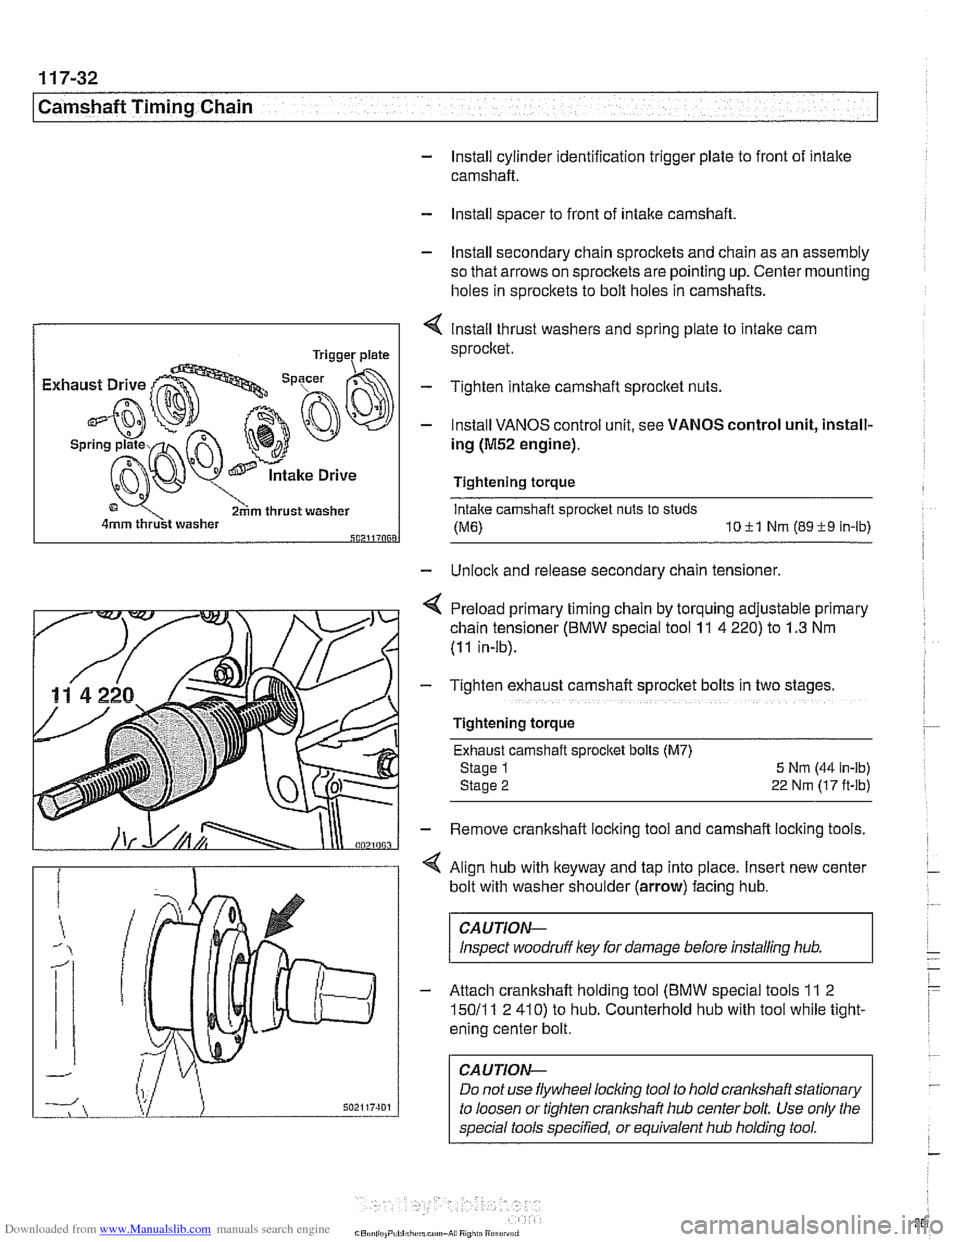
- Install secondary chain sprockets and chain as an assembly
so that arrows on sprockets are pointing up. Center mounting
holes in sprockets to bolt holes in camshafts.
4 lnstall thrust washers and spring plate to intake cam
sprocket.
Tighten intake camshaft sprocket nuts.
- Install VANOS control unit, see VANOS control unit, install-
ing
(M52 engine).
Tightening torque
Intake camshaft sprocket nuts to studs
(ME) 1011 Nm (8919 In-lb) 502117068
- Unlock and release secondary chain tensioner,
4 Preload primary timing chain by torquing adjustable primary
chain tensioner (BMW special tool
11 4 220) to 1.3 Nm
(11 in-lb).
- Tighten exhaust camshaft sprocket bolts in two stage
Tightening torque Exhaust camshaft sprocket bolls (M7)
Stage 1
5 Nrn (44 in-lb)
Stage
2 22 Nm (17 ft-lb)
- Remove crankshaft locking tool and camshaft locking tools.
< Align hub with keyway and tap into place. Insert new center
bolt with washer shoulder (arrow) facing hub.
CAUTION-
Inspect woodruff ley for damage before installing hub.
- Attach crankshaft holding tool (BMW special tools 11 2
15011 1 2 410) to hub. Counterhold hub with tool while tight-
ening center bolt.
CAUTION-
Do not use flywheel locling tool to hold crankshaft stationary
to loosen or tighten
cranlshaft hub center bolt. Use only the
special tools specified, or equivalent hub holding tool.
Page 292 of 1002
Downloaded from www.Manualslib.com manuals search engine
~ ~~ ~
I Camshaft Timing Chain I --
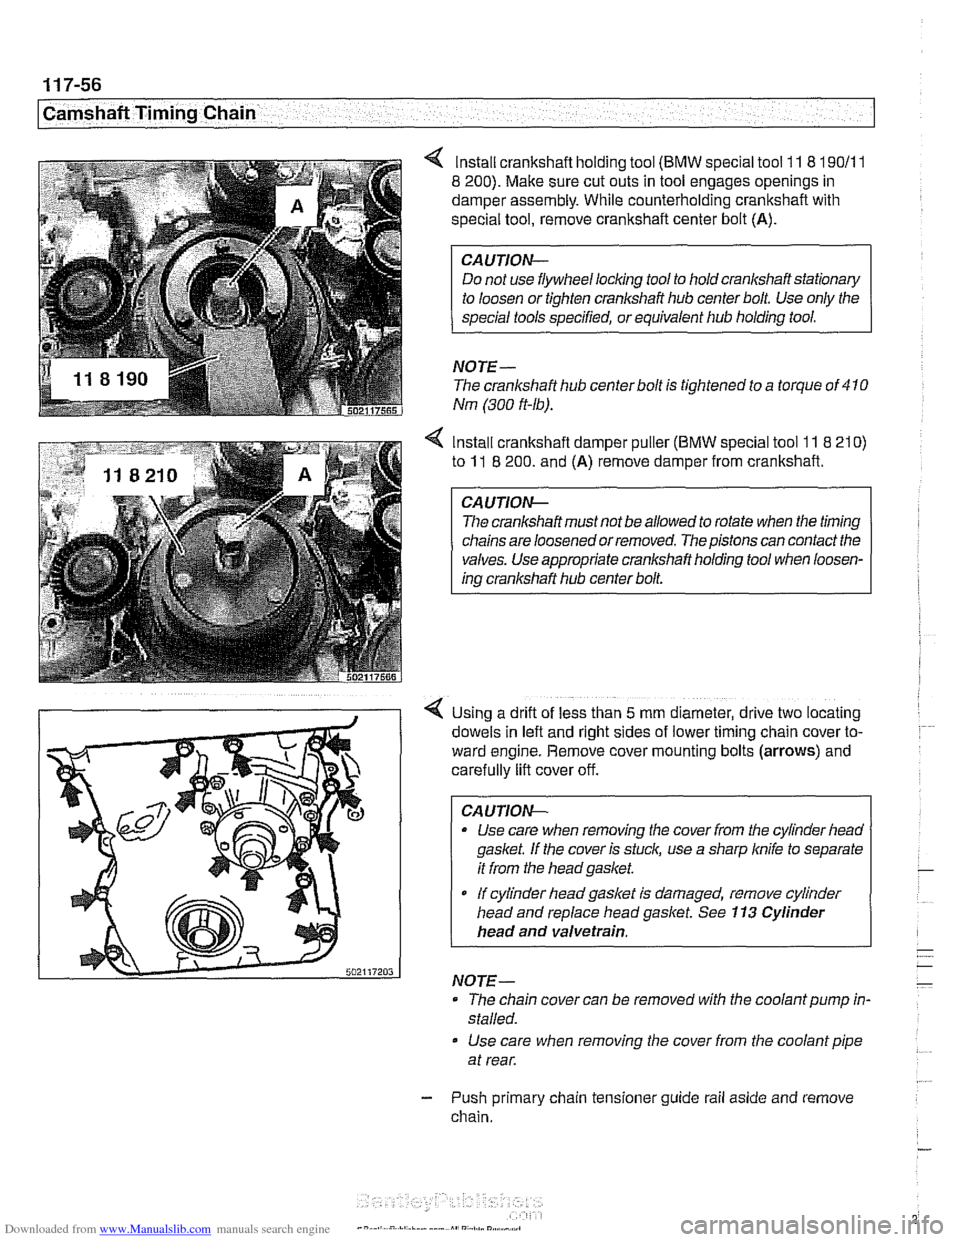
lnstall crankshaft holding tool (BMW special tool 11 8 190/11
8 200). Make sure cut outs in tool engages openings in
damper assembly. While counterholding crankshaft with
special tool, remove crankshaft center bolt (A).
CAUTION-
Do not use flywheel locking tool to hold crankshaft stationary
NOTE-
The crankshaft hub centerbolt is tightened to a torque of 410
Nm (300 ft-lb).
4 Install crankshaft damper puller (BMW special tool 11 8 210)
to 11 8 200. and (A) remove damper from crankshaft.
The crankshaft must not be allowed to rotate when the timing
chains are loosened or removed. The pistons can contact the
valves. Use appropriate crankshaft holding tool when loosen-
ing crankshaft hub center bolt.
Using a drift of less than
5 mm diameter, drive two locating
dowels in left and right sides of lower timing
cham cover to-
ward engine. Remove cover mounting bolts
(arrows) and
carefully lift cover off.
CA
UTION-
* Use care when removing the cover from the cylinder heao
gasket. If the cover is stuck, use a sharp
knife to separate
it from the headgasket.
If cylinder liead gasket Is damaged, remove cylinder
head and replace head gasket. See
113 Cylinder
head and valvetrain.
NOTE-
- The chain cover can be removed with the coolant pump in-
stalled.
Use care when removing the cover from the coolant pipe
at rear.
- Push primary chain tensioner guide rail aside and remove
chain.
Page 322 of 1002
Downloaded from www.Manualslib.com manuals search engine
11 9-2
Lubrication System
This repair group covers lubrication system troubleshooting
as well as oil pan removal and oil pump replacement.
In 6-cylinder models, removal of the oil pan requires the re-
moval of the exhaust system and some front suspension
components. Those procedures are fully covered in:
180 Exhaust System
210 Clutch
230 Manual Transmission
0 240 Automatic Transmission
310 Front Suspension
320 Steering and Wheel Alignment
NOTE-
Oil change procedure and oil filter replacement are covered
in
020 Maintenance.
CAUTIOG
V8 engines: The oil pump fasteners (including the sprocket
retaining nut) are known to vibrate loose. This can result in oil
starvation and engine failure. Be sure to check oil bolts and
nut tightness whenever the
oilpump is accessible. If any fas-
teners are found to be loose, remove them and reinstall with
Loctite
Band torque to specifications.
Special tools
The engine needs to be properly supported while the front
suspension
subframe is lowered to access the oil pan.
A standard oil pressure gauge may be used for measuring oil
pressure.
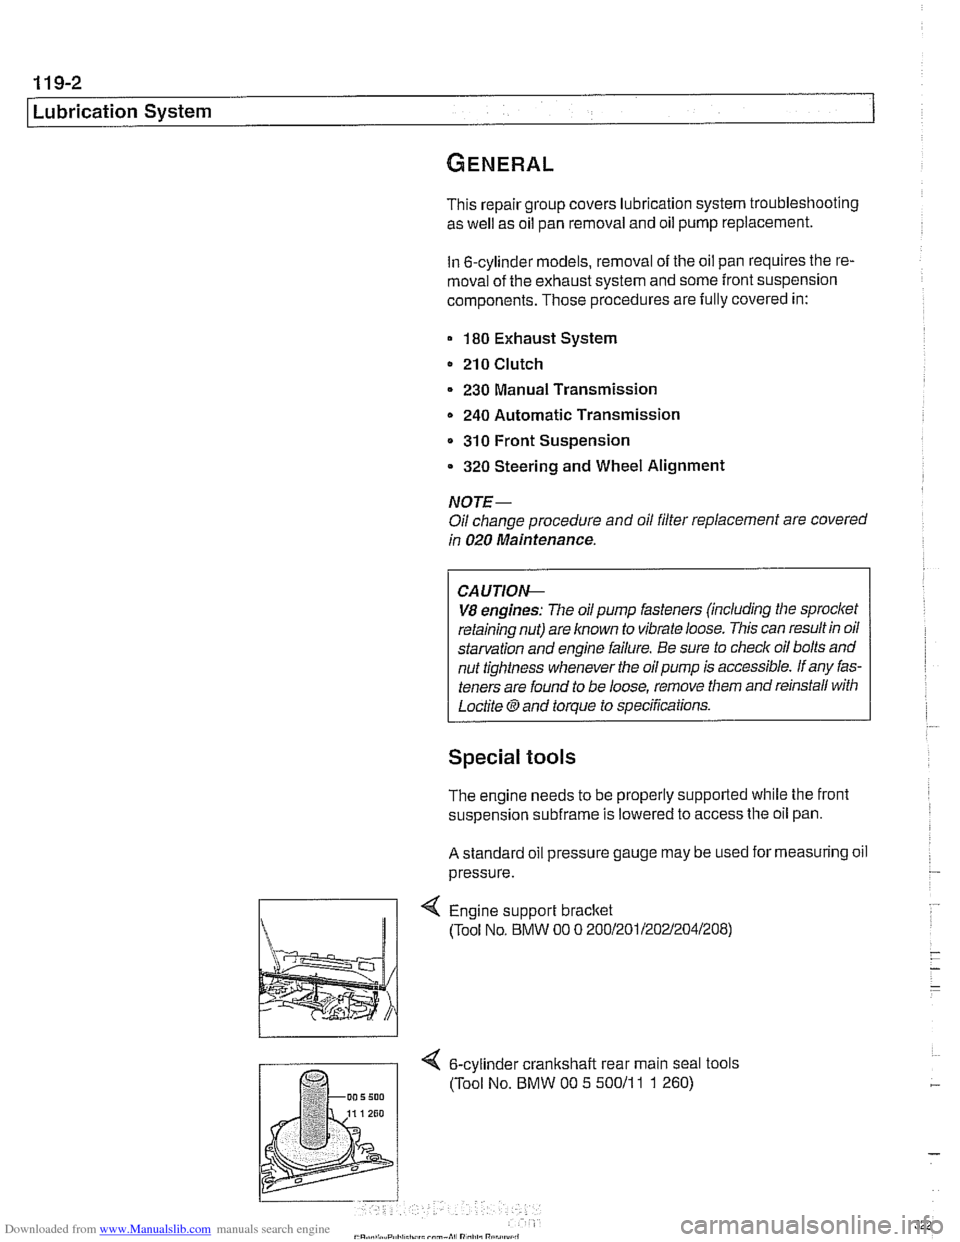
Engine support bracket
(Tool No, BMW 00 0 20012011202~2041208)
4 6-cylinder crankshalt rear main seal tools
(Tool No. BMW 00 5 50011
1 1 260)
Page 328 of 1002
Downloaded from www.Manualslib.com manuals search engine
I Lubrication System -
- Remainder of assembly is reverse of disassembly.
Install flywheel, clutch or torque converter and
transmission.
Fill engine with oil.
- Run engine and check for leaks.
Tightening torques
Oil
drain plug fo oil pan (MI21 25 Nm (18 ft-lb)
Oil pan to engine
block
M6 (8.8 grade) 10 Nm (89 in-ib)
M6 (1 0.9 grade) 12 Nm (9 ft-lb)
M8 (8.8 grade) 22 Nm (1 6 it-lb)
Rear main seal carrier to crankcase
M6 10 Nm (89 in-lb)
ME 22 Nm (16 ft-lb)
Crankshaft rear main seal, replacing (V-8)
- Remove transmission. See 230 Manual Transmission or
240 Automatic Transmission.
- Manual transmission vehicles: Remove clutch pressure plate
and disc. See
210 Clutch.
- Remove flywheel. See 210 Clutch.
- Drain engine oil.
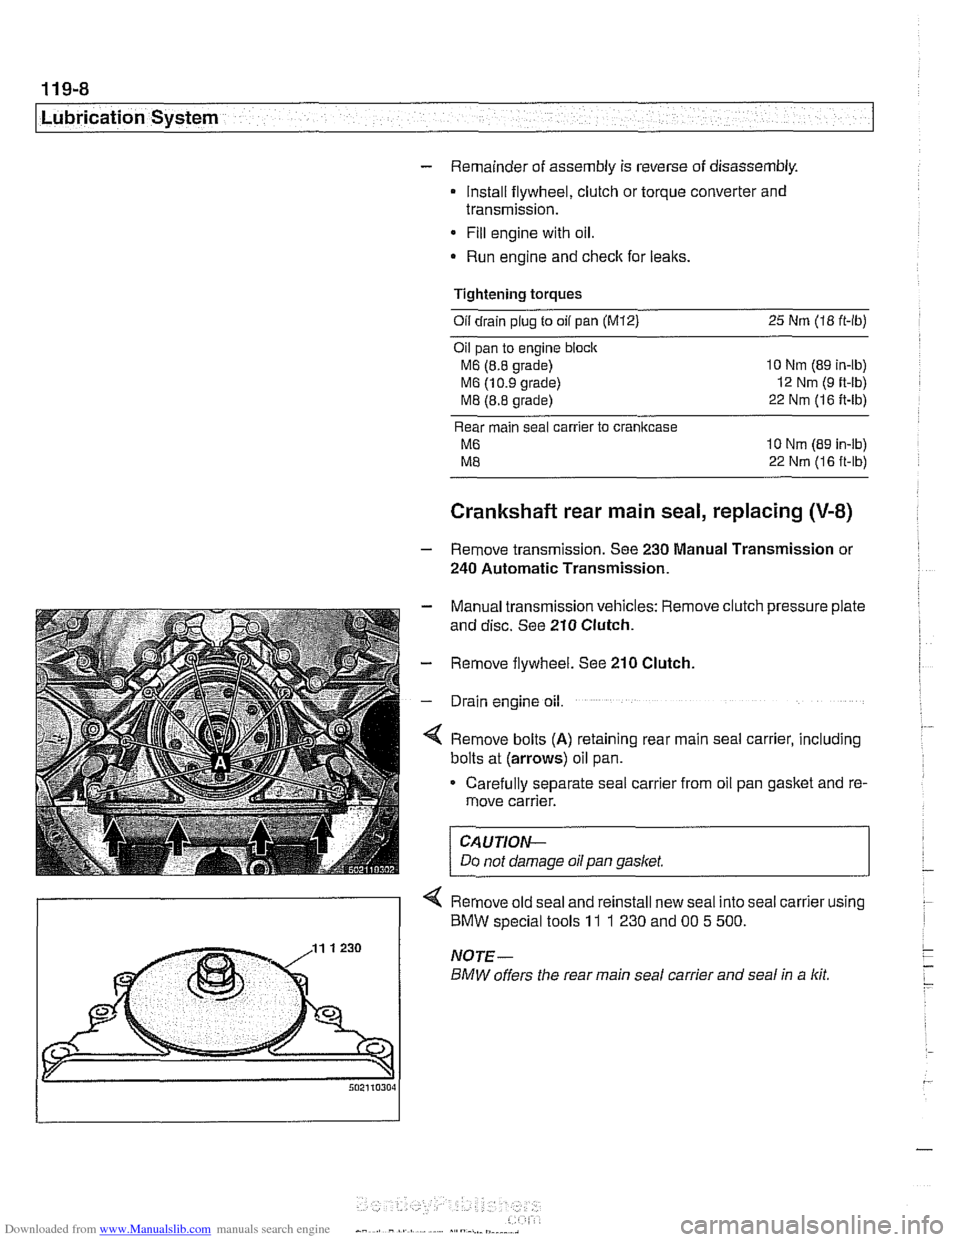
4 Remove bolts (A) retaining rear main seal carrier, including
bolts at (arrows) oil pan.
Carefully separate seal carrier from oil pan gasket and re-
move carrier.
CAUTION-
Do not damage oil pan gasket.
< Remove old seal and reinstall new seal into seal carrier using
) BMW special tools 11 1 230 and 00 5 500.
Page 329 of 1002
Downloaded from www.Manualslib.com manuals search engine
- When reinstalling seal carrier to crankcase:
Check locating sleeves for damage.
Replace gasitet between rear main seal carrier and
cranlt-
case.
Apply thin coat of
3 Bond 8 1209 or equivalent sealant to
oil pan
gasltet sealing surfaces.
* Lubricate crankshaft and seal contact surfaces.
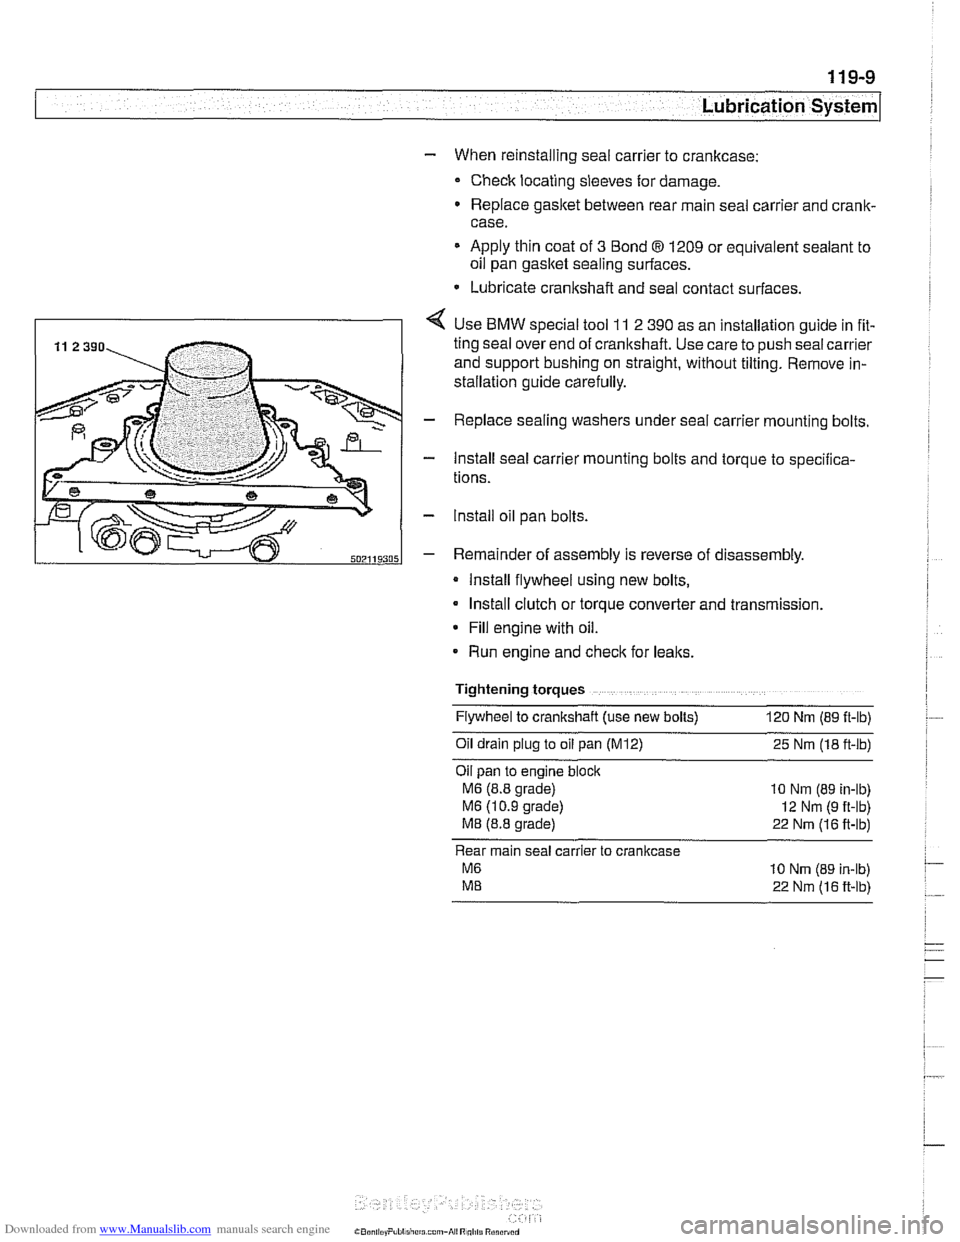
4 Use BMW special tool 11 2 390 as an installation guide in fit-
ting seal over end of cranltshaft. Use care to push seal carrier
and support bushing on straight, without tilting. Remove in-
stallation guide carefully.
- Replace sealing washers under seal carrier mounting bolts.
- Install seal carrier mounting bolts and torque to specilica-
tions.
- lnstall oil pan bolts.
- Remainder of assembly is reverse of disassembly.
Install flywheel using new bolts,
Install clutch or torque converter and transmission.
* Fill engine with oil.
Run engine and
checlt for leaks.
Tightening torques Flywheel to crankshaft (use new bolts)
120 Nm (89 ft-lb)
011 dra~n plug to 011 pan (M12) 25 Nm (18 ft-lb)
Oil pan to
eng~ne block
M6 (8.8 grade) 10 Nm (89 in-lb)
M6 (1 0 9 grade) 12 Nm (9 ft-lb)
M8 (8.8 grade) 22 Nm (16 ft-lb)
Rear main seal carrier to crankcase
M6 10 Nrn (89 in-lb)
ME 22 Nm (16 ft-lb)
Page 387 of 1002
Downloaded from www.Manualslib.com manuals search engine
Battery, Starter, ~lternatorl
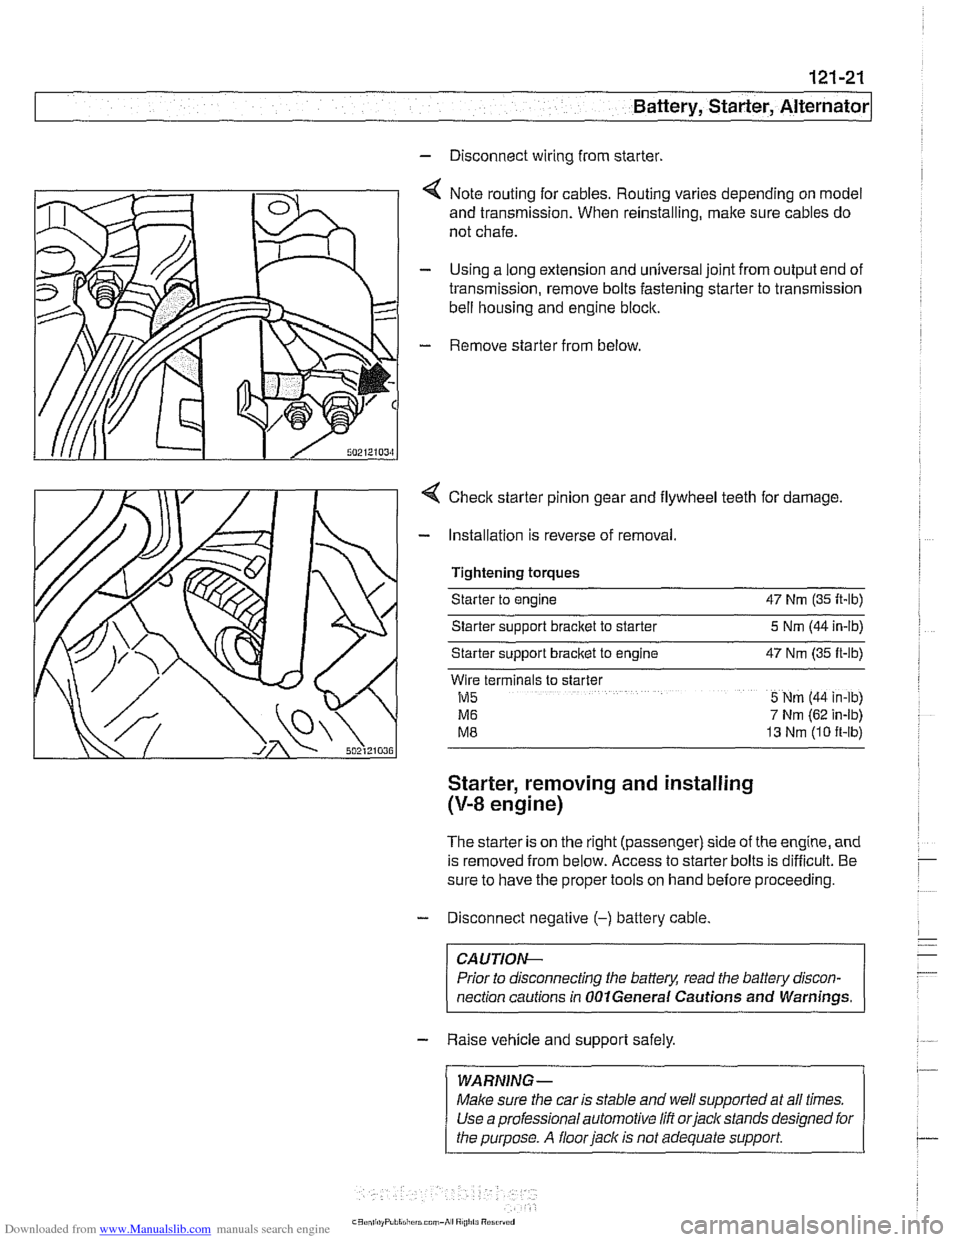
- Disconnect wiring from starter.
4 Note routing for cables. Routing varies depending on model
and transmission. When reinstalling, make sure cables do
not chafe.
- Using a long extension and universal joint from output end of
transmission, remove bolts fastening starter to transmission
bell housing and engine block.
- Remove starter from below
4 Checlc starter pinion gear and flywheel teeth for damage.
- Installation is reverse of removal.
Tightening torques
Starter to engine 47 Nrn (35 It-lb)
Starter sipport bracket to starter 5 Nrn (44 in-lb)
Starter support
bracket to engine 47 Nrn (35 ft-lb)
Wlre terminals to slarter
M5 5 Nrn (44 in-lb)
M6 7 Nrn (62 in-lb)
M8 13 Nrn (10 ft-lb)
Starter, removing and installing
(V-8 engine)
The starter is on the right (passenger) side of the engine, and
is removed from below. Access to starter bolts is difficult. Be
sure to have the proper tools on hand before proceeding.
- Disconnect negative (-) battery cable
CA UTIOW-
Prior to disconnecting the battery, read the battev discon-
nection cautions in
OOlGeneral Cautions and Warnings. -
- Raise vehicle and support safely.
/ WARNING- 1 ~ ~~ ~~ ~~~ ~
Make sure the car is stable and well supported at all times.
Use a professional automotive lift orjacltstands designed for
I the purpose. A floor jack is not adequate support I