check BMW 550I 2007 Owners Manual
[x] Cancel search | Manufacturer: BMW, Model Year: 2007, Model line: 550I, Model: BMW 550I 2007Pages: 273, PDF Size: 8.96 MB
Page 12 of 273
Cockpit
10
Cockpit
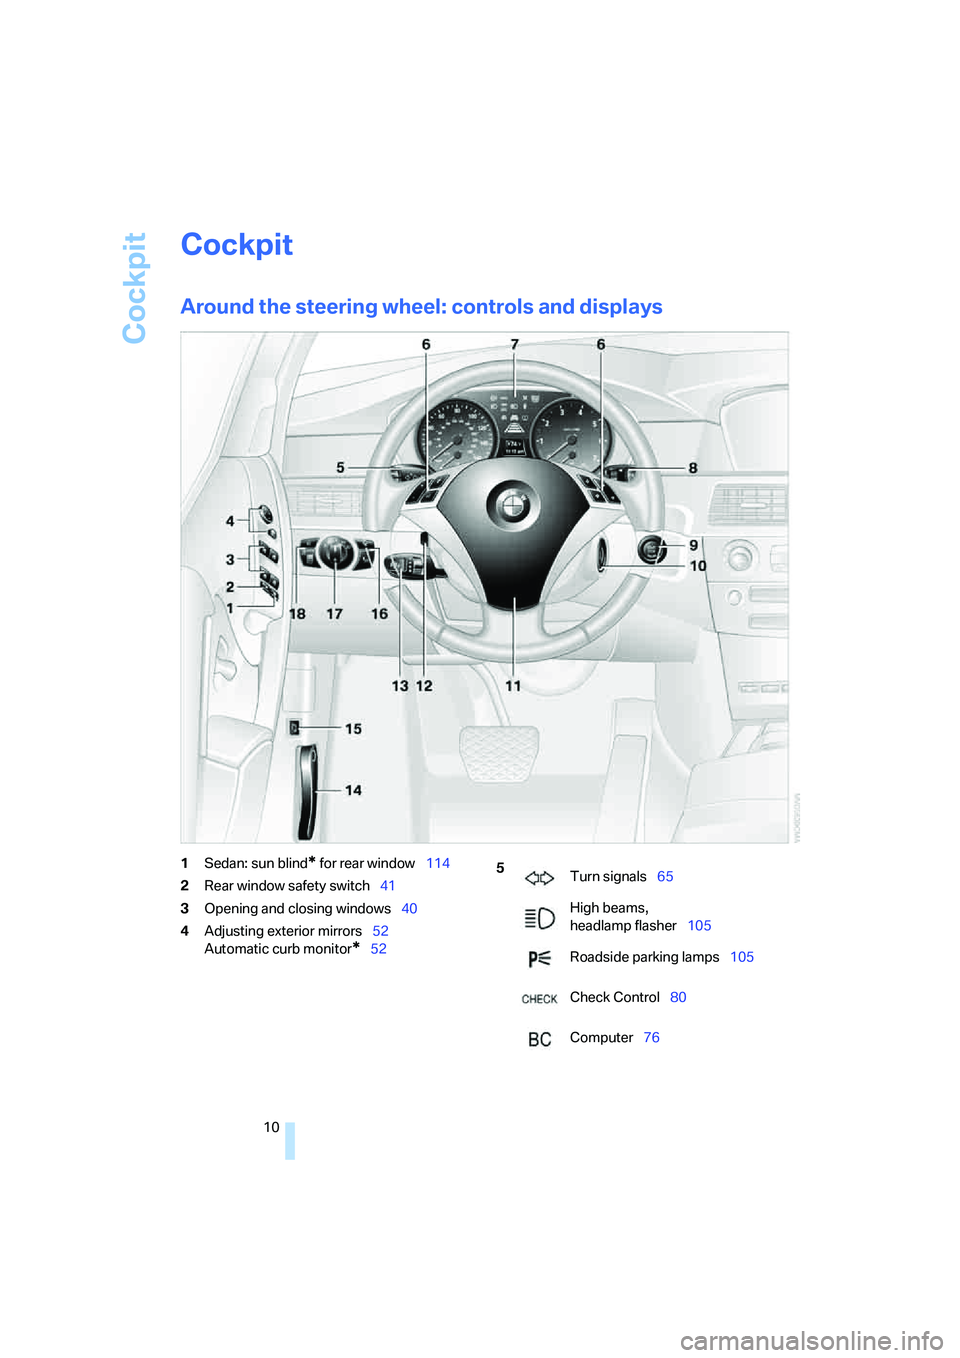
Around the steering wheel: controls and displays
1Sedan: sun blind* for rear window114
2Rear window safety switch41
3Opening and closing windows40
4Adjusting exterior mirrors52
Automatic curb monitor
*52
5
Turn signals65
High beams,
headlamp flasher105
Roadside parking lamps105
Check Control80
Computer76
Page 14 of 273
Cockpit
12
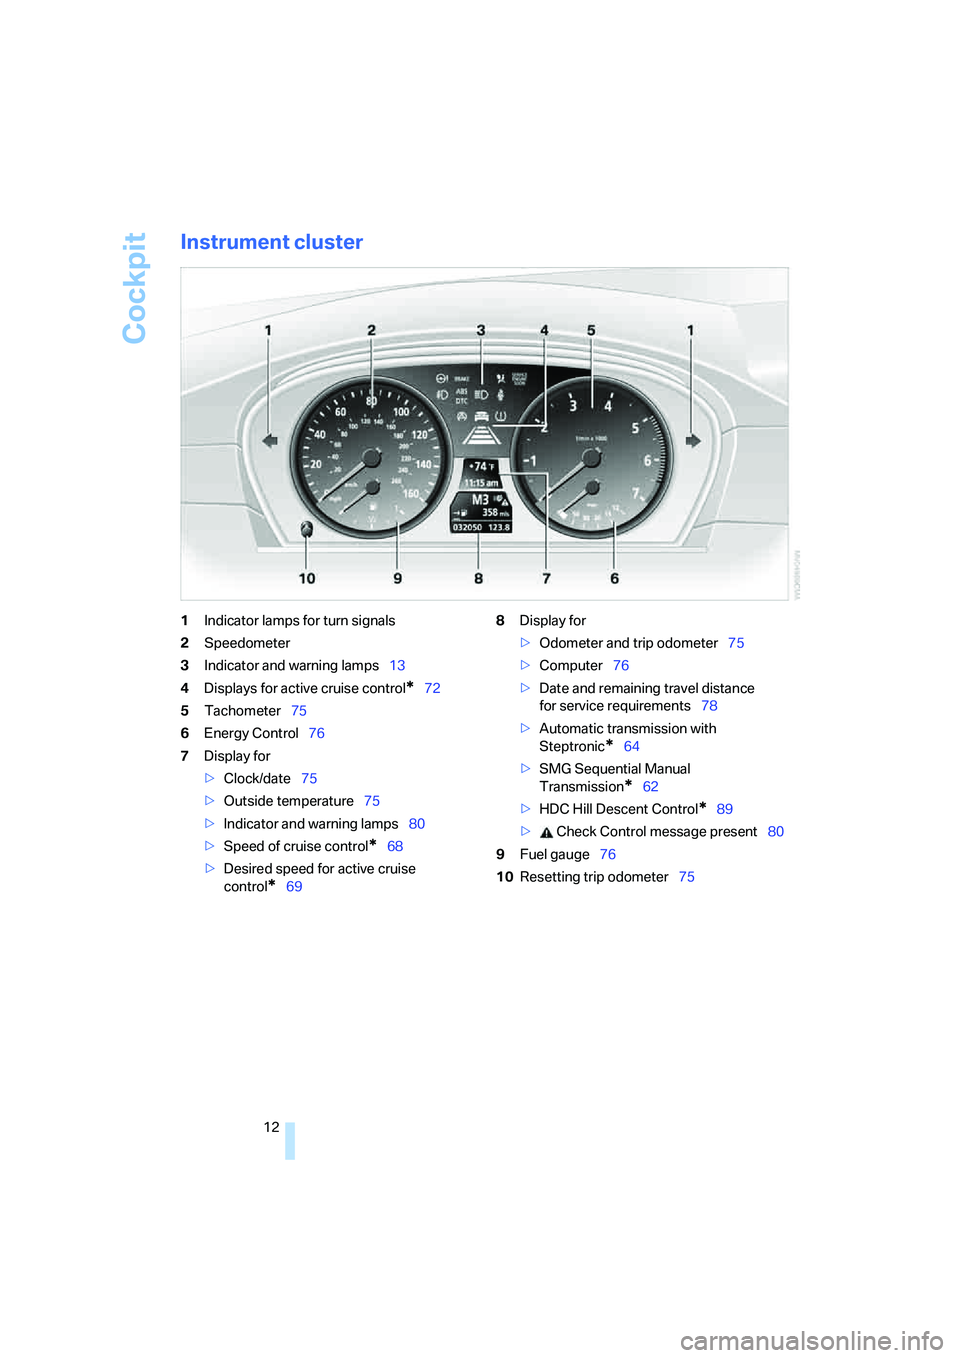
Instrument cluster
1Indicator lamps for turn signals
2Speedometer
3Indicator and warning lamps13
4Displays for active cruise control
*72
5Tachometer75
6Energy Control76
7Display for
>Clock/date75
>Outside temperature75
>Indicator and warning lamps80
>Speed of cruise control
*68
>Desired speed for active cruise
control
*698Display for
>Odometer and trip odometer75
>Computer76
>Date and remaining travel distance
for service requirements78
>Automatic transmission with
Steptronic
*64
>SMG Sequential Manual
Transmission
*62
>HDC Hill Descent Control
*89
> Check Control message present80
9Fuel gauge76
10Resetting trip odometer75
Page 15 of 273
At a glance
13Reference
Controls
Driving tips
Communications
Navigation
Entertainment
Mobility
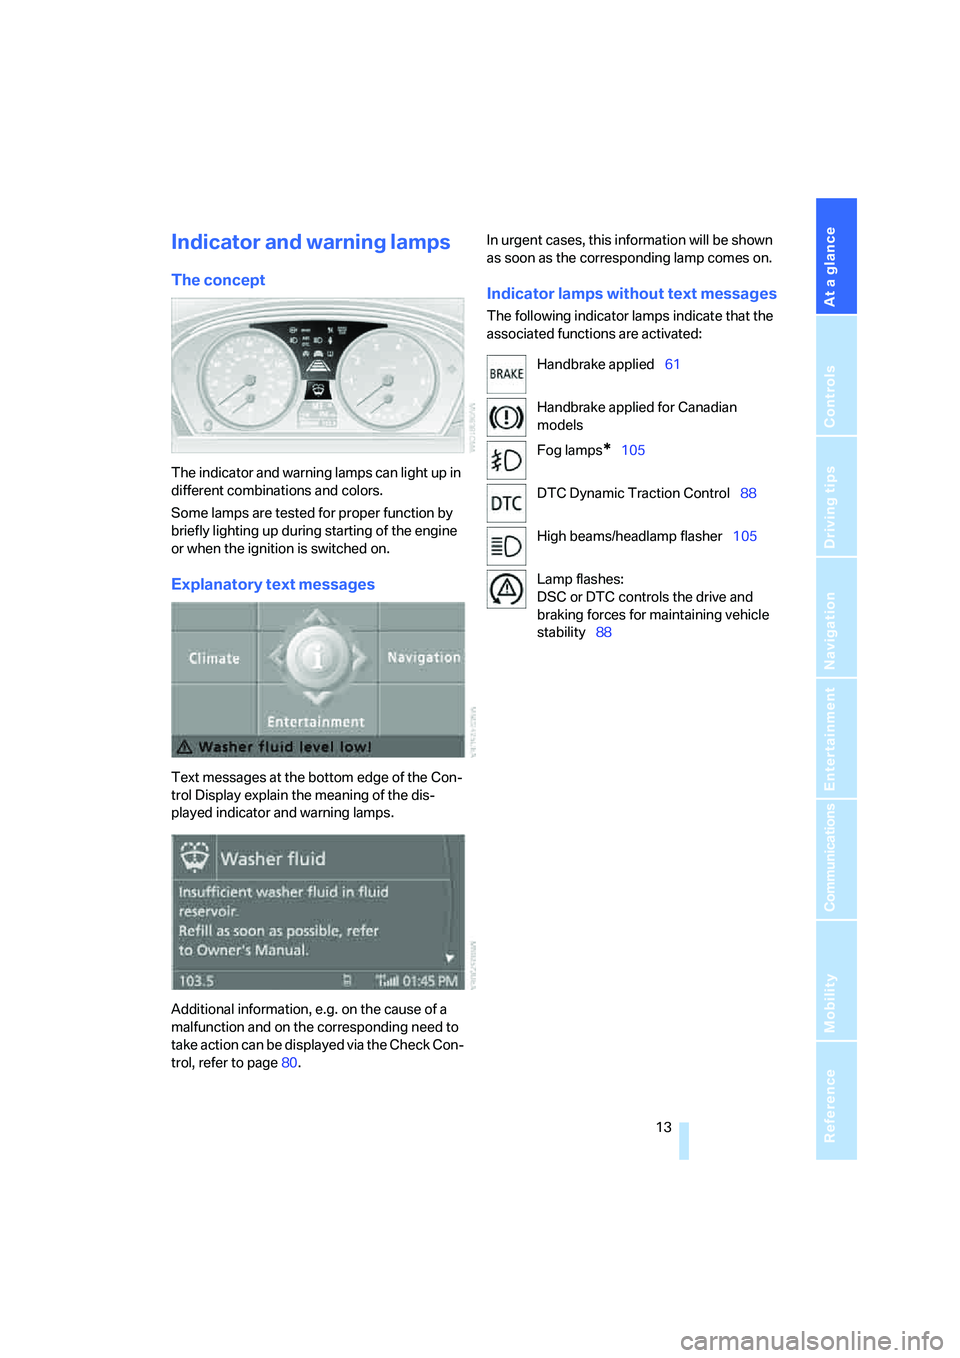
Indicator and warning lamps
The concept
The indicator and warning lamps can light up in
different combinations and colors.
Some lamps are tested for proper function by
briefly lighting up during starting of the engine
or when the ignition is switched on.
Explanatory text messages
Text messages at the bottom edge of the Con-
trol Display explain the meaning of the dis-
played indicator and warning lamps.
Additional information, e.g. on the cause of a
malfunction and on the corresponding need to
take action can be displayed via the Check Con-
trol, refer to page80.In urgent cases, this information will be shown
as soon as the corresponding lamp comes on.
Indicator lamps without text messages
The following indicator lamps indicate that the
associated functions are activated:
Handbrake applied61
Handbrake applied for Canadian
models
Fog lamps
*105
DTC Dynamic Traction Control88
High beams/headlamp flasher105
Lamp flashes:
DSC or DTC controls the drive and
braking forces for maintaining vehicle
stability88
Page 22 of 273
iDrive
20
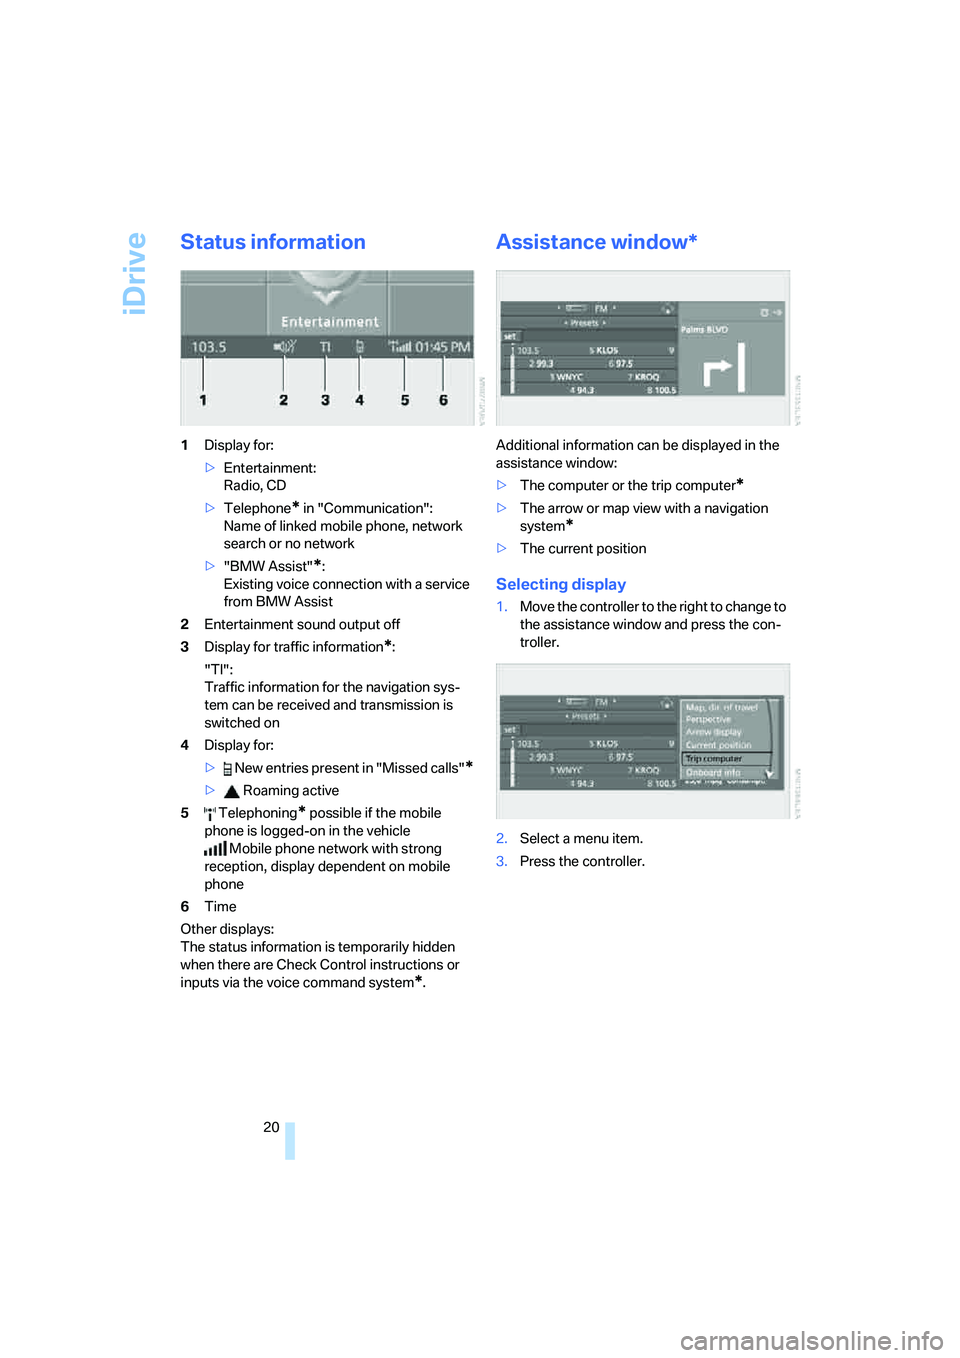
Status information
1Display for:
>Entertainment:
Radio, CD
>Telephone
* in "Communication":
Name of linked mobile phone, network
search or no network
>"BMW Assist"
*:
Existing voice connection with a service
from BMW Assist
2Entertainment sound output off
3Display for traffic information
*:
"TI":
Traffic information for the navigation sys-
tem
can be received and transmission is
switched on
4Display for:
> New entries present in "Missed calls"
*
> Roaming active
5 Telephoning
* possible if the mobile
phone is logged-on in the vehicle
Mobile phone network with strong
reception, display dependent on mobile
phone
6Time
Other displays:
The status information is temporarily hidden
when there are Check Control instructions or
inputs via the voice command system
*.
Assistance window*
Additional information can be displayed in the
assistance window:
>The computer or the trip computer
*
>The arrow or map view with a navigation
system
*
>The current position
Selecting display
1.Move the controller to the right to change to
the assistance window and press the con-
troller.
2.Select a menu item.
3.Press the controller.
Page 41 of 273
Controls
39Reference
At a glance
Driving tips
Communications
Navigation
Entertainment
Mobility
Comfort access supports the following func-
tions:
>Unlocking/locking vehicle
>Comfort closing
>Opening luggage compartment lid/tailgate
separately
>Sports Wagon: opening rear window sepa-
rately
>Starting engine
Functional requirement
>The vehicle or the luggage compartment
lid/tailgate can only be locked if the vehicle
detects that the remote control you are car-
rying is outside the vehicle.
>The next unlocking and locking cycle is not
possible until after approx. 2 seconds.
>The engine can only be started if the vehicle
detects that the remote control is located in
the vehicle.
Comparison with ordinary remote
control
You can control the functions mentioned previ-
ously with the comfort access or by pressing
the buttons on the remote control. Therefore,
please familiarize yourself with the information
on opening and closing beginning on page28
beforehand.
The special features when using comfort
access are described in the following.
Should a short delay occur when opening
or closing the windows or the glass sun-
roof, the system is checking whether a remote
control is located in the vehicle. Please repeat
opening or closing if necessary.<
Unlocking
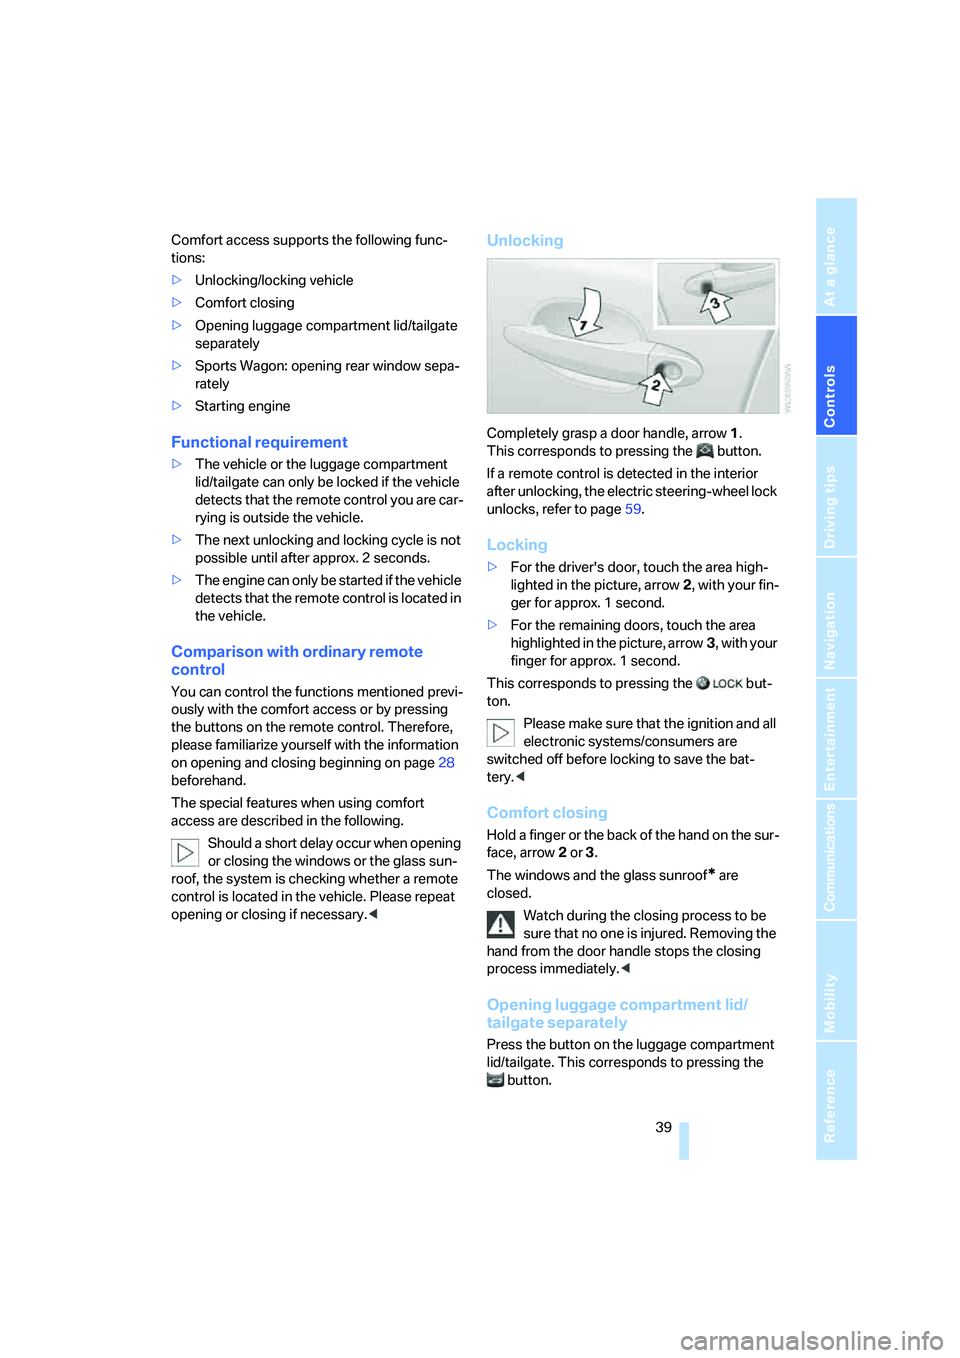
Completely grasp a door handle, arrow1.
This corresponds to pressing the button.
If a remote control is detected in the interior
after unlocking, the electric steering-wheel lock
unlocks, refer to page59.
Locking
>For the driver's door, touch the area high-
lighted in the picture, arrow2, with your fin-
ger for approx. 1 second.
>For the remaining doors, touch the area
highlighted in the picture, arrow3, with your
finger for approx. 1 second.
This corresponds to pressing the but-
ton.
Please make sure that the ignition and all
electronic systems/consumers are
switched off before locking to save the bat-
tery.<
Comfort closing
Hold a finger or the back of the hand on the sur-
face, arrow2 or 3.
The windows and the glass sunroof
* are
closed.
Watch during the closing process to be
sure that no one is injured. Removing the
hand from the door handle stops the closing
process immediately.<
Opening luggage compartment lid/
tailgate separately
Press the button on the luggage compartment
lid/tailgate. This corresponds to pressing the
button.
Page 52 of 273
Adjusting
50
Removing
1.Pull the head restraint upward to the stop.
2.Press the button, arrow1, and pull the head
restraint all the way out.
Safety belts
To ensure that the safety systems con-
tinue to provide optimized protection,
please observe the adjustment instructions on
page45.<
Before every drive, make sure that safety belts
are being worn at all of the occupied seats. Air-
bags complement the safety belt as an addi-
tional safety device, but they do not represent a
substitute.
Fastening
Make sure you hear the latch plate engage in
the belt buckle.
Safety belt reminder for driver's seat
and passenger seat*
The indicator lamp lights up and a sig-
nal sounds. A message also appears on
the Control Display. Please check
whether the safety belt is correctly positioned.The safety belt reminder is operative at speeds
above approx. 5 mph/8 km/h. It can also be acti-
vated if objects are placed on the passenger
seat.
Releasing
1.Grasp the belt firmly.
2.Press the red button in the buckle.
3.Guide the belt into its reel.
The shoulder strap's anchorage point will be
correct for adult seat occupants of every build if
the seat is correctly adjusted, refer to page46.
The two rear safety belt buckles integrated into
the rear seat are for passengers sitting on the
left and right. The belt buckle embossed with
the word CENTER is intended exclusively for
use by passengers riding in the center position.
Damage to safety belts
In the event of loads caused by accidents
or other damage: replace the belt system
including the safety belt tensioners and any
child restraint systems, and have the belt
anchor points checked. Only have this work
carried out at a BMW center or at a workshop
that works according to BMW repair proce-
dures with correspondingly trained personnel.
Otherwise correct operation of this safety
equipment is not guaranteed.<
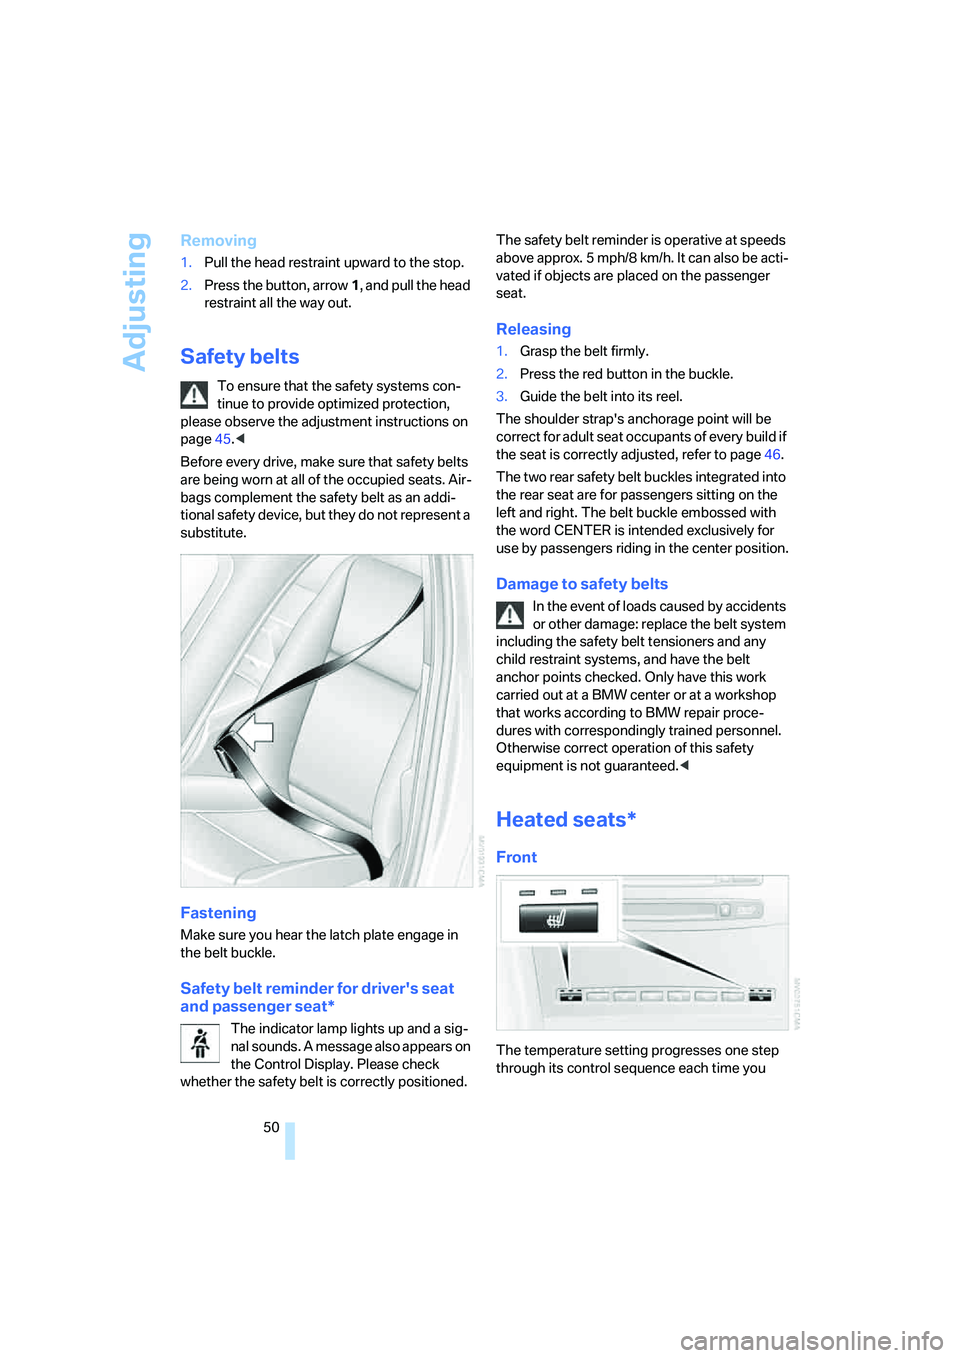
Heated seats*
Front
The temperature setting progresses one step
through its control sequence each time you
Page 74 of 273
Driving
72
Displays in instrument cluster
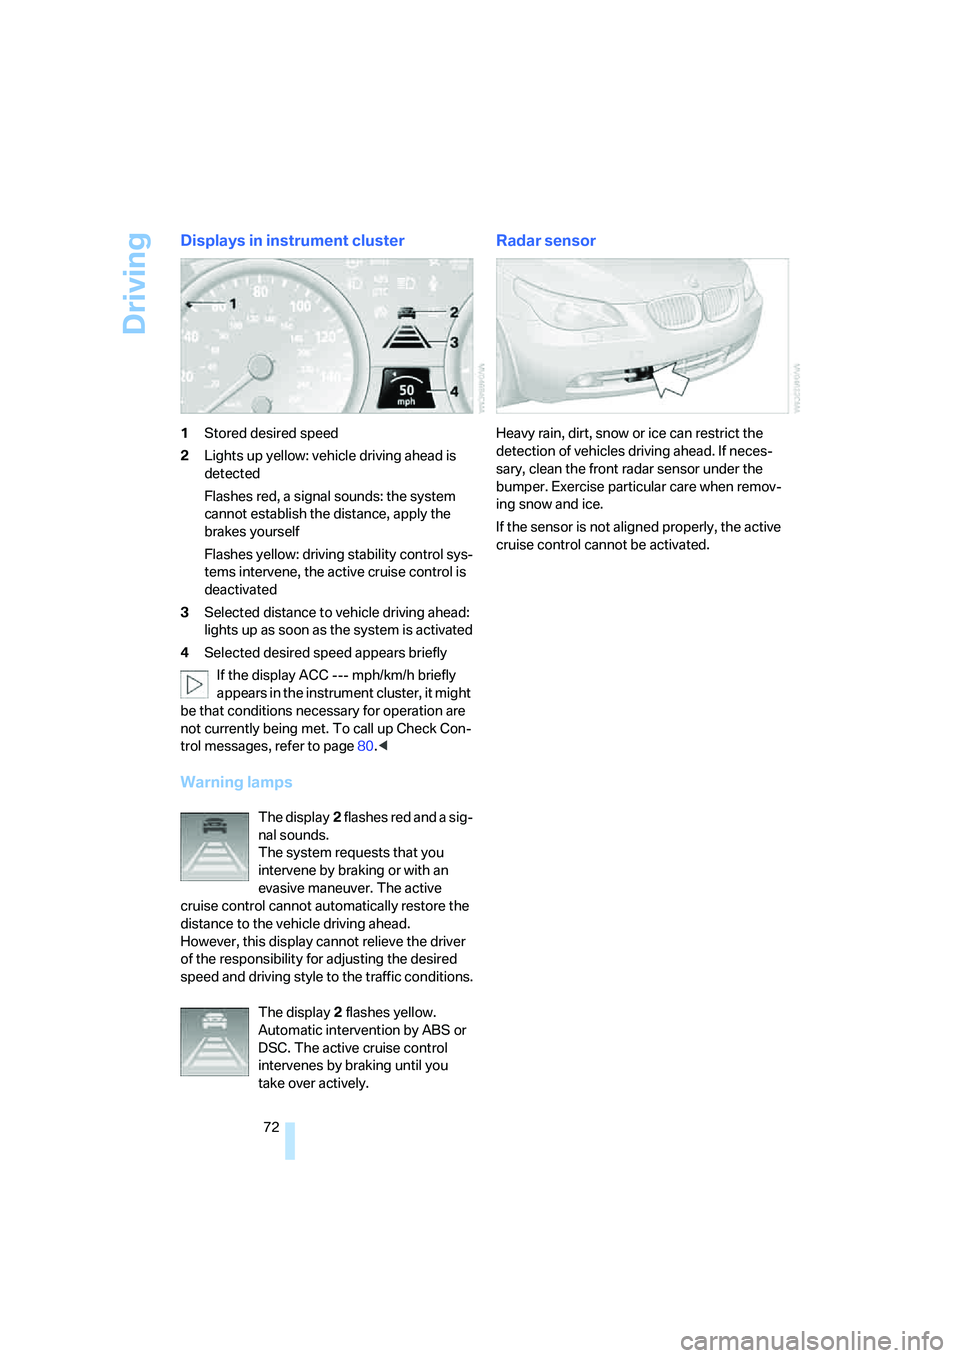
1Stored desired speed
2Lights up yellow: vehicle driving ahead is
detected
Flashes red, a signal sounds: the system
cannot establish the distance, apply the
brakes yourself
Flashes yellow: driving stability control sys-
tems intervene, the active cruise control is
deactivated
3Selected distance to vehicle driving ahead:
lights up as soon as the system is activated
4Selected desired speed appears briefly
If the display ACC --- mph/km/h briefly
appears in the instrument cluster, it might
be that conditions necessary for operation are
not currently being met. To call up Check Con-
trol messages, refer to page80.<
Warning lamps
The display2 flashes red and a sig-
nal sounds.
The system requests that you
intervene by braking or with an
evasive maneuver. The active
cruise control cannot automatically restore the
distance to the vehicle driving ahead.
However, this display cannot relieve the driver
of the responsibility for adjusting the desired
speed and driving style to the traffic conditions.
The display2 flashes yellow.
Automatic intervention by ABS or
DSC. The active cruise control
intervenes by braking until you
take over actively.
Radar sensor
Heavy rain, dirt, snow or ice can restrict the
detection of vehicles driving ahead. If neces-
sary, clean the front radar sensor under the
bumper. Exercise particular care when remov-
ing snow and ice.
If the sensor is not aligned properly, the active
cruise control cannot be activated.
Page 77 of 273
Controls
75Reference
At a glance
Driving tips
Communications
Navigation
Entertainment
Mobility
Everything under control
Odometer, outside
temperature display, clock
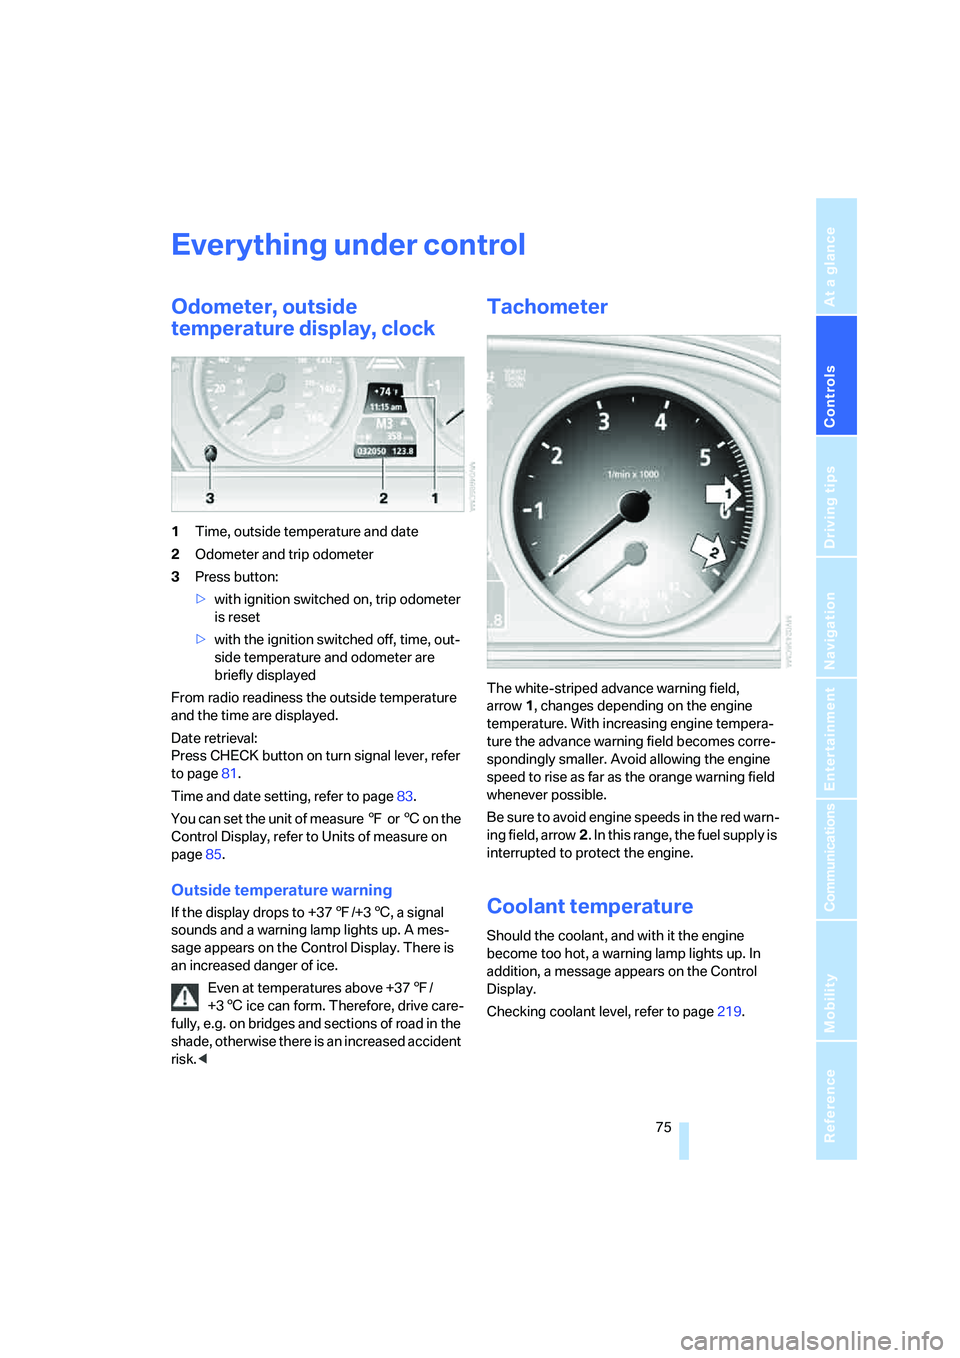
1Time, outside temperature and date
2Odometer and trip odometer
3Press button:
>with ignition switched on, trip odometer
is reset
>with the ignition switched off, time, out-
side temperature and odometer are
briefly displayed
From radio readiness the outside temperature
and the time are displayed.
Date retrieval:
Press CHECK button on turn signal lever, refer
to page81.
Time and date setting, refer to page83.
You can set the unit of measure 7 or 6 on the
Control Display, refer to Units of measure on
page85.
Outside temperature warning
If the display drops to +377/+36, a signal
sounds and a warning lamp lights up. A mes-
sage appears on the Control Display. There is
an increased danger of ice.
Even at temperatures above +377/
+36 ice can form. Therefore, drive care-
fully, e.g. on bridges and sections of road in the
shade, otherwise there is an increased accident
risk.<
Tachometer
The white-striped advance warning field,
arrow1, changes depending on the engine
temperature. With increasing engine tempera-
ture the advance warning field becomes corre-
spondingly smaller. Avoid allowing the engine
speed to rise as far as the orange warning field
whenever possible.
Be sure to avoid engine speeds in the red warn-
ing field, arrow2. In this range, the fuel supply is
interrupted to protect the engine.
Coolant temperature
Should the coolant, and with it the engine
become too hot, a warning lamp lights up. In
addition, a message appears on the Control
Display.
Checking coolant level, refer to page219.
Page 82 of 273
Everything under control
80 12.Press the controller to apply the setting.
The date entry is stored.
To exit the menu:
Select the arrow and press the controller.
Check Control
The concept
The Check Control monitors functions in the
vehicle and issues a message if there is a mal-
function in the monitored systems. This kind of
Check Control message consists of indicator
and warning lamps in the instrument cluster,
and if necessary an acoustic signal and text
messages at the bottom of the Control Display.
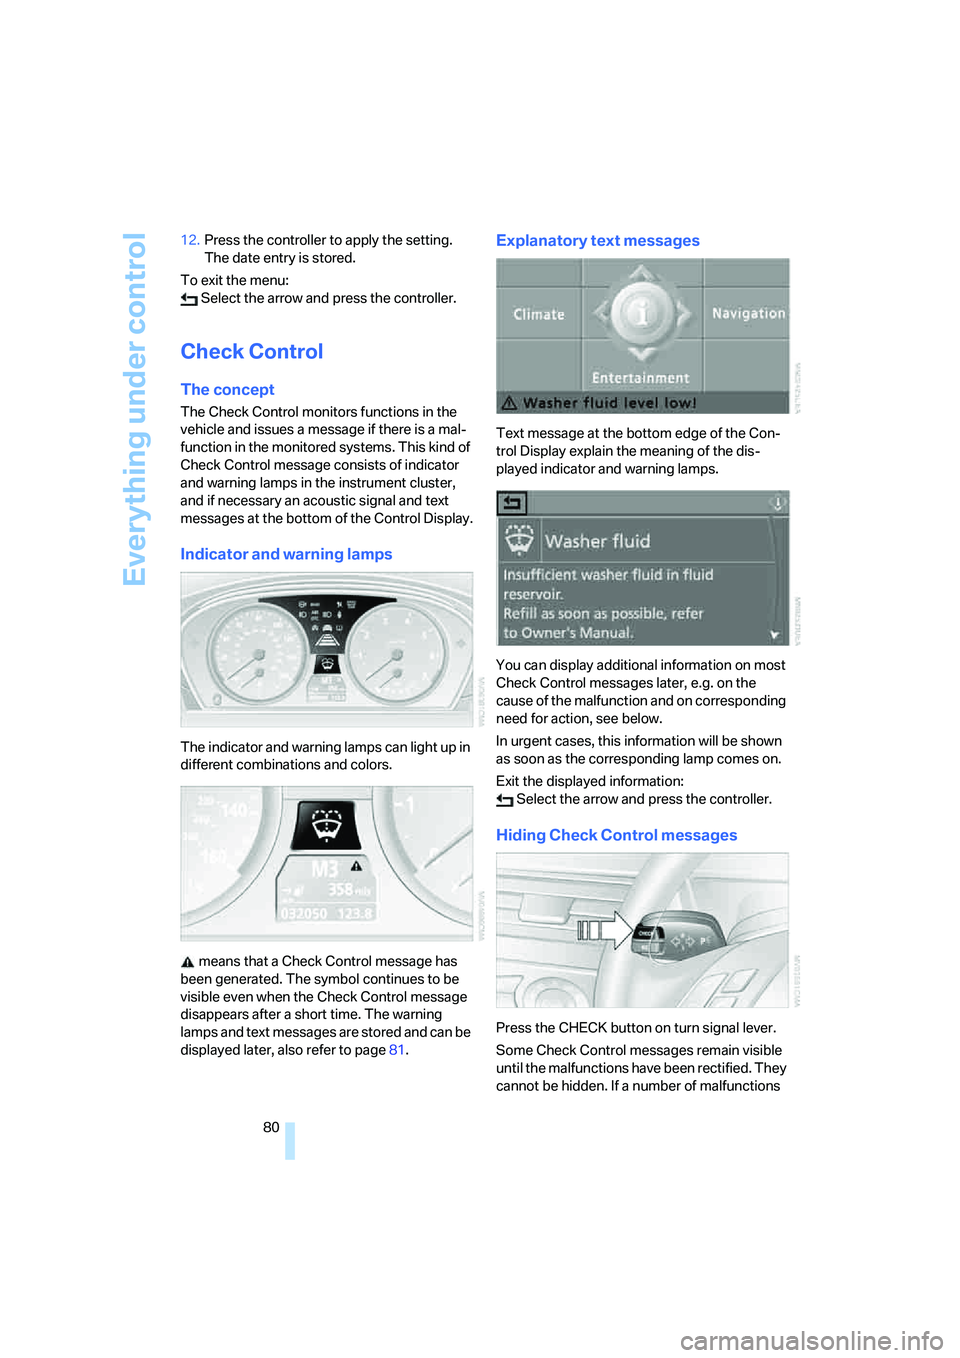
Indicator and warning lamps
The indicator and warning lamps can light up in
different combinations and colors.
means that a Check Control message has
been generated. The symbol continues to be
visible even when the Check Control message
disappears after a short time. The warning
lamps and text messages are stored and can be
displayed later, also refer to page81.
Explanatory text messages
Text message at the bottom edge of the Con-
trol Display explain the meaning of the dis-
played indicator and warning lamps.
You can display additional information on most
Check Control messages later, e.g. on the
cause of the malfunction and on corresponding
need for action, see below.
In urgent cases, this information will be shown
as soon as the corresponding lamp comes on.
Exit the displayed information:
Select the arrow and press the controller.
Hiding Check Control messages
Press the CHECK button on turn signal lever.
Some Check Control messages remain visible
until the malfunctions have been rectified. They
cannot be hidden. If a number of malfunctions
Page 83 of 273
Controls
81Reference
At a glance
Driving tips
Communications
Navigation
Entertainment
Mobility
occur simultaneously, they are displayed in
succession.
Other messages are automatically hidden after
approx. 20 seconds, but remain stored.
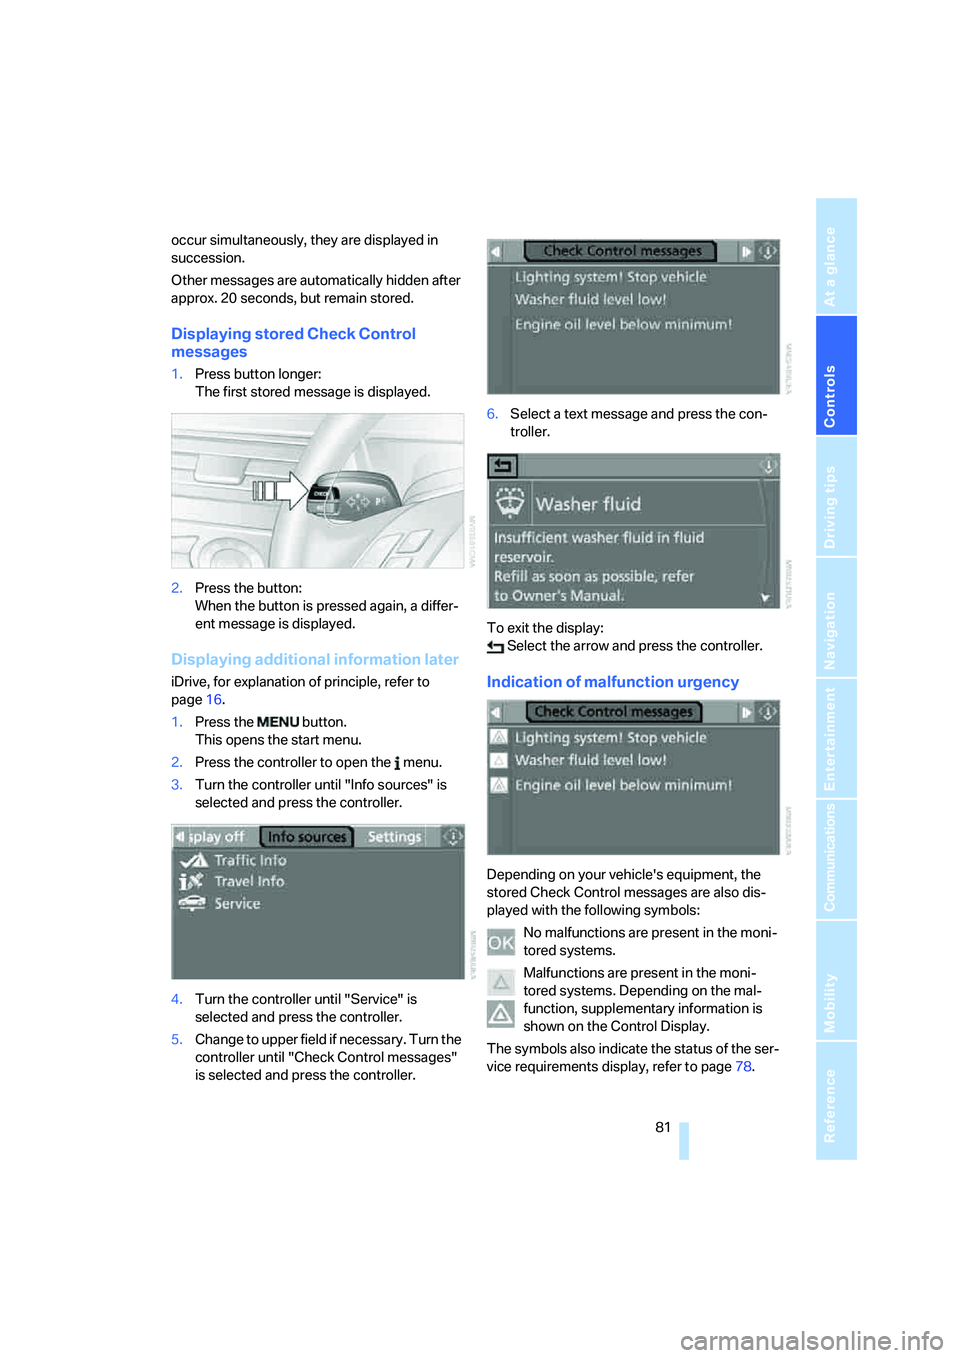
Displaying stored Check Control
messages
1.Press button longer:
The first stored message is displayed.
2.Press the button:
When the button is pressed again, a differ-
ent message is displayed.
Displaying additional information later
iDrive, for explanation of principle, refer to
page16.
1.Press the button.
This opens the start menu.
2.Press the controller to open the menu.
3.Turn the controller until "Info sources" is
selected and press the controller.
4.Turn the controller until "Service" is
selected and press the controller.
5.Change to upper field if necessary. Turn the
controller until "Check Control messages"
is selected and press the controller.6.Select a text message and press the con-
troller.
To exit the display:
Select the arrow and press the controller.Indication of malfunction urgency
Depending on your vehicle's equipment, the
stored Check Control messages are also dis-
played with the following symbols:
No malfunctions are present in the moni-
tored systems.
Malfunctions are present in the moni-
tored systems. Depending on the mal-
function, supplementary information is
shown on the Control Display.
The symbols also indicate the status of the ser-
vice requirements display, refer to page78.