center BMW 550I TOURING 2006 E61 Owner's Manual
[x] Cancel search | Manufacturer: BMW, Model Year: 2006, Model line: 550I TOURING, Model: BMW 550I TOURING 2006 E61Pages: 259, PDF Size: 8.9 MB
Page 6 of 259
Notes
4
Notes
Using this Owner's Manual
We have made every effort to ensure that you
are able to find what you need in this Owner's
Manual as quickly as possible. The fastest way
to find specific topics is to refer to the detailed
index at the back of the manual. If you wish to
gain an initial overview of your vehicle, you will
find this in the first chapter.
Should you sell your BMW some day, please
remember to hand over the Owner's Manual
as well; it is an important component of your
vehicle.
Additional sources of information
Should you have any other questions, your
BMW center will be glad to advise you at any
time.
You can find information on BMW, e.g. on tech-
nology, on the Internet at www.bmwusa.com.
Symbols used
Indicates precautions that must be fol-
lowed precisely in order to avoid the pos-
sibility of personal injury and serious damage to
the vehicle.
Indicates information that will assist you
in gaining the optimum benefit from your
vehicle and enable you to care more effectively
for your vehicle.
Refers to measures that can be taken to
help protect the environment.
*Indicates special equipment, country-spe-
cific equipment and optional extras, as well as
equipment and functions not yet available at the
time of printing.
"..." Identifies Control Display texts used to
select individual functions.
{...} Verbal instructions to use with the voice
command system.
{{...}} Identifies the answers generated by the
voice command system.
Symbols on vehicle components
Indicates that you should consult the rel-
evant section of this Owner's Manual for
information on a particular part or assembly.
Page 7 of 259
5Reference
At a glance
Controls
Driving tips
Communications
Navigation
Entertainment
Mobility
The individual vehicle
When purchasing your BMW, you have decided
in favor of a model with individualized equip-
ment and features. This Owner's Manual
describes the entire array of options and equip-
ment available with a specific BMW model.
Please bear in mind that the manual may con-
tain information on accessories and equipment
that you have not specified for your own vehicle.
Sections describing options and special equip-
ment are marked by asterisks
* to assist you in
identifying possible differences between the
descriptions in this manual and your own vehi-
cle's equipment.
If equipment in your BMW is not described in
this Owner's Manual, please refer to the accom-
panying Supplementary Owner's Manuals.
Editorial notice
BMW pursues a policy of continuous, ongoing
development that is conceived to ensure that
our vehicles continue to embody the highest
quality and safety standards combined with
advanced, state-of-the-art technology. For this
r e a s o n , i t i s p o s s i b l e t h a t t h e f e a t u r e s d e s c r i b e d
in this Owner's Manual could differ from those
on your vehicle.
For your own safety
Maintenance and repairs
Advanced technology, e.g. the use of
modern materials and high-performance
electronics, requires specially adapted mainte-
nance and repair methods. Therefore, have cor-
responding work on your BMW performed only
by your BMW center or a workshop that works
according to BMW repair procedures with cor-
respondingly trained personnel. If this work is
not carried out properly, there is a danger of
subsequent damage and related safety haz-
ards.<
Page 8 of 259
Notes
6
Parts and accessories
For your own safety, use genuine parts
and accessories approved by BMW.
When you purchase accessories tested and
approved by BMW and Genuine BMW Parts,
you simultaneously acquire the assurance that
they have been thoroughly tested by BMW to
ensure optimum performance when installed
on your vehicle.
BMW warrants these parts to be free from
defects in material and workmanship.
BMW will not accept any liability for damage
resulting from installation of parts and accesso-
ries not approved by BMW.
BMW cannot test every product made by other
manufacturers to verify if it can be used on a
BMW safely and without risk to either the vehi-
cle, its operation or its occupants.
Genuine BMW Parts, BMW Accessories and
other products approved by BMW, together
with professional advice on using these items,
are available from all BMW centers.
Installation and operation of non-BMW
approved accessories such as alarms, radios,
amplifiers, radar detectors, wheels, suspension
components, brake dust shields, telephones,
including operation of any mobile phone from
within the vehicle without using an externally
mounted antenna, or transceiver equipment, for
instance, CBs, walkie-talkies, ham radios or
similar accessories, may cause extensive dam-
age to the vehicle, compromise its safety, inter-
fere with the vehicle's electrical system or affect
the validity of the BMW Limited Warranty. See
your BMW center for additional information.<
Maintenance, replacement, or repair of
the emission control devices and sys-
tems may be performed by any automotive
repair establishment or individual using any cer-
tified automotive part.<
California Proposition 65 Warning
California law requires us to issue the following
warning:
Engine exhaust and a wide variety of
automobile components and parts,
including components found in the interior fur-
nishings in a vehicle, contain or emit chemicals
known to the State of California to cause cancer
and birth defects and reproductive harm. In
addition, certain fluids contained in vehicles and
certain products of component wear contain or
emit chemicals known to the State of California
to cause cancer and birth defects or other
reproductive harm.
Battery posts, terminals and related accesso-
ries contain lead and lead compounds. Wash
your hands after handling.
Used engine oil contains chemicals that have
caused cancer in laboratory animals. Always
protect your skin by washing thoroughly with
soap and water.<
Page 16 of 259
Cockpit
14
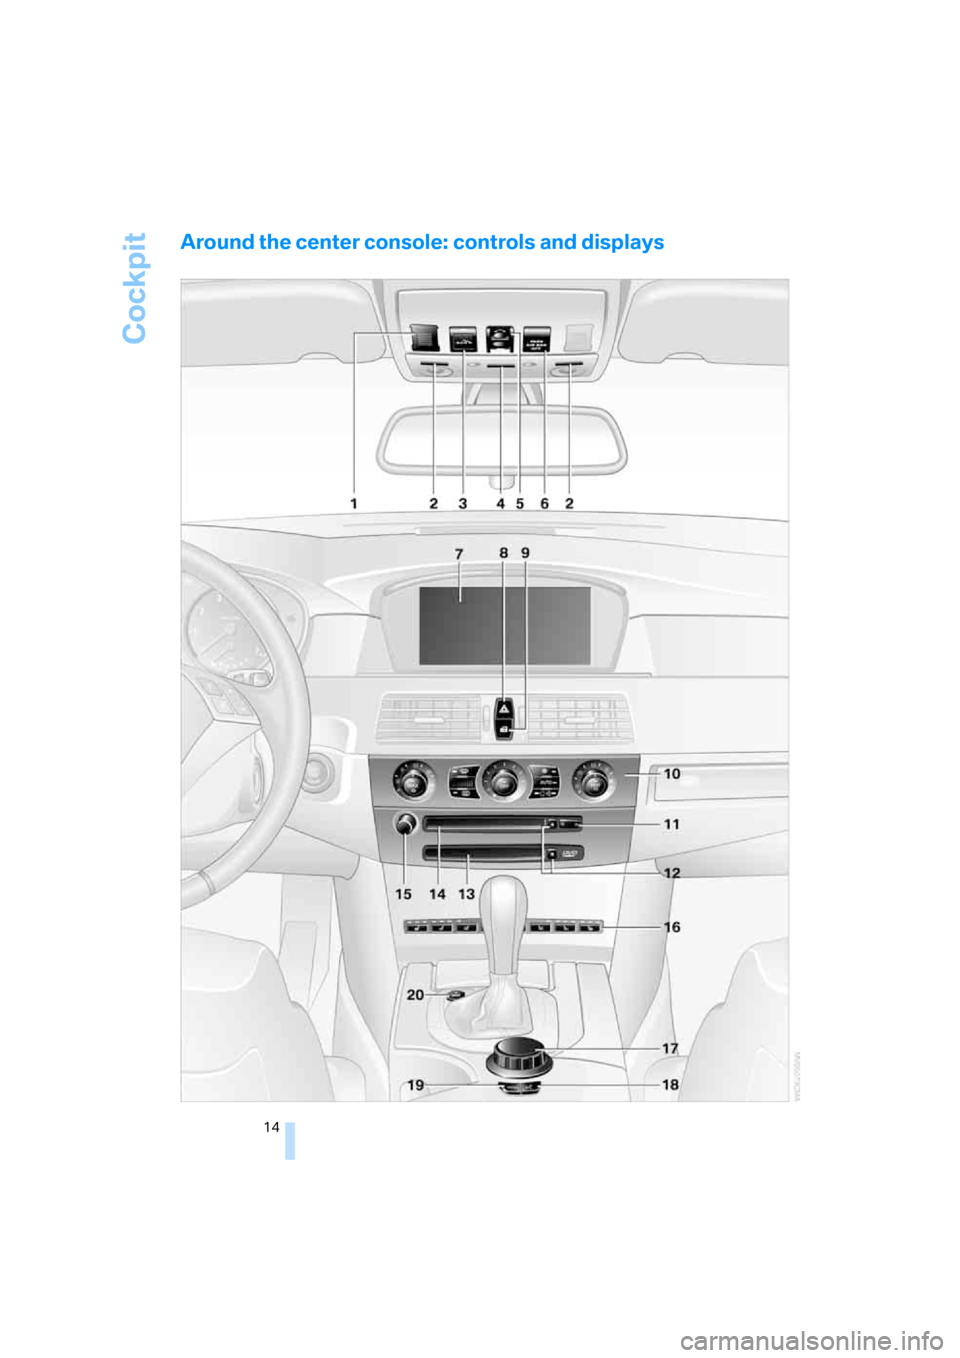
Around the center console: controls and displays
Page 25 of 259
At a glance
23Reference
Controls
Driving tips
Communications
Navigation
Entertainment
Mobility
If no other commands are possible, then oper-
ate the equipment using iDrive.
Terminating or canceling voice
command system
Press the button on the steering wheel or in
the center console
or
Commands
Having possible commands read aloud
You can have the system read aloud the possi-
ble commands related to the selected menu
item on the Control Display.
To have the system list the possible com-
mands:
For example, if you have selected "CD", the
system will read aloud the possible commands
for operating the CD player and the CD
changer
*.
Opening help
Using alternative commands
There are often a number of commands to run a
function, e.g.:
Running functions directly with short
commands
With short commands you can carry out certain
functions directly, regardless of which menu
item is selected, refer to page231.
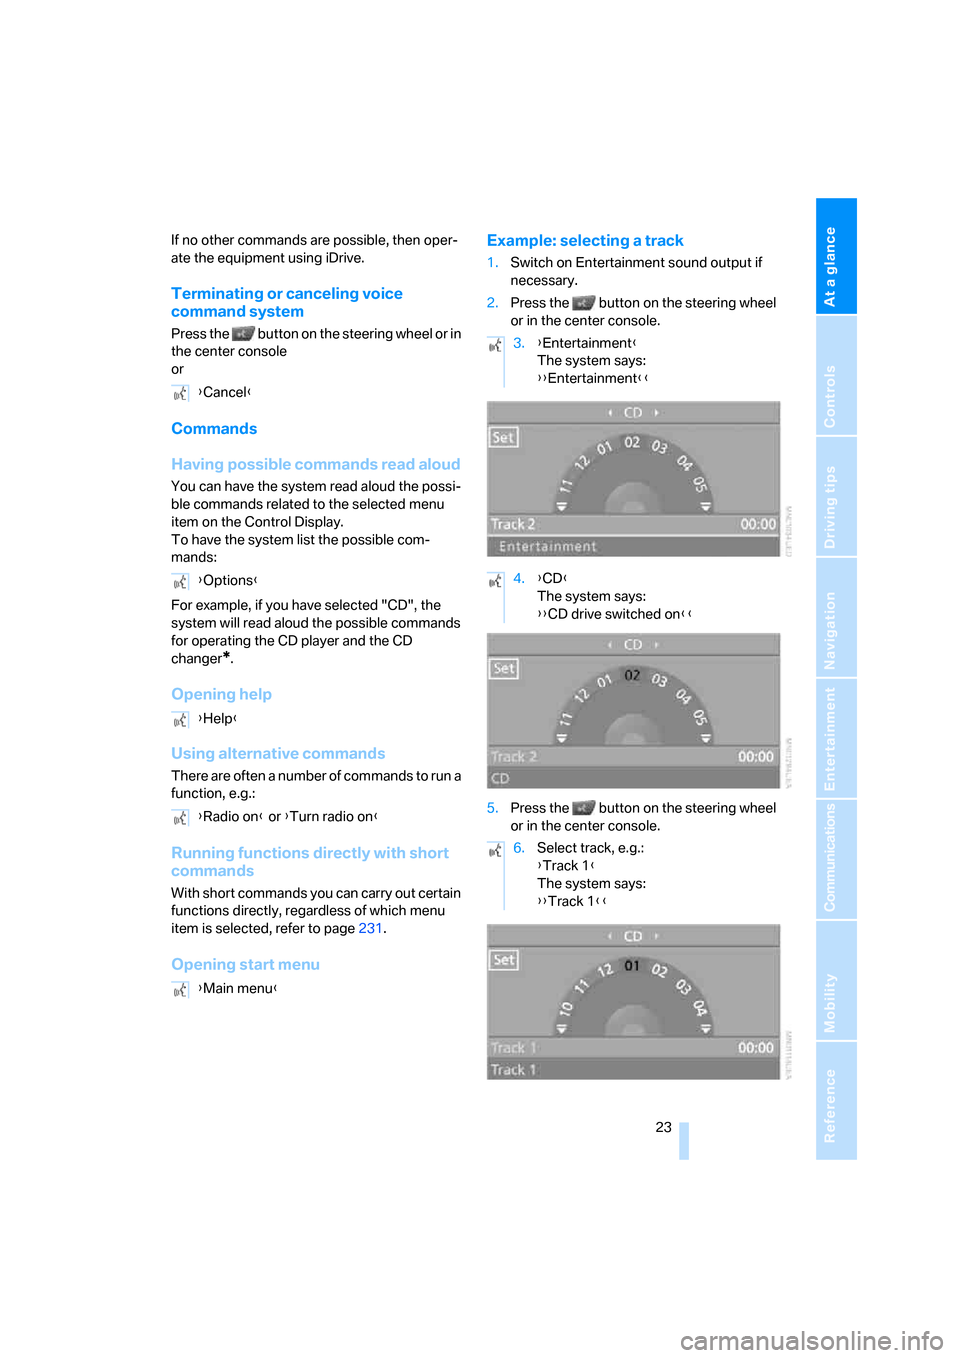
Opening start menuExample: selecting a track
1.Switch on Entertainment sound output if
necessary.
2.Press the button on the steering wheel
or in the center console.
5.Press the button on the steering wheel
or in the center console. {Cancel}
{Options}
{Help}
{Radio on} or {Turn radio on}
{Main menu}
3.{Entertainment}
The system says:
{{Entertainment}}
4.{CD}
The system says:
{{CD drive switched on}}
6.Select track, e.g.:
{Track 1}
The system says:
{{Track 1}}
Page 30 of 259
Opening and closing
28
Opening and closing
Keys/remote control
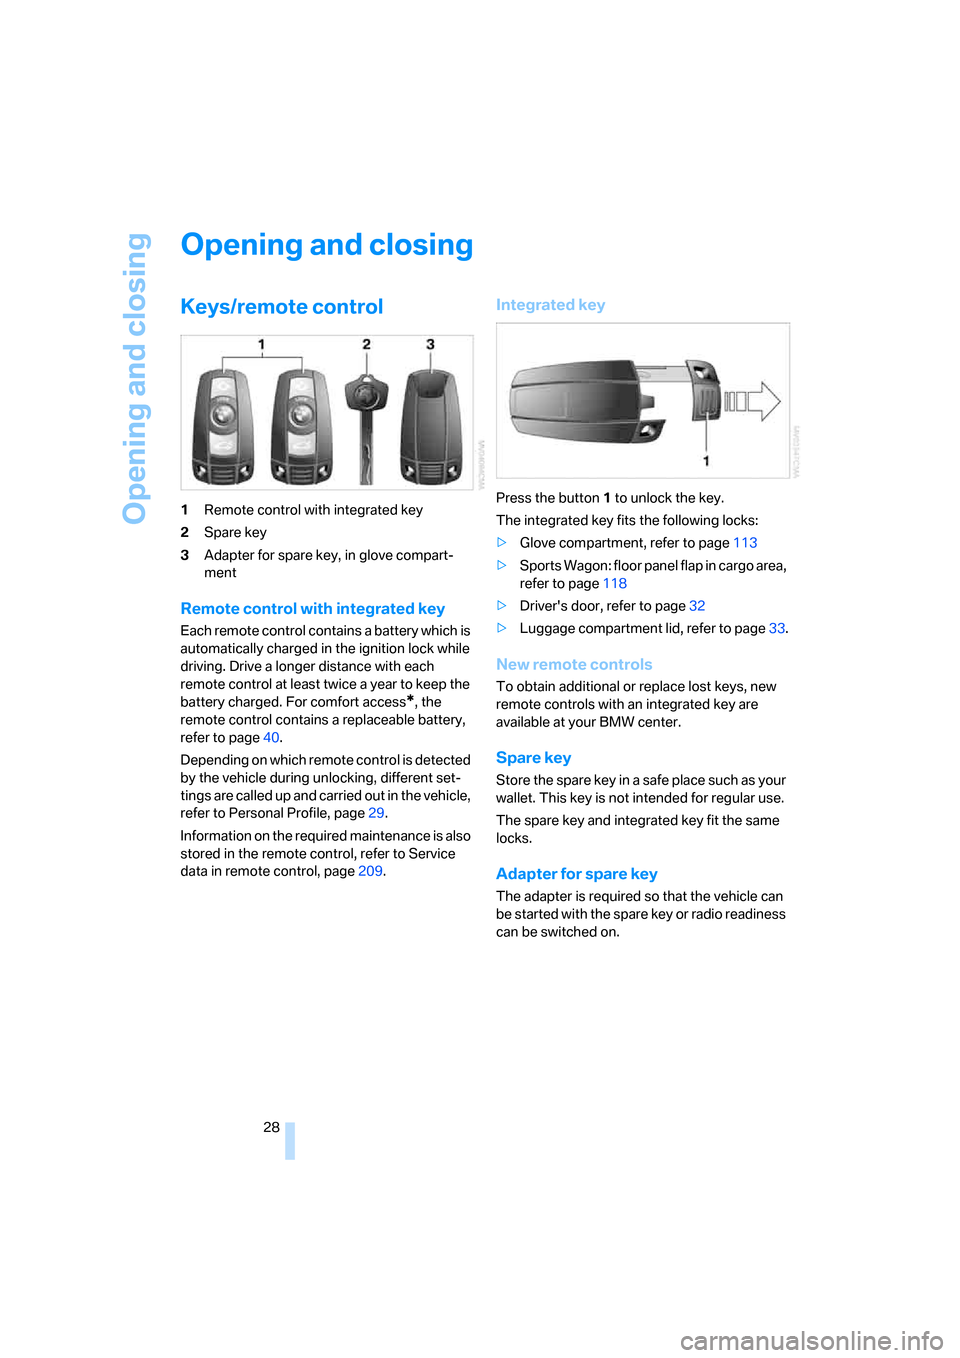
1Remote control with integrated key
2Spare key
3Adapter for spare key, in glove compart-
ment
Remote control with integrated key
Each remote control contains a battery which is
automatically charged in the ignition lock while
driving. Drive a longer distance with each
remote control at least twice a year to keep the
battery charged. For comfort access
*, the
remote control contains a replaceable battery,
refer to page40.
Depending on which remote control is detected
by the vehicle during unlocking, different set-
tings are called up and carried out in the vehicle,
refer to Personal Profile, page29.
Information on the required maintenance is also
stored in the remote control, refer to Service
data in remote control, page209.
Integrated key
Press the button1 to unlock the key.
The integrated key fits the following locks:
>Glove compartment, refer to page113
>Sports Wagon: floor panel flap in cargo area,
refer to page118
>Driver's door, refer to page32
>Luggage compartment lid, refer to page33.
New remote controls
To obtain additional or replace lost keys, new
remote controls with an integrated key are
available at your BMW center.
Spare key
Store the spare key in a safe place such as your
wallet. This key is not intended for regular use.
The spare key and integrated key fit the same
locks.
Adapter for spare key
The adapter is required so that the vehicle can
be started with the spare key or radio readiness
can be switched on.
Page 42 of 259
Opening and closing
40 When doing so, do not depress the brake
or clutch pedal, as otherwise the engine
will start immediately.<
Starting engine
You can start the engine or switch on the switch
on ignition if a remote control is located in the
interior of the vehicle. It need not be inserted in
the ignition lock, refer to page58.
If you take the remote control with you when
leaving the vehicle with the engine running, a
warning lamp lights up. In addition, a message
appears on the Control Display. As long as no
remote control is detected in the vehicle, it is
only possible to restart the engine within
approx. 10 seconds after it is switched off.
Switching off engine with automatic
transmission
The engine can only be switched off in the
selector lever position P, refer to page60.
To switch off the engine in the selector lever
position N, the remote control must be inserted
in the ignition lock.
Before driving into a car wash with
automatic transmission
1.Insert remote control into ignition lock.
2.Depress brake pedal.
3.Place selector lever in position N.
4.Switch off the engine.
The vehicle can roll.
Malfunction
The comfort access function may malfunction
due to local radio waves. Then open or close the
vehicle with the buttons on the remote control
or with a key. To start the engine following this,
insert the remote control in the ignition lock.
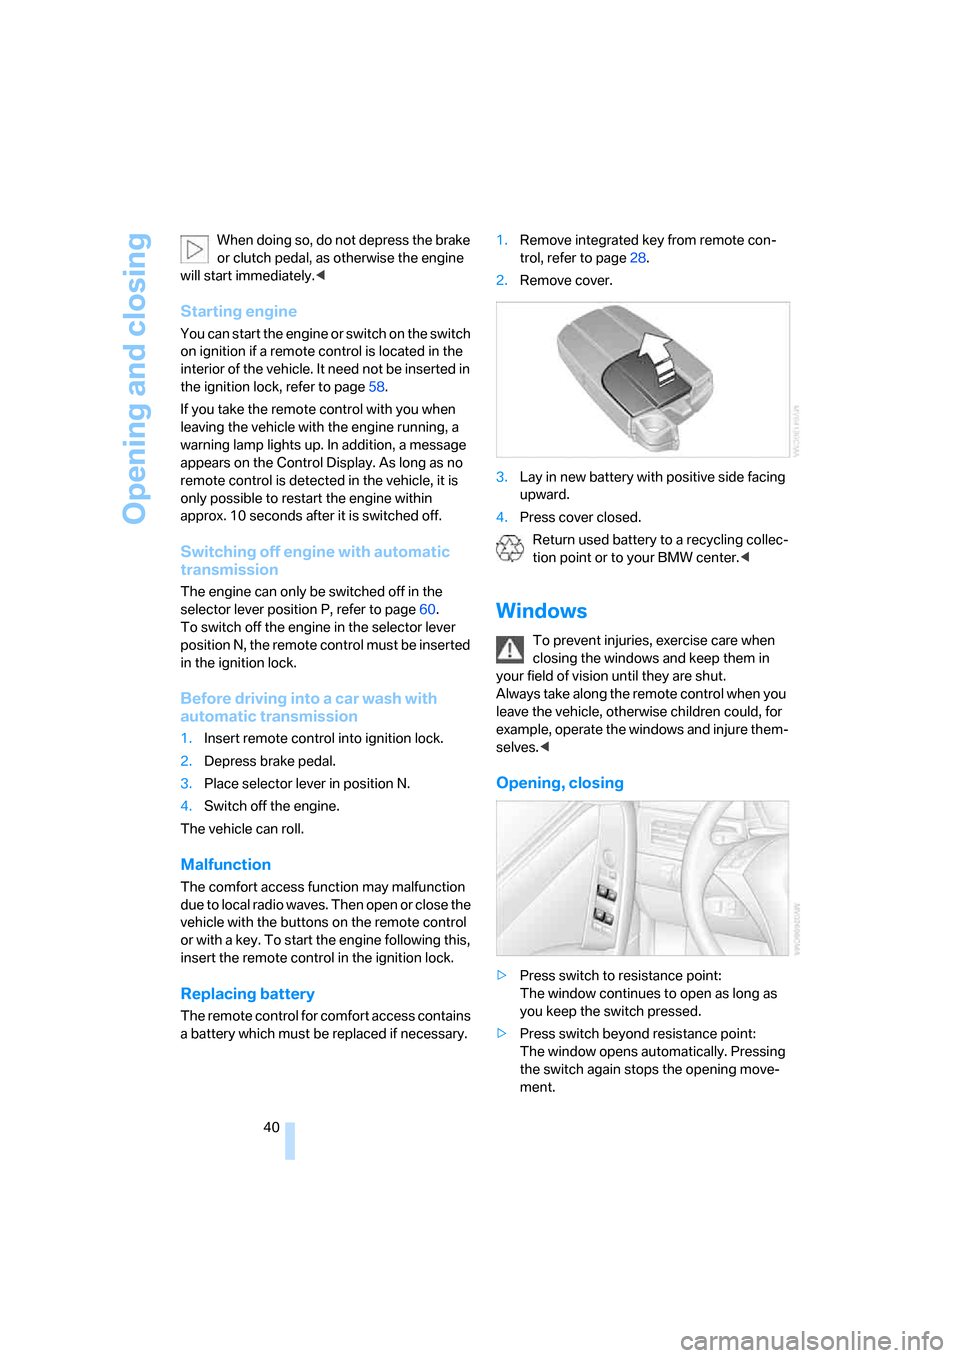
Replacing battery
The remote control for comfort access contains
a battery which must be replaced if necessary.1.Remove integrated key from remote con-
trol, refer to page28.
2.Remove cover.
3.Lay in new battery with positive side facing
upward.
4.Press cover closed.
Return used battery to a recycling collec-
tion point or to your BMW center.<
Windows
To prevent injuries, exercise care when
closing the windows and keep them in
your field of vision until they are shut.
Always take along the remote control when you
leave the vehicle, otherwise children could, for
example, operate the windows and injure them-
selves.<
Opening, closing
>Press switch to resistance point:
The window continues to open as long as
you keep the switch pressed.
>Press switch beyond resistance point:
The window opens automatically. Pressing
the switch again stops the opening move-
ment.
Page 44 of 259
Opening and closing
42 >The opened glass sunroof automatically
moves into the raised position. The sliding
visor remains completely open.
Do not use force to close the headliner
insert with the glass sunroof in its raised
position, otherwise the mechanism will be dam-
aged.<
Opening, closing
>Press switch back to the resistance point.
The glass sunroof and the sliding visor open
together for as long as you hold the switch
in this position.
>Press switch back past the resistance point.
The glass sunroof and the sliding visor open
automatically. Briefly press the switch again
to stop the opening movement.
In a similar manner, the glass sunroof closes
when you slide the switch forward. The sliding
visor remains open and can be closed by hand.
For information on using the convenience oper-
ation at the door lock or with the remote control,
refer to page31 or32.
For information on comfort closing with comfort
access, refer to page39.
Automatic opening and closing
Press the switch past the resistance point.
The following movements are also automatic:
>When the sunroof is open, press the switch
in the lifting direction: the sunroof is raised
all the way.
>When the sunroof is raised, press the
switch in the opening direction: the sunroof
is opened all the way.
Pressing the switch again stops the motion.
Pinch protection system
If the glass sunroof encounters resistance when
closing from roughly the center of the roof
opening or when closing from the raised posi-
tion, the closing action is interrupted and the
glass sunroof reopens a short way.Despite the pinch protection system,
inspect the sunroof's travel path prior to
closing it, as the safety system might fail to
detect certain kinds of obstructions, such as
very thin objects, and the sunroof would con-
tinue closing.
Pressing the switch beyond the resistance
point and holding it there deactivates the pinch
protection system.<
Following interruptions in electrical
power supply
After a power loss, the sunroof may only
respond to the lift command. The system must
be initialized. BMW recommends having this
work done by your BMW center.
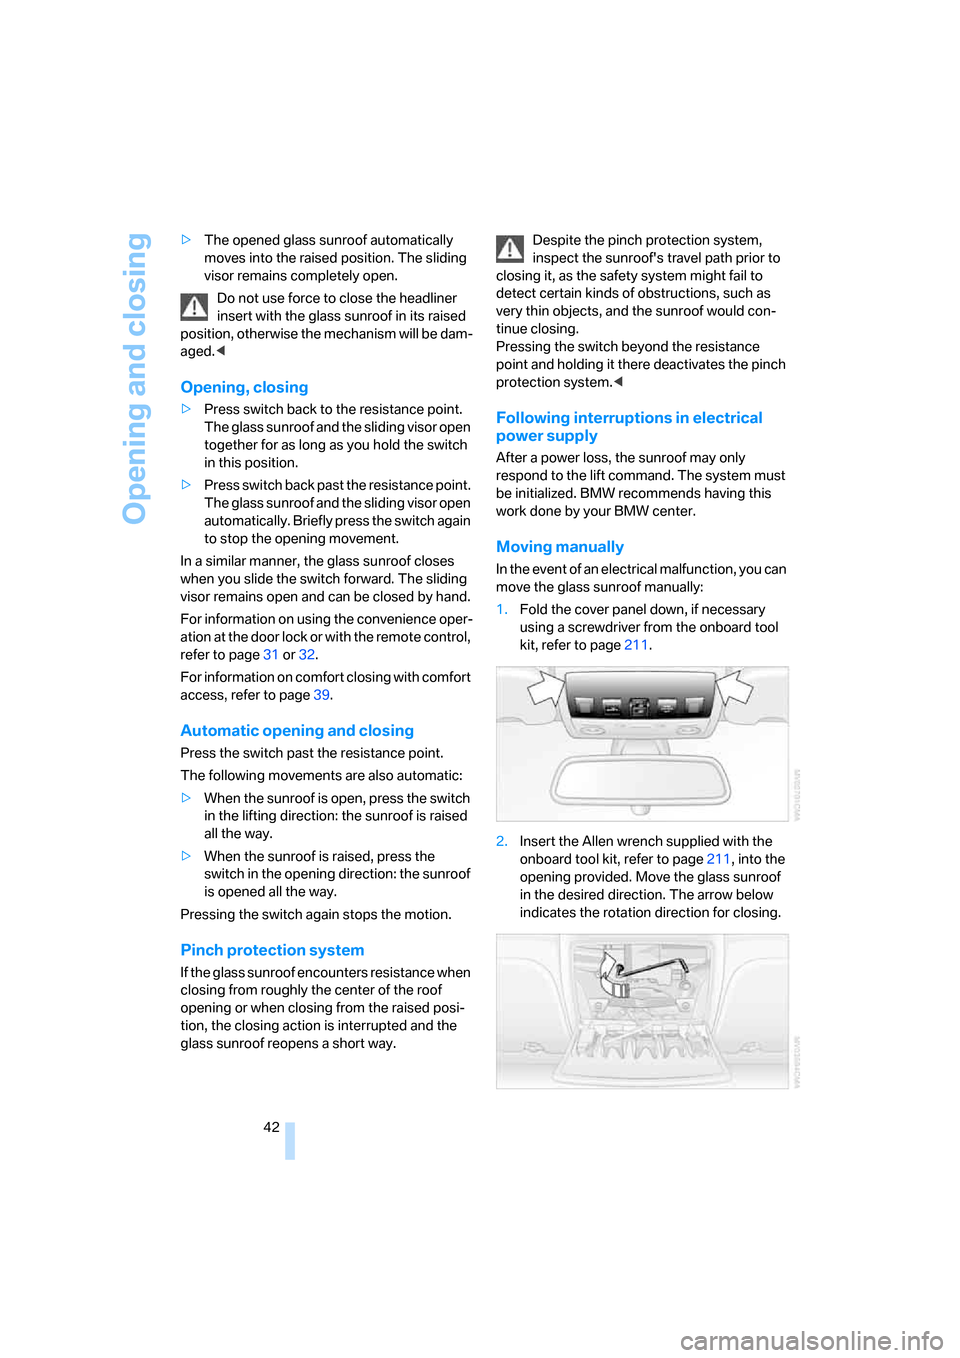
Moving manually
In the event of an electrical malfunction, you can
move the glass sunroof manually:
1.Fold the cover panel down, if necessary
using a screwdriver from the onboard tool
kit, refer to page211.
2.Insert the Allen wrench supplied with the
onboard tool kit, refer to page211, into the
opening provided. Move the glass sunroof
in the desired direction. The arrow below
indicates the rotation direction for closing.
Page 45 of 259
Controls
43Reference
At a glance
Driving tips
Communications
Navigation
Entertainment
Mobility
Sports Wagon:
Panorama glass sunroof
The panorama glass sunroof is ready for opera-
tion with the ignition switched on, refer to
page58.
To prevent injuries, exercise care when
closing the panorama glass sunroof and
keep it in your field of vision until it is closed.
Always take along the remote control when you
leave the vehicle, otherwise children could, for
example, operate the roof and injure them-
selves.<
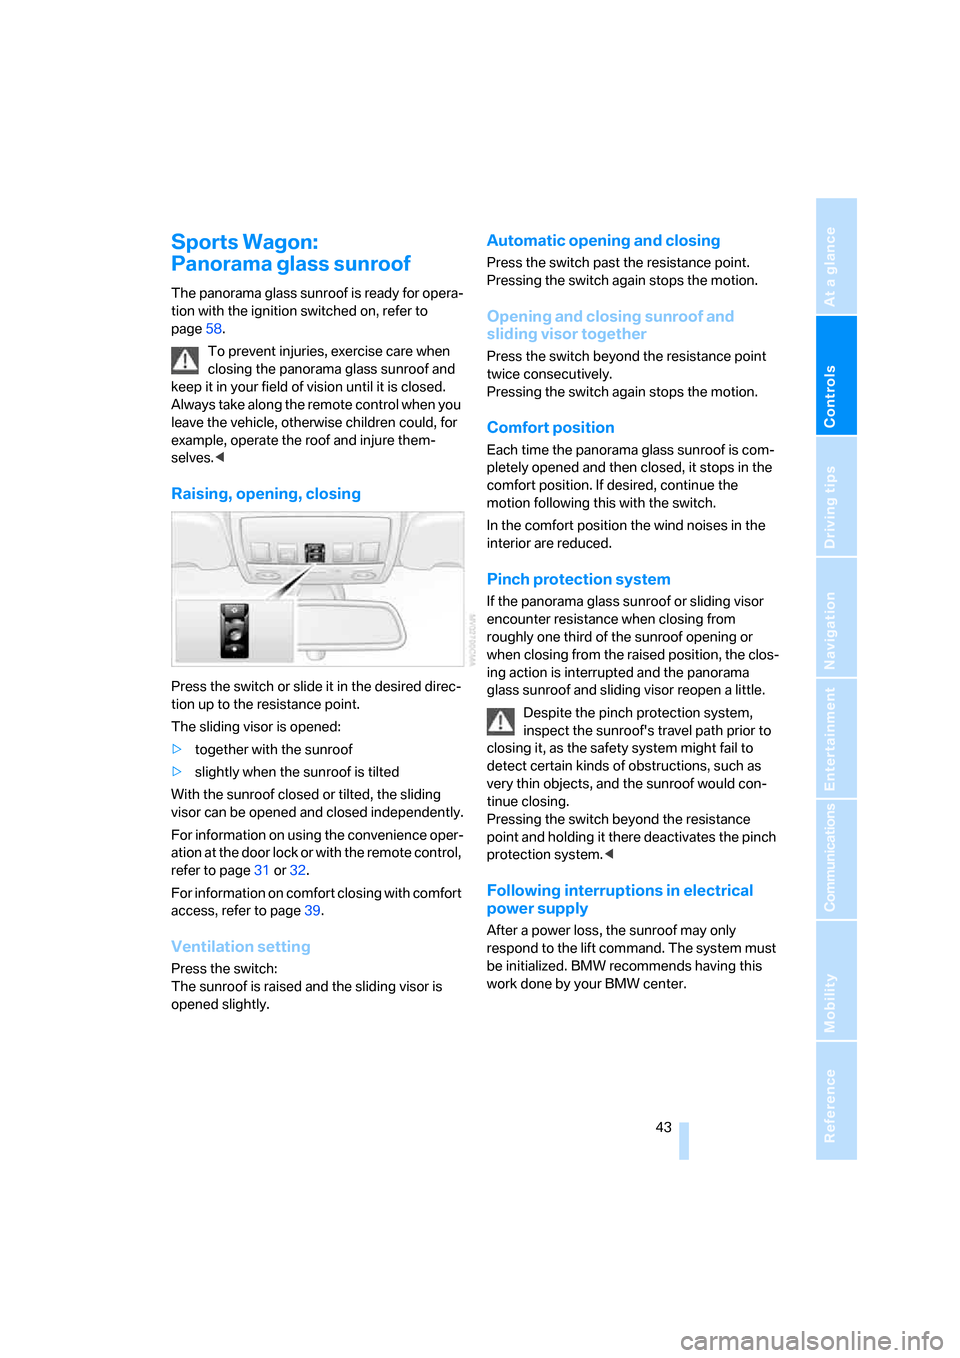
Raising, opening, closing
Press the switch or slide it in the desired direc-
tion up to the resistance point.
The sliding visor is opened:
>together with the sunroof
>slightly when the sunroof is tilted
With the sunroof closed or tilted, the sliding
visor can be opened and closed independently.
For information on using the convenience oper-
ation at the door lock or with the remote control,
refer to page31 or32.
For information on comfort closing with comfort
access, refer to page39.
Ventilation setting
Press the switch:
The sunroof is raised and the sliding visor is
opened slightly.
Automatic opening and closing
Press the switch past the resistance point.
Pressing the switch again stops the motion.
Opening and closing sunroof and
sliding visor together
Press the switch beyond the resistance point
twice consecutively.
Pressing the switch again stops the motion.
Comfort position
Each time the panorama glass sunroof is com-
pletely opened and then closed, it stops in the
comfort position. If desired, continue the
motion following this with the switch.
In the comfort position the wind noises in the
interior are reduced.
Pinch protection system
If the panorama glass sunroof or sliding visor
encounter resistance when closing from
roughly one third of the sunroof opening or
when closing from the raised position, the clos-
ing action is interrupted and the panorama
glass sunroof and sliding visor reopen a little.
Despite the pinch protection system,
inspect the sunroof's travel path prior to
closing it, as the safety system might fail to
detect certain kinds of obstructions, such as
very thin objects, and the sunroof would con-
tinue closing.
Pressing the switch beyond the resistance
point and holding it there deactivates the pinch
protection system.<
Following interruptions in electrical
power supply
After a power loss, the sunroof may only
respond to the lift command. The system must
be initialized. BMW recommends having this
work done by your BMW center.
Page 47 of 259
Controls
45Reference
At a glance
Driving tips
Communications
Navigation
Entertainment
Mobility
Adjustments
Sitting safely
The ideal sitting position can make a vital con-
tribution to relaxed, fatigue-free driving. In the
interaction with the safety belts, the head
restraints and the airbags, the seat position
plays an important role in an accident. To
ensure that the safety systems operate with
optimal efficiency, we strongly urge you to
observe the instructions contained in the fol-
lowing section.
For additional information on transporting chil-
dren safely, refer to page54.
Airbags
Always maintain an adequate distance
between yourself and the airbags. Always
hold the steering wheel by its rim with hands at
the 9 o'clock and 3 o'clock positions, to mini-
mize the risk of injuries to your hands and arms
in the event of airbag deployment.
No one and nothing is to come between the air-
bags and the seat occupant.
Do not use the cover of the front airbag on the
front passenger side as a storage area. Make
sure that the front passenger is sitting correctly
and does not rest feet or legs on the instrument
panel, otherwise leg injuries can occur if the
front airbag is triggered.
Make sure that occupants do not rest their head
on the side or head airbag, otherwise injuries
can occur if the airbags are triggered.<
Even if you adhere to all the instructions, inju-
ries resulting from contact with airbags cannot
be fully excluded, depending on the circum-
stances. The ignition and inflation noise may
provoke a mild hearing loss in extremely sensi-
tive individuals. This effect is usually only tem-
porary.
For airbag locations and additional information
on airbags, refer to page94.
Head restraints
A correctly adjusted head restraint reduces the
risk of spinal injury in the event of an accident.
Adjust the head restraint so that its center
is approx. at ear level. Otherwise there is
increased danger of injury in the event of an
accident.<
Head restraints, refer to page48.
Safety belts
Before every drive, make sure that safety belts
are being worn at all of the occupied seats. Air-
bags complement the safety belt as an addi-
tional safety device, but they do not represent a
substitute.
Your vehicle is provided with five seats, which
are all equipped with a safety belt.
Never allow more than one person to
wear a single safety belt. Never allow
infants or small children to ride in a passenger's
lap. Make sure that the belt lies low around the
hips in the lap area and does not press on the
abdomen. The safety belt may not lie across the
neck, rub on sharp edges, be routed over solid
or breakable objects or be pinched. Wear the
safety belt without twisting, snugly across the
lap and shoulders, as close to the body as pos-
sible. Otherwise the belt can slip over the hips
in the lap area in a frontal impact and injure the
abdomen. Avoid wearing clothing that prevents
the belt from fitting properly and pull the belt in
the upper body area periodically to readjust the
tension, in order to avoid a reduction in the
restraint of the safety belt.
Sports Wagon: if the middle safety belt in the
rear is used, the larger seatback half must be
locked, refer to page117, otherwise the middle
safety belt has no restraining action.<
Safety belts, refer to page49.