USB port BMW 550I XDRIVE GRAN TURISMO 2012 Owners Manual
[x] Cancel search | Manufacturer: BMW, Model Year: 2012, Model line: 550I XDRIVE GRAN TURISMO, Model: BMW 550I XDRIVE GRAN TURISMO 2012Pages: 321, PDF Size: 12.7 MB
Page 20 of 321
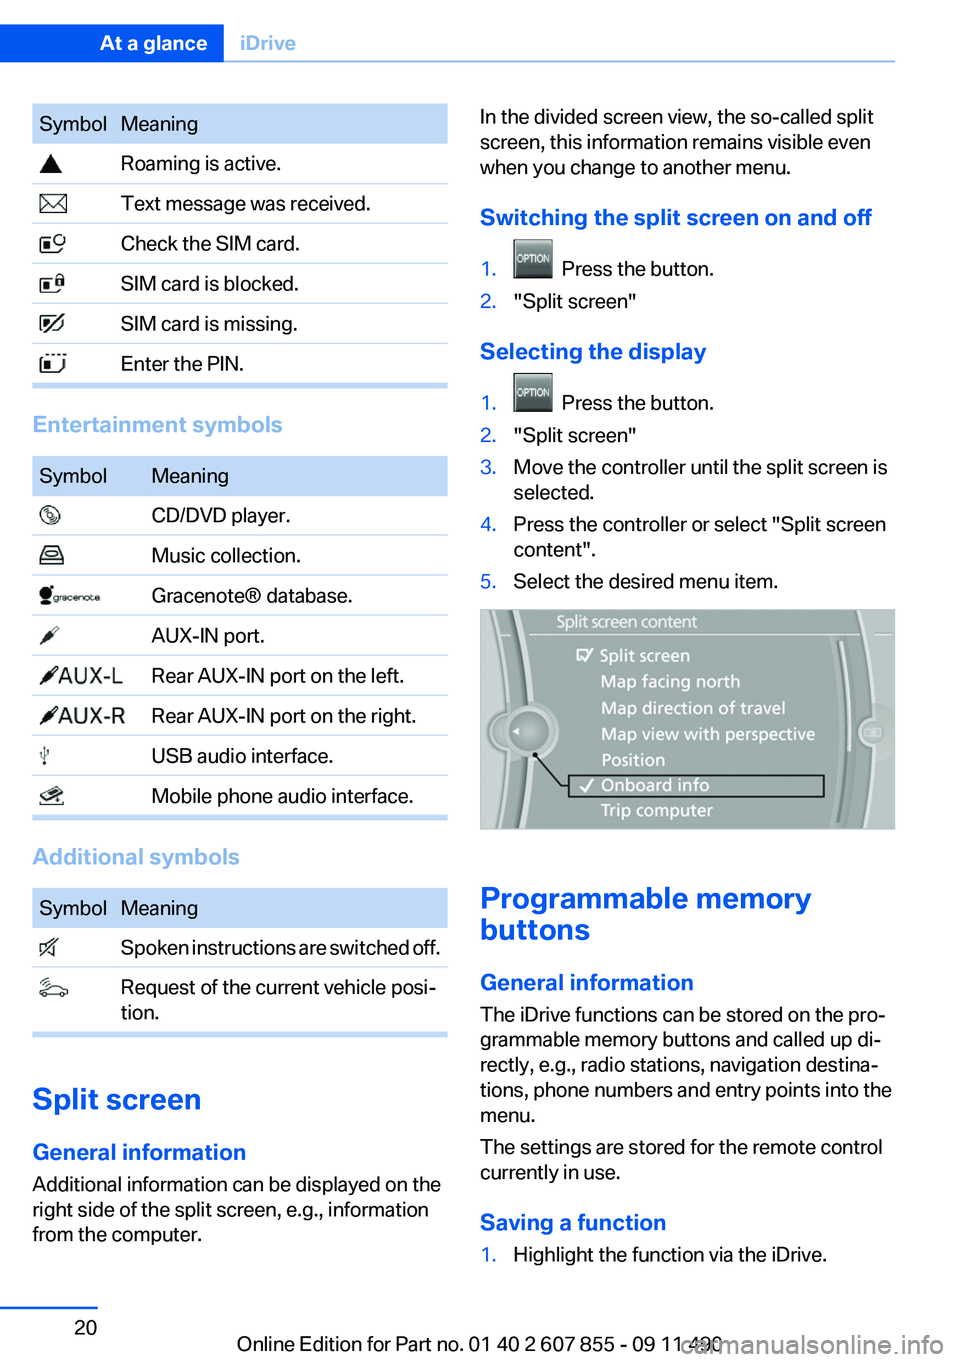
SymbolMeaning Roaming is active. Text message was received. Check the SIM card. SIM card is blocked. SIM card is missing. Enter the PIN.
Entertainment symbols
SymbolMeaning CD/DVD player. Music collection. Gracenote® database. AUX-IN port. Rear AUX-IN port on the left. Rear AUX-IN port on the right. USB audio interface. Mobile phone audio interface.
Additional symbols
SymbolMeaning Spoken instructions are switched off. Request of the current vehicle posi‐
tion.
Split screen
General information
Additional information can be displayed on the
right side of the split screen, e.g., information
from the computer.
In the divided screen view, the so-called split
screen, this information remains visible even
when you change to another menu.
Switching the split screen on and off1. Press the button.2."Split screen"
Selecting the display
1. Press the button.2."Split screen"3.Move the controller until the split screen is
selected.4.Press the controller or select "Split screen
content".5.Select the desired menu item.
Programmable memory
buttons
General information
The iDrive functions can be stored on the pro‐
grammable memory buttons and called up di‐
rectly, e.g., radio stations, navigation destina‐
tions, phone numbers and entry points into the
menu.
The settings are stored for the remote control
currently in use.
Saving a function
1.Highlight the function via the iDrive.Seite 20At a glanceiDrive20
Online Edition for Part no. 01 40 2 607 855 - 09 11 490
Page 32 of 321
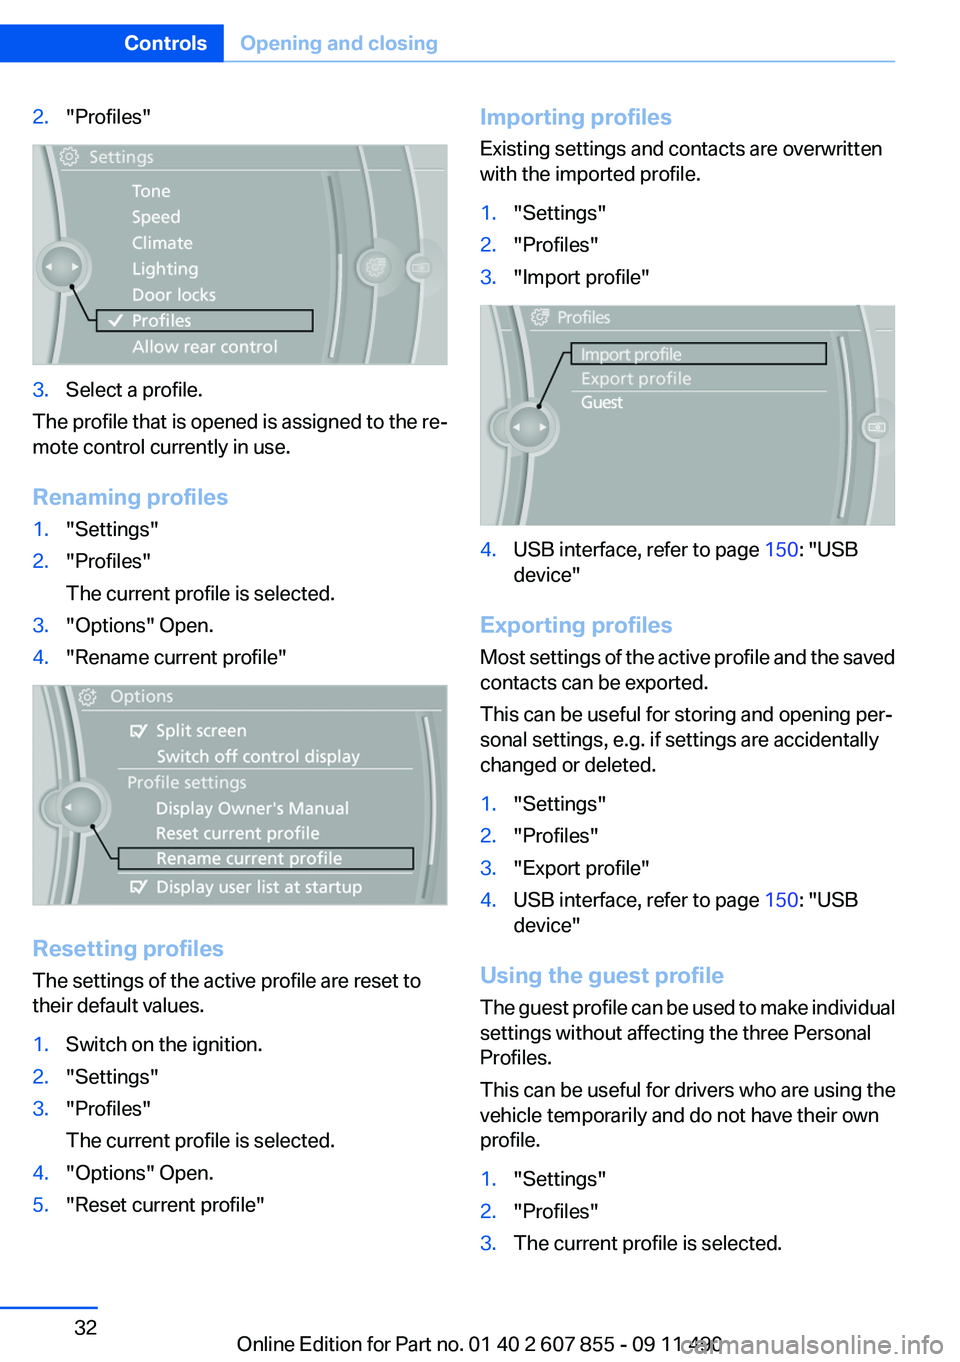
2."Profiles"3.Select a profile.
The profile that is opened is assigned to the re‐
mote control currently in use.
Renaming profiles
1."Settings"2."Profiles"
The current profile is selected.3."Options" Open.4."Rename current profile"
Resetting profiles
The settings of the active profile are reset to
their default values.
1.Switch on the ignition.2."Settings"3."Profiles"
The current profile is selected.4."Options" Open.5."Reset current profile"Importing profiles
Existing settings and contacts are overwritten
with the imported profile.1."Settings"2."Profiles"3."Import profile"4.USB interface, refer to page 150: "USB
device"
Exporting profiles
Most settings of the active profile and the saved
contacts can be exported.
This can be useful for storing and opening per‐
sonal settings, e.g. if settings are accidentally
changed or deleted.
1."Settings"2."Profiles"3."Export profile"4.USB interface, refer to page 150: "USB
device"
Using the guest profile
The guest profile can be used to make individual
settings without affecting the three Personal
Profiles.
This can be useful for drivers who are using the
vehicle temporarily and do not have their own
profile.
1."Settings"2."Profiles"3.The current profile is selected.Seite 32ControlsOpening and closing32
Online Edition for Part no. 01 40 2 607 855 - 09 11 490
Page 150 of 321
Storage compartmentsVehicle equipment
All standard, country-specific and optional
equipment that is offered in the model series is
described in this chapter. Therefore, equipment
is also described that is not available in a vehicle,
e. g., because of the selected optional equip‐
ment or country variant. This also applies for
safety-related functions and systems.
Storage compartments
The following storage compartments are avail‐
able in the vehicle interior:▷Glove compartment on the driver's and front
passenger side, refer to page 150.▷Storage compartment in the center console,
refer to page 152.▷Storage compartment in the center armrest,
refer to page 151, in the front and rear.▷Compartments in the doors.▷Pockets on the backrests of the front seats.▷Net in the front passenger footwell.
No loose objects in the passenger com‐
partment
Do not stow any objects in the passenger com‐
partment without securing them; otherwise,
they may present a danger to occupants for in‐
stance during braking and avoidance maneu‐
vers.◀
Glove compartment
Front passenger side
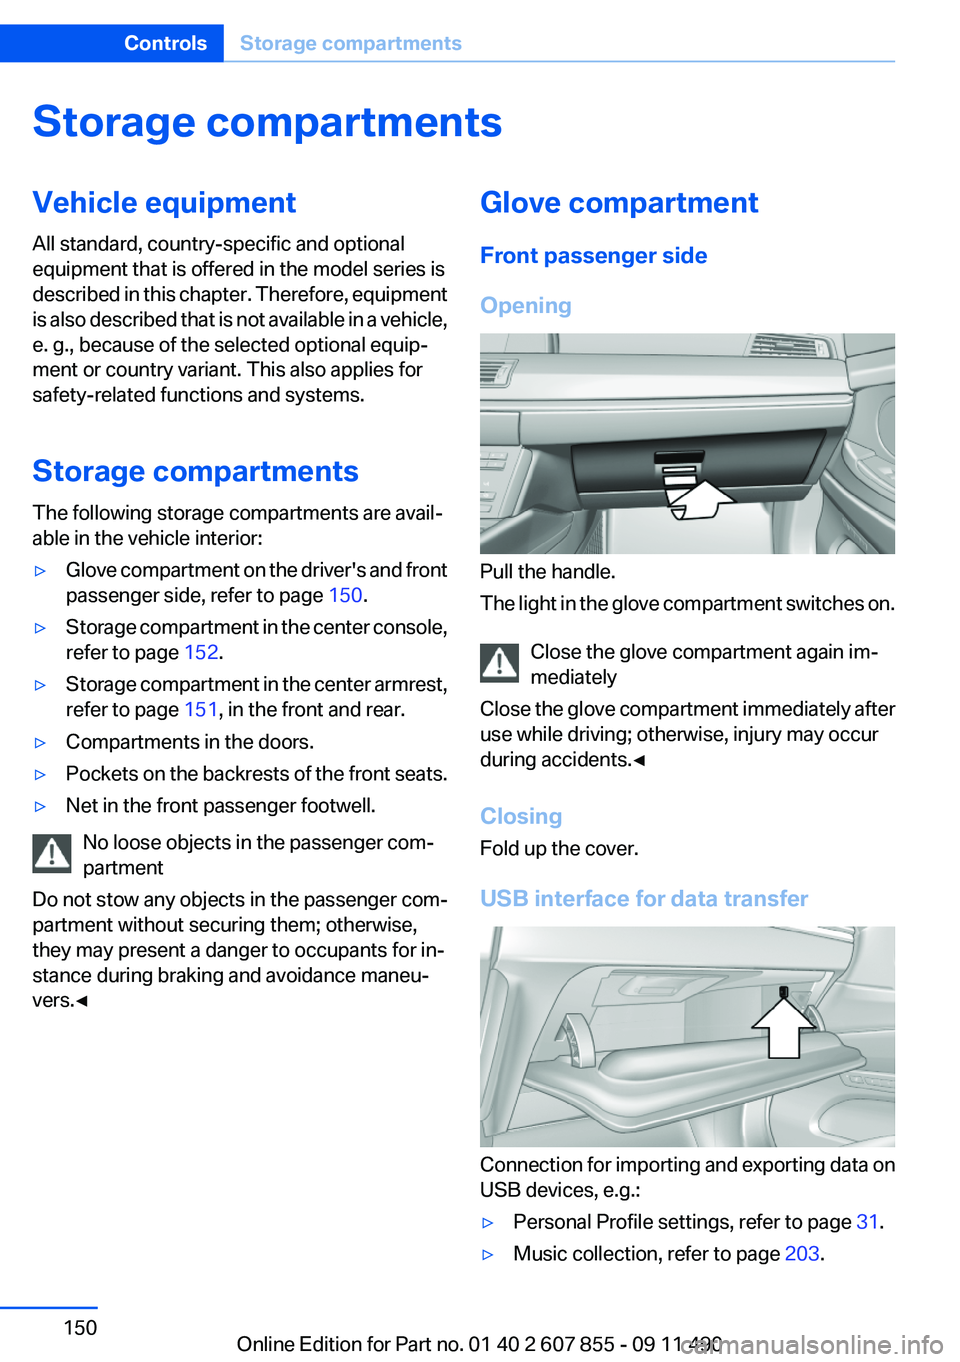
Opening
Pull the handle.
The light in the glove compartment switches on.
Close the glove compartment again im‐
mediately
Close the glove compartment immediately after
use while driving; otherwise, injury may occur
during accidents.◀
Closing
Fold up the cover.
USB interface for data transfer
Connection for importing and exporting data on
USB devices, e.g.:
▷Personal Profile settings, refer to page 31.▷Music collection, refer to page 203.Seite 150ControlsStorage compartments150
Online Edition for Part no. 01 40 2 607 855 - 09 11 490
Page 152 of 321
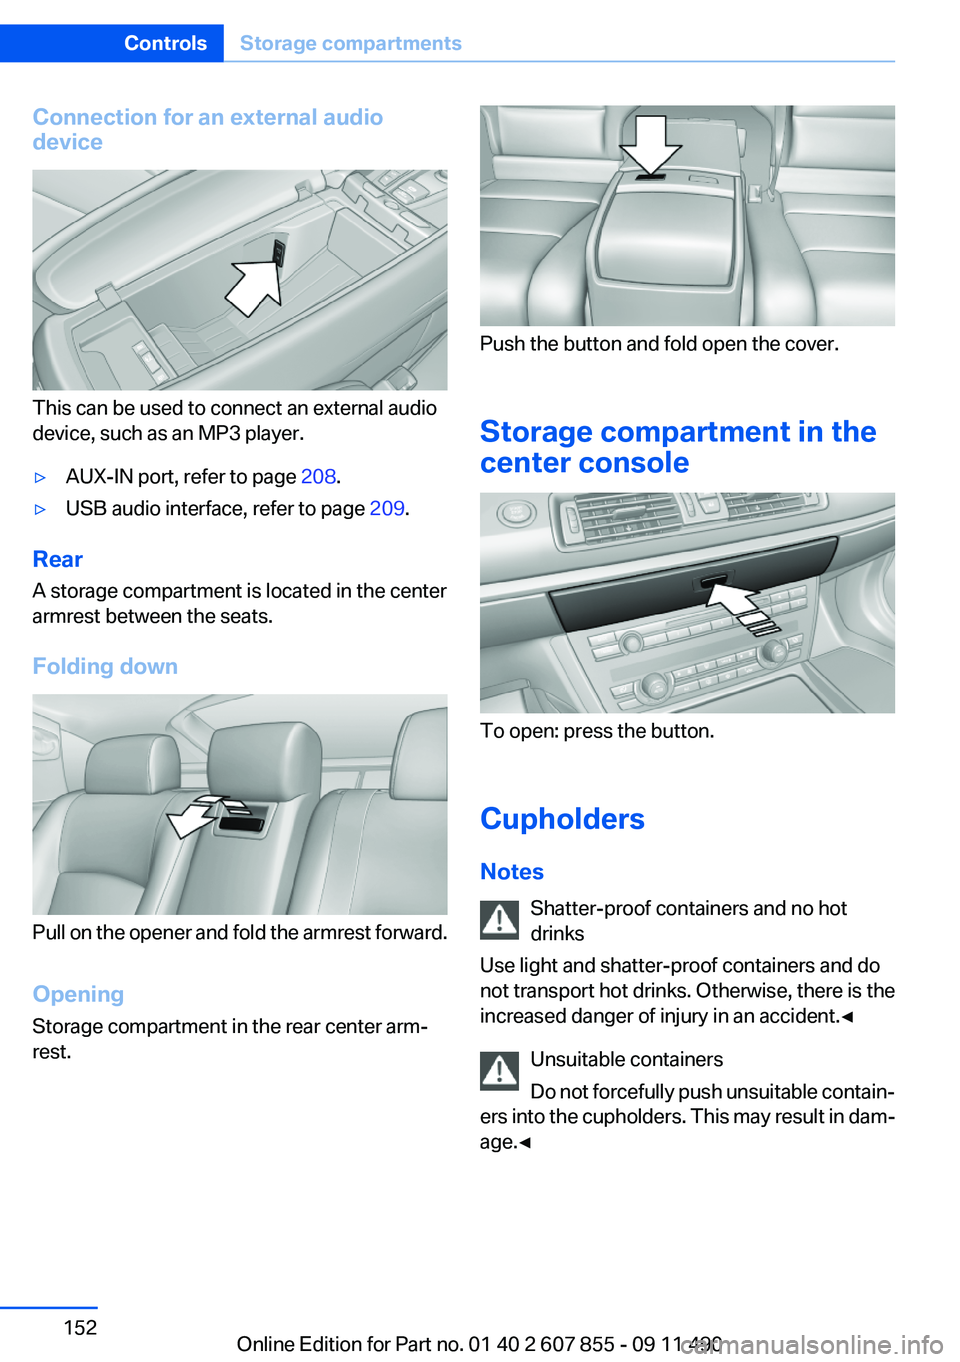
Connection for an external audio
device
This can be used to connect an external audio
device, such as an MP3 player.
▷AUX-IN port, refer to page 208.▷USB audio interface, refer to page 209.
Rear
A storage compartment is located in the center
armrest between the seats.
Folding down
Pull on the opener and fold the armrest forward.
Opening
Storage compartment in the rear center arm‐
rest.
Push the button and fold open the cover.
Storage compartment in the
center console
To open: press the button.
Cupholders
Notes Shatter-proof containers and no hot
drinks
Use light and shatter-proof containers and do
not transport hot drinks. Otherwise, there is the
increased danger of injury in an accident.◀
Unsuitable containers
Do not forcefully push unsuitable contain‐
ers into the cupholders. This may result in dam‐
age.◀
Seite 152ControlsStorage compartments152
Online Edition for Part no. 01 40 2 607 855 - 09 11 490
Page 205 of 321
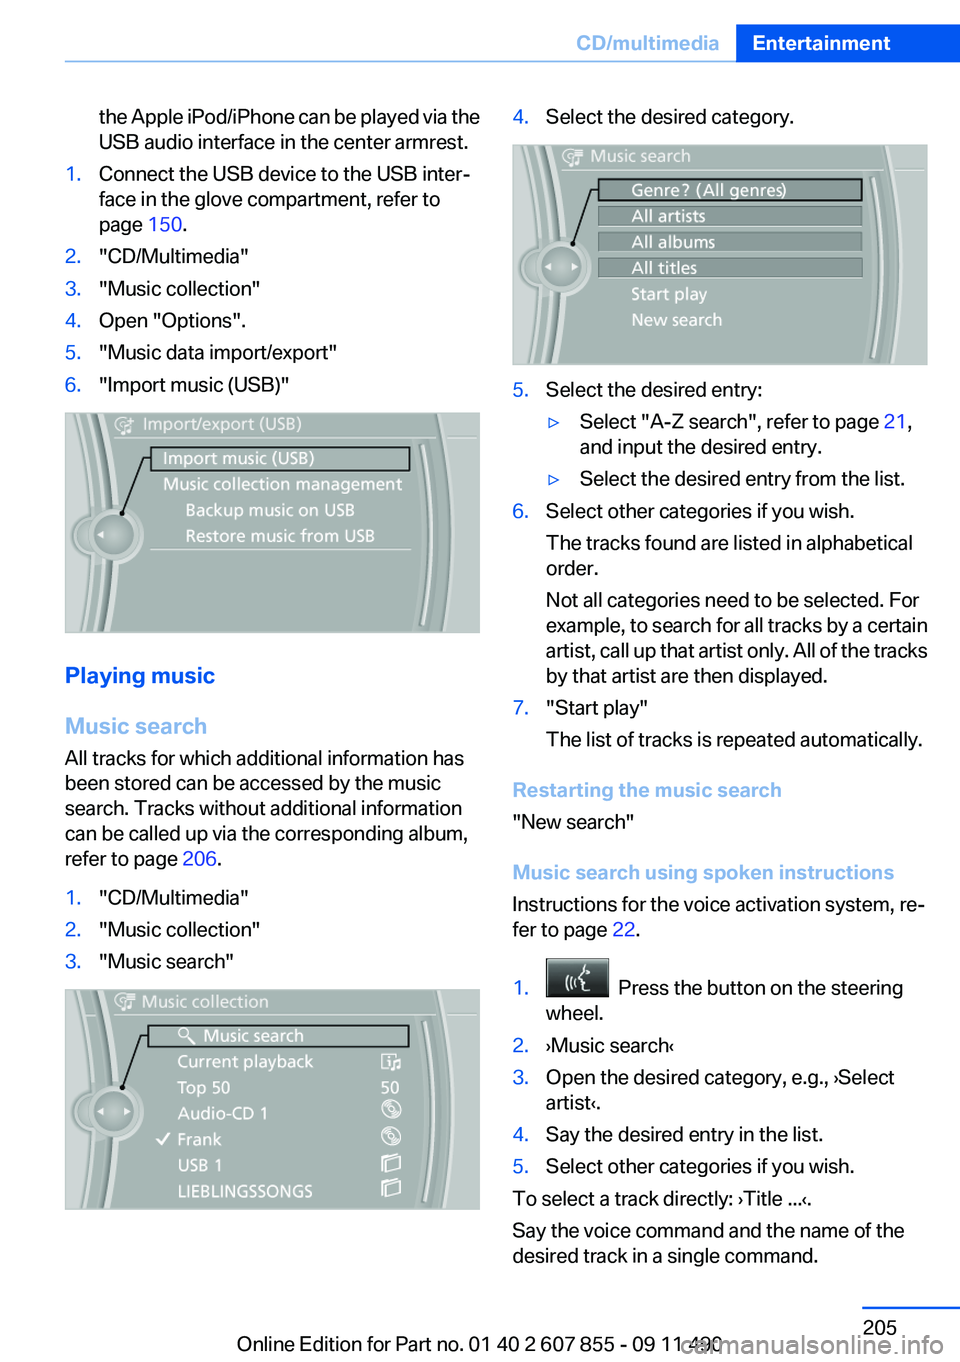
the Apple iPod/iPhone can be played via the
USB audio interface in the center armrest.1.Connect the USB device to the USB inter‐
face in the glove compartment, refer to
page 150.2."CD/Multimedia"3."Music collection"4.Open "Options".5."Music data import/export"6."Import music (USB)"
Playing music
Music search
All tracks for which additional information has
been stored can be accessed by the music
search. Tracks without additional information
can be called up via the corresponding album,
refer to page 206.
1."CD/Multimedia"2."Music collection"3."Music search"4.Select the desired category.5.Select the desired entry:▷Select "A-Z search", refer to page 21,
and input the desired entry.▷Select the desired entry from the list.6.Select other categories if you wish.
The tracks found are listed in alphabetical
order.
Not all categories need to be selected. For
example, to search for all tracks by a certain
artist, call up that artist only. All of the tracks
by that artist are then displayed.7."Start play"
The list of tracks is repeated automatically.
Restarting the music search
"New search"
Music search using spoken instructions
Instructions for the voice activation system, re‐
fer to page 22.
1. Press the button on the steering
wheel.2.›Music search‹3.Open the desired category, e.g., ›Select
artist‹.4.Say the desired entry in the list.5.Select other categories if you wish.
To select a track directly: ›Title ...‹.
Say the voice command and the name of the
desired track in a single command.
Seite 205CD/multimediaEntertainment205
Online Edition for Part no. 01 40 2 607 855 - 09 11 490
Page 208 of 321
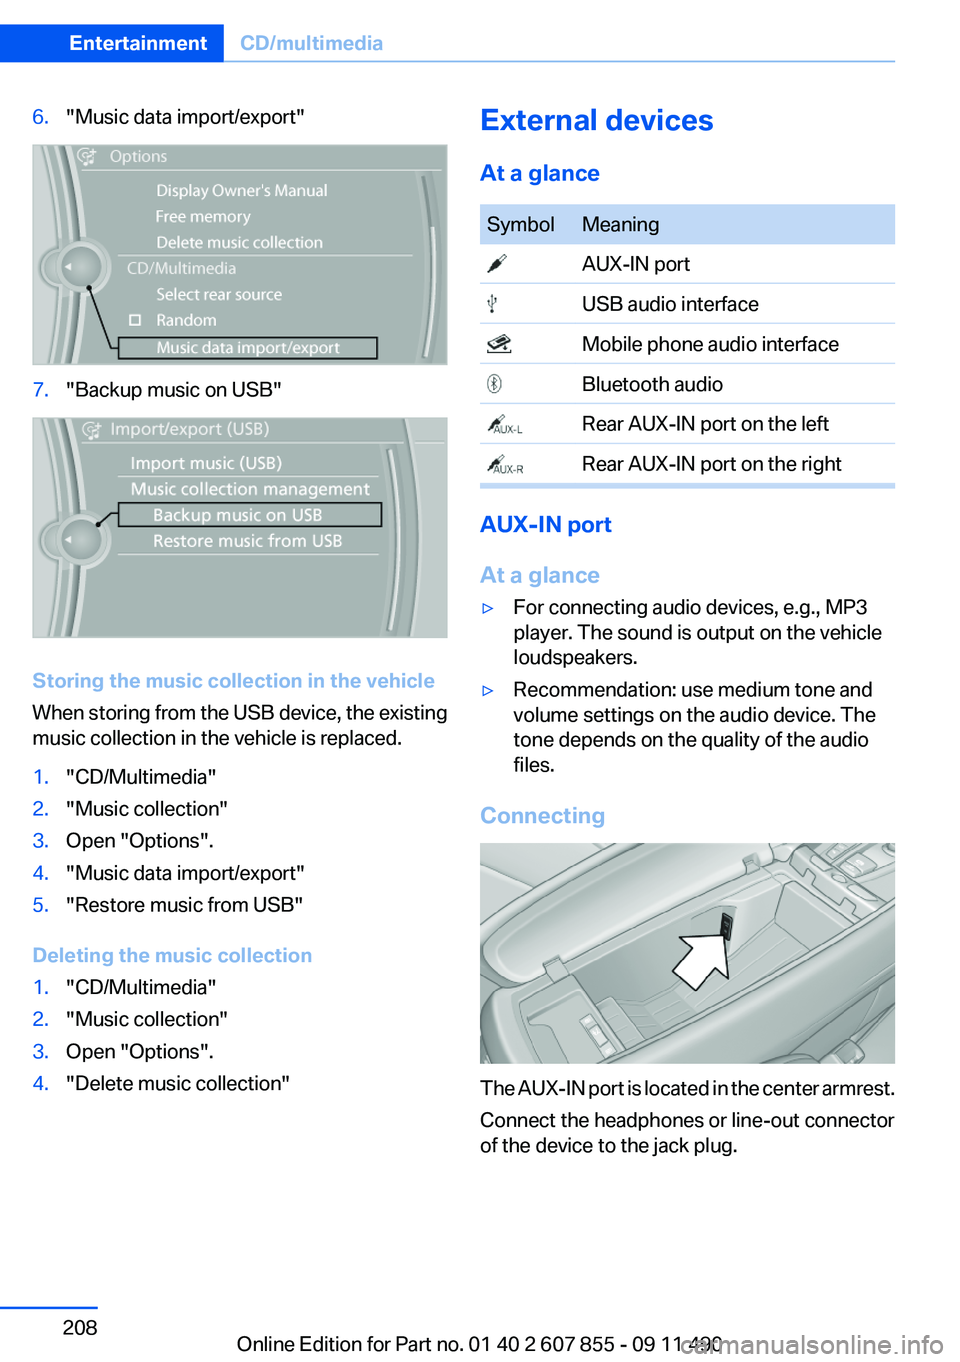
6."Music data import/export"7."Backup music on USB"
Storing the music collection in the vehicle
When storing from the USB device, the existing
music collection in the vehicle is replaced.
1."CD/Multimedia"2."Music collection"3.Open "Options".4."Music data import/export"5."Restore music from USB"
Deleting the music collection
1."CD/Multimedia"2."Music collection"3.Open "Options".4."Delete music collection"External devices
At a glanceSymbolMeaning AUX-IN port USB audio interface Mobile phone audio interface Bluetooth audio Rear AUX-IN port on the left Rear AUX-IN port on the right
AUX-IN port
At a glance
▷For connecting audio devices, e.g., MP3
player. The sound is output on the vehicle
loudspeakers.▷Recommendation: use medium tone and
volume settings on the audio device. The
tone depends on the quality of the audio
files.
Connecting
The AUX-IN port is located in the center armrest.
Connect the headphones or line-out connector
of the device to the jack plug.
Seite 208EntertainmentCD/multimedia208
Online Edition for Part no. 01 40 2 607 855 - 09 11 490
Page 209 of 321
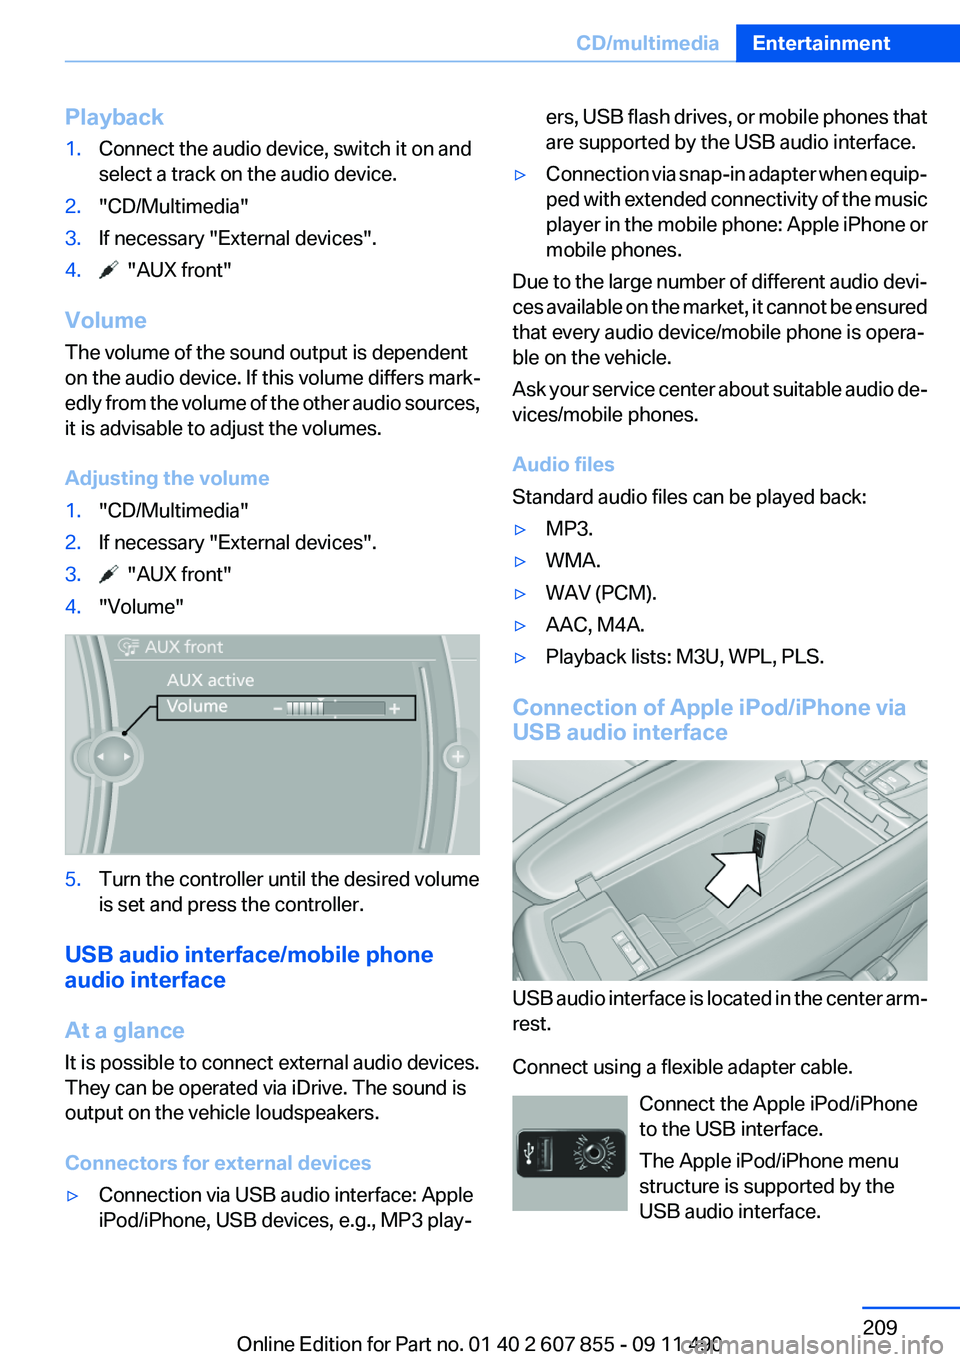
Playback1.Connect the audio device, switch it on and
select a track on the audio device.2."CD/Multimedia"3.If necessary "External devices".4. "AUX front"
Volume
The volume of the sound output is dependent
on the audio device. If this volume differs mark‐
edly from the volume of the other audio sources,
it is advisable to adjust the volumes.
Adjusting the volume
1."CD/Multimedia"2.If necessary "External devices".3. "AUX front"4."Volume"5.Turn the controller until the desired volume
is set and press the controller.
USB audio interface/mobile phone
audio interface
At a glance
It is possible to connect external audio devices.
They can be operated via iDrive. The sound is
output on the vehicle loudspeakers.
Connectors for external devices
▷Connection via USB audio interface: Apple
iPod/iPhone, USB devices, e.g., MP3 play‐ers, USB flash drives, or mobile phones that
are supported by the USB audio interface.▷Connection via snap-in adapter when equip‐
ped with extended connectivity of the music
player in the mobile phone: Apple iPhone or
mobile phones.
Due to the large number of different audio devi‐
ces available on the market, it cannot be ensured
that every audio device/mobile phone is opera‐
ble on the vehicle.
Ask your service center about suitable audio de‐
vices/mobile phones.
Audio files
Standard audio files can be played back:
▷MP3.▷WMA.▷WAV (PCM).▷AAC, M4A.▷Playback lists: M3U, WPL, PLS.
Connection of Apple iPod/iPhone via
USB audio interface
USB audio interface is located in the center arm‐
rest.
Connect using a flexible adapter cable. Connect the Apple iPod/iPhone
to the USB interface.
The Apple iPod/iPhone menu
structure is supported by the
USB audio interface.
Seite 209CD/multimediaEntertainment209
Online Edition for Part no. 01 40 2 607 855 - 09 11 490
Page 212 of 321
peratures; refer to the audio device operating
instructions.
Depending on the configuration of the audio
files, e.g., bit rates greater than 256 kbit/s, the
files may not play back correctly in each case.
Information on connection▷The connected audio device is supplied with
a max. power of 500 mA if supported by the
device. Therefore, do not additionally con‐
nect the device to a socket in the vehicle;
otherwise, playback may be compromised.▷Do not use force when plugging the con‐
nector into the USB interface.▷Do not connect devices such as fans or
lamps to the USB audio interface.▷Do not connect USB hard drives.▷Do not use the USB audio interface to re‐
charge external devices.
Bluetooth audio
At a glance
▷Music files on external devices such as audio
devices or mobile phones can be played
back via Bluetooth.
Use of a mobile phone as an audio source,
refer to page 227.▷The sound is output on the vehicle loud‐
speakers.▷The volume of the sound output is depend‐
ent on the device. If necessary, adjust the
volume on the device.▷Up to four external devices can be paired
with the vehicle.
Requirements
▷The device is suitable. Information under
www.bmwusa.com/bluetooth.▷The device is ready for operation.▷The ignition is switched on.▷Bluetooth is activated on the vehicle, refer to
page 227, and on the device.▷Bluetooth presettings must be made on the
device, such as for a connection without
confirmation or visibility; refer to the device
operating instructions.▷A number with at least four and a maximum
of 16 digits is defined as the Bluetooth pass‐
key. It is only required once for pairing.
Pairing and connecting
Pairing a device
To avoid becoming distracted and posing
an unnecessary hazard both to your own vehi‐
cle's occupants and to other road users, only
pair the device while the vehicle is stationary.◀
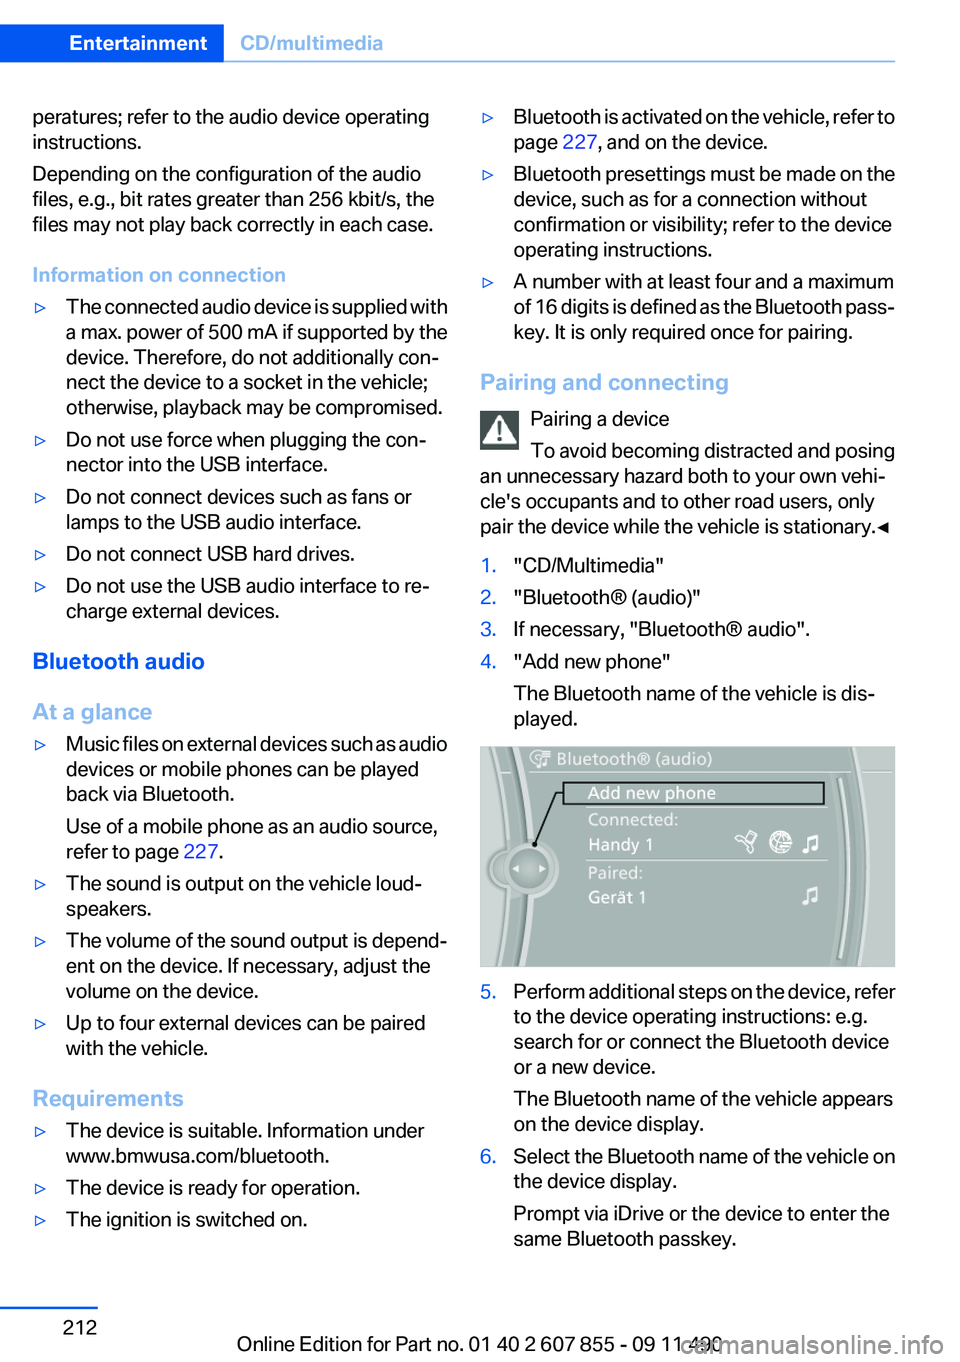
1."CD/Multimedia"2."Bluetooth® (audio)"3.If necessary, "Bluetooth® audio".4."Add new phone"
The Bluetooth name of the vehicle is dis‐
played.5.Perform additional steps on the device, refer
to the device operating instructions: e.g.
search for or connect the Bluetooth device
or a new device.
The Bluetooth name of the vehicle appears
on the device display.6.Select the Bluetooth name of the vehicle on
the device display.
Prompt via iDrive or the device to enter the
same Bluetooth passkey.Seite 212EntertainmentCD/multimedia212
Online Edition for Part no. 01 40 2 607 855 - 09 11 490
Page 215 of 321
Music files can only be played back softly.▷Adjust the volume settings on the device.
Playback is disturbed when buttons are pressed
or by other messages on the device.
▷Switch off the button tones and other signal
tones on the device.
Playback is interrupted by a telephone call or
traffic bulletin and is not resumed automatically.
▷Switch the radio off and on again.
Playback is not possible if the mobile phone is
connected both via Bluetooth Audio and via the
extended connectivity of the music player in the
mobile phone.
▷Disconnect one of the two connections; for
example, disconnect the audio connection,
refer to page 214, and restart playback.
If all points in this list have been checked and the
required function is still not available, please
contact the hotline or service center.
Software Update
The vehicle supports various external devices
depending on the current software version. With
a software update, the vehicle can support new
cell phones or new external devices.
The updating of the software is done via:
▷USB.
Updates and related current information is
available at www.bmw.com/update.
Displaying the current version
The currently installed software is displayed.
1."Settings"2."Software update"3."Show current version"
SelectDesired version to displayAdditional in‐
formation.
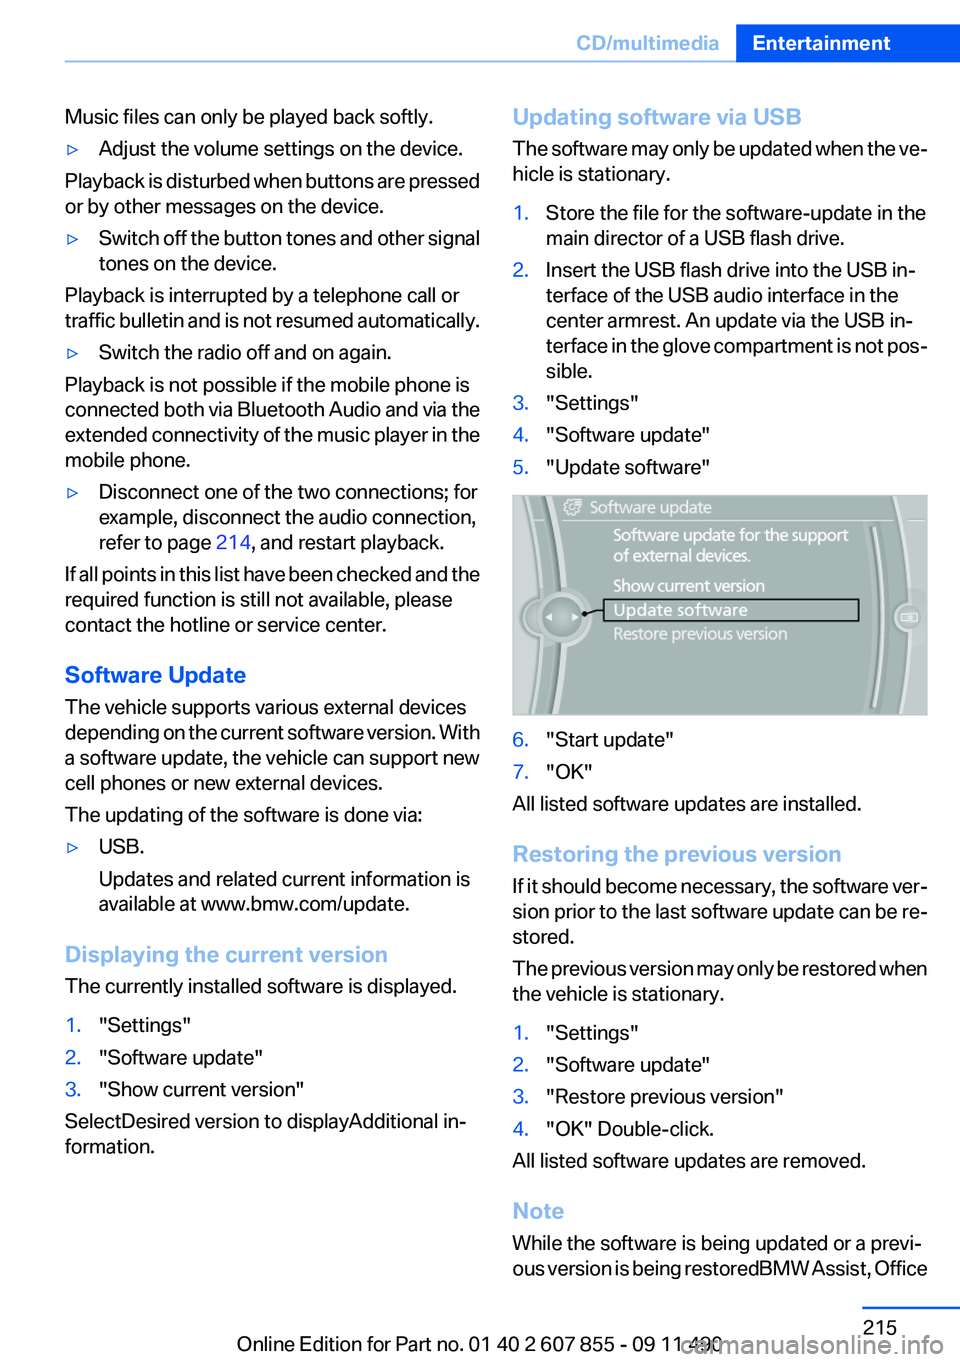
Updating software via USB
The software may only be updated when the ve‐
hicle is stationary.1.Store the file for the software-update in the
main director of a USB flash drive.2.Insert the USB flash drive into the USB in‐
terface of the USB audio interface in the
center armrest. An update via the USB in‐
terface in the glove compartment is not pos‐
sible.3."Settings"4."Software update"5."Update software"6."Start update"7."OK"
All listed software updates are installed.
Restoring the previous version
If it should become necessary, the software ver‐
sion prior to the last software update can be re‐
stored.
The previous version may only be restored when
the vehicle is stationary.
1."Settings"2."Software update"3."Restore previous version"4."OK" Double-click.
All listed software updates are removed.
Note
While the software is being updated or a previ‐
ous version is being restoredBMW Assist, Office
Seite 215CD/multimediaEntertainment215
Online Edition for Part no. 01 40 2 607 855 - 09 11 490
Page 219 of 321
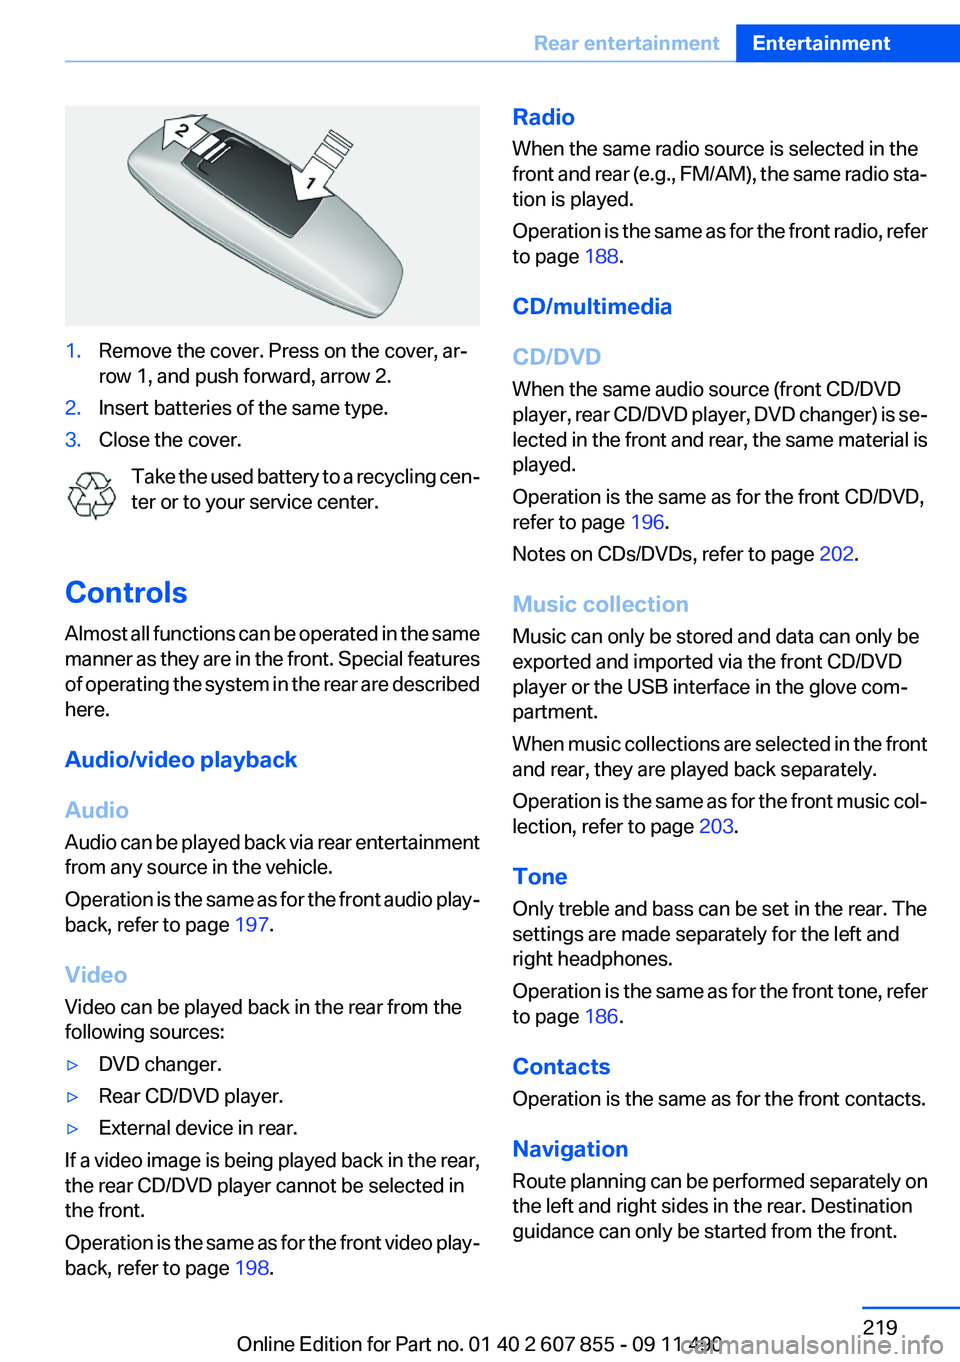
1.Remove the cover. Press on the cover, ar‐
row 1, and push forward, arrow 2.2.Insert batteries of the same type.3.Close the cover.
Take the used battery to a recycling cen‐
ter or to your service center.
Controls
Almost all functions can be operated in the same
manner as they are in the front. Special features
of operating the system in the rear are described
here.
Audio/video playback
Audio
Audio can be played back via rear entertainment
from any source in the vehicle.
Operation is the same as for the front audio play‐
back, refer to page 197.
Video
Video can be played back in the rear from the
following sources:
▷DVD changer.▷Rear CD/DVD player.▷External device in rear.
If a video image is being played back in the rear,
the rear CD/DVD player cannot be selected in
the front.
Operation is the same as for the front video play‐
back, refer to page 198.
Radio
When the same radio source is selected in the
front and rear (e.g., FM/AM), the same radio sta‐
tion is played.
Operation is the same as for the front radio, refer
to page 188.
CD/multimedia
CD/DVD
When the same audio source (front CD/DVD
player, rear CD/DVD player, DVD changer) is se‐
lected in the front and rear, the same material is
played.
Operation is the same as for the front CD/DVD,
refer to page 196.
Notes on CDs/DVDs, refer to page 202.
Music collection
Music can only be stored and data can only be
exported and imported via the front CD/DVD
player or the USB interface in the glove com‐
partment.
When music collections are selected in the front
and rear, they are played back separately.
Operation is the same as for the front music col‐
lection, refer to page 203.
Tone
Only treble and bass can be set in the rear. The
settings are made separately for the left and
right headphones.
Operation is the same as for the front tone, refer
to page 186.
Contacts
Operation is the same as for the front contacts.
Navigation
Route planning can be performed separately on
the left and right sides in the rear. Destination
guidance can only be started from the front.Seite 219Rear entertainmentEntertainment219
Online Edition for Part no. 01 40 2 607 855 - 09 11 490