ignition BMW 650I XDRIVE CONVERTIBLE 2014 Owners Manual
[x] Cancel search | Manufacturer: BMW, Model Year: 2014, Model line: 650I XDRIVE CONVERTIBLE, Model: BMW 650I XDRIVE CONVERTIBLE 2014Pages: 243, PDF Size: 7.83 MB
Page 13 of 243
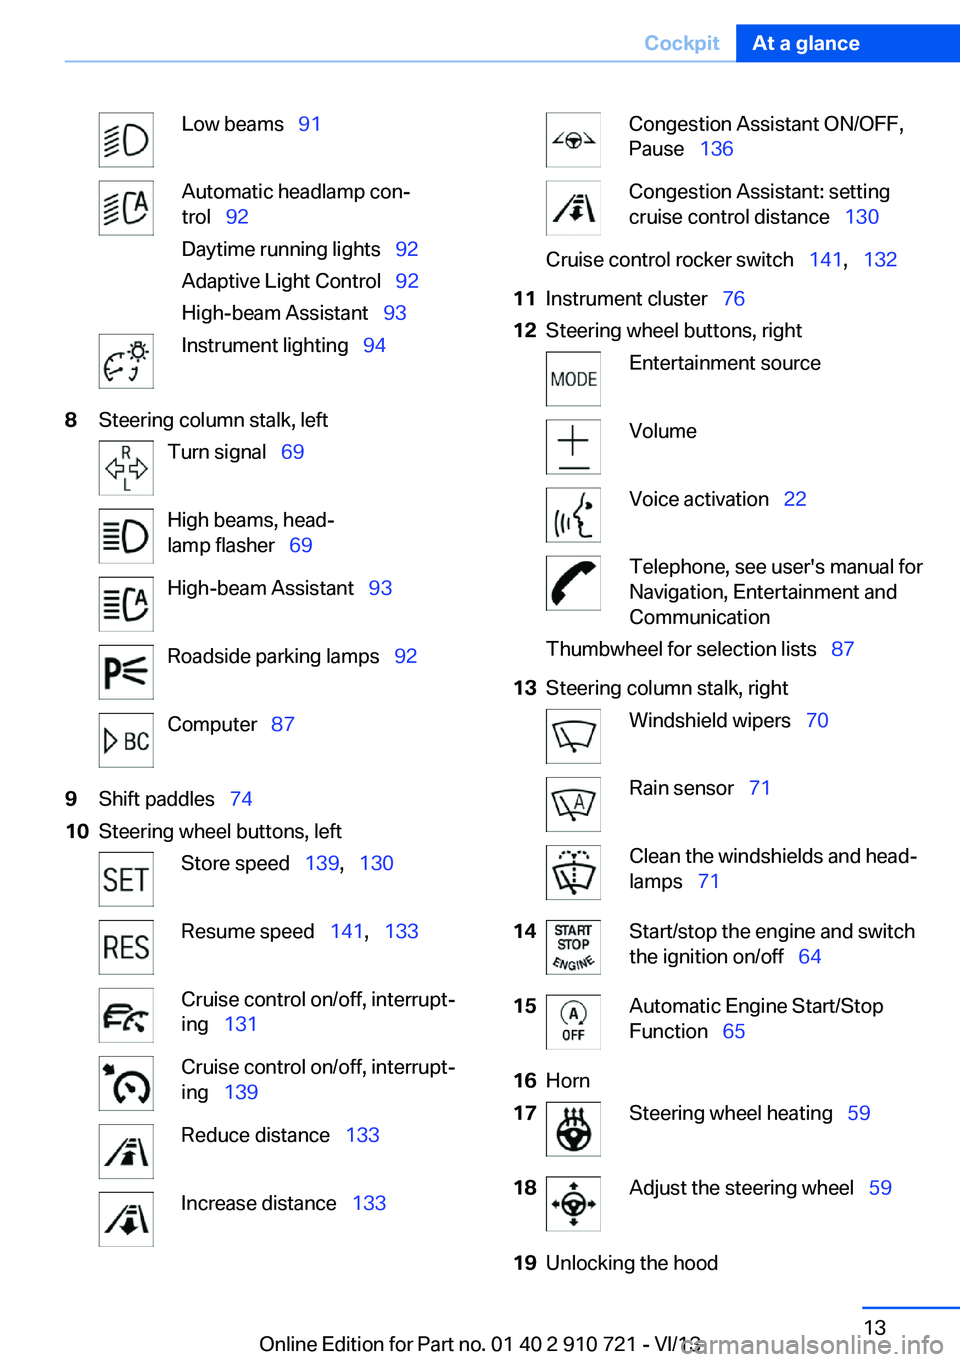
Low beams 91Automatic headlamp con‐
trol 92
Daytime running lights 92
Adaptive Light Control 92
High-beam Assistant 93Instrument lighting 948Steering column stalk, leftTurn signal 69High beams, head‐
lamp flasher 69High-beam Assistant 93Roadside parking lamps 92Computer 879Shift paddles 7410Steering wheel buttons, leftStore speed 139, 130Resume speed 141, 133Cruise control on/off, interrupt‐
ing 131Cruise control on/off, interrupt‐
ing 139Reduce distance 133Increase distance 133Congestion Assistant ON/OFF,
Pause 136Congestion Assistant: setting
cruise control distance 130Cruise control rocker switch 141, 13211Instrument cluster 7612Steering wheel buttons, rightEntertainment sourceVolumeVoice activation 22Telephone, see user's manual for
Navigation, Entertainment and
CommunicationThumbwheel for selection lists 8713Steering column stalk, rightWindshield wipers 70Rain sensor 71Clean the windshields and head‐
lamps 7114Start/stop the engine and switch
the ignition on/off 6415Automatic Engine Start/Stop
Function 6516Horn17Steering wheel heating 5918Adjust the steering wheel 5919Unlocking the hoodSeite 13CockpitAt a glance13
Online Edition for Part no. 01 40 2 910 721 - VI/13
Page 31 of 243
Take the used battery to a recycling
center or to your service center.
New remote controls You can obtain new remote controls from your
service center.
Loss of the remote controls Lost remote controls can be blocked by your
service center.
Emergency detection of remote
control
It is possible to switch on the ignition or start
the engine in situations such as the following:▷Interference of radio transmission to re‐
mote control by external sources.▷Discharged battery in the remote control.▷Interference of radio transmission by mo‐
bile devices in close proximity to the re‐
mote control.▷Interference of radio transmission by
charger while charging items such as mo‐
bile devices in the vehicle.
A Check Control message is displayed if an at‐
tempt is made to switch on the ignition or start
the engine.
Starting the engine with emergency
detection of the remote control
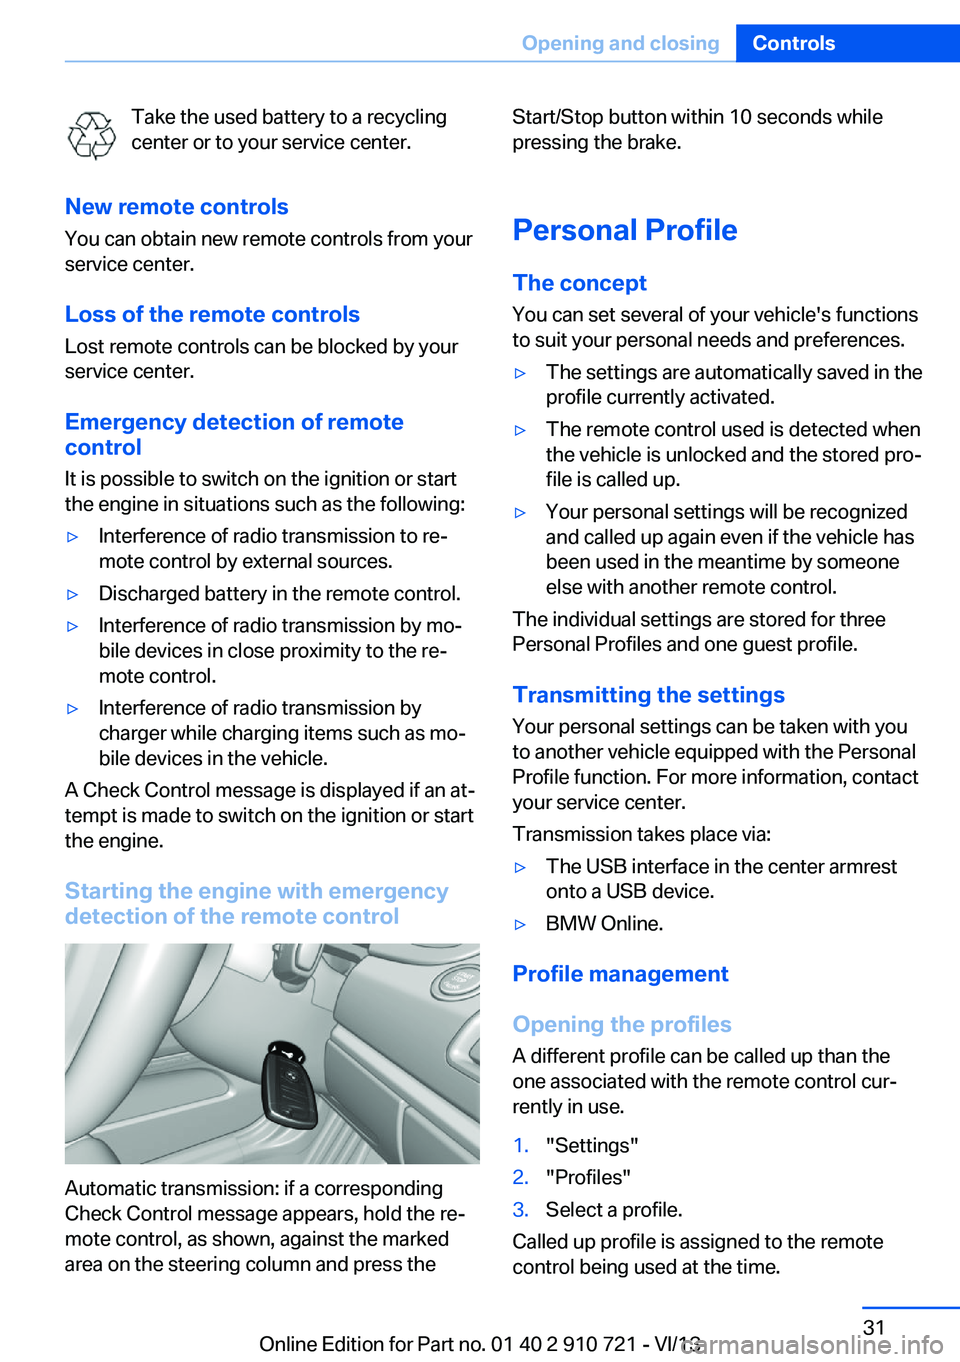
Automatic transmission: if a corresponding
Check Control message appears, hold the re‐
mote control, as shown, against the marked
area on the steering column and press the
Start/Stop button within 10 seconds while
pressing the brake.
Personal Profile
The concept You can set several of your vehicle's functions
to suit your personal needs and preferences.▷The settings are automatically saved in the
profile currently activated.▷The remote control used is detected when
the vehicle is unlocked and the stored pro‐
file is called up.▷Your personal settings will be recognized
and called up again even if the vehicle has
been used in the meantime by someone
else with another remote control.
The individual settings are stored for three
Personal Profiles and one guest profile.
Transmitting the settings
Your personal settings can be taken with you
to another vehicle equipped with the Personal
Profile function. For more information, contact
your service center.
Transmission takes place via:
▷The USB interface in the center armrest
onto a USB device.▷BMW Online.
Profile management
Opening the profiles A different profile can be called up than the
one associated with the remote control cur‐
rently in use.
1."Settings"2."Profiles"3.Select a profile.
Called up profile is assigned to the remote
control being used at the time.
Seite 31Opening and closingControls31
Online Edition for Part no. 01 40 2 910 721 - VI/13
Page 38 of 243
This is beneficial when the vehicle is parked
using valet service. The infrared remote con‐
trol can be handed out without the key.
Emergency unlocking
Pull the handle inside the cargo area.
The trunk lid unlocks.
Comfort Access
The concept The vehicle can be accessed without activat‐
ing the remote control.
All you need to do is to have the remote con‐ trol with you, e.g., in your jacket pocket.
The vehicle automatically detects the remote
control when it is nearby or in the passenger
compartment.
Comfort Access supports the following func‐
tions:
▷Unlocking/locking of the vehicle.▷Unlocking of the trunk lid separately.▷Start the engine.
Functional requirements
▷There are no external sources of interfer‐
ence nearby.▷To lock the vehicle, the remote control
must be located outside of the vehicle.▷The next unlocking and locking cycle is not
possible until after approx. 2 seconds.▷The engine can only be started if the re‐
mote control is inside the vehicle.
Comparison with ordinary remote
control
The functions can be controlled by pressing the buttons of the remote control or Comfort
Access.
Unlocking
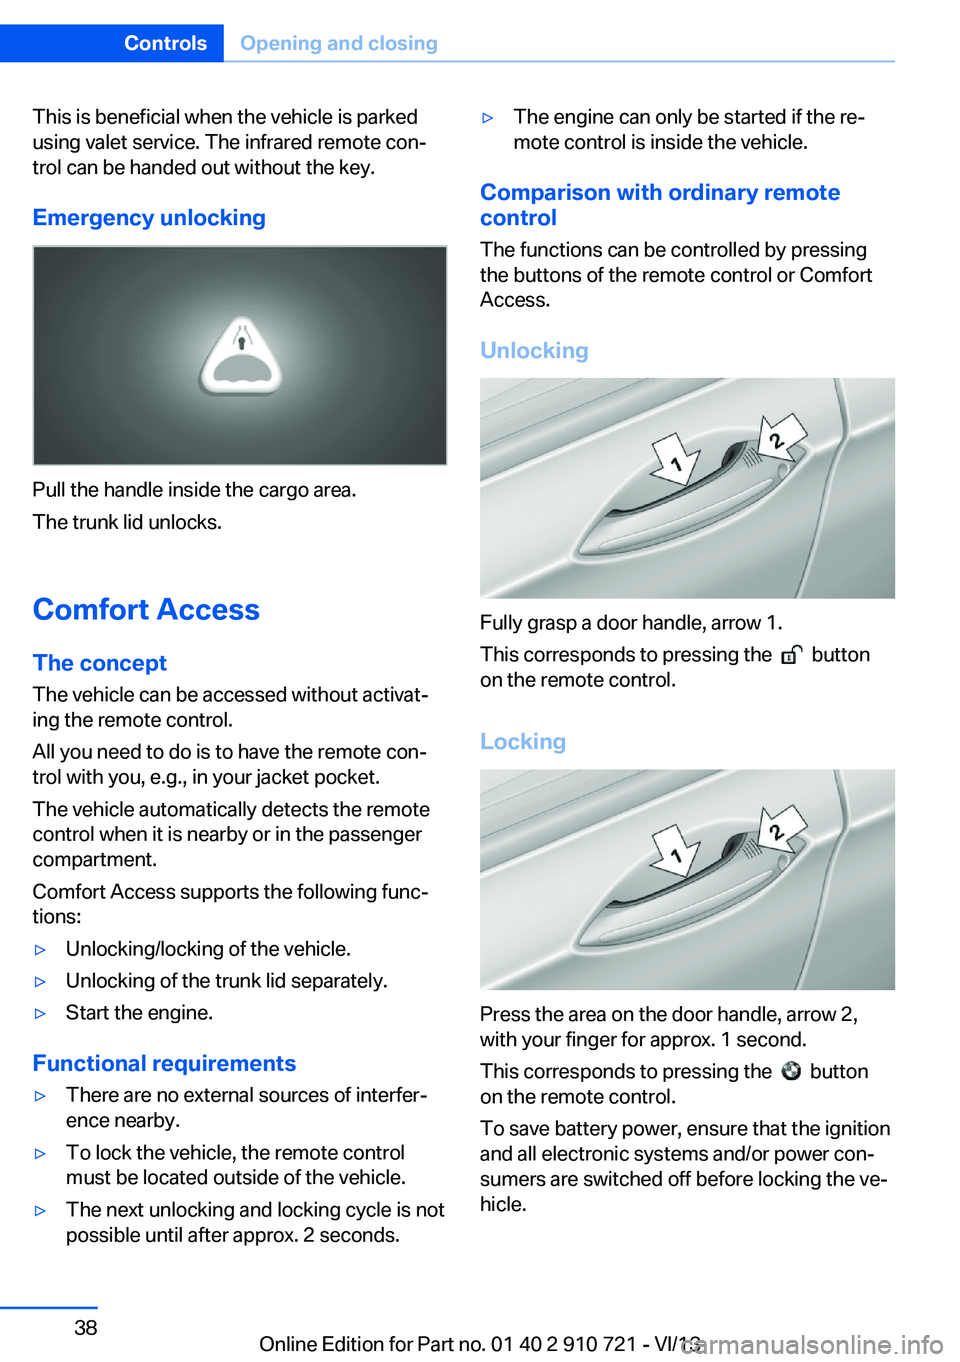
Fully grasp a door handle, arrow 1.
This corresponds to pressing the
button
on the remote control.
Locking
Press the area on the door handle, arrow 2,
with your finger for approx. 1 second.
This corresponds to pressing the
button
on the remote control.
To save battery power, ensure that the ignition
and all electronic systems and/or power con‐
sumers are switched off before locking the ve‐
hicle.
Seite 38ControlsOpening and closing38
Online Edition for Part no. 01 40 2 910 721 - VI/13
Page 41 of 243
▷The indicator lamp flashes after locking:
The doors, hood or trunk lid is not closed
properly, but the rest of the vehicle is se‐
cured.
After 10 seconds, the indicator lamp
flashes continuously. Interior motion sen‐
sor and tilt alarm sensor are not active.▷The indicator lamp goes out after unlock‐
ing:
The vehicle has not been tampered with.▷The indicator lamp flashes after unlocking
until the engine ignition is switched on, but
no longer than approx. 5 minutes:
An alarm has been triggered.
Tilt alarm sensor The tilt of the vehicle is monitored.
The alarm system responds in situations such
as attempts to steal a wheel or when the car is
towed.
Interior motion sensor The interior is monitored to the height of the
seat cushions. The alarm system is armed to‐
gether with the interior motion sensor even
when the convertible top is open. Falling ob‐
jects such as leaves can trigger the alarm unin‐
tentionally.
Avoiding unintentional alarms
The tilt alarm sensor and interior motion sen‐
sor can be switched off together, such as in
the following situations:
▷In automatic car washes.▷In duplex garages.▷During transport on car-carrying trains, at
sea or on a trailer.▷When animals are to remain in the vehicle.Switching off the tilt alarm sensor and
interior motion sensor
Press the remote control button again
within 10 seconds as soon as the vehicle
is locked.
The indicator lamp lights up for approx. 2 sec‐
onds and then continues to flash.
The tilt alarm sensor and interior motion sen‐
sor are switched off until the vehicle is locked
again.
Power windows
General information Take the remote control with you
Take the remote control with you when
leaving the vehicle so that children, for exam‐
ple, cannot operate the power windows and in‐
jure themselves.◀
Closing the windows when driving
To close the side windows when driving,
first close the rear windows or all four windows
at the same time; otherwise, the windows may
not close tightly at high speeds.◀
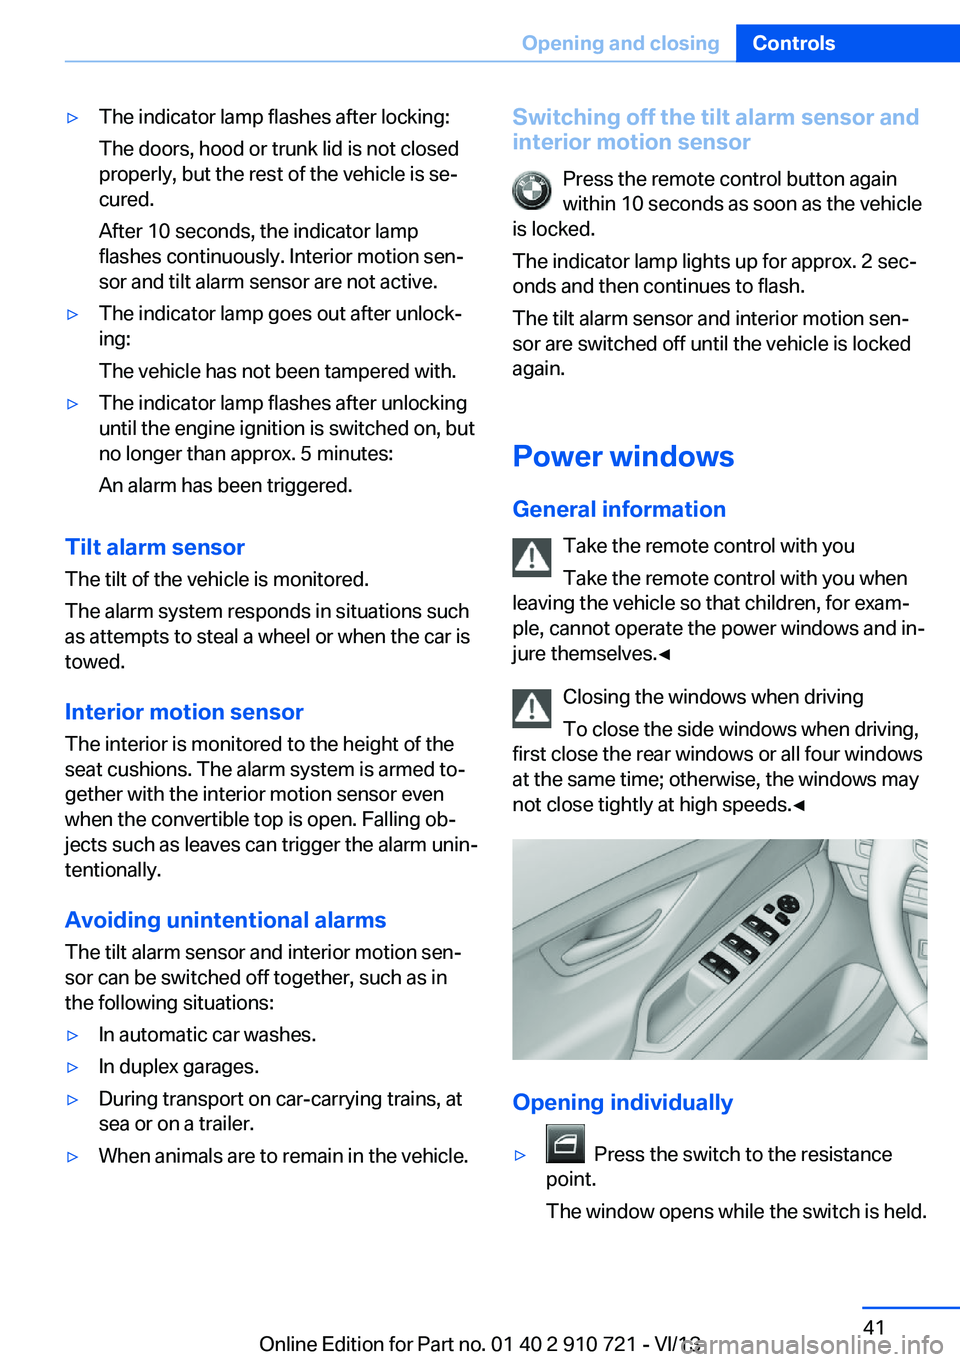
Opening individually
▷ Press the switch to the resistance
point.
The window opens while the switch is held.
Seite 41Opening and closingControls41
Online Edition for Part no. 01 40 2 910 721 - VI/13
Page 44 of 243
▷Always open or close the convertible top
completely. Convertible top and
convertible top well storage cover are
locked in the final positions. Driving with
the convertible tope or convertible top well
storage cover unlocked can result in dam‐
age.▷Do not reach into the convertible top
mechanism during the opening and closing
operation. Keep children away from the
opening path of the convertible top, other‐
wise, there is a risk of injury.▷When the convertible top is opened during
driving, be alert to traffic; otherwise, it may
result in an accident. If possible, do not
move the convertible top while driving in
reverse because rearward vision is se‐
verely impaired while the convertible top is
in motion. During windy conditions, do not
operate the convertible top while driving.
Do not drive faster than 30 mph/50 km/h;
otherwise, vehicle damage may occur.▷Do not attach any roof carrier systems;
otherwise, an accident may occur.◀
Functional requirements
The ignition or radio ready state must be
switched on.
It is not possible to start the engine and oper‐
ate the convertible top simultaneously. When
the engine is started, the convertible top
movement is briefly interrupted.
Under the following conditions, the convertible
top movement cannot be moved and a Check
Control message is displayed.
▷Cargo area partition is flipped up.▷Trunk lid is open.▷External temperature is too low.▷Vehicle system too low.▷Convertible top drive is overheating.▷Movement of the convertible top not al‐
lowed because of national regulations.▷Vehicle speed is too high.Before opening and closing▷Follow the safety instructions for the
convertible top.▷Make sure that the cargo area partition in
the cargo area is folded down.▷Make sure that the cargo does not push
against the cargo area partition from be‐
low.▷Make sure that the trunk lid is closed.
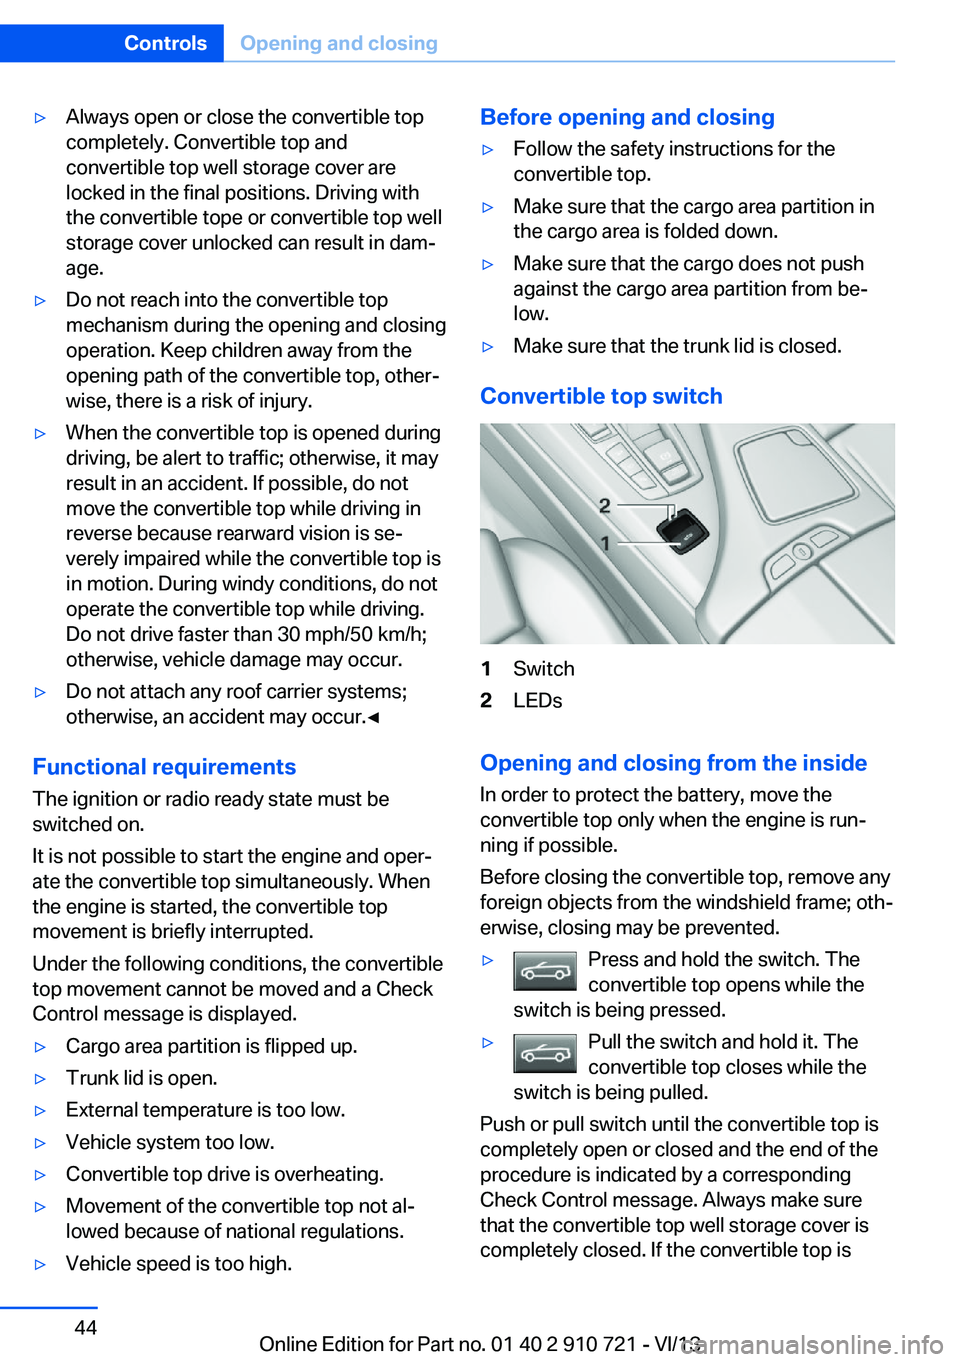
Convertible top switch
1Switch2LEDs
Opening and closing from the inside
In order to protect the battery, move the
convertible top only when the engine is run‐
ning if possible.
Before closing the convertible top, remove any
foreign objects from the windshield frame; oth‐
erwise, closing may be prevented.
▷Press and hold the switch. The
convertible top opens while the
switch is being pressed.▷Pull the switch and hold it. The
convertible top closes while the
switch is being pulled.
Push or pull switch until the convertible top is
completely open or closed and the end of the
procedure is indicated by a corresponding
Check Control message. Always make sure
that the convertible top well storage cover is
completely closed. If the convertible top is
Seite 44ControlsOpening and closing44
Online Edition for Part no. 01 40 2 910 721 - VI/13
Page 46 of 243
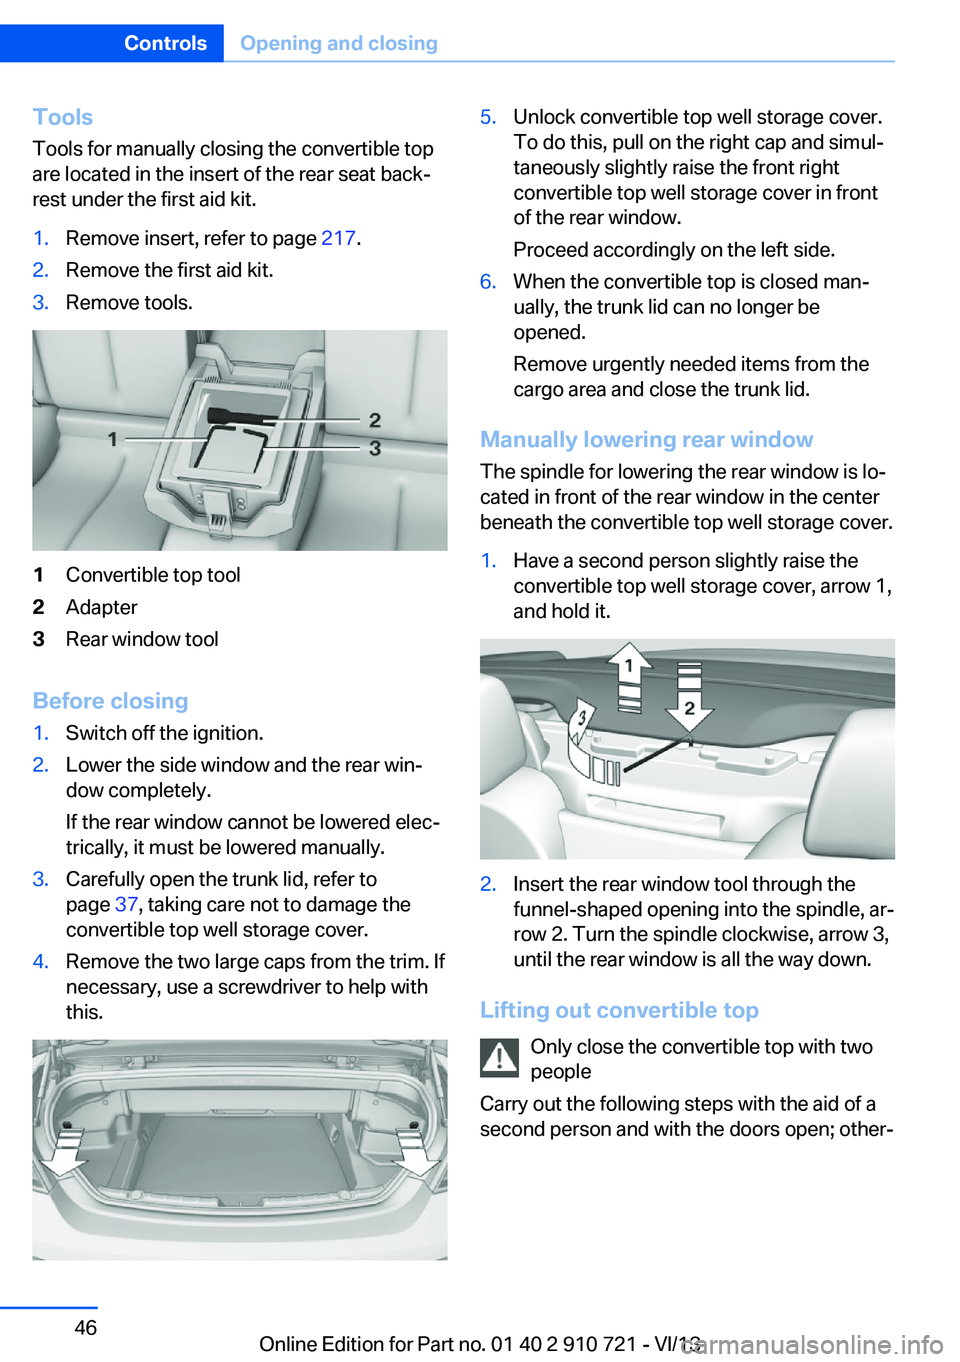
ToolsTools for manually closing the convertible top
are located in the insert of the rear seat back‐
rest under the first aid kit.1.Remove insert, refer to page 217.2.Remove the first aid kit.3.Remove tools.1Convertible top tool2Adapter3Rear window tool
Before closing
1.Switch off the ignition.2.Lower the side window and the rear win‐
dow completely.
If the rear window cannot be lowered elec‐
trically, it must be lowered manually.3.Carefully open the trunk lid, refer to
page 37, taking care not to damage the
convertible top well storage cover.4.Remove the two large caps from the trim. If
necessary, use a screwdriver to help with
this.5.Unlock convertible top well storage cover.
To do this, pull on the right cap and simul‐
taneously slightly raise the front right
convertible top well storage cover in front
of the rear window.
Proceed accordingly on the left side.6.When the convertible top is closed man‐
ually, the trunk lid can no longer be
opened.
Remove urgently needed items from the
cargo area and close the trunk lid.
Manually lowering rear window
The spindle for lowering the rear window is lo‐
cated in front of the rear window in the center
beneath the convertible top well storage cover.
1.Have a second person slightly raise the
convertible top well storage cover, arrow 1,
and hold it.2.Insert the rear window tool through the
funnel-shaped opening into the spindle, ar‐
row 2. Turn the spindle clockwise, arrow 3,
until the rear window is all the way down.
Lifting out convertible top
Only close the convertible top with two
people
Carry out the following steps with the aid of a second person and with the doors open; other‐
Seite 46ControlsOpening and closing46
Online Edition for Part no. 01 40 2 910 721 - VI/13
Page 47 of 243
wise, it may result in damage to the convertible
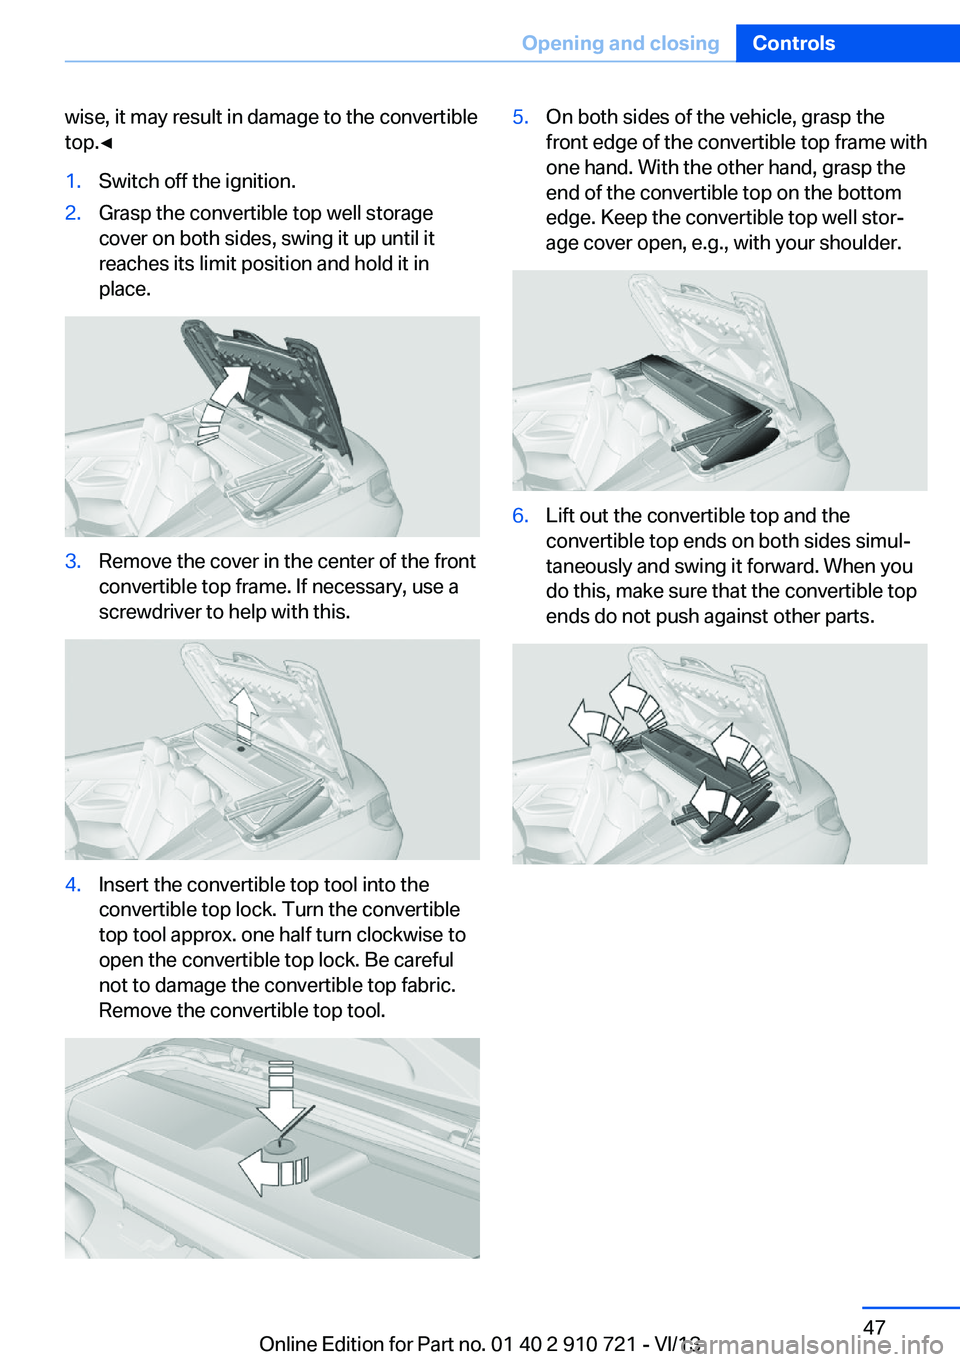
top.◀1.Switch off the ignition.2.Grasp the convertible top well storage
cover on both sides, swing it up until it
reaches its limit position and hold it in
place.3.Remove the cover in the center of the front
convertible top frame. If necessary, use a
screwdriver to help with this.4.Insert the convertible top tool into the
convertible top lock. Turn the convertible
top tool approx. one half turn clockwise to
open the convertible top lock. Be careful
not to damage the convertible top fabric.
Remove the convertible top tool.5.On both sides of the vehicle, grasp the
front edge of the convertible top frame with
one hand. With the other hand, grasp the
end of the convertible top on the bottom
edge. Keep the convertible top well stor‐
age cover open, e.g., with your shoulder.6.Lift out the convertible top and the
convertible top ends on both sides simul‐
taneously and swing it forward. When you
do this, make sure that the convertible top
ends do not push against other parts.Seite 47Opening and closingControls47
Online Edition for Part no. 01 40 2 910 721 - VI/13
Page 48 of 243
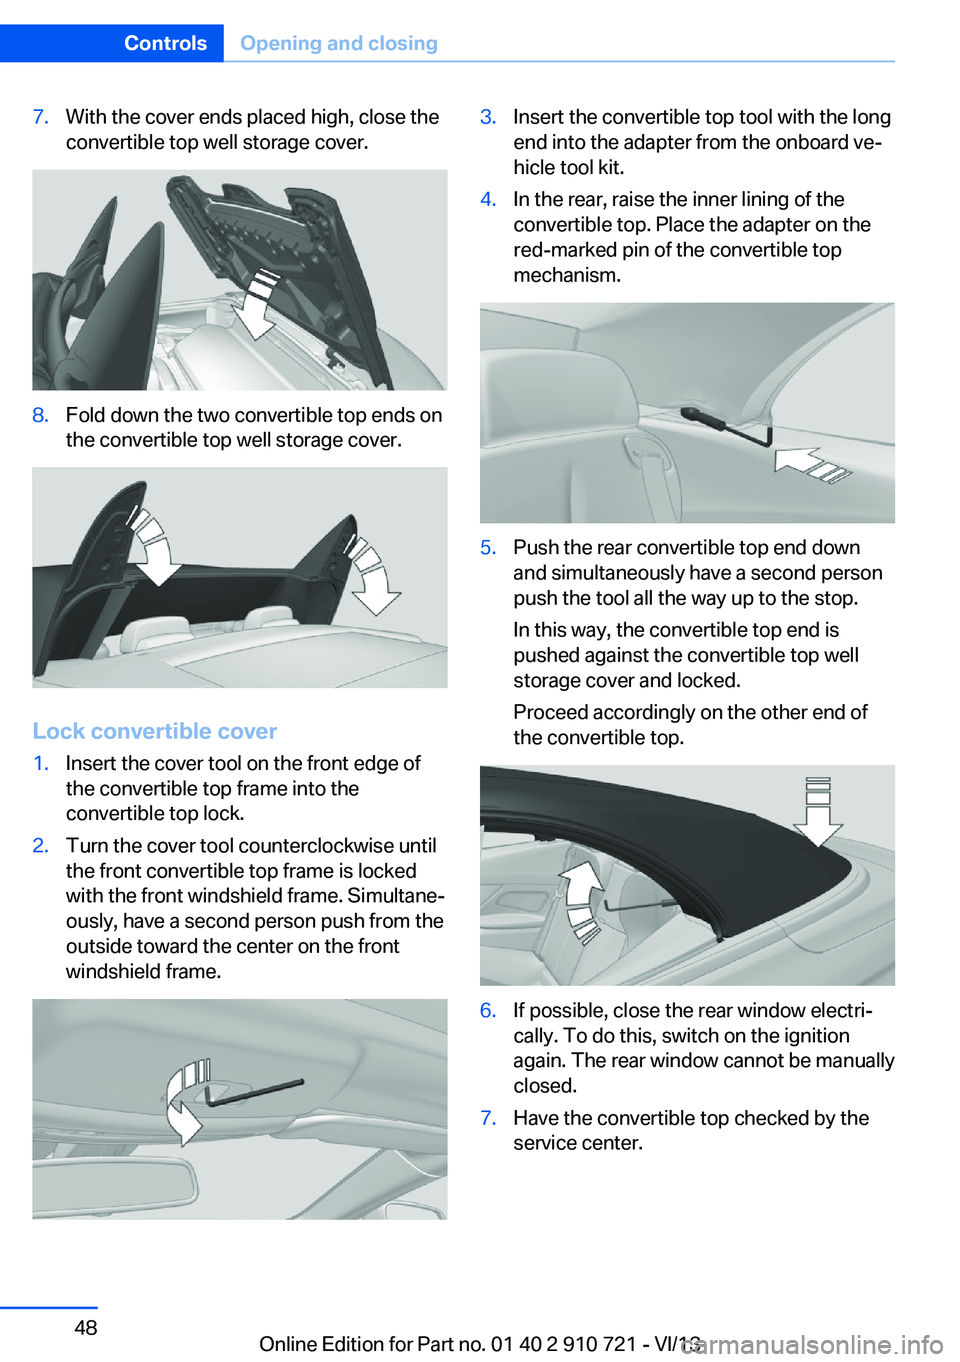
7.With the cover ends placed high, close the
convertible top well storage cover.8.Fold down the two convertible top ends on
the convertible top well storage cover.
Lock convertible cover
1.Insert the cover tool on the front edge of
the convertible top frame into the
convertible top lock.2.Turn the cover tool counterclockwise until
the front convertible top frame is locked
with the front windshield frame. Simultane‐
ously, have a second person push from the
outside toward the center on the front
windshield frame.3.Insert the convertible top tool with the long
end into the adapter from the onboard ve‐
hicle tool kit.4.In the rear, raise the inner lining of the
convertible top. Place the adapter on the
red-marked pin of the convertible top
mechanism.5.Push the rear convertible top end down
and simultaneously have a second person
push the tool all the way up to the stop.
In this way, the convertible top end is
pushed against the convertible top well
storage cover and locked.
Proceed accordingly on the other end of
the convertible top.6.If possible, close the rear window electri‐
cally. To do this, switch on the ignition
again. The rear window cannot be manually
closed.7.Have the convertible top checked by the
service center.Seite 48ControlsOpening and closing48
Online Edition for Part no. 01 40 2 910 721 - VI/13
Page 57 of 243
Storing1.Switch on the ignition.2.Set the desired position.3. Press the button. The LED in the
button lights up.4.Press the desired button 1 or 2. The LED
goes out.
If the M button is pressed accidentally:
Press the button again.
The LED goes out.
Calling up settings Do not retrieve the memory while driving
Do not retrieve the memory setting while
driving, as an unexpected movement of the
seat or steering wheel could result in an acci‐
dent.◀
Comfort function
1.Open the driver's door.2.Switch off the ignition.3.Briefly press the desired button 1 or 2.
The corresponding seat position is performed
automatically.
The procedure stops when a switch for adjust‐
ing the seat or one of the buttons is pressed.
Safety mode
1.Close the driver's door or switch on the ig‐
nition.2.Press and hold the desired button 1 or 2
until the adjustment procedure is com‐
pleted.
Calling up of a seat position
deactivated
After a brief period, the calling up of stored
seat positions is deactivated to save battery
power.
To reactivate calling up of a seat position:
▷Open or close the door or trunk lid.▷Press a button on the remote control.▷Press the Start/Stop button.
Mirrors
Exterior mirrors
At a glance
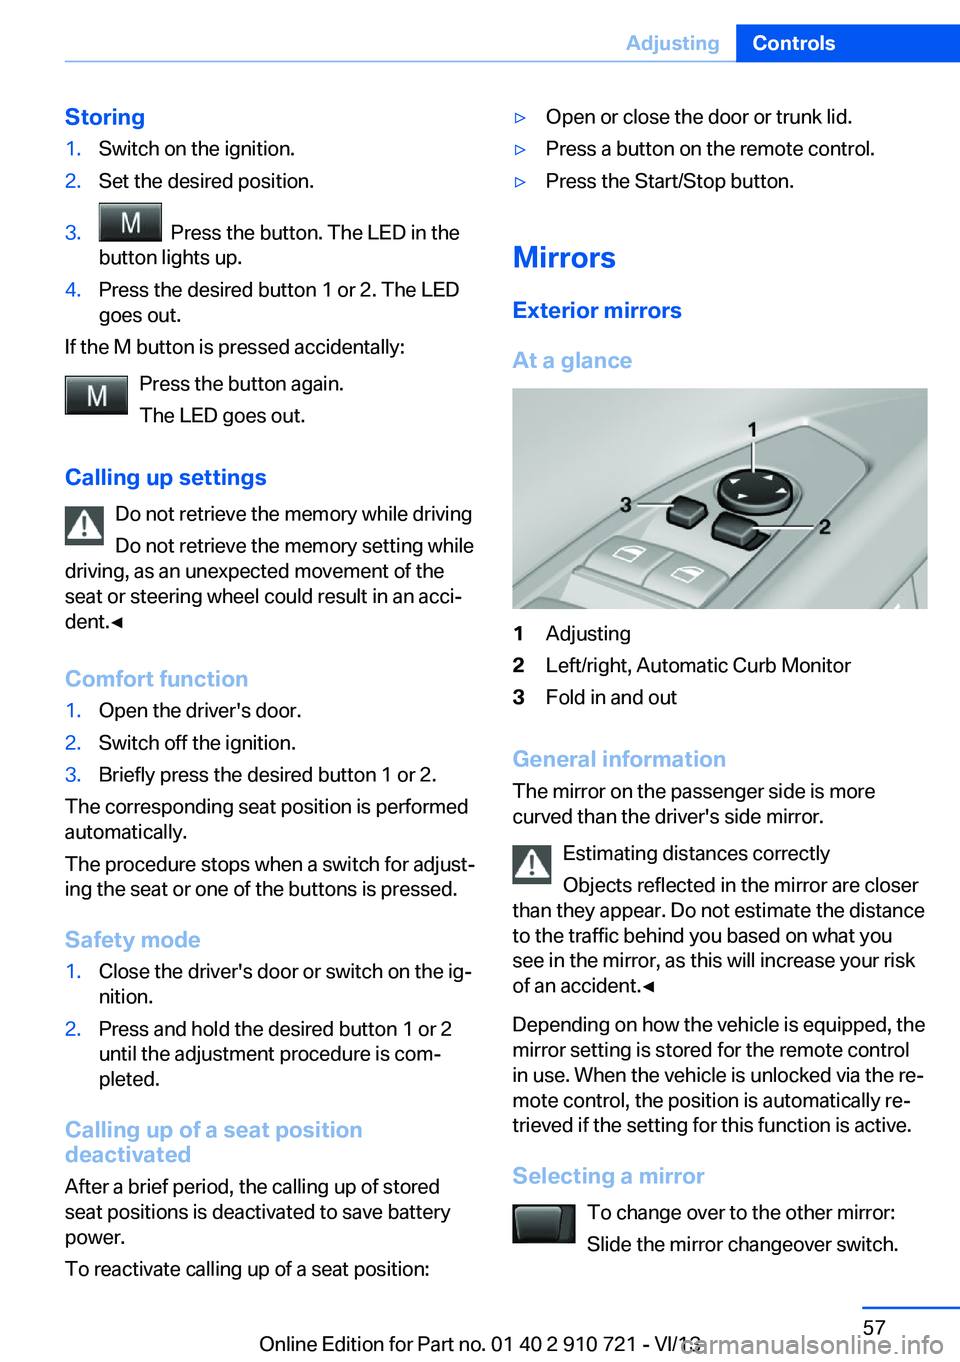
1Adjusting2Left/right, Automatic Curb Monitor3Fold in and out
General information
The mirror on the passenger side is more
curved than the driver's side mirror.
Estimating distances correctly
Objects reflected in the mirror are closer
than they appear. Do not estimate the distance
to the traffic behind you based on what you
see in the mirror, as this will increase your risk
of an accident.◀
Depending on how the vehicle is equipped, the
mirror setting is stored for the remote control
in use. When the vehicle is unlocked via the re‐
mote control, the position is automatically re‐
trieved if the setting for this function is active.
Selecting a mirror To change over to the other mirror:Slide the mirror changeover switch.
Seite 57AdjustingControls57
Online Edition for Part no. 01 40 2 910 721 - VI/13
Page 63 of 243
DrivingVehicle equipment
All standard, country-specific and optional
equipment that is offered in the model series is
described in this chapter. Therefore, equip‐
ment is also described that is not available in a
vehicle, e. g., because of the selected optional
equipment or country variant. This also applies
for safety-related functions and systems.
Start/Stop button The concept Pressing the Start/Stop button
switches the ignition on or off
and starts the engine.
Automatic transmission: The
engine starts if the brake is de‐
pressed while pressing the Start/Stop button.
Ignition on Automatic transmission: Press the Start/Stop
button but do not depress the brake.
All vehicle systems are ready for operation.
Most of the indicator and warning lamps in the
instrument cluster light up for varying lengths
of time.
To save battery power when the engine is off,
switch off the ignition and any unnecessary
electronic systems/power consumers.
The ignition switches off automatically:▷When locking the vehicle, even if the low
beams are switched on.▷Shortly before the battery is discharged
completely, so that the engine can still be
started.Note
If the engine is switched off and the ignition is
switched on, the system automatically
switches to the radio ready state when the
door is opened if the lights are switched off or
the daytime running lights are switched on.
Ignition off
Automatic transmission: Press the Start/Stop
button again, but do not depress the brake.
All indicator lamps in the instrument cluster go
out.
To save battery power when the engine is off,
switch off the ignition and any unnecessary
electronic systems/power consumers.
Transmission position P with the ignition
off
When the ignition is switched off, position P is
engaged automatically. When in an automatic
car wash, for example, ensure that the ignition
is not switched off accidentally.◀
The ignition automatically cuts off while the
vehicle is stationary and the engine is stopped:▷When locking the vehicle, and when the
low beams are activated.▷Shortly before the battery is discharged
completely, so that the engine can still be
started. This function is only available
when the low beams are switched off.▷When opening or closing the driver door, if
the driver's seat belt is unbuckled and the
low beams are switched off.▷While the driver's seat belt is unbuckled, if
the driver's door is open and the low
beams are switched off.
When the ignition is switched off, by opening
or closing the driver's door or unbuckling the
driver's seat belt, the radio ready state remains
active.
Seite 63DrivingControls63
Online Edition for Part no. 01 40 2 910 721 - VI/13